Customize Syncthing. Blue insulating tape in small business and at home

I suddenly had a guide on how to configure syncthing. I am sure that this may be useful to many.
About the revolution in the distribution of files, which made the torrent-protocol to talk too. One problem was with the classic version of the technology - static. If the data in the directory was changed, you had to re-create and transfer the new torrent file to everyone. And suddenly, BitTorrentSync suddenly appears. Happiness comes, now you can synchronize whole arrays of changing data. However, after a while, the proprietary nature of software translates into a drastic reduction in functionality, linking to its servers and a rather aggressive monetization. This is where the ideologically kosher free successor comes to the scene - Syncthing.
Syncthing, like normal torrent, can crawl through almost any barriers in the form of firewalls, NAT, and the like. In the case of gray IP addresses, it relies on centralized relays and server announcers. In this case, you can safely raise them yourself, which gives complete independence from the developers infrastructure. All nodes in the cluster are equal. You can set two-sided and one-sided synchronization when the changes on the deleted copies do not affect the original. Is able to versioning. Beauty, in a word.
')
In my case, the task of daily backup database was solved. 3 independent offices in different parts of the city. Internet via Yota-modem stuck in Mikrotik. The channel is narrow and unstable in width. The main idea that has been implemented is the exchange of database bases on the principle of the torrent-protocol at night, when the load on the network is minimal, and nobody touches the database. As a result, each unit stores copies of two adjacent ones. Good redundancy and geographical distribution, which has already saved once, when the server was suddenly killed by a lightning strike.
Install. By default, I mean a server based on deb-based Linux, although syncthing has versions for Windows and Android. For production, add the repositories from the stable branch and install:
# Add the release PGP keys: curl -s https://syncthing.net/release-key.txt | sudo apt-key add - # Add the "stable" channel to your APT sources: echo "deb https://apt.syncthing.net/ syncthing stable" | sudo tee /etc/apt/sources.list.d/syncthing.list # Update and install syncthing: sudo apt-get update sudo apt-get install syncthing Now you need to deal with demons. Such software should not work as root. All files created as a result of synchronization must belong to a local user. Therefore, there are two options - automatic start as a system service or as a user service. The second option will work only when the user is logged in via ssh or logged in to the local system. We are interested in the system daemon, and the systemd publicly beloved by the public is best for this. Paths may vary slightly in different distributions. This manual applies to Debian and Ubuntu 16.04 Server. First, create a unit:
sudo nano /etc/systemd/system/syncthing@.service And we bring in the following contents:
[Unit]
Description=Syncthing - Open Source Continuous File Synchronization for %I
Documentation=man:syncthing(1)
After=network.target
Wants=syncthing-inotify@.service

[Service]
User=%i
ExecStart=/usr/bin/syncthing -no-browser -no-restart -logflags=0
Restart=on-failure
SuccessExitStatus=3 4
RestartForceExitStatus=3 4

[Install]
WantedBy=multi-user.target
Now it remains only to activate the service on behalf of the desired user and you can configure the node.
sudo systemctl enable syncthing@username.service sudo systemctl start syncthing@username.service 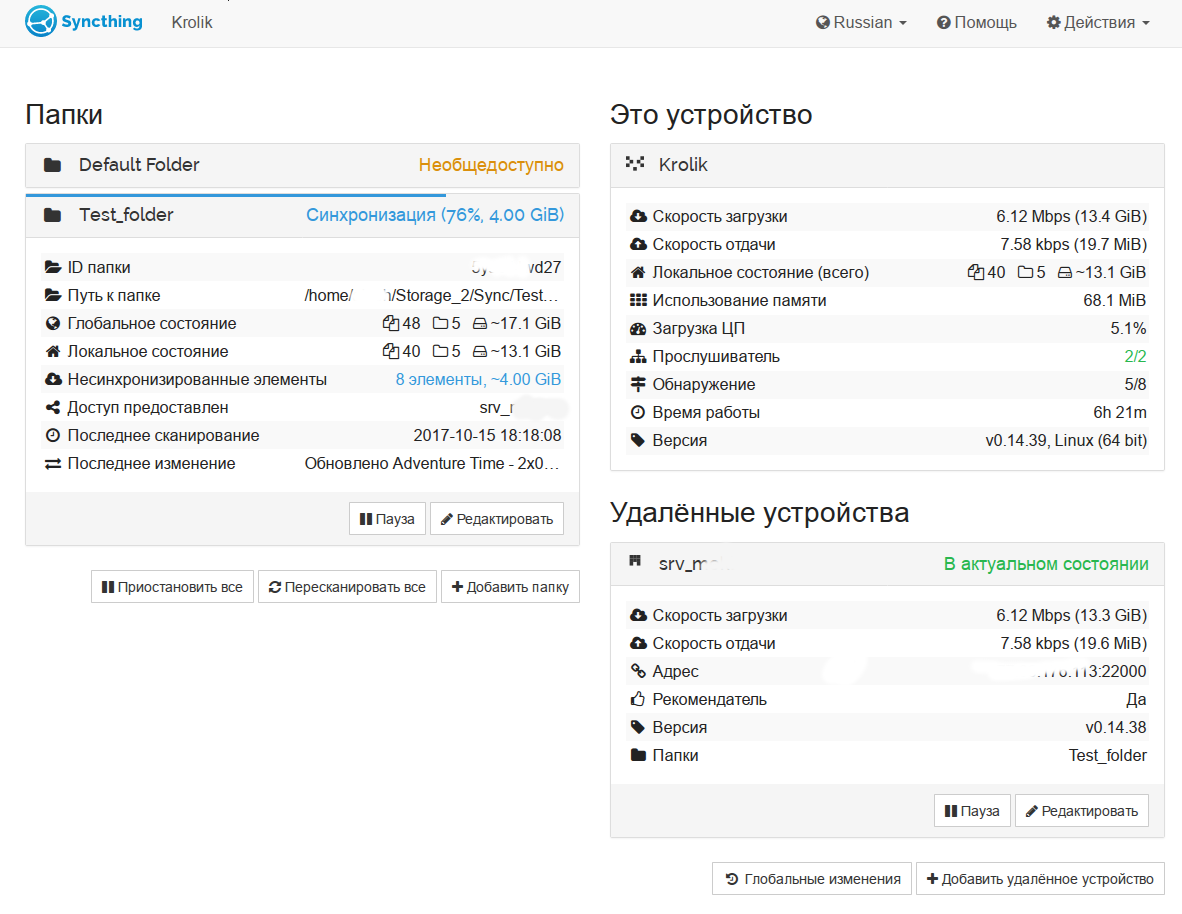
The interface is available at 127.0.0.1:8384. If you want to log in from another machine, you will have to fix the config ~ / .config / syncthing / config.xml. Further settings are extremely simple - trusted nodes are added using a unique key, and then the necessary directories are shared in single- or two-way synchronization. If necessary, you can manually specify the ip address and port of the node; without this, a network of server announcers and relays will be used to establish the connection. Moreover, you can raise announcers and relays on your infrastructure, which allows you to use the software within the company's extensive local network.

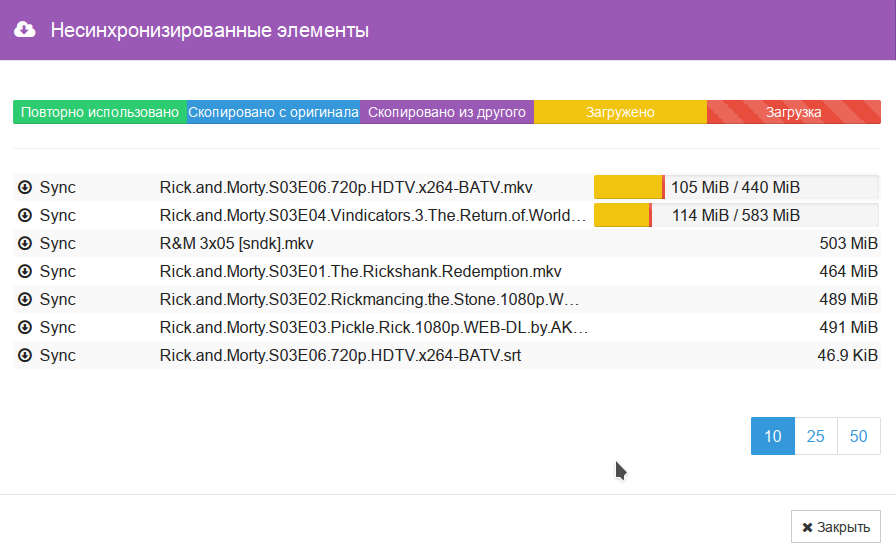
At any time, you can conveniently view a list of synchronized files. Extremely useful and easy to set up turned out software. Resources consumes quite sparingly. right now in standby mode it eats about 15 megabytes of RAM and a fraction of a percent of processor time. The total amount of data in a cluster in the region of 500 GB.
Good luck to everyone in the experiments. Durable electrical tape.
Update 1
Thanks datacompboy . Found an interesting flag to ignore the deletion in the master node.
the incoming index updates updates. When set, incoming updates with flag set are ignored.
Some problem is that from the point of view of other nodes, it will be an out of sync.
Assume two devices, “Alice” and “Bob”, are sharing a folder. Bob has set ignoreDelete..
Alice and Bob. Deleted as well. When Alice deletes a file
In this state, it can be seen.
It has been noted that it has been the case.
It is a rainy day.
Update 2
Addition from Stam_emg .
To automatically confirm customers, you can do this:
It is necessary to turn on the Introducer mode on the distribution server, then when adding a folder on the client, it will be added to the server without confirmation.
docs.syncthing.net/users/introducer.html
Source: https://habr.com/ru/post/350892/
All Articles