Simple static webpack site 4
After reading a number of articles (for example, this one ), I decided to switch to the modern approach using Node.js when writing simple websites from the “dinosaur” approach. Below is an example of an assembly of a simple static site using Webpack 4 . The article was written as I did not find instructions with the solution to my problem: I had to collect everything in pieces.
Formulation of the problem
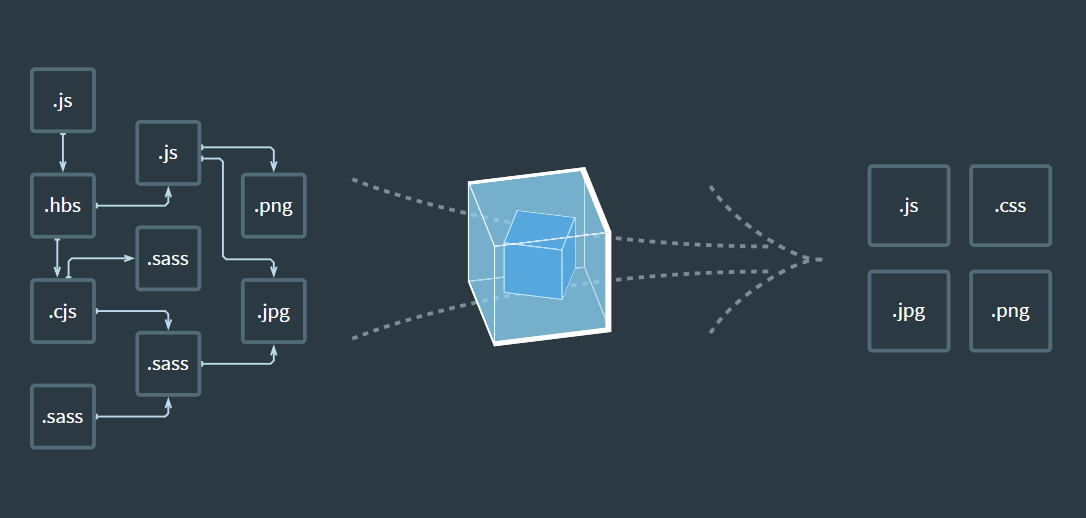
A website is a simple set of HTML pages with its CSS styles and a JavaScript file. It is necessary to write a project that would collect our site from source:
- from SASS (more precisely SCSS) files one CSS file is formed;
- one JavaScript file is formed from various JavaScript libraries and user code;
- HTML pages are collected using a template engine, where the contents of the header and footer can be split into separate files.
The collected site should not use React, Vue.js.
When choosing technologies, the most popular ones are selected as far as possible. For this reason, I refused both Grunt and Gulp in favor of the Webpack, although, frankly, I liked the Gulp syntax more because of its monotony.
For example, several pages based on Bootstrap 4 will be put together. But this is just for example.
It is assumed that Node.js is installed (on Windows, the installer is simply downloaded and installed in the “Next, Next” style), and you know how to work with the command line.
Update. You need to get a set of ready-made HTML pages that can be uploaded to the hosting without additional settings (for example, on GitHub Pages) or opened locally on the computer.
Project structure
The overall structure of the project is presented below:
. ├── dist - , ├─┬ src - │ ├── favicon - │ ├── fonts - │ ├─┬ html - HTML │ │ ├── includes - (header, footer) │ │ └── views - HTML │ ├── img - (, .) │ ├── js - JavaScript │ ├── scss - SSS │ └── uploads - (, .) ├── package.json - Node.js └── webpack.config.js - Webpack . ├── dist ├─┬ src │ ├─┬ favicon │ │ └── favicon.ico │ ├─┬ fonts │ │ └── Roboto-Regular.ttf │ ├─┬ html │ │ ├─┬ includes │ │ │ ├── footer.html │ │ │ └── header.html │ │ └─┬ views │ │ ├── index.html │ │ └── second.html │ ├─┬ img │ │ └── logo.svg │ ├─┬ js │ │ └── index.js │ ├─┬ scss │ │ └── style.scss │ └─┬ uploads │ └── test.jpg ├── package.json └── webpack.config.js Under favicon, the whole folder is highlighted, as in the modern web you cannot do with the usual one ico file. But for example, only this one file is used.
A controversial decision may seem to divide the images into two folders: img and uploads . But here I used the ideology of the location of files from Wordpress. In my opinion, throwing all the images into one folder is not a good idea.
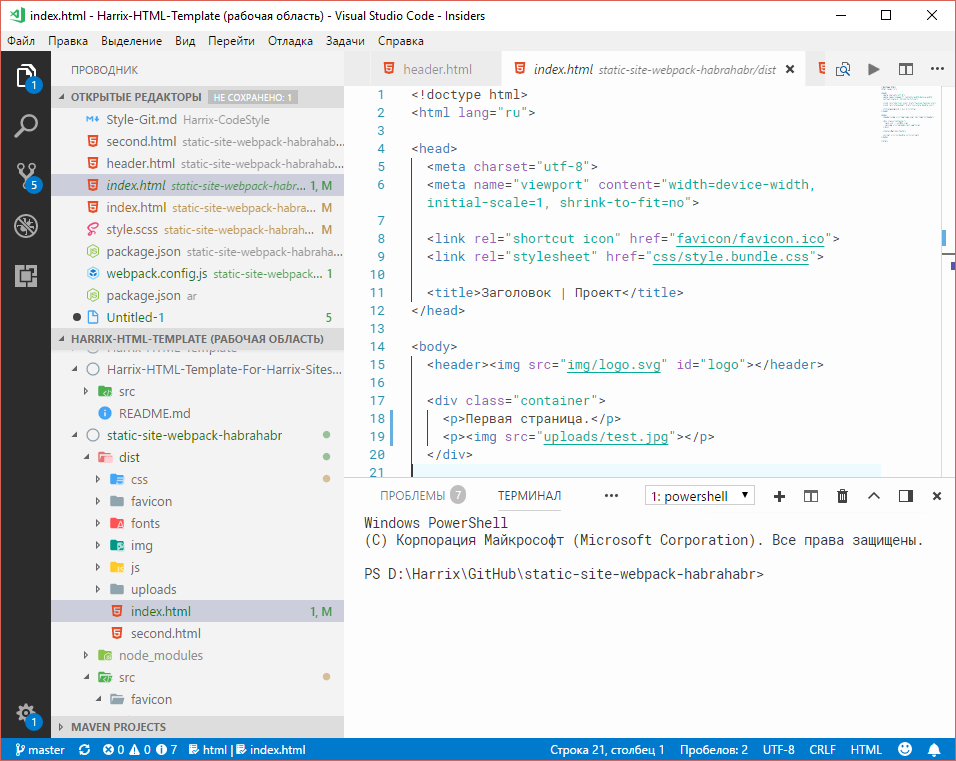
To work with the project I use Visual Studio Code , which I am very satisfied with. I especially like that the command line is built into the program and called up via Ctrl + ` .
Let's make a draft of Node.js. To do this, create a folder of our project with the above structure and go to it on the command line, where we call the command to create the package.json file.
npm init All questions can simply be answered by pressing Enter , if you do not want to fill in the detailed information.
We will install three common packages that we will need in any case: webpack , webpack-cli (the command line in the webpack was taken in a separate package) and webpack-dev-server (to start the local server so that the browser immediately displays the saved changes to the project) .
npm install webpack webpack-cli webpack-dev-server --save-dev { "name": "static-site-webpack-habr", "version": "1.0.0", "description": "", "main": "index.js", "scripts": { "test": "echo \"Error: no test specified\" && exit 1" }, "license": "ISC", "devDependencies": { "webpack": "^4.1.1", "webpack-cli": "^2.0.11", "webpack-dev-server": "^3.1.1" } } Also a file package-lock.json will be created, which we don’t touch at all. But in the git repository you need to add this file, in contrast to the node_modules folder, which you need to register in the .gitignore file if you use git.
We collect JavaScript
Since the Webpack was created primarily to build js files, this part will be the easiest. In order to be able to write javascript in a modern form of ES2015, which is not supported by browsers, put the packages babel-core , babel-loader , babel-preset-env .
npm install babel-core babel-loader babel-preset-env --save-dev After creating the configuration file webpack.config.js with the following contents:
const path = require('path'); module.exports = { entry: [ './src/js/index.js', ], output: { filename: './js/bundle.js' }, devtool: "source-map", module: { rules: [{ test: /\.js$/, include: path.resolve(__dirname, 'src/js'), use: { loader: 'babel-loader', options: { presets: 'env' } } }, ] }, plugins: [ ] }; In the entry section ( entry points) we indicate which js file we will collect, in the output section we indicate the path in the dist folder where the assembled file will be placed. Please note that in the webpack 4 in the output path you do not need to specify the dist folder itself! And yes, how can I not like that in one webpack file in some cases you need to write a relative path, in other cases a relative path in a special folder, in the third cases you need an absolute path (for example, we get it with this command path.resolve(__dirname, 'src/js') ).
The devtool parameter value is also set to: source-map , which will allow creating source maps for js and css files.
For processing specific files (by extension, by location), webpack creates rules in the rules section. Now we have a rule there that we skip all js files through the Babel translator, which converts our new-fashioned ES2015 into a standard javascript version that is understandable to browsers.
In our test case, we impose our page on Boostrap 4. Therefore, we will need to install three packages: bootstrap , jquery , popper.js . We install the second and third packages on demand of Bootstrap.
npm install bootstrap jquery popper.js --save Please note that we need these three packages for the site itself, and not for its assembly. Therefore, we install these packages with the --save flag, not --save-dev .
Now you can start writing our index.js file:
import jQuery from 'jquery'; import popper from 'popper.js'; import bootstrap from 'bootstrap'; jQuery(function() { jQuery('body').css('color', 'blue'); }); As an example of custom code, js just repainted the text color to blue.
Now you can proceed to build the js file. To do this, in the package.json file in the scripts section we write the following npm scripts:
"scripts": { "dev": "webpack --mode development", "build": "webpack --mode production", "watch": "webpack --mode development --watch", "start": "webpack-dev-server --mode development --open" }, Now, when you start the npm run dev line on the command line, the project will be built (css and html files will also be collected by this command later), and the files /dist/js bundle.js and bundle.js.map will appear in the /dist/js bundle.js.map .
When you run the npm run build command, the project will also be built, but the final (with optimization, maximum file minimization), which you can upload to the hosting.
When you start npm run watch , the mode of automatic viewing of changes in project files with automatic addition of modified files is launched. Yes, to disable this mode in the command line (for example, so that you can write other commands), you can press Ctrl + C (at least in PowerShell).
When you start npm run start, the local server will start, which will launch the html page and will also track changes in the files. But while we are not using this command, we haven’t added the assembly of html pages.
The project build mode creates or rewrites files in the dist folder. But during the development of a project with different assemblies, files can be renamed, deleted. And Webpack will not ensure that unnecessary files left over from previous builds are deleted from the dist folder. Therefore, we will add another clean-webpack-plugin that will clear the dist folder before each build of the project.
Update 2018.04.11. I had to abandon the clean-webpack-plugin . Why? When you start the server through the npm run start webpack-dev-server --mode development --open ( webpack-dev-server --mode development --open ), then webpack compiles files automatically, without saving them into the dist folder. And that's fine. But at the same time, the dist folder is cleared due to the presence of a clean-webpack-plugin . As a result, in the local server operation mode, the dist folder is empty, which negatively affects the work with git (only if you keep the project build in the git repository, as I do): after each server launch, a lot of changes appear due to deleted files. It would be good if the dist folder was cleaned up only with a full build, for example, npm run build-and-beautify (about this command below). Plugin clean-webpack-plugin could not be configured in the desired way. Therefore, I use another del-cli that is not related to the webpack and works separately.
npm install del-cli --save-dev Make changes to the package.json file.
{ ... "scripts": { ... "clear": "del-cli dist" }, ... } Building CSS file
The CSS file will be collected from the SCSS files, for which the src/scss folder is reserved for us. In it we will create a style.scss file, for example, with the following contents:
$font-stack: -apple-system, BlinkMacSystemFont,Roboto,'Open Sans','Helvetica Neue',sans-serif; @import "~bootstrap/scss/bootstrap"; @font-face { font-family: 'Roboto'; font-style: normal; font-weight: 400; src: url(../fonts/Roboto-Regular.ttf); } body { font-family: $font-stack; #logo { width: 10rem; } .container { img { width: 20rem; } } } Please note that the styles of Bootstrap are connected not through its CSS file, but through SSS ( @import "node_modules/bootstrap/scss/bootstrap"@import "~bootstrap/scss/bootstrap"; ), which will allow in case of need to rewrite certain properties of the library, use its mixins, etc. But what is sad. If, when assembling a js file when connecting a js file to the Bootstrap library, the Webpack library knows where the necessary files are located, then when connecting the styles you need to specify the path to the folder in node_modules .
To handle css files, we will need the following modules: node-sass , sass-loader , css-loader and extract-text-webpack-plugin (they say that in the next version of Webpack, the last plugin will not need).
Important! At the time of this writing, the plug-in extract-text-webpack-plugin in the stable version does not know how to work with Webpack 4. Therefore, you need to install its beta version via @next :
npm install node-sass sass-loader css-loader extract-text-webpack-plugin@next --save-dev I hope that soon it will be possible to install all the plugins in the normal way:
npm install node-sass sass-loader css-loader extract-text-webpack-plugin --save-dev Add the following changes to webpack.config.js :
... const ExtractTextPlugin = require("extract-text-webpack-plugin"); ... module.exports = { entry: [ ... './src/scss/style.scss' ], ... module: { rules: [{ ... { test: /\.(sass|scss)$/, include: path.resolve(__dirname, 'src/scss'), use: ExtractTextPlugin.extract({ use: [{ loader: "css-loader", options: { sourceMap: true, minimize: true, url: false } }, { loader: "sass-loader", options: { sourceMap: true } } ] }) }, ] }, plugins: [ new ExtractTextPlugin({ filename: './css/style.bundle.css', allChunks: true, }), ... ] }; Notice that at the entry entry points we added a new input file style.scss , but the output file was not specified in output , but in the call to the ExtractTextPlugin plugin in the plugins section. We include support for sourceMap source maps for sass-loader and css-loader packages.
You may also notice that there is no style-loader package, which is most often mentioned when working with css in a Webpack. This package embeds css code in the HTML file, which can be convenient for single-page applications, but not for multi-page ones.
And the most controversial moment. For the css-loader package, we added a url parameter equal to false . What for? By default, url=true , and if Webpack, when building css, finds links to external files: background images, fonts (for example, in our case there is a link to the url(../fonts/Roboto-Regular.ttf) font file url(../fonts/Roboto-Regular.ttf) ), then it these files will ask to somehow handle. To do this, most often use file-loader packages (copies files to the build folder) or url-loader (trying to embed small files into HTML code). In this case, the relative relative paths to the files in the compiled css can be changed.
But what problem encountered in practice. I have a src/scss with scss code. There is a src/img folder with images that are referenced in the SSS code. All is well. But, for example, I needed to connect a third-party library to the site (for example, lightgallery). Its SCSS code is located in the node_modules/lightgallery/src/sass , which refers to the pictures from the node_modules/lightgallery/src/img folder through relative paths. And if we add library styles to our style.scss , the file-loader will look for pictures of the lightgallery library in my src/img folder, and not where they are. And I could not overcome it.
Update. The last problem can be solved , as Odrin suggested, with the help of the resolve-url-loader and file-loader packages.
... module.exports = { ... module: { rules: [ ... { test: /\.(png|jpg|gif)$/, use: [ { loader: 'file-loader', options: {name: 'img/[name].[ext]'} } ] }, { test: /\.(sass|scss)$/, include: path.resolve(__dirname, 'src/scss'), use: ExtractTextPlugin.extract({ use: [{ loader: "css-loader", options: { sourceMap: true, minimize: true//, //url: false } }, { loader: "resolve-url-loader" }, { loader: "sass-loader", options: { sourceMap: true } } ] }) } ... ] }, ... }; That is, the resolve-url-loader package instead of relative paths sets the paths that the webpack will understand. And already file-loader will copy the necessary files. The problem is the name property in the file-loader. If you specify it as name: '[path]/[name].[ext]' , then in my example the folder dist\node_modules\lightgallery\src\img appears in the dist folder, in which there are already images. No, the css will have the correct paths to this folder, but it will not be nice. Therefore, it is better to specify the file name without a path (for example, name: 'img/[name].[ext]' ). True, then all the pictures will go into one folder - it will not always be useful.
Therefore, by setting the url=false we say that we don’t touch all the links to the files in the SCSS code, we don’t change the paths, we don’t copy and we don’t embed any files: we’ll deal with them separately. Perhaps this solution is bad, and you suggest a more correct approach.
Building HTML Pages
Let's turn to the funniest one: to build the HTML pages, where I have the most difficulties.
To build HTML pages we will use the html-webpack-plugin that supports various types of templating tools. We also need the raw-loader package.
npm install html-webpack-plugin raw-loader --save-dev As HTML template we will use default template template lodash. This is what a typical HTML page will look like before build:
<% var data = { title: " | ", author: "Harrix" }; %> <%= _.template(require('./../includes/header.html'))(data) %> <p>text</p> <%= _.template(require('./../includes/footer.html'))(data) %> First, in the data variable, we register all our variable pages that we want to use on this page. Then we embed the header and footer templates via _.template(require()) .
An important clarification. In articles about building HTML pages via the html-webpack-plugin , you usually html-webpack-plugin embedded templates via the command:
require('html-loader!./../includes/header.html') But at the same time, the syntax of lodash will not work in these embedded templates (I still do not understand why this happens). And the data from the data variable will not be transferred there. Therefore, we force the webpack to say that we embed exactly the template that needs to be processed as a lodash template.
Now we can use full lodash syntax in embedded templates. In the code file header.html below through <%=title%> print the title of the article.
<!doctype html> <html lang="ru"> <head> <meta charset="utf-8"> <meta name="viewport" content="width=device-width, initial-scale=1, shrink-to-fit=no"> <link rel="shortcut icon" href="favicon/favicon.ico"> <link rel="stylesheet" href="css/style.bundle.css"> <title><%=title%></title> </head> <body> <header><img src="img/logo.svg" id="logo"></header> The html-webpack-plugin package has the ability to generate several HTML pages:
plugins: [ new HtmlWebpackPlugin(), // Generates default index.html new HtmlWebpackPlugin({ // Also generate a test.html filename: 'test.html', template: 'src/assets/test.html' }) ] But to prescribe for each page the creation of its own instance of the plugin is definitely not good. Therefore, we automate this process by finding all the HTML files in the src/html/views folder and create our own versions of new HtmlWebpackPlugin() for them.
To do this, make the following changes in the webpack.config.js file:
... const HtmlWebpackPlugin = require('html-webpack-plugin'); const fs = require('fs') function generateHtmlPlugins(templateDir) { const templateFiles = fs.readdirSync(path.resolve(__dirname, templateDir)); return templateFiles.map(item => { const parts = item.split('.'); const name = parts[0]; const extension = parts[1]; return new HtmlWebpackPlugin({ filename: `${name}.html`, template: path.resolve(__dirname, `${templateDir}/${name}.${extension}`), inject: false, }) }) } const htmlPlugins = generateHtmlPlugins('./src/html/views') module.exports = { module: { ... { test: /\.html$/, include: path.resolve(__dirname, 'src/html/includes'), use: ['raw-loader'] }, ] }, plugins: [ ... ].concat(htmlPlugins) }; The generateHtmlPlugins function will search all HTML pages. Please note that the function code has an inject: false setting that tells Webpack that you do not need to embed links to the js and css file into the HTML code yourself: we will do everything manually in the header.html and footer.html .
It should also be noted that embedded templates are processed by the plugin raw-loader (the file contents are simply loaded as text), and not by the html-loader , as is most often suggested. And also, as in the case of CSS, I don’t use the file-loader or url-loader packages.
And there remains the last optional moment for working with HTML. JavaScript file and CSS file will be minimized. But I want to make HTML files, on the contrary, beautiful and not minify. Therefore, after the assembly of all HTML files, I want to go through some beautify plugin. And then a setup was waiting for me: I did not find a way to do this in the Webpack. The problem is that you need to process the files after the embedded templates are inserted.
Found a html-cli package that can do this independently of the Webpack. But he has 38 installations per month. That is, it means two options: either no one needs to bring HTML files to a beautiful appearance, or there is another popular solution I don’t know about. And for the sake of just this one function, Gulp doesn't want to be screwed.
Install this plugin:
npm install html-cli --save-dev And in the package.json file, we register two more scripts, which, after the Webpack work, will result in a beautiful appearance of the HTML files with a tab setting in two spaces.
"scripts": { "build-and-beautify": "del-cli dist && webpack --mode production && html dist/*.html --indent-size 2", "beautify": "html dist/*.html --indent-size 2" }, Update 2018.04.11 Notice that I have added del-cli dist to the build-and-beautify del-cli dist , which clears the dist folder before building.
Therefore, for the final build, I recommend using not the * npm run build command , but the npm run build-and-beautify command .
Copy remaining files
We generated js, css files, HTML pages. There are still files of images, fonts, etc., which we did not touch and deliberately did not copy via file-loader or url-loader . Therefore, we will copy all the remaining folders through the copy-webpack-plugin :
npm install copy-webpack-plugin --save-dev In the webpack.config.js file webpack.config.js will make changes:
... const HtmlWebpackPlugin = require('html-webpack-plugin'); ... module.exports = { ... plugins: [ ... new CopyWebpackPlugin([{ from: './src/fonts', to: './fonts' }, { from: './src/favicon', to: './favicon' }, { from: './src/img', to: './img' }, { from: './src/uploads', to: './uploads' } ]), ]... }; Everything. Now with the npm run build-and-beautify command we build the project and the collected static site appears in the dist folder.

Summary files
{ "name": "static-site-webpack-habr", "version": "1.0.0", "description": "HTML template", "main": "src/index.js", "scripts": { "dev": "webpack --mode development", "build": "webpack --mode production", "build-and-beautify": "del-cli dist && webpack --mode production && html dist/*.html --indent-size 2", "watch": "webpack --mode development --watch", "start": "webpack-dev-server --mode development --open", "beautify": "html dist/*.html --indent-size 2", "clear": "del-cli dist" }, "dependencies": { "bootstrap": "^4.1.0", "jquery": "^3.3.1", "popper.js": "^1.14.3" }, "devDependencies": { "babel-core": "^6.26.0", "babel-loader": "^7.1.3", "babel-preset-env": "^1.6.1", "copy-webpack-plugin": "^4.5.0", "css-loader": "^0.28.11", "del-cli": "^1.1.0", "extract-text-webpack-plugin": "^4.0.0-beta.0", "html-cli": "^1.0.0", "html-webpack-plugin": "^3.2.0", "node-sass": "^4.8.3", "raw-loader": "^0.5.1", "sass-loader": "^6.0.6", "webpack": "^4.5.0", "webpack-cli": "^2.0.14", "webpack-dev-server": "^3.1.3" } } const path = require('path'); const ExtractTextPlugin = require("extract-text-webpack-plugin"); const CopyWebpackPlugin = require('copy-webpack-plugin'); const HtmlWebpackPlugin = require('html-webpack-plugin'); const fs = require('fs') function generateHtmlPlugins(templateDir) { const templateFiles = fs.readdirSync(path.resolve(__dirname, templateDir)); return templateFiles.map(item => { const parts = item.split('.'); const name = parts[0]; const extension = parts[1]; return new HtmlWebpackPlugin({ filename: `${name}.html`, template: path.resolve(__dirname, `${templateDir}/${name}.${extension}`), inject: false, }) }) } const htmlPlugins = generateHtmlPlugins('./src/html/views'); module.exports = { entry: [ './src/js/index.js', './src/scss/style.scss' ], output: { filename: './js/bundle.js' }, devtool: "source-map", module: { rules: [{ test: /\.js$/, include: path.resolve(__dirname, 'src/js'), use: { loader: 'babel-loader', options: { presets: 'env' } } }, { test: /\.(sass|scss)$/, include: path.resolve(__dirname, 'src/scss'), use: ExtractTextPlugin.extract({ use: [{ loader: "css-loader", options: { sourceMap: true, minimize: true, url: false } }, { loader: "sass-loader", options: { sourceMap: true } } ] }) }, { test: /\.html$/, include: path.resolve(__dirname, 'src/html/includes'), use: ['raw-loader'] }, ] }, plugins: [ new ExtractTextPlugin({ filename: './css/style.bundle.css', allChunks: true, }), new CopyWebpackPlugin([{ from: './src/fonts', to: './fonts' }, { from: './src/favicon', to: './favicon' }, { from: './src/img', to: './img' }, { from: './src/uploads', to: './uploads' } ]), ].concat(htmlPlugins) }; <% var data = { title: " | ", author: "Harrix" }; %> <%= _.template(require('./../includes/header.html'))(data) %> <div class="container"> <p> .</p> <p><img src="uploads/test.jpg"></p> </div> <%= _.template(require('./../includes/footer.html'))(data) %> <!doctype html> <html lang="ru"> <head> <meta charset="utf-8"> <meta name="viewport" content="width=device-width, initial-scale=1, shrink-to-fit=no"> <link rel="shortcut icon" href="favicon/favicon.ico"> <link rel="stylesheet" href="css/style.bundle.css"> <title><%=title%></title> </head> <body> <header><img src="img/logo.svg" id="logo"></header> <footer><%=author%></footer> <script src="js/bundle.js"></script> </body> </html> <!doctype html> <html lang="ru"> <head> <meta charset="utf-8"> <meta name="viewport" content="width=device-width, initial-scale=1, shrink-to-fit=no"> <link rel="shortcut icon" href="favicon/favicon.ico"> <link rel="stylesheet" href="css/style.bundle.css"> <title> | </title> </head> <body> <header><img src="img/logo.svg" id="logo"></header> <div class="container"> <p> .</p> <p><img src="uploads/test.jpg"></p> </div> <footer>Harrix</footer> <script src="js/bundle.js"></script> </body> </html> Sources
Link to the repository with the draft.
')
Source: https://habr.com/ru/post/350886/
All Articles