(Not) original greeting for March 8
I think many in childhood drew homemade cards for moms, sisters, grandmothers. At school for sure. However, after a certain age, the fascination with such things remains the lot of a very small number of people. It is unlikely that you ever gave something like this to your girlfriend / wife. But they will surely like it, psychology and all that .

Naturally, we, programmers, are broad-shouldered people, we are not lured by silky paper, so I decided to make a postcard as a mobile application, and not to glue on a knee of cardboard and colored paper. Fortunately, now even homeless people have smartphones.
Disclaimer
I in no way claim the quality of the program code presented in the post, the originality of the idea or its implementation.
I am not responsible for your eyes, which are inflamed with horrible code, and insult programmers' feelings.
I understand that most of the decisions I made during development were not ideal, and I hope that this post will save other developers from similar blunders
Idea and task analysis
So, for a successful, bright and memorable congratulations need, what? Right, wow effect! To do this, you should do everything invisibly to the object of congratulations, and add a little programmer magic. Fortunately for me, in Android it is enough, both white and black.
Imagine you wrote and installed the application in the phone to the victim the culprit of the whole undertaking, and then what? " Start, please, that application " or " Give the phone for a second ... Look! ". Wow effect will not, do not even hope.
Therefore, the best thing that occurred to me was to preinstall the application (I wanted to disguise it, but did not have time, and I didn’t have to, in general), and at time X, launch it remotely using magic, surprising the unsuspecting Muggle.
The postcard is filled with memorable photos and short greetings in the style of "I wish to remain beautiful, smart, kind, happiness, health ." Individual set, you never know what your congratulations like.
Already at the design stage, I made my first and most critical mistake. I decided that I would have time in a short time to make a beautiful card with a bunch of animations, without having any experience with this very animation and its optimization . Not to say that visually it turned out badly, but without the animation that I added, everything would be excellent, and there would be less problems.
Tools

For the work we need:
- Any IDE for Android Development
- A photo
the victimsand stock images for postcards - Google Firebase or Google Cloud Firestore
- The curl utility or any other means of sending POST requests
Implementation
To create animations, I used the WowoViewPager library. I do not advise to use it for similar projects.
The library allows you to create animated slides, working through the ViewPager. Scrolling by default is done by swipe. You can fully customize the movement of any view-elements, speed and type of animation. Gif and svg animations are supported.
The main disadvantage, in my opinion, is the requirement to store all elements in one xml-file. The library, apparently, is not designed for a large number of slides (in the original example, there are only a maximum of 4 of them). In my case, 21 slides and 16 jpeg-photos caused more than 200 MB of memory to "wipe out".
I will not begin the process of creating animations, since each programmer has his own crutches and bicycles. I just want to mention that you can use the flags to hide the toolbar and the notification panel.
getWindow().requestFeature(Window.FEATURE_ACTION_BAR); getWindow().setFlags(WindowManager.LayoutParams.FLAG_FULLSCREEN, WindowManager.LayoutParams.FLAG_FULLSCREEN); In the process of working with the animation library, I was waiting for a few unexpected troubles. The classic formula for centering absolute coordinates
(screenWidth-viewWidth)/2 did not work; empirically, I found out that the desired effect is given by an absolutely analogous formula:
screenWidth/2 - viewWidth/2 However, in one exceptional case, the photograph was centered only by the formula
screenWidth/3.5 - viewWidth/3.5 Given that the difference in size was only 3 pixels along the Y axis (! Sic)

That was how I felt at that moment. I do not know what it is connected with - with the features of the coordinates in the android, library bugs, or with my clumsy hands. Maybe in the comments someone faced with similar problems.
After the realization of the postcard itself, it was the turn of magic.
First of all, create a new project in the Firebase Console .
When creating a project, specify the name and country.
The next step is to connect Firebase to the postcard. There are two options to choose from: Realtime Database and Cloud Firestore . In this particular case there is no difference, both services cope perfectly well with their task. What is the global difference - I do not know. I used Cloud Firestore. The link is the official tutorial.
1) Specify Gradle dependencies at project level.
dependencies { ... classpath 'com.google.gms:google-services:3.2.0' ... } 2) Specify Gradle dependencies at the app module level. Immediately take into account the dependence for receiving push-notifications
compile 'com.google.firebase:firebase-core:11.8.0' compile 'com.google.firebase:firebase-firestore:11.8.0' compile 'com.google.firebase:firebase-messaging:11.8.0' 3) Create and add a service to the manifest to get a Firebase token and then write to Cloud Firestore. We need the token to run the application remotely. I note that I do not have the function of removing the old token from the database, I did not have time to implement it. If you need, there is an example above the link.
<application> ... <service android:name=".FirebaseIdService"> <intent-filter> <action android:name="com.google.firebase.INSTANCE_ID_EVENT"/> </intent-filter> </service> ... </application> public class FirebaseIdService extends FirebaseInstanceIdService { @Override public void onTokenRefresh() { // String refreshedToken = FirebaseInstanceId.getInstance().getToken(); Log.d("TOKEN REFRESH", refreshedToken); // FirebaseFirestore db = FirebaseFirestore.getInstance(); Map<String, Object> data = new HashMap<>(); // hashmap data.put("token", refreshedToken); //devices - db.collection("devices") .add(data) .addOnSuccessListener(new OnSuccessListener<DocumentReference>() { @Override public void onSuccess(DocumentReference documentReference) { Log.d("FIREBASE", "Data added, id: " + documentReference.getId()); } }) .addOnFailureListener(new OnFailureListener() { @Override public void onFailure(@NonNull Exception e) { Log.d("FIREBASE", "Data adding failed, exception: \n" + e); } }); } } 4) Create and add a service to the manifest for receiving push notifications from Firebase. Earlier we added a dependency in Gradle.
I will not explain the principles of creation and operation of push-notifications in android. For this there are specialized sites. The above example should work in most smartphones with Android 4.2.2 and higher.
<application> ... <service android:name=".FirebaseMessageHandleService"> <intent-filter> <action android:name="com.google.firebase.MESSAGING_EVENT"/> </intent-filter> </service> ... </application> public class FirebaseMessageHandleService extends FirebaseMessagingService { @Override public void onMessageReceived(RemoteMessage remoteMessage) { super.onMessageReceived(remoteMessage); { // Intent intent = new Intent(this, MainActivity.class); /** * Activity , * Activity, , * . * onNewIntent() */ intent.addFlags(Intent.FLAG_ACTIVITY_CLEAR_TOP); /** * * - */ PendingIntent contentIntent = PendingIntent.getActivity(this, 0, intent, PendingIntent.FLAG_CANCEL_CURRENT); // NotificationManager notificationManager = (NotificationManager) getSystemService(Context.NOTIFICATION_SERVICE); // , , . . NotificationCompat.Builder notificationBuilder = new NotificationCompat.Builder(this); // : , , , . notificationBuilder.setContentIntent(contentIntent); notificationBuilder.setSmallIcon(R.drawable.ic_launcher_background); notificationBuilder.setContentTitle(" !"); notificationBuilder.setContentText(" "); // Notification Notification notification = notificationBuilder.build(); notification.defaults = Notification.DEFAULT_SOUND; notificationManager.notify(1, notification); /** * . * * push- Firebase * */ Intent intent1 = new Intent(getApplicationContext(), MainActivity.class); intent1.addFlags(Intent.FLAG_ACTIVITY_NEW_TASK); startActivity(intent1); } } } I was writing a postcard in the early morning of March 8th. Catastrophically did not have time, only a few minutes remained before the alarm clock, but I have not yet checked how the application works in the girl’s smartphone (we have different screen resolutions). I had fingerprint access. When setting up debugging via USB, a reboot was required. After the reboot, it turned out that I do not remember the graphic password. At that moment, I felt like a complete moron. A step away from the finish, I could not test the application ( facepalm ). I had to wake up the girl and make her unlock, good, when she woke up, she didn’t understand anything and entered the password on the machine.
The final stage of development. It remains only to prepare a request to be sent to Firebase to initiate a push notification.
Important point:
Firebase allows you to send a notification in two ways: simple and customizable.
A simple option involves sending only two fields - the header and notification text. This type of message can be sent directly from the Firebase console, but notification will be received only if there is a running application process. It does not suit us, because the application should not manifest itself until the moment X.
Customized version allows you to send messages in json-format up to 4Kb with any content. Such a message will come even if the message is cleared from the stack of previously running applications. (However, if the application and its services were killed by some memory cleaner, the notification will not come until the application is restarted). The minus of the customizable method is that it can be sent only by a POST request to the Firebase servers.
To send a request, I used the curl utility. Since the code was written from under Linux Mint, it was enough for me to start the terminal. You can use any other tool, for example Postman.
"Authorization: key = <your key>"
The key can be viewed in the Firebase project settings (click on the gear)
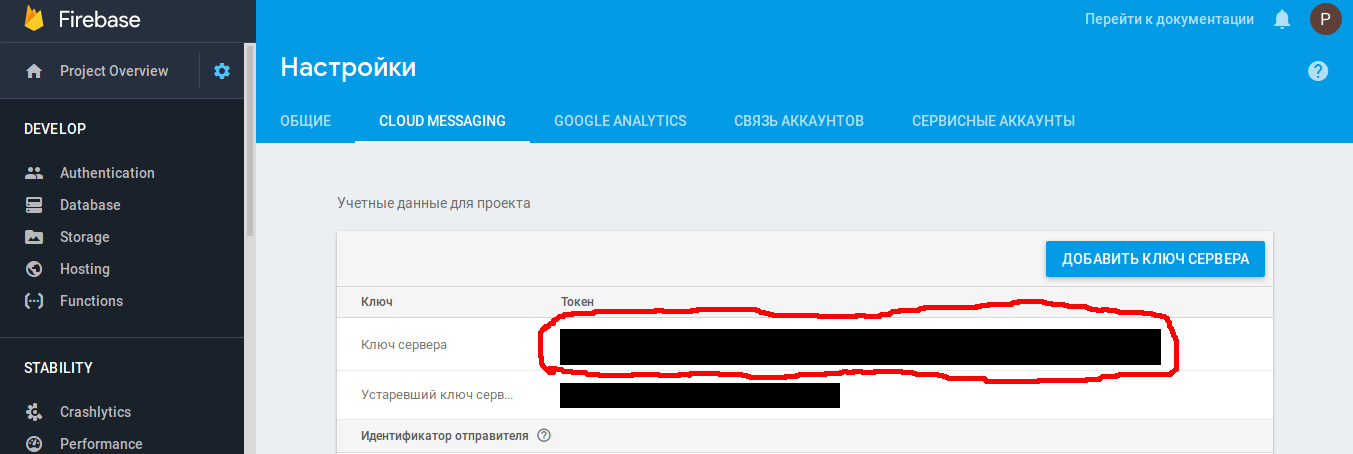
"Content-Type: application / json"
{ "to":"Firebase- ", "data":{" ":" "}, "priority":10 // } curl -X POST --header "Authorization: key=your_key" --Header "Content-Type: application/json" https://fcm.googleapis.com/fcm/send -d "{\"to\" : \"firebase_token\" , \"data\":{\"name\" : \"value\"} , \"priority\" : 10}" Now it remains only at the right time to send a request!
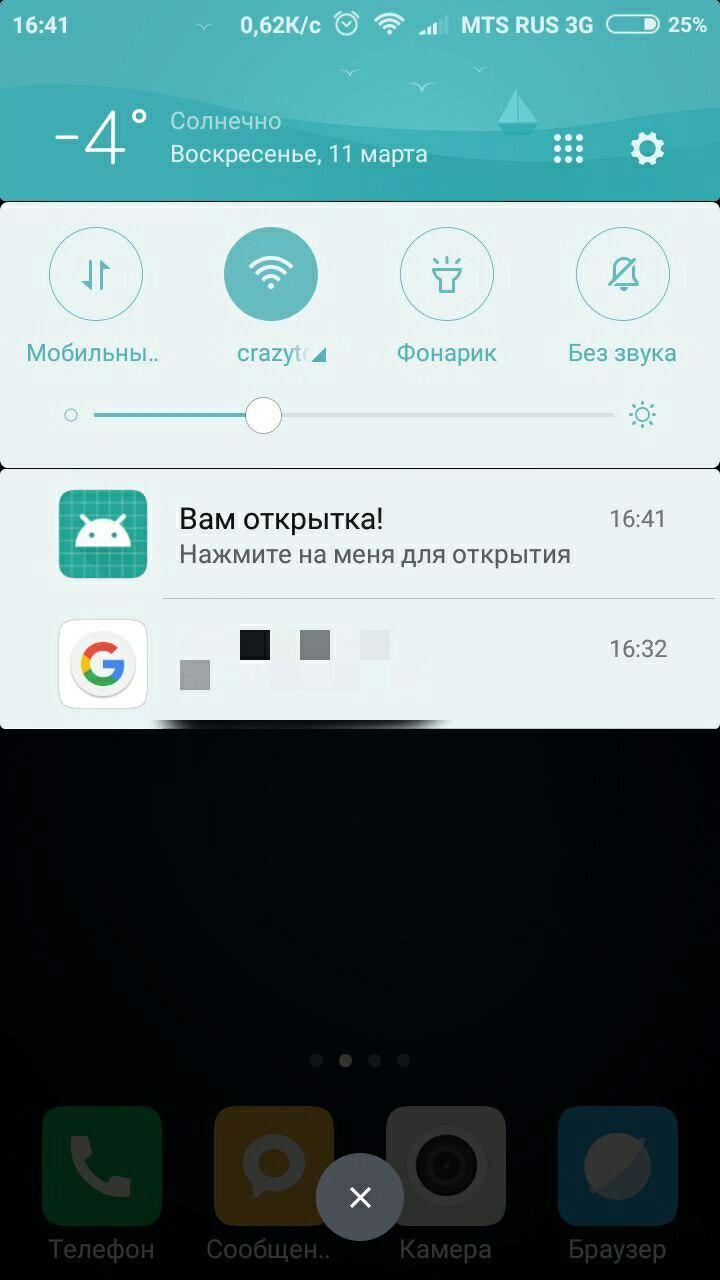

The girl liked the wow effect was achieved :)
')
Source: https://habr.com/ru/post/350882/
All Articles