Creating animation transitions between Activity in Android
Starting with Android 4.4, an additional animation tool for creating animations appeared in the arsenal of developers - Transitions Framework. Initially, it was intended to create animations for changing the state of an application by manipulating multiple View. With the release of Android 5.0, the set of available animations has been expanded to fit the Material Design concept presented at the same time.
Transitions Framework allows you to quickly and easily create a variety of animations. Therefore, in the process of working on iFunny, it was impossible to pass by this toolkit. The readers are invited to a special case of using the Transitions API - creating an animation of the transition between the Activity with the effect of "seamlessness".

From a visual point of view, the animations of transitions between the Activity presented in the Transitions Framework can be divided into two types: ordinary animations and animations with a common element. The concept of animation with a common element is demonstrated on anhonestly stolen from developer.android.com pic. 1. On it in the role of common elements are the avatar and the name of the contact.
')

Fig. 1. Animation of the transition between the Activity with common elements
But no one likes long introductions, so let's go straight to the story of how this type of animation was created in the iFunny application. As a first example, consider the animation shown in Fig. 2. To use it, we need Android version 5.0 and higher.
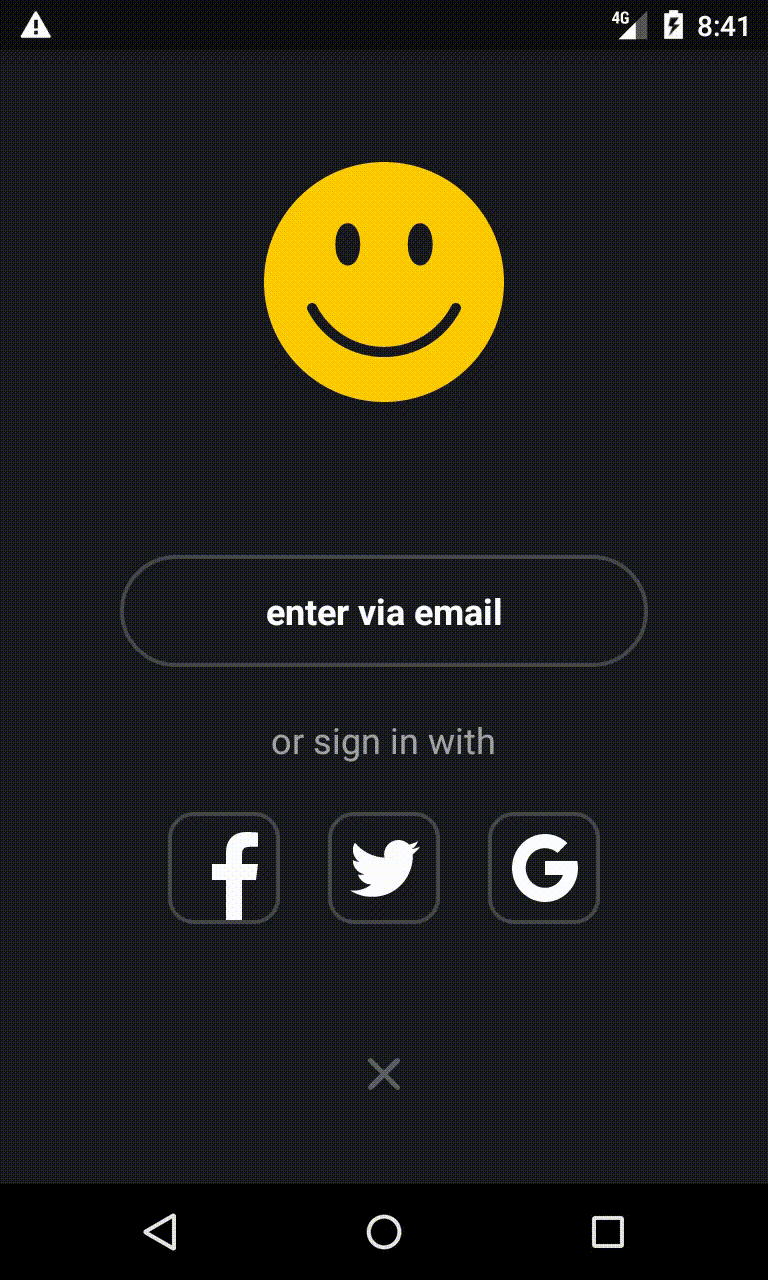
Fig. 2. Animate the transition between the Activity on the user authentication screen
From the user's point of view, there is nothing unusual here: one screen, a simple animation. But, as you might have guessed, “under the hood” is a transition between two screens with one common element.
The first step to creating such a transition is, oddly enough, the choice of this element itself and the determination of its location in the layout of both Activity. After that, in the description of each View displaying the selected element, you need to add the android: transitionName attribute, and also assign them android: id, if it is absent.
In our case, these are ordinary ImageViews of the following form:
It is worth noting two important points. First, in both ImageView you need to set the same transitionName, which is logical. Secondly, since we use ImageView, then the content should be the same, since using two different resources can lead to unexpected consequences (at least to a blinking animated View at the beginning and end of the animation).
In the second step, you need to add options for the launching (second) Activity, indicating that when it starts, the animation should be launched.
Note. By “second” is meant a triggered Activity, the transition to which must be made, and by “first” - a triggering Activity.
This is done as follows:
In the listing below:
And now the attentive reader may be perplexed: the introduction dealt with the use of API level 19, in the example API level 21 appeared, and in the listing above there is a restriction on API level 22. Unfortunately, while writing the code, it turned out that the transition animation with a common element may behave incorrectly on phones with API level 21. This manifests itself in the form of animation slowdowns in general and artifacts on the animated View in particular. If you are already familiar with the topic, know the reasons for such behavior and / or ways to solve the described problem - tell us about it in the comments.
In the third step, it is necessary to describe the transition animation, i.e. specify the path traversed by the animated View, and the transformation of the View itself. To do this, create a separate projectName / src / main / res / transitions / email_auth_transition.xml file with the following contents:
A bit of theory. The transitionSet tag is intended to describe several transformations applied to the animated View at once. The transitionOrdering parameter is responsible for the order in which these transformations are applied. In our case, they are applied simultaneously. There are several types of ready-made transformations presented in the Transitions Framework. The full list can be found on this page . We will focus on two specific ones: changeBounds and changeImageTransform.
The first is intended to transform the size of the View. The second works only with ImageView and in conjunction with the first allows you to change not only the size, but also the shape of the ImageView. Using the transformation data, we obtain at the output the image resizing animation shown in Fig. 2. If you do not specify the type of motion of the animated View, then it will move along the shortest path. A more interesting way to get around is in the second example.
The final step in creating an animation is its announcement in the themes of both Activity. To do this, edit the description with the following: (or create new ones in the projectName / src / main / res / values-v22 / theme.xml folder):
Here:
It should be noted that for OS versions below 5.1 it is necessary to create themes with identical styles in order to avoid quite expected consequences in the form of an application crash. For example, put them in the projectName / src / main / res / values / theme.xml file:
So, to create an animation of the transition from Activity to Activity, you need:
As you can see, creating such animations is not at all difficult, except for some of the limitations mentioned in the first example. Now consider the second, more complex example. Here we are interested in the transition from the comments section to the user profile (Fig. 3).

Fig. 3. Animation of the transition from the comments to the user profile
All the steps to create a transition, discussed above, are also suitable for this animation. But the transformation of the common element is implemented a little differently. The listing below describes the movement of the common element “in an arc” along with a change in its size.
What is the complexity of the second example? In the first case, an image was used from the resources of the application itself, and here the image is downloaded from the network. In addition, for comments, the user's avatar image is taken at a lower resolution than for the profile. Therefore, it is necessary not only to give the second Activity access to the image used in the first one, but upon completion of the animation, load the required image in higher quality. So there are two problems.
To solve the first one, it would be possible to manually cache the image on a disk or transfer its address in the parameter of the second Activity. However, the solution to this problem was shifted to the library used in the application for downloading images - Glide. When loading an image, simply add the diskCacheStrategy parameter (DiskCacheStrategy.SOURCE), and it will be cached by the library itself (relevant for Glide version 3.x). Therefore, when re-accessing this resource from the second Activity, the cached file will be used, which will help us to avoid the blinking of the animated ImageView.
The second problem is also solved quite simply. While the transition is being animated, the user profile along with the avatar in higher resolution are downloaded from the network and await its completion. As soon as both conditions are fulfilled (completion of the animation and completion of the download), the user's avatar is updated. You can achieve this behavior by using a special Listener, which implements callbacks that are called when the animation status changes. To do this, in the Fragment, which belongs to the second Activity, we define this Listener:
Here the following happens:
Consider exactly how the Listener is implemented:
In the onProfileUpdated () method, we update the profile content, incl. and avatar.
It is worth mentioning separately the case when the common element goes off the screen. Its peculiarity is that, contrary to (and maybe according to) logic, the transition animation will still be completed and will look quite funny (Fig. 4).

Fig. 4. Animation of the return from the profile in the comments
To avoid such behavior, it is enough to expose it to a view that is different from View.VISIBLE when the common element leaves the screen.
In general, we can say that the Transitions Framework is a simple and powerful tool for creating animations. It is not limited to animations of the transition between the Activity - the article was considered only a special case of its use. It is also worth noting that in addition to the provided transformations, there is an opportunity to create your own, but this is a completely different story, worthy of a separate post.
PS And how you came up with animations for iFunny, you can read here .
Transitions Framework allows you to quickly and easily create a variety of animations. Therefore, in the process of working on iFunny, it was impossible to pass by this toolkit. The readers are invited to a special case of using the Transitions API - creating an animation of the transition between the Activity with the effect of "seamlessness".
From a visual point of view, the animations of transitions between the Activity presented in the Transitions Framework can be divided into two types: ordinary animations and animations with a common element. The concept of animation with a common element is demonstrated on an
')
Fig. 1. Animation of the transition between the Activity with common elements
But no one likes long introductions, so let's go straight to the story of how this type of animation was created in the iFunny application. As a first example, consider the animation shown in Fig. 2. To use it, we need Android version 5.0 and higher.
Fig. 2. Animate the transition between the Activity on the user authentication screen
From the user's point of view, there is nothing unusual here: one screen, a simple animation. But, as you might have guessed, “under the hood” is a transition between two screens with one common element.
The first step to creating such a transition is, oddly enough, the choice of this element itself and the determination of its location in the layout of both Activity. After that, in the description of each View displaying the selected element, you need to add the android: transitionName attribute, and also assign them android: id, if it is absent.
In our case, these are ordinary ImageViews of the following form:
<ImageView android:layout_width="40dp" android:layout_height="40dp" android:layout_gravity="center" android:transitionName="@string/email_auth_transition" app:srcCompat="@drawable/ic_ifunny_logo" /> It is worth noting two important points. First, in both ImageView you need to set the same transitionName, which is logical. Secondly, since we use ImageView, then the content should be the same, since using two different resources can lead to unexpected consequences (at least to a blinking animated View at the beginning and end of the animation).
In the second step, you need to add options for the launching (second) Activity, indicating that when it starts, the animation should be launched.
Note. By “second” is meant a triggered Activity, the transition to which must be made, and by “first” - a triggering Activity.
This is done as follows:
Bundle bundle = null; if (android.os.Build.VERSION.SDK_INT >= Build.VERSION_CODES.LOLLIPOP_MR1) { View v = activity.findViewById(R.id.auth_logo); if (v != null) { ActivityOptions options = ActivityOptions.makeSceneTransitionAnimation(activity, v, activity.getString(R.string.email_auth_transition)); bundle = options.toBundle(); } } Intent intent = new Intent(activity, SecondActivity.class); if (bundle == null) { activity.startActivity(intent); } else { activity.startActivity(intent, bundle); } In the listing below:
- R.id.auth_logo - ImageView from the first Activity used in the animation;
- activity - the first Activity;
- R.string.email_auth_transition - a label previously left in the layout of both ImageView;
- SecondActivity.class is the second Activity.
And now the attentive reader may be perplexed: the introduction dealt with the use of API level 19, in the example API level 21 appeared, and in the listing above there is a restriction on API level 22. Unfortunately, while writing the code, it turned out that the transition animation with a common element may behave incorrectly on phones with API level 21. This manifests itself in the form of animation slowdowns in general and artifacts on the animated View in particular. If you are already familiar with the topic, know the reasons for such behavior and / or ways to solve the described problem - tell us about it in the comments.
In the third step, it is necessary to describe the transition animation, i.e. specify the path traversed by the animated View, and the transformation of the View itself. To do this, create a separate projectName / src / main / res / transitions / email_auth_transition.xml file with the following contents:
<?xml version="1.0" encoding="utf-8"?> <transitionSet xmlns:android="http://schemas.android.com/apk/res/android" android:transitionOrdering="together"> <changeBounds/> <changeImageTransform/> </transitionSet> A bit of theory. The transitionSet tag is intended to describe several transformations applied to the animated View at once. The transitionOrdering parameter is responsible for the order in which these transformations are applied. In our case, they are applied simultaneously. There are several types of ready-made transformations presented in the Transitions Framework. The full list can be found on this page . We will focus on two specific ones: changeBounds and changeImageTransform.
The first is intended to transform the size of the View. The second works only with ImageView and in conjunction with the first allows you to change not only the size, but also the shape of the ImageView. Using the transformation data, we obtain at the output the image resizing animation shown in Fig. 2. If you do not specify the type of motion of the animated View, then it will move along the shortest path. A more interesting way to get around is in the second example.
The final step in creating an animation is its announcement in the themes of both Activity. To do this, edit the description with the following: (or create new ones in the projectName / src / main / res / values-v22 / theme.xml folder):
<style name="Theme.FirstActivity" parent="Theme.AppCompat.Light.NoActionBar"> <item name="android:windowActivityTransitions">true</item> </style> <style name="Theme.SecondActivity" parent="Theme.AppCompat.Light.NoActionBar"> <item name="android:windowActivityTransitions">true</item> <item name="android:windowSharedElementEnterTransition"> @transition/email_auth_transition </item> <item name="android:windowSharedElementExitTransition"> @transition/email_auth_transition </item> </style> Here:
- android: windowActivityTransitions allows animation of the transition;
- android: windowSharedElementEnterTransition points to a file describing the transition animation from the first to the second Activity;
- android: windowSharedElementExitTransition points to a file describing the transition animation when returning from the second Activity to the first one.
It should be noted that for OS versions below 5.1 it is necessary to create themes with identical styles in order to avoid quite expected consequences in the form of an application crash. For example, put them in the projectName / src / main / res / values / theme.xml file:
<style name="Theme.FirstActivity" parent="Theme.NoActionBar.Translucent"/> <style name="Theme.SecondActivity" parent="Theme.TransparentActionBar"/> So, to create an animation of the transition from Activity to Activity, you need:
- Describe animations (in our case in the xml-file);
- Add these animations to the xml-description of the topic Activity;
- Mark an animated common element (View) in the markup;
- When launching the second Activity, specify in the launch parameters that it is necessary to enable transition animation for it.
As you can see, creating such animations is not at all difficult, except for some of the limitations mentioned in the first example. Now consider the second, more complex example. Here we are interested in the transition from the comments section to the user profile (Fig. 3).
Fig. 3. Animation of the transition from the comments to the user profile
All the steps to create a transition, discussed above, are also suitable for this animation. But the transformation of the common element is implemented a little differently. The listing below describes the movement of the common element “in an arc” along with a change in its size.
<transitionSet xmlns:android="http://schemas.android.com/apk/res/android"> <changeBounds> <arcMotion android:maximumAngle="90" android:minimumHorizontalAngle="90" android:minimumVerticalAngle="0" /> </changeBounds> </transitionSet> What is the complexity of the second example? In the first case, an image was used from the resources of the application itself, and here the image is downloaded from the network. In addition, for comments, the user's avatar image is taken at a lower resolution than for the profile. Therefore, it is necessary not only to give the second Activity access to the image used in the first one, but upon completion of the animation, load the required image in higher quality. So there are two problems.
To solve the first one, it would be possible to manually cache the image on a disk or transfer its address in the parameter of the second Activity. However, the solution to this problem was shifted to the library used in the application for downloading images - Glide. When loading an image, simply add the diskCacheStrategy parameter (DiskCacheStrategy.SOURCE), and it will be cached by the library itself (relevant for Glide version 3.x). Therefore, when re-accessing this resource from the second Activity, the cached file will be used, which will help us to avoid the blinking of the animated ImageView.
The second problem is also solved quite simply. While the transition is being animated, the user profile along with the avatar in higher resolution are downloaded from the network and await its completion. As soon as both conditions are fulfilled (completion of the animation and completion of the download), the user's avatar is updated. You can achieve this behavior by using a special Listener, which implements callbacks that are called when the animation status changes. To do this, in the Fragment, which belongs to the second Activity, we define this Listener:
@Override public void onViewCreated(View view, @Nullable Bundle savedInstanceState) { super.onViewCreated(view, savedInstanceState); if (android.os.Build.VERSION.SDK_INT >= Build.VERSION_CODES.LOLLIPOP_MR1) { getActivity().getWindow().getSharedElementEnterTransition() .addListener(mEnterTransitionListener); } setAvatar(); } Here the following happens:
- Using getSharedElementEnterTransition (). AddListener () sets the Listener to animate the appearance of the Activity;
- In the setAvatar () method, an attempt is made to download and install an avatar (which is already in the cache).
Consider exactly how the Listener is implemented:
private Transition.TransitionListener mEnterTransitionListener = new Transition.TransitionListener() { @Override public void onTransitionStart(Transition transition) { } @Override public void onTransitionEnd(Transition transition) { onProfileUpdated(); } @Override public void onTransitionCancel(Transition transition) { } @Override public void onTransitionPause(Transition transition) { } @Override public void onTransitionResume(Transition transition) { } }; In the onProfileUpdated () method, we update the profile content, incl. and avatar.
It is worth mentioning separately the case when the common element goes off the screen. Its peculiarity is that, contrary to (and maybe according to) logic, the transition animation will still be completed and will look quite funny (Fig. 4).
Fig. 4. Animation of the return from the profile in the comments
To avoid such behavior, it is enough to expose it to a view that is different from View.VISIBLE when the common element leaves the screen.
In general, we can say that the Transitions Framework is a simple and powerful tool for creating animations. It is not limited to animations of the transition between the Activity - the article was considered only a special case of its use. It is also worth noting that in addition to the provided transformations, there is an opportunity to create your own, but this is a completely different story, worthy of a separate post.
PS And how you came up with animations for iFunny, you can read here .
Source: https://habr.com/ru/post/350662/
All Articles