Unleash the game code using the Command pattern, and debugging while flying on the time machine
Hello! I write articles on architecture in game development. In this article I want to make out the pattern Command (Command) . It is multifaceted, and can be applied in different ways. But I'll show you how to do my favorite trick — a time machine for debugging game state changes.
This thing saved me a lot of time searching and playing complex bugs. It allows you to make "snapshots" of the game state, its history of changes, and use them step by step.
Beginner developers will get familiar with the pattern, and advanced ones will probably find the trick useful.
Want to know how to do this? I ask under the cat.
If you are already familiar with the Command pattern, then go directly to the section "Making a State Modification Unidirectional".
Command Pattern
What do we mean by the word "team"? This is something like an order. With the help of a team, a person expresses the need to perform an action. Action is inseparable from the team.
The Command pattern is a way of representing action in the world of object-oriented programming. And it is thanks to polymorphism that this becomes possible.
The idea behind the pattern is that all the commands for the system are the same. In terms of OOP, all commands have a common interface. The system can transparently execute any of them. This means that the team must be completely independent, and encapsulate all the data necessary for its execution.
While the description is rather abstract. Let's get to the specifics. Basic interface for all commands:
public interface ICommand { void Execute(); } Now an example of a specific command implementation:
public class WriteToConsoleCommand : ICommand { public string Message { get; private set; } public void Execute() { Console.WriteLine(Message); } } This is a kind of "Hello world" on the teams. And how to execute them? Let's write a simple command processing system.
public interface IGameSystem { void Execute(ICommand cmd); } public class LoggableGameSystem : IGameSystem { public LoggableGameSystem(ILogger log) { _log = log; } public void Execute(ICommand cmd) { _log.Debug(string.Format("Executing command <{0}>: {1}", cmd.GetType(), cmd); cmd.Execute(); } private ILogger _log; } Now we can log every executable command for debugging. Is it convenient? But the command needs to be prepared for the debug output, we add the ToString () method.
public class WriteToConsoleCommand : ICommand { public string Message { get; private set; } public void Execute() { Console.WriteLine(Message); } public override string ToString() { return Message; } } Check how it works.
class Program { static void Main(string[] args) { var gameSystem = new LoggableGameSystem(); var cmd = new WriteToConsoleCommand("Hello world"); var cmd2 = new WriteToConsoleCommand("Hello world2"); gameSystem.Execute(cmd); gameSystem.Execute(cmd2); } } This is a fairly simple example. Of course, the debugging output is useful, but it is not clear what else useful can be learned from this pattern.
In my projects I constantly use this pattern for several reasons:
- The team retains everything that is necessary until its execution. It is essentially an immutable object. Therefore, it is easy to transmit over the network, and equally execute both on the client and on the server. Of course, this is assuming that with the same input parameters, both the client and the server give the same results.
- A command is a very small piece of logic. It is easy to write, easy to understand, and easy to debug. Since the command is immutable and does not contain any additional dependencies, it is easy for it to write unit tests.
- Complex business logic is easy to express through a set of simplest commands. Commands are easy to reuse and link in sequence.
- A team can act as a checkpoint, or as a transaction, as you like. If the change in the state of the data occurs only through commands, it simplifies debugging, and even the understanding of the program. If something breaks down, you can always trace which team caused the error. What is convenient - you can see the parameters with which the command was executed.
- Command execution may be delayed. A typical example is sending a command to a server. When the user initiated any action in the game, a command is created and added to the queue for execution. The actual execution of the command occurs only after confirmation from the server.
- Since the commands are rather abstracted from all dependencies, it is easy to change the architecture. For example, if before the code was only offline and the control of AI occurred only locally, then it is easy to change to control AI using the server. After all, the code does not matter who sends commands, local code, or server.
- A well-known command trick - you can not only apply changes, but also make support for the "undo" action
- The code written with the ideology of commands is slightly different from the traditional approach with calling functions. When a programmer creates a command, he reports the need to change the state. How and when it will be done - he is not interested. This allows you to create interesting things.
A little more about the last item. For example, you had a synchronous function that should become asynchronous. To do this, you need to change its signature, and write a mechanism for processing an asynchronous result in the form of a callback, or corutine, or async / await (if you crawled to .net 4.6). And so every time, for each individual function.
The mechanism of commands allows to abstract from the mechanism of execution. Therefore, if a command was previously executed instantly, it can easily be made asynchronous. It can even be changed dynamically, in runtime.
Specific example. The game supports partial offline. If the network connection is now unavailable, then the commands go to the queue and are executed when the connection is restored. If there is a connection, then the commands are executed instantly.
Simple unlinking of a state from logic using Commands
Theory
This item is not necessary for the implementation of the "time machine", but it is useful, since the reactivity of the UI can still be useful during debugging.
To begin, I wanted to tell you about the simple decoupling of UI from logic. In Unity, various patterns are applicable, including MVVM, and there are a number of frameworks for this. But in general, this is not so much about the UI, as about the state modification itself.
Let's look at the general concepts and try to build a simple system ourselves.
What is one-way modification of the state? The idea is borrowed from the approach of Flux , described by the guys from Facebook. On this approach, all sorts of newfangled libraries like Redux are built .
In traditional MV * approaches, View interacts with the model bilaterally.
In Unity, the situation is often worse. Traditional MVC does not fit here, and the data is often modified directly from View, as I will show below. In complex applications, the number of links goes off scale, the update is lost in the update, everything gets confused, and it turns out spaghetti.
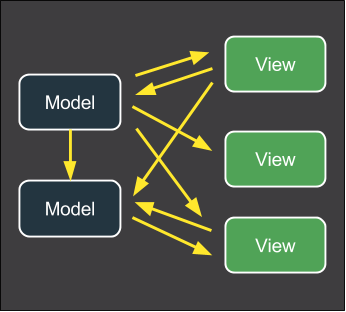
(Source: medium.com )
I suggest to play and make the system similar to Redux. The basic idea that Redux proposes to store all the state of an application in one object. That is one model.
Some here will be horrified. But after all, the serialization of the game state, most often, is reduced to the serialization of a single object. This is a fairly natural approach to gaming.
The second idea is that the state is modified using Actions. In essence, this is exactly the same as the Command described earlier. View can not modify the state directly, but only through the command.
The third idea is a natural continuation, View can only read the status and subscribe to its updates.
This is how it looks in Flux ideology:
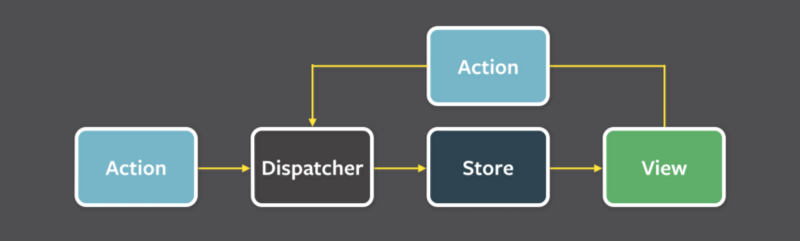
(Source: medium.com )
In our case, the Store is a game state. And Action is a team. Dispatcher, respectively, that executes commands.
This approach will give a lot of goodies. Since the state object is only one, and its modification is performed only through commands, it is easy to make a single state update event.
Then the UI is easy to make reactive. That is, automatically update the data when updating the state (hello UniRx , its application will be discussed in another article).
With this approach, changing the state of the game can be initiated from the server side. Also through the team. Since the update event state is exactly the same, the UI is absolutely violet, where the update came from.
Another good thing is cool debugging features. Since View can only give birth to commands, it becomes easier to follow the changes of the state to the steamed turnip.
Detailed logging, command history, reproduction of bugs, etc., all this becomes possible thanks to this pattern.
Implementation
For a start, we will define the state of the game. Let it be the next class:
[System.Serializable] public class GameState { public int coins; } Add save game state to JSON file. To do this, make a separate manager.
public interface IGameStateManager { GameState GameState { get; set; } void Load(); void Save(); } public class LocalGameStateManager : IGameStateManager { public GameState GameState { get; set; } public void Load() { if (!File.Exists(GAME_STATE_PATH)) { return; } GameState = JsonUtility.FromJson<GameState>(File.ReadAllText(GAME_STATE_PATH)); } public void Save() { File.WriteAllText(GAME_STATE_PATH, JsonUtility.ToJson(GameState)); } private static readonly string GAME_STATE_PATH = Path.Combine(Application.persistentDataPath, "gameState.json"); } In the previous article, I looked at the problem of dependencies, and talked about the Dependency Injection (DI) pattern. It's time to use it.
For Unity3d there is a simple and convenient Zenject DI framework. I will use it. Installation and configuration are rather trivial, and are described in detail in the documentation. Therefore, immediately to the point. Let's declare a binding for IGameStateManager.
I created my own MonoInstaller instance called BindingsInstaller , according to the documentation, and added it to the scene.
public class BindingsInstaller : MonoInstaller<BindingsInstaller> { public override void InstallBindings() { Container.Bind<IGameStateManager>().To<LocalGameStateManager>().AsSingle(); Container.Bind<Loader>().FromNewComponentOnNewGameObject().NonLazy(); } I also added banding for the Loader component, which will monitor the loading and exit of the game.
public class Loader : MonoBehaviour { [Inject] public void Init(IGameStateManager gameStateManager) { _gameStateManager = gameStateManager; } private void Awake() { Debug.Log("Loading started"); _gameStateManager.Load(); } private void OnApplicationQuit() { Debug.Log("Quitting application"); _gameStateManager.Save(); } private IGameStateManager _gameStateManager; } Script Loader runs the very first in the game. I use it as a starting point. And also as a script that monitors the loading and saving game state.
Now I am throwing in the simplest View for UI.
public class CoinsView : MonoBehaviour { public Text currencyText; [Inject] public void Init(IGameStateManager gameStateManager) { _gameStateManager = gameStateManager; UpdateView(); } public void AddCoins() { _gameStateManager.GameState.coins += Random.Range(1,100); UpdateView(); } public void RemoveCoins() { _gameStateManager.GameState.coins -= Random.Range(1,100); UpdateView(); } public void UpdateView() { currencyText.text = "Coins: " + _gameStateManager.GameState.coins; } private IGameStateManager _gameStateManager; } Here I added two methods for adding and removing an arbitrary number of coins. The standard approach that I often see in the code is to push business logic right into the UI.
So do not do :). But for now, let's make sure our little prototype works.
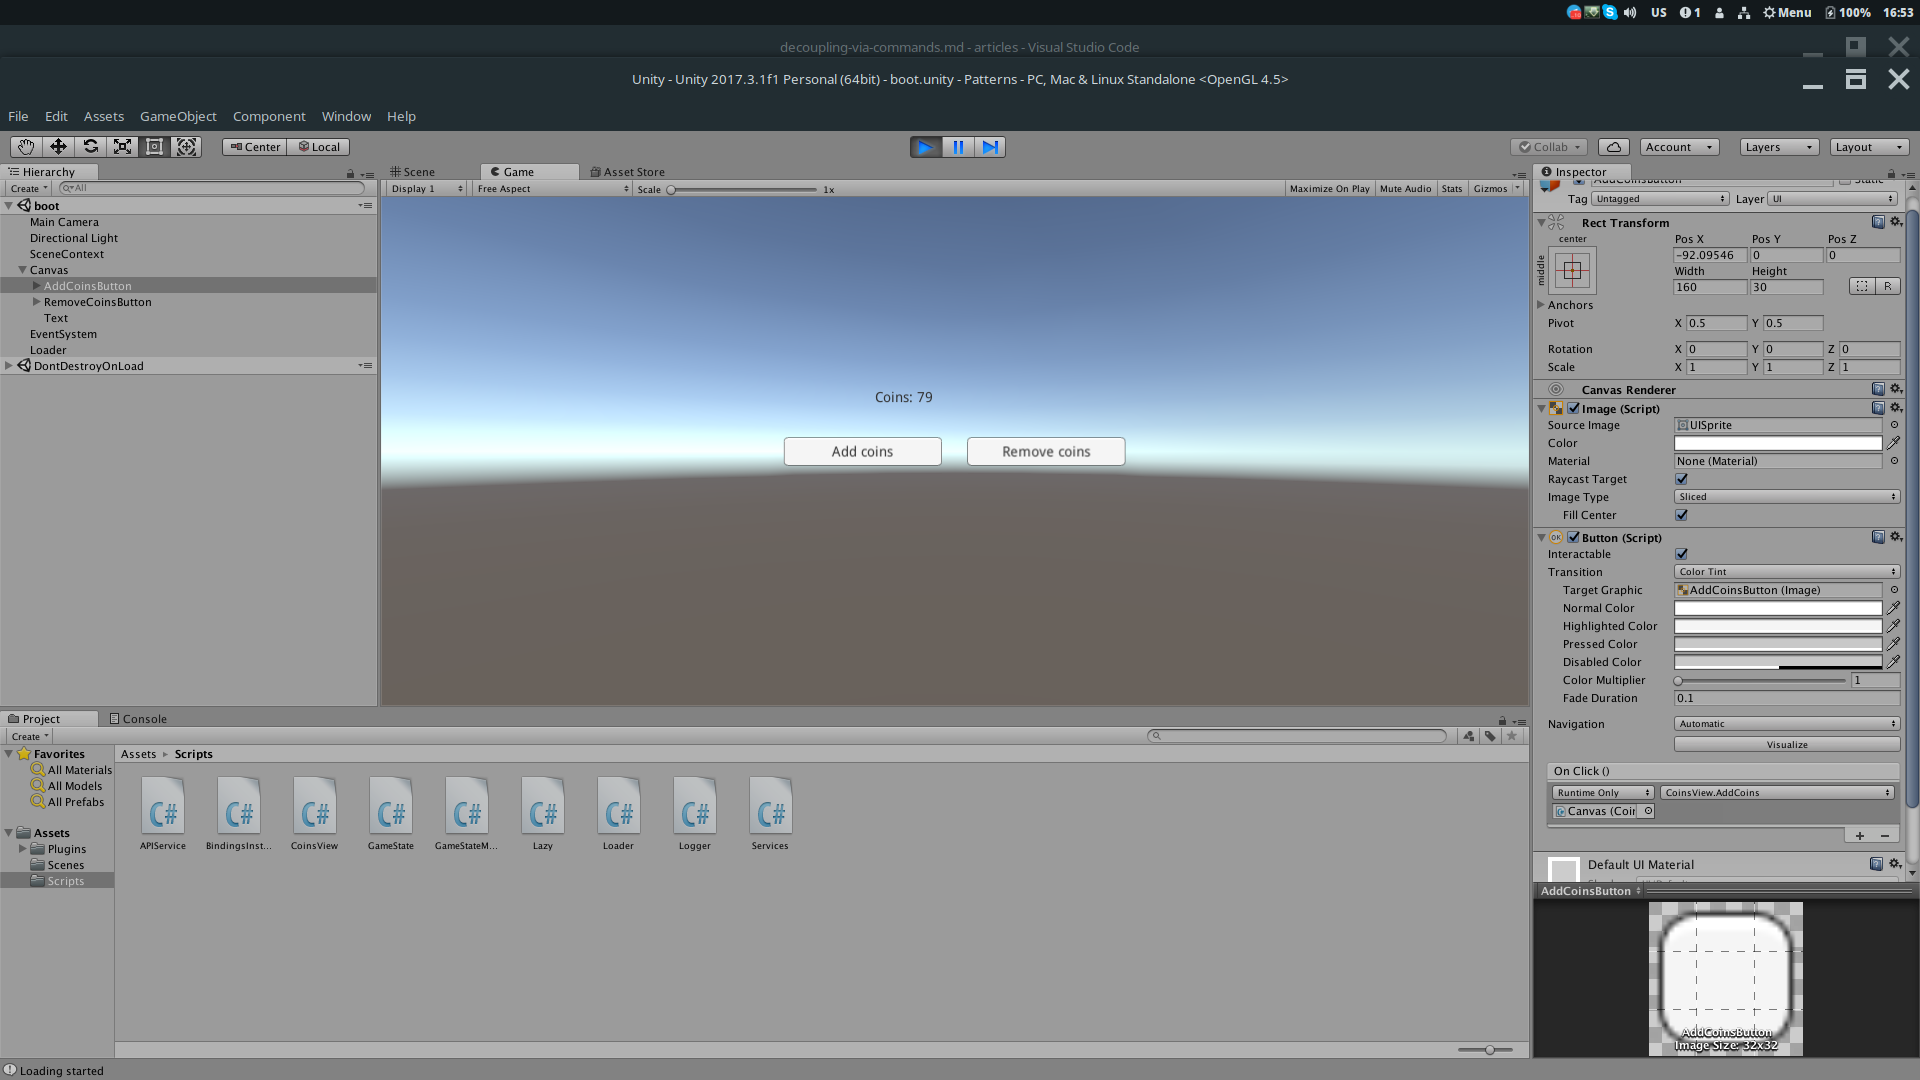
Buttons work, the state is saved and restored at boot.
Now let's brush our code.
Let's make a separate type of command that is modified by GameState.
public interface ICommand { } public interface IGameStateCommand : ICommand { void Execute(GameState gameState); } The common interface is empty to denote a single type of command. For commands that modify GameState, we denote the Execute method, which accepts a state as a parameter.
Let's create a service that will run commands that modify the state, like the one I showed before. The interface is generic to fit any type of command.
public interface ICommandsExecutor<TCommand> where TCommand: ICommand { void Execute(TCommand command); } public class GameStateCommandsExecutor : ICommandsExecutor<IGameStateCommand> { public GameStateCommandsExecutor(IGameStateManager gameStateManager) { _gameStateManager = gameStateManager; } public void Execute(IGameStateCommand command) { command.Execute(_gameStateManager.GameState); } private readonly IGameStateManager _gameStateManager; } We register the manager in DI.
public class BindingsInstaller : MonoInstaller<BindingsInstaller> { public override void InstallBindings() { Container.Bind<IGameStateManager>().To<LocalGameStateManager>().AsSingle(); Container.Bind<Loader>().FromNewComponentOnNewGameObject().AsSingle().NonLazy(); // added this line Container.Bind<ICommandsExecutor<IGameStateCommand>>().To<GameStateCommandsExecutor>().AsSingle(); } } Now let's do the implementation of the command itself.
public class AddCoinsCommand : IGameStateCommand { public AddCoinsCommand(int amount) { _amount = amount; } public void Execute(GameState gameState) { gameState.coins += _amount; } private int _amount; } Change the CoinsView to use commands.
public class CoinsView : MonoBehaviour { public Text currencyText; [Inject] public void Init(IGameStateManager gameStateManager, ICommandsExecutor<IGameStateCommand> commandsExecutor) { _gameStateManager = gameStateManager; _commandsExecutor = commandsExecutor; UpdateView(); } public void AddCoins() { var cmd = new AddCoinsCommand(Random.Range(1, 100)); _commandsExecutor.Execute(cmd); UpdateView(); } public void RemoveCoins() { var cmd = new AddCoinsCommand(-Random.Range(1, 100)); _commandsExecutor.Execute(cmd); UpdateView(); } public void UpdateView() { currencyText.text = "Coins: " + _gameStateManager.GameState.coins; } private IGameStateManager _gameStateManager; private ICommandsExecutor<IGameStateCommand> _commandsExecutor; } CoinsView now uses GameState for reading only. And all changes to the state occur through teams.
What spoils the picture here is the call to UpdateView manually. We can forget to call it. Or the status can be updated by sending a command from another View.
Add a status update event to ICommandExecutor . Plus we will make a separate interface-alias for Executor'a game state commands to hide the extra types in the generic.
public interface ICommandsExecutor<TState, TCommand> { // added event event System.Action<TState> stateUpdated; void Execute(TCommand command); } public interface IGameStateCommandsExecutor : ICommandsExecutor<GameState, IGameStateCommand> { } Update the registration in DI
public class BindingsInstaller : MonoInstaller<BindingsInstaller> { public override void InstallBindings() { Container.Bind<IGameStateManager>().To<LocalGameStateManager>().AsSingle(); Container.Bind<Loader>().FromNewComponentOnNewGameObject().AsSingle().NonLazy(); // updated this line Container.Bind<IGameStateCommandsExecutor>() .To<DefaultCommandsExecutor>().AsSingle(); } } Add an event to DefaultCommandsExecutor .
public class DefaultCommandsExecutor : IGameStateCommandsExecutor { // this event added public event Action<GameState> stateUpdated { add { _stateUpdated += value; if (value != null) { value(_gameStateManager.GameState); } } remove { _stateUpdated -= value; } } public DefaultCommandsExecutor(IGameStateManager gameStateManager) { _gameStateManager = gameStateManager; } public void Execute(IGameStateCommand command) { command.Execute(_gameStateManager.GameState); // these lines added if (_stateUpdate != null) { _stateUpdated(_gameStateManager.GameState); } } private readonly IGameStateManager _gameStateManager; // this line added private Action<GameState> _stateUpdated; } It is worth paying attention to the implementation of the event. Since the executor fumbles the state only inside the event, it is important to immediately pull it when subscribing.
Now, finally, update the View.
public class CoinsView : MonoBehaviour { public Text currencyText; [Inject] public void Init(IGameStateCommandsExecutor commandsExecutor) { _commandsExecutor = commandsExecutor; _commandsExecutor.stateUpdated += UpdateView; } public void AddCoins() { var cmd = new AddCoinsCommand(Random.Range(1, 100)); _commandsExecutor.Execute(cmd); } public void RemoveCoins() { var cmd = new AddCoinsCommand(-Random.Range(1, 100)); _commandsExecutor.Execute(cmd); } public void UpdateView(GameState gameState) { currencyText.text = "Coins: " + gameState.coins; } private void OnDestroy() { _commandsExecutor.stateUpdated -= UpdateView; } private IGameStateCommandsExecutor _commandsExecutor; } IGameStateManager is no longer needed for View, since UpdateView takes a GameState as a parameter. Great, got rid of excess dependence! UpdateView itself, we subscribe to an event in the IGameStateCommandsExecutor . It will be called at any state change. Also, we do not forget to unsubscribe from the event in OnDestroy.
Here is such an approach. Pretty clean. Not intricate. Now it is impossible to forget to call UpdateView in some place, under some damn condition, which is reproduced only in a certain phase of the moon.
Well. Breathed out, and we go on, there are even more buns.
Use command history as a time machine for debugging complex logic
How do you test bugs? Run the application, and follow the steps to reproduce the bug. Often these steps are performed manually, we walk along the UI, poke buttons, everything.
Nothing, if the bug is simple, or the conditions of the playback of the bug are easy to repeat But what if the bug is tied to network logic and time. For example, in the game there is any event going for 10 minutes. Bug occurs upon completion of the event.
Each test iteration will take at least 10 minutes. Usually you need several iterations, and between them you need to fix something.
I will show an interesting technique using the above pattern, which will save you from some headache.
In the code from the previous paragraph, a bug has clearly crept in. After all, the number of coins can be negative. Of course, the case is far from the most difficult, but I hope you have a good imagination.
Imagine that the logic is complex and time-consuming to reproduce the bug every time. But here we are, or the tester accidentally stumbled upon it. What if this bug could be "saved"?
Now the trick itself: let's keep the state that was at the start of the game, as well as the entire history of the teams performed on it during the game session.
This data is enough to reproduce the bug as many times as necessary in a split second. At the same time, there is even no need to run the UI. After all, all modifications of the broken state are stored in history. This is like a small integration test case.
We proceed to the implementation. Since this solution assumes a slightly more advanced serialization, such as interface serialization, JsonUtility will not be enough. Therefore I will put Json.Net for Unity from the asset store.
First, let's make a debug version of IGameStateManager , which copies the “initial” state of the game into a separate file. That is, the condition that was at the time of launching the game.
public class DebugGameStateManager : LocalGameStateManager { public override void Load() { base.Load(); File.WriteAllText(BACKUP_GAMESTATE_PATH, JsonUtility.ToJson(GameState)); } public void SaveBackupAs(string name) { File.Copy( Path.Combine(Application.persistentDataPath, "gameStateBackup.json"), Path.Combine(Application.persistentDataPath, name + ".json"), true); } public void RestoreBackupState(string name) { var path = Path.Combine(Application.persistentDataPath, name + ".json"); Debug.Log("Restoring state from " + path); GameState = JsonUtility.FromJson<GameState>(File.ReadAllText(path)); } private static readonly string BACKUP_GAMESTATE_PATH = Path.Combine(Application.persistentDataPath, "gameStateBackup.json"); } Behind the scenes, I left the conversion methods of the parent class to virtual. I'll leave it to you as an exercise. In addition, the SaveBackupAs method has been SaveBackupAs , which will be needed later on so that we can save our "snapshots" with a specific name.
Now we will create a debug version of the executor who is able to keep the history of commands, and generally retains a full cast of the form “initial state + commands”.
public class DebugCommandsExecutor : DefaultCommandsExecutor { public IList<IGameStateCommand> commandsHistory { get { return _commands; } } public DebugCommandsExecutor(DebugGameStateManager gameStateManager) : base(gameStateManager) { _debugGameStateManager = gameStateManager; } public void SaveReplay(string name) { _debugGameStateManager.SaveBackupAs(name); File.WriteAllText(GetReplayFile(name), JsonConvert.SerializeObject(new CommandsHistory { commands = _commands }, _jsonSettings)); } public void LoadReplay(string name) { _debugGameStateManager.RestoreBackupState(name); _commands = JsonConvert.DeserializeObject<CommandsHistory>( File.ReadAllText(GetReplayFile(name)), _jsonSettings ).commands; _stateUpdated(_gameStateManager.GameState); } public void Replay(string name, int toIndex) { _debugGameStateManager.RestoreBackupState(name); LoadReplay(name); var history = _commands; _commands = new List<IGameStateCommand>(); for (int i = 0; i < Math.Min(toIndex, history.Count); ++i) { Execute(history[i]); } _commands = history; } private string GetReplayFile(string name) { return Path.Combine(Application.persistentDataPath, name + "_commands.json"); } public override void Execute(IGameStateCommand command) { _commands.Add(command); base.Execute(command); } private List<IGameStateCommand> _commands = new List<IGameStateCommand>(); public class CommandsHistory { public List<IGameStateCommand> commands; } private readonly JsonSerializerSettings _jsonSettings = new JsonSerializerSettings() { TypeNameHandling = TypeNameHandling.All }; private readonly DebugGameStateManager _debugGameStateManager; } Here you can see that the standard JsonUtility capabilities would not be enough. I had to set TypeNameHandling for the serialization settings so that when loading / saving the nugget, the commands are deserialized into typed objects, because the logic is tied to them.
What else is remarkable about this executor?
- Keeps every team in history.
- Able to save and restore the history of teams and state games
- The key Replay method "loses" all teams, starting with the initial state of the game, and up to the team with the specified index
I would not want a release project to have a history of memory clogging, so I will register this service with DI only if there is a DEBUG define.
public class BindingsInstaller : MonoInstaller<BindingsInstaller> { public override void InstallBindings() { Container.Bind<Loader>().FromNewComponentOnNewGameObject().AsSingle().NonLazy(); #if DEBUG Container.Bind<IGameStateManager>().To<DebugGameStateManager>().AsSingle(); Container.Bind<DebugGameStateManager>().AsSingle(); Container.Bind<IGameStateCommandsExecutor>().To<DebugCommandsExecutor>().AsSingle(); #else Container.Bind<IGameStateManager>().To<LocalGameStateManager>().AsSingle(); Container.Bind<IGameStateCommandsExecutor>().To<DefaultCommandsExecutor>().AsSingle(); #endif } } Oh yeah, you need to prepare the command for serialization:
public class AddCoinsCommand : IGameStateCommand { public AddCoinsCommand(int amount) { _amount = amount; } public void Execute(GameState gameState) { gameState.coins += _amount; } public override string ToString() { return GetType().ToString() + " " + _amount; } [JsonProperty("amount")] private int _amount; } JsonProperty, . ToString(), .
, "DEBUG" Player Settings -> Other Settings -> Scripting define symbols.
/ Unity. EditorWindow.
public class CommandsHistoryWindow : EditorWindow { [MenuItem("Window/CommandsHistoryWindow")] public static CommandsHistoryWindow GetOrCreateWindow() { var window = EditorWindow.GetWindow<CommandsHistoryWindow>(); window.titleContent = new GUIContent("CommandsHistoryWindow"); return window; } public void OnGUI() { // this part is required to get // DI context of the scene var sceneContext = GameObject.FindObjectOfType<SceneContext>(); if (sceneContext == null || sceneContext.Container == null) { return; } // this guard ensures that OnGUI runs only when IGameStateCommandExecutor exists // in other words only in runtime var executor = sceneContext.Container.TryResolve<IGameStateCommandsExecutor>() as DebugCommandsExecutor; if (executor == null) { return; } // general buttons to load and save "snapshot" EditorGUILayout.BeginHorizontal(); _replayName = EditorGUILayout.TextField("Replay name", _replayName); if (GUILayout.Button("Save")) { executor.SaveReplay(_replayName); } if (GUILayout.Button("Load")) { executor.LoadReplay(_replayName); } EditorGUILayout.EndHorizontal(); // and the main block which allows us to walk through commands step by step EditorGUILayout.LabelField("Commands: " + executor.commandsHistory.Count); for (int i = 0; i < executor.commandsHistory.Count; ++i) { var cmd = executor.commandsHistory[i]; EditorGUILayout.BeginHorizontal(); EditorGUILayout.LabelField(cmd.ToString()); if (GUILayout.Button("Step to")) { executor.Replay(_replayName, i + 1); } EditorGUILayout.EndHorizontal(); } } private string _replayName; } . ?
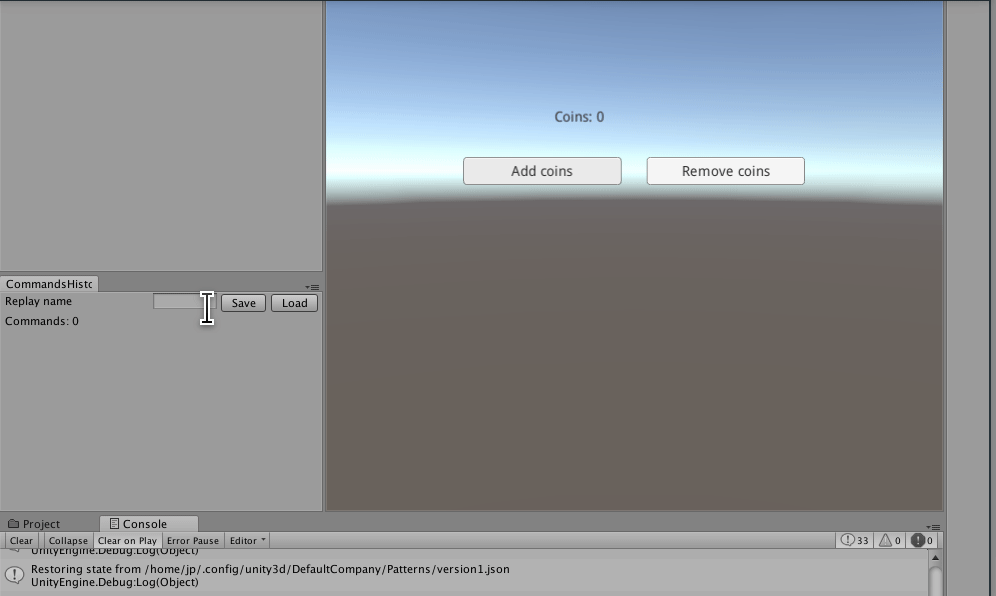
"initial" , , .
, , , .
version1.
Step to, "" , .
. . " " , . , "negativeCoins" save.
, negativeCoins.json negativeCoins_commands.json, . , negativeCoins, Load . .
, , UI, . .
. , "", , , .
, .
public class AddCoinsCommand : IGameStateCommand { public AddCoinsCommand(int amount) { _amount = amount; } public void Execute(GameState gameState) { gameState.coins += _amount; // this is the fix if (gameState.coins < 0) { gameState.coins = 0; } } public override string ToString() { return GetType().ToString() + " " + _amount; } [JsonProperty("amount")] private int _amount; } version1 , .

, . Victory!
Command. . , .
:
UI, Flux, UI.
, , , , , .
, , , , . , /. =).
. , , UI, , . , GameStateManager'a, UI .
UI — , . , , . .
, =), .
')
Source: https://habr.com/ru/post/350630/
All Articles