Unit-testing screenshots: break the sound barrier. Decryption report
It is fashionable to test the layout recourse with screenshots, this will not surprise anyone. We have long wanted to introduce this type of testing at home. All the time confused questions of ease of support and application, but to a greater extent - the bandwidth of solutions. I wanted it to be something easy to use and quick to use. Ready solutions did not fit, and we undertook to make our own.
Under the cut, we’ll tell you what came out of it, what tasks were solved, and how we achieved that screening testing practically didn’t affect the total test time. This post is a transcript of the report that sounded at HolyJS 2017 Moscow . You can watch the video by the link , and read and watch the slides on.
Hello everyone, my name is Roman. I work in Avito. I do many things, including open-source, the author of several projects: CSSTree , basis.js , rempl , CSSO Maintainer and others .
Today I will talk about unit testing with screenshots. This report is a story about the search for engineering solutions. I will not give recipes for all occasions. But I will share the direction of thought: where to go to make everything good.
Bicycles are not always bad. Those who know me, remember that I often try to do something new, despite the fact that there are a lot of things ready. What does this lead to? If you do not give up, you can find solutions, and not at all where you were looking for them.
Since we have a screenshots theme today, I’ll say that you can speed up testing not only by optimizing the code. The problem can not only be in it. And experimenting, you can get interesting moves and solutions.
Modern front-tenders usually come up with NPM when they encounter a problem, try StackOverflow and try to use ready-made solutions. But not always npm install can help. “The spirit of adventurism has disappeared in us”: we rarely try to do something on our own, dig deep.

We will fix it.
Unit Testing: Tools
Testing can be different: unit, functional, integration ... In this report, I will talk about unit testing of components or some blocks that we want to test for layout regression.
We wanted to deal with this topic for a long time, but everyone didn’t get a hand. We needed such a solution to make it simple, cheap and fast.
What are the options?
- Ready services;
- Finished tools, for example Gemini;
- You can write your own.
Services do not suit us for certain reasons: we do not want to use external services, we want everything to be inside.
What about the finished tools? They are, there are several of them, but they are usually focused on walking through the urls and “clicking” certain blocks. This did not quite suit us - we wanted to test exactly the components and blocks, their state, making screenshots.
There is a Gemini tool from Yandex, a good thing, but it looks like a spaceship. It is difficult to start, configure, you have to write a lot of code. Perhaps this is not a problem. But for me the problem was that by taking a simple test from the readme, copying it a hundred times, I got this figure: 100 images of 282x200 are checked for about two minutes. It is too long.
As a result, they began to make their own. About this will be today's report. I'll run ahead: I'll show you what we did.
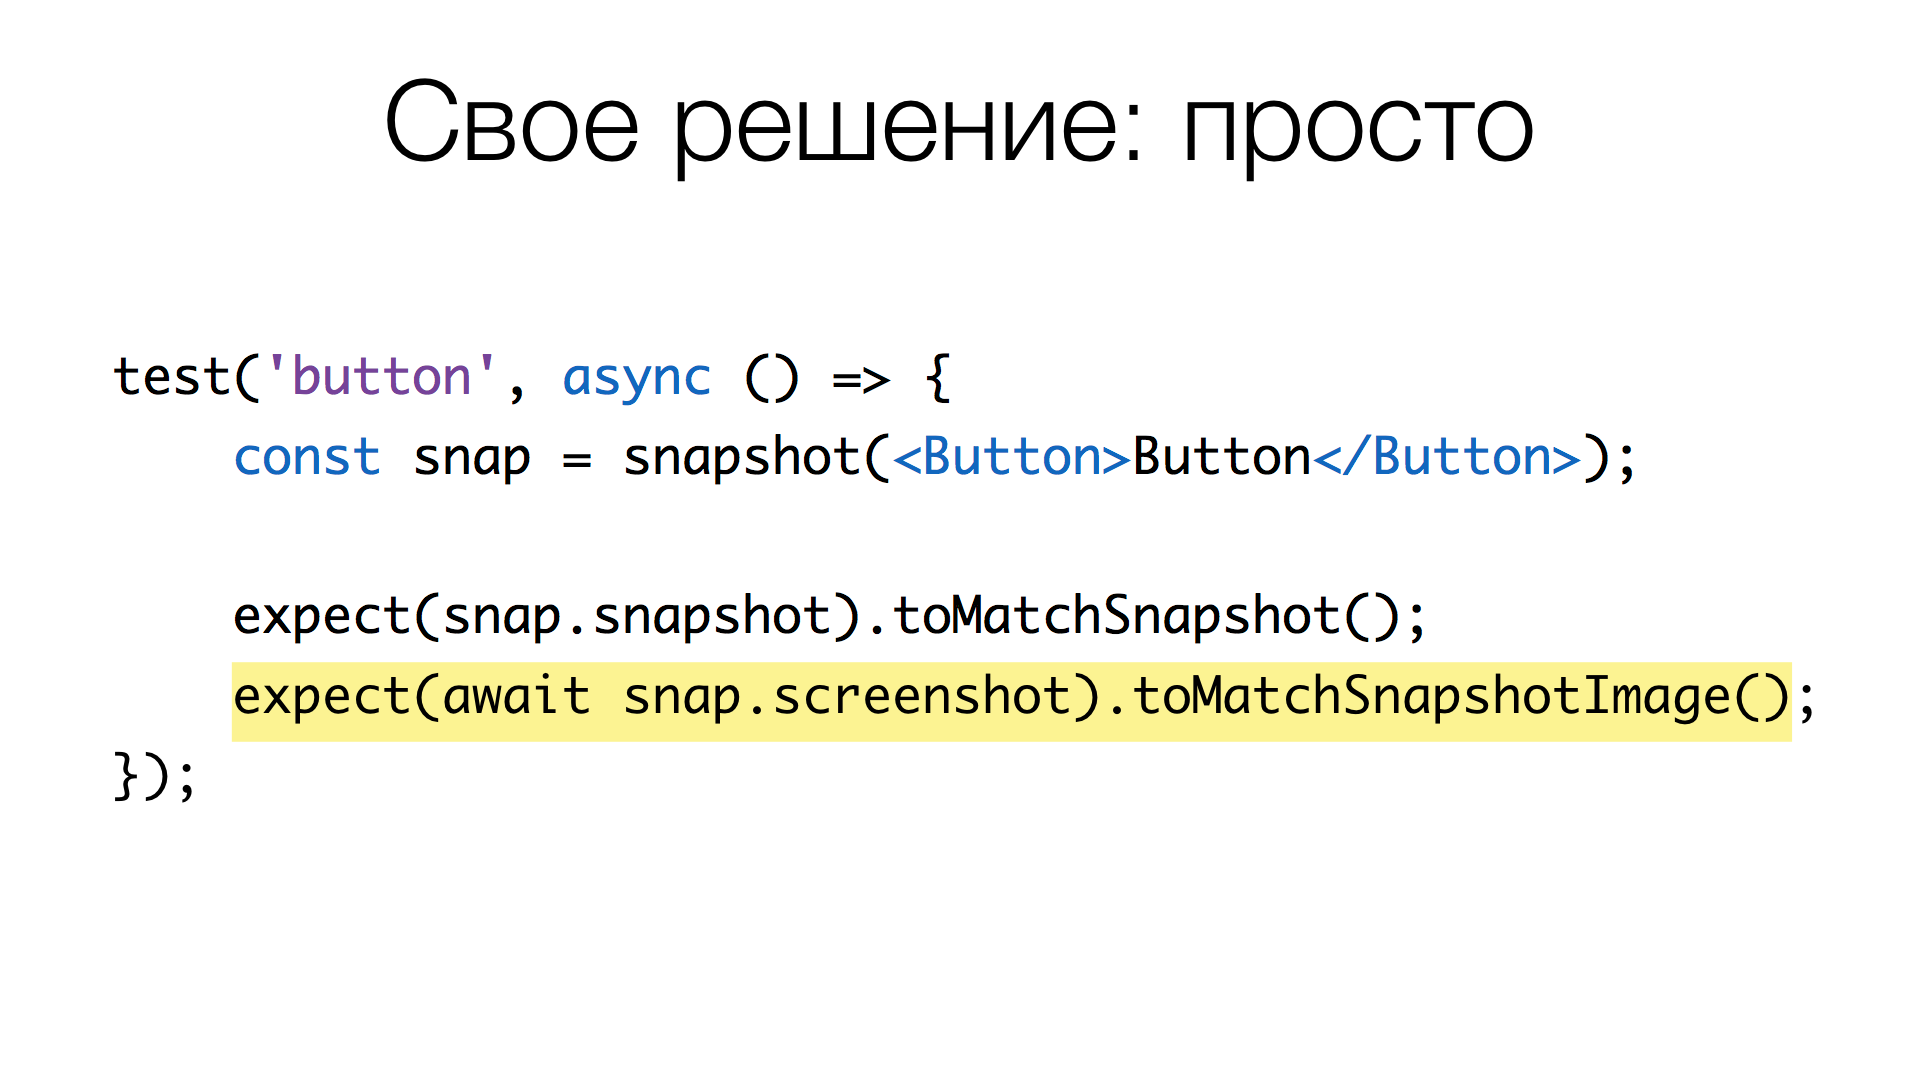
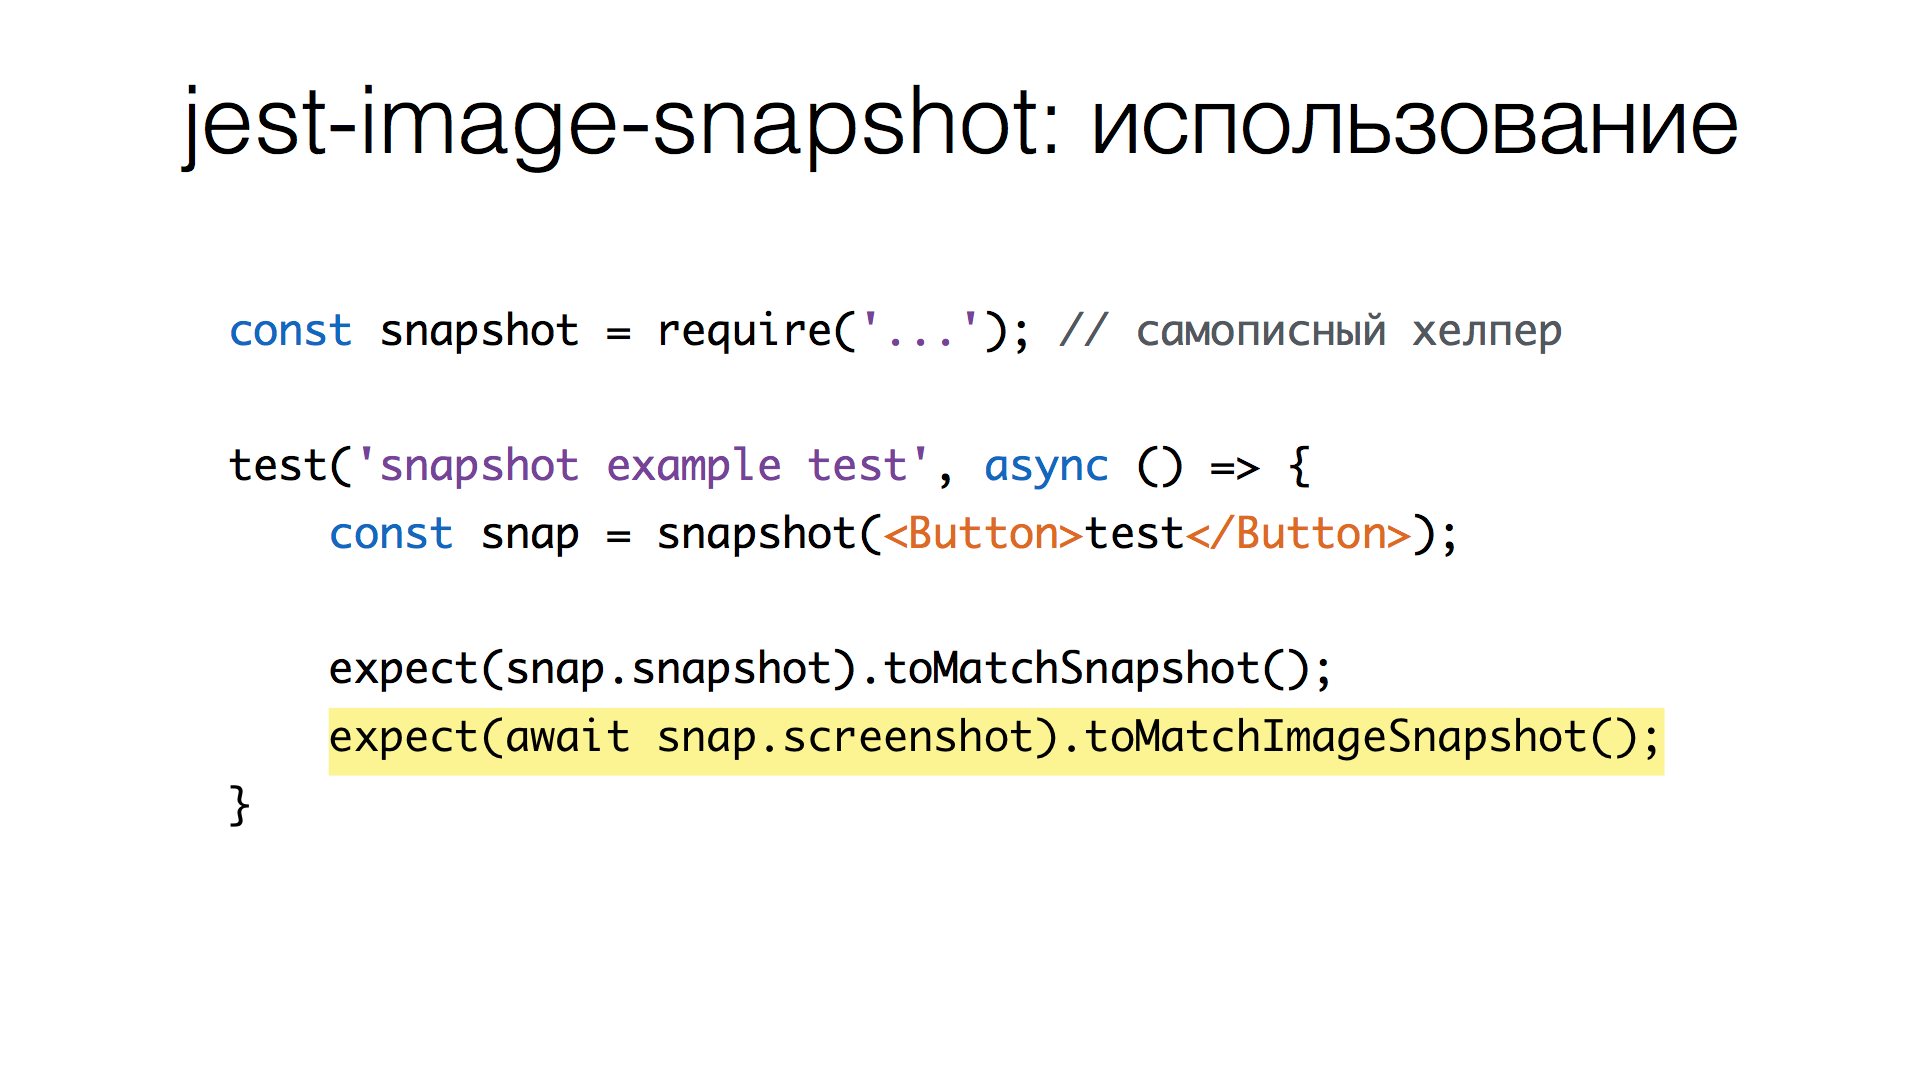
So, having a certain component markup test on React, we add one line in which we take a screenshot and call the "magic" method toMatchSnapshotImage() . That is, one additional line in the test - and we among other things check the status of the component with a screenshot.
In figures: if two identical screenshots of 800x600 are compared, then, in our solution, the comparison takes about 0 ms. If the screenshots are slightly different, and you need to count the pixels that are different, it takes about 100 ms. Updating screenshots, getting pictures when we initialize the “base” of reference screenshots, takes about 25 ms per screenshot. A lot or a little - see later.
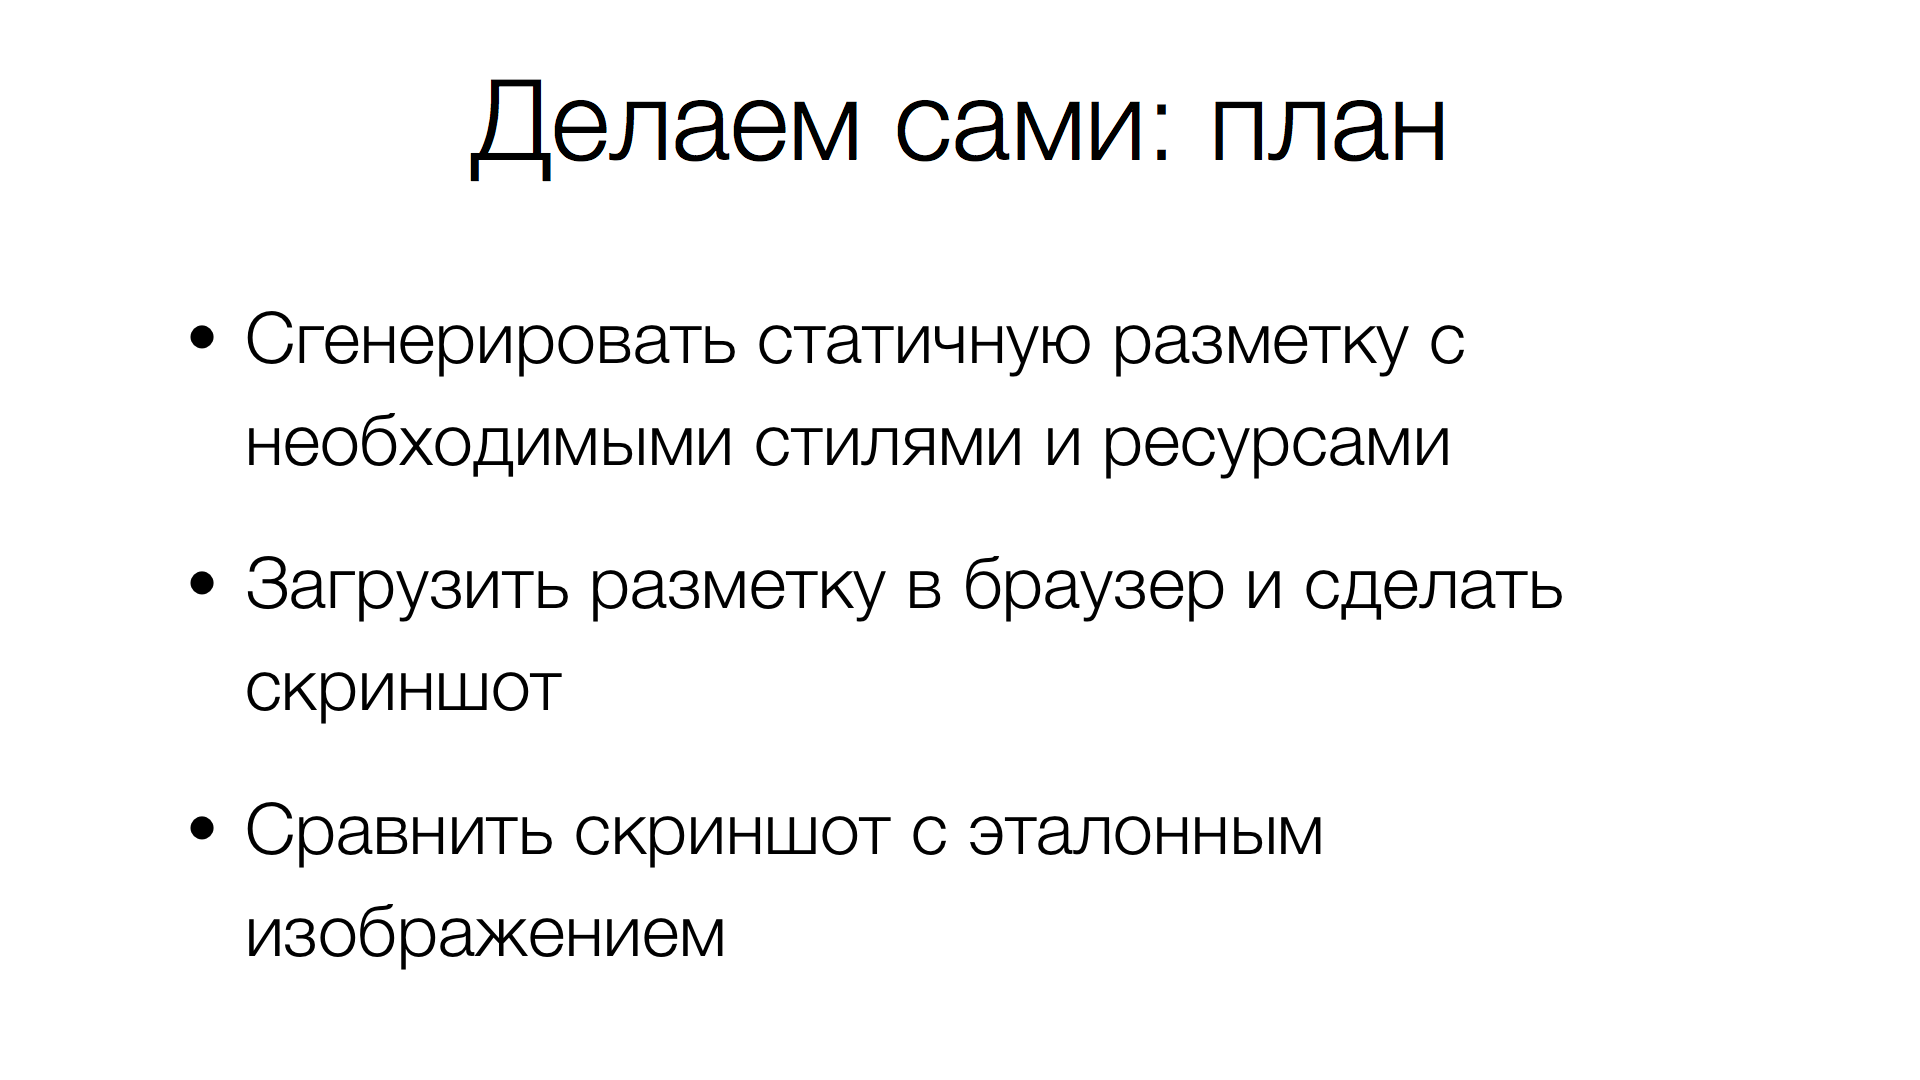
If we make our own decision, which is able to take a screenshot from the current markup and compare it with the standard, what needs to be done to do this? First, get a static markup of the component with the necessary styles and resources, load it all into a browser, take a screenshot and compare it with a reference screenshot. Not so difficult.
Markup generation
Let's start by generating the markup. It is divided into several steps. First, generate the HTML component. Then we determine which dependent parts there are: which styles he uses, which images he needs, and so on. We are trying to collect all this into a single HTML document that does not contain references to local resources or files.
HTML generation
HTML generation is highly dependent on the stack you are using. In our case, this is React. Take the ready-made react-dom / server library that allows you to generate a static string, the same HTML that we need.
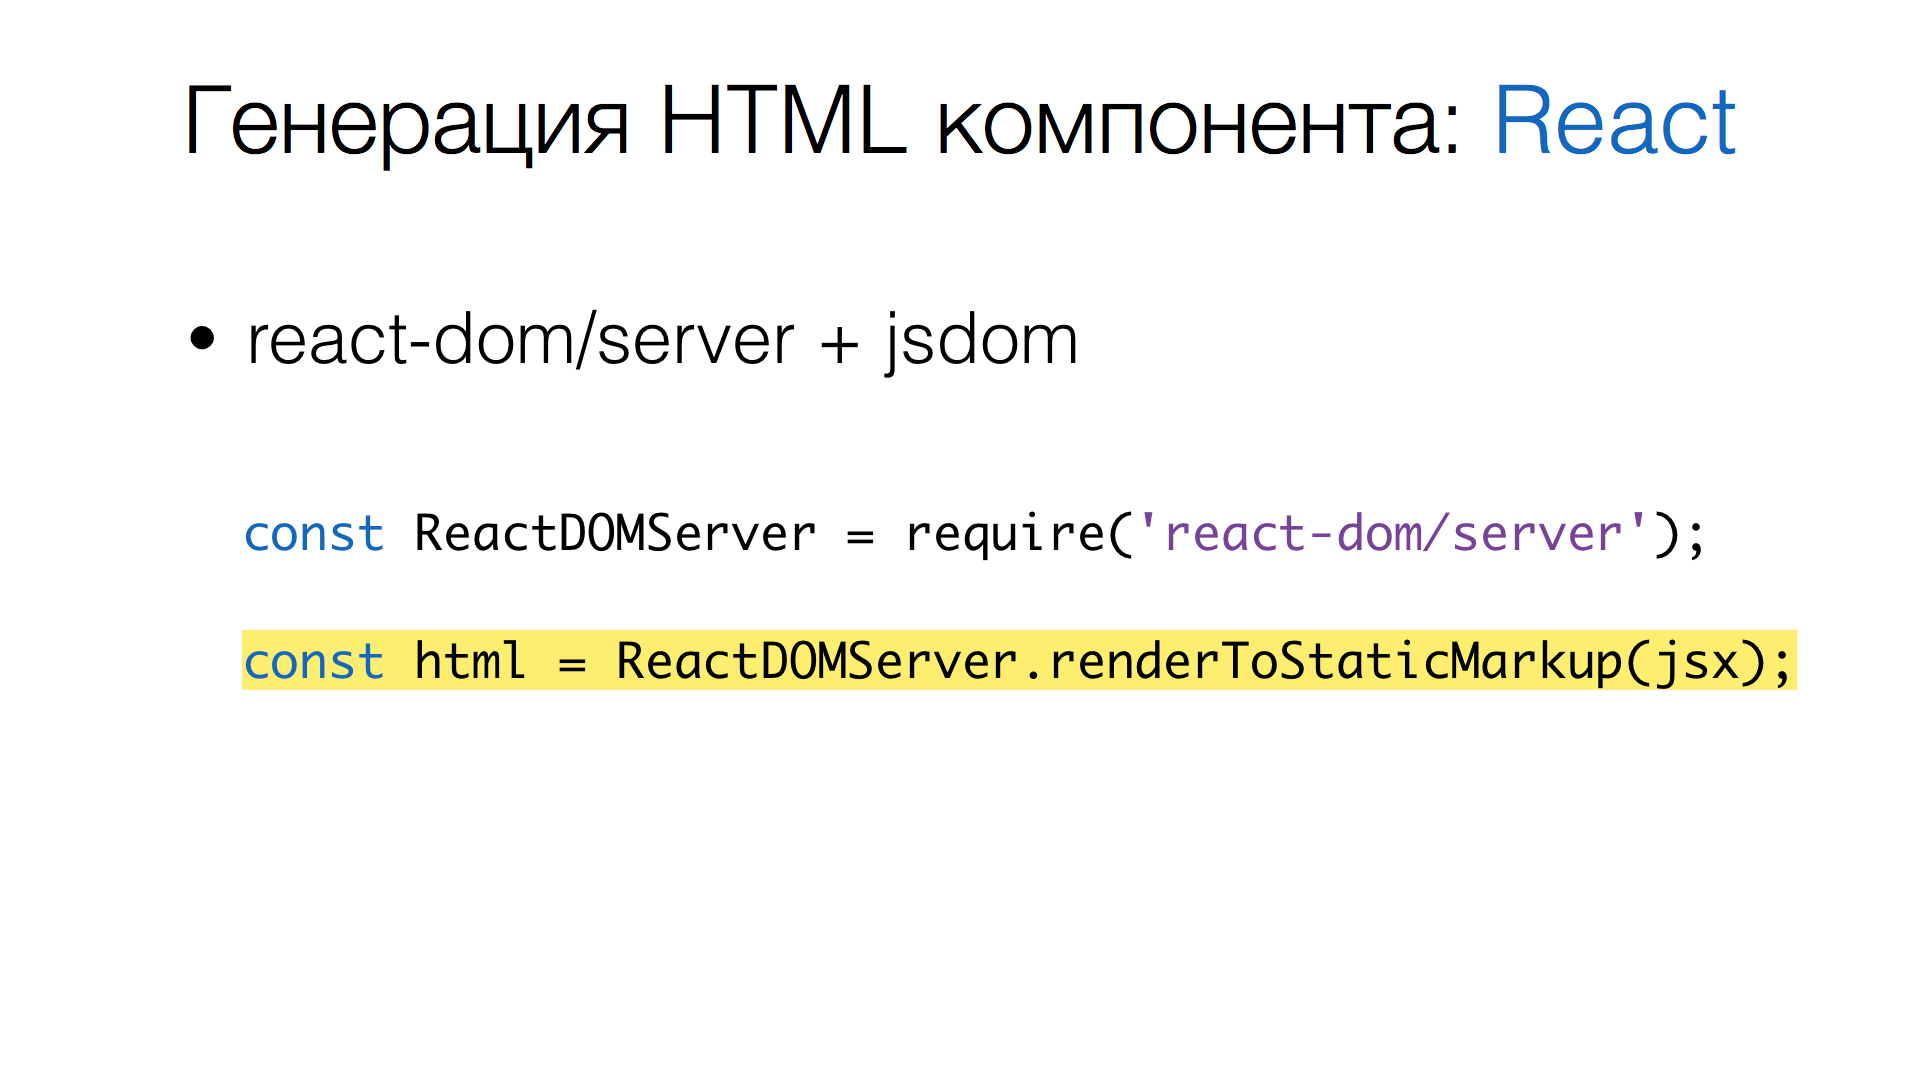
That is, we connect react-dom/server , we call the renderToStaticMarkup() method - we get HTML.
CSS generation
Go ahead: Generate CSS. We already have HTML, but most likely there are still a lot of styles and other resources. All this needs to be collected. What is the action plan here? First, you need to find the files that are connected and used in the components. And convert CSS files so that they do not contain links to resources. That is, to find links to resources and zainlaynit them in the CSS itself. Then it's all glue.
The solution, again, depends on the stack. In our case, we use Jest as a test runner, Babel to convert JavaScript and CSS Modules to describe styles.
First we do a search for CSS files.
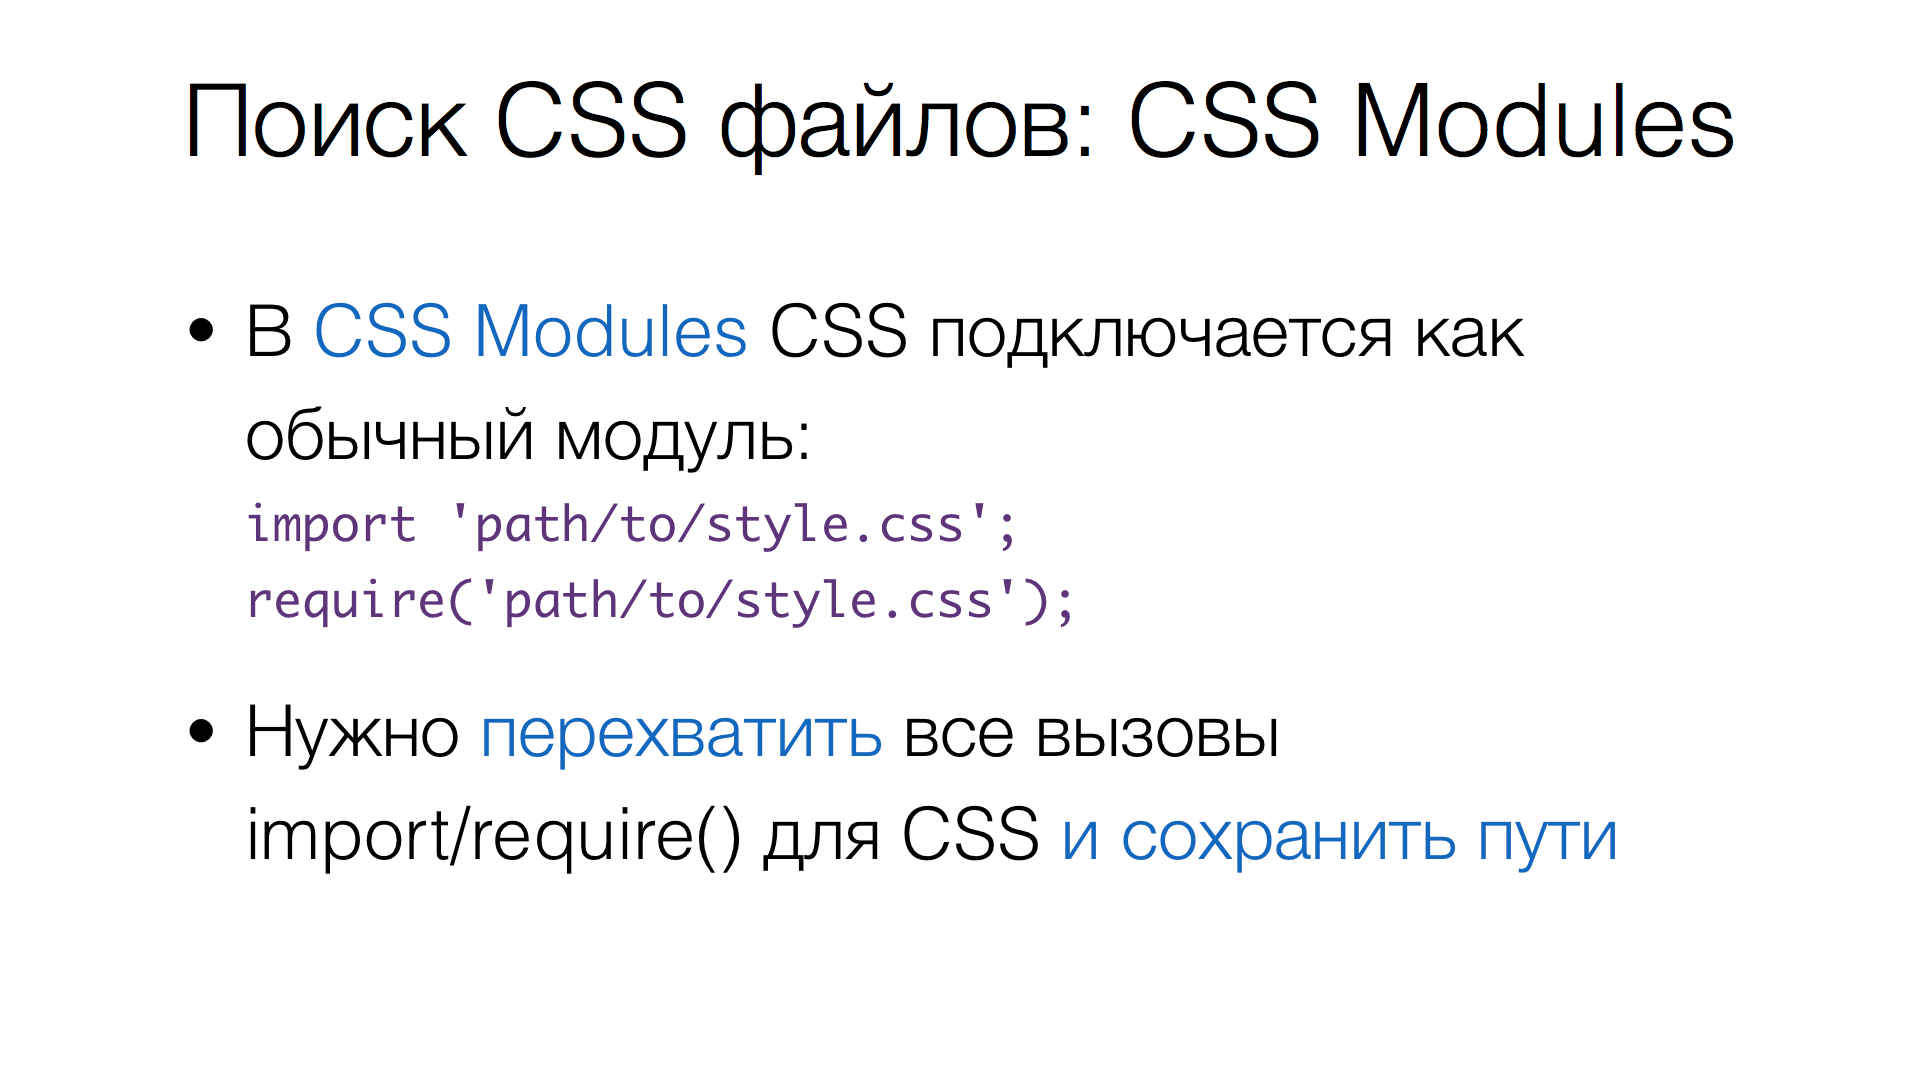
CSS Modules means that CSS is connected in JavaScript as a normal module, that is, either import or require() .
Technically, you need to intercept all such calls and convert them so as to save the paths that were requested.
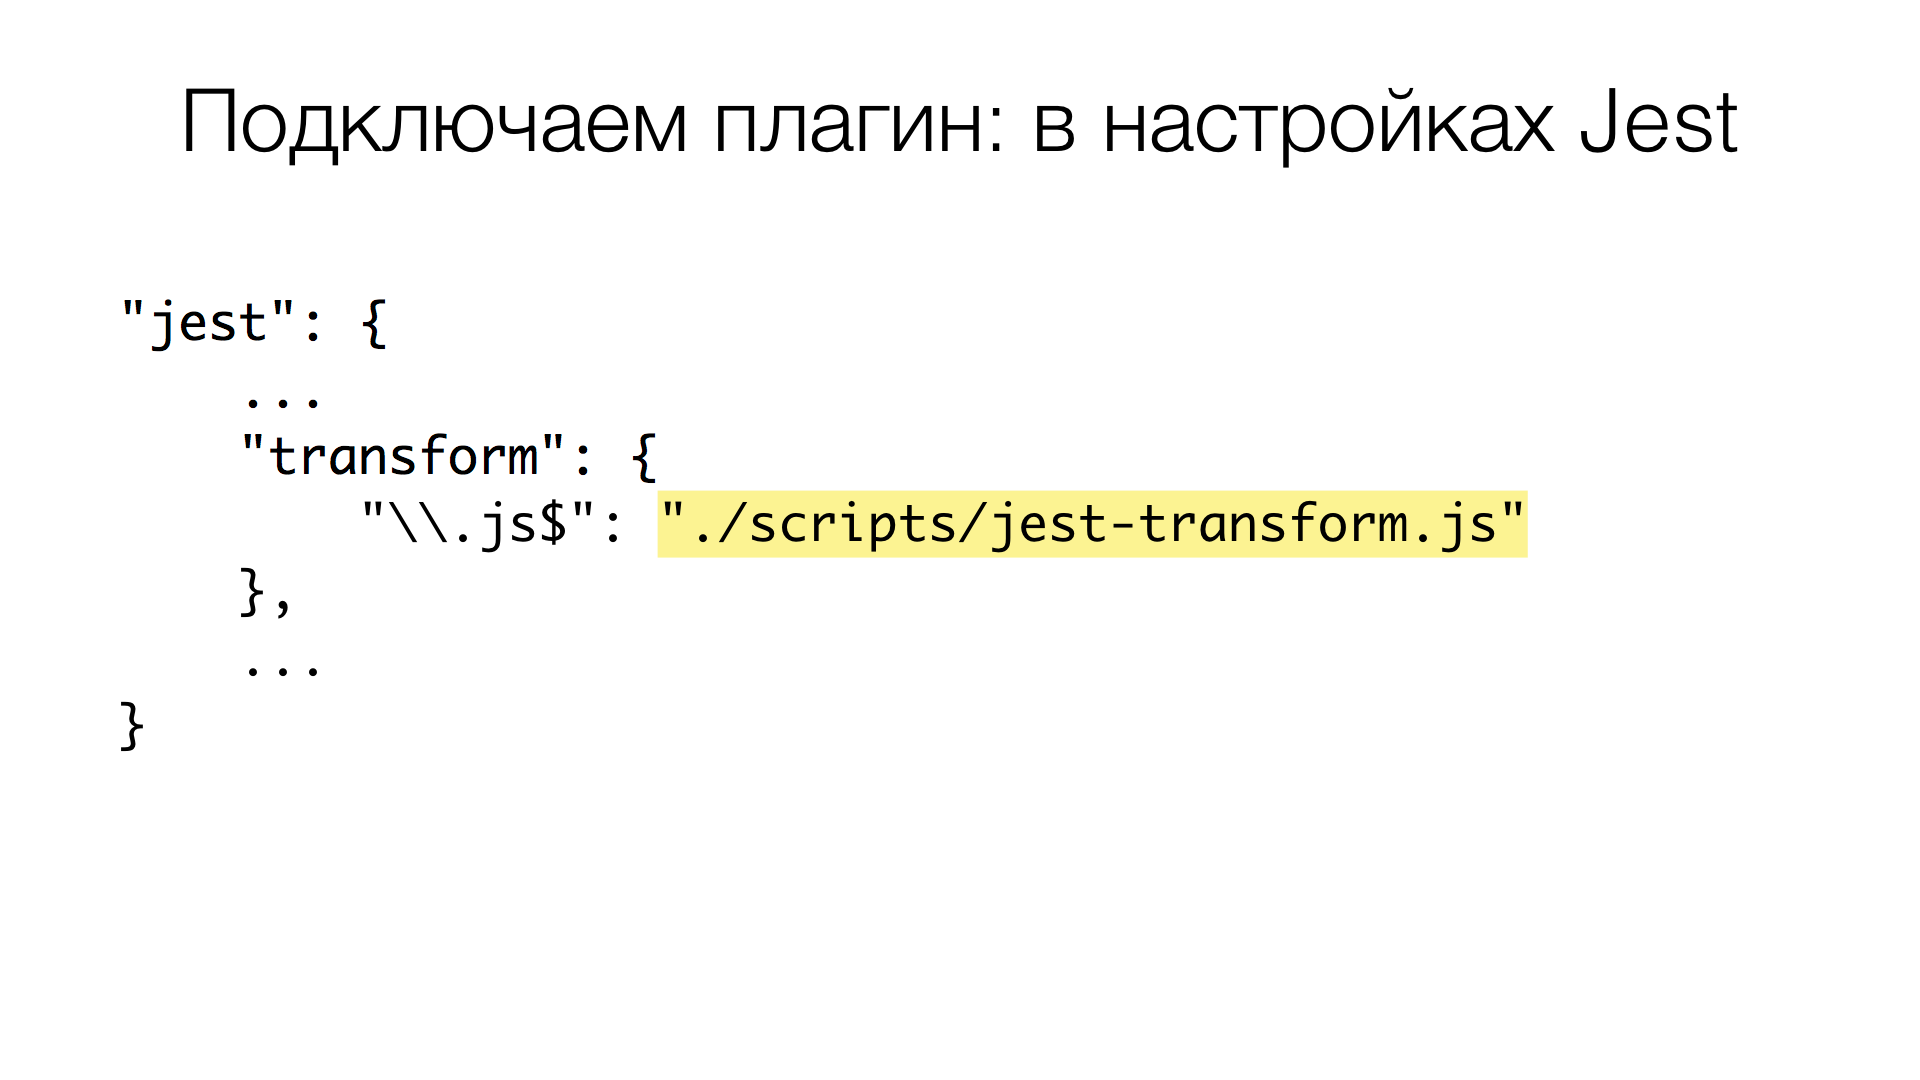
To do this, we wrote a plugin for Babel. Jest has the ability to customize the transformation of JavaScript (perhaps you are already doing this if you use Jest). Using the transform setting, scripts are added to transform the resources that match the rule. In our case, we need JavaScript files.
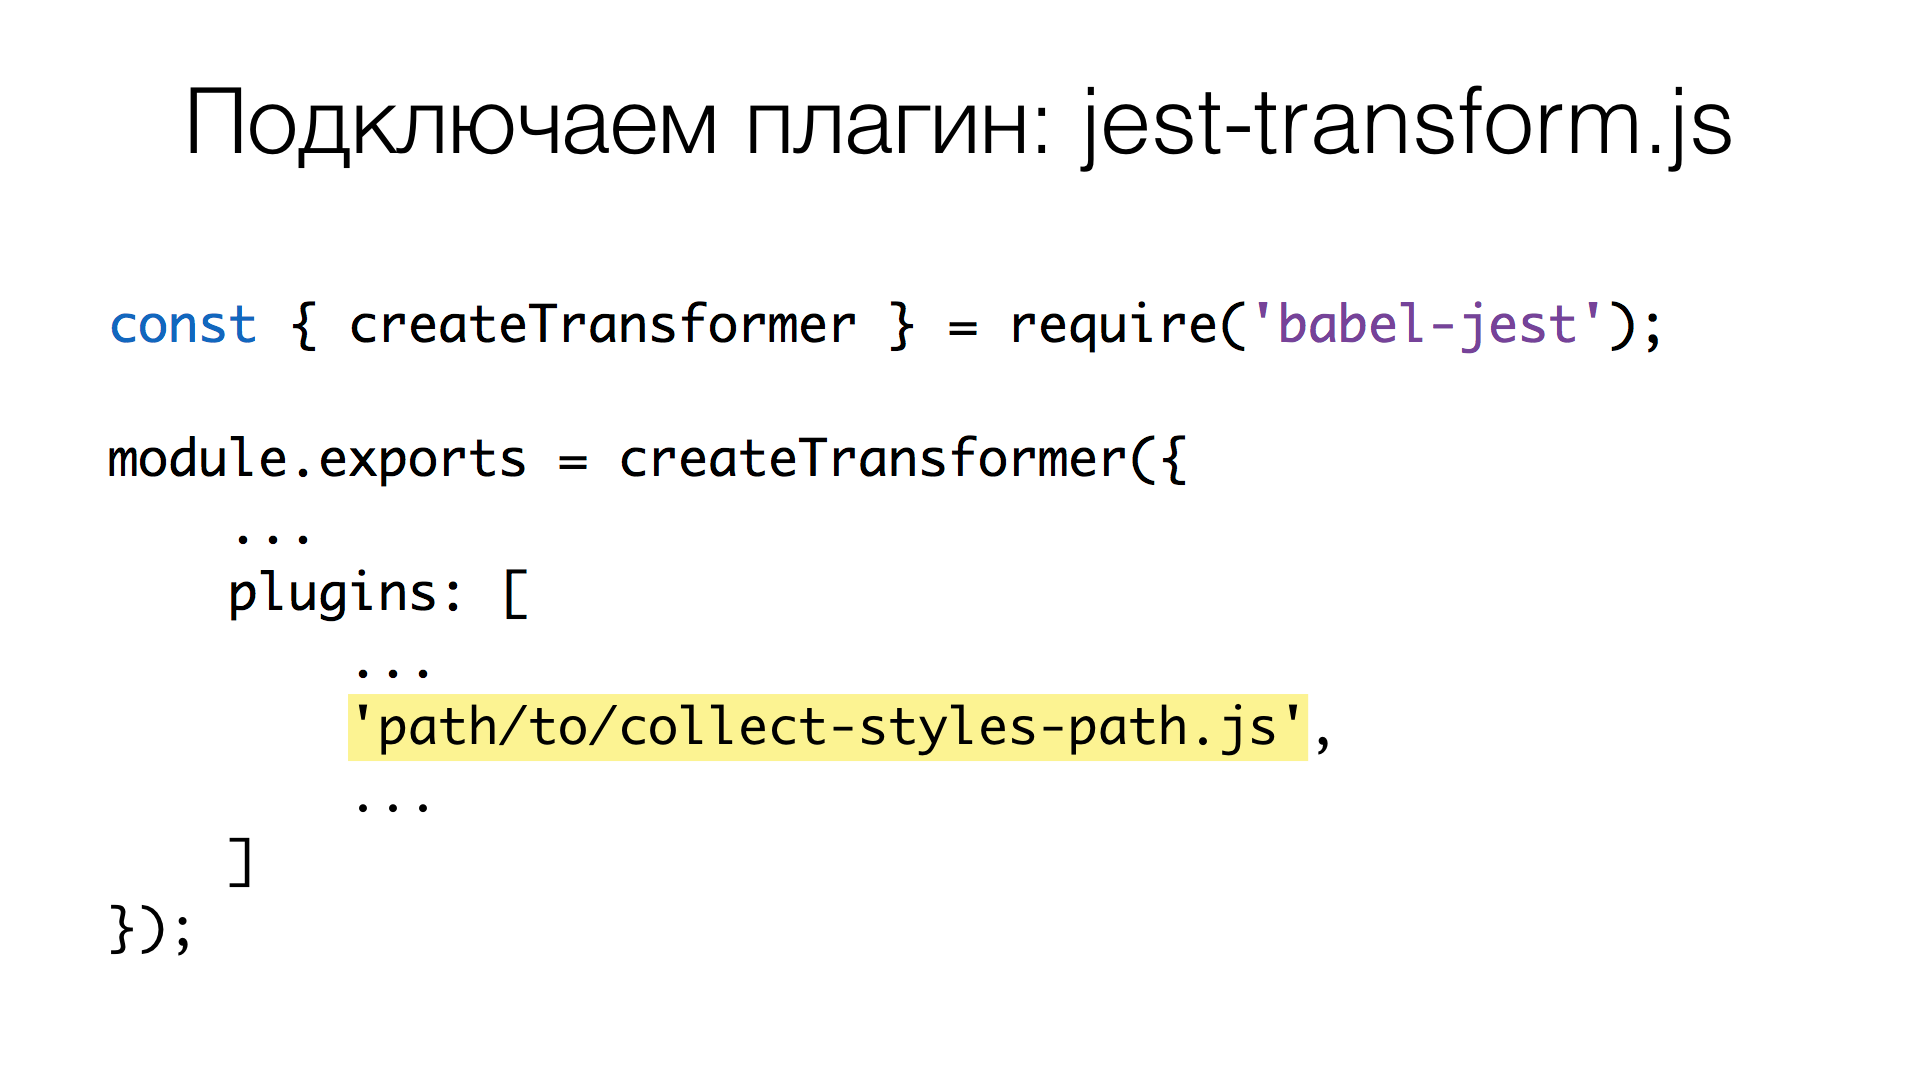
The script creates a transformer using babel-jest . To other settings, we need to add our own plugin that will do the necessary.
The task of the plugin consists of two parts. First, a search is made for all import that are require() to require() , so that it is easier then to look for CSS connections. After that, all require() are replaced with a special function:
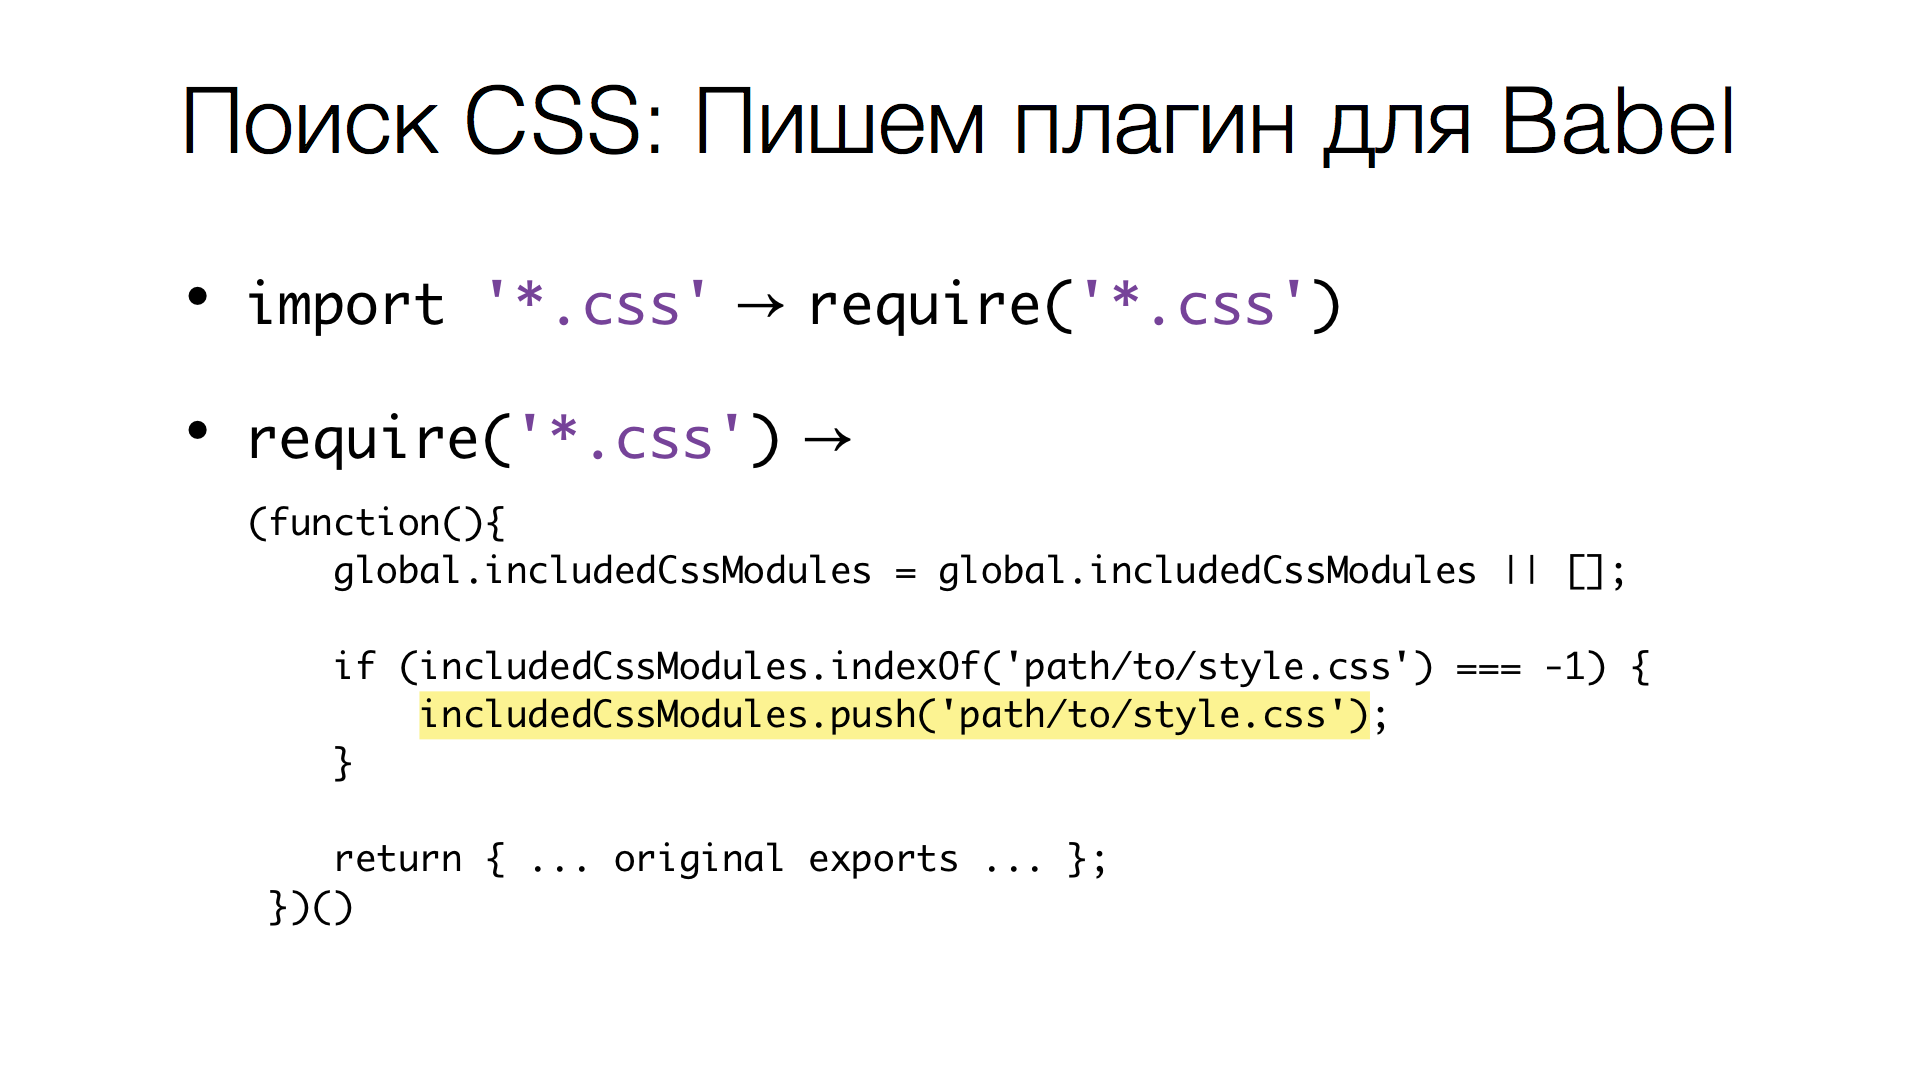
This function initializes the global array to store the paths, adds new paths to this array, and returns the original export that was replaced. The plugin code is 52 lines. The solution can be simplified, but so far it has not been necessary.
At the time of generating the HTML markup component in the array includedCssModules will be all the paths that were requested through require() . All we have to do is convert the paths into the content of these files.
CSS processing
At this stage, we need to bypass all the CSS files, find links to resources in them and zainlaynit them. We also need to turn off the dynamics: if you use animation or some dynamic parts, the result may be different, a screenshot can be made at an unpredictable moment.
Inline resources
To zainlaynit resources, we wrote another plugin. (You can use ready-made, but in this case it turned out to be easier to write your own).
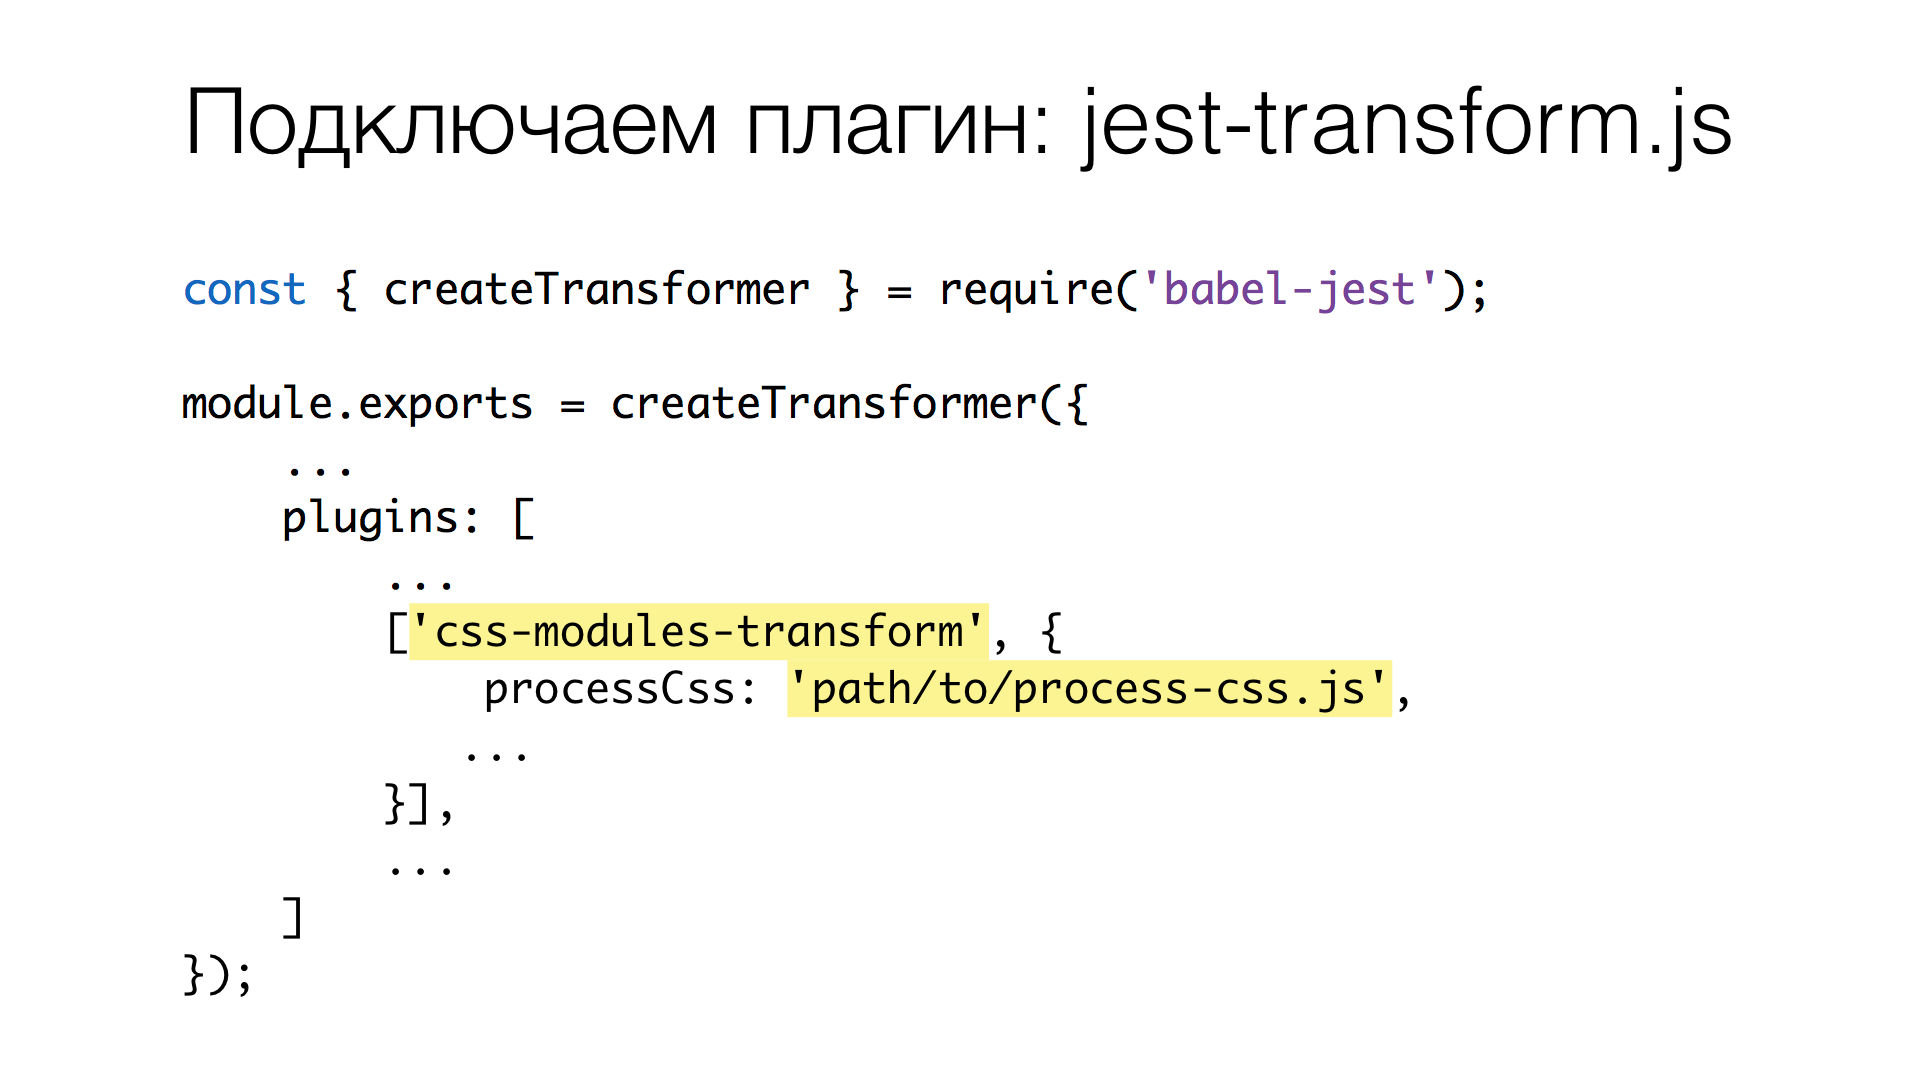
How does all this look? Remember we added a plugin to jest-transform ? Here is the same story, only we use a special plugin for CSS Modules, namely css-modules-transform for babel-jest , which has the ability to customize CSS preprocessing: some script that will convert CSS before it is used.
So, add the path to our plugin in processCss and write the plugin itself. It uses the CSSTree parser. The point is not only that I am its author;) - it is fast, detailed and allows, for example, to search for ways and urles without complex RegExp 's. It is also tolerant of errors: if there are incomprehensible parts in CSS, then nothing will break, just these parts will remain unassembled. But this rarely happens.
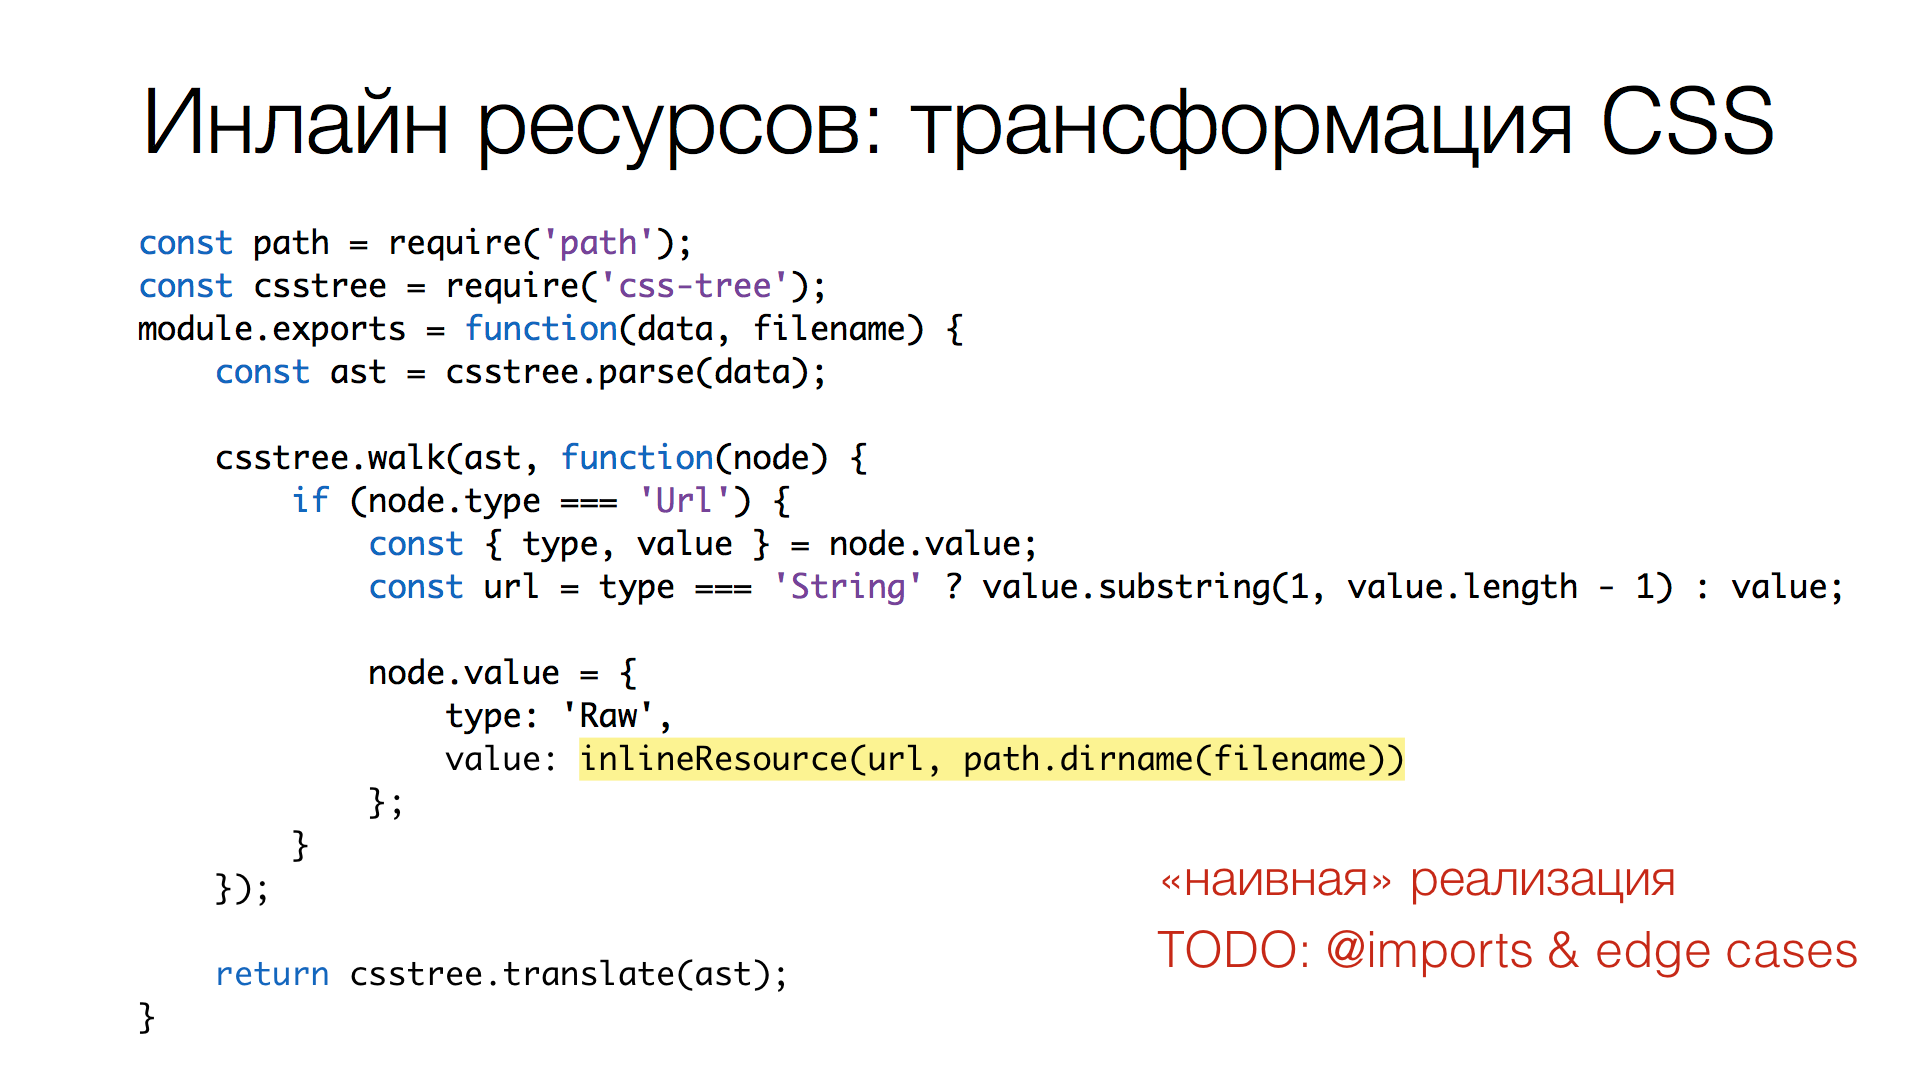
The plugin searches urls in CSS and replaces them with inline resources.
What's going on here? In the first line we get AST, that is, we parse the CSS string into the tree. Next we go around this tree, find the nodes of the Url type, select a value from them and use it as the path to the file that needs to be zainlaynit. In the end, simply call translate , that is, transform the transformed tree back into a string.
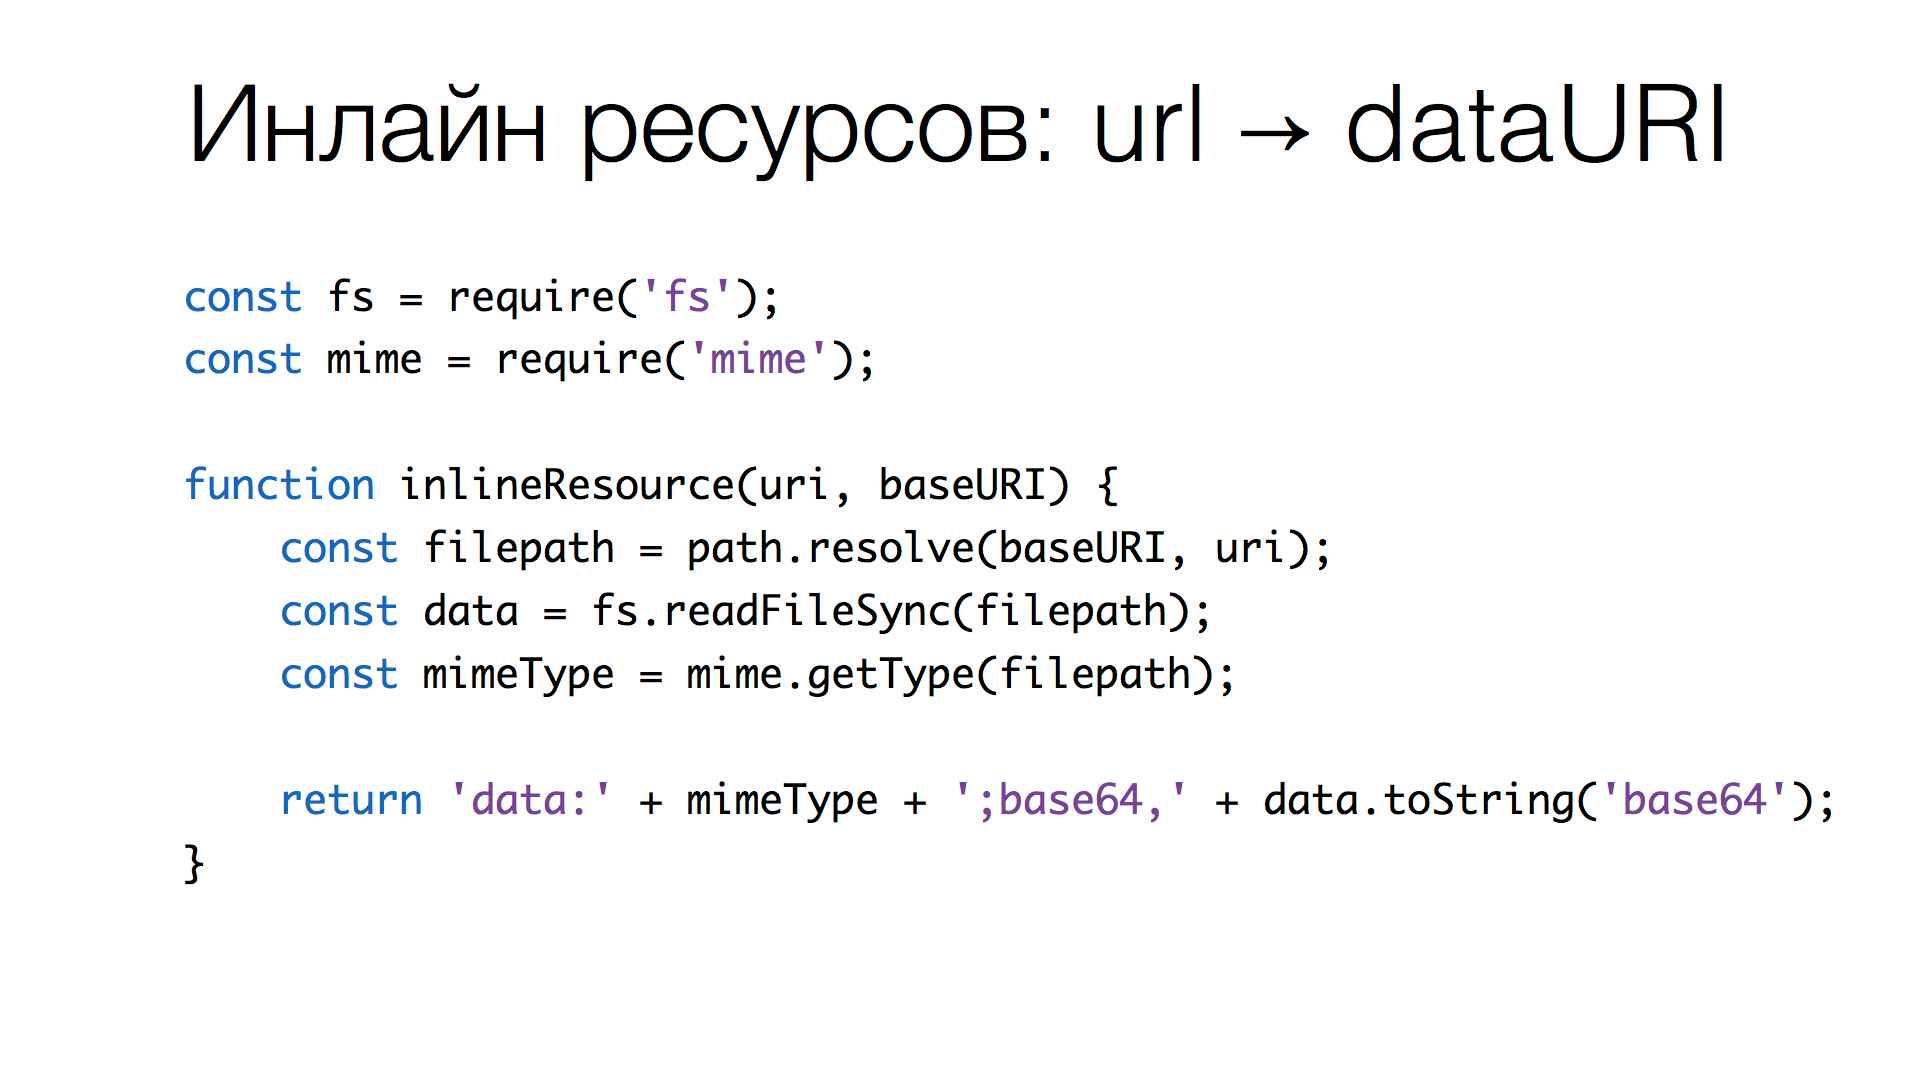
The implementation of inline resources is not as difficult as it may seem:
- take the URI, resolve it relative to the CSS file in which it is used (because the paths are relative);
- read binary data from a file;
- computed by extension mime type;
- generate the resource URI of the resource.
Everything! We zainlaynili resources. The functions described are 26 lines of code that do everything necessary.
What else might be useful to write your own solution: we can expand it, for example, later we added the conversion of animated GIF to static images. But more on that later.
Getting rid of the dynamics
The next step we need to get rid of the dynamics. How to freeze an animation and where does it happen?
Dynamics appears in:
- CSS Transitions;
- CSS Animations;
- a carriage in the input fields that flashes and may disappear or appear at any time;
- animated gif and a number of other moments.
Let's try to “shut off” all this so that the same result is always obtained.
CSS Transition
Zero all transitions-delay and transition-duration .

In this case, all transition will be guaranteed to be in the final state.
CSS Animation
We do the same with CSS animations.
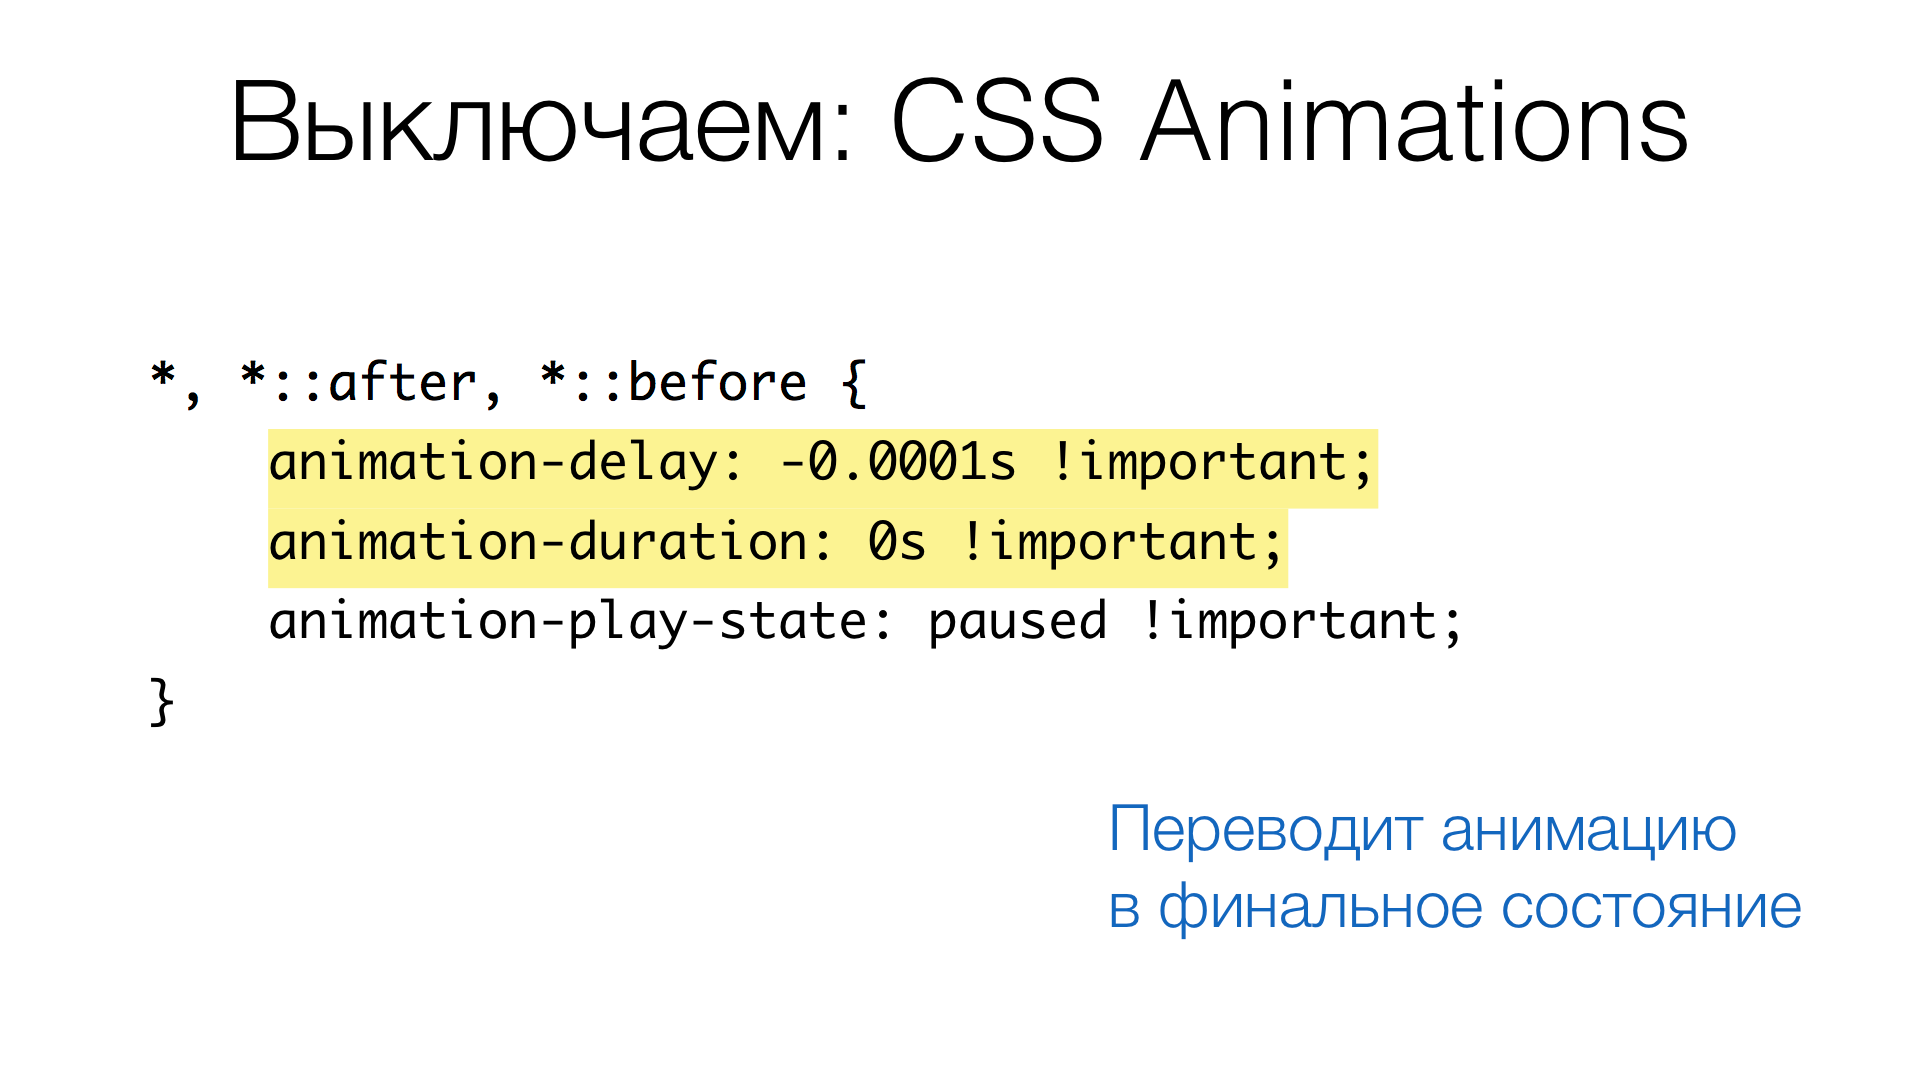
Here you can see this hack:
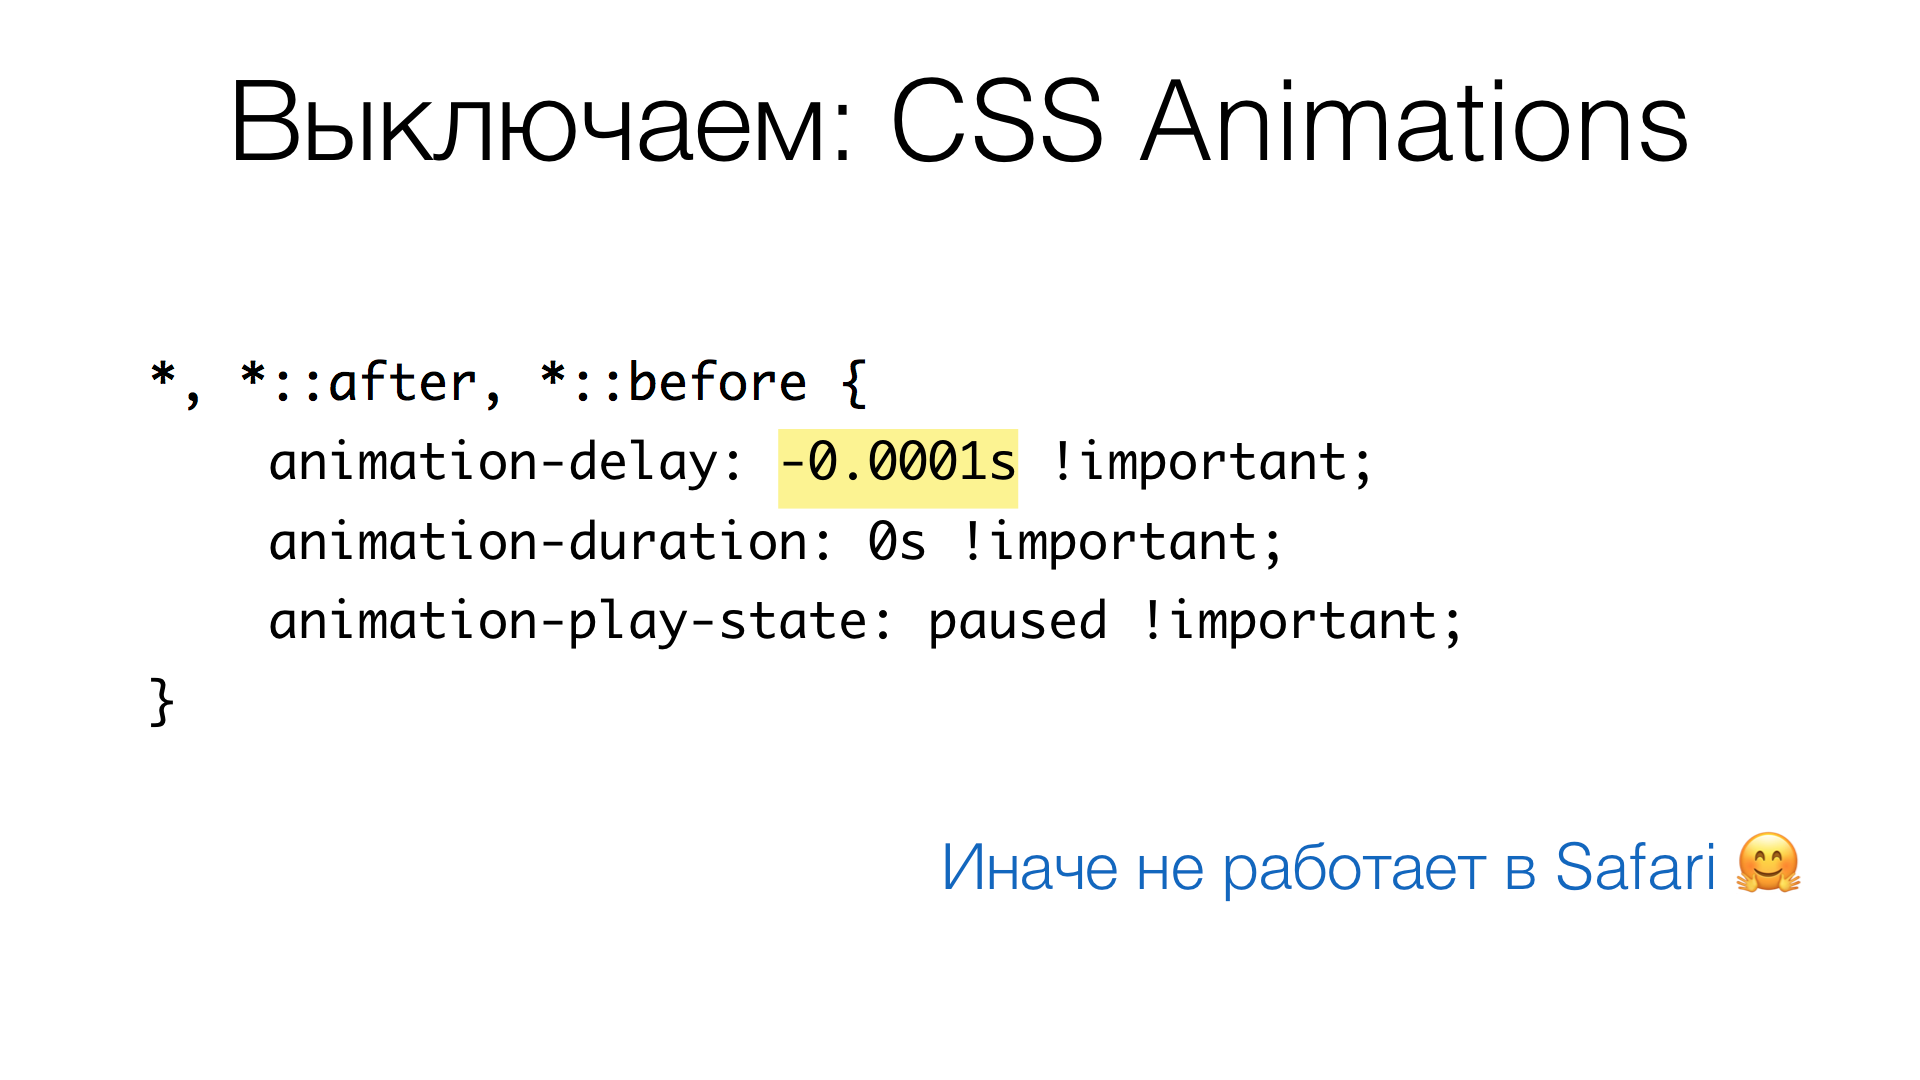
Note the value of the animation-delay: –0.0001s . The fact is that without this in Safari, animations will not have a final state.
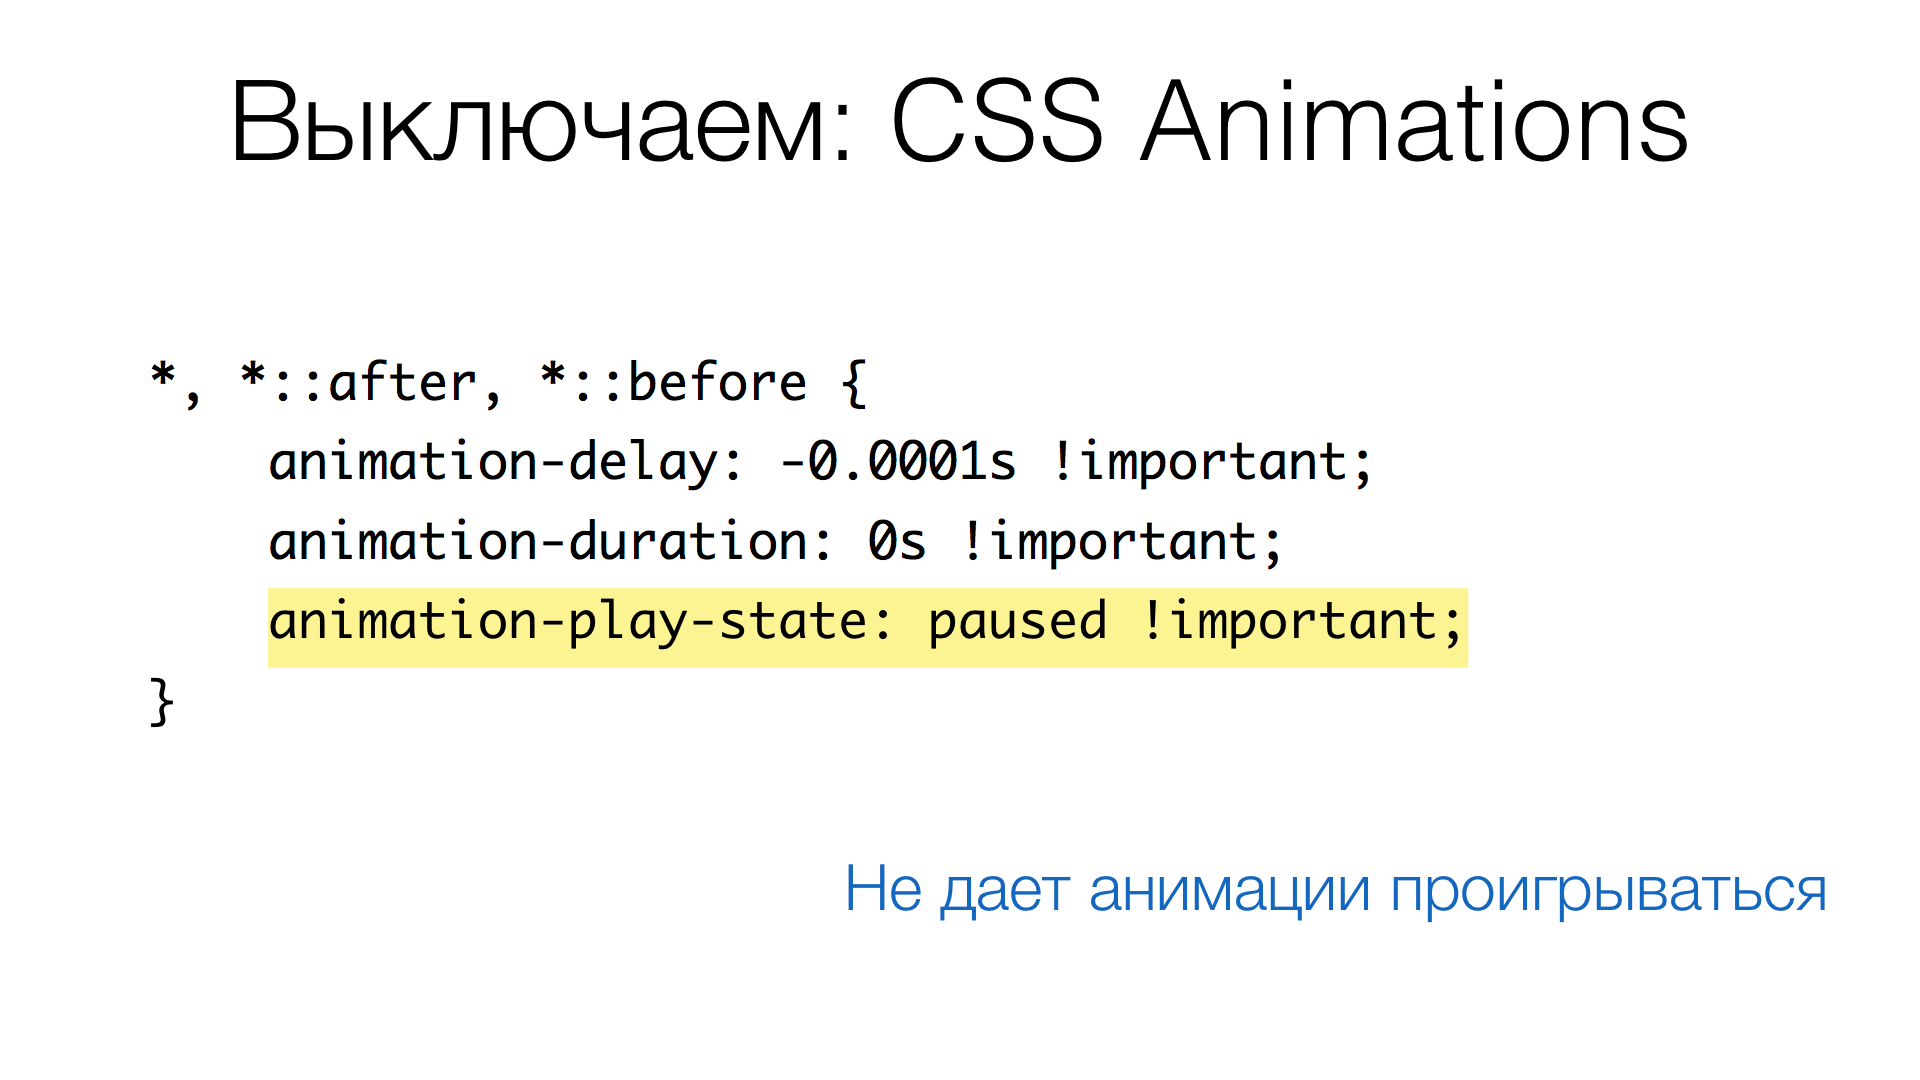
One last thing: we drove the animation to the end (final state), but the animations are different from the transitions in that they can be repeated. Therefore, we pause the state of the animation by setting the animation-play-state to paused . Thus, the animations are paused, that is, they stop playing.
Carriage
The next moment is a carriage in the fields. The problem is that it flashes: at some point we see a vertical line, at some point - no. This may affect the resulting screenshot.
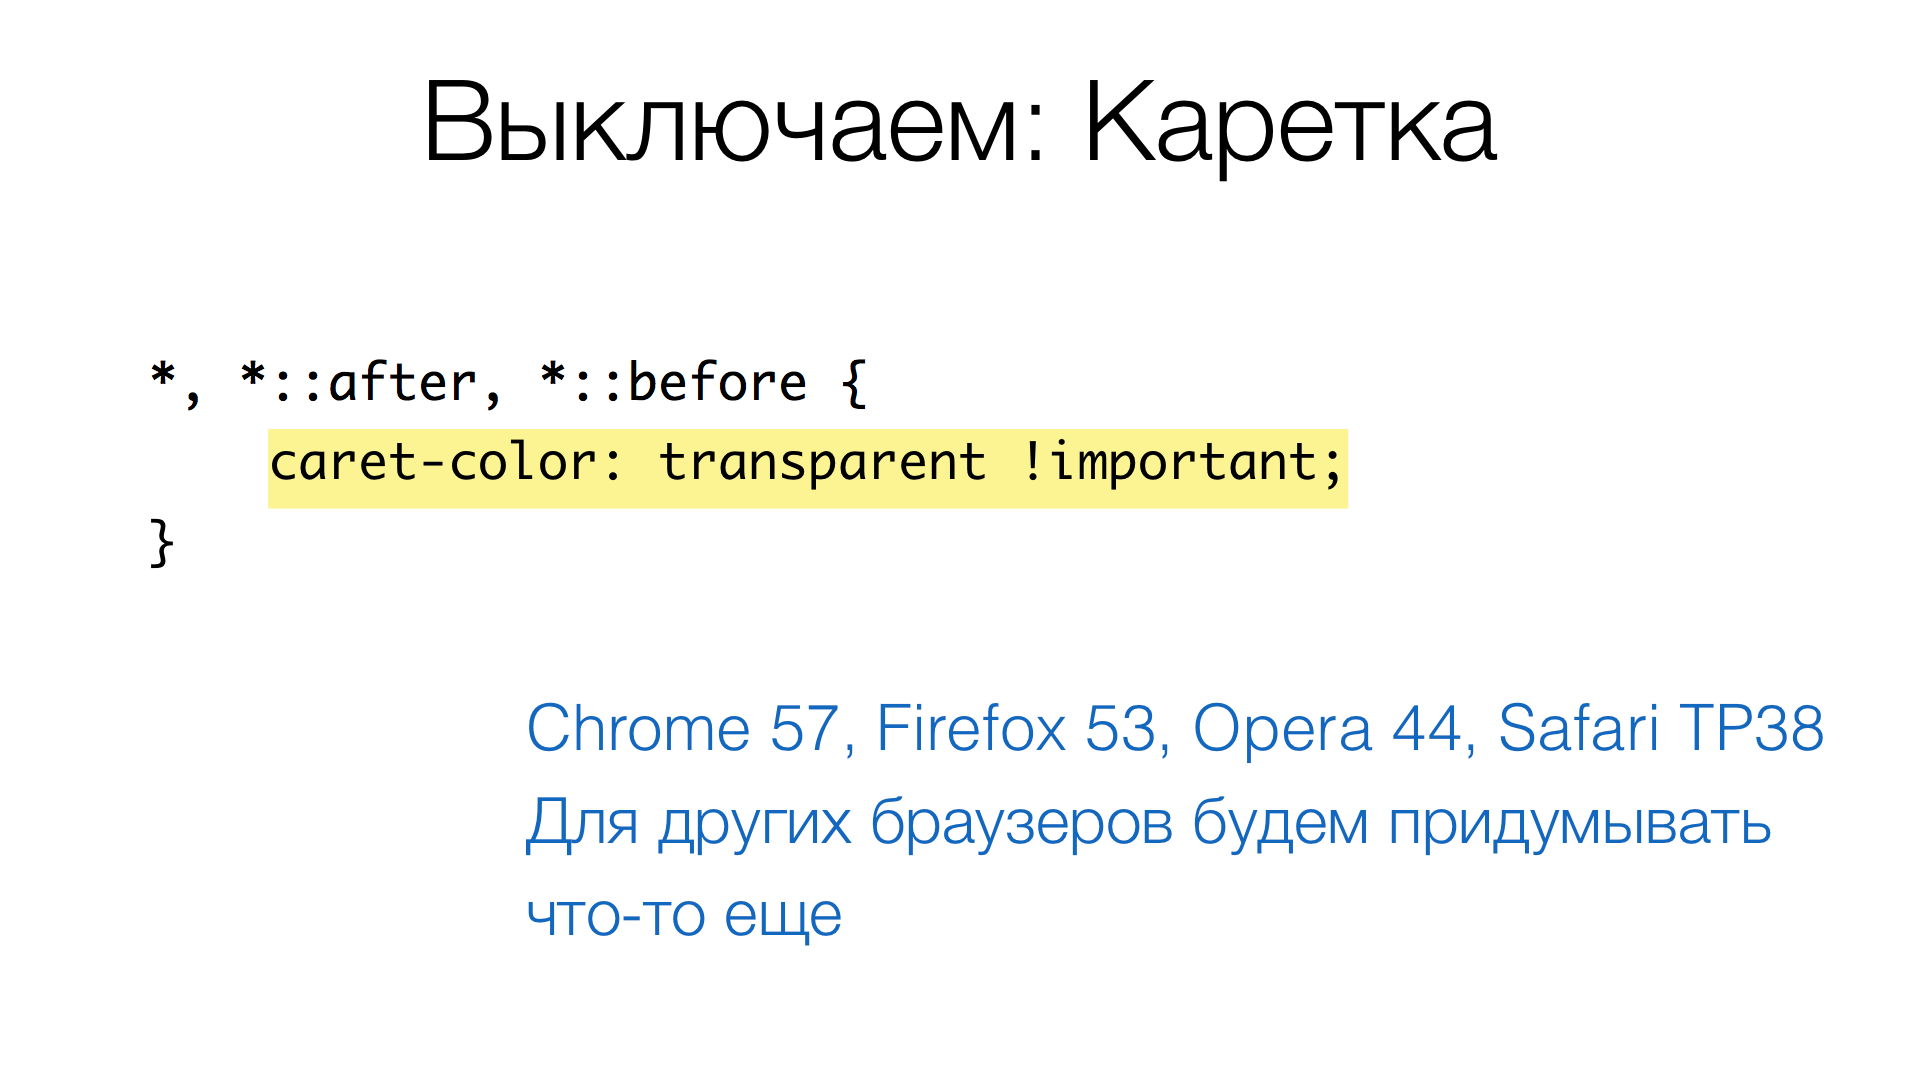
In recent months, a property called caret-color appeared in browsers: first in Chrome, then in Firefox and Safari (Technology Preview). To “turn off” the carriage, we can make it transparent (set the color to transparent ). Thus the carriage will always be invisible and will not affect the result.
For other versions of browsers, you will have to come up with something else, but this is only when we will use them for screenshots.
Gif
With GIF, the situation is a bit more complicated. The task is to leave one static frame from an animated GIF. I tried to find a module for this, set it up and forget about the problem. As a result, I found many libraries that resize images, change the palette, make a GIF from several images, or, on the contrary, make a set of images from an animated GIF. But I did not find such a package that makes animated GIF static. I had to write myself.
After two hours of searching for the library, I decided to see how complex the GIF format is. I read the wiki , opened the specification from the 89th year - it turned out quite understandable.
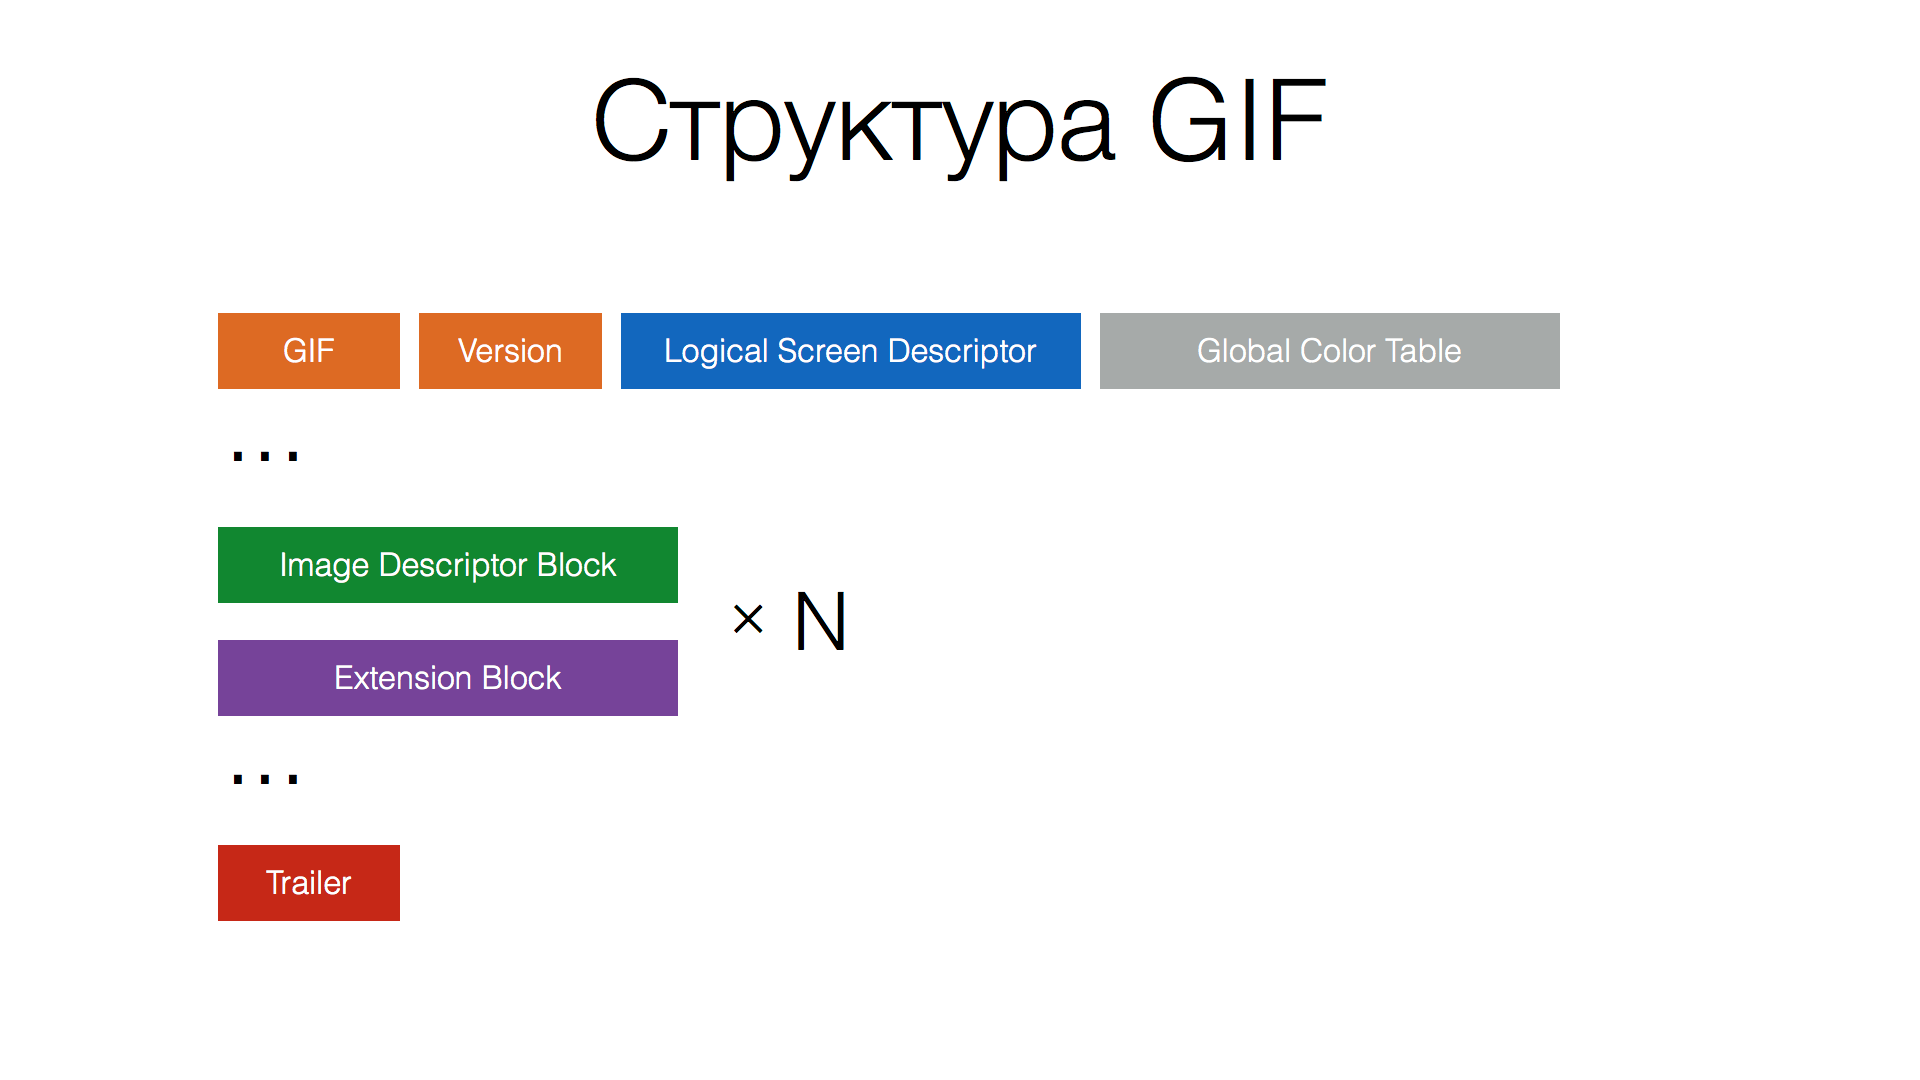
GIF consists of several blocks: at the beginning there is a signature describing the size of the image and a table of indexed colors. Then there are successive blocks: Image Descriptor Block, which is responsible for graphics, and Extension Block, in which you can store a palette, some text, comments, copyrights, and so on. At the end of the file comes Trailer, a special block that says the GIF is over.
Thus, you need to go through these blocks and filter (delete) all Image Descriptor Block, except the first one. Here is a link to the Gist with the code that does the necessary. I wrote it in a couple of hours, debugged it, while it works fine, no problems were found.
As a result: GIF images are static, animations are turned off, all the ways to CSS are. It remains to glue. What could be simpler, it would seem?
CSS glueing
Let's see how Jest works. It usually runs in parallel, runs several threads that execute tests. Each test file runs in one of the streams, and each file is a separate context that does not fumble data between other contexts. And the problem is that we have a CSS transformation where we got access to the source code of CSS files is outside the context of the test, and we cannot access this content. We cannot read CSS from a file either, because CSS has already been converted, stored in JavaScript itself, in some environment, context, worker.
How to shuffle CSS between tests? We did a little hack. Each worker creates a temporary file in JSON format, where the key is the path to CSS, and the value itself is already converted CSS. Each stream reads this file, takes the necessary one from there and makes a concatenation inside the context of the test.
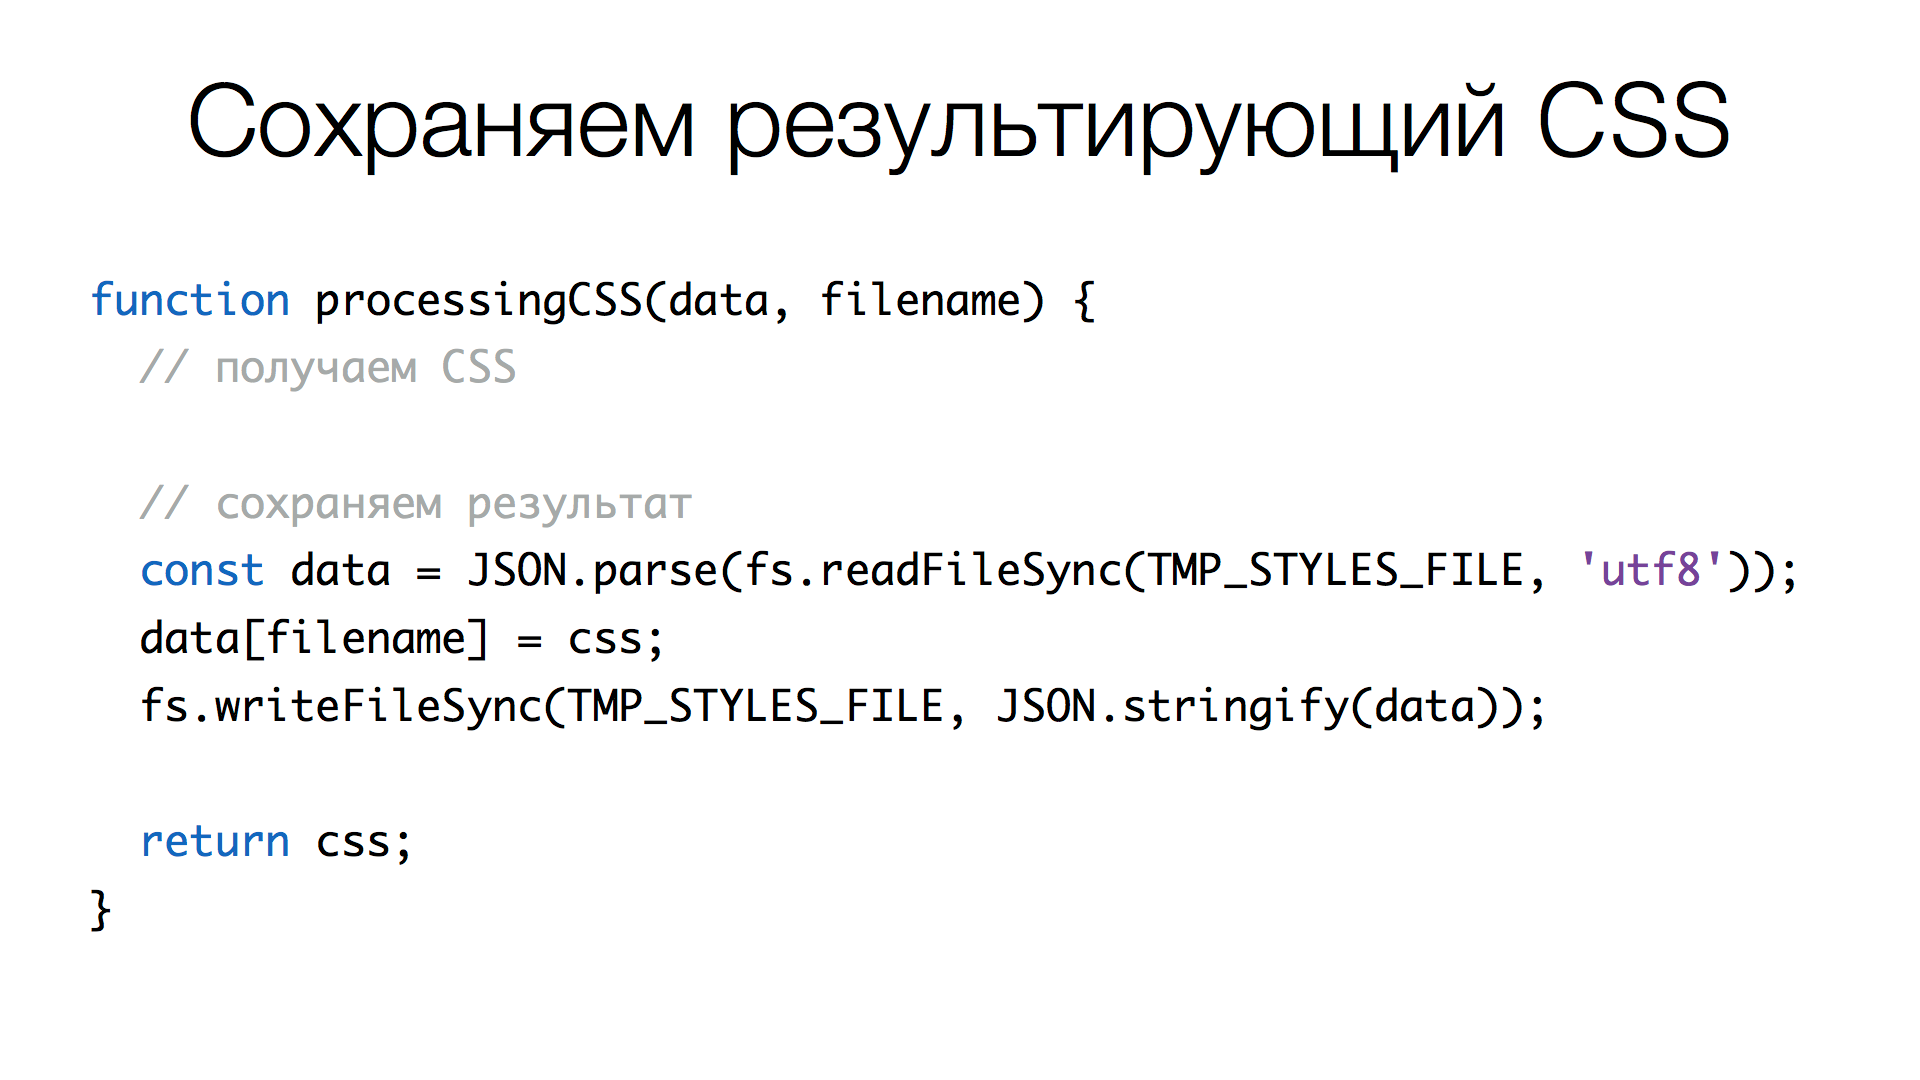
Here we read some temporary file, parse it in JSON, add the necessary content to it. Filename is the key, CSS is the converted value. And write back the converted map.
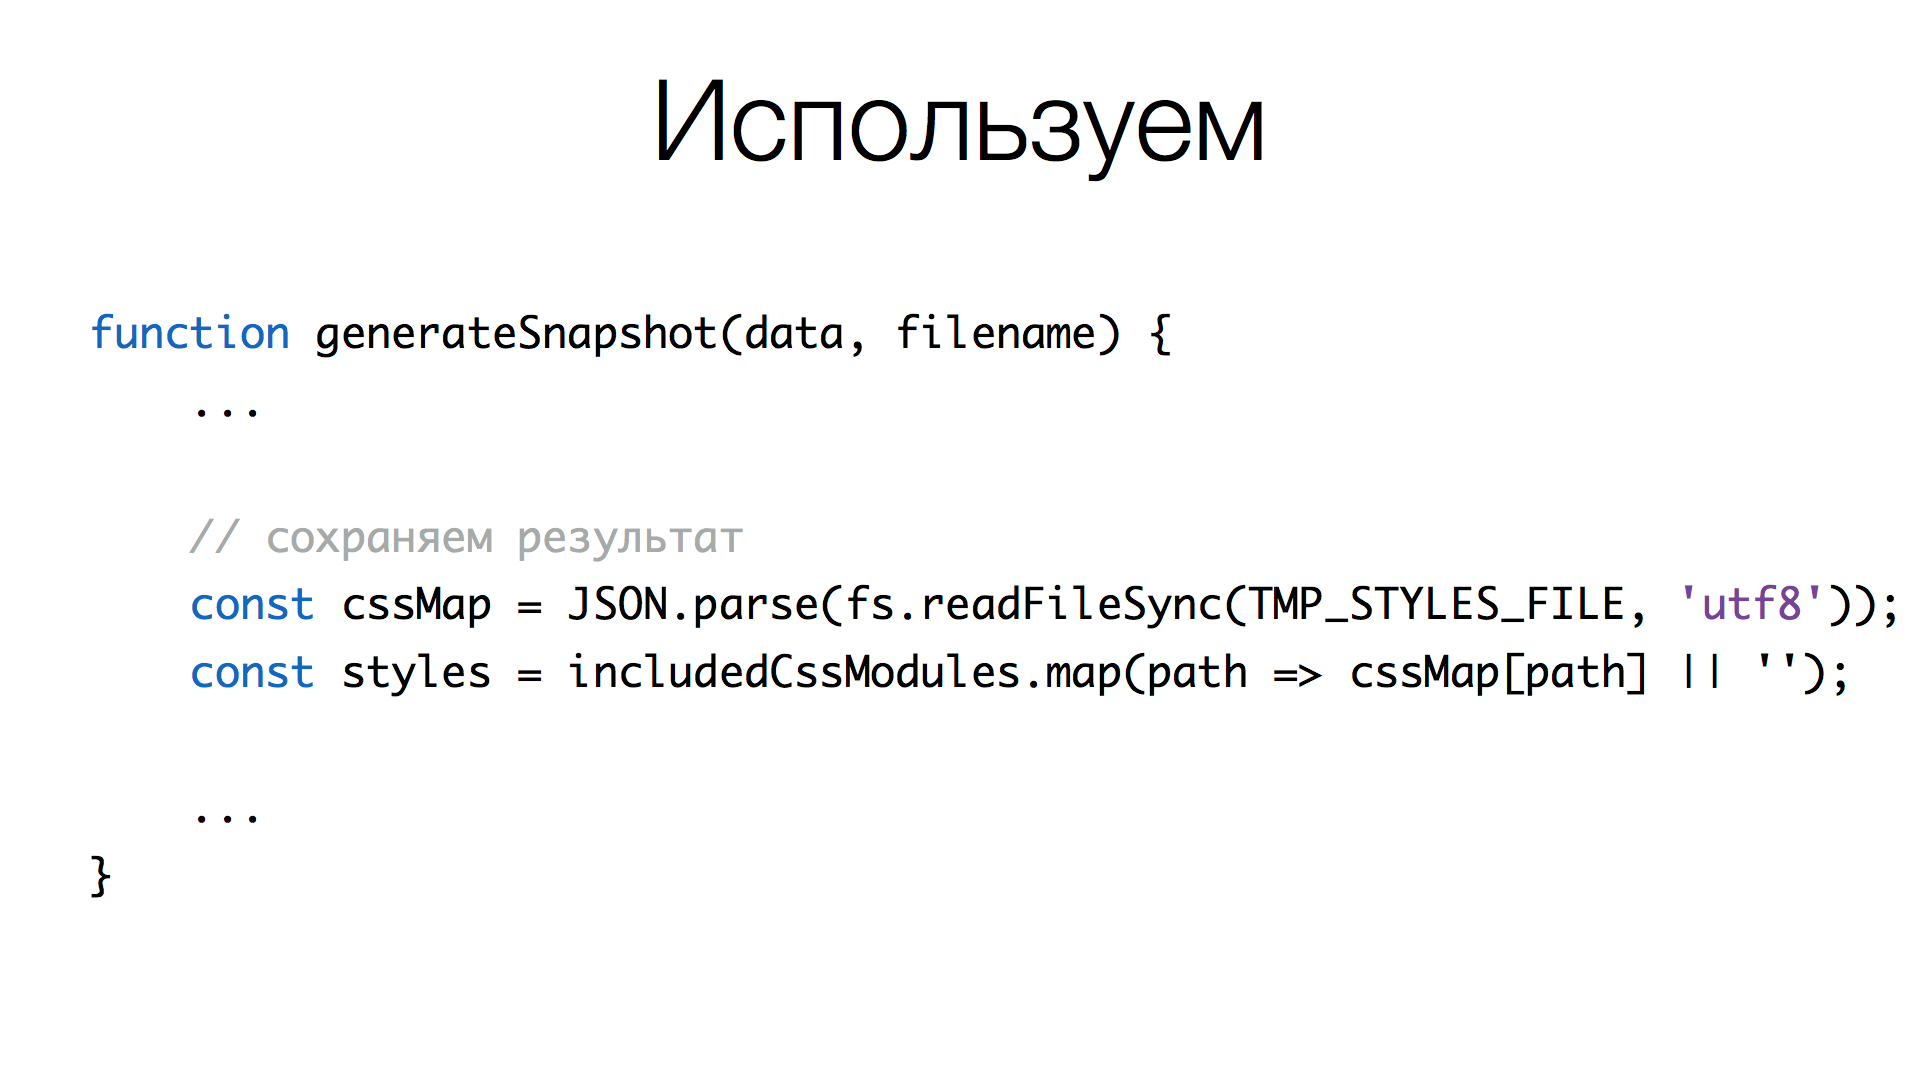
When we generate CSS for the screenshot, we read from this file, use includedCssModules (an array of CSS paths), get the content of the necessary files, and do join() .
It remains to gather everything.
Final build
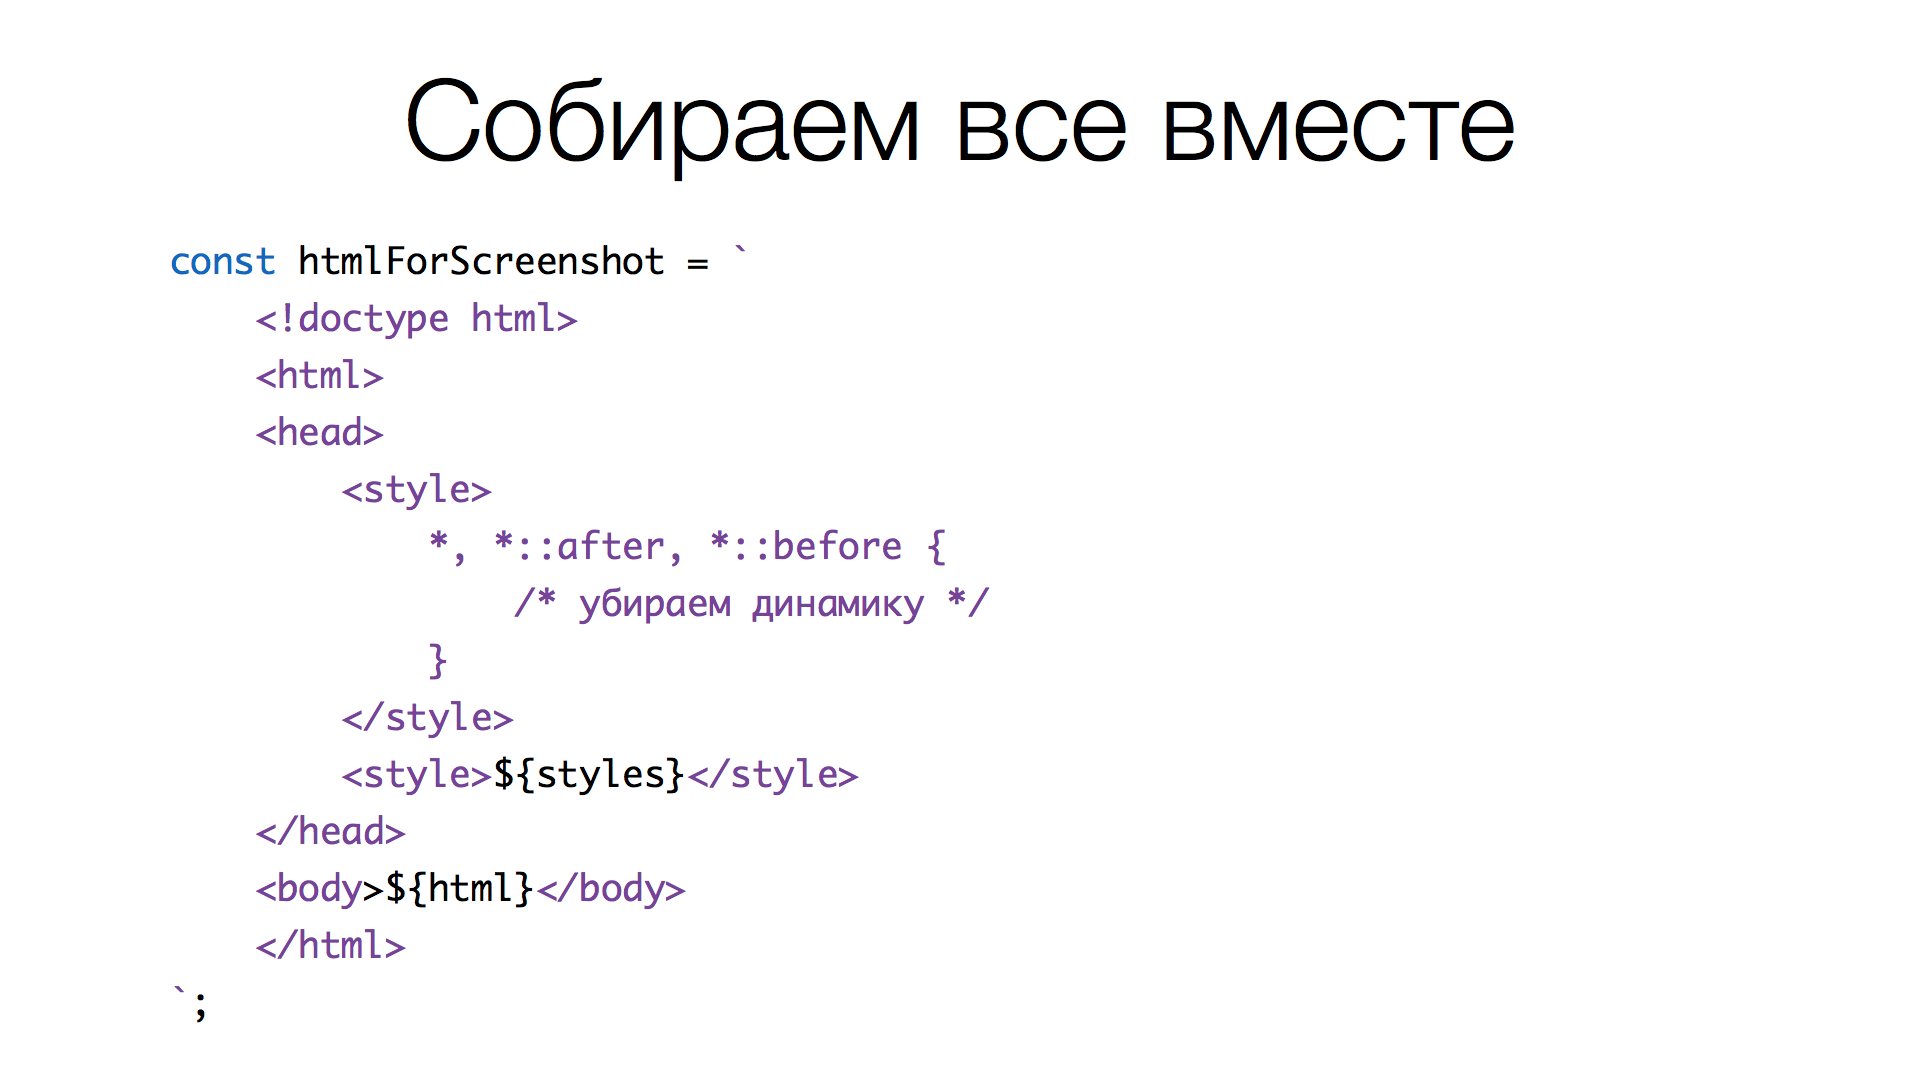
Generating the final HTML. First, we set styles that disable dynamics (animations). In the second style, all the glued CSS that we found are connected. Each test will have its own set of these styles, because when we make the require() component, it pulls up its dependencies, which will be in our list. As a result, only used CSS files are connected, and not all CSS in the project. HTML, respectively, we received earlier - this is the code of the component itself.
As a result, we have achieved our goal. We can generate the HTML component in the desired state, plus the CSS that it needs.
So, all the markup is assembled, the animation is turned off - everything is ready to take a screenshot. Solutions are not perfect, you can do better, but you need to continue to dig inside Jest, Babel, CSS Modules and so on to get more elegant and stable solutions. But in general, it suits us, and we can move on.
Screenshots
Today, making screenshots in the browser is quite simple. A few years ago it could have been a difficult task, it was necessary to use complex solutions. Today, there are headless browsers that run without a GUI, in which you can download arbitrary code and watch how it works, including taking screenshots.
Also, all modern browsers support WebDriver. If you use, for example, Selenium, then everything is done relatively easily. There are libraries, helpers that simplify writing tests for such environments.
In our case, we did simple comparisons using a single browser. While there was no need to make a cross-browser comparison, so we used Puppeteer , a special library that can run headless Chrome and provides a fairly convenient interface for working with it. Here is the main code that makes the screenshot.
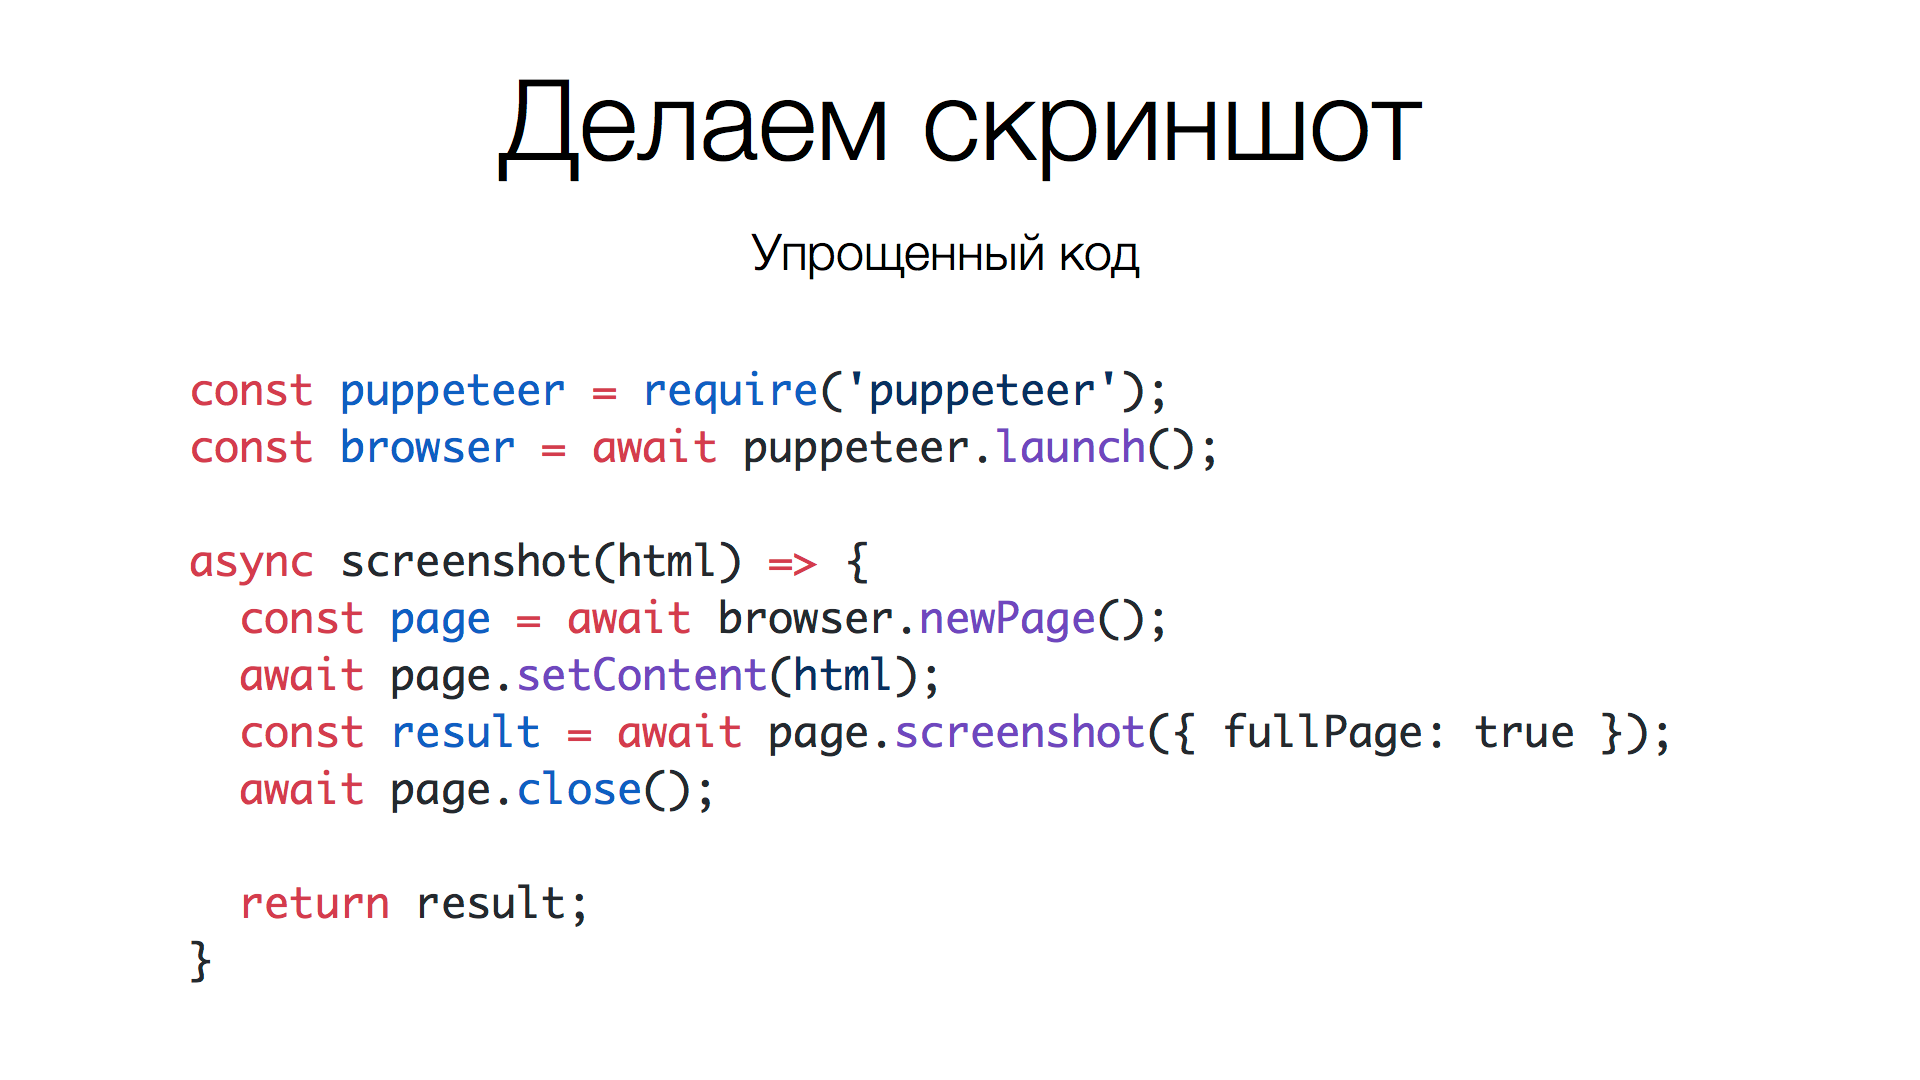
This is where the Puppeteer connects, the browser starts, and when you need to take a screenshot, we call the screenshot() function with some HTML. This function creates a new page, inserts the transferred HTML into it, takes a screenshot, closes the page and gives us the result of the screenshot. Works. Not difficult. But it turned out not so simple.
The fact is that when we run the code locally, everything works fine for us. We have a reference image and a new one, because we create a new image in the same browser version, the same system where we made the reference. But when we started running all of this on CI, where we no longer have Mac, not Windows, but Linux, our own version of Chrome, our anti-aliasing rules, our own fonts, etc., the images turned out to be different. That is, they began to get different results.
What to do? There are several solutions. Some solutions are trying to overcome this difference with the help of mathematics. They compare not pixel-by-pixel, but pixel and neighboring pixels - that is, a loose comparison with a certain tolerance. It is expensive and somehow strange, I would just like to compare pixel by pixel.
We went in the direction of another solution: make an external microservice, where you can send a POST request with the HTML code, and get an image at the output, a screenshot that we need.
What are the benefits we got? There is no dependence on the machine where the tests are run, you can update, change the browser version - it does not matter, on the microserver side there is always the same browser, which gives the same result.
Also, no local settings are required for the new project. You do not need to launch browsers, configure Puppeteer and other things, we just make a POST request and receive an image. It turns out even faster, oddly enough, although there are network costs. We send a request to the service, there are caches and a heated browser, which gives the image very quickly. Plus PNGs are quite small, they press well, network traffic is not very big.
Cons, too. The service may fall at any time, you need to monitor its "health". Everyone knows that the browser can “eat off” a lot of memory, even if simple pages are visited. The service may dramatically rush load, it can not cope, its resources are limited. And if the service falls, he can not give the image - our tests do not pass.
Accordingly, if everyone at the same time decides to check the screenshots (to launch), it may turn out that either they have to wait a long time or the service stops responding, because there is a big load. The latter is solved more or less: we have a local cloud where you can create several service instances and distribute the load. But nevertheless, such a problem exists. What is the death of the service?
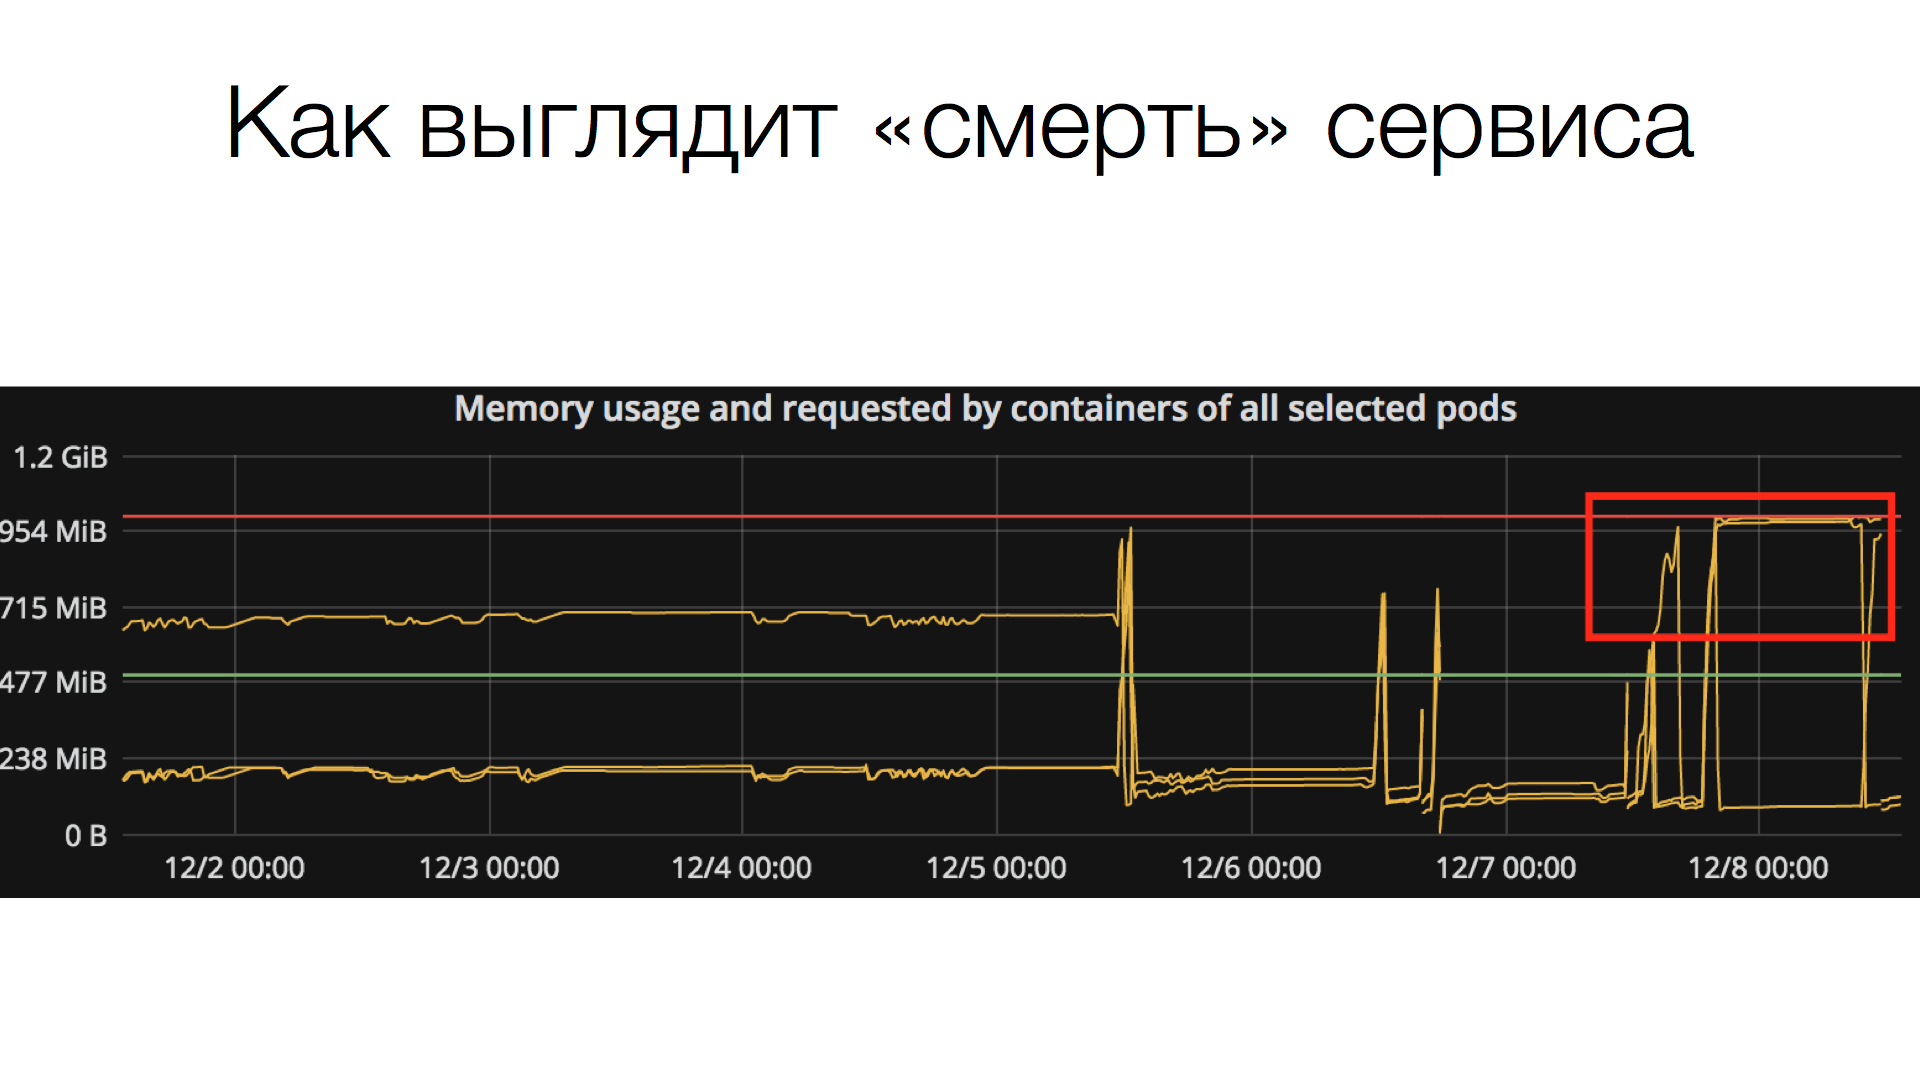
There is a certain service instance that works, it has a limited amount of memory (in this case, 1 GB), it can “eat” all the available memory and stop responding. In such cases, only a reboot helps.
Microservice solutions have another side. When we made the creation of screenshots on the code, the idea was to teach the service to give screenshots not only by code, but also by URL plus a certain selector. What the service does in this case: it enters the page, and either makes a full screenshot of the page, or of the block to which the transmitted selector matches. This turned out to be convenient and useful for other tasks not related to testing at all. For example, we are experimenting now: we insert in the documentation, in our knowledge base, screenshots of pages, instructions for our services, parts of the site, using the URL of the service for images ( <img> ). It turns out that when we go into the documentation, we always have actual screenshots. And you do not need to constantly update them. This is a very interesting solution, which turned out by itself.
Applying the method when we can use the URL to the screenshot service as an image, and thus getting a screenshot of a page or block, is very useful for other tasks, not only for documentation. For example, you can build functional graphs of sites: in each block of the graph there may be screenshots of pages or blocks that will be updated with each rolling out of the site.
Image Comparison
So, we proceed directly to testing with screenshots. We received a code, received screenshots for this code, it remains to compare them.
Let me remind you, we use jest to test components. It is important.
Jest has a “killer feature” - a comparison of snapshots.
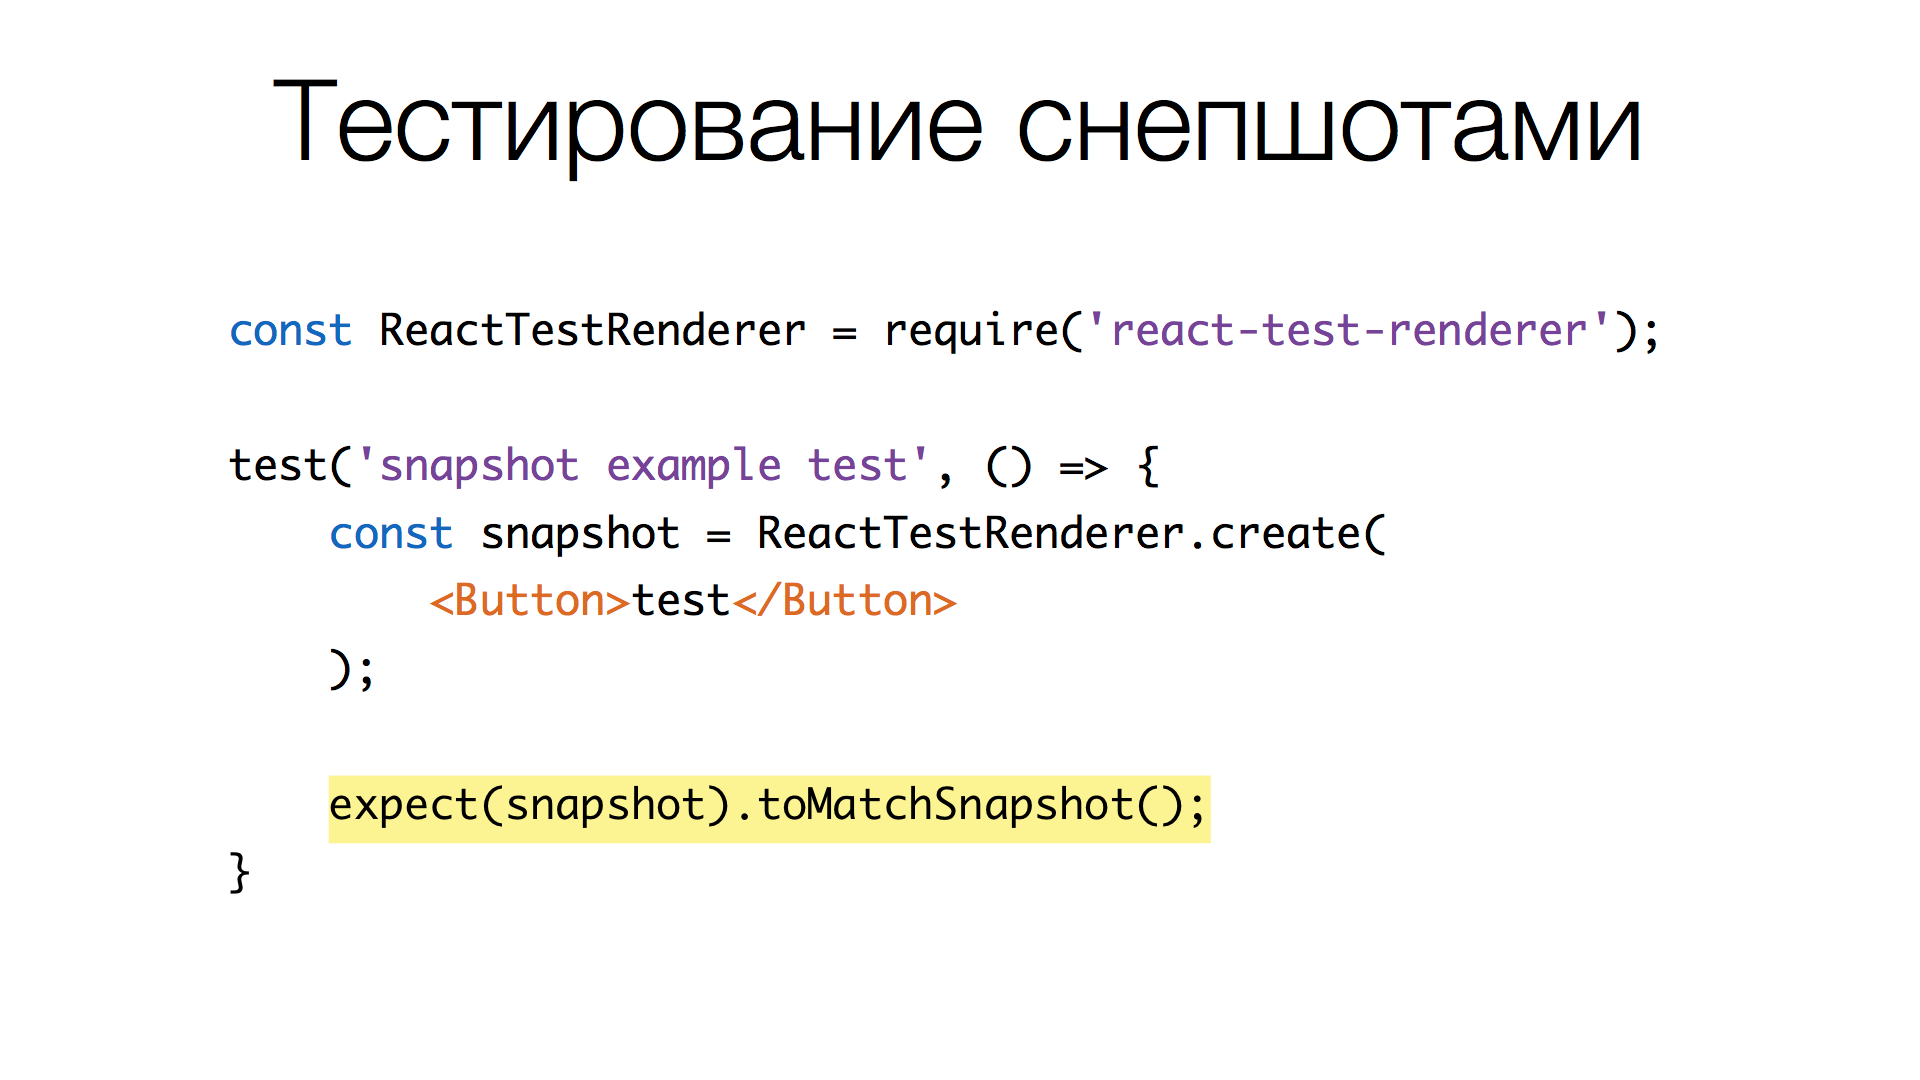
We make markup of objects, some data, and we can call the toMatchSnapshot() method for this data. How the method works:
- causes the value to be validated on a string using various methods like
JSON.stringify(); - If the test is new, the result is saved to the local database of results for later comparison;
- if the test is run again, the previous snapshot is taken from the base and two lines are compared, whether they are equal or not. If they are not equal, then there will be an error, that is, the test is not passed. If the test has been deleted, Jest notes that there is an irrelevant snapshot in the database so that there is no garbage.
Using the toMatchSnapshot() method, we can check whether the markup (HTML) of components has changed or not, and we don’t need to write code in order to compare, update, store snapshots, and so on. Magic!
But back to the comparison of images. We have binary images, this is not a string representation. There are no built-in tools for comparing images in Jest yet. There is a ticket on this topic on GitHub, they are waiting for a pull request. Maybe they will do it in time. But at the moment there is a plugin from American Express - jest-image-snapshot . It is well suited to start, to immediately begin to compare binary images. It looks like this:
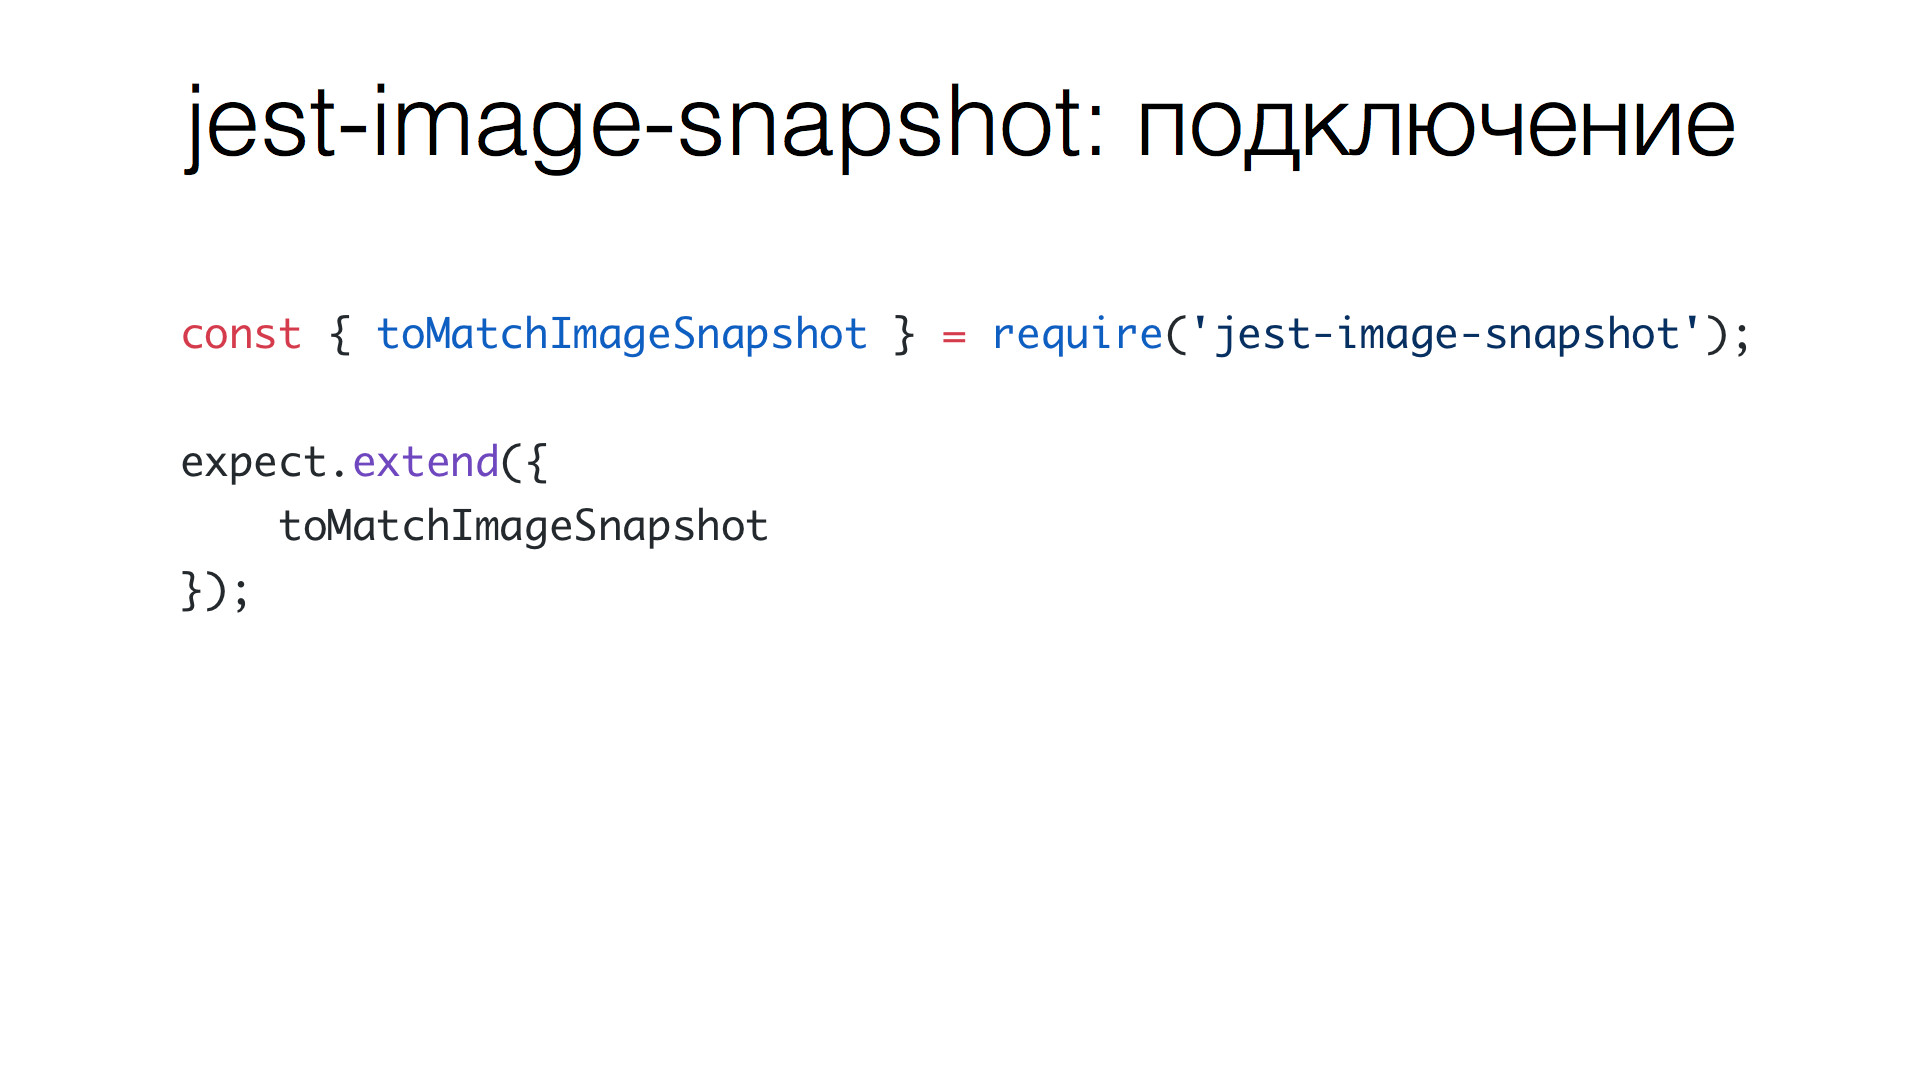
We connect this module and extend the expect new method toMatchImageSnapshot() , which is taken from jest-image-snapshot .
. — , , , .
, toMatchImageSnapshot() . , toMatchSnapshot() . , . , , , , ( — ), .
? , . , . Jest. ( , Jest : , , . CI, , , , ). , jest-image-snapshot , , , , CI, CI , .
: , , , , .
— . 800600, 1,5-2 . ? , 300 . , , . 300 — .
jest-image-snapshot . — . , 300 ( : « ») 10-20 , . 4,5 . , , . , Jest, 12-15 .
? , jest-image-snapshot , blink-diff , , PNG.
, , 800600. — 480 . — . — 4 (RGB ). 2 . , , 4 . 300 — 300 4 , .
, Garbage Collector , . , . : .
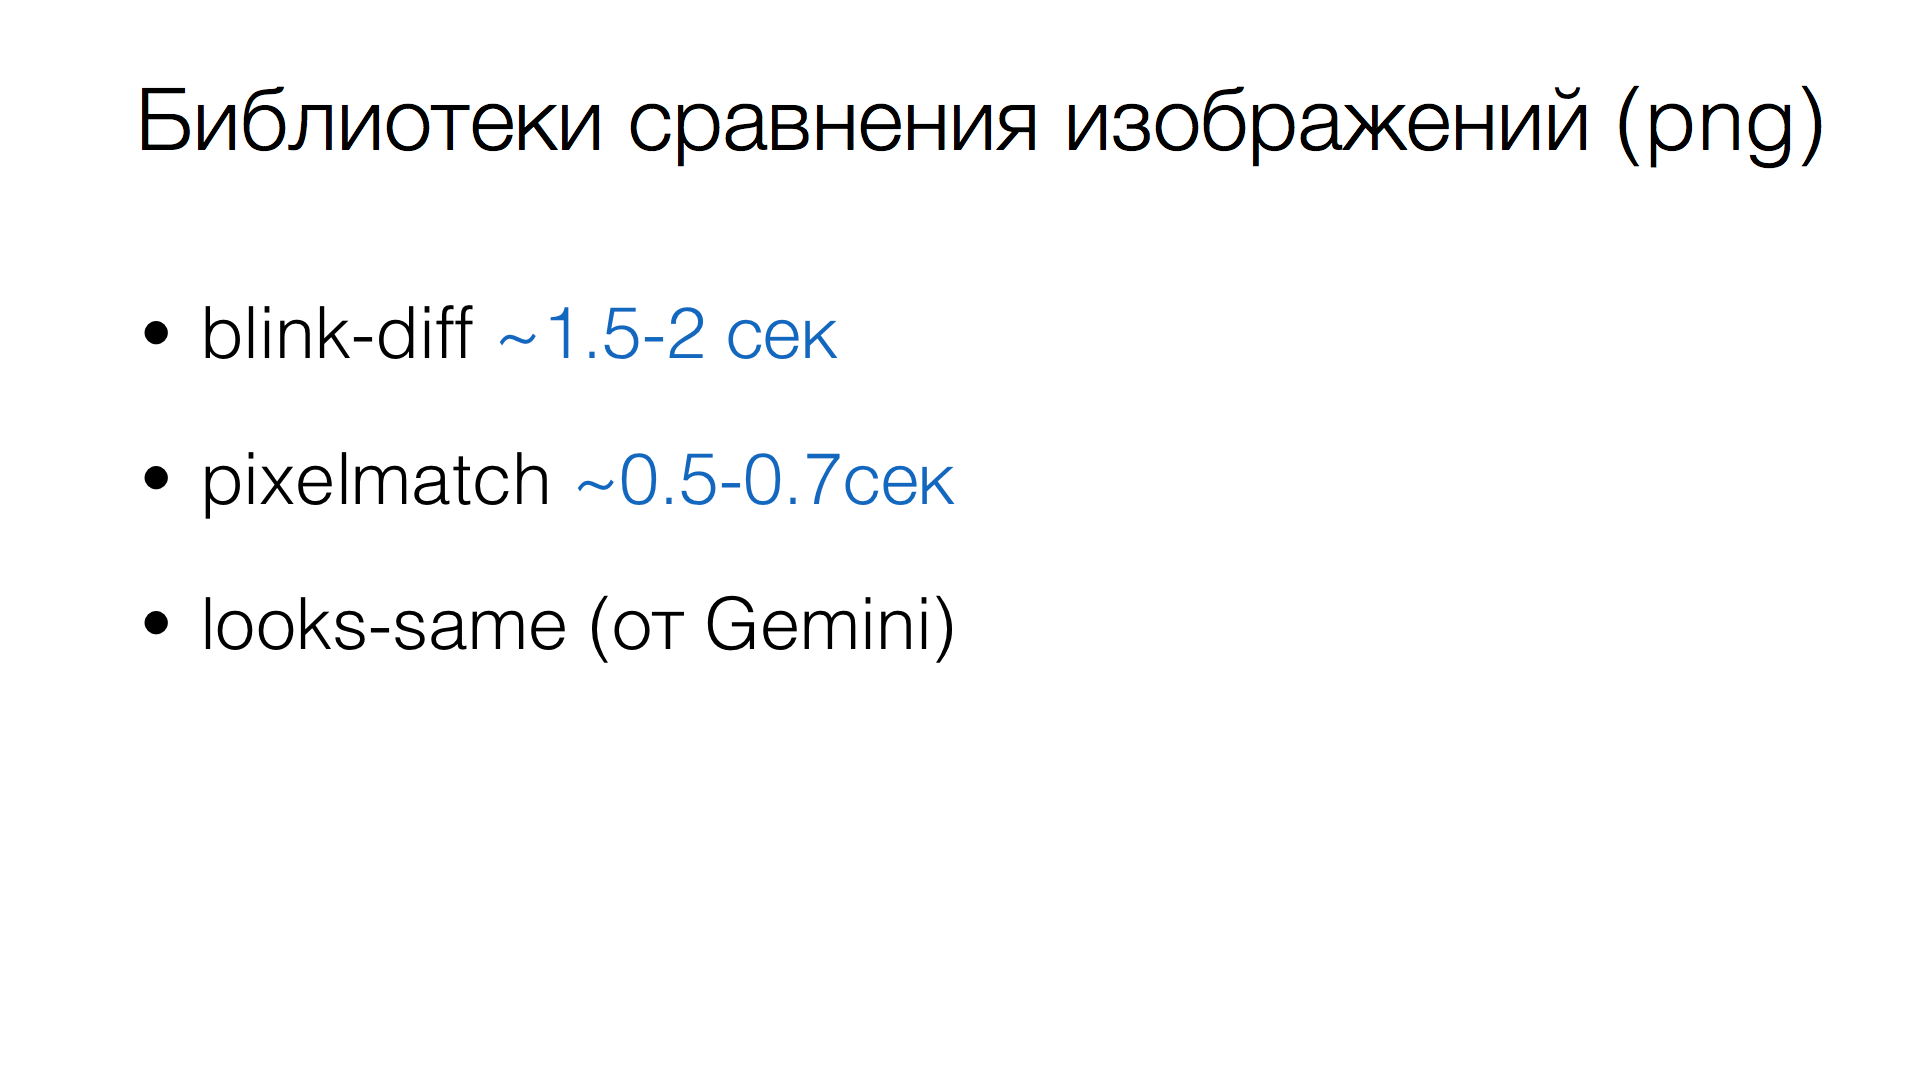
. , blink-diff , , 1,5-2 (800x600). — pixelmatch . . , jest-image-snapshot ( , ). looks-same Gemini, , pixelmatch .
? : ( ) . . PNG , (, 800x600 , 2 , ). , .
? , !
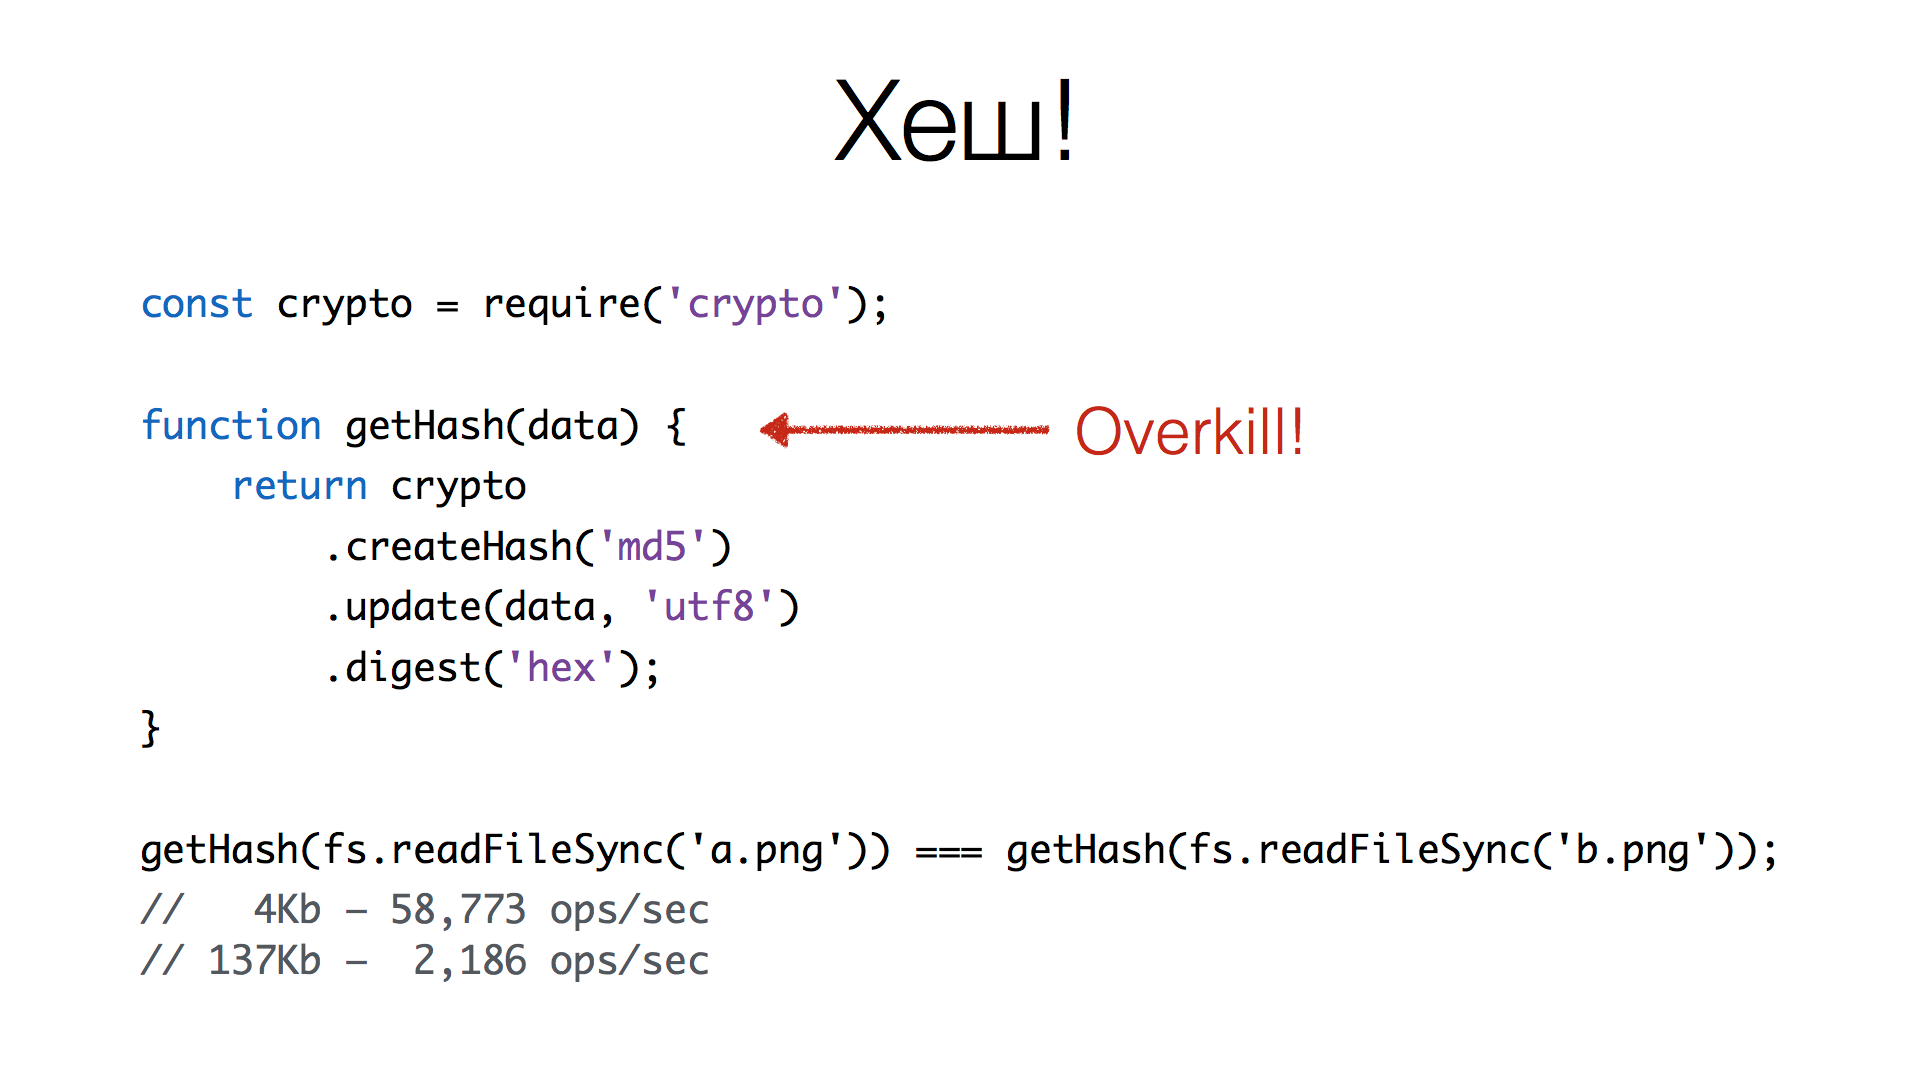
node.js – crypto , . , md5 sha1 , . , hex , .
. 4 58 . , . 137 2 . , , .
. — overkill. , . ? , , ( ) . , . :
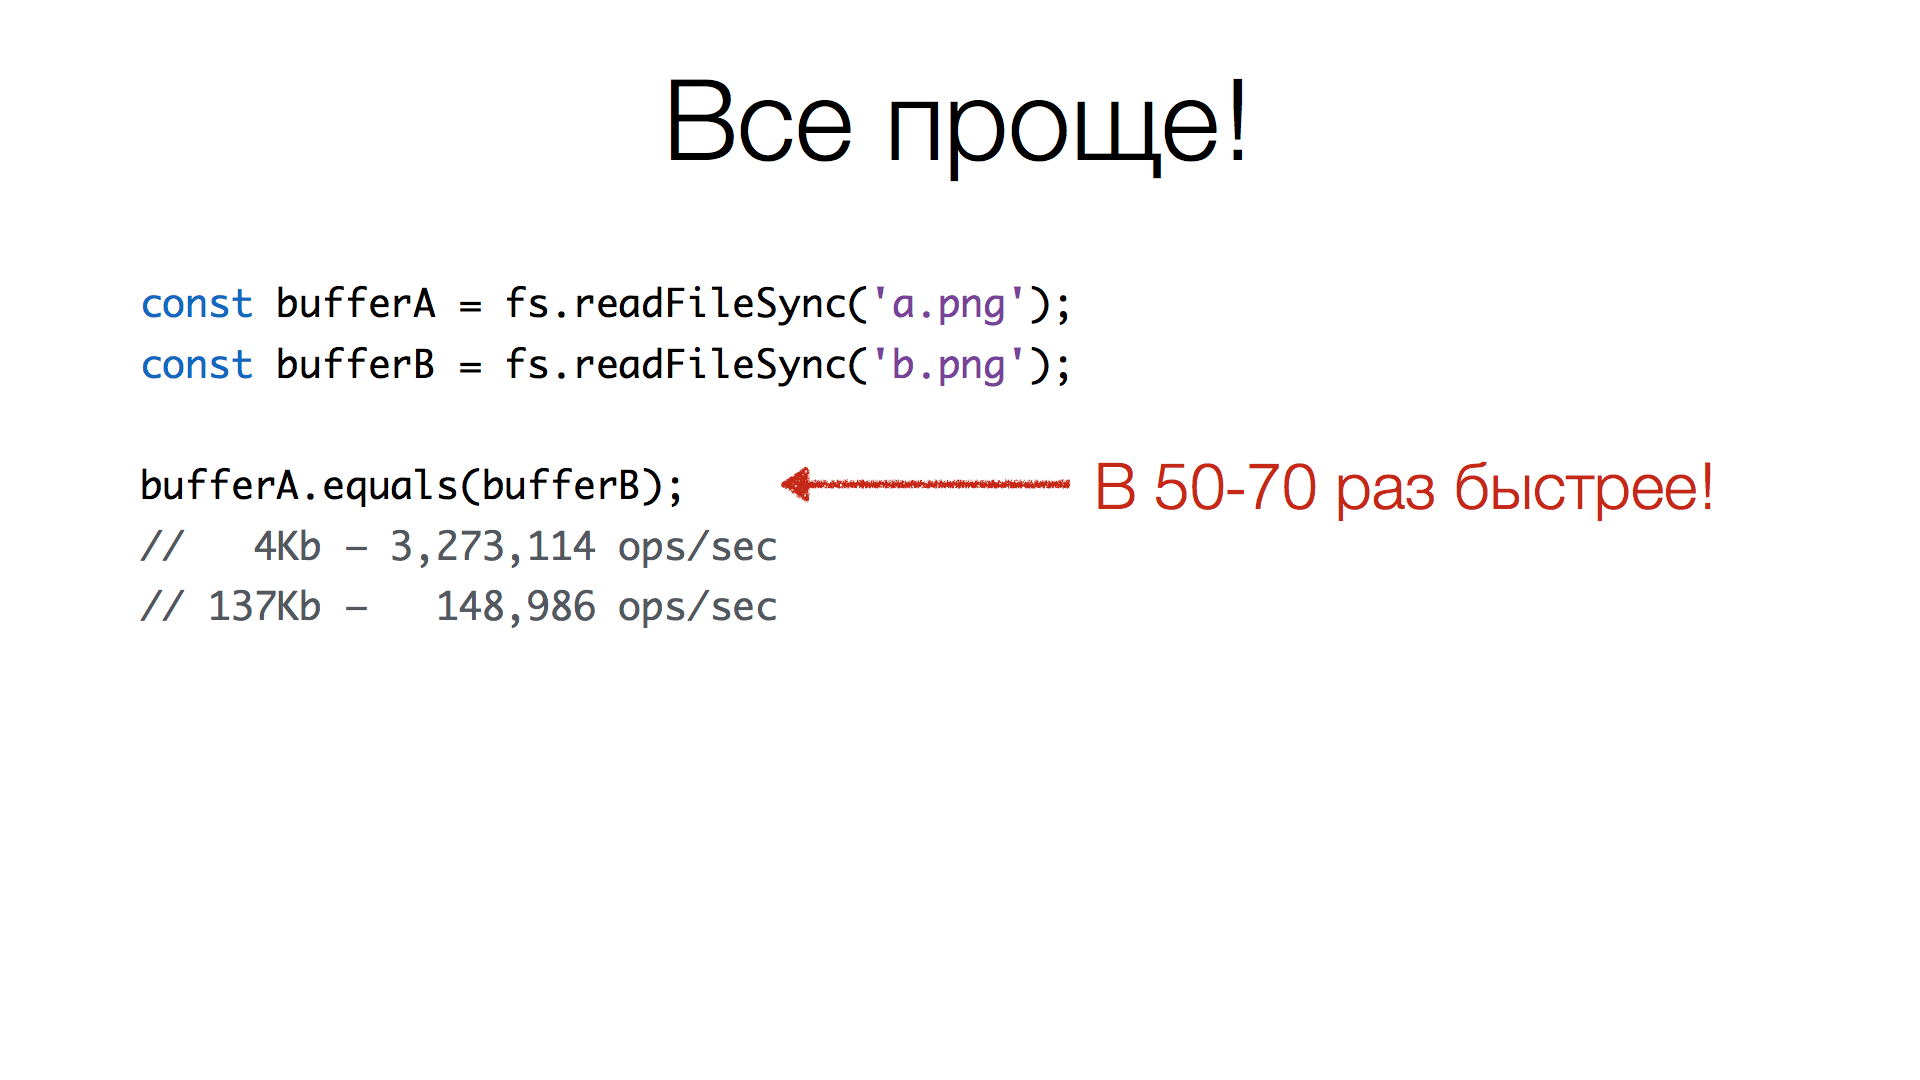
Buffer equals() ( compare() , –1, 1 0, ). , , , equals() . : 4 — 3 , 137 — 148 . 50-70 , .
, , . . , . , ? , , .
, : , PNG, , . GZIP, , , , .
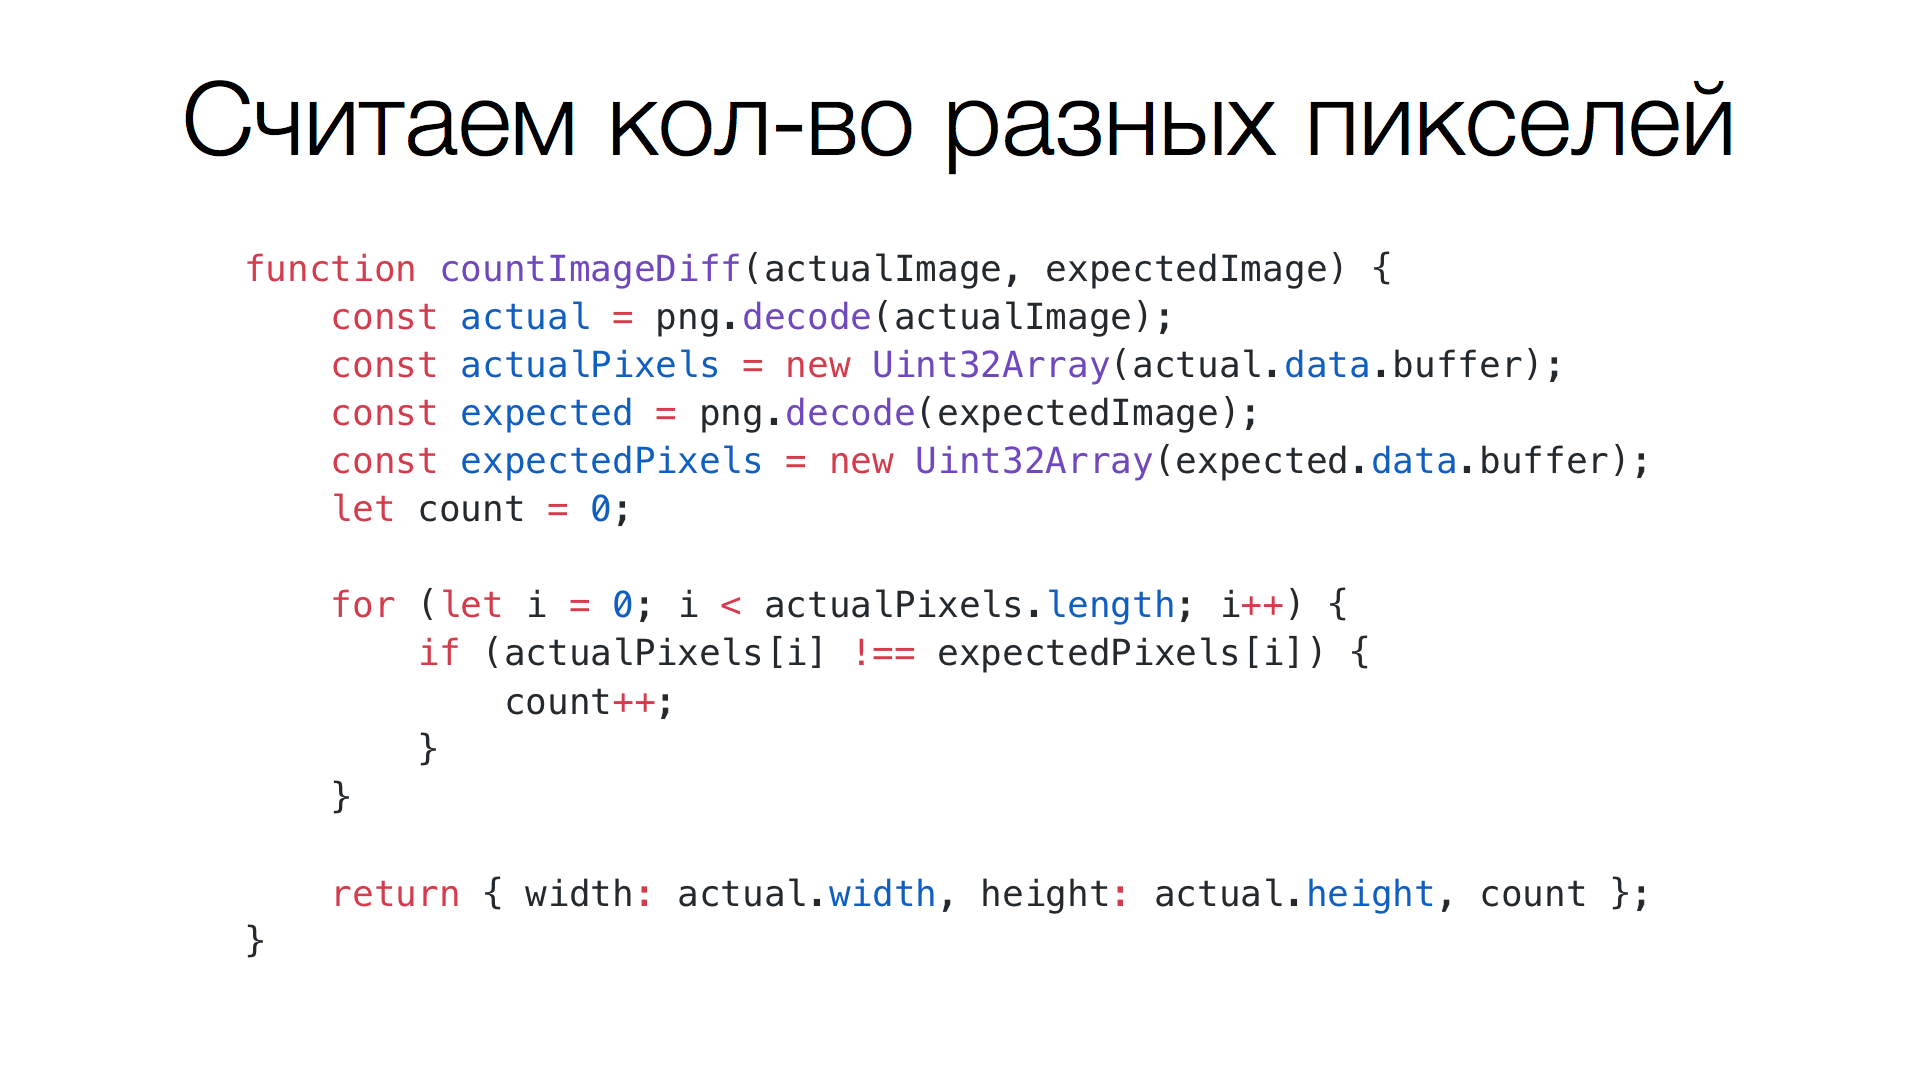
, ( actualImage expectedImage ), fast-png . Uint32Array . , , . , , . , , . actual.data , , , Uint32Array, . , , , . : , , , , .
, , (: count / (width * height) ).
, . 800600 ~100 , , , .
diff-
: ? ?
, . , , . diff- .
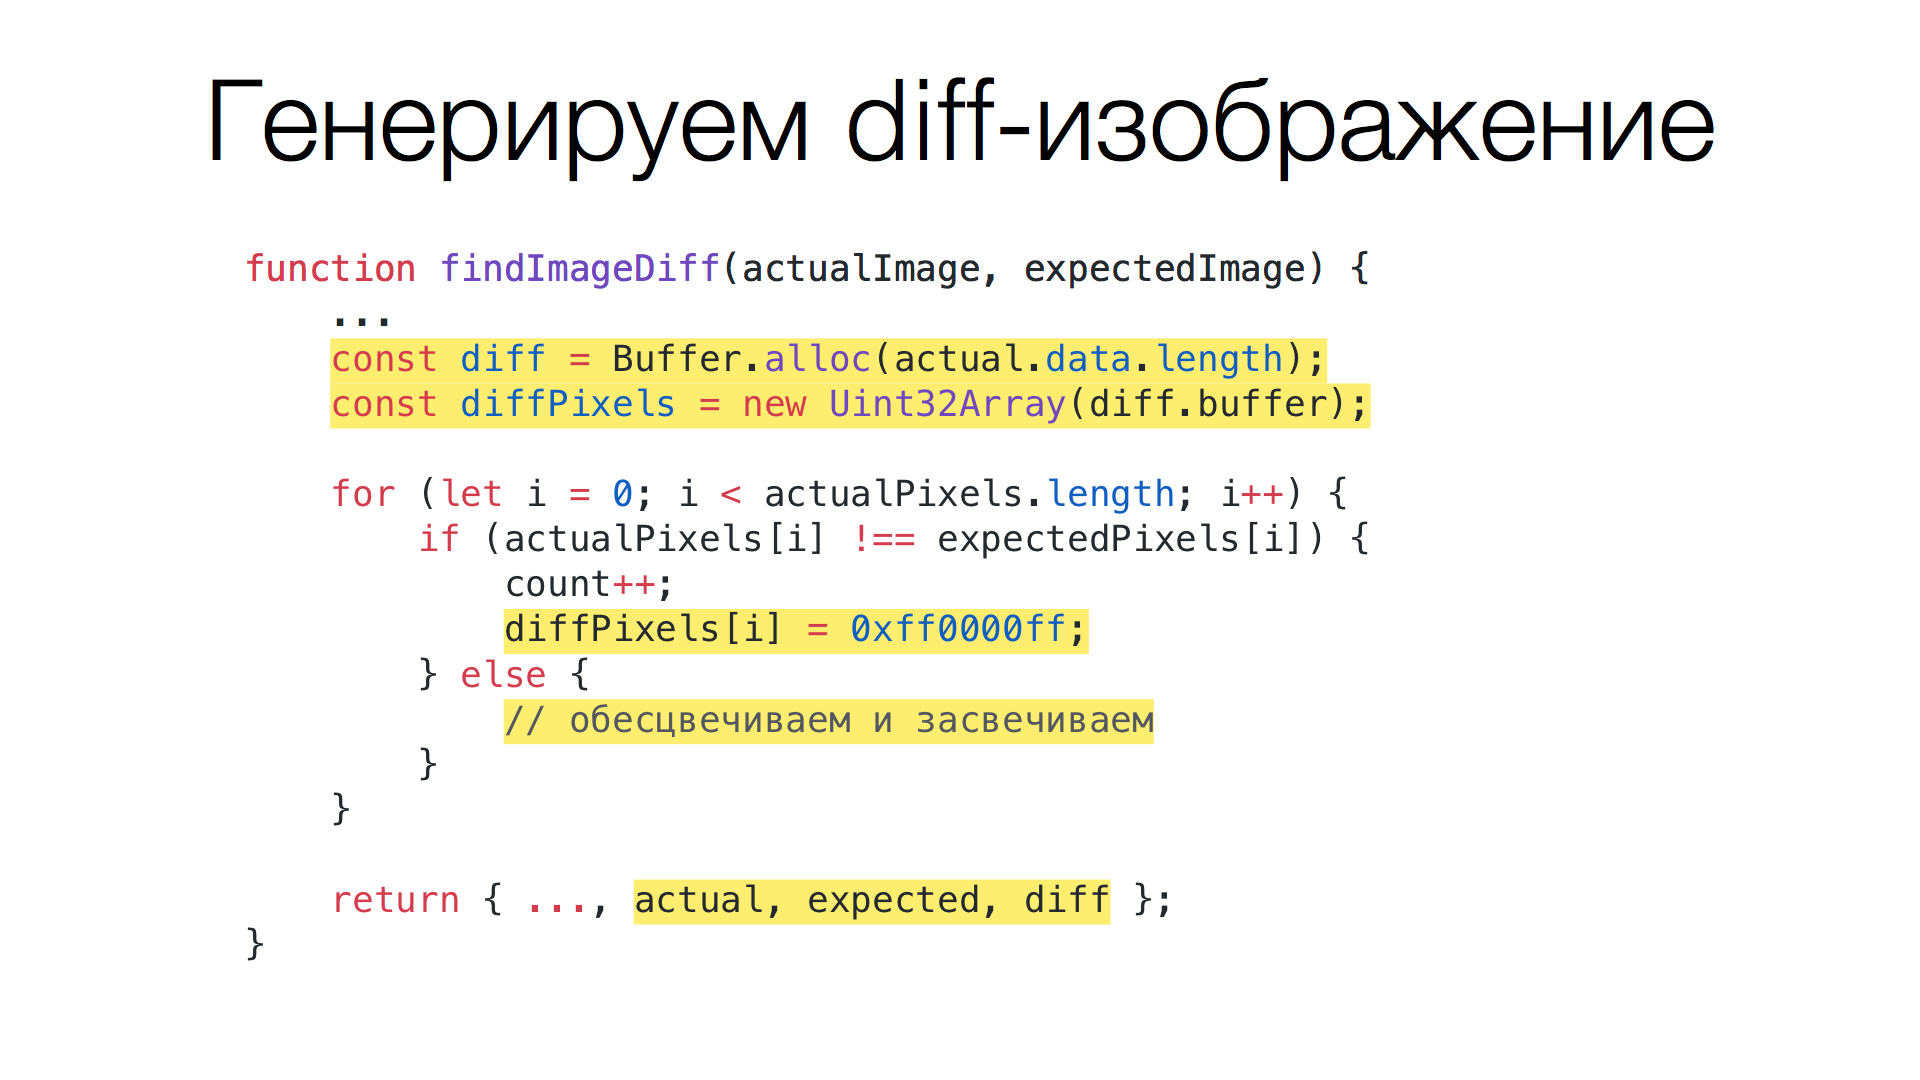
, . , alloc() , ( ). Uint32Array. . , , . . — , . , . — . , .
?
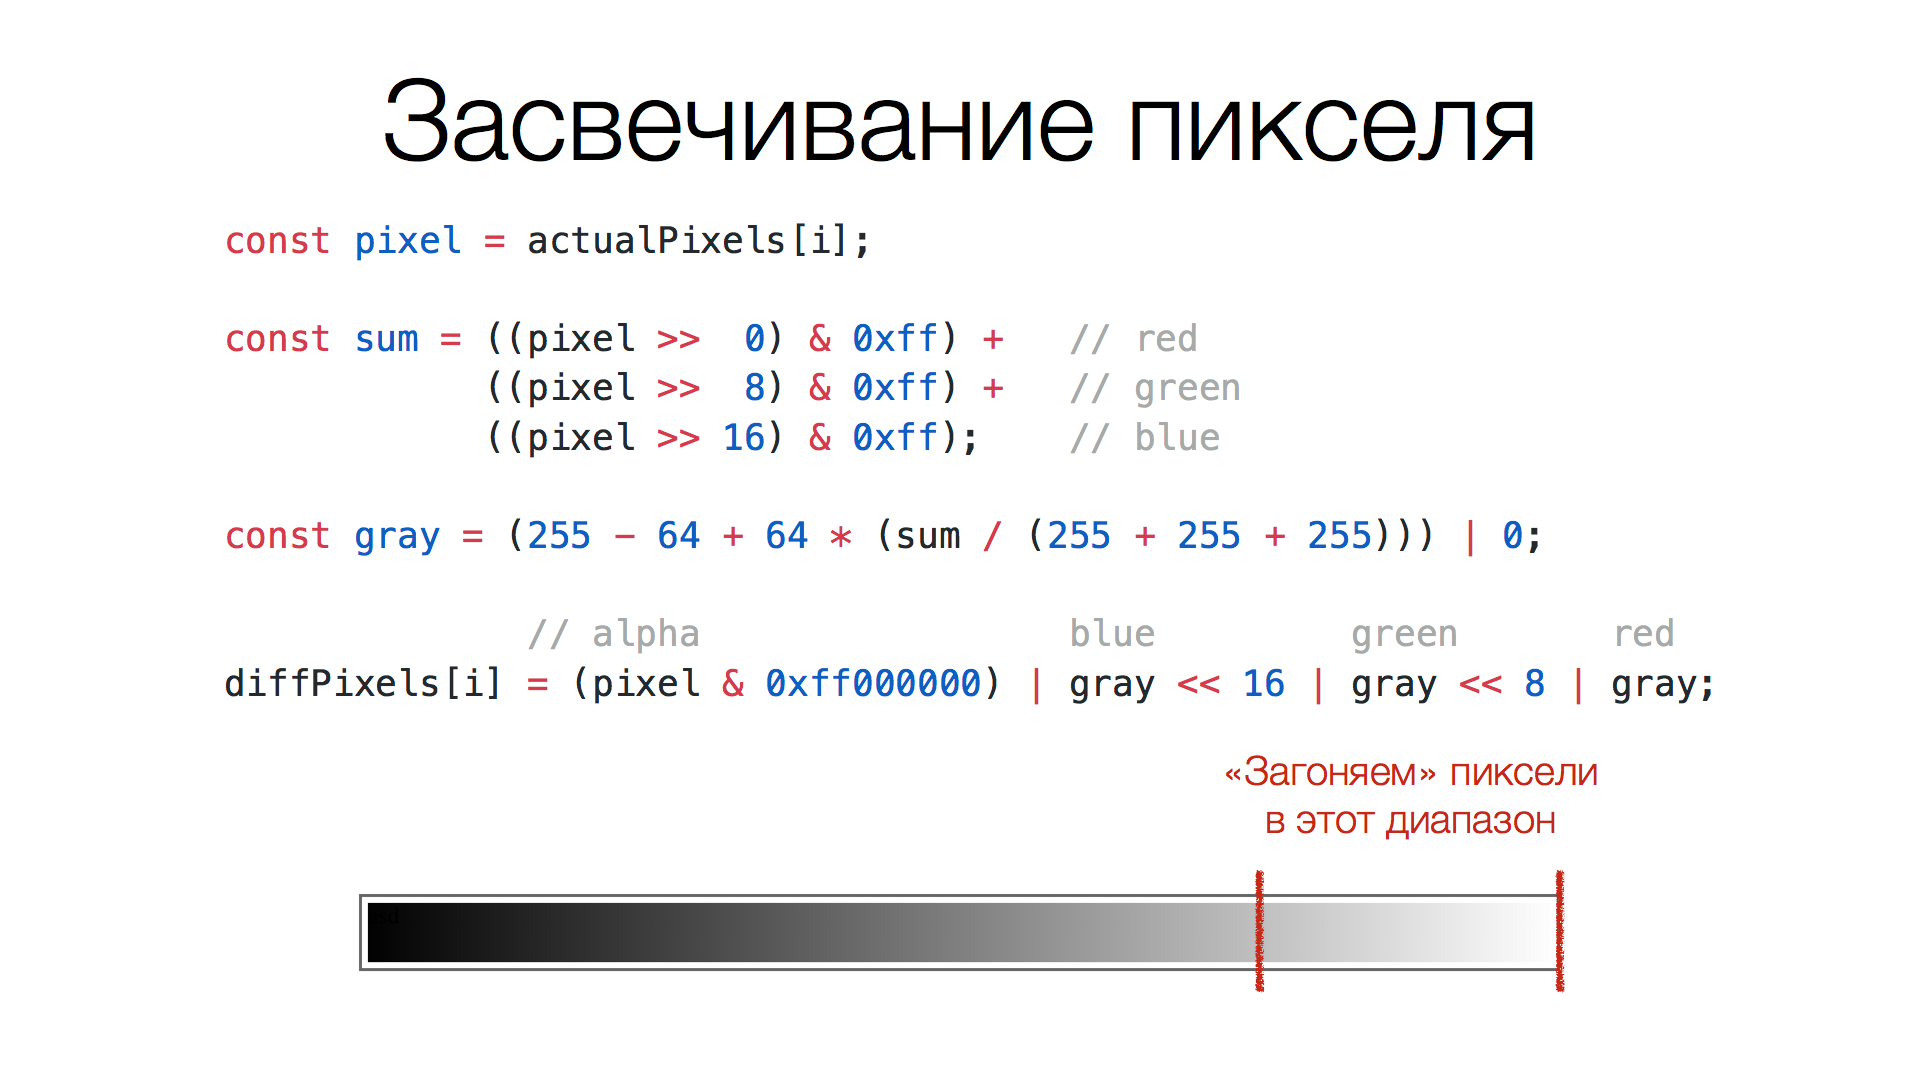
, — , , , — , — 255. . , . . gray ( ) . .
: , . , , , .
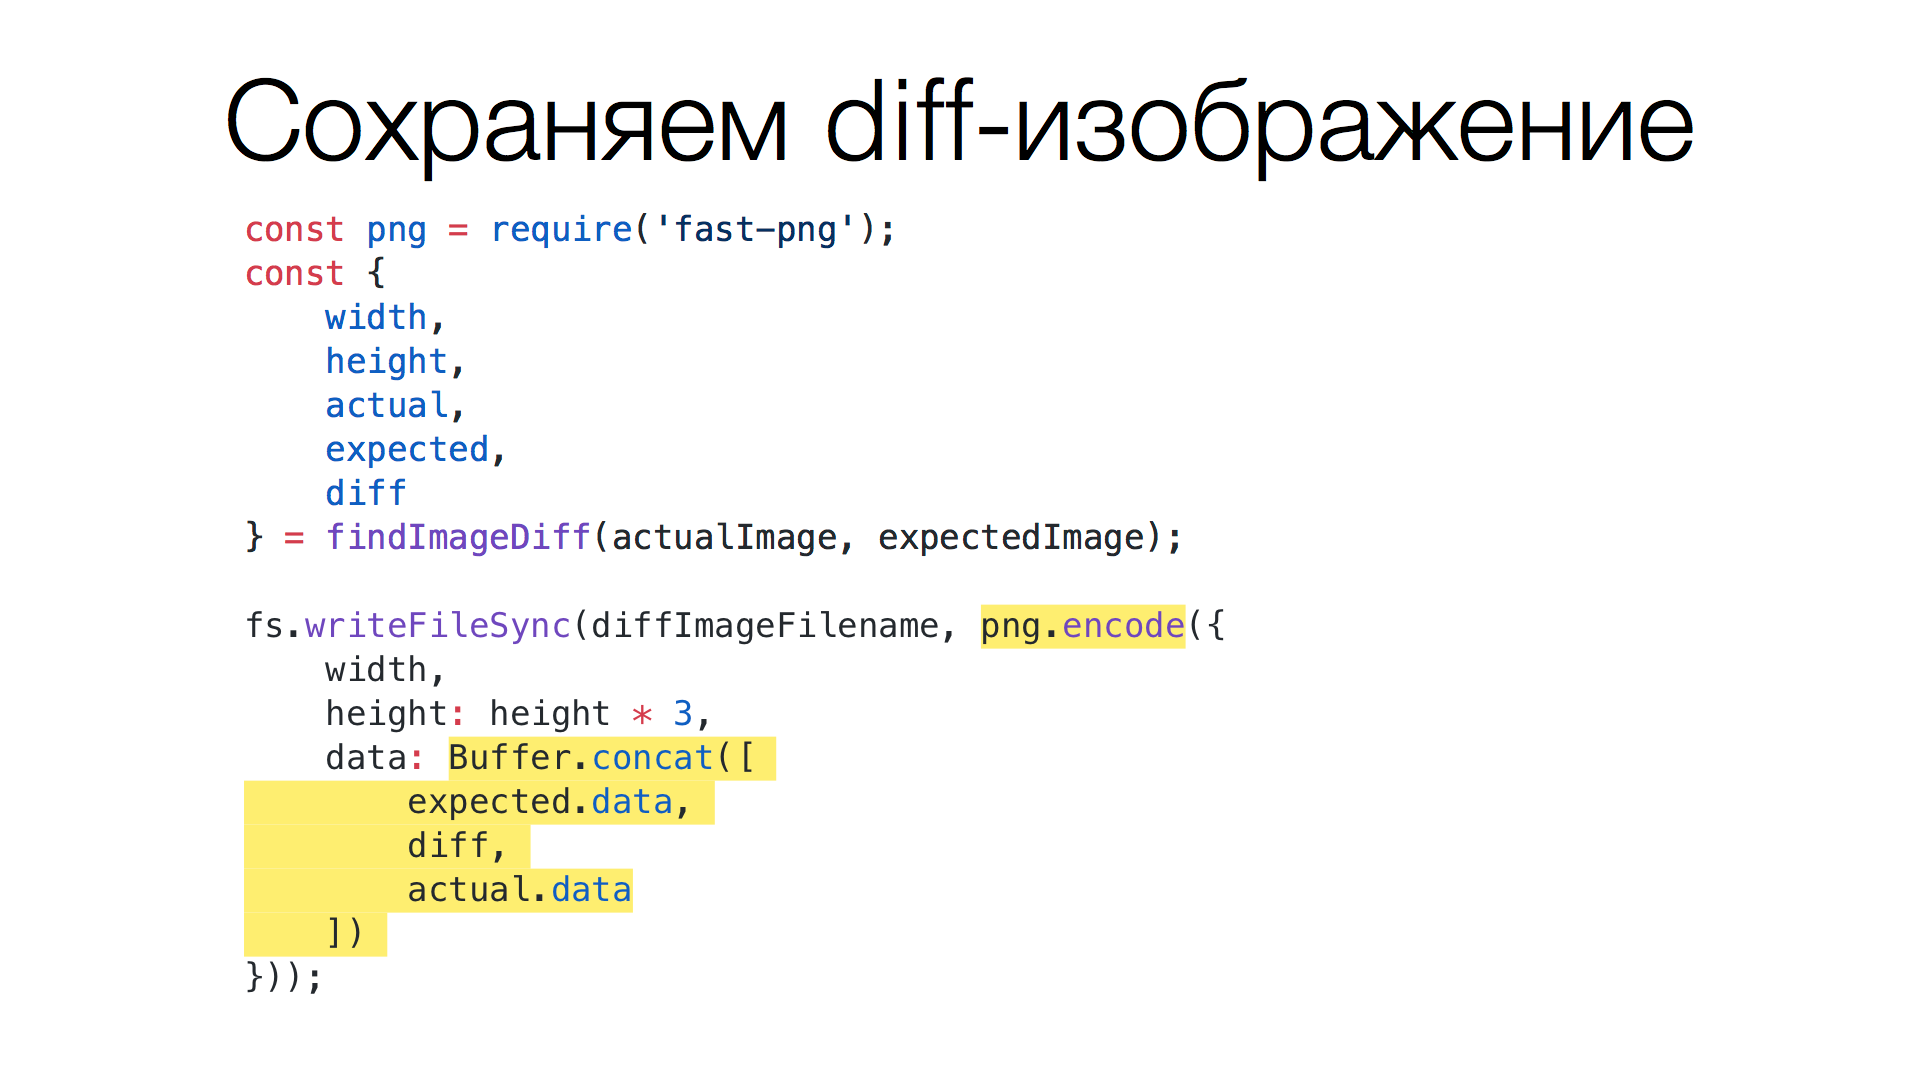
( actual , expected diff ) Buffer.concat() , . fast-png, PNG. , , , .
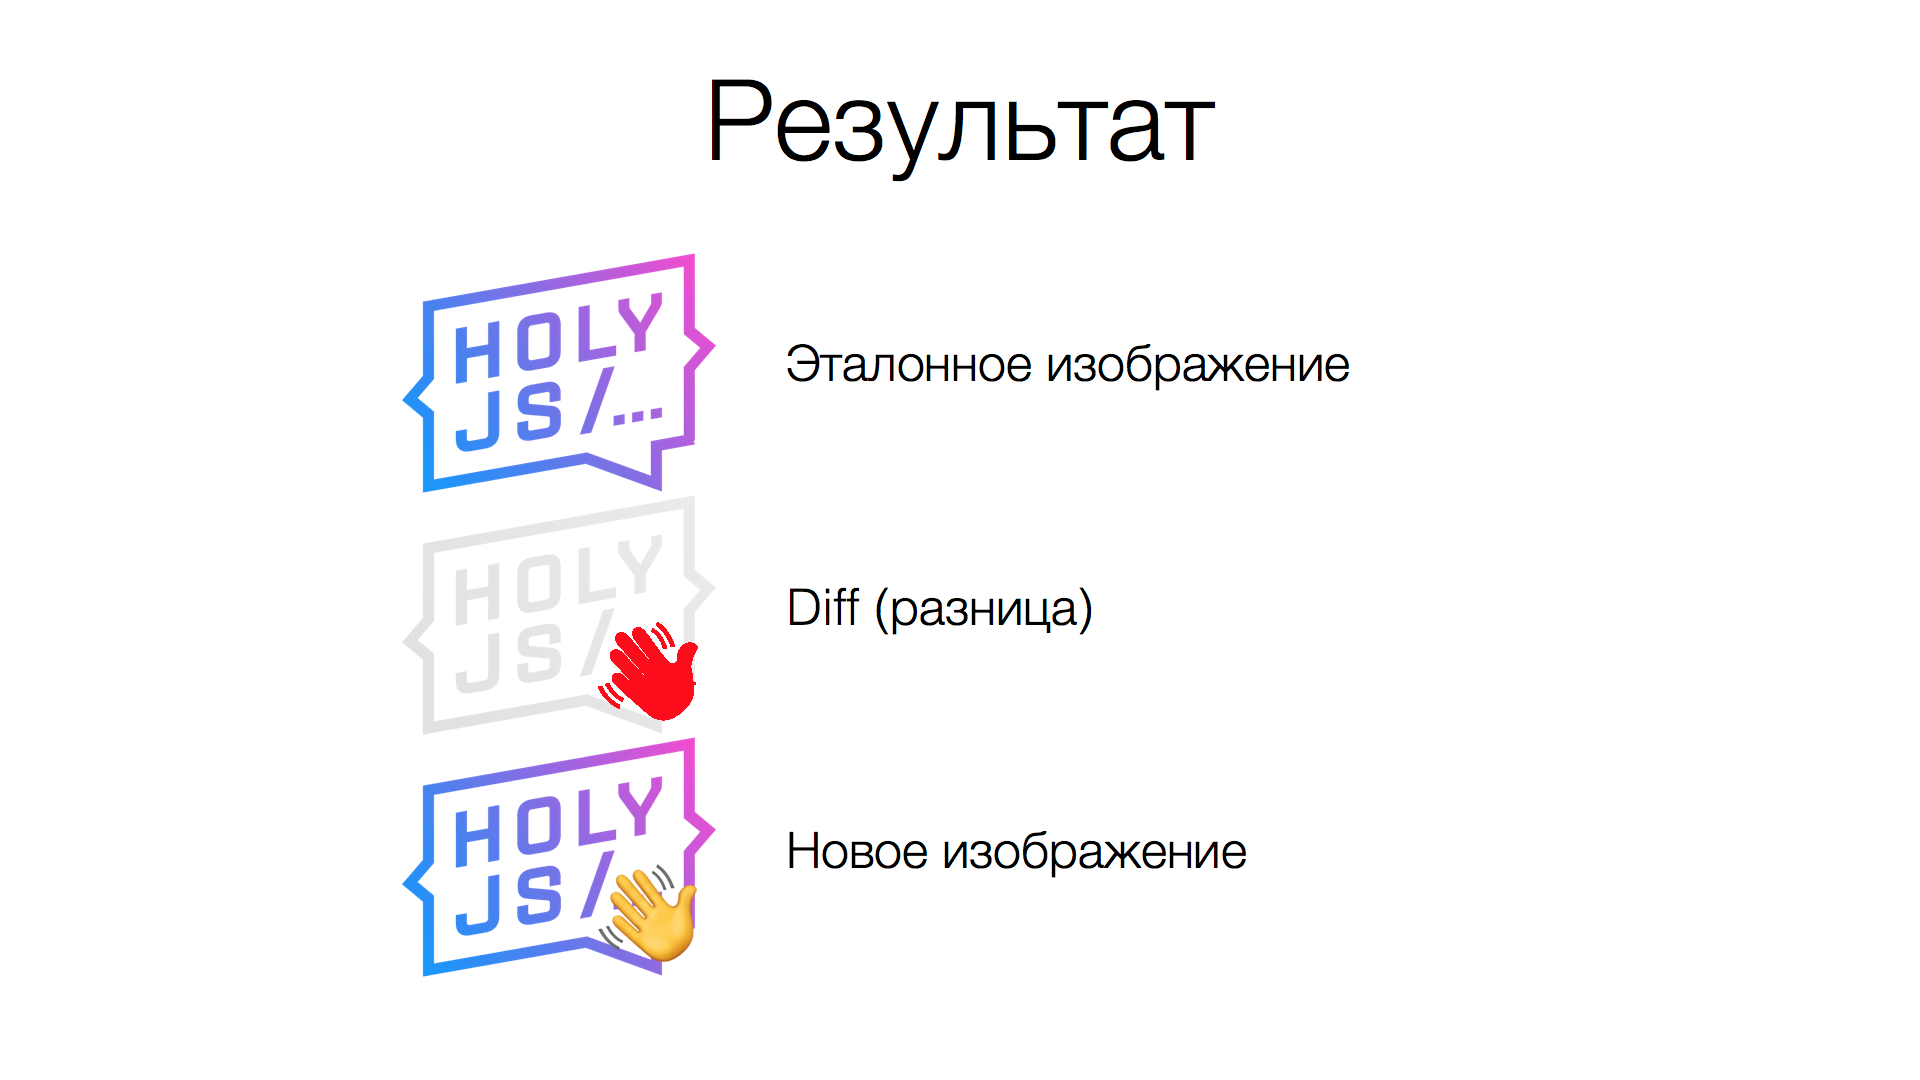
, ( ), — diff: , . ? .
? , , 250 ( , diff-). . , .
. JS, / PNG, / GZIP . , . WebAssembly , . , , , .
: diff-, . diff ! , Git. , . , GitHub , . BitBucket (Stash), :
, . diff? , () . .
Jest, , expand . , , . Jest , . — --expand , . : expand , , , diff-.
?
? , . . What does it mean? , , . , , . , , , , ? , , .
, HTML , . :
- ();
- , ;
- .
. , , . , . -, .
, , , ( ), ( CI, ). , . , , . , , .
: ? — . Why not? , PNG , , . GIF , PNG «»?
, PNG. , PNG . , GIF. GIF , PNG 4 : , , .
() PNG, . , . . ? , , , . — , .
, . – . , . (, ). , ( ), , – . ( ), . , .
( ), , . 45-50 , - , 12-15 . 300 (800x600). .
: , - -, 300 . , ( — ). .
GIT
, , – Git. Git, , .
, Git, VCS, . , ( ). , Git , . Git.
Git — GIT LFS . , Git. :
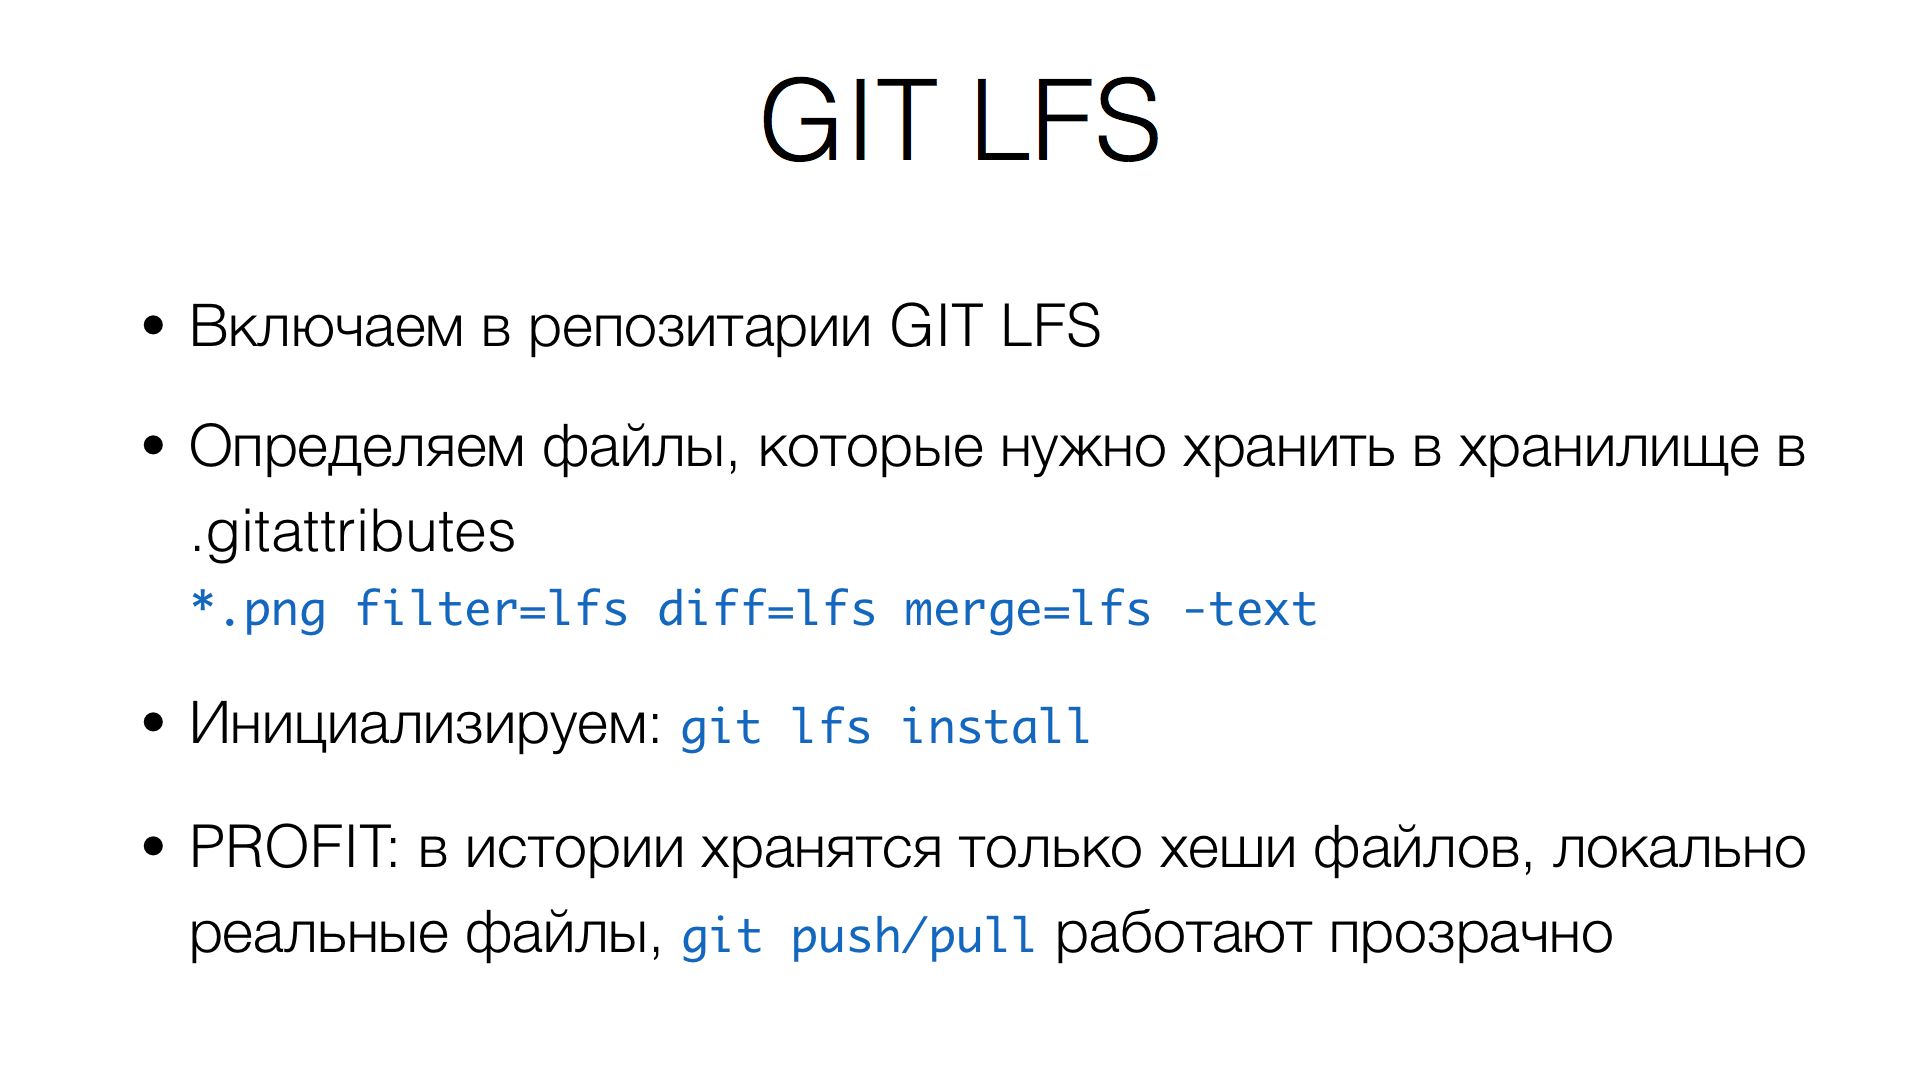
Git , : GIT LFS, . . pull , . push, , Git . git push/pull .
CI, beyond the frontend
: 12-15 , , CI . . CI , : 14 , 4 . : 700+ , 300+ . , — 3,5 . . , - , , devops-, , , ? , TeamCity , .
CI : , git, git checkout, , -, eslint-, stylelint- . . « », , , 3,5 . , , , , . , 30 .
results
- 12-15 . 300 (800600). CI — 20-30 . : , , . 3,5 , , . 20-30 .
Jest. , : , , expand, , (, ). : , , Jest. , , jest-image-snapshot , , .
— « », , . , , , Open Source.
Results
Babel, CSS Modules, Jest. , , , , . , , - , .
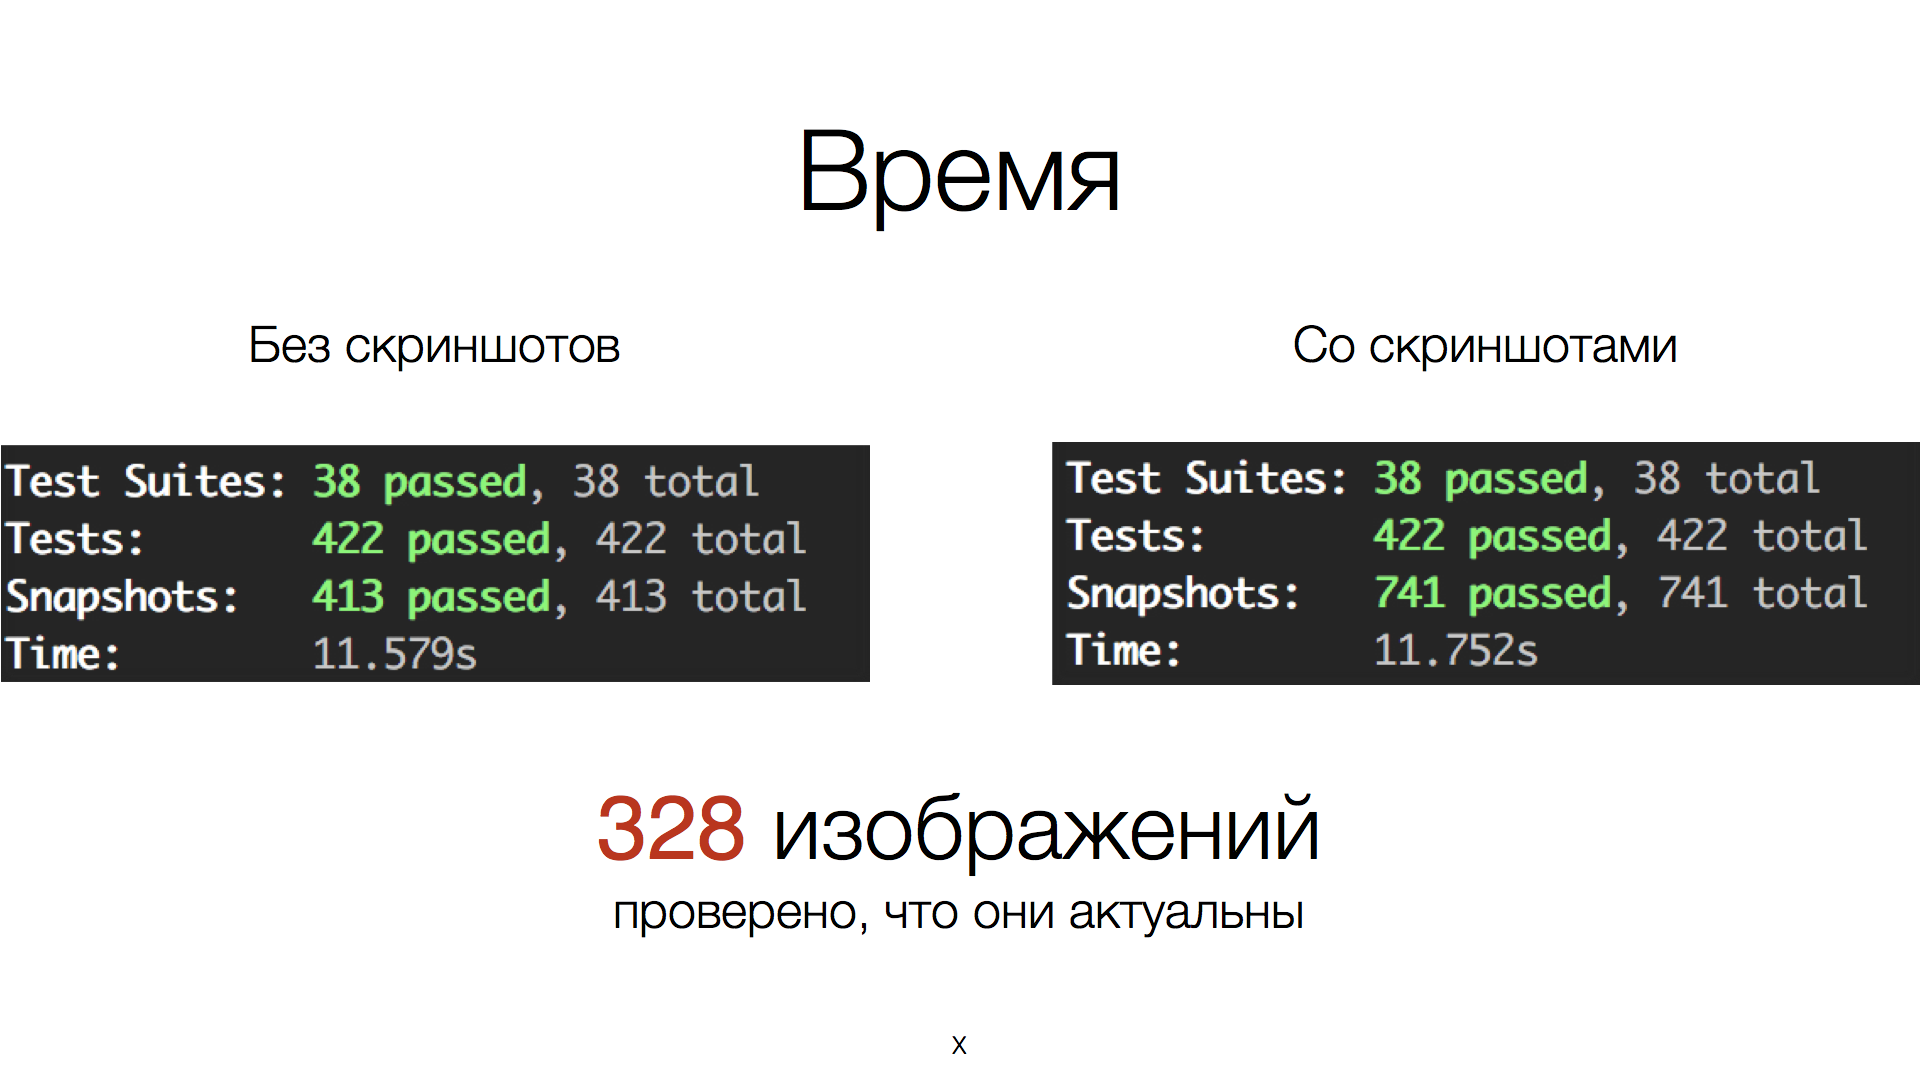
: 11 , . . 328 : .
: , , . , : , . , - — .
? , Jest , GIF, PNG, . Buffer API, TeamCity, - .
: - . . , .
That's all. Thank!
')
Source: https://habr.com/ru/post/350604/
All Articles