How JS Works: Web Push Notifications
[We advise you to read] Other 19 parts of the cycle
Part 1: Overview of the engine, execution time mechanisms, call stack
Part 2: About the V8 internals and code optimization
Part 3: Memory management, four types of memory leaks and dealing with them
Part 4: Event loop, asynchrony, and five ways to improve code with async / await
Part 5: WebSocket and HTTP / 2 + SSE. What to choose?
Part 6: Features and Scope of WebAssembly
Part 7: Web Workers and Five Use Cases
Part 8: Service Workers
Part 9: Web push notifications
Part 10: Tracking DOM Changes with MutationObserver
Part 11: The engines of rendering web pages and tips to optimize their performance
Part 12: Browser networking subsystem, optimizing its performance and security
Part 12: Browser networking subsystem, optimizing its performance and security
Part 13: Animation with CSS and JavaScript
Part 14: How JS works: abstract syntax trees, parsing and its optimization
Part 15: How JS Works: Classes and Inheritance, Babil and TypeScript Transformation
Part 16: How JS Works: Storage Systems
Part 17: How JS Works: Shadow DOM Technology and Web Components
Part 18: How JS: WebRTC and P2P Communication Mechanisms Work
Part 19: How JS Works: Custom Elements
Today we publish the translation of the ninth part of a series of articles on the use of web technologies and JavaScript. In this article, we explore web push notifications. Namely, let's talk about the mechanisms underlying them, and how to subscribe to notifications, how their sending and receiving processes are arranged.
It turned out that push-notifications, which are very common in the world of mobile applications, got to the web quite late, although they are one of those features that many developers would like to use.
Overview
The technology we are talking about here allows users to subscribe to periodic notifications of web applications that are designed to inform subscribers of the appearance of new materials, or the occurrence of events that may be of interest to them. From the point of view of the web resource itself, this means that there is a reason and opportunity to invite users who subscribe to push notifications to visit this resource.
')
One of the mechanisms that provide push notifications is service workers . Service workers who handle push notifications save system resources because their code is executed only when a new notification arrives at the browser, for which a particular service worker is responsible.
Push API and Notifications API
What we call here "web push-notifications", in fact, is represented by two technologies. These are the Push API , which is used when the server sends a message to the service worker, and the Notifications API , which is used when the service worker, or a script in the web application itself, intends to show the user a notification.
Push API
To implement the push notification mechanism, you need to perform the following three steps:
- Preparing user interface. This step involves the preparation of mechanisms that allow the user to subscribe to notifications.
- Sending a push message. At this step, the application server of the web application developer is accessed with the corresponding API, which leads to sending a notification to the user's device.
- Receive push messages. In this step, the push message is processed after it is delivered to the browser.
Consider all this in more detail.
Check browser capabilities
First you need to know if the current browser supports push notifications. You can do this by running the following checks:
- Check for
serviceWorkerin thenavigatorobject. - Check if there is a
PushManagerin thewindowobject.
Here's what it looks like:
if (!('serviceWorker' in navigator)) { // -. return; } if (!('PushManager' in window)) { // push-. return; } If the user's browser does not support the technologies necessary for the operation of web push-notifications, it makes no sense to suggest the user to subscribe to them.
Registration service worker
If after checking the browser it turned out that it supports what we need, you can proceed to registering a service worker. We already spoke about how to do this.
Getting user permission
After the service worker has been registered, you can start the user’s subscription procedure for notifications. In order to do this, you need to get the user's permission to send him push messages.
The permissions API is relatively simple. The only thing that you need to pay attention to is that now two versions of this API are used .
In its older version, it took a callback function, now it returns a promise. This is the source of the problem, since it is impossible to know in advance which version of the API is implemented in the current browser. Therefore, it is necessary to support both of these approaches.
It looks like this:
function requestPermission() { return new Promise(function(resolve, reject) { const permissionResult = Notification.requestPermission(function(result) { // . resolve(result); }); if (permissionResult) { permissionResult.then(resolve, reject); } }) .then(function(permissionResult) { if (permissionResult !== 'granted') { throw new Error('Permission not granted.'); } }); } Calling
Notification.requestPermission() will display the next window.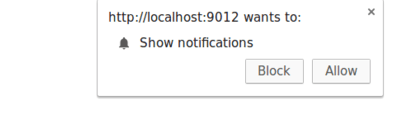
Request permission to display notifications
After the user responds to the request for permission by clicking on the
Allow , Block , or closing the window, we will get the result as a string, which, according to the user's choice, will contain 'granted' , 'denied' , or 'default' .Remember that if a user clicks on the
Block button, your application will no longer be able to ask him for permission to display notifications until he unlocks it himself. In order to do this, the user will have to delve into the browser settings.Subscribing a user with PushManager
After we have verified that the service worker has registered and received permission from the user to display notifications, you can subscribe by calling the
registration.pushManager.subscribe() method during the registration of the service worker.Here's how it all, including the registration of the service worker, looks like:
function subscribeUserToPush() { return navigator.serviceWorker.register('service-worker.js') .then(function(registration) { var subscribeOptions = { userVisibleOnly: true, applicationServerKey: btoa( 'BEl62iUYgUivxIkv69yViEuiBIa-Ib9-SkvMeAtA3LFgDzkrxZJjSgSnfckjBJuBkr3qBUYIHBQFLXYp5Nksh8U' ) }; return registration.pushManager.subscribe(subscribeOptions); }) .then(function(pushSubscription) { console.log('PushSubscription: ', JSON.stringify(pushSubscription)); return pushSubscription; }); } The
registration.pushManager.subscribe(options) method takes an options object, which contains a number of options, some of which are optional:userVisibleOnly. This boolean value indicates that the generated subscription will be used only to display messages. This parameter must be set totrue, otherwise we will encounter an error (this has historical reasons).applicationServerKey. This is a Base64 encodedDOMString, or anArrayBufferobject that contains the public key that the push server will use to authenticate the application server.
The web application server must generate a pair of application keys unique to the server (they are also called VAPID keys). This pair includes public and private keys. The server keeps the private key secret and sends the public key to the client. The keys allow the push notification service to know which application server has signed the user, and to be sure that it is the same server that sends notifications to a specific user.
A pair of keys for the application need to be created only once. In order to generate keys, you can look here .
The browser sends the
applicationServerKey (public key) to the push service during the subscription process. This means that the push service will be able to associate the application's public key with a subscription, PushSubscription .This is what happens here:
- The web application loads and calls
subscribe(), passing the server key. - The browser performs a network request to the push service, which will generate the address of the entry point to its own API, associate this address with the key and return information about it to the browser.
- The browser will add this information to the
PushSubscriptionobject, which is returned via thesubscribe()promise.
Later, when you want to send a push notification, you need to create an
Authorization header that contains information signed by the application's private server key. When the push service receives a request to send a notification, it checks the header using the public key that is already associated with the API entry point in the second step of the process described above.PushSubscription object
The
PushSubscription object contains all the information needed to send push notifications to the user's device. Here is what it looks like: { "endpoint": "https://domain.pushservice.com/some-id", "keys": { "p256dh": "BIPUL12DLfytvTajnryr3PJdAgXS3HGMlLqndGcJGabyhHheJYlNGCeXl1dn18gSJ1WArAPIxr4gK0_dQds4yiI=", "auth":"FPssMOQPmLmXWmdSTdbKVw==" } } The
endpoint property is a push notification service URL, an API entry point. In order to send a notification, you must perform a POST request at this URL.The
keys object contains information used to encrypt the message data sent in the push notification.When the user is subscribed to notifications, and you have a
PushSubscription object, you need to send it to the server. On the server, the contents of this object need to be stored in the database, for example, and from this point on this information can be used to send push notifications to the appropriate user.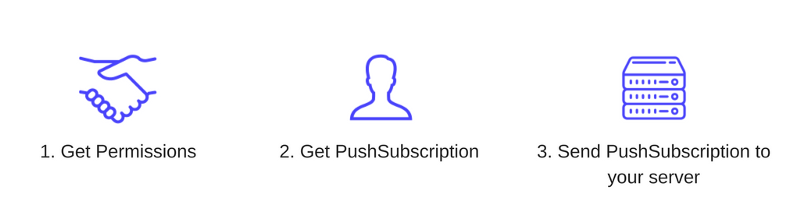
Getting permissions, building a PushSubscription object and sending it to the server
Sending a push message
When sending a push message to a user, you need to inform the push service (by calling the appropriate API method) about what data to send, to whom it should be sent, and any additional information about the message. Typically, this call is made from the web application server.
Push services
A push service is a system that receives requests to send push notifications, checks them and delivers notifications to the appropriate browser.
Please note that push services are third-party services that you, as a web application developer, do not control. Your servers are those servers that interact with push services through an API. An example of a push service is Google FM .
Push service takes on the implementation of many complex tasks. For example, if the browser is offline, the push service will put the messages in a queue and wait until the message is sent until the browser is available.
Each browser can use any push service, the developer of the web application does not affect the choice of the push service. All push services, however, have the same API, so the variety of such services does not create problems with the implementation of push notifications. In order to get the URL that will handle requests to send your push messages, you need to refer to the previously stored value of the
endpoint parameter of the PushSubscription object.Push services API
The push services API provides tools to send messages to users. It is represented by the Web Push Protocol , which is an IETF standard that defines how to work with push services.
The data that is sent in the push message must be encrypted. So the developer does not allow push-services to view the data sent to users. This is important, since it is the browser that decides which push service to use (these can be push services that are not secure enough).
For each push message, the following properties are set:
TTL- defines the period that an undelivered push-notification can spend in the queue before its removalPriority- sets the priority of the message, which allows the push service to send only high-priority messages in case you need to save battery power of the user's device.Topic- assigns a push the name of a topic to a push notification, which will lead to the replacement of waiting messages with the same topic. As a result, as soon as the user's device is active, the user will receive the current message.
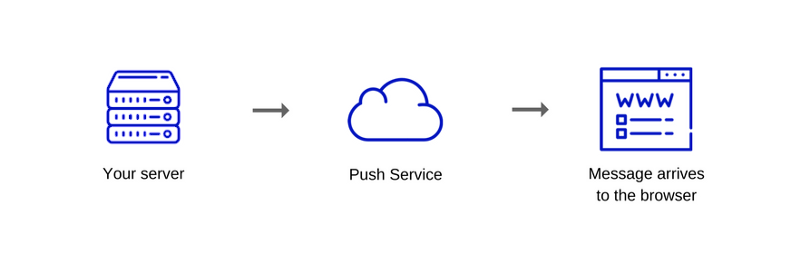
Web application developer server, push server, and browser that receives the message
Browser push events
As soon as the message is sent to the push service, it will remain in the idle state until one of the following events occurs:
- The device is online.
- The message retention period specified by the TTL parameter has expired.
When a push service delivers a message, the browser receives it, decrypts it, and triggers a push event in a previously registered service worker.
The most interesting thing here is that the browser can call a service worker even if the corresponding web page is not open. Here the following happens:
- A push notification comes to the browser that decrypts it.
- The browser activates the service worker.
- The push event is passed to the service worker.
The code that is used to set up a push event handler looks just like the code of any other event handler written in JavaScript:
self.addEventListener('push', function(event) { if (event.data) { console.log('This push event has data: ', event.data.text()); } else { console.log('This push event has no data.'); } }); If we talk about the features of service workers, then it should be noted that the developer has a minimum level of control over how long the service worker will be running, since it is the browser that decides when to activate it and when to stop it.
The design of the service worker
event.waitUntil(promise) informs the browser that, before the promise is resolved, the service worker is busy processing the notification, and the browser should not shut down the service worker until this work is completed.Here is a sample code to handle the push event:
self.addEventListener('push', function(event) { var promise = self.registration.showNotification('Push notification!'); event.waitUntil(promise); }); Calling
self.registration.showNotification() results in a notification that the user can see; this call returns a prompt that will be resolved as soon as the notification is displayed.The
showNotification(title, options) method showNotification(title, options) allows you to customize the appearance of the notification in accordance with the needs of the developer. So, the title parameter is a string, and the options parameter is an object approximately like the following: { "//": "Visual Options", "body": "<String>", "icon": "<URL String>", "image": "<URL String>", "badge": "<URL String>", "vibrate": "<Array of Integers>", "sound": "<URL String>", "dir": "<String of 'auto' | 'ltr' | 'rtl'>", "//": "Behavioural Options", "tag": "<String>", "data": "<Anything>", "requireInteraction": "<boolean>", "renotify": "<Boolean>", "silent": "<Boolean>", "//": "Both Visual & Behavioural Options", "actions": "<Array of Strings>", "//": "Information Option. No visual affect.", "timestamp": "<Long>" } Here you can read the details on how to configure the appearance of notifications.
Results
Push notifications can also bring benefits to the resources on which they are used and to the users of these resources. Perhaps the most important thing to remember for owners of web resources is that their push notifications must contain something that is really interesting and necessary for users.
The author of this material says that in his company, SessionStack , they plan to use push notifications in order to inform users about failures, problems or anomalies in their projects. This will allow them to instantly learn about emergency situations and take appropriate action.
Previous parts of a series of articles:
Part 1: How JS Works: Overview of the Engine, Runtime Mechanisms, Call Stack
Part 2: How JS Works: About V8 Inside and Code Optimization
Part 3: How JS works: memory management, four types of memory leaks and how to deal with them
Part 4: How JS works: event loop, asynchrony, and five ways to improve code with async / await
Part 5: How JS: WebSocket and HTTP / 2 + SSE work. What to choose?
Part 6: How JS Works: Features and Scope of WebAssembly
Part 7: How JS Works: Web Workers and Five Use Cases
Part 8: How JS Works: Service Workers
Dear readers! Do you use push notifications in your projects?

Source: https://habr.com/ru/post/350486/
All Articles