Publish the game on Google Play. Configuring Play Games Plugin for Unity
Hello! I decided to share my experience on adding a game to the Google Play Console and setting up the Play Games Plugin for Unity.
We will begin with the Unity setup.
First you need to download and install Play Games Plugin.
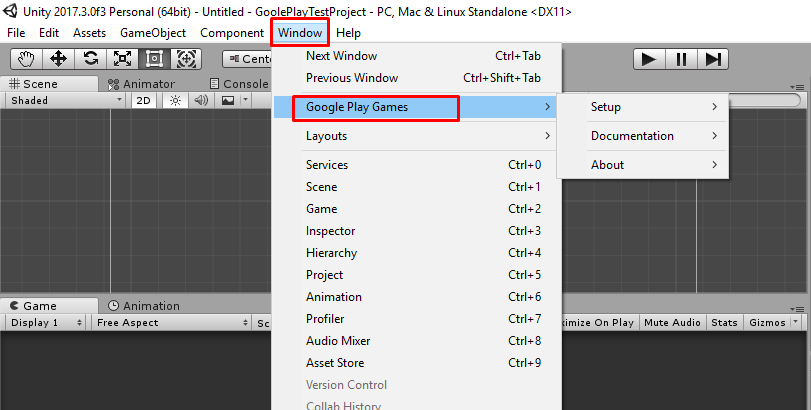
To do this, follow this link , download the repository, go to the current-build folder, open GooglePlayGamesPlugin and install it. After that, Google Play Games should appear in the Windows tab.
')
And this window should appear
Before creating a build, you will need to change a couple of settings in Player Settings. Go to Edit -> Project Settings -> Player.
In the Other Settings tab, specify the following fields:
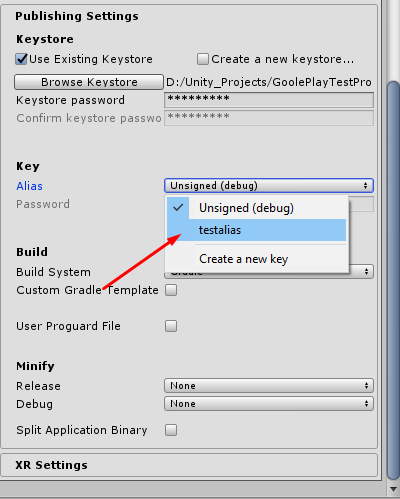
Next, go to the tab Publishing Settings.
Here we need to create a keystore, (more about the keystore here and here is a bit shorter ).
After that you will need to create Alias:
Now, every time you create a new build, you will need to go into these settings and enter passwords for the keys, so keep the keys in a safe place, in case of loss there will be big problems with recovery.
More information about all the settings can be read on the Unity page .
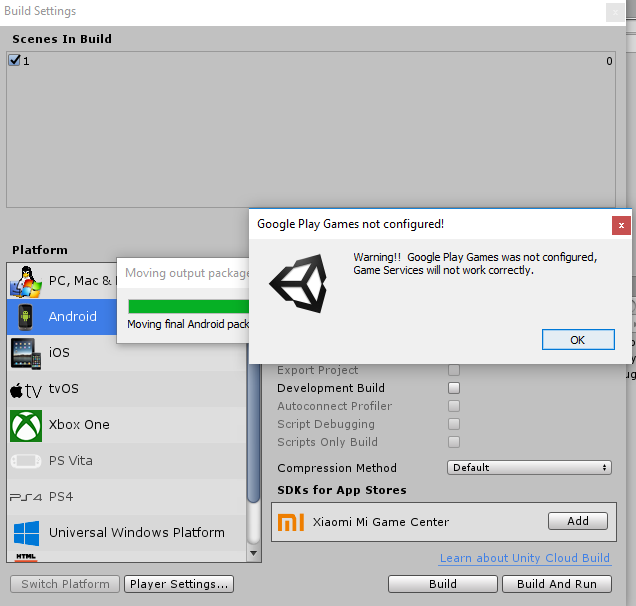
If such a window appears after creating the build, then do not worry, after setting up the Google Service, we will return to Unity.
For a start, we will need to purchase a Google Developer Account, it costs $ 25. Suppose we already bought it.
Open link to Google Play Console
Go to the All Applications tab, click New Application, enter the name, select the language of the future application, click create.

After creating the application, a page with your application will open.
Here you will need to fill in all the necessary fields so that you can publish the application. You can just point at the triangle, and he will tell you what you need to fill.

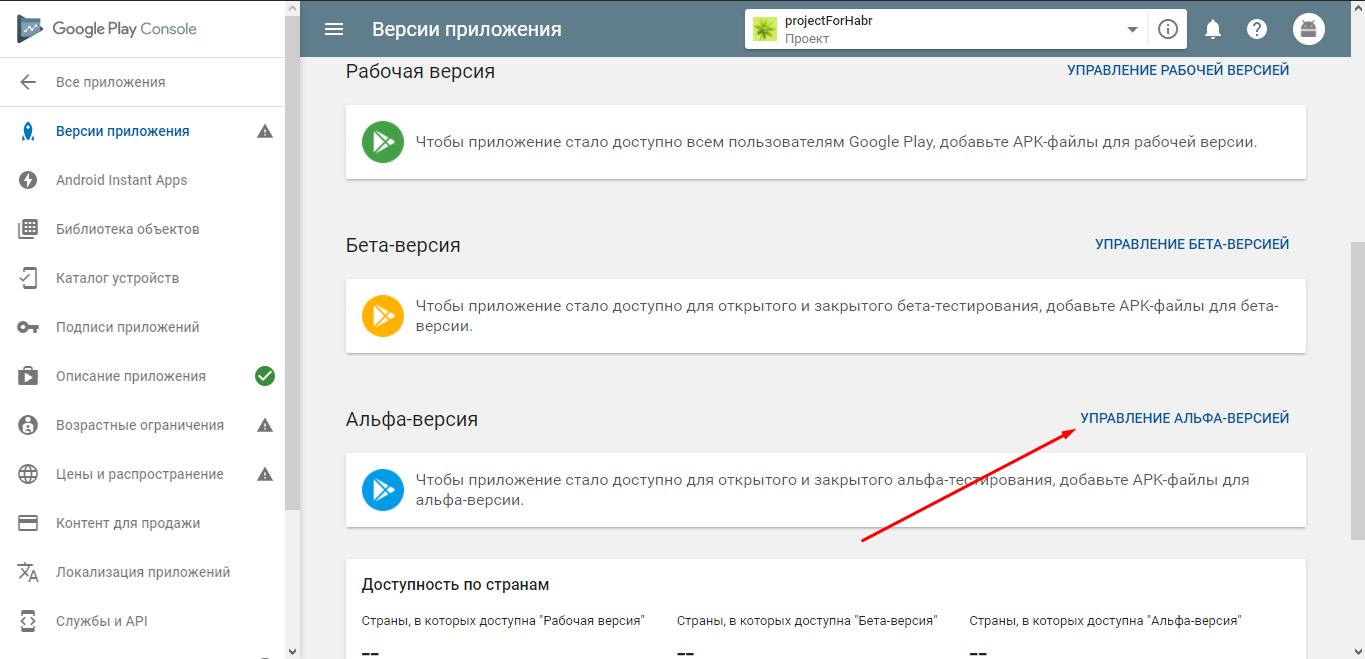
After filling in all the required fields, go to the Application Versions tab,
then you decide at what stage your application, and based on the choice, go to the tab control, in my case this is Alpha testing.
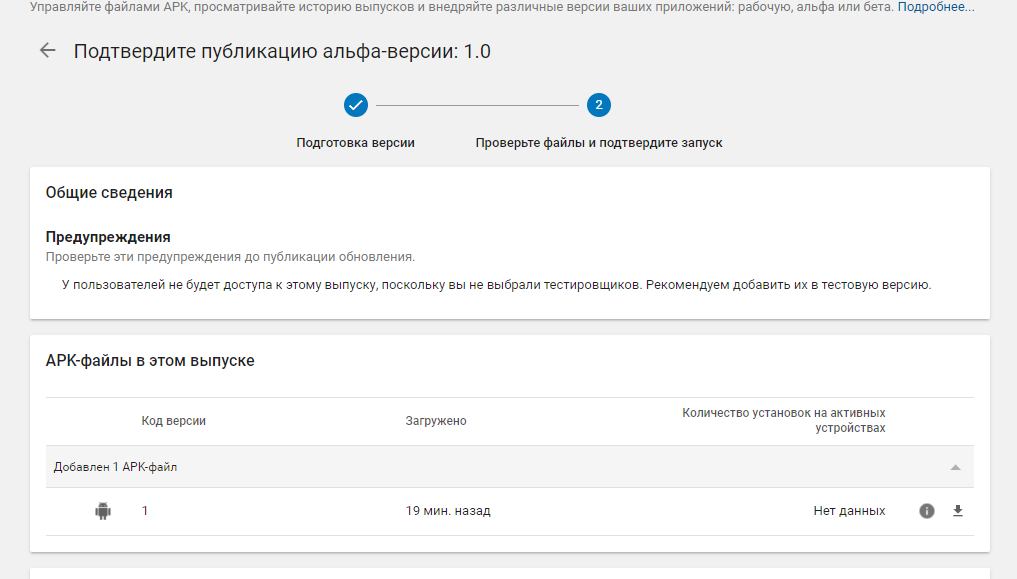
Here we choose to create a release, connect the Google Play App Signing in the next window (if it appears). Select our apk file, after downloading the file, Google should automatically pull up the version of the application, and the bundle number (the settings that you specified before creating the build) as shown in the screenshot.

And the last thing you need to do before creating a release is to fill in the “What's new in this version” field (do not delete the language tags when filling out). Click to see, there should be a warning of this type:
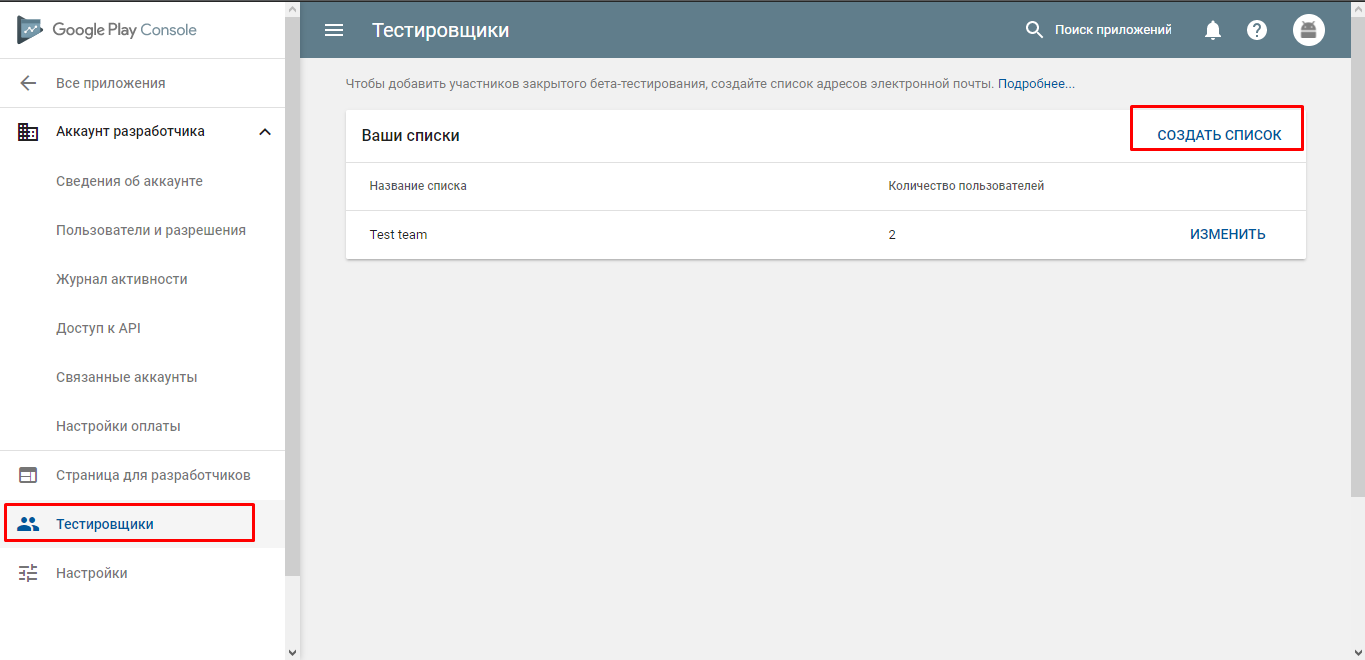
Okay, you need to add testers before publishing the application, you can do this in the settings. Exit the application tab, on the main page, select Settings, go to the Testers tab and add a list (just specify the mail).
You return to your application, click on Manage, then choose what testing will be, open or closed, choose your list of testers, click save.
Go back to the Application Versions page, click to change the version, everything is preserved what you did before (including your apk that you downloaded), just click to view, and click to publish (before publication, make sure that the application is ready for publication, otherwise you will have an invalid publish button)

After that, the project should go to the stage of preparing for publication, you will need to wait a couple of hours until our application is checked.

In the meantime, we are checking, we will move on to setting up gaming services.
Game services allow you to add leaderboards, cloud storage, achievements, quests, etc. to the game.
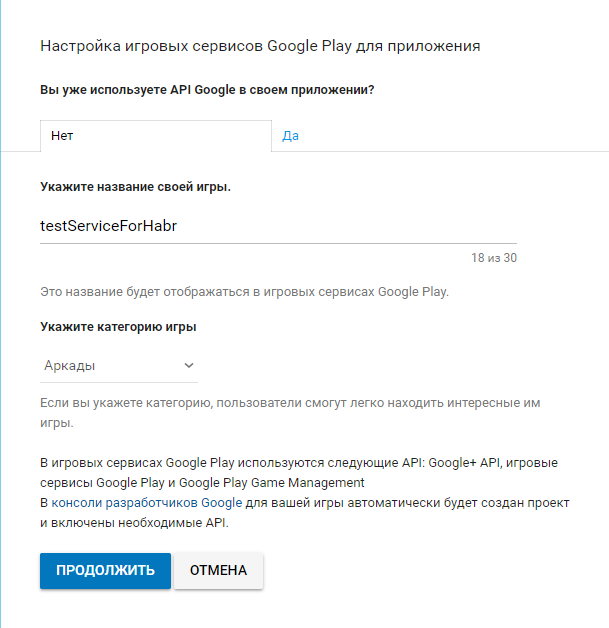
Go to the main page, go to the Game Services tab, click to add a game, be sure to choose that you are not using the Google API yet, click continue.
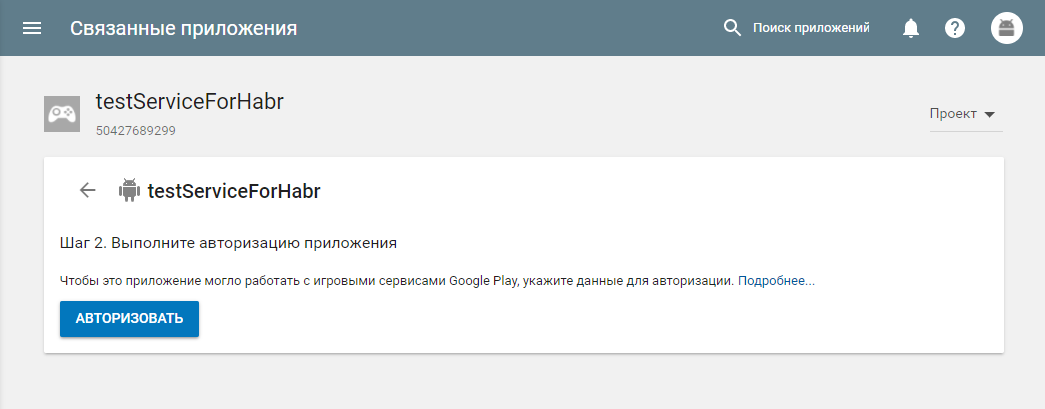
Here we will need to tie the game that we downloaded earlier to the service that we have just created. Go to the Related Applications tab and select the platform (in my case Android), when you click on the package name, your game should appear, select it, twist it a bit lower, and select the settings that you need, then save.

After that, you must authorize the application, click to authorize and confirm, a little later I will tell about it.
If you want to use cloud storage, go to the Game Details tab and there after the game description there will be the Saved games option, turn it on and save the changes (after selecting this option, it cannot be changed after publishing the service), immediately scroll to the end and enable the Google Drive API.
Now you can add what you want, in my case I will add one leaderboard.
After you have done everything / added, go to the Publication tab, it will indicate what you have not done, click to publish the game.
Again, you will need to wait a couple of hours.
After your game is published, you can find it on the Google Play page, and also we will need to send a link to our application to testers.

To do this, go to Release Management, Application Versions, expand this window.
and see the link that will need to be sent to testers, go through it.
Here we have a window in which we will have to agree to test our application, click Participate in testing
After that, a window should appear that you have become a tester, on the page there will be links from where you can download the application.

Now you can download your application and test it.
Tip : To quickly go to your application page on Google Play, hover over the information icon to the right of the name of your project, and click Find on Google Play.
Well, you can now download your apps from Google Play. The next step is to update the application.
Suppose we have changed something in the application, and now we want to update the version of the application on Google Play.
For this, it is mandatory to change the Bundle Version Code in Unity (it is not necessary to change the application version), and enter the passwords for the keys that were created before.
After creating the build, go to Google Play Console, open the application that we want to update, go to Release Management -> Application Versions -> go to Management, Select Create Issue in the upper right corner, download our apk, fill in the What's New field (you can copy from the past version). The version code is taken from the Bundle Version Code, in my case it is 2.
Click save, after View and click publish.
After the update, you will have to wait about 30 minutes before publishing the application. After updating the application, the new version should be tested on 10 devices, you can watch in real time how it is being tested, watch the launch video, and read the logs. To do this, go to the application -> Release Management -> Test Report. Here you will find a list of phones that are being tested, and monitor the status of the passage.
To watch the video with the launch, select the device where the testing has already been completed, then a window with the characteristics of the phone and video should open.

ps A month ago, it was possible to watch the logs under the video, who knows where Google has gone?
Usually, testing takes about 20 minutes, after that you have to wait 10-15 minutes before publishing on Google Play. By the way, be careful if you download several versions in a row, not the fact that the version you are downloading is the last one, my advice after publication can safely wait about an hour before testing.
Agree, if you are testing Google Play Services, it takes a decent amount of time (about 40 minutes) all the way from download to download, which is not at all happy. I myself went this way when I did support Google Play Services, it was very painful to wait 40 minutes after each small change to test it. Like watching a video about cloud storage, I saw the Nox applications ( link , I hope they don’t consider advertising), which perfectly emulates Android, you just create a new version of the application, install it in Nox, and that's it, you can safely test it, bypassing 30 minutes time, not bad right? But there is another snag, Google Play services will not work if you downloaded the application not from Google Play, but this can be easily bypassed, I also stumbled on this in the cloud storage video.
And so, let's move on, go to the application -> Release management -> Application signatures, 2 sets of certificates will open before you, you need a SHA1 certificate from the Download certificate section, copy its value.

Now you need to change the value of the certificate in the Google API, for this we go to the Game Services, select the one to which your application is attached, open the Game Information, turn to the bottom of the page and see the link, go through it (thanks google for such a cool design, sometimes it takes a few minutes to find the link).
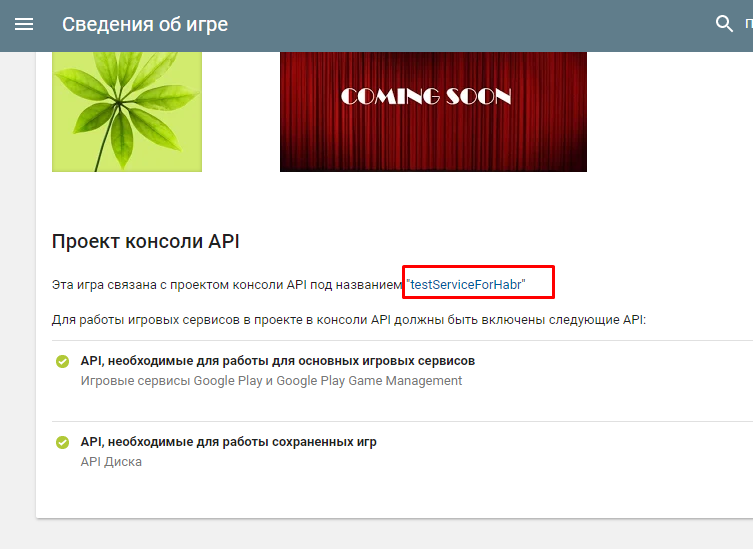
This will open this page, here we are interested in the section Credentials
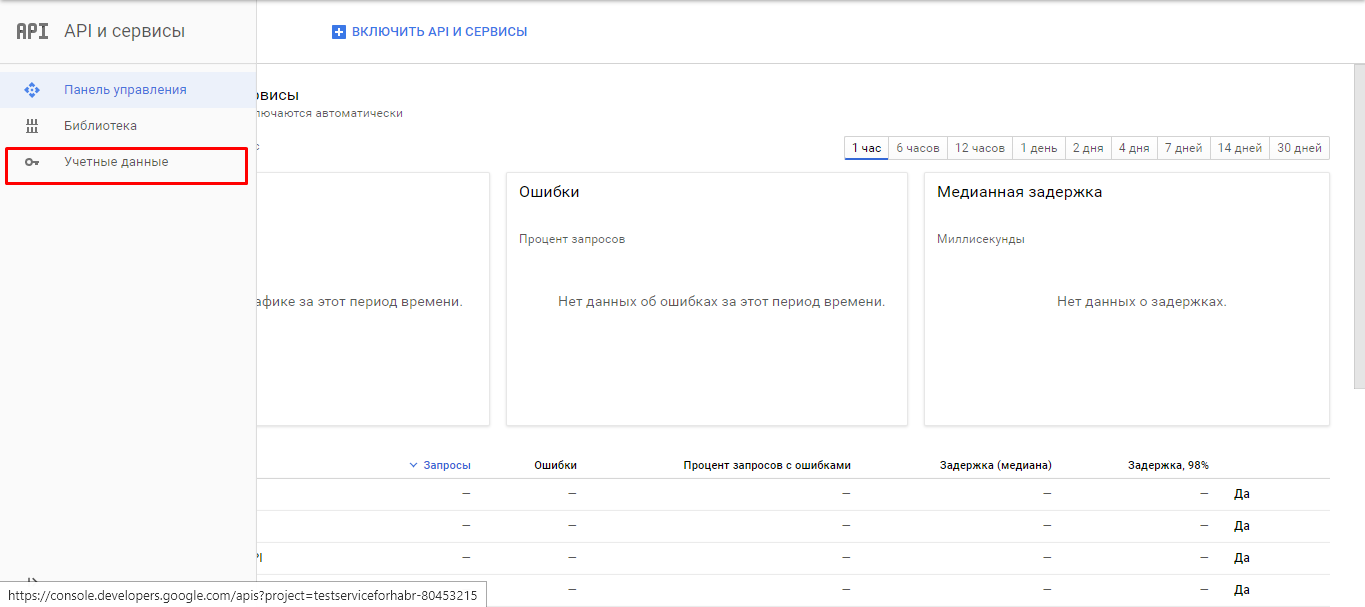

We open our account and change the value of the SHA1 certificate to the one that you copied before, and save.
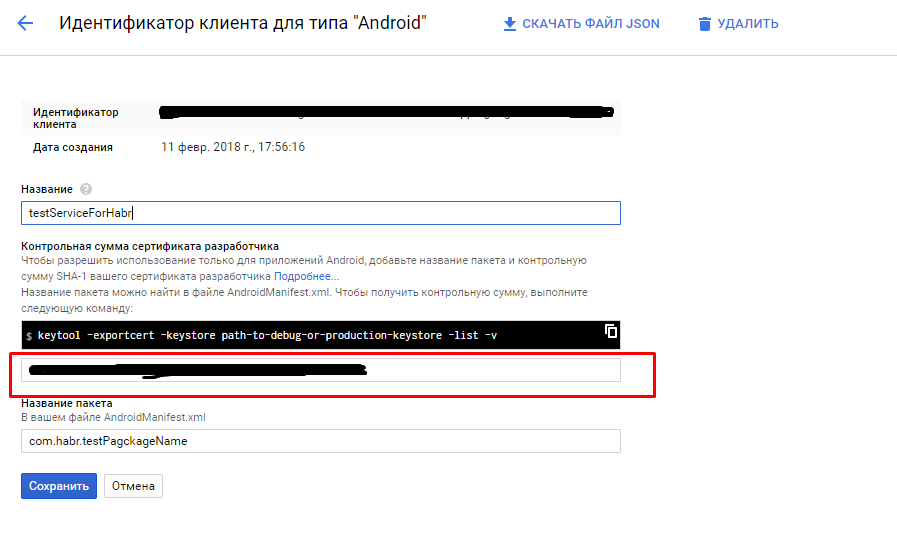
Important! Do not forget before publishing the release version to change the value of the certificate SHA1 to that of the Certificate to sign the application. Otherwise, services will not work for users.

Now we have reduced our testing to 5-7 minutes, a good result!
After we’ve done everything in the Google Play Console, we can go back to Unity and finish our settings.
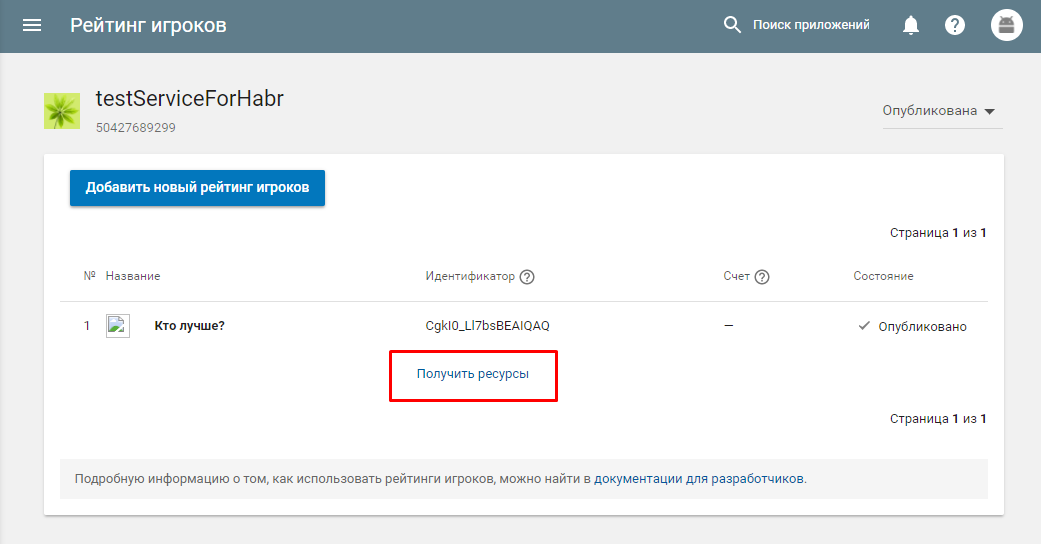
To begin, open the Google Play Console and go to the Game Services, and open something from what we have created (for example, player rating) and see “Get Resources”, click on it, copy everything in the Android tab, and open Unity.
Open Unity, go to the Window tab -> Google Play Games -> Setup -> Android setup

This window should appear.
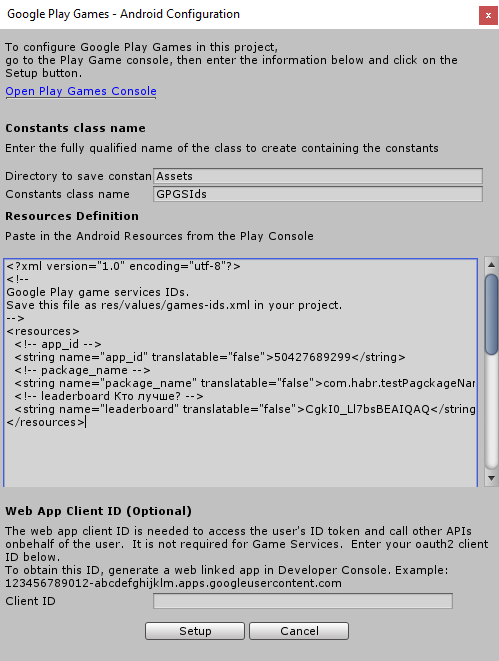
In it we indicate where we will save the class, and the name of the class, we also insert there what we copied before, and click Setup, a window will appear that the setup was successful.
That's all, now this class contains constants with id-schnick of things that we have created.
In the end, I decided to duplicate all the links that were in the article, as well as provide links to videos that will be useful when setting up Google Services in the code.
And that's all, thank you all!
We will begin with the Unity setup.
Unity setup
First you need to download and install Play Games Plugin.
To do this, follow this link , download the repository, go to the current-build folder, open GooglePlayGamesPlugin and install it. After that, Google Play Games should appear in the Windows tab.
')
And this window should appear
Before creating a build, you will need to change a couple of settings in Player Settings. Go to Edit -> Project Settings -> Player.
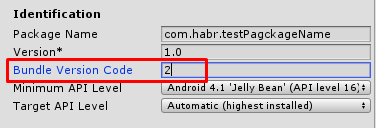
In the Other Settings tab, specify the following fields:
- Package name: Package name of your future game
- Version: Application Version
- Bundle Version Code: Based on it, Google Play determines which version of the application is newer. It will not be displayed to users.
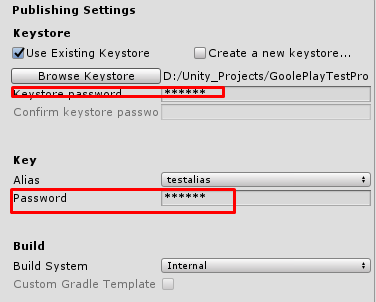
Next, go to the tab Publishing Settings.
Here we need to create a keystore, (more about the keystore here and here is a bit shorter ).
- Select the checkbox Create a new keystore
- Next select Browse Keystore
- We set a name, we save
- Fill in the field with a password
After that you will need to create Alias:
- Click on Alias, select Create a new key
- Fill in the fields, click Create key
- Choose our Alias key that we just created
About Aliases
Aliases
Keystore (at least in the JKS format) allows you to store several pairs of keys and certificates. An alias is used to identify each pair or individual certificate. The alias is specified in the source code when accessing the corresponding key or certificate. Access to each alias is limited by password.
Keystore (at least in the JKS format) allows you to store several pairs of keys and certificates. An alias is used to identify each pair or individual certificate. The alias is specified in the source code when accessing the corresponding key or certificate. Access to each alias is limited by password.
Now, every time you create a new build, you will need to go into these settings and enter passwords for the keys, so keep the keys in a safe place, in case of loss there will be big problems with recovery.
More information about all the settings can be read on the Unity page .
If such a window appears after creating the build, then do not worry, after setting up the Google Service, we will return to Unity.
Setting up the Google Play Console
For a start, we will need to purchase a Google Developer Account, it costs $ 25. Suppose we already bought it.
Open link to Google Play Console
Go to the All Applications tab, click New Application, enter the name, select the language of the future application, click create.
After creating the application, a page with your application will open.
Here you will need to fill in all the necessary fields so that you can publish the application. You can just point at the triangle, and he will tell you what you need to fill.
After filling in all the required fields, go to the Application Versions tab,
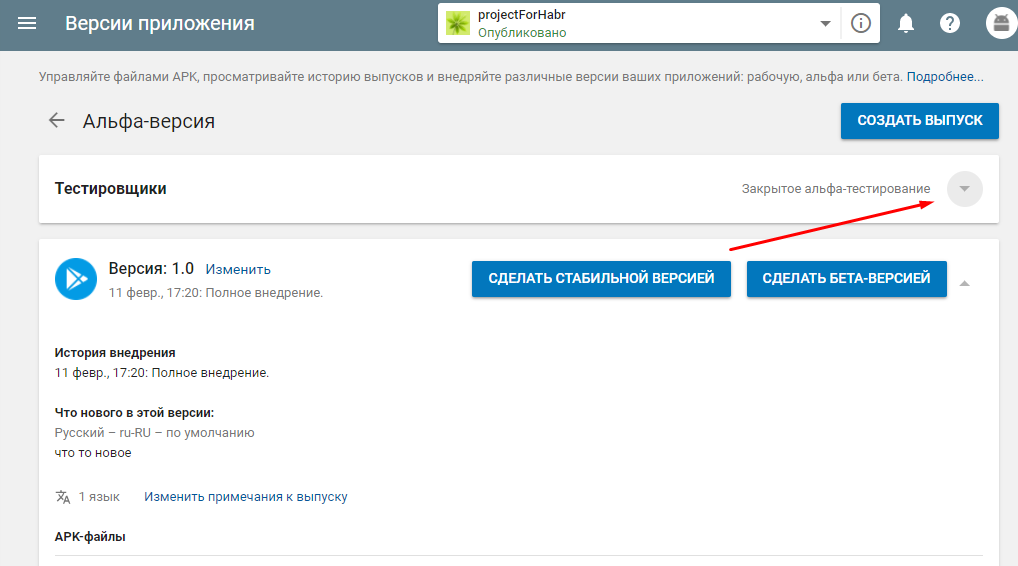
then you decide at what stage your application, and based on the choice, go to the tab control, in my case this is Alpha testing.
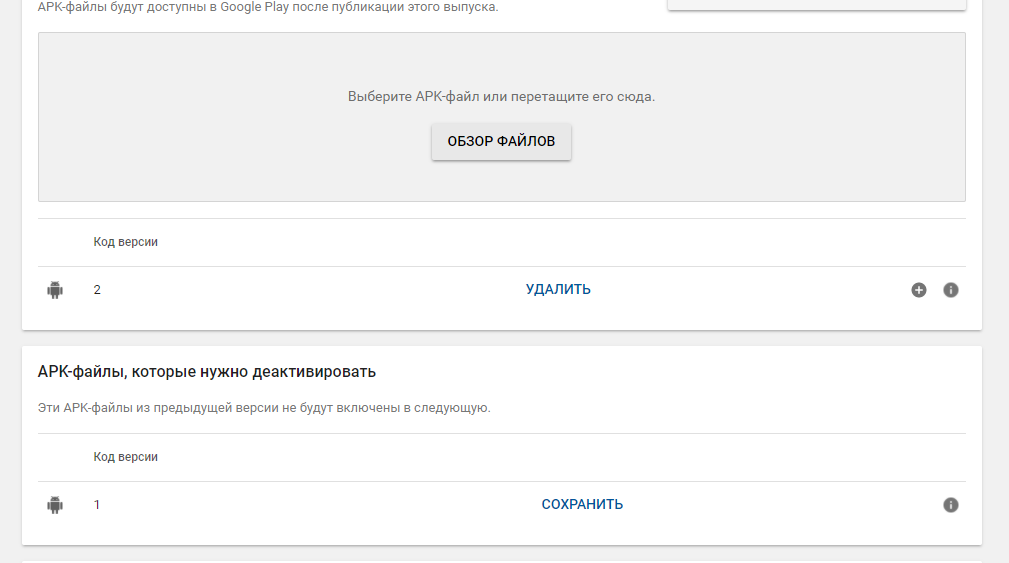
Here we choose to create a release, connect the Google Play App Signing in the next window (if it appears). Select our apk file, after downloading the file, Google should automatically pull up the version of the application, and the bundle number (the settings that you specified before creating the build) as shown in the screenshot.
And the last thing you need to do before creating a release is to fill in the “What's new in this version” field (do not delete the language tags when filling out). Click to see, there should be a warning of this type:
Okay, you need to add testers before publishing the application, you can do this in the settings. Exit the application tab, on the main page, select Settings, go to the Testers tab and add a list (just specify the mail).
You return to your application, click on Manage, then choose what testing will be, open or closed, choose your list of testers, click save.
Go back to the Application Versions page, click to change the version, everything is preserved what you did before (including your apk that you downloaded), just click to view, and click to publish (before publication, make sure that the application is ready for publication, otherwise you will have an invalid publish button)
After that, the project should go to the stage of preparing for publication, you will need to wait a couple of hours until our application is checked.
In the meantime, we are checking, we will move on to setting up gaming services.
Configuring Game Services
Game services allow you to add leaderboards, cloud storage, achievements, quests, etc. to the game.
Go to the main page, go to the Game Services tab, click to add a game, be sure to choose that you are not using the Google API yet, click continue.
Here we will need to tie the game that we downloaded earlier to the service that we have just created. Go to the Related Applications tab and select the platform (in my case Android), when you click on the package name, your game should appear, select it, twist it a bit lower, and select the settings that you need, then save.
After that, you must authorize the application, click to authorize and confirm, a little later I will tell about it.
If you want to use cloud storage, go to the Game Details tab and there after the game description there will be the Saved games option, turn it on and save the changes (after selecting this option, it cannot be changed after publishing the service), immediately scroll to the end and enable the Google Drive API.
Now you can add what you want, in my case I will add one leaderboard.
After you have done everything / added, go to the Publication tab, it will indicate what you have not done, click to publish the game.
Again, you will need to wait a couple of hours.
After publication
After your game is published, you can find it on the Google Play page, and also we will need to send a link to our application to testers.
To do this, go to Release Management, Application Versions, expand this window.
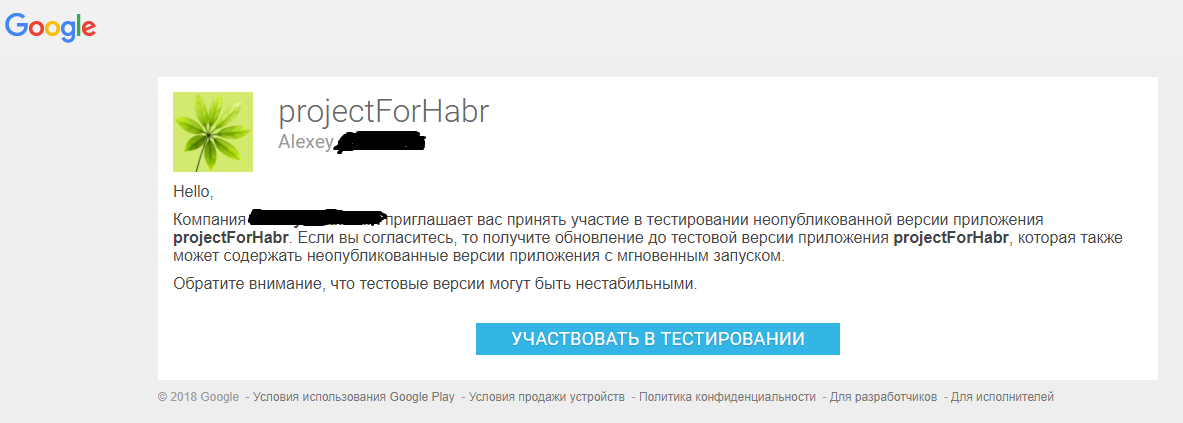
and see the link that will need to be sent to testers, go through it.
Here we have a window in which we will have to agree to test our application, click Participate in testing
After that, a window should appear that you have become a tester, on the page there will be links from where you can download the application.
Now you can download your application and test it.
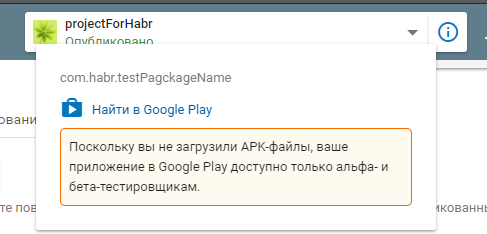
Tip : To quickly go to your application page on Google Play, hover over the information icon to the right of the name of your project, and click Find on Google Play.
Well, you can now download your apps from Google Play. The next step is to update the application.
Update application
Suppose we have changed something in the application, and now we want to update the version of the application on Google Play.
For this, it is mandatory to change the Bundle Version Code in Unity (it is not necessary to change the application version), and enter the passwords for the keys that were created before.
After creating the build, go to Google Play Console, open the application that we want to update, go to Release Management -> Application Versions -> go to Management, Select Create Issue in the upper right corner, download our apk, fill in the What's New field (you can copy from the past version). The version code is taken from the Bundle Version Code, in my case it is 2.
Click save, after View and click publish.
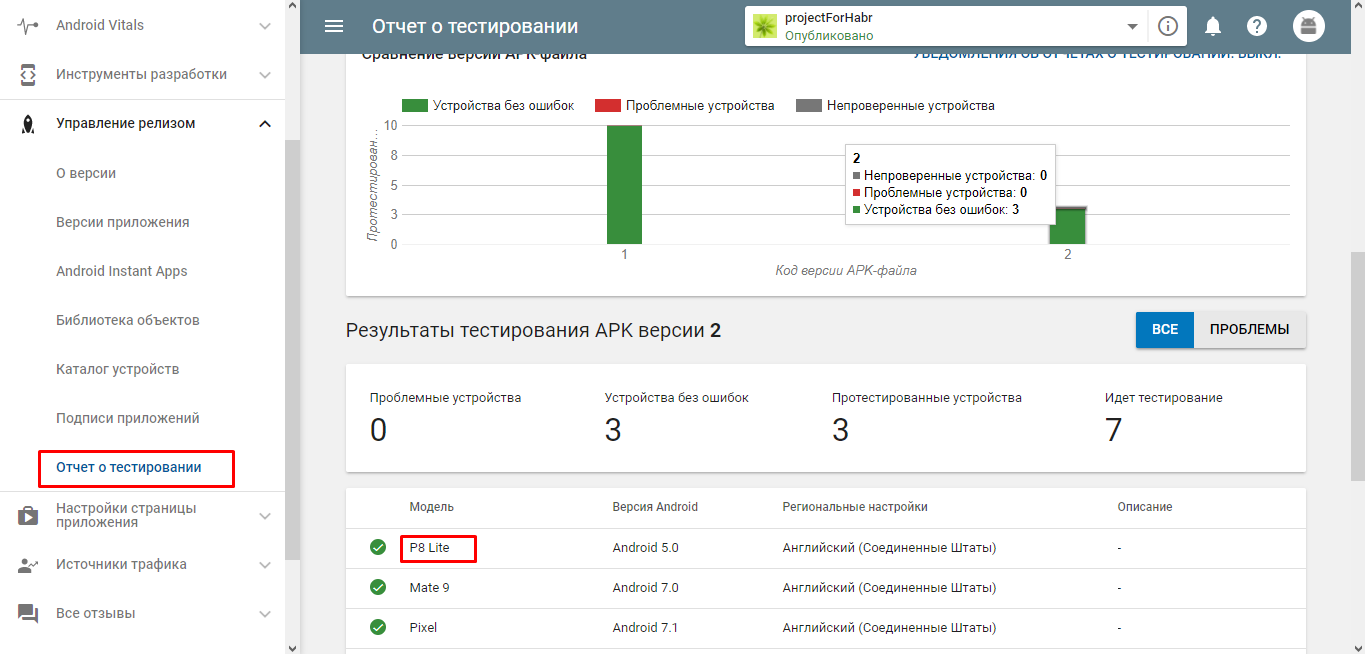
After the update, you will have to wait about 30 minutes before publishing the application. After updating the application, the new version should be tested on 10 devices, you can watch in real time how it is being tested, watch the launch video, and read the logs. To do this, go to the application -> Release Management -> Test Report. Here you will find a list of phones that are being tested, and monitor the status of the passage.
To watch the video with the launch, select the device where the testing has already been completed, then a window with the characteristics of the phone and video should open.
ps A month ago, it was possible to watch the logs under the video, who knows where Google has gone?
Usually, testing takes about 20 minutes, after that you have to wait 10-15 minutes before publishing on Google Play. By the way, be careful if you download several versions in a row, not the fact that the version you are downloading is the last one, my advice after publication can safely wait about an hour before testing.
Accelerate Testing
Agree, if you are testing Google Play Services, it takes a decent amount of time (about 40 minutes) all the way from download to download, which is not at all happy. I myself went this way when I did support Google Play Services, it was very painful to wait 40 minutes after each small change to test it. Like watching a video about cloud storage, I saw the Nox applications ( link , I hope they don’t consider advertising), which perfectly emulates Android, you just create a new version of the application, install it in Nox, and that's it, you can safely test it, bypassing 30 minutes time, not bad right? But there is another snag, Google Play services will not work if you downloaded the application not from Google Play, but this can be easily bypassed, I also stumbled on this in the cloud storage video.
And so, let's move on, go to the application -> Release management -> Application signatures, 2 sets of certificates will open before you, you need a SHA1 certificate from the Download certificate section, copy its value.
Now you need to change the value of the certificate in the Google API, for this we go to the Game Services, select the one to which your application is attached, open the Game Information, turn to the bottom of the page and see the link, go through it (thanks google for such a cool design, sometimes it takes a few minutes to find the link).
This will open this page, here we are interested in the section Credentials
We open our account and change the value of the SHA1 certificate to the one that you copied before, and save.
Important! Do not forget before publishing the release version to change the value of the certificate SHA1 to that of the Certificate to sign the application. Otherwise, services will not work for users.
Now we have reduced our testing to 5-7 minutes, a good result!
We finish with the setting of Unity
After we’ve done everything in the Google Play Console, we can go back to Unity and finish our settings.
To begin, open the Google Play Console and go to the Game Services, and open something from what we have created (for example, player rating) and see “Get Resources”, click on it, copy everything in the Android tab, and open Unity.
Open Unity, go to the Window tab -> Google Play Games -> Setup -> Android setup
This window should appear.
In it we indicate where we will save the class, and the name of the class, we also insert there what we copied before, and click Setup, a window will appear that the setup was successful.
That's all, now this class contains constants with id-schnick of things that we have created.
In the end, I decided to duplicate all the links that were in the article, as well as provide links to videos that will be useful when setting up Google Services in the code.
- About keystore
- About the same, just shorter
- Android Player Settings official Unity page
- Google Play Console
- Play Games Unity Plugin
- Useful links on Google Service:
- (eng) - Adding achievements and leaderboards
- (eng) - Cloud Conservation
- (eng) - Also about cloud storage, I highly recommend this video.
- (rus) - Publish the game on Google Play
- (rus) - Embedding Google Services into the game
- And a link to the documentation.
And that's all, thank you all!
Source: https://habr.com/ru/post/350458/
All Articles