Develop isomorphic RealWorld applications with SSR and Progressive Enhancement. Part 3 - Routing & Fetching
In the previous part of the tutorial, we taught our isomorphic application to proxy requests to backend api , transfer the initial state between synchronous requests using the session and perform Server-side rendering with the ability to reuse the client markup ( hydrate ). In this section, we will solve two more key problems of isomorphic web applications: isomorphic routing and navigation , and repeated fetching and the initial state of the data . And do it literally 5 lines of code. Let's go!

First I want to add a little project manifest . The fact is that once again, after reading last year’s comparison of frontend frameworks , I thought, why not add items to the manifesto that somehow correlate with this comparison?
Unfortunately, I’d hardly be able to seriously affect the performance of Ractive (although I’ll offer a few optimizations). However, two other characteristics - the size of the bundle and the number of lines of code , I can easily add to the project manifest. So, the updated manifest will look like this:
')

Of course, I would like both indicators to be the best among all the frameworks from this comparison. However, I definitely will not be able to bypass Apprun by the size of the bundle. Yet 19Kb is some kind of magic at all.
I think it will be enough for me if I fulfill all the conditions of the manifest and at the same time the number of lines of code and the size of the bundle will be comparable to the minimum values of other implementations. Simply put, I want my implementation to be at the level of React / Mobx and Elm by the size of the bundle and at the level of Apprun and CLJS re-frame by the number of lines of code. It will also be a kind of achievement, given that other implementations do not have all the declared capabilities. But, wait and see.

Another small lyrical digression. Ractive has finally changed its logo and color style ! And therefore, I am glad that this happened with my filing . Despite the fact that my version of the logo was not chosen, I am still a little proud that I was able to stir up such a conservative community. Hooray!
The previous parts of the tutorial contained polls, the results of which are good. More than 80% of readers found the topic of the tutorial interesting and as many, one way or another, spoke for the current level of detail. However, creating a survey about the details, I honestly hoped that the result would be different. With all, so, everything is clear and the level of detail, and hence the volume of the material can be reduced. It turned out that it is not.
Despite the results of this survey, we still have to accelerate. I will go through many aspects of the implementation only superficially, otherwise the tutorial will be too long and most likely will bore me and you. But, this does not apply to this part of the material! Because, in fact, this part actually finishes the effort required to write the framework of an isomorphic application.
Further, we will exploit the created “infrastructure” and step by step implement the RealWorld project specification and manifest points. I want to once again draw your attention to the fact that we did not start writing the code of the application itself, but I assure you that this is not a problem. Then it will accelerate significantly. I think we will have to compensate for this acceleration, as well as the inevitable reduction in detail, by discussing the details in the comments. So welcome !

First, briefly tell the main idea, then we'll see the implementation. It turned out that in the world of the frontend 2 main approaches to routing within SPA applications dominate:
The method of determining the list of paths (routes) and their correspondence to the components that appear in the form of a kind of “pages” in a certain configuration file. Conventionally, it might look like this:
In this case, in the template, as a rule, there is some kind of anchor element (component or just a tag) where the triggered component will be rendered.
Routes are defined directly in the template using special routing components that accept properties of the route pattern and other necessary options through the properties. Accordingly, the markup, which is a “page”, is located inside the tag of the route component, something like this:
What is so bad about these approaches? The answer is nothing, let them be. However, both approaches have a number of disadvantages:
It is possible that all this is far-fetched. However, one minus is inherent in both of these approaches quite precisely - low routing flexibility, of the type “this route is such a component, that route is a component”.
At the same time, most often the logic of client routing is not limited to the regular match with the current URL. As it seems to me, it is generally not entirely correct to consider routing in isolation from the general state of the application ( state ). This is the same part of the state as any other data. And therefore, to be able to maximally flexibly work with the state of the application and the UI state (as its visual component), we need to use other approaches.
To begin with, I will give an example: we have a website header, in which there is a link to a modal window with a login form for the user. Of course, you do not want this link to be shown to those users who are logged in, so you are doing something like:
This is completely normal, here we check the current status to see if the user is logged in or not.
Another requirement - this link should open the login form on any page of the site, as well as via a direct link. Since the modal window is part of the current page, it will be logical to use the URL Fragment (in the common hash ) for a direct link opening this modal window. The pattern of such a route might look something like this:
It's pretty cool that you can, just by specifying the appropriate hash , open a modal window on any page without any additional actions at all:
And also close this modal window by simply pressing the “Back” button in the browser or even history.back () .
However, in order for everything to work as it should, we need to check another piece of the state, loggedIn . What if we use one of the above routing methods? Wrap component modals in another component that will check for authorization?
Well, maybe you can. And what if there are several additional conditions? Hm
And yet, what if you think about and consider the route as part of the overall application state? You can come up with a lot of cases where the route works in conjunction with other parts of the state. Then why are we so eager to isolate it with some additional syntax, to separate it in every way from the rest of the state? So I do not know.
What am I writing all this and how does this relate to isomorphism? Actually, there is no way)))) I just want you not to be surprised when you see such unpretentious constructions acting as routing in my code:
As you can see, when using this approach, we don’t have to invent any new syntax, write a bunch of additional components, or configure configs. We simply use the route as part of the overall state of the application and, in fact, we can do all sorts of madness with a couple of lines of code.
And now in the case. Isomorphic routing has only three main points that matter:
Often I see how the developers take out the routing far "out", alienating it from the general state and from the context. Also, quite often, those who try to write isomorphic applications, as if they purposefully use separately server-side (for example, by means of Express ) and client routing. Sometimes with common configs, sometimes even with separate ones. But enough about the sad.
In my projects I use the plugin for Ractive router. In fact, this is nothing more than a wrapper over PageJS and qs , which implements a State-based approach to routing. The own code of this “router” takes up 100 lines of code from the force and in fact stupidly proxies the router's state to the reactive state Ractive and back. A router can be applied globally and be immediately accessible to all components, or in isolation to a specific instance of a component. With it, you can do all sorts of such things:
And even such:
Let's first connect our router to the application and teach it to be isomorphic:
./src/app.js
./middleware/app.js
Congratulations, now in our application there is a completely isomorphic routing! Please note that on the server I just put the current URL into the router and assigned it. This is all you need to do if your router meets the specified conditions. I also use completely canonical references - this is very important in the context of isomorphism and progressive improvement.
In addition, both the client and the server now support dynamic meta tags (title, description and keywords), which are written in a special config and are connected to the router at the time of its initialization. This config looks very simple and is not required:
./config/meta.json
Let's now use our router to create several pages. To do this, create the main application template ( app.html ) and partials for the header ( navbar.html ) and the footer ( footer.html ). To do this, simply copy the finished markup there from the RealWorld specification and add some dynamics:
./src/templates/partials/navbar.html
./src/templates/partials/footer.html
./src/templates/app.html
And let's not forget to register these templates in the application instance:
./src/app.js
The attentive reader, I am sure, has already noticed a few points. Read more about them voluntarily read under spoilers.
Result:

What we have in the end:

Next, probably the most sensitive issue of isomorphic applications, work with data. What is the problem? In fact, there are even two of them:
At first glance, these questions are quite understandable and even trivial. However, we are not just looking for some kind of solution, we are looking for a beautiful solution, and most importantly the most isomorphic one. That is why we will not accept the solution "in the forehead", for example, when data on the server is loaded in advance (essentially synchronously) before running the application (sync / prefetch), on the client asynchronously and "lazily" (async / lazy). Many do just that, but this is not our option.
We want to be able to fetch data in a uniform, anywhere and any way, within any component, at any nesting level. In any place of the code, in component hooks or something else. And most importantly, the most "lazy", ie really only load the data that is required to display the current state of the application both on the client and on the server. And with all this, we want the data load code for the client and for the server to be common. Cool! So what are we waiting for?

There is no problem on the client with all this, because there we are funny and asynchronous. On the server, we are also asynchronous, but unfortunately the HTTP request that came to us for SSR is not. This means that at some point, we have to render the state of the application in HTML and send it to the client. And the main thing to do this only when all the necessary data, for all components, at all levels of nesting, have already been loaded. The problem and the hand immediately reaches out for pre-fetching, but we will restrain ourselves for the common good.
In fact, I am sure that there are many ways to organize all this. I will only talk about the method that I use myself and which I find quite convenient. To do this, use another plugin for Ractive . The entire plugin has about 100 lines of code, which introduces three additional methods to the prototype of the Ractive constructor:
Using these methods, we can determine those asynchronous operations whose waiting is an important part of SSR . And we also get a point (callback function) in which all the data added to the “expectations” is guaranteed to be extracted. Separately, I note that this approach makes it possible in an obvious way to determine which data will participate in the SSR , and which will not. Sometimes this is convenient for optimizing SSR . For example, when on the server we render only the main part of the content (for search engines or simply to speed up SSR ), and the minor parts are “sucked” already on the client. In addition, these methods will help us in solving the second problem, but first let's look at it.
So, we taught our server to wait for downloading the necessary data and render HTML on time. Further, ready-made markup comes to the client and our “smart” Ractive intends to hydrogenate it (see Part 2 ). It runs exactly the same code as on the server, the hierarchy of components begins to unwind, and the code that fetches the necessary data on the server also begins to execute.
And here are two important points: firstly, it is extremely important for us that the checksum converges. That is, in order for the markup to be reused, which means that the data must be the same as on the server. Secondly, we would not want the client to once again twitch all those APIs that the server has already twitched.

The obvious solution here will be to transfer to the client the data collected on the server (preferably in a normalized form), and most importantly in some way on the client to scatter this data on the components so as to prevent re-loading of data and not break the hydration . A problem, but in fact it is solved simply.
So, we first register the plugin ( ractive-ready ), learn how to render our application on the server in time, and also get all the collected data in a structured way:
./src/app.js
./middleware/app.js
Like all. A ready callback not only allows you to wait for the data to load, but also receives this data in a structured way as a second argument. The first argument, as is customary in NodeJS , is an error that can occur during this process. The data is structured according to the component hierarchy, which will allow each component on the client to find its own piece of data in the overall structure. Next, just throw these values for server rendering and put them on the page:
./src/templates/_index.html
We simply put the data in the window .__ DATA__ , where we will look for them on the client.
Tax, now we need to check how this whole farm works, which means we need to perform at least one asynchronous operation. I think we will write a test request for a list of articles and display them on the main page. For one test proxying requests.
For this we need:
We register all this globally:
./src/app.js
Next, we import the api-service in the same place and write a simple request to get the list of articles in the oninit hook and, attention, add the “promise” to the “waiting” (LOL):
./src/app.js
Well, we display a list of articles on the main page (so far everything is not beautiful and in a bunch, because for the test):
./src/templates/app.html
"Um, wait a minute we put the promise in the data and allowed it directly in the template?" Well, yes, it is. Here we use the {{formatDate ()}} helper and partial {{> errors}} . They will be useful to us more than once.
Now SSR will be executed along with the list of articles that will also be placed in the window object .__ DATA__ . However, while the client code will still perform a repeated request to the API, which is not good. Fix this:
./src/app.js

Yes, no, nothing complicated here. We explicitly define the key by which the data ( articlesList ) will lie (or already lie) , and the path in the data object (window .__ DATA__ === @global .__ DATA__ ). If there is no data, then we make a request and put the promise in wait, indicating the second argument with a key. In any of the options set the value in the component. That's all.
In short, now the data will be loaded on the server, expected, rendered during the SSR , come to the client in a structured way, be identified and reused without unnecessary requests to the API and with hydration markup. Well done!
Summarizing the total of 3 parts of this tutorial, it can be noted that we managed to create a fairly simple and concise basis for an isomorphic application. I decided to allocate this framework to a separate repository , so that you can be sure that this code is not really application code and can be used in any project.
The current results of the project are here:
→ Repository
→ Demo
In the next part, we will finally start writing the RealWorld application! Let's start with the breakdown of the application into components and the implementation of several of them. I also plan to briefly describe what types of components are, how they differ and when they should be used. Do not switch!
UPD: Develop isomorphic RealWorld applications with SSR and Progressive Enhancement. Part 4 - Components and Composition
Prologue
About the manifest
First I want to add a little project manifest . The fact is that once again, after reading last year’s comparison of frontend frameworks , I thought, why not add items to the manifesto that somehow correlate with this comparison?
Unfortunately, I’d hardly be able to seriously affect the performance of Ractive (although I’ll offer a few optimizations). However, two other characteristics - the size of the bundle and the number of lines of code , I can easily add to the project manifest. So, the updated manifest will look like this:
')
"Manifest" of the project:
- Comply with the specifications of the project RealWorld;
- Fully support the work on the server (SSR and all the rest);
- On the client to work as a full-fledged SPA;
- Indexed by search engines;
- Work with JS disabled on the client;
- 100% isomorphic (common) code;
- For implementation, do not use "half measures" and "crutches";
- Use the maximum simple and well-known technology stack;
- The size of the final bundle should not exceed 100Kb gzip;
- The number of lines of application code should not exceed 1000 loc.
Of course, I would like both indicators to be the best among all the frameworks from this comparison. However, I definitely will not be able to bypass Apprun by the size of the bundle. Yet 19Kb is some kind of magic at all.
I think it will be enough for me if I fulfill all the conditions of the manifest and at the same time the number of lines of code and the size of the bundle will be comparable to the minimum values of other implementations. Simply put, I want my implementation to be at the level of React / Mobx and Elm by the size of the bundle and at the level of Apprun and CLJS re-frame by the number of lines of code. It will also be a kind of achievement, given that other implementations do not have all the declared capabilities. But, wait and see.
Pro logo
Another small lyrical digression. Ractive has finally changed its logo and color style ! And therefore, I am glad that this happened with my filing . Despite the fact that my version of the logo was not chosen, I am still a little proud that I was able to stir up such a conservative community. Hooray!
About detailing
The previous parts of the tutorial contained polls, the results of which are good. More than 80% of readers found the topic of the tutorial interesting and as many, one way or another, spoke for the current level of detail. However, creating a survey about the details, I honestly hoped that the result would be different. With all, so, everything is clear and the level of detail, and hence the volume of the material can be reduced. It turned out that it is not.
Despite the results of this survey, we still have to accelerate. I will go through many aspects of the implementation only superficially, otherwise the tutorial will be too long and most likely will bore me and you. But, this does not apply to this part of the material! Because, in fact, this part actually finishes the effort required to write the framework of an isomorphic application.
Further, we will exploit the created “infrastructure” and step by step implement the RealWorld project specification and manifest points. I want to once again draw your attention to the fact that we did not start writing the code of the application itself, but I assure you that this is not a problem. Then it will accelerate significantly. I think we will have to compensate for this acceleration, as well as the inevitable reduction in detail, by discussing the details in the comments. So welcome !
Routing
First, briefly tell the main idea, then we'll see the implementation. It turned out that in the world of the frontend 2 main approaches to routing within SPA applications dominate:
Config-based routing (Angular & Co)
The method of determining the list of paths (routes) and their correspondence to the components that appear in the form of a kind of “pages” in a certain configuration file. Conventionally, it might look like this:
const routes = [ { path: /some pattern/, component: MyComponentConstructor, ...otherOptions }, ]; In this case, in the template, as a rule, there is some kind of anchor element (component or just a tag) where the triggered component will be rendered.
Component-based routing (React & Co)
Routes are defined directly in the template using special routing components that accept properties of the route pattern and other necessary options through the properties. Accordingly, the markup, which is a “page”, is located inside the tag of the route component, something like this:
<Route path="some pattern" ...otherOptions> <MyComponent ...someProps /> </Route> What is so bad about these approaches? The answer is nothing, let them be. However, both approaches have a number of disadvantages:
- Config-based routing - too much boilerplate, too far from the context. As a rule, the route rezolvitsya in one particular component, which is not very flexible.
- Component-based routing is close to the context, however for some reason the tags of the components are actually used as conditional statements. It is difficult to predict all the necessary options for routing, so it is always limited by the capabilities of the route component (i.e., the settings it can accept).
It is possible that all this is far-fetched. However, one minus is inherent in both of these approaches quite precisely - low routing flexibility, of the type “this route is such a component, that route is a component”.
At the same time, most often the logic of client routing is not limited to the regular match with the current URL. As it seems to me, it is generally not entirely correct to consider routing in isolation from the general state of the application ( state ). This is the same part of the state as any other data. And therefore, to be able to maximally flexibly work with the state of the application and the UI state (as its visual component), we need to use other approaches.
State-based routing
To begin with, I will give an example: we have a website header, in which there is a link to a modal window with a login form for the user. Of course, you do not want this link to be shown to those users who are logged in, so you are doing something like:
{{#if ! loggedIn}} <a href="">Login</a> {{/if}} This is completely normal, here we check the current status to see if the user is logged in or not.
Another requirement - this link should open the login form on any page of the site, as well as via a direct link. Since the modal window is part of the current page, it will be logical to use the URL Fragment (in the common hash ) for a direct link opening this modal window. The pattern of such a route might look something like this:
'/*#login' It's pretty cool that you can, just by specifying the appropriate hash , open a modal window on any page without any additional actions at all:
{{#if ! loggedIn}} <a href="/{{currentPath}}#login">Login</a> {{/if}} And also close this modal window by simply pressing the “Back” button in the browser or even history.back () .
However, in order for everything to work as it should, we need to check another piece of the state, loggedIn . What if we use one of the above routing methods? Wrap component modals in another component that will check for authorization?
<Route path="/*#login"> <NotAuthorized> <Modal> <form>...</form> </Modal> </NotAuthorized> </Route> Well, maybe you can. And what if there are several additional conditions? Hm
And yet, what if you think about and consider the route as part of the overall application state? You can come up with a lot of cases where the route works in conjunction with other parts of the state. Then why are we so eager to isolate it with some additional syntax, to separate it in every way from the rest of the state? So I do not know.
What am I writing all this and how does this relate to isomorphism? Actually, there is no way)))) I just want you not to be surprised when you see such unpretentious constructions acting as routing in my code:
{{#if $route.match('/*#login') && ! loggedIn }} <modal> <form>...</form> </modal> {{/if}} As you can see, when using this approach, we don’t have to invent any new syntax, write a bunch of additional components, or configure configs. We simply use the route as part of the overall state of the application and, in fact, we can do all sorts of madness with a couple of lines of code.
And now in the case. Isomorphic routing has only three main points that matter:
- Your router should give an opportunity to set the current URL manually and dispute these changes;
- Do not break in NodeJS environment, i.e. abstract from enviroment-specific things;
- Your routing should be “inside” the application, not “outside”.
Often I see how the developers take out the routing far "out", alienating it from the general state and from the context. Also, quite often, those who try to write isomorphic applications, as if they purposefully use separately server-side (for example, by means of Express ) and client routing. Sometimes with common configs, sometimes even with separate ones. But enough about the sad.
In my projects I use the plugin for Ractive router. In fact, this is nothing more than a wrapper over PageJS and qs , which implements a State-based approach to routing. The own code of this “router” takes up 100 lines of code from the force and in fact stupidly proxies the router's state to the reactive state Ractive and back. A router can be applied globally and be immediately accessible to all components, or in isolation to a specific instance of a component. With it, you can do all sorts of such things:
{{#if $route.match('/products/:id') }} <product id="{{$route.params.id}}" cart="{{$route.state.cart}}"></product> {{#if ! loggerIn }} <a href="#login">Login to buy it</a> {{/if}} {{elseif $route.match('/products') }} <products filters="{{$route.query}}"></products> {{else}} <p>404 - Not found</p> <a href="/products">Go to search the best products</a> {{/if}} {{#if $route.match('/*#login') && ! loggerIn }} <modal> <form>...</form> </modal> {{/if}} And even such:
// get route or a parts this.get('$route'); this.get('$route.pathname'); this.get('$route.query'); this.get('$route.params'); this.get('$route.state'); // navigate to another route this.set('$route.pathname', '/product/1'); // set history state this.set('$route.state', state); // listen route changes this.observe('$route', (val, old, keypath) => {}); Write the code
Let's first connect our router to the application and teach it to be isomorphic:
./src/app.js
Ractive.use(require('ractive-page')({ meta: require('../config/meta.json') })); Full code ./src/app.js
const Ractive = require('ractive'); Ractive.DEBUG = (process.env.NODE_ENV === 'development'); Ractive.DEBUG_PROMISES = Ractive.DEBUG; Ractive.defaults.enhance = true; Ractive.defaults.lazy = true; Ractive.defaults.sanitize = true; Ractive.use(require('ractive-page')({ meta: require('../config/meta.json') })); const options = { el: '#app', template: `<div id="msg">Static text! + {{message}} + {{fullName}}</div>`, data: { message: 'Hello world', firstName: 'Habr', lastName: 'User' }, computed: { fullName() { return this.get('firstName') + ' ' + this.get('lastName'); } } }; module.exports = () => new Ractive(options); ./middleware/app.js
const route = app.$page.show(req.url, null, true, false); ... const meta = route.state.meta; Full code ./middleware/app.js
const run = require('../src/app'); module.exports = () => (req, res, next) => { const app = run(), route = app.$page.show(req.url, null, true, false); const meta = route.state.meta, content = app.toHTML(), styles = app.toCSS(); app.teardown(); res.render('index', { meta, content, styles }); }; Congratulations, now in our application there is a completely isomorphic routing! Please note that on the server I just put the current URL into the router and assigned it. This is all you need to do if your router meets the specified conditions. I also use completely canonical references - this is very important in the context of isomorphism and progressive improvement.
In addition, both the client and the server now support dynamic meta tags (title, description and keywords), which are written in a special config and are connected to the router at the time of its initialization. This config looks very simple and is not required:
./config/meta.json
{ "/" : { "title": "Global Feed", "description": "", "keywords": "" }, ... } Let's now use our router to create several pages. To do this, create the main application template ( app.html ) and partials for the header ( navbar.html ) and the footer ( footer.html ). To do this, simply copy the finished markup there from the RealWorld specification and add some dynamics:
./src/templates/partials/navbar.html
<nav class="navbar navbar-light"> <div class="container"> {{#with @shared.$route.pathname as pathname}} <a class="navbar-brand" href="/">conduit</a> <ul class="nav navbar-nav pull-xs-right"> <li class="nav-item"> <a href="/" class-active="pathname === '/'" class="nav-link"> Home </a> </li> <li class="nav-item"> <a href="/login" class-active="pathname === '/login'" class="nav-link"> Sign in </a> </li> <li class="nav-item"> <a href="/register" class-active="pathname === '/register'" class="nav-link"> Sign up </a> </li> </ul> {{/with}} </div> </nav> ./src/templates/partials/footer.html
<footer> <div class="container"> <a href="/" class="logo-font">conduit</a> <span class="attribution"> An interactive learning project from <a href="https://thinkster.io">Thinkster</a>. Code & design licensed under MIT. </span> </div> </footer> ./src/templates/app.html
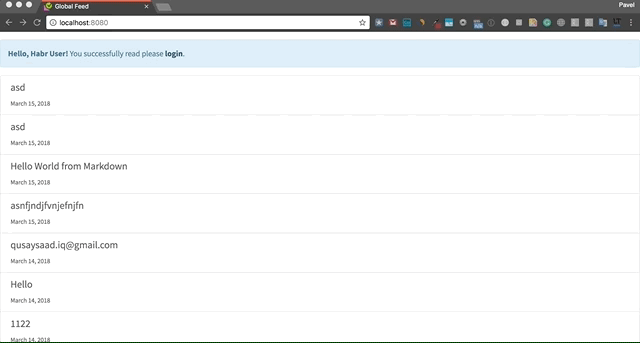
<div id="page"> {{>navbar}} {{#with @shared.$route as $route }} {{#if $route.match('/login')}} <div fade-in-out> <div class="alert alert-info"><strong>Login</strong>. {{message}}</div> </div> {{elseif $route.match('/register')}} <div fade-in-out> <div class="alert alert-info"><strong>Register</strong>. {{message}}</div> </div> {{elseif $route.match('/')}} <div fade-in-out> <div class="alert alert-info"> <strong>Hello, {{fullName}}!</strong> You successfully read please <a href="/login" class="alert-link">login</a>. </div> </div> {{else}} <div fade-in-out> <p>404 page</p> </div> {{/if}} {{/with}} {{>footer}} </div> And let's not forget to register these templates in the application instance:
./src/app.js
const options = { el: '#app', template: require('./templates/parsed/app'), partials: { navbar: require('./templates/parsed/navbar'), footer: require('./templates/parsed/footer') }, transitions: { fade: require('ractive-transitions-fade'), }, .... }; Full code ./src/app.js
const Ractive = require('ractive'); Ractive.DEBUG = (process.env.NODE_ENV === 'development'); Ractive.DEBUG_PROMISES = Ractive.DEBUG; Ractive.defaults.enhance = true; Ractive.defaults.lazy = true; Ractive.defaults.sanitize = true; Ractive.use(require('ractive-page')({ meta: require('../config/meta.json') })); const options = { el: '#app', template: require('./templates/parsed/app'), partials: { navbar: require('./templates/parsed/navbar'), footer: require('./templates/parsed/footer') }, transitions: { fade: require('ractive-transitions-fade'), }, data: { message: 'Hello world', firstName: 'Habr', lastName: 'User' }, computed: { fullName() { return this.get('firstName') + ' ' + this.get('lastName'); } } }; module.exports = () => new Ractive(options); The attentive reader, I am sure, has already noticed a few points. Read more about them voluntarily read under spoilers.
Transition animation
Ractive from the box has the ability to animate transitions ( transition ) with the appearance or disappearance of elements. To do this, you need to import the corresponding transition-plugin ( ractive-transitions-fade ), register it either globally or locally, as I have done, and use the plugin using a special directive ( fade-in-out ).
In this case, I use the banal fade with default settings, but plugins support setting settings, for example:
In this case, I use the banal fade with default settings, but plugins support setting settings, for example:
<div fade-in="{ duration: 500 }"><!-- duration 500 ms --></div> <div fade-out="{ delay: 500 }"><!-- c delay 500 ms --></div> Pre-parsing templates
Ractive supports several options for registering a template for a component:
As you already understood, Ractive has full support for the abstract syntax tree ( AST ). As a matter of fact, all the options are eventually brought to the AST and on its basis work is being done at runtime . Therefore, in order to optimize the speed of work, I precompile .html templates in AST and do not spend resources on parsing at runtime . This is done using the npm run parse command, which is run before building the webpack.
// Selector (script tag with type="text/ractive") template: '#my-template', // HTML string template: `<p>{{greeting}} world!</p>`, // Template AST template: {"v":3,"t":[{"t":7,"e":"p","f":[{"t":2,"r":"greeting"}," world!"]}]}, // Function template (data, p) { return `<p>{{greeting}} world!</p>`; }, As you already understood, Ractive has full support for the abstract syntax tree ( AST ). As a matter of fact, all the options are eventually brought to the AST and on its basis work is being done at runtime . Therefore, in order to optimize the speed of work, I precompile .html templates in AST and do not spend resources on parsing at runtime . This is done using the npm run parse command, which is run before building the webpack.
About class- *
Special directive Ractive , which allows you to easily switch classes depending on the condition:
In this case, we track the change of the path and highlight the active menu item.
<a href="/login" class-active="pathname === '/login'" class="nav-link">Login</a> In this case, we track the change of the path and highlight the active menu item.
About @shared
This piece is used in Ractive to share some data between components, for example:
As well as the local state of components, the shared state is reactive, it can be used in dependencies of the calculated properties and subscribe to changes.
// Component 1 this.set('@shared.foo', 'bar'); // Component 2 this.get('@shared.foo'); As well as the local state of components, the shared state is reactive, it can be used in dependencies of the calculated properties and subscribe to changes.
About {{#with}}
Similar to the javascript construction with , this block expression creates a new scope, or rather the context within the template. This is very convenient to use shorter paths (keypaths) or more semantic naming:
{{#with foo.bar.baz.qux as qux, data as articles}} {{ qux }} {{ articles }} {{/with}} Result:
What we have in the end:
- Isomorphic routing, working both on the client and on the server without any changes;
- Fully functional browser history;
- Animation of transitions between pages (for the time being does not look very good, but it can be tweaked);
- Actual meta tags both on the client and during SSR.
Data fetching
Next, probably the most sensitive issue of isomorphic applications, work with data. What is the problem? In fact, there are even two of them:
- Asynchronous data loading on the server;
- Reloading data on the client.
At first glance, these questions are quite understandable and even trivial. However, we are not just looking for some kind of solution, we are looking for a beautiful solution, and most importantly the most isomorphic one. That is why we will not accept the solution "in the forehead", for example, when data on the server is loaded in advance (essentially synchronously) before running the application (sync / prefetch), on the client asynchronously and "lazily" (async / lazy). Many do just that, but this is not our option.
We want to be able to fetch data in a uniform, anywhere and any way, within any component, at any nesting level. In any place of the code, in component hooks or something else. And most importantly, the most "lazy", ie really only load the data that is required to display the current state of the application both on the client and on the server. And with all this, we want the data load code for the client and for the server to be common. Cool! So what are we waiting for?
There is no problem on the client with all this, because there we are funny and asynchronous. On the server, we are also asynchronous, but unfortunately the HTTP request that came to us for SSR is not. This means that at some point, we have to render the state of the application in HTML and send it to the client. And the main thing to do this only when all the necessary data, for all components, at all levels of nesting, have already been loaded. The problem and the hand immediately reaches out for pre-fetching, but we will restrain ourselves for the common good.
In fact, I am sure that there are many ways to organize all this. I will only talk about the method that I use myself and which I find quite convenient. To do this, use another plugin for Ractive . The entire plugin has about 100 lines of code, which introduces three additional methods to the prototype of the Ractive constructor:
// add async operation to "waitings" this.wait(promise[, key]); // callback when all "waitings" ready this.ready(callback); // return "keychain" of instance in components hierarchy this.keychain(); Using these methods, we can determine those asynchronous operations whose waiting is an important part of SSR . And we also get a point (callback function) in which all the data added to the “expectations” is guaranteed to be extracted. Separately, I note that this approach makes it possible in an obvious way to determine which data will participate in the SSR , and which will not. Sometimes this is convenient for optimizing SSR . For example, when on the server we render only the main part of the content (for search engines or simply to speed up SSR ), and the minor parts are “sucked” already on the client. In addition, these methods will help us in solving the second problem, but first let's look at it.
So, we taught our server to wait for downloading the necessary data and render HTML on time. Further, ready-made markup comes to the client and our “smart” Ractive intends to hydrogenate it (see Part 2 ). It runs exactly the same code as on the server, the hierarchy of components begins to unwind, and the code that fetches the necessary data on the server also begins to execute.
And here are two important points: firstly, it is extremely important for us that the checksum converges. That is, in order for the markup to be reused, which means that the data must be the same as on the server. Secondly, we would not want the client to once again twitch all those APIs that the server has already twitched.
The obvious solution here will be to transfer to the client the data collected on the server (preferably in a normalized form), and most importantly in some way on the client to scatter this data on the components so as to prevent re-loading of data and not break the hydration . A problem, but in fact it is solved simply.
Write the code
So, we first register the plugin ( ractive-ready ), learn how to render our application on the server in time, and also get all the collected data in a structured way:
./src/app.js
Ractive.use(require('ractive-ready')()); Full code ./src/app.js
const Ractive = require('ractive'); Ractive.DEBUG = (process.env.NODE_ENV === 'development'); Ractive.DEBUG_PROMISES = Ractive.DEBUG; Ractive.defaults.enhance = true; Ractive.defaults.lazy = true; Ractive.defaults.sanitize = true; Ractive.use(require('ractive-ready')()); Ractive.use(require('ractive-page')({ meta: require('../config/meta.json') })); const options = { el: '#app', template: require('./templates/parsed/app'), partials: { navbar: require('./templates/parsed/navbar'), footer: require('./templates/parsed/footer') }, transitions: { fade: require('ractive-transitions-fade'), }, data: { message: 'Hello world', firstName: 'Habr', lastName: 'User' }, computed: { fullName() { return this.get('firstName') + ' ' + this.get('lastName'); } } }; module.exports = () => new Ractive(options); ./middleware/app.js
app.ready((error, data) => { .... data = JSON.stringify(data || {}); error = error && error.message ? error.message : error; res.render('index', { meta, content, styles, data, error }); }); Full code ./middleware/app.js
const run = require('../src/app'); module.exports = () => (req, res, next) => { const app = run(), route = app.$page.show(req.url, null, true, false); app.ready((error, data) => { const meta = route.state.meta, content = app.toHTML(), styles = app.toCSS(); app.teardown(); data = JSON.stringify(data || {}); error = error && error.message ? error.message : error; res.render('index', { meta, content, styles, data, error }); }); }; Like all. A ready callback not only allows you to wait for the data to load, but also receives this data in a structured way as a second argument. The first argument, as is customary in NodeJS , is an error that can occur during this process. The data is structured according to the component hierarchy, which will allow each component on the client to find its own piece of data in the overall structure. Next, just throw these values for server rendering and put them on the page:
./src/templates/_index.html
{{#error}} <div class="alert alert-danger">{{ error }}</div> {{/error}} ... <script> window.__DATA__ = {{& data }} </script> Full code ./src/templates/_index.html
<!doctype html> <html lang="en" dir="ltr"> <head> <meta charset="utf-8"> <meta http-equiv="X-UA-Compatible" content="IE=edge"> <meta name="description" content="{{ meta.description }}"> <meta name="keywords" content="{{ meta.keywords }}"/> <meta name="viewport" content="width=device-width, initial-scale=1.0, minimum-scale=1.0"> <title>{{ meta.title }}</title> <link rel="stylesheet" href="//code.ionicframework.com/ionicons/2.0.1/css/ionicons.min.css"> <link rel="stylesheet" href="//fonts.googleapis.com/css?family=Titillium+Web:700|Source+Serif+Pro:400,700|Merriweather+Sans:400,700|Source+Sans+Pro:400,300,600,700,300italic,400italic,600italic,700italic"> <link rel="stylesheet" href="//demo.productionready.io/main.css"> <link rel="shortcut icon" type="image/x-icon" href="/favicon.ico"> <link rel="icon" type="image/png" href="/img/favicon.png"> <link rel="apple-touch-icon" href="/img/favicon.png"> <link rel="manifest" href="/manifest.json"> <style> {{& styles }} </style> </head> <body> {{#error}} <div class="alert alert-danger">{{ error }}</div> {{/error}} <div id="app"> {{& content }} </div> <script> window.pageEl = document.getElementById('page'); </script> <script> window.__DATA__ = {{& data }} </script> </body> </html> We simply put the data in the window .__ DATA__ , where we will look for them on the client.
Tax, now we need to check how this whole farm works, which means we need to perform at least one asynchronous operation. I think we will write a test request for a list of articles and display them on the main page. For one test proxying requests.
For this we need:
API service
./config/api.json
./src/services/api.js
Axios , RealWorld Backend API .
{ "backendURL": "https://conduit.productionready.io", "timeout": 3000, "https": true, "baseURL": "http://localhost:8080/api", "maxContentLength": 10000, "maxRedirects": 5, "withCredentials": true, "responseType": "json" } ./src/services/api.js
const axios = require('axios'); const config = require('../../config/api.json'); const source = axios.CancelToken.source(); const api = axios.create({ baseURL: config.baseURL, timeout: config.timeout, maxRedirects: config.maxRedirects, withCredentials: config.withCredentials, responseType: config.responseType, cancelToken: source.token }); const resolve = res => JSON.parse(JSON.stringify(res.data).replace(/( |<([^>]+)>)/ig, '')); const reject = err => { throw (err.response && err.response.data && err.response.data.errors) || {message: [err.message]}; }; const auth = { current: () => api.get(`/user`).then(resolve).catch(reject), logout: () => api.delete(`/users/logout`).then(resolve).catch(reject), login: (email, password) => api.post(`/users/login`, { user: { email, password } }).then(resolve).catch(reject), register: (username, email, password) => api.post(`/users`, { user: { username, email, password } }).then(resolve).catch(reject), save: user => api.put(`/user`, { user }).then(resolve).catch(reject) }; const tags = { fetchAll: () => api.get('/tags').then(resolve).catch(reject) }; const articles = { fetchAll: (type, params) => api.get(`/articles/${type || ''}`, { params }).then(resolve).catch(reject), fetch: slug => api.get(`/articles/${slug}`).then(resolve).catch(reject), create: article => api.post(`/articles`, { article }).then(resolve).catch(reject), update: article => api.put(`/articles/${article.slug}`, { article }).then(resolve).catch(reject), delete: slug => api.delete(`/articles/${slug}`).catch(reject) }; const comments = { fetchAll: slug => api.get(`/articles/${slug}/comments`).then(resolve).catch(reject), create: (slug, comment) => api.post(`/articles/${slug}/comments`, { comment }).then(resolve).catch(reject), delete: (slug, commentId) => api.delete(`/articles/${slug}/comments/${commentId}`).catch(reject) }; const favorites = { add: slug => api.post(`/articles/${slug}/favorite`).then(resolve).catch(reject), remove: slug => api.delete(`/articles/${slug}/favorite`).then(resolve).catch(reject) }; const profiles = { fetch: username => api.get(`/profiles/${username}`).then(resolve).catch(reject), follow: username => api.post(`/profiles/${username}/follow`).then(resolve).catch(reject), unfollow: username => api.delete(`/profiles/${username}/follow`).then(resolve).catch(reject), }; const cancel = msg => source.cancel(msg); const request = api.request; module.exports = { auth, tags, articles, comments, favorites, profiles, cancel, request }; Axios , RealWorld Backend API .
Partial for displaying API errors
./src/templates/partials/errors.html
partial , API .
<ul class="error-messages"> {{#errors}} {{#each this as err}} <li>{{ @key }} {{ err }}</li> {{/each}} {{/errors}} </ul> partial , API .
Helper for formatting dates
./src/helpers/formatDate.js
const options = { year: 'numeric', month: 'long', day: 'numeric' }; const formatter = new Intl.DateTimeFormat('en-us', options); module.exports = function (val) { return formatter.format(new Date(val)); }; We register all this globally:
./src/app.js
Ractive.defaults.data.formatDate = require('./helpers/formatDate'); Ractive.defaults.data.errors = null; Ractive.partials.errors = require('./templates/parsed/errors'); Full code ./src/app.js
const Ractive = require('ractive'); Ractive.DEBUG = (process.env.NODE_ENV === 'development'); Ractive.DEBUG_PROMISES = Ractive.DEBUG; Ractive.defaults.enhance = true; Ractive.defaults.lazy = true; Ractive.defaults.sanitize = true; Ractive.defaults.data.formatDate = require('./helpers/formatDate'); Ractive.defaults.data.errors = null; Ractive.partials.errors = require('./templates/parsed/errors'); Ractive.use(require('ractive-ready')()); Ractive.use(require('ractive-page')({ meta: require('../config/meta.json') })); const options = { el: '#app', template: require('./templates/parsed/app'), partials: { navbar: require('./templates/parsed/navbar'), footer: require('./templates/parsed/footer') }, transitions: { fade: require('ractive-transitions-fade'), }, data: { message: 'Hello world', firstName: 'Habr', lastName: 'User' }, computed: { fullName() { return this.get('firstName') + ' ' + this.get('lastName'); } } }; module.exports = () => new Ractive(options); Next, we import the api-service in the same place and write a simple request to get the list of articles in the oninit hook and, attention, add the “promise” to the “waiting” (LOL):
./src/app.js
const api = require('./services/api'); const options = { ... oninit () { let articles = api.articles.fetchAll(); this.wait(articles); this.set('articles', articles); } }; Full code ./src/app.js
const Ractive = require('ractive'); Ractive.DEBUG = (process.env.NODE_ENV === 'development'); Ractive.DEBUG_PROMISES = Ractive.DEBUG; Ractive.defaults.enhance = true; Ractive.defaults.lazy = true; Ractive.defaults.sanitize = true; Ractive.defaults.data.formatDate = require('./helpers/formatDate'); Ractive.defaults.data.errors = null; Ractive.partials.errors = require('./templates/parsed/errors'); Ractive.use(require('ractive-ready')()); Ractive.use(require('ractive-page')({ meta: require('../config/meta.json') })); const api = require('./services/api'); const options = { el: '#app', template: require('./templates/parsed/app'), partials: { navbar: require('./templates/parsed/navbar'), footer: require('./templates/parsed/footer') }, transitions: { fade: require('ractive-transitions-fade'), }, data: { message: 'Hello world', firstName: 'Habr', lastName: 'User', articles: [] }, computed: { fullName() { return this.get('firstName') + ' ' + this.get('lastName'); } }, oninit () { let articles = api.articles.fetchAll(); this.wait(articles); this.set('articles', articles); } }; module.exports = () => new Ractive(options); Well, we display a list of articles on the main page (so far everything is not beautiful and in a bunch, because for the test):
./src/templates/app.html
{{#await articles}} <div class="alert alert-light">Loading articles...</div> {{then data}} <div class="list-group"> {{#each data.articles as article}} <div class="list-group-item list-group-item-action flex-column align-items-start"> <div class="d-flex w-100 justify-content-between"> <h5 class="mb-1">{{ article.title }}</h5> <small>{{ formatDate(article.createdAt) }}</small> </div> </div> {{else}} <div class="list-group-item">No articles are here... yet.</div> {{/each}} </div> {{catch errors}} {{>errors}} {{/await}} Full code ./src/templates/app.html
<div id="page"> {{>navbar}} {{#with @shared.$route as $route }} {{#if $route.match('/login')}} <div fade-in-out> <div class="alert alert-info"><strong>Login</strong>. {{message}}</div> </div> {{elseif $route.match('/register')}} <div fade-in-out> <div class="alert alert-info"><strong>Register</strong>. {{message}}</div> </div> {{elseif $route.match('/')}} <div fade-in-out> <div class="alert alert-info"> <strong>Hello, {{fullName}}!</strong> You successfully read please <a href="/login" class="alert-link">login</a>. </div> {{#await articles}} <div class="alert alert-light">Loading articles...</div> {{then data}} <div class="list-group"> {{#each data.articles as article}} <div class="list-group-item list-group-item-action flex-column align-items-start"> <div class="d-flex w-100 justify-content-between"> <h5 class="mb-1">{{ article.title }}</h5> <small>{{ formatDate(article.createdAt) }}</small> </div> </div> {{else}} <div class="list-group-item">No articles are here... yet.</div> {{/each}} </div> {{catch errors}} {{>errors}} {{/await}} </div> {{else}} <div fade-in-out> <p>404 page</p> </div> {{/if}} {{/with}} {{>footer}} </div> "Um, wait a minute we put the promise in the data and allowed it directly in the template?" Well, yes, it is. Here we use the {{formatDate ()}} helper and partial {{> errors}} . They will be useful to us more than once.
About {{#await}}
Now SSR will be executed along with the list of articles that will also be placed in the window object .__ DATA__ . However, while the client code will still perform a repeated request to the API, which is not good. Fix this:
./src/app.js
const options = { ... oninit () { const key = 'articlesList'; let articles = this.get(`@global.__DATA__.${key}`); if ( ! articles ) { articles = api.articles.fetchAll(); this.wait(articles, key); } this.set('articles', articles); } }; Full code ./src/app.js
const Ractive = require('ractive'); Ractive.DEBUG = (process.env.NODE_ENV === 'development'); Ractive.DEBUG_PROMISES = Ractive.DEBUG; Ractive.defaults.enhance = true; Ractive.defaults.lazy = true; Ractive.defaults.sanitize = true; Ractive.defaults.data.formatDate = require('./helpers/formatDate'); Ractive.defaults.data.errors = null; Ractive.partials.errors = require('./templates/parsed/errors'); Ractive.use(require('ractive-ready')()); Ractive.use(require('ractive-page')({ meta: require('../config/meta.json') })); const options = { el: '#app', template: require('./templates/parsed/app'), partials: { navbar: require('./templates/parsed/navbar'), footer: require('./templates/parsed/footer') }, transitions: { fade: require('ractive-transitions-fade'), }, data: { message: 'Hello world', firstName: 'Habr', lastName: 'User', articles: [] }, computed: { fullName() { return this.get('firstName') + ' ' + this.get('lastName'); } }, oninit () { const key = 'articlesList'; let articles = this.get(`@global.__DATA__.${key}`); if ( ! articles ) { articles = api.articles.fetchAll(); this.wait(articles, key); } this.set('articles', articles); } }; module.exports = () => new Ractive(options); Yes, no, nothing complicated here. We explicitly define the key by which the data ( articlesList ) will lie (or already lie) , and the path in the data object (window .__ DATA__ === @global .__ DATA__ ). If there is no data, then we make a request and put the promise in wait, indicating the second argument with a key. In any of the options set the value in the component. That's all.
An interesting case with @global
Ractive «feature rich». @global — ( window ). , window .
— :
, .
— :
this.get('@global.foo.bar.baz'); // undefined, no errors , .
In short, now the data will be loaded on the server, expected, rendered during the SSR , come to the client in a structured way, be identified and reused without unnecessary requests to the API and with hydration markup. Well done!
Epilogue
Summarizing the total of 3 parts of this tutorial, it can be noted that we managed to create a fairly simple and concise basis for an isomorphic application. I decided to allocate this framework to a separate repository , so that you can be sure that this code is not really application code and can be used in any project.
The current results of the project are here:
→ Repository
→ Demo
In the next part, we will finally start writing the RealWorld application! Let's start with the breakdown of the application into components and the implementation of several of them. I also plan to briefly describe what types of components are, how they differ and when they should be used. Do not switch!
UPD: Develop isomorphic RealWorld applications with SSR and Progressive Enhancement. Part 4 - Components and Composition
Source: https://habr.com/ru/post/350428/
All Articles