NRF51822: we are friends of BLE and RTOS
Modern trends in technology are on the path of increasing integration - progress allows the development process of electronic devices to become more and more similar to the assembly of the designer. One of the most striking examples is the huge number of so-called "systems on a chip" - SoC, a bunch of microcontrollers and peripherals for almost every taste. Today, we will look at one of these systems, the NRF51822 chip from Nordic Semiconductor - a solution for systems designed to work with BLE technology included in the Bluetooth 4.0 standard.
And since electronic devices are increasingly increasing the level of integration, why not programming to rise to a higher level of abstraction and make a Bluetooth application running a real-time operating system - RTOS.
Our goal in this article is to make a simple embedded application for the NRF51822 running the RTOS Keil-RTX that will poll the ADC once a second and record the values obtained in the BLE characteristics. If you are interested in this topic - welcome under cat.
Briefly about RTOS and BLE
A lot has already been said about RTOS, so in order not to repeat, I advise you to read about it here and here . Of the important features of using RTOS, I would like to note only that they allow you to very easily increase the functionality of the program without adding confusion to the code. This is possible due to the fact that certain parts of the program can work conditionally at the same time without interfering with each other and can be executed as isolated blocks. And if we make an application for a “system on a chip”, which is guaranteed to perform a large number of different sorts of tasks, many of which are time-consuming, then using RTOS can greatly simplify our lives.
')
About what BLE is and how it works, there is a wonderful series of articles , which, among other things, helped me to understand some things. If you have not read - be sure to read. Within the framework of this article, we are more interested in practical nuances of working with this technology.
Generally speaking, writing “we are friends of BLE and RTOS”, I allowed myself to listen a little, because in a sense these two concepts get along very well even without our participation. The fact is that the Bluetooth stack that we use in the controller to work with the BLE standard is in itself a kind of RTOS, in which there are tasks, the controller for these tasks, timers ticking and events occur in it. Therefore, in my personal opinion, the use of RTOS in BLE applications will be a good tone, since this will allow the application as a whole to one level of abstraction.
Required Tools
In order not to touch on the basic issues of launching NRF51, we will rely on the articles of Comrade Foxek , therefore we will need the same tools:
• NRF51 debug board
• Smartphone running Android OS
• Android nRF Connect application
• MKD ARM Keil uVision
RTOS configuration
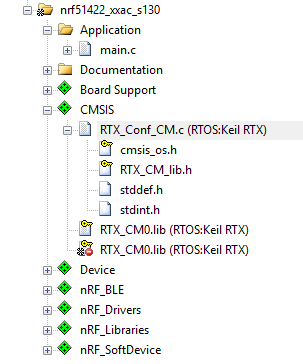
We start classically - we will load the ble_app_template template project using the Pack Installer (for details on this step, see nRF51822 Quick Start ) and add the necessary dependencies using the Run-Time Environment Manager after downloading them to the Instal Instal -e Pack:

So we added RTOS to our project. Now, in order for it to interact with the hardware, it is necessary to make some tuning. CMSIS-RTOS is well adapted to work with Cortex-M core processors and, as a rule, uses the SysTick system timer for time slicing in the OS. However, the NRF51 controller has a Cortex-M0 core on its board and does not have a SysTick timer, so the manufacturer recommends using the RTC1 real-time clock for clocking the RTOS. On the one hand, such a solution is a plus, since RTC1 does not turn off in the controller's sleep mode, which means we can build an application with very low consumption under RTOS control. On the other hand, the RTC blocks are clocked with a frequency of only 32768 Hz, which means that the size of the system time quantum will not work out to be sufficiently small.
UPD. In the Run-Time Environment Manager, in the nRF_Libraries tab for the app_timer module, select the Rtx option. Otherwise, there will be a conflict with the multiple definition of the RTC1 interrupt handler.
In order to make our OS understand which timer it works with, we need to add several functions: timer initialization and a couple of event handlers and timer interrupts. To do this, open the RTX_Conf_CM.c file from the CMSIS tab,
Add the header file nrf.h to it, find the Global Functions section and replace the contents of the functions in it with the following:
Source
/*---------------------------------------------------------------------------- * Global Functions *---------------------------------------------------------------------------*/ /*--------------------------- os_idle_demon ---------------------------------*/ #define TIMER_MASK 0xFFFFFF volatile unsigned int rtos_suspend; /// \brief The idle demon is running when no other thread is ready to run void os_idle_demon (void) { unsigned int expected_time; unsigned int prev_time; NVIC_SetPriority(PendSV_IRQn, NVIC_GetPriority(RTC1_IRQn)); for (;; ) { rtos_suspend = 1; expected_time = os_suspend(); expected_time &= TIMER_MASK; if (expected_time > 2) { prev_time = NRF_RTC1->COUNTER; expected_time += prev_time; NRF_RTC1->CC[0] = (expected_time > TIMER_MASK) ? expected_time - TIMER_MASK : expected_time; NRF_RTC1->INTENCLR = RTC_INTENSET_TICK_Msk; NVIC_EnableIRQ(RTC1_IRQn); __disable_irq(); if (rtos_suspend) { NRF_RTC1->INTENSET = RTC_INTENSET_COMPARE0_Msk; __WFI(); NRF_RTC1->EVENTS_COMPARE[0] = 0; NRF_RTC1->INTENCLR = RTC_INTENSET_COMPARE0_Msk; } __enable_irq(); NRF_RTC1->INTENSET = RTC_INTENSET_TICK_Msk; expected_time = NRF_RTC1->COUNTER; expected_time = (expected_time >= prev_time) ? expected_time - prev_time : TIMER_MASK - prev_time + expected_time; } os_resume(expected_time); } } #if (OS_SYSTICK == 0) // Functions for alternative timer as RTX kernel timer /*--------------------------- os_tick_init ----------------------------------*/ /// \brief Initializes an alternative hardware timer as RTX kernel timer /// \return IRQ number of the alternative hardware timer int os_tick_init (void) { NRF_CLOCK->LFCLKSRC = (CLOCK_LFCLKSRC_SRC_Xtal << CLOCK_LFCLKSRC_SRC_Pos); NRF_CLOCK->EVENTS_LFCLKSTARTED = 0; NRF_CLOCK->TASKS_LFCLKSTART = 1; while (NRF_CLOCK->EVENTS_LFCLKSTARTED == 0) { // Do nothing. } NRF_RTC1->PRESCALER = 32;//OS_TRV; NRF_RTC1->INTENSET = RTC_INTENSET_TICK_Msk; NRF_RTC1->TASKS_START = 1; return (RTC1_IRQn); /* Return IRQ number of timer (0..239) */ } /*--------------------------- os_tick_val -----------------------------------*/ /// \brief Get alternative hardware timer's current value (0 .. OS_TRV) /// \return Current value of the alternative hardware timer uint32_t os_tick_val (void) { return NRF_RTC1->COUNTER; } /*--------------------------- os_tick_ovf -----------------------------------*/ /// \brief Get alternative hardware timer's overflow flag /// \return Overflow flag\n /// - 1 : overflow /// - 0 : no overflow uint32_t os_tick_ovf (void) { return NRF_RTC1->EVENTS_OVRFLW; } /*--------------------------- os_tick_irqack --------------------------------*/ /// \brief Acknowledge alternative hardware timer interrupt void os_tick_irqack (void) { if ((NRF_RTC1->EVENTS_TICK != 0) && ((NRF_RTC1->INTENSET & RTC_INTENSET_TICK_Msk) != 0)) { NRF_RTC1->EVENTS_TICK = 0; } } #if defined (__CC_ARM) /* ARM Compiler */ __asm __declspec(noreturn) void RTC1_IRQHandler(void) { EXTERN OS_Tick_Handler BL OS_Tick_Handler } #else #error "Unknown compiler! Don't know how to create SVC function." #endif #endif // (OS_SYSTICK == 0) The os_idle_demon () function is responsible just for the work of the system when using power saving modes - if our application is not busy with any task, then the system itself puts the controller to sleep.
Next, we say to our system that we will not use SysTick, because for this we already have all the functions, well, at the same time, let's say with what frequency the clocking works and how we want to quantize the system time. To do this, open the configuration utility in the same RTX_Conf_CM.c file and set the appropriate system parameters for us:
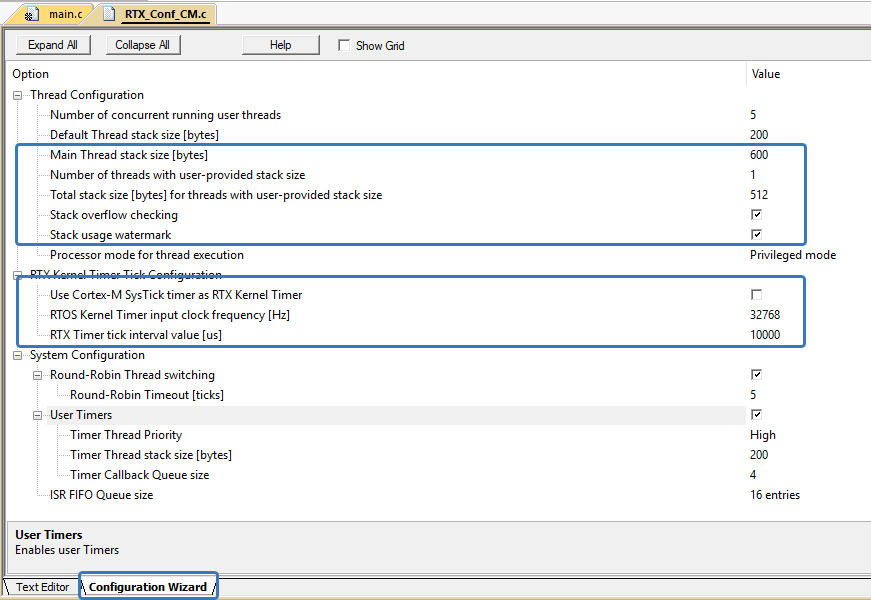
The interval between system counts of 10ms was not chosen by chance: if at a clock frequency of 32768 Hz we use the prescaler 327, then the timer frequency will turn out to be 99.9 Hz, which at least with some acceptable accuracy will ensure the system timings. If it is necessary to use smaller values for this interval, then you can pick up such values that will give acceptable accuracy (for example, divisor 31 and interval length 977 μs), but these will be non-circular numbers, which introduces some confusion in the code. Also, let's create streams with a non-standard stack size, allocate memory for these streams and tick the watermark for the stack - this will make debugging more intuitive.
At this stage, you can try to collect and download the program to the controller. The operating system will start and start executing the main function as its only thread. However, the meaning of RTOS is that different tasks are spinning in different streams, so now we will create our own stream for our BLE stack:
// ble_stack_thread osPoolDef(ble_evt_pool, 8, ble_evt_t); // osPoolId ble_evt_pool; // osMessageQDef(ble_stack_msg_box, 8, ble_evt_t); // osMessageQId ble_stack_msg_box; // osThreadId ble_stack_thread_id; // void ble_stack_thread(void const * arg); // osThreadDef (ble_stack_thread, osPriorityAboveNormal, 1, 400); Here we defined the memory pool to be used by the stack, the mailbox through which the stack will receive messages from the system, as well as the thread itself, declared its number and the function in which it will be executed. Now it remains to determine what the thread itself will do, as well as to declare the function of its creation in the system and the stack event handler:
Source
// BLE void ble_stack_thread(void const * arg) { uint32_t err_code; osEvent evt; ble_evt_t * p_ble_evt; UNUSED_PARAMETER(arg); while (1) { evt = osMessageGet(ble_stack_msg_box, osWaitForever); // wait for message if (evt.status == osEventMessage) { p_ble_evt = evt.value.p; switch (p_ble_evt->header.evt_id) { case BLE_GAP_EVT_CONNECTED: err_code = bsp_indication_set(BSP_INDICATE_CONNECTED); APP_ERROR_CHECK(err_code); m_conn_handle = p_ble_evt->evt.gap_evt.conn_handle; break; case BLE_GAP_EVT_DISCONNECTED: m_conn_handle = BLE_CONN_HANDLE_INVALID; break; default: // No implementation needed. break; } (void)osPoolFree(ble_evt_pool, p_ble_evt); } } } // BLE void ble_create_thread (void) { ble_evt_pool = osPoolCreate(osPool(ble_evt_pool)); ble_stack_msg_box = osMessageCreate(osMessageQ(ble_stack_msg_box), NULL); ble_stack_thread_id = osThreadCreate(osThread(ble_stack_thread), NULL); } As you can see, the standard function of the on_ble_evt event handler is replaced with a simple message transfer to the stream, within which the logic that the handler used to perform has already been organized.
To register a stream in the system, we will create a function that creates a memory pool and a mailbox, and then creates a stream and registers it with an identifier, which we declared a little earlier. It remains only to add this all to main and run:
Source
int main(void) { uint32_t err_code; bool erase_bonds; static osStatus status; // status = osKernelInitialize(); // timers_init(); ble_stack_init(); device_manager_init(erase_bonds); gap_params_init(); advertising_init(); services_init(); conn_params_init(); // err_code = ble_advertising_start(BLE_ADV_MODE_FAST); APP_ERROR_CHECK(err_code); ble_create_thread(); // status = osKernelStart(); } Pay attention to the functions osKernelInitialize () and osKernelStart () - since main is already a stream, by the time it enters it RTOS is already running. However, it is better to create streams and configure all peripherals on a stopped OS, so the first function is to pause and the second run back to work.
In addition, I deleted everything that concerns bsp_ble from the project, since this library is trying to interfere with the work of the stack bypassing RTOS, but we don’t want to do that at all. I also removed the main loop from main itself, since main is a thread and after all initializations we don’t have to keep its memory reserved. Therefore, the main is completed, and the system continues to work, such miracles.
Now you can build the program, download it to the controller and connect to our device using the nRF Connect program:

As we see, we still do not have a single service, so it's time to fix it. As you remember, we were going to read data from the ADC and write it into the service characteristic. In order not to repeat and build my own bike, I will take the template for creating services and features from here .
Source
// void services_init(void) { ble_uuid_t ble_uuid; /* 128 - UUID */ ble_uuid128_t base_uuid = ADC_BASE_UUID; uint8_t uuid_type; ble_uuid.type = BLE_UUID_TYPE_VENDOR_BEGIN; ble_uuid.uuid = ADC_SERVICE_UUID; sd_ble_uuid_vs_add(&base_uuid, &ble_uuid.type); sd_ble_gatts_service_add(BLE_GATTS_SRVC_TYPE_PRIMARY, &ble_uuid, &adc_handles); } /* * UUID - * handles - ( ) * n_bytes - * iswrite, isnotf, isread - , , */ uint32_t char_add(uint16_t UUID, ble_gatts_char_handles_t * handles, uint8_t n_bytes, bool iswrite, bool isnotf, bool isread) { ble_gatts_char_md_t char_md; ble_gatts_attr_md_t cccd_md; ble_gatts_attr_t attr_char_value; ble_uuid_t char_uuid; ble_gatts_attr_md_t attr_md; memset(&cccd_md, 0, sizeof(cccd_md)); BLE_GAP_CONN_SEC_MODE_SET_OPEN(&cccd_md.read_perm); BLE_GAP_CONN_SEC_MODE_SET_OPEN(&cccd_md.write_perm); cccd_md.vloc = BLE_GATTS_VLOC_STACK; memset(&char_md, 0, sizeof(char_md)); char_md.char_props.notify = isnotf; // ; char_md.char_props.write = iswrite; // ; char_md.char_props.read = isread; // ; char_md.p_char_user_desc = NULL; char_md.p_char_pf = NULL; char_md.p_user_desc_md = NULL; char_md.p_cccd_md = &cccd_md; char_md.p_sccd_md = NULL; /* UUID - 128 - */ char_uuid.type = BLE_UUID_TYPE_VENDOR_BEGIN; char_uuid.uuid = UUID; memset(&attr_md, 0, sizeof(attr_md)); BLE_GAP_CONN_SEC_MODE_SET_OPEN(&attr_md.read_perm); BLE_GAP_CONN_SEC_MODE_SET_OPEN(&attr_md.write_perm); attr_md.vloc = BLE_GATTS_VLOC_STACK; attr_md.rd_auth = 0; attr_md.wr_auth = 0; attr_md.vlen = 0; attr_char_value.p_uuid = &char_uuid; attr_char_value.p_attr_md = &attr_md; attr_char_value.init_len = n_bytes; attr_char_value.init_offs = 0; attr_char_value.max_len = n_bytes; // ; attr_char_value.p_value = NULL; // ; /* */ sd_ble_gatts_characteristic_add(adc_handles, &char_md, &attr_char_value, handles); return 0; } Here, ADC_BASE_UUID and ADC_SERVICE_UUID are a composite service identifier, set in this form:
/* UUID ( UUID ) */ #define ADC_BASE_UUID {0x66, 0x9A, 0x0C, 0x20, 0x00, 0x08, 0x1A, 0x8F, 0xE7, 0x11, 0x61, 0xBE, 0x00, 0x00, 0x00, 0x00} /* UUID ( UUID ) */ #define ADC_SERVICE_UUID 0x1533 #define ADC_CHAR_UUID 0x1534 Great, now we have a service with one characteristic, which contains 1 byte of data. It remains only to fill this byte with useful information, so we turn to the article and initialize the ADC, which will perform the conversion once a second and add a function that will update the content of the characteristic:
Source
// void ADC_init (void) { // 2 8 NRF_ADC->CONFIG = 0x00; NRF_ADC->CONFIG |= (ADC_CONFIG_RES_8bit << ADC_CONFIG_RES_Pos)| (ADC_CONFIG_INPSEL_AnalogInputOneThirdPrescaling << ADC_CONFIG_INPSEL_Pos)| (ADC_CONFIG_PSEL_AnalogInput2 << ADC_CONFIG_PSEL_Pos); NRF_ADC->INTENSET |= ADC_INTENSET_END_Enabled << ADC_INTENSET_END_Pos; NRF_ADC->ENABLE |= ADC_ENABLE_ENABLE_Enabled << ADC_ENABLE_ENABLE_Pos; // NVIC_SetPriority(ADC_IRQn, 1); NVIC_EnableIRQ(ADC_IRQn); // NRF_TIMER1->POWER = 1; NRF_TIMER1->MODE = TIMER_MODE_MODE_Timer << TIMER_MODE_MODE_Pos; NRF_TIMER1->PRESCALER = 10; // 16 MHz / 2^10 = 15625 Hz NRF_TIMER1->CC[0] = 15625; // 15625 Hz / 15625 = 1 Hz NRF_TIMER1->INTENSET = (TIMER_INTENSET_COMPARE1_Enabled << TIMER_INTENSET_COMPARE1_Pos); NRF_TIMER1->SHORTS |= (TIMER_SHORTS_COMPARE0_CLEAR_Enabled << TIMER_SHORTS_COMPARE0_CLEAR_Pos); // PPI NRF_PPI->CH[0].EEP = (uint32_t) &NRF_TIMER1->EVENTS_COMPARE[0]; NRF_PPI->CH[0].TEP = (uint32_t) &NRF_ADC->TASKS_START; NRF_PPI->CHEN |= PPI_CHEN_CH0_Enabled; NRF_PPI->CHENSET |= PPI_CHENSET_CH0_Enabled; NRF_PPI->TASKS_CHG[0].EN = 1; NRF_TIMER1->TASKS_START = 1; } // void ADC_IRQHandler(void) { rtos_suspend = 0; NRF_ADC->EVENTS_END = 0; if (NRF_ADC->CONFIG >> ADC_CONFIG_PSEL_Pos == ADC_CONFIG_PSEL_AnalogInput2) { NRF_TIMER1->EVENTS_COMPARE[0] = 0; adc_val = NRF_ADC->RESULT; osSignalSet(char_update_thread_id, 1<<CharUpdateSignal); } } Note that in the interrupt handler there is such a construction as
rtos_suspend = 0;
The rtos_suspend variable itself is defined in the RTOS configuration file and exported to our main file. Since the operating system does not manage interrupts, this variable is needed so that the program understands that the system is not inactive at the moment, but is in the interrupt handler, which means that the power saving functions should not be activated now. It is strongly recommended that each interrupt handler reset this variable, since otherwise the system’s behavior remains unpredictable.
Since the interrupt handler cannot perform actions on the stack (in our case, update the characteristics), we can create a thread that will do this. There are tools such as signals to interact with streams from interrupts. In essence, signals are just bits in a flag variable that can be set and reset — very much like interrupts. Create a stream to record the characteristics and a signal-alert for it and add it to main:
thread
// void char_update_thread (void const* arg); // osThreadId char_update_thread_id; // osThreadDef(char_update_thread, osPriorityNormal, 1, 0); // int32_t CharUpdateSignal = 0x01; // void char_update_thread (void const* arg) { while(1) { osSignalWait(1<<CharUpdateSignal,osWaitForever); ble_char_update(&adc_val,1,adc_char_handles.value_handle); } } main
int main(void) { uint32_t err_code; bool erase_bonds; static osStatus status; // status = osKernelInitialize(); // timers_init(); ble_stack_init(); device_manager_init(erase_bonds); gap_params_init(); advertising_init(); services_init(); char_add(ADC_CHAR_UUID,&adc_char_handles, 1, false, false, true); conn_params_init(); // err_code = ble_advertising_start(BLE_ADV_MODE_FAST); APP_ERROR_CHECK(err_code); // ADC_init(); // ble_create_thread(); char_update_thread_id = osThreadCreate(osThread(char_update_thread),NULL); // status = osKernelStart(); } Great, now everything is ready! You can download the program to the controller and check what we have:
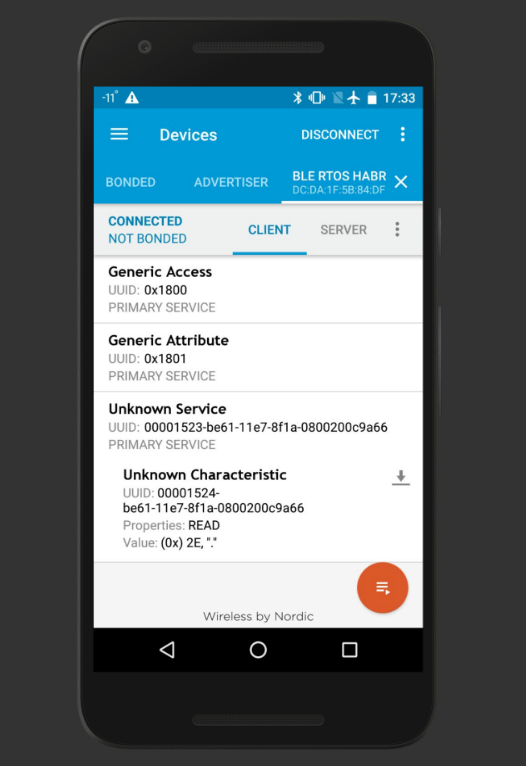
As you can see, we have a service with one characteristic that stores a single-byte value. We can read it and make sure that the values change according to the change in voltage at the ADC input. It was also possible to make this a notifying characteristic, then if the data in the characteristic on the device were changed, they would be automatically updated on the smartphone.
Conclusion
In conclusion, I would like to say that at first glance it seems as if RTOS introduces an unnecessary complication into the project, but this is not quite so. The fact is that the application we created can now be easily scaled until there is no more memory for all the tasks. For each new module, be it some kind of mathematical operations or work with peripherals, it will be enough to create your own thread and the only thing the programmer will need to think about is how to distribute priorities between tasks and, in difficult cases, when different threads turn to one and to build the same resources with semaphores and latches.
Links
Project RTOS BLE
Keil-RTX web page
NRF51822 in brief: Quick start
NRF51822 in brief: Power saving and some peripherals
NRF51822 product page
Source: https://habr.com/ru/post/350416/
All Articles