Cuckoo 2.0. We collect the best open source platform for analyzing malicious files

Greetings Habr!
4 years ago I published the assembly instructions for the dynamic analysis of malicious files Cuckoo Sandbox 1.2. During this time, the project managed to acquire impressive functionality and a huge community, having recently updated to version 2.0, which for more than a year and a half hung in the Release Candidate stage.
I finally prepared for you a complete manual for assembling Cuckoo Sandbox 2.0.5 with all the pluses that are in the project at the moment, with Cuckoo packaging in the venv and without using root , adding more than 12 security tools in the sandbox! From the totality of the collected material, I will not be afraid to say: "This is the most complete and verified step in a step of a guide from all published on the Internet at the moment." For those who master the article to the end - I will give a little advice on what to do when the sandbox is assembled and how to get the maximum profit from automating the information security processes with your fuzz using the open source. All geeks, virus analysts, security guards, guys from SOC, CERT, CSIRT and just lovers poke buttons in the terminal - welcome under the cat!
Over the past few years, a lot has happened in the Cuckoo project, new tools have been added, additional software support has appeared, the number of signatures has increased several times, the malware rating system has appeared, the entire UI has been rewritten and now you can set up a nice dark theme.

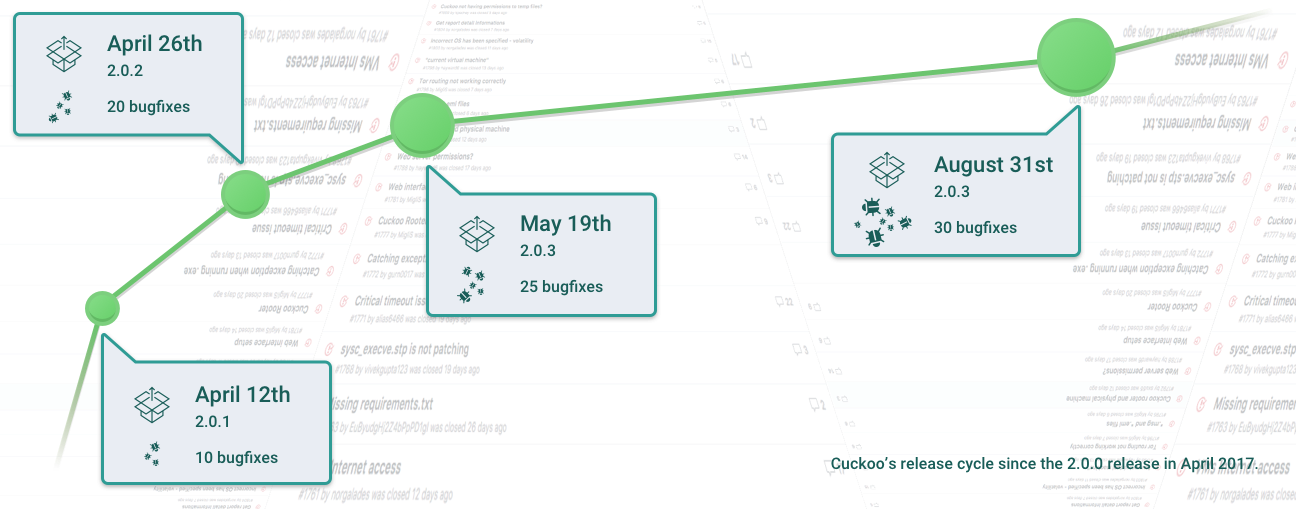
The positive changes in the project are obvious - the sandbox began to be updated with micro releases, which promptly close the identified and confirmed bugs. Developers began to write about all small changes to the blog , there you can find the roadmap of the project. Unfortunately, there have been so many changes that it’s difficult to compile the “before” and “after” tables, now these are 2 platforms from different eras, better see the blog yourself, you will like it!
I advise you to look into the blog more often, the developers have already promised that the zer0mon VM antidetek driver will be included in the master branch, but now the deadlines have been shifted to release 2.1.0, stay tuned, the thing is really necessary!
The very same code Cuckoo moved to the PIP package manager and the cuckoo is updated literally into one command.
The news about the launch of commercial support has also become positive for customers who need stability in their work, since stability has been Cuckoo’s main drawback since the first releases. I really hope that the money raised in the project will help developers to achieve high-quality application work.
However, the problem with the installation is unchanged from the beginning of the project - the Cuckoo Sandbox is well documented, and with modules in which bugs always occur - trouble. Some applications are not documented at all and to understand how and what works - you need to look at the code, some are almost not updated and not supported, like HoneyD. Having spent a considerable amount of time, I was able to collect the cuckoo with all the recommendations of the developers - to wrap the cuckoo in Venv and configure everything from scratch without using root privileges for Cuckoo! Each stage is verified step into step by multiple back-ups of backups in the test environment, until the instruction has become fully operational.
Assembly features
According to the recommendations of the developers, Cuckoo Sandbox 2.0.5 is built on the Ubuntu OS 04/04/03 installed in the ESXi cluster. As a hypervisor, Cuckoo will use VirtualBox 5.2. VM installation will be done via VMcloak auto installation script . With VMcloak, you no longer need to search for vulnerable old software for the guest OS, you do not need to configure the network and Python, VMcloak installs everything you need into one terminal command, including Cuckoo Agent and configures it. With VMcloak, it is now a pleasure to clone, administer and tune VMs. I use Windows 7 SP1 X64 as the OS of the virtual environment, although the Cuckoo Sandbox supports all versions of Windows, starting with XP.
Half a year ago, the developers of Cuckoo turned on the ability to proxy traffic from VM through VPN or Tor. In this setting, I stopped at a simple method - to give access to the Internet directly or through Tor.
In addition to the Cuckoo Sandbox, the following software will be installed:
- Suricata - IDS.
- Snort - IDS.
- HoneyD - Honeypot.
- InetSim - Network Emulator.
- Tor - onion routing guest VM traffic.
- Teserract - Recognize text on screenshots.
- MitMproxy - Analysis of SSL traffic through "man-in-the-middle".
- Moloch - IDS (very convenient and cool utility for analyzing traffic).
- SSDeep - Fuzzy-Hashing.
- Volatility - RAM research framework.
- Distorm3 - Disassembler.
- Yara - A utility for recognizing and classifying malware.
The thirteenth item should have been the program for streaming antivirus analysis of IRMA files, but when IRMA was turned on in Cuckoo, uploading the report to Elastic broke, the developers did not give an answer for this bug, and there was no time to analyze the elastic Index. Therefore, in this manual there will be an item about assembling IRMA, but integration with Cuckoo will not be included. Perhaps there is an ELK stack guru, ready to valiantly overcome the bug and supplement my article. Find IRMA and use it will be possible on port 8080.
As a drawback, I can point out incorrect links to Moloch in the web interface of the sandbox, you can probably fix it, but for me this is not critical, the Moloch service itself will hang on port 8005 and this is enough.

Cuckoo will store the data of skinings in MongoDB database, system data in Postgresql and indexes in Elasticsearch for quick search and retrieval, export to Json, HTML and PDF, work through the Nginx web server with SSL configured across all canons (not counting self-signed cert) and in conjunction with UWSGI.
This assembly is configured only for analysis in the Windows sandbox. Android, OS X and Linux are not configured. If there are questions on this part - write to the LAN, theoretically I know how to do it, but this functionality is beyond the scope of my interests and my work at the moment.
Manual features
In the current article, the auto-install script will not be provided. Of course, I am not too lazy to write it, but there is no point in it so that the sandbox works correctly - it is better to collect manually and carefully look at what is going to, analyze each error. You still build an application that interacts with a dozen external programs that are constantly updated. Bugs are inevitable, so it’s better to find them yourself than to figure out what went wrong in the script.
In this article, I did not make all the dependencies of installed programs to the very beginning in one line, as in the previous article. For each specific software connected to Cuckoo dependencies are listed in the installation section of this software.
4 years of malware analysis using Cuckoo showed me a very obvious linear relationship - the more you connect to the services sandbox, the worse it works. Therefore, it makes no sense to put all the dependencies at once, because older and more experienced IT professionals may give up on those components that are unstable, and the information from them will be redundant. The best is the enemy of the good, as they say.
This article does not involve the REST API , it is quite simple to do this, but I don’t need it at the current stage.
I will not describe each utility in detail, I’ll only mark the important, especially the essential part of the utilities described in my last article , and there is also info on how to enable REST API.
And most importantly - the article is published for several months after the assembly instructions, something can already change, something does not work. If you met a bug - write in the LAN.
And now we will answer the most popular question and proceed with the installation!
And what if I'm not strong in these of your Linux, and the sandbox is very necessary
The answer to this question is simple - use online sandboxes or mess with Windows Sysinternals .
- Service number 1, "Estonian Cuckoo" . Very competently assembled Cuckoo Sandbox latest version from the Estonian Computer Emergency Response Team CERT. The best sandbox implementation I've found on the net. Using the service, we remember that the downloaded data can be parsed into competence indicators (IoC) and transferred to other national CERTs using MISP software in accordance with the established TLP transfer rules. Therefore, carefully consider whether or not you should upload confidential software there.
- Service number 2, "Hybrid Analysis" . A sandbox popular in narrow circles (or not in narrow ones) online, the stability and quality of which is at its best, from the minuses - the functionality is a bit limited, the malware samples cannot be unloaded.
- Service number 3, "Ever-dead Malwr" - the most popular sandbox, supported by the authors of the Cuckoo Sandbox, has fallen again under load and does not rise for half a year. The only site from which it was possible to load samples of viral software for analysis for free, not counting this collection . I hope for a revival, but the forecast is not comforting.
- Option 4, "I will search for myself" - for those who are familiar with the principles of OSINT and the language of search queries. We take a piece of static text from the platform:

And we google in quotes, finding all sandboxes in the index excluding github:
Assembly
So, the theoretical part behind, we start practice!
OS update
We update system packages.
sudo apt update sudo apt upgrade -y Cuckoo Dependencies
Install the Cuckoo dependencies.
sudo apt install python python-pip python-dev libffi-dev libssl-dev libfuzzy-dev -y sudo apt install python-virtualenv python-setuptools -y sudo apt install libjpeg-dev zlib1g-dev swig -y sudo -H pip install -U pip Virtualbox
Install Virtualbox with extpack.
cd /opt sudo sh -c 'echo "deb http://download.virtualbox.org/virtualbox/debian xenial contrib" >> /etc/apt/sources.list.d/virtualbox.list' sudo wget -q https://www.virtualbox.org/download/oracle_vbox_2016.asc -O- | sudo apt-key add - sudo apt update && sudo apt install virtualbox-5.2 -y VBOX_LATEST_VERSION=$(curl http://download.virtualbox.org/virtualbox/LATEST.TXT) sudo wget http://download.virtualbox.org/virtualbox/${VBOX_LATEST_VERSION}/Oracle_VM_VirtualBox_Extension_Pack-${VBOX_LATEST_VERSION}.vbox-extpack sudo vboxmanage extpack install Oracle_VM_VirtualBox_Extension_Pack-${VBOX_LATEST_VERSION}.vbox-extpack Cuckoo sandbox
Install Venv, activate and install Cuckoo via PIP.
sudo adduser cuckoo sudo usermod -a -G vboxusers cuckoo cd /home/cuckoo su cuckoo virtualenv cuckoo . /home/cuckoo/cuckoo/bin/activate pip install -U pip setuptools psycopg2 yara-python weasyprint pycrypto pydeep easy_install distribute pip install -U cuckoo pip install weasyprint==0.36 pip install m2crypto==0.24.0 cuckoo cuckoo community deactivate sudo apt install python-m2crypto exit Java for Elasticsearch
Elastic is written in Java, so we need to install Java.
sudo add-apt-repository ppa:webupd8team/java sudo apt update && sudo apt install oracle-java8-installer -y sudo bash -c "echo 'JAVA_HOME=\"/usr/lib/jvm/java-8-openjdk-amd64\"' >> /etc/environment" source /etc/environment DB
Here we install and configure all databases, note that the variable "db_passwd" generates a random password to the Postgres database, if you want to set your own - do not forget to set it.
Cuckoo uses the outdated Elastic version 2, pay attention to this and do not accidentally install the 5.x + version.
sudo apt install mongodb -y sudo apt install postgresql libpq-dev -y sudo pip install psycopg2 db_passwd=$(date +%s | sha256sum | base64 | head -c 32 ; echo) echo "CREATE USER cuckoo WITH PASSWORD '$db_passwd';" | sudo -u postgres psql echo "CREATE DATABASE cuckoo;" | sudo -u postgres psql echo "GRANT ALL PRIVILEGES ON DATABASE cuckoo to cuckoo;" | sudo -u postgres psql wget -qO - https://packages.elastic.co/GPG-KEY-elasticsearch | sudo apt-key add - echo "deb http://packages.elastic.co/elasticsearch/2.x/debian stable main" | sudo tee -a /etc/apt/sources.list.d/elasticsearch-2.x.list sudo apt update && sudo apt install elasticsearch -y sudo systemctl daemon-reload sudo systemctl enable elasticsearch.service sudo service elasticsearch stop cd /home/cuckoo/ sudo mkdir /home/cuckoo/ESData sudo chown root:elasticsearch ESData sudo chmod 777 /home/cuckoo/ESData sudo usermod -a -G elasticsearch cuckoo sudo bash -c "cat >> /etc/elasticsearch/elasticsearch.yml <<DELIM cluster.name: es-cuckoo node.name: es-node-n1 node.master: true node.data: true bootstrap.mlockall: true path.data: /home/cuckoo/ESData network.bind_host: 0.0.0.0 DELIM" sudo service elasticsearch start sudo curl -X PUT -d @'/home/cuckoo/.cuckoo/elasticsearch/template.json' 'http://localhost:9200/_template/cuckoo' Yara + rules
Install the latest version of Yara and add the rules of Yara to Cuckoo.
cd /opt sudo apt install dh-autoreconf flex bison libjansson-dev libmagic-dev -y sudo wget https://github.com/VirusTotal/yara/archive/v3.7.1.tar.gz sudo tar -zxf v3.7.1.tar.gz cd yara-3.6.3/ sudo ./bootstrap.sh sudo ./configure --with-crypto --enable-cuckoo --enable-magic sudo make sudo make install sudo -H pip install -U yara-python cd /home/cuckoo/.cuckoo/yara/ su cuckoo sudo git clone https://github.com/lehuff/cuckoo-yara-rules.git sudo cp cuckoo-yara-rules/cuckoo-yara-rules.py . sudo rm -rf cuckoo-yara-rules sudo python cuckoo-yara-rules.py sudo chown -R cuckoo:cuckoo /home/cuckoo/.cuckoo/ SSDeep
Install SSDeep.
cd /opt sudo -H pip install -U ssdeep sudo git clone https://github.com/bunzen/pySSDeep.git cd pySSDeep sudo python setup.py build sudo python setup.py install cd - Volatility
Installing Volatility is simple, but forcing Cuckoo from venv to see it — not really, to put it in the venv along with Cuckoo is also not an option, it changes the versions of Cuckoo libraries with dependencies. From the third line of a crutch that solves this problem, if anyone has an idea how to make friends with it in the right way - write.
sudo apt install pcregrep libpcre++-dev -y sudo -H pip install -U git+https://github.com/kbandla/pydeep.git sudo apt install volatility -y cp -r /usr/lib/python2.7/dist-packages/volatility* /home/cuckoo/cuckoo/lib/python2.7/site-packages sudo chown cuckoo:cuckoo /home/cuckoo/cuckoo/lib/python2.7/site-packages/* mv /home/cuckoo/.cuckoo/signatures/windows/volatility_sig.py /home/cuckoo/.cuckoo/signatures/windows/volatility_sig.py.deactivate TCPDump
Reached TCP dump.
sudo apt install tcpdump apparmor-utils -y sudo aa-disable /usr/sbin/tcpdump sudo setcap cap_net_raw,cap_net_admin=eip /usr/sbin/tcpdump sudo chmod +s /usr/sbin/tcpdump Teserract
It is put simply, it is connected too, however I have not noticed delights in work of OCR.
sudo apt install tesseract-ocr -y Fonts for PDF
Without this magic, PDF reports will not be generated.
sudo -H pip install -U cairocffi sudo apt install wkhtmltopdf xvfb xfonts-100dpi -y MitMproxy
A very useful library that allows you to pry SSL traffic. Note that Cuckoo only understands version 0.18.2 of the package.
sudo apt install libarchive13 libxml2-dev libxslt1-dev -y sudo -H pip install -U mitmproxy==0.18.2 su cuckoo cd ~ mitmproxy + ctrl-c sudo cp ~/.mitmproxy/mitmproxy-ca-cert.p12 /home/cuckoo/.cuckoo/analyzer/windows/bin/cert.p12 sudo chown cuckoo:cuckoo /home/cuckoo/.cuckoo/analyzer/windows/bin/cert.p12 exit Tor
It's all quite simple.
sudo apt install tor -y sudo sh -c 'echo TransPort 192.168.56.1:9040 >> /etc/tor/torrc' sudo sh -c 'echo DNSPort 192.168.56.1:5353 >> /etc/tor/torrc' Suricata
Initially, I wanted to write what and where in the config it is necessary to edit, but by the time I was able to overcome Suricata and remove all the flaws of work, there were a lot of edits to the config, and 0 was documented, so I publish the config entirely. Moreover, the original rules file will remain intact.
sudo add-apt-repository ppa:oisf/suricata-stable sudo apt update && sudo apt install suricata -y echo "alert http any any -> any any (msg:\"FILE store all\"; filestore; noalert; sid:15; rev:1;)" | sudo tee /etc/suricata/rules/cuckoo.rules sudo touch /etc/suricata/suricata-cuckoo.yaml %YAML 1.1 --- vars: address-groups: HOME_NET: "[192.168.0.0/16,10.0.0.0/8,172.16.0.0/12]" EXTERNAL_NET: "any" HTTP_SERVERS: "$HOME_NET" SMTP_SERVERS: "$HOME_NET" SQL_SERVERS: "$HOME_NET" DNS_SERVERS: "$HOME_NET" TELNET_SERVERS: "$HOME_NET" AIM_SERVERS: "$EXTERNAL_NET" DNP3_SERVER: "$HOME_NET" DNP3_CLIENT: "$HOME_NET" MODBUS_CLIENT: "$HOME_NET" MODBUS_SERVER: "$HOME_NET" ENIP_CLIENT: "$HOME_NET" ENIP_SERVER: "$HOME_NET" port-groups: HTTP_PORTS: "80" SHELLCODE_PORTS: "!80" ORACLE_PORTS: 1521 SSH_PORTS: 22 DNP3_PORTS: 20000 MODBUS_PORTS: 502 FILE_DATA_PORTS: "[$HTTP_PORTS,110,143]" FTP_PORTS: 21 default-rule-path: /etc/suricata/rules rule-files: - botcc.rules - ciarmy.rules - compromised.rules - drop.rules - dshield.rules - emerging-attack_response.rules - emerging-chat.rules - emerging-current_events.rules - emerging-dns.rules - emerging-dos.rules - emerging-exploit.rules - emerging-ftp.rules - emerging-imap.rules - emerging-malware.rules - emerging-misc.rules - emerging-mobile_malware.rules - emerging-netbios.rules - emerging-p2p.rules - emerging-policy.rules - emerging-pop3.rules - emerging-rpc.rules - emerging-scan.rules - emerging-smtp.rules - emerging-snmp.rules - emerging-sql.rules - emerging-telnet.rules - emerging-tftp.rules - emerging-trojan.rules - emerging-user_agents.rules - emerging-voip.rules - emerging-web_client.rules - emerging-web_server.rules - emerging-worm.rules - tor.rules - http-events.rules - smtp-events.rules - dns-events.rules - tls-events.rules classification-file: /etc/suricata/classification.config reference-config-file: /etc/suricata/reference.config default-log-dir: /var/log/suricata/ stats: enabled: yes interval: 8 outputs: - fast: enabled: no filename: fast.log append: yes - eve-log: enabled: yes filetype: regular filename: eve.json types: - alert: metadata: yes tagged-packets: yes xff: enabled: no mode: extra-data deployment: reverse header: X-Forwarded-For - http: extended: yes - dns: query: yes answer: yes - tls: extended: yes - files: force-magic: no - smtp: - ssh - stats: totals: yes threads: no deltas: no= - flow - unified2-alert: enabled: no filename: unified2.alert xff: enabled: no mode: extra-data deployment: reverse header: X-Forwarded-For - http-log: enabled: no filename: http.log append: yes - tls-log: enabled: no filename: tls.log append: yes - tls-store: enabled: no - dns-log: enabled: no filename: dns.log append: yes - pcap-log: enabled: no filename: log.pcap limit: 1000mb max-files: 2000 mode: normal use-stream-depth: no honor-pass-rules: no - alert-debug: enabled: no filename: alert-debug.log append: yes - alert-prelude: enabled: no profile: suricata log-packet-content: no log-packet-header: yes - stats: enabled: yes filename: stats.log totals: yes threads: no - syslog: enabled: no facility: local5 - drop: enabled: yes filename: drop.log append: yes - file-store: enabled: yes log-dir: files force-magic: no force-filestore: no - file-log: enabled: yes filename: files-json.log append: yes force-magic: no - tcp-data: enabled: no type: file filename: tcp-data.log - http-body-data: enabled: no type: file filename: http-data.log - lua: enabled: no scripts: logging: default-log-level: notice default-output-filter: outputs: - console: enabled: yes - file: enabled: yes level: info filename: /var/log/suricata/suricata.log - syslog: enabled: no facility: local5 format: "[%i] <%d> -- " af-packet: - interface: eth0 cluster-id: 99 cluster-type: cluster_flow defrag: yes - interface: default pcap: - interface: eth0 - interface: default pcap-file: checksum-checks: auto app-layer: protocols: tls: enabled: yes detection-ports: dp: 443 dcerpc: enabled: yes ftp: enabled: yes ssh: enabled: yes smtp: enabled: yes mime: decode-mime: yes decode-base64: yes decode-quoted-printable: yes header-value-depth: 2000 extract-urls: yes body-md5: no inspected-tracker: content-limit: 100000 content-inspect-min-size: 32768 content-inspect-window: 4096 imap: enabled: detection-only msn: enabled: detection-only smb: enabled: yes detection-ports: dp: 139, 445 nfs: enabled: no dns: tcp: enabled: yes detection-ports: dp: 53 udp: enabled: yes detection-ports: dp: 53 http: enabled: yes request-body-limit: 0 response-body-limit: 0 libhtp: default-config: personality: IDS request-body-limit: 100kb response-body-limit: 100kb request-body-minimal-inspect-size: 32kb request-body-inspect-window: 4kb response-body-minimal-inspect-size: 40kb response-body-inspect-window: 16kb response-body-decompress-layer-limit: 2 http-body-inline: auto double-decode-path: no double-decode-query: no server-config: modbus: enabled: no detection-ports: dp: 502 stream-depth: 0 dnp3: enabled: no detection-ports: dp: 20000 enip: enabled: no detection-ports: dp: 44818 sp: 44818 ntp: enabled: no asn1-max-frames: 256 coredump: max-dump: unlimited host-mode: auto unix-command: enabled: yes filename: custom.socket legacy: uricontent: enabled engine-analysis: rules-fast-pattern: yes rules: yes pcre: match-limit: 3500 match-limit-recursion: 1500 host-os-policy: windows: [0.0.0.0/0] bsd: [] bsd-right: [] old-linux: [] linux: [] old-solaris: [] solaris: [] hpux10: [] hpux11: [] irix: [] macos: [] vista: [] windows2k3: [] defrag: memcap: 32mb hash-size: 65536 trackers: 65535 max-frags: 65535 prealloc: yes timeout: 60 flow: memcap: 128mb hash-size: 65536 prealloc: 10000 emergency-recovery: 30 vlan: use-for-tracking: true flow-timeouts: default: new: 30 established: 300 closed: 0 bypassed: 100 emergency-new: 10 emergency-established: 100 emergency-closed: 0 emergency-bypassed: 50 tcp: new: 60 established: 600 closed: 60 bypassed: 100 emergency-new: 5 emergency-established: 100 emergency-closed: 10 emergency-bypassed: 50 udp: new: 30 established: 300 bypassed: 100 emergency-new: 10 emergency-established: 100 emergency-bypassed: 50 icmp: new: 30 established: 300 bypassed: 100 emergency-new: 10 emergency-established: 100 emergency-bypassed: 50 stream: memcap: 64mb checksum-validation: yes inline: auto reassembly: memcap: 256mb depth: 0 toserver-chunk-size: 2560 toclient-chunk-size: 2560 randomize-chunk-size: yes host: hash-size: 4096 prealloc: 1000 memcap: 32mb decoder: teredo: enabled: true detect: profile: medium custom-values: toclient-groups: 3 toserver-groups: 25 sgh-mpm-context: auto inspection-recursion-limit: 3000 prefilter: default: mpm grouping: profiling: grouping: dump-to-disk: false include-rules: false include-mpm-stats: false mpm-algo: auto spm-algo: auto threading: set-cpu-affinity: no cpu-affinity: - management-cpu-set: cpu: [ 0 ] - receive-cpu-set: cpu: [ 0 ] - worker-cpu-set: cpu: [ "all" ] mode: "exclusive" prio: low: [ 0 ] medium: [ "1-2" ] high: [ 3 ] default: "medium" detect-thread-ratio: 1.0 luajit: states: 128 profiling: rules: enabled: yes filename: rule_perf.log append: yes limit: 10 json: yes keywords: enabled: yes filename: keyword_perf.log append: yes rulegroups: enabled: yes filename: rule_group_perf.log append: yes packets: enabled: yes filename: packet_stats.log append: yes csv: enabled: no filename: packet_stats.csv locks: enabled: no filename: lock_stats.log append: yes pcap-log: enabled: no filename: pcaplog_stats.log append: yes nfq: nflog: - group: 2 buffer-size: 18432 - group: default qthreshold: 1 qtimeout: 100 max-size: 20000 capture: netmap: - interface: eth2 - interface: default pfring: - interface: eth0 threads: 1 cluster-id: 99 cluster-type: cluster_flow - interface: default ipfw: napatech: hba: -1 use-all-streams: yes streams: ["0-3"] mpipe: load-balance: dynamic iqueue-packets: 2048 inputs: - interface: xgbe2 - interface: xgbe3 - interface: xgbe4 stack: size128: 0 size256: 9 size512: 0 size1024: 0 size1664: 7 size4096: 0 size10386: 0 size16384: 0 cuda: mpm: data-buffer-size-min-limit: 0 data-buffer-size-max-limit: 1500 cudabuffer-buffer-size: 500mb gpu-transfer-size: 50mb batching-timeout: 2000 device-id: 0 cuda-streams: 2 And finally, correct rights.
sudo mkdir /var/run/suricata sudo chown cuckoo:cuckoo /var/run/suricata sudo chown -R cuckoo:cuckoo /etc/suricata sudo chown -R cuckoo:cuckoo /var/log/suricata sudo touch /etc/suricata/threshold.config ETupdate
Customize auto-update Community Suricata signatures.
cd /opt sudo git clone https://github.com/seanthegeek/etupdate.git sudo cp etupdate/etupdate /usr/sbin sudo /usr/sbin/etupdate -V sudo crontab -e 0 0 * * * /usr/sbin/etupdate -V Snort
I didn’t add rules to it, because I trust Suricata more.
sudo apt install snort -y When configuring, we specify the default interface and subnet 192.168.0.0/16.
sudo chown -R cuckoo:cuckoo /etc/snort/ sudo chown -R cuckoo:cuckoo /var/log/snort/ VMcloak and Windows 7 SP1 X64
The most convenient program for automatic deployment of VM Cuckoo. Significantly shortens the time, but the author rewrote its logic of work and, of course, did not update the documentation. I advise you to look at either the utility code on GitHub , or read the old documentation in order to understand all the pleasures of working with VMcloak and deal with what we will do next.
The most attentive browser will notice that the official repository of the project https://github.com/jbremer/vmcloak differs from that used in the https://github.com/tweemeterjop/vmcloak script below. In relation to the fork, the original did not know how to enable vRDE - an implementation of the RDP protocol in a custom guest VM.
Probably the correct option would be to take the original code and finish the vRDE into it, however if the fork is not so far from the original, you can use the fork, as I do below. At the time of setup, the repository and its fork practically had no differences.
From my own experience I will say - vRDE is needed, there are use cases when the target attack document is protected by a Word password and the password must be entered in order for the virus to work in the sandbox, or the virus is glued to the installer, which must be installed. Without vRDE, this is problematic. Yes, and to further configure the OS vRDE, we also need.
cd /opt sudo apt install libyaml-dev libpython2.7-dev genisoimage -y sudo git clone -b vrde https://github.com/tweemeterjop/vmcloak.git cd vmcloak/ sudo cp /home/cuckoo/.cuckoo/agent/agent.py vmcloak/data/bootstrap/ sudo -H pip install -r requirements.txt sudo python setup.py install cd .. sudo mkdir -p /mnt/win7 sudo mount -o loop,ro ~/en_windows_7_enterprise_with_sp1_x64_dvd_u_677651.iso /mnt/win7/ sudo vmcloak-vboxnet0 sudo vmcloak-iptables 192.168.56.0/24 ens160 cd /home/cuckoo su cuckoo vmcloak init --vrde --resolution 1280x1024 --ramsize 4096 --win7_x64 --product professional --cpus 2 win7x64 vmcloak install --vrde win7_x64 python27 pillow adobepdf chrome cuteftp dotnet40 flash java silverlight vcredist wic vmcloak modify --vrde win7_x64 Windows 7 Setup
After
vmcloak modify --vrde win7_x64 VM will start, you can connect to it via RDP. If you work with Win10 - do not use the tile application of the remote desktop, it falls into a stupor and trance, when the connection goes to the VM without a login and password, use the classic application, everything is OK.
The following items on my list are optional, however, in order to reduce the number of false positives and simplify the operation of malware, it is recommended to disable (or enable) all of the following. Not superfluous and installation in the guest VM software, which is used at work by all employees.
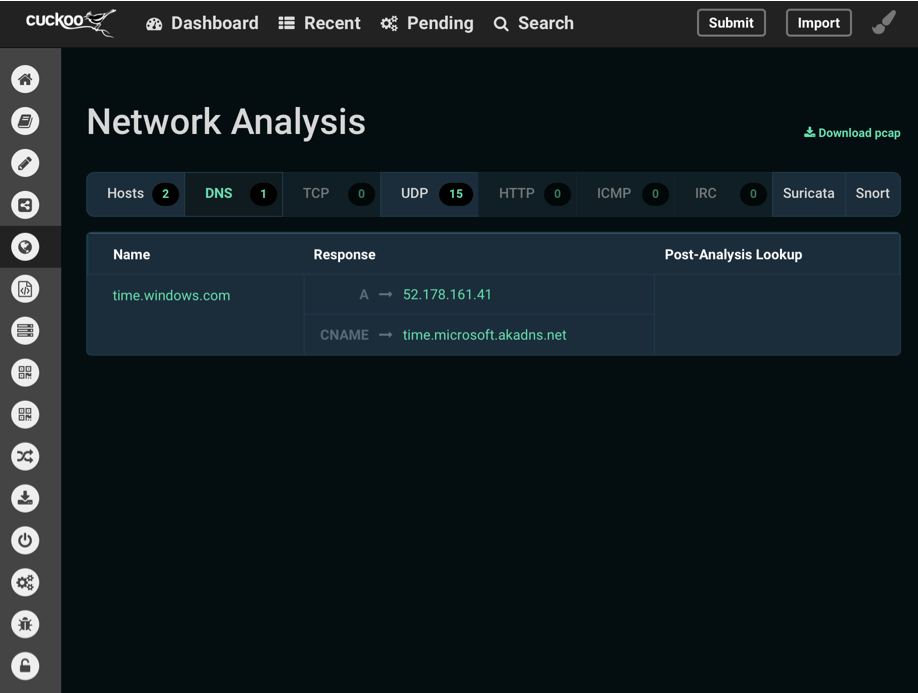
An example of unnecessary data in the report:
I will notice! All of the following should be done only for Windows 7 SP1 x64, on other operating systems actions may be different.
After some time working with the new sandbox, my list began to include the following items:
Disable Windows Messenger broadcasts on UDP port 1900
HKEY_LOCAL_MACHINE \ Software \ Microsoft \ DirectPlayNATHelp \ DPNHUPnP key Name: UPnPMode Type: REG_DWORD Value: 2
Turn off x64 driver checking so that Cuckoo works fine with x64
cmd - bcdedit.exe / set nointegritychecks ON
disable NCSI
HKEY_LOCAL_MACHINE \ SYSTEM \ CurrentControlSet \ Services \ NlaSvc \ Parameters \ Internet EnableActiveProbing Type Key: REG_DWORD Value: 0
disable teredo.ipv6.microsoft.com
cmd - netsh interface teredo set state disabled
disable IPv6
HKEY_LOCAL_MACHINE \ SYSTEM \ CurrentControlSet \ Services \ Tcpip6 \ Parameters \ add the DWORDDisabled key DisabledComponents 8
- Disable Tredo Network Adapters
- Disable autorun Adobe Reader, Flash player, MS Office
- Disable Chrome Update
- In chrome: // plugins allow the launch of the vulnerable flash
- In the settings of Chrome to allow everything in content settings
- In the HKEY_LOCAL_MACHINE \ SOFTWARE \ Policies \ Google branch, delete Update
- Disable services FP, UPnP, SSDP
- Set the default chrome browser
- Set an empty chrome start page
- Disable Chrome privacy settings
- Install FileZilla
- Disable synchronization with NTP
- Disable secure viewing office (Data execution prevention mode)
- Allow autorun macros in all applications in the office
The sequence of compiling your own instructions under your own OS:
- We check the legitimate executable file in the sandbox;
- We look, where and in what tabs superfluous info appeared, for example, the appeal to time.microsoft.com;
- Open Google and see how we disable it;
- We write down, we disconnect.
Adding VM to Cuckoo
Create a snapshot of a newly configured guest OS and add to Cuckoo at the same time removing the pre-installed VM cuckoo1 from the config.
vmcloak snapshot win7_x64 win7_x64node1 192.168.56.101 . /home/cuckoo/cuckoo/bin/activate cuckoo machine --add win7x64node1 192.168.56.101 --platform windows --snapshot vmcloak cuckoo machine --delete cuckoo1 deactivate Moloch
The coolest tool for working with network traffic. Unlike other network analyzers, Moloch stakes on an analytics toolkit with tons of features, timelines, graphs, and more. I am very sorry that I learned about it so recently and used to this less convenient MalCom . One of the key advantages of Moloch is the ability to combine and analyze all the network packets of all scans from Cuckoo at one time. Well, working in conjunction with Elasticsearch allows Moloch to process a huge amount of data.
This is what this beauty looks like (screen from the official repository):

Well, also install it.
sudo apt install libjson-perl -y cd /opt sudo wget https://files.molo.ch/builds/ubuntu-16.04/moloch_0.20.2-2_amd64.deb sudo dpkg -i moloch_0.20.2-2_amd64.deb sudo /data/moloch/bin/Configure Next, you must specify the interface vboxnet0, the login and password Moloch, the Elasticsearch IP address.
sudo /data/moloch/db/db.pl http://localhost:9200 init sudo /data/moloch/bin/moloch_add_user.sh cuckoo cuckoo cuckoosandbox --admin InetSim
We establish a virtual local area network that the virus was not lonely in a sandbox. Settings emulated services left default, 18 emulated services turned out, not counting the web.
sudo su echo "deb http://www.inetsim.org/debian/ binary/" > /etc/apt/sources.list.d/inetsim.list wget -O - http://www.inetsim.org/inetsim-archive-signing-key.asc | apt-key add - apt update apt install inetsim exit In the /etc/internet / windowsim.conf config, you need to comment out the HTTP and HHTPS web services so that they do not conflict with Cuckoo:
#start_service http #start_service https IRMA

The IRMA sandbox is not integrated due to the problem of uploading reports to Elasticsearch. But this does not prevent us from deploying and testing the utility. IRMA is compiled into Vagrant and deployed automatically via Ansible strictly version 2.2.1.0.
sudo apt install vagrant -y cd /opt sudo wget https://releases.hashicorp.com/vagrant/2.0.2/vagrant_2.0.2_x86_64.deb sudo dpkg -i vagrant_2.0.2_x86_64.deb sudo -H pip install -U ansible==2.2.1.0 Download IRMA:
sudo git clone https://github.com/quarkslab/irma cd irma/ansible Let's add forwarding from VM to port 8080 by adding to the / opt / irma / ansible / Vagrantfile file
line 19:
config.vm.network "forwarded_port", guest: 80, host: 8080 And install IRMA:
sudo vagrant up HoneyD
HoneyD is the oldest and extremely functional hanipot. There is only one minus in it - it ceased to be updated several years ago. Skills to search for suitable forks were successfully applied, after which a relatively fresh version of the HoneyD installation via Ansible was found, which I hurried to use. In Hanipot, I have nastril only one host, you can configure at least a whole subnet using the official manual .
cd /opt/ sudo git clone https://github.com/Bifrozt/honeyd-ansible.git cd honeyd-ansible/ sudo ansible-playbook honeyd.yml sudo touch /usr/share/honeyd/config.conf Save the config.
create default set default default tcp action filtered set default default udp action filtered set default default icmp action filtered create windows set windows personality "Microsoft Windows XP Professional SP3" set windows uptime 1728650 set windows maxfds 35 set windows default tcp action reset add windows tcp port 135 open add windows tcp port 139 open add windows tcp port 445 open set windows ethernet "08:00:27:81:1d:0c" bind 192.168.56.103 windows Web server
Install Nginx, generate a certificate and even enable http2 support.
sudo add-apt-repository ppa:nginx/development sudo apt update sudo apt install nginx -y sudo openssl dhparam -out /etc/ssl/certs/dhparam.pem 2048 sudo mkdir /etc/nginx/ssl sudo openssl req -x509 -nodes -days 365 -newkey rsa:2048 -keyout /etc/nginx/ssl/nginx.key -out /etc/nginx/ssl/nginx.crt sudo -H pip install -U uwsgi cd /home/cuckoo/ sudo mkdir /var/log/uwsgi/ sudo mkdir /etc/uwsgi sudo chown cuckoo:cuckoo /var/log/uwsgi/ sudo chown cuckoo:cuckoo /etc/uwsgi/ su cuckoo Next, add the UWSGI config.
[uwsgi] plugins = python socket = /tmp/uwsgi.sock chmod-socket = 664 master = true processes = 4 virtualenv = /home/cuckoo/cuckoo module = cuckoo.web.web.wsgi uid = cuckoo gid = cuckoo static-map = /static=/home/cuckoo/cuckoo/local/lib/python2.7/site-packages/cuckoo/web/static env = CUCKOO_APP=web env = CUCKOO_CWD=/home/cuckoo/.cuckoo And the nginx config, changing the IP and site name:
upstream _uwsgi_cuckoo_web { server unix:/tmp/uwsgi.sock; } server { listen 80; listen [::]:80; server_name cuckoo.test.ru; return 301 https://10.0.0.3$request_uri; server_tokens off; } server { listen 443 ssl http2; listen [::]:443 ssl http2; server_name cuckoo.test.ru; ssl_certificate /etc/nginx/ssl/nginx.crt; ssl_certificate_key /etc/nginx/ssl/nginx.key; ssl_dhparam /etc/ssl/certs/dhparam.pem; ssl_session_timeout 1d; ssl_session_cache shared:SSL:50m; ssl_session_tickets off; ssl_protocols TLSv1.2; ssl_ciphers 'ECDHE-ECDSA-AES256-GCM-SHA384:ECDHE-RSA-AES256-GCM-SHA384:ECDHE-ECDSA-CHACHA20-POLY1305:ECDHE-RSA-CHACHA20-POLY1305:ECDHE-ECDSA-AES128-GCM-SHA256:ECDHE-RSA-AES128-GCM-SHA256:ECDHE-ECDSA-AES256-SHA384:ECDHE-RSA-AES256-SHA384:ECDHE-ECDSA-AES128-SHA256:ECDHE-RSA-AES128-SHA256'; ssl_prefer_server_ciphers on; add_header Strict-Transport-Security "max-age=15768000"; ssl_stapling on; ssl_stapling_verify on; server_tokens off; location / { client_max_body_size 1G; proxy_redirect off; proxy_set_header X-Forwarded-Proto $scheme; uwsgi_pass _uwsgi_cuckoo_web; include uwsgi_params; } } Now add the user www-data to the cuckoo group and use the symlink to enable our config.
sudo adduser www-data cuckoo sudo ln -s /etc/nginx/sites-available/cuckoo-web /etc/nginx/sites-enabled/ sudo systemctl reload nginx Cuckoo configs
And finally, the most important thing - we combine everything collected in the sandbox. To explain what is there to what is long, meaningless and 85% of the parameters are intuitive, I suggest using the official documentation starting from page 96, if there are difficulties in understanding some of the parameters. Either the main peep in my last article. Not the worst will be the option to copy and use my files below, but at your own peril and risk.
[sniffer] enabled = yes tcpdump = /usr/sbin/tcpdump bpf = [mitm] enabled = yes mitmdump = /usr/local/bin/mitmdump port_base = 50000 script = mitm.py certificate = bin/cert.p12 [services] enabled = yes services = honeyd timeout = 0 [reboot] enabled = yes [cuckoo] version_check = yes delete_original = no delete_bin_copy = no machinery = virtualbox memory_dump = yes terminate_processes = no reschedule = no process_results = yes max_analysis_count = 0 max_machines_count = 0 max_vmstartup_count = 10 freespace = 1024 tmppath = rooter = /tmp/cuckoo-rooter [feedback] enabled = no name = company = email = [resultserver] ip = 192.168.56.1 port = 2042 force_port = no upload_max_size = 134217728 [processing] analysis_size_limit = 134217728 resolve_dns = yes sort_pcap = yes [database] connection = postgresql://cuckoo:Supersecretpassword4habr@localhost:5432/cuckoo timeout = 60 [timeouts] default = 120 critical = 60 vm_state = 60 [basic] guest_profile = Win7SP1x64 delete_memdump = yes [malfind] enabled = yes filter = yes [apihooks] enabled = no filter = yes [pslist] enabled = yes filter = no [psxview] enabled = yes filter = no [callbacks] enabled = yes filter = no [idt] enabled = yes filter = no [timers] enabled = yes filter = no [messagehooks] enabled = no filter = no [getsids] enabled = yes filter = no [privs] enabled = yes filter = no [dlllist] enabled = yes filter = yes [handles] enabled = yes filter = yes [ldrmodules] enabled = yes filter = yes [mutantscan] enabled = yes filter = yes [devicetree] enabled = yes filter = yes [svcscan] enabled = yes filter = yes [modscan] enabled = yes filter = yes [yarascan] enabled = yes filter = yes [ssdt] enabled = yes filter = yes [gdt] enabled = yes filter = yes [sockscan] enabled = yes filter = no [netscan] enabled = no filter = no [mask] enabled = no pid_generic = [analysisinfo] enabled = yes [apkinfo] enabled = no decompilation_threshold = 5000000 [baseline] enabled = no [behavior] enabled = yes [buffer] enabled = yes [debug] enabled = yes [droidmon] enabled = no [dropped] enabled = yes [dumptls] enabled = yes [extracted] enabled = yes [googleplay] enabled = no android_id = google_login = google_password = [memory] enabled = yes [misp] enabled = no url = apikey = maxioc = 100 [network] enabled = yes whitelist_dns = no allowed_dns = [procmemory] enabled = yes idapro = no extract_img = no extract_dll = no dump_delete = no [procmon] enabled = yes [screenshots] enabled = yes tesseract = /usr/bin/tesseract [snort] enabled = yes snort = /usr/sbin/snort conf = /etc/snort/snort.conf [static] enabled = yes pdf_timeout = 60 [strings] enabled = yes [suricata] enabled = yes suricata = /usr/bin/suricata conf = /etc/suricata/suricata-cuckoo.yaml eve_log = eve.json files_log = files-json.log files_dir = files socket = [targetinfo] enabled = yes [virustotal] enabled = yes timeout = 60 scan = yes key = virustotal [irma] enabled = no timeout = 300 scan = yes force = yes url = http://172.16.1.30 [feedback] enabled = no [jsondump] enabled = yes indent = 4 calls = yes [singlefile] enabled = yes html = no pdf = yes [misp] enabled = no url = apikey = mode = maldoc ipaddr hashes url [mongodb] enabled = yes host = 127.0.0.1 port = 27017 db = cuckoo store_memdump = yes paginate = 100 username = password = [elasticsearch] enabled = yes hosts = 127.0.0.1 timeout = 300 calls = no index = cuckoo index_time_pattern = yearly cuckoo_node = [moloch] enabled = yes host = 10.0.0.3:8005 insecure = no moloch_capture = /data/moloch/bin/moloch-capture conf = /data/moloch/etc/config.ini instance = cuckoo [notification] enabled = no url = identifier = [mattermost] enabled = no url = myurl = username = cuckoo show_virustotal = no show_signatures = no show_urls = no hash_filename = no hash_url = no [routing] route = none internet = ens160 rt_table = main auto_rt = yes drop = no [inetsim] enabled = yes server = 192.168.56.1 [tor] enabled = yes dnsport = 5353 proxyport = 9040 [vpn] enabled = no vpns = vpn0 [vpn0] name = vpn0 description = Spain, Europe interface = tun0 rt_table = tun0 [virtualbox] mode = headless path = /usr/bin/VBoxManage interface = vboxnet0 machines = win7_x64node1 [win7_x64node1] label = win7_x64node1 platform = windows ip = 192.168.56.101 snapshot = vmcloak interface = resultserver_ip = 192.168.56.1 resultserver_port = 2042 tags = options = osprofile = Win7SP1x64 [honeyd] label = honeyd platform = linux ip = 192.168.56.103 tags = service, honeyd options = nictrace noagent Cuckoo
, .
supervisor Cuckoo.
sudo apt install supervisor -y sudo systemctl stop supervisor C supervisor:
[program:vmcloak-vboxnet0] command=vmcloak-vboxnet0 directory=/usr/local/bin/ [program:vmcloak-ifconfig] command=vmcloak-iptables 192.168.56.0/24 ens160 directory=/usr/local/bin/ [group:vmcloak-internet] programs = vmcloak-vboxnet0, vmcloak-ifconfig [program:cuckoo-rooter] command = /home/cuckoo/cuckoo/bin/cuckoo rooter --sudo autorestart = true [program:cuckoo-daemon] command = /home/cuckoo/cuckoo/bin/cuckoo -d -m 10000 user = cuckoo startsecs = 30 autorestart = true [program:cuckoo-process] command = /home/cuckoo/cuckoo/bin/cuckoo process p%(process_num)d process_name = cuckoo-process_%(process_num)d numprocs = 4 user = cuckoo autorestart = true [group:cuckoo] programs = cuckoo-rooter, cuckoo-daemon, cuckoo-process [program:distributed] command = /home/cuckoo/cuckoo/bin/python -m cuckoo.distributed.worker user = cuckoo autostart = false autorestart = true environment = CUCKOO_APP="worker",CUCKOO_CWD="/home/cuckoo/.cuckoo" [program:uwsgi] user = cuckoo directory = /usr/bin command = bash -c 'sleep 5 && uwsgi --ini /etc/uwsgi/cuckoo.ini' autorestart = true stderr_logfile = /var/log/uwsgi/uwsgi-err.log stdout_logfile = /var/log/uwsgi/uwsgi-out.log stopsignal = QUIT :
sudo systemctl restart supervisor sudo supervisorctl -c /etc/supervisor/supervisord.conf reload ( supervisor , - , ):
sleep 30 sudo systemctl start molochcapture.service sudo systemctl start molochviewer.service sudo inetsim cd /opt/irma/ansible/ sudo vagrant up sudo honeyd -f /usr/share/honeyd/config.conf -i vboxnet0 :
sudo chmod +x serv.sh sudo crontab -e @reboot /bin/sh /opt/serv.sh ? " ! ?"
?
, — .
, — . , , . .
— - . , , .
— 3 :
- . , , , Cuckoo Sandbox, IDS, UEBA, USM, SIEM ;
- (Incident Response Platform, IRP);
- . (Threat intelligense Platform, TIP).
, , — IRP TheHive Project . , 2.
- TheHive — .
- Cortex — .
TheHive Project stack.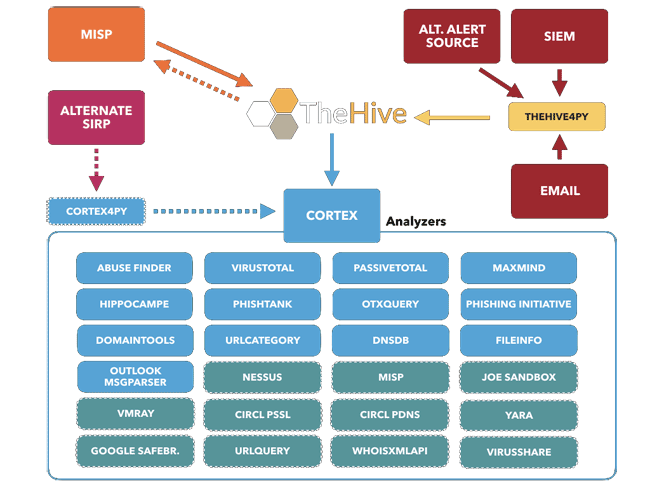
TheHive — , , - . TheHive . (case) , , "DDoS " :
- " , L7 ?"
- " IP "
- " blackhole"
, , — , , TLP .
TheHive UI.
TheHive , , API TheHive4Py , , SIEM, . — . , IP, , , , . , . — Cortex . , API ( ) .
— , TheHive (Case). (Tasks), , " ", " " . , Cortex VirusTotal, , AlienVault OTX , , , Cuckoo Sandbox 8-10 . . -, . Cortex TheHive.
MISP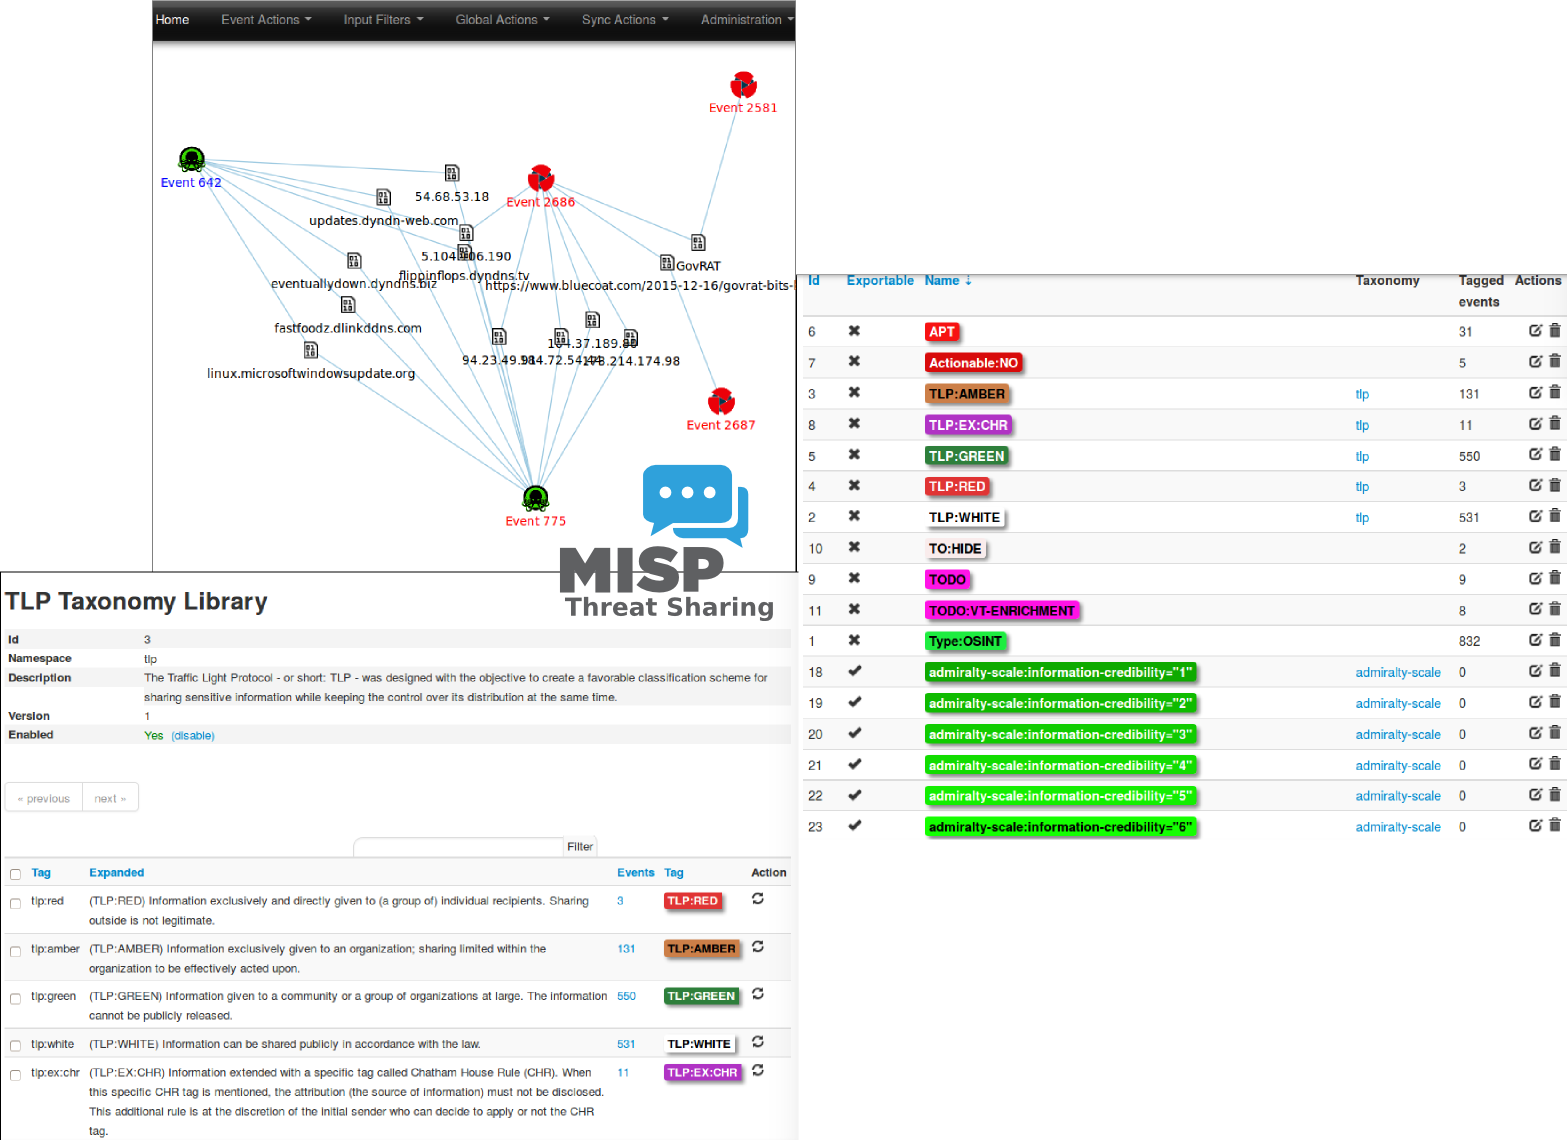
TheHive Cuckoo MISP , : Firewall IP , — .
, , , , . TheHive KPI.
MISP, , 47 , CERT, . MISP , , — Proxy MISP, — .
: — open source, , Cuckoo Sandbox. , -?
Thanks for attention!
useful links
, , , , — .
- https://bdavis-cybersecurity.blogspot.ru/2016/11/cuckoo-sandbox-installation-part-2-of-4.html?m=1
- https://hub.docker.com/r/abzcoding/cuckoo-base/~/dockerfile/
- https://media.readthedocs.org/pdf/cuckoo/latest/cuckoo.pdf
- https://www.elastic.co/guide/en/elasticsearch/reference/current/setup.html
- http://www.jjzhentan.com/ropgadget_com/posts/cuckoo_install.html
- http://ropgadget.com/posts/cuckoo_install.html
- http://www.rffuste.com/2016/09/18/cuckoo-sandbox-install-notes-part-2-installation-and-configuration/
- https://cuckoo.sh/docs/
- http://vmcloak.readthedocs.io/en/latest/config.html
- http://www.trishtech.com/2015/07/disable-active-internet-probing-ncsi-in-windows/
')
Source: https://habr.com/ru/post/350392/
All Articles