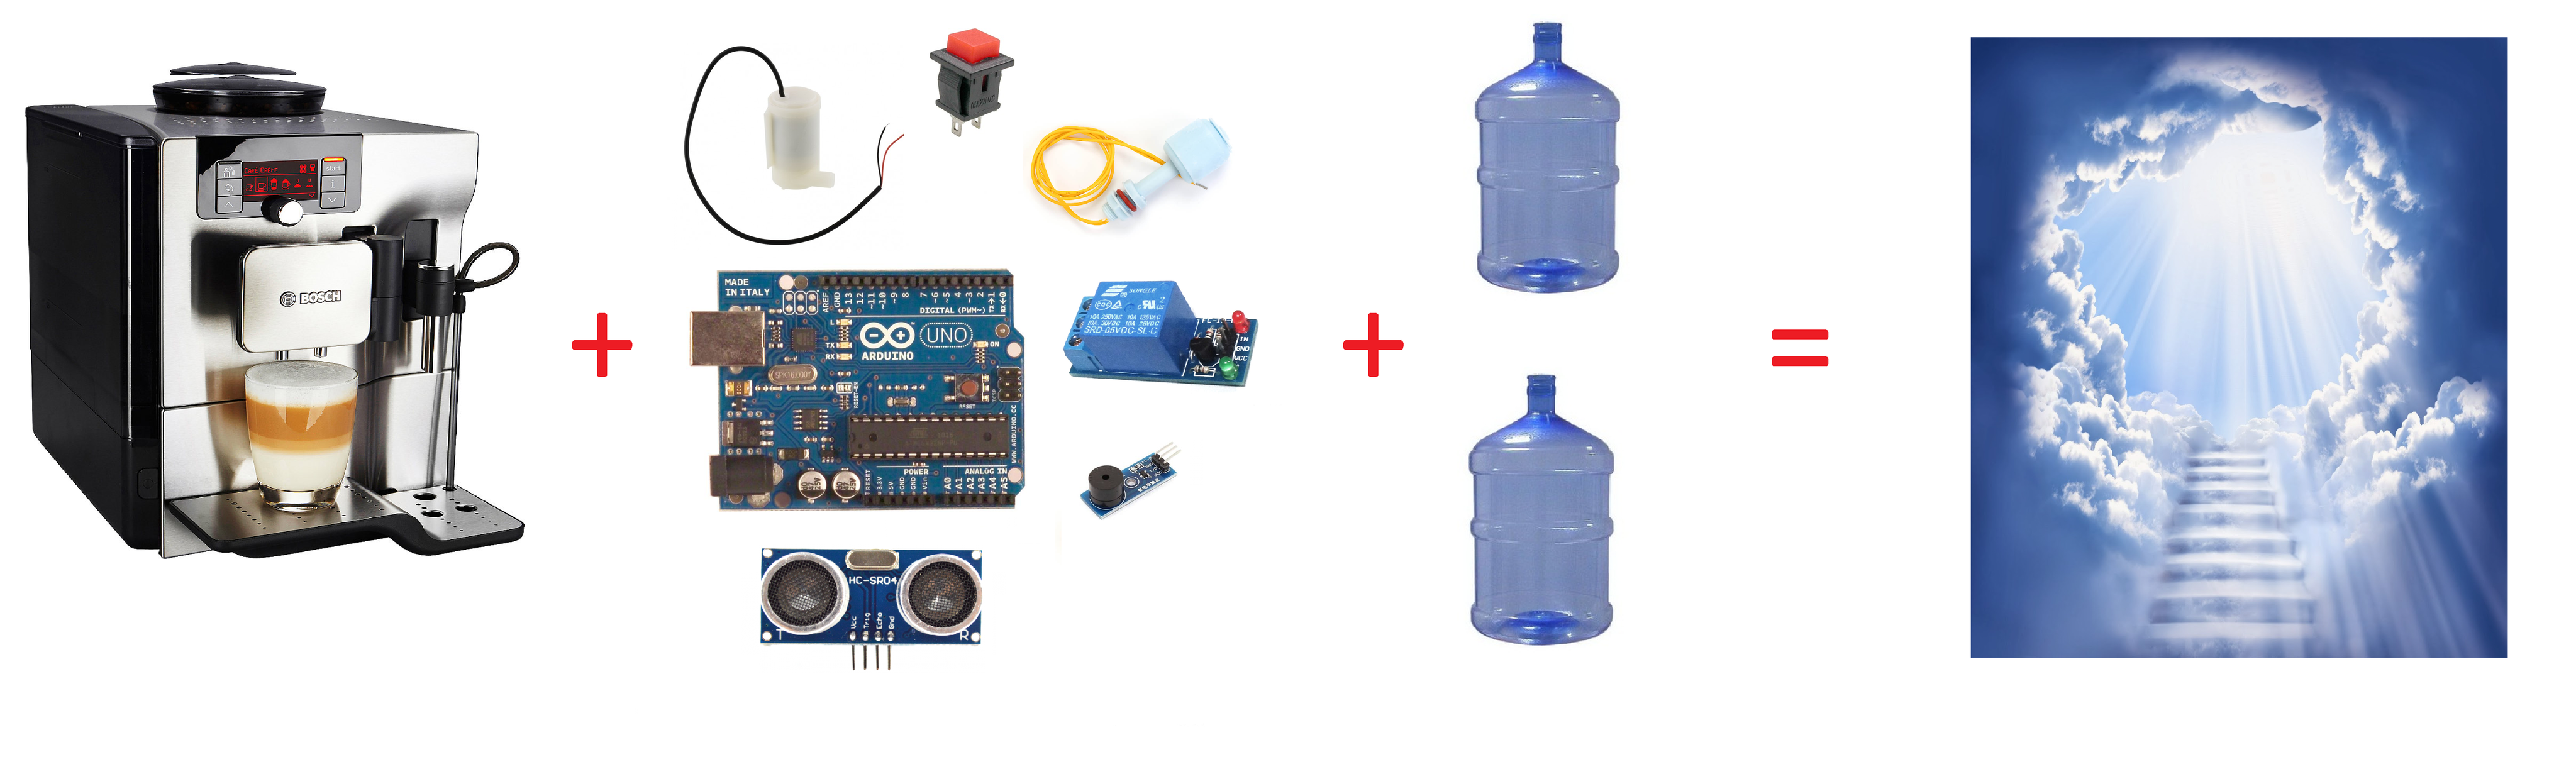
Arduated coffee machine
I like to do things as simple as an ax, but at the same time terribly useful, for example, like the last article of 9 years ago - Installing Ubuntu Linux from the hard drive. The script , and now the time has come for such an activity.
Under the cat you will find detailed instructions on how to use the Arduino and cheap and affordable tools to automate the supply of clean fresh water to the coffee machine, as well as to organize the drainage of liquid from the coffee machine tray, which does not provide connection to external communications.
Background and Motivation
The story is such that SKYF bought a coffee machine at a small but very proud company producing “huge quadrocopters”; the nearest water supply and sewage utilities were 100 meters from it. During operation, it turned out that a team of 30 people filled the drip tray for ~ 10 cups of coffee, and then it was necessary to go through three doors to the nearest bathroom, balancing with a tray filled with water, like in Sabantui with an egg in a spoon, so as not to shed, not a drop on the worn floor, nor, especially, on the pants. The filling of the clean water reservoir delivered a smaller problem, since the dispenser was half a meter from the coffee machine and you only needed to stand for 1-2 minutes in your hands with a plastic tank for clean water. But I firmly decided that “enough to endure it” (c) and armed with the Arduino Uno, which was lying around my scarf, I decided to automate the process of filling the tank and draining the waste liquid.
Previously studied the issue of profitability of this idea of automation, it turned out that the difference in the price of the acquired coffee machine and coffee machine with the ability to connect to the sewage system is 2 times the minimum! I will give an example of coffee machines in prices at the beginning of 2018:
- Purchased coffee machine ~ 60 000 rubles;
- The cost of supplementing the function of connecting to "external communications" ~ 3000 rubles;
- Coffee machine with the ability to connect to the water supply and sewage systems - ~ from 110 000 to ∞ rubles.
Prices are just heaven and earth. Definitely it makes sense to automate the purchased coffee machine.
')
Main section
Goals:
- increase the drain interval of the liquid from the pallet every 1 hour at least once a day;
- implement a convenient way to transport waste liquid to sewer communications;
- forget what it is to remove the clean water tank and stand for 1-2 minutes near the dispenser to fill the tank.
Ways to solve the problem:
- make a humanoid robot or hire a robot-like person who handled these problems manually;
- make an automatic system that will reduce the frequency of manual labor of coffee machine users.
Obviously, the first method is very debt and interesting, I will leave it for the future. At leisure, you can make a robot that delivers the prepared coffee from the coffee machine to the worker and who would automate the remaining manual labor. The second way with the secretary is boring, banal, it has been done for centuries, this is not our method. We choose the third method, it is optimal in terms of the complexity / price ratio.
We solve the goals in accordance with the chosen method.
Our patient looks like this:

On the left of the coffee machine there is a removable tank for clean water, in the lower part there is a pull-out tray for drops of ~ 400 ml.
The task is solved organizationally and with the help of elements of the automatic control system:
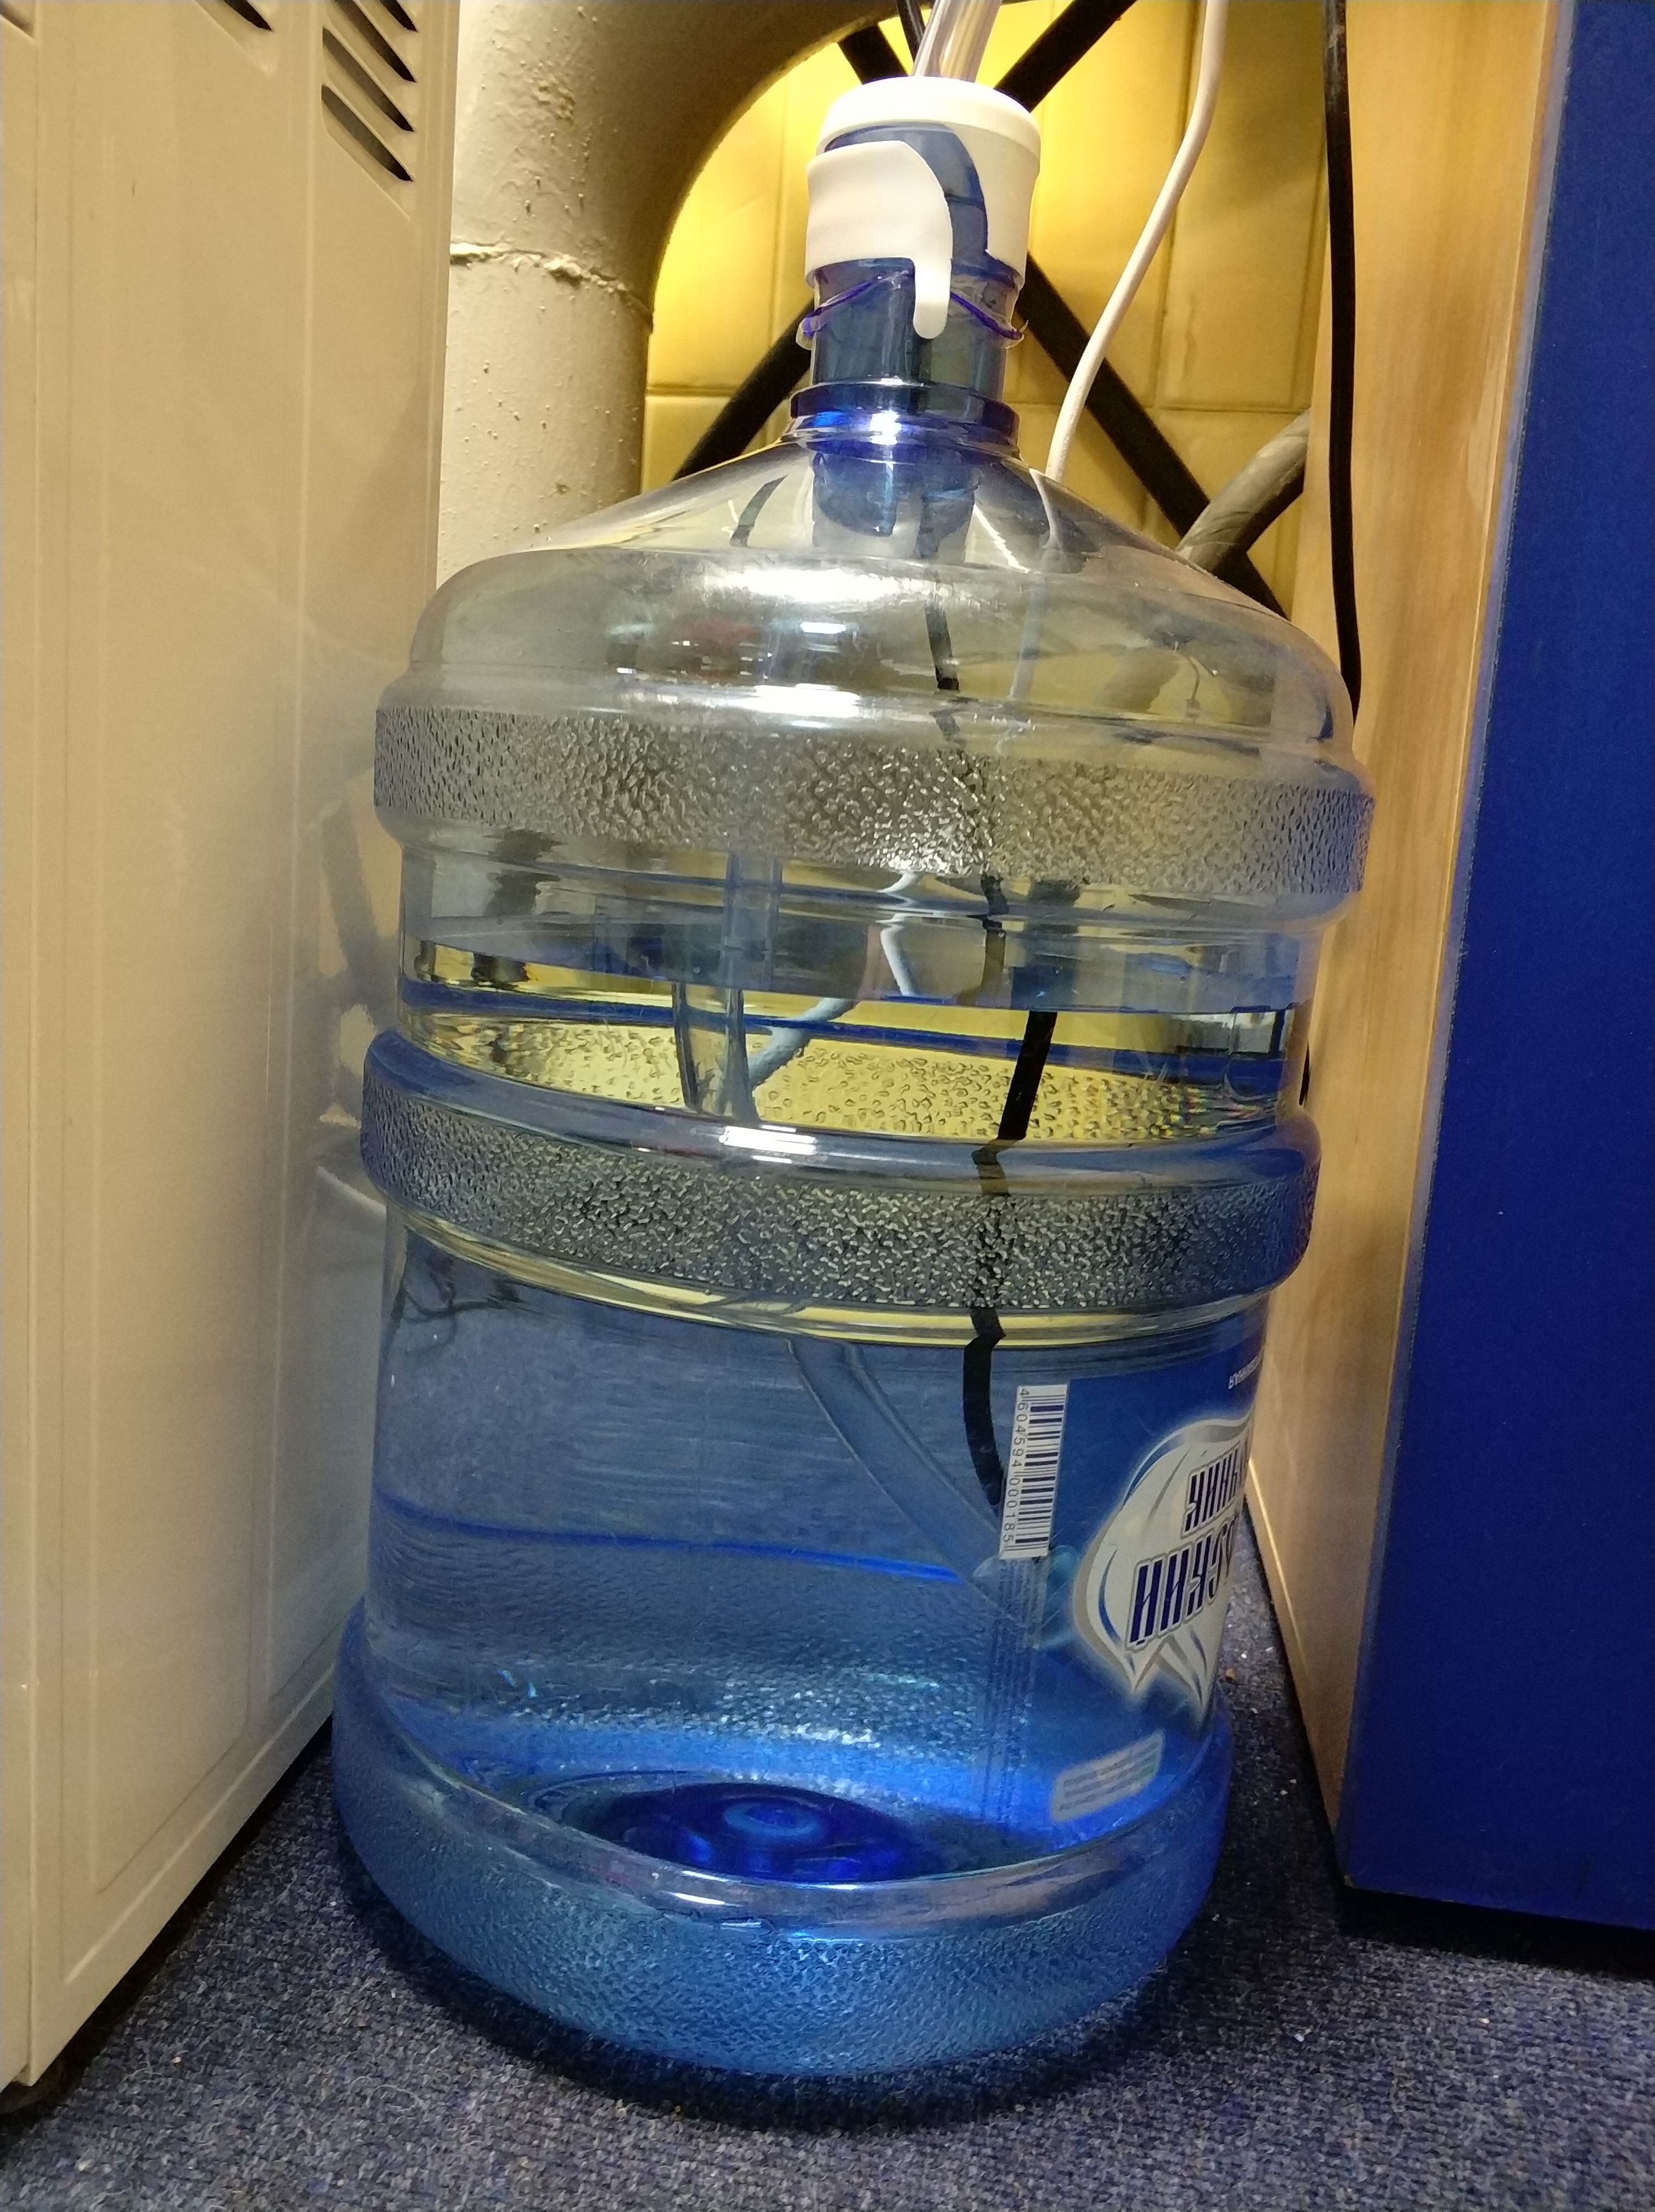
1) we take two bottles of 19 liters, which are always at hand in the office, one will be for clean water, the other for waste;
2) in the case of reducing the level in the tank of the coffee machine to the minimum, from the bottle of clean water with the help of a pump, water is supplied to the maximum mark;
3) we connect the PVC pipe to the pallet with the external tank and control the level in it, the bottle itself, so as not to spoil the appetite with the color of the drains, cover it with a cover offered by many water delivery services.
For example, here is such a case:

If you have very close water supply and sewage, but the coffee machine does not provide for the possibility of connecting to the water supply and sewage, then this article will also suit you. Instead of a pump, you will have a solenoid valve, which can also be controlled using 12 volts, the valve is connected, for example, with a water filter (which usually comes with a clean water tap). And about the drain - the tube down the drain, the level sensor in the drain tank will need to be removed from the program below.
Choosing automation
Take the Arduino Uno and begin to automate. We will need:
- Water level sensor in the coffee machine tank;
- Pump to feed water from the bottle to the tank;
- Water level sensor in the tank drains.
The logic is simple:
IF the level in the tank of the coffee machine is below the minimum -> turn on the pump;
IF the level in the tank of the coffee machine is above the maximum -> stop the pump;
IF the level in the tank drains above the maximum - scream.
It would seem that the logic is simple, but with the implementation it turned out that not everything is so simple, all the details are in the programming section.
You will also need a power supply 220V-> 12V, they are powered, and the Arduino, and the pump. We will control the pump using an Arduino relay (any relay module with a control voltage of 5 Volts and no more than 20mA will do, you can do it yourself, or you can simply buy a relay from Arduino).

To communicate with the human species of Arduinka, we will buy a piezo-digger, in order to notify about faults, and a button through which we will read the wishes and behavior of a person.
We also need a case for folding this whole farm, I used the 3d model for the Arduino Uno and attached a relay with a squeaker to the Arduino case itself. Here is who on that much.
- Water level sensor in the coffee machine tank;
- Pump to feed water from the bottle to the tank;
- Water level sensor in the tank drains.
The logic is simple:
IF the level in the tank of the coffee machine is below the minimum -> turn on the pump;
IF the level in the tank of the coffee machine is above the maximum -> stop the pump;
IF the level in the tank drains above the maximum - scream.
It would seem that the logic is simple, but with the implementation it turned out that not everything is so simple, all the details are in the programming section.
Choosing a pump
Pump requirements:
1) should pass into the neck of an ordinary office water bottle of 19 liters, the diameter of the neck is 53 mm;
2) must have a supply voltage of no more than 12 volts in order to co-ordinate with the power supply of the Arduino and not have the danger of electric shock;
3) it is desirable to be immersed in the bottle so as not to litter the space around the coffee machine and not to catch the eye;
4) should be able to create pressure to lift water by 1.5 meters.
The following pumps satisfied these criteria:
- Submersible pump AMP-X157 from Amperk 5-12 Volts;
- submersible pump BI0002156 from the Chinese at 6-15 Volts.

At first I chose the first option, simply because it was sold in my city, there is no time to wait for a month for the Chinese, I want to drink coffee without worries right here and now. But during operation, it turned out that the protruding fitting does not crawl through the neck into another bottle. Then I bought a Chinese pump, it went perfectly.
Characteristics of the Chinese pump (important parameters for us are highlighted in bold):
Operating voltage 6-15 V
Rated current: 1.2A
Maximum consumption: 600l / h
Sizes: Approx. 10.8 x 4 cm (H x W)
Perfect. We take. At this pump in the nearest hardware store, I bought a transparent PVC tube with an inner diameter of 12. On the first pump, which “amperka” was a tube with a diameter of 8 and 10 cm (internal, external) 1 m long, a drain was made from it, so you have to buy 2 tube, who wants to just go through the instructions.
1) should pass into the neck of an ordinary office water bottle of 19 liters, the diameter of the neck is 53 mm;
2) must have a supply voltage of no more than 12 volts in order to co-ordinate with the power supply of the Arduino and not have the danger of electric shock;
3) it is desirable to be immersed in the bottle so as not to litter the space around the coffee machine and not to catch the eye;
4) should be able to create pressure to lift water by 1.5 meters.
The following pumps satisfied these criteria:
- Submersible pump AMP-X157 from Amperk 5-12 Volts;
- submersible pump BI0002156 from the Chinese at 6-15 Volts.
At first I chose the first option, simply because it was sold in my city, there is no time to wait for a month for the Chinese, I want to drink coffee without worries right here and now. But during operation, it turned out that the protruding fitting does not crawl through the neck into another bottle. Then I bought a Chinese pump, it went perfectly.
Characteristics of the Chinese pump (important parameters for us are highlighted in bold):
Operating voltage 6-15 V
Rated current: 1.2A
Maximum consumption: 600l / h
Sizes: Approx. 10.8 x 4 cm (H x W)
Perfect. We take. At this pump in the nearest hardware store, I bought a transparent PVC tube with an inner diameter of 12. On the first pump, which “amperka” was a tube with a diameter of 8 and 10 cm (internal, external) 1 m long, a drain was made from it, so you have to buy 2 tube, who wants to just go through the instructions.
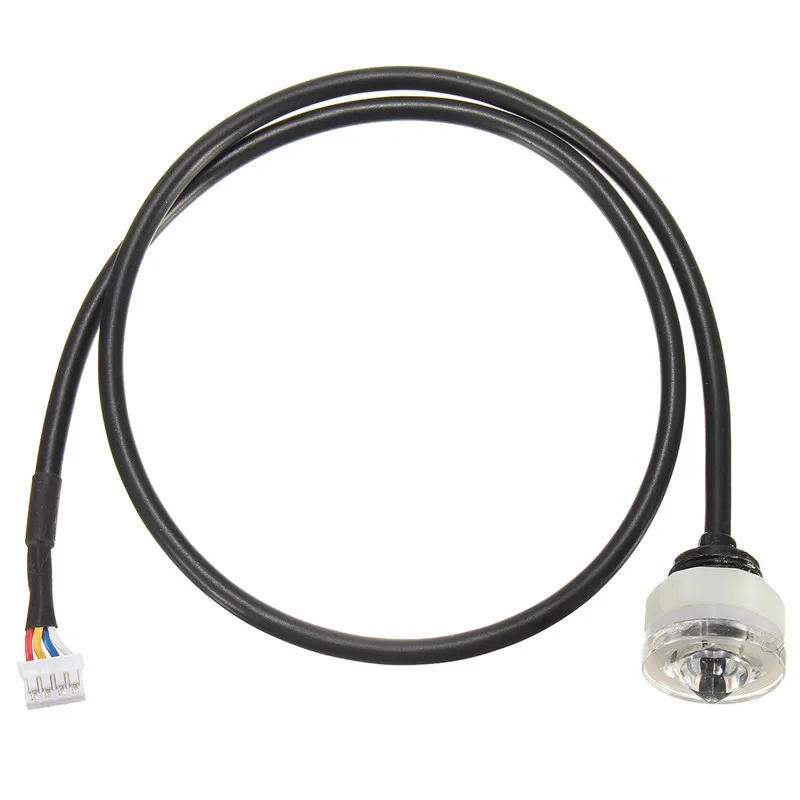
Choosing level sensors
Level sensor requirements:
1) should give information about the low and high level in the water tank;
2) if possible, should not require intervention in the design of the tank;
3) should be compact;
4) must be aesthetic and not stand out;
5) should be supplied with a safe and Arduino compatible power supply of 5-12 volts;
6) should be available in the city (my demand here and now);
7) must work with fresh water;
What the market offers us:
1) Level sensor specifically for Arduino

Satisfies the points: 2, 3, 5, 6.
Does not satisfy the points: 1, 4. For me, it is too highlighted and not aesthetic, besides its length will not allow to measure the entire height of the level (tank height is about 22 cm, this sensor is 6.2 cm)
2) Float level
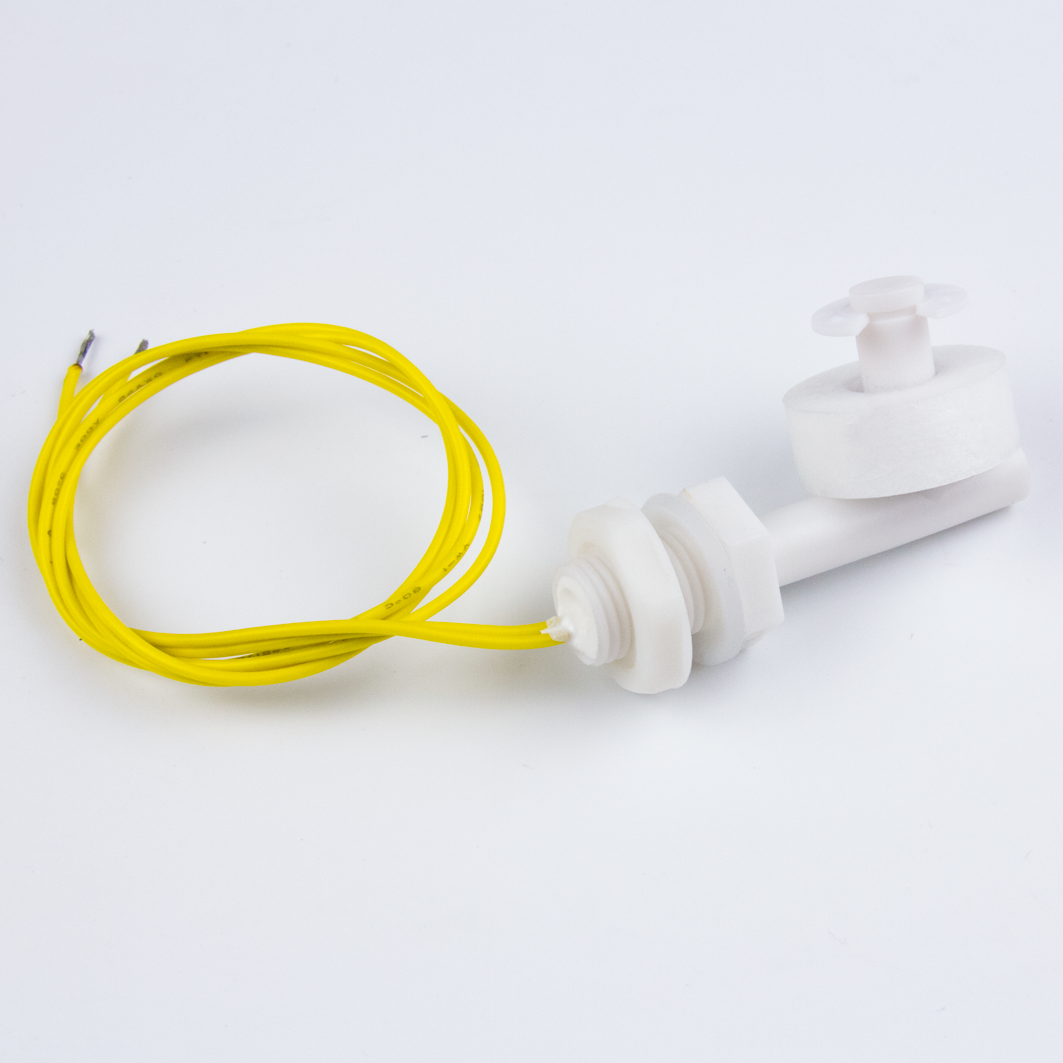
Satisfies the points: 1 (two sensors), 3, 5, 6.
Does not satisfy the points: 2, 4. It is necessary to drill the tank, it stands out, but we take it, we will need it.
Also there is in the form of a bar, also not suitable - it is difficult to choose the right size
3) Infrared level sensor (optocoupler)
Satisfies the points: 1 (two sensors), 3, 4, 5, 6.
Does not satisfy the points: 2. Need to drill the tank.
4) Ultrasonic distance sensor HC-SR04

Satisfies all items. The tank has a lid to which this sensor can be attached and measure the distance to the surface, thanks to which the sound from the water is 99% reflected back (“echoes are walking along Lake Yahreng” (c)), this sensor is ideal: compatible with arduino , safe voltage, do not drill anything, will be hidden under the lid (in theory), in stores in bulk, it measures the level completely from the bottom to the full.
The sensor itself works as follows: the sensor has an emitter and a receiver, the emitter sends a sound wave, and the receiver listens when an echo arrives; using all known physics formulas and echo return time, you can calculate the distance to the reflected surface. We take.
1) should give information about the low and high level in the water tank;
2) if possible, should not require intervention in the design of the tank;
3) should be compact;
4) must be aesthetic and not stand out;
5) should be supplied with a safe and Arduino compatible power supply of 5-12 volts;
6) should be available in the city (my demand here and now);
7) must work with fresh water;
What the market offers us:
1) Level sensor specifically for Arduino
Satisfies the points: 2, 3, 5, 6.
Does not satisfy the points: 1, 4. For me, it is too highlighted and not aesthetic, besides its length will not allow to measure the entire height of the level (tank height is about 22 cm, this sensor is 6.2 cm)
2) Float level
Satisfies the points: 1 (two sensors), 3, 5, 6.
Does not satisfy the points: 2, 4. It is necessary to drill the tank, it stands out, but we take it, we will need it.
Also there is in the form of a bar, also not suitable - it is difficult to choose the right size
3) Infrared level sensor (optocoupler)
Satisfies the points: 1 (two sensors), 3, 4, 5, 6.
Does not satisfy the points: 2. Need to drill the tank.
4) Ultrasonic distance sensor HC-SR04
Satisfies all items. The tank has a lid to which this sensor can be attached and measure the distance to the surface, thanks to which the sound from the water is 99% reflected back (“echoes are walking along Lake Yahreng” (c)), this sensor is ideal: compatible with arduino , safe voltage, do not drill anything, will be hidden under the lid (in theory), in stores in bulk, it measures the level completely from the bottom to the full.
The sensor itself works as follows: the sensor has an emitter and a receiver, the emitter sends a sound wave, and the receiver listens when an echo arrives; using all known physics formulas and echo return time, you can calculate the distance to the reflected surface. We take.
You will also need a power supply 220V-> 12V, they are powered, and the Arduino, and the pump. We will control the pump using an Arduino relay (any relay module with a control voltage of 5 Volts and no more than 20mA will do, you can do it yourself, or you can simply buy a relay from Arduino).
To communicate with the human species of Arduinka, we will buy a piezo-digger, in order to notify about faults, and a button through which we will read the wishes and behavior of a person.
We also need a case for folding this whole farm, I used the 3d model for the Arduino Uno and attached a relay with a squeaker to the Arduino case itself. Here is who on that much.
We collect, solder, drill, glue
Total that we need (some kind of "while all the houses" ...):
1) 2 bottles of 19 liters;
2) Arduino Uno;
3) Power supply 12 Volt;
4) Submersible pump BI0002156;
5) Ultrasonic distance sensor HC-SR04 (I will call it sonar);
6) Float level straight;
7) Button to interact with the person;
8) 5 volt relay;
9) Piezopischalka;
10) housing;
11) To heaps of jumpers dad-mom, mom-mom;
Of the tools: electrical tape, knife, sealant, drill, drill, soldering iron with all due.
The general scheme is shown below.

We assemble according to the “principle” scheme below the entire structure. GND from each element we pull on any GND output Arduino, the same story with + 5V. Following the number of channels will give you the advantage of not reworking the pin numbers in the program, which will be lower.
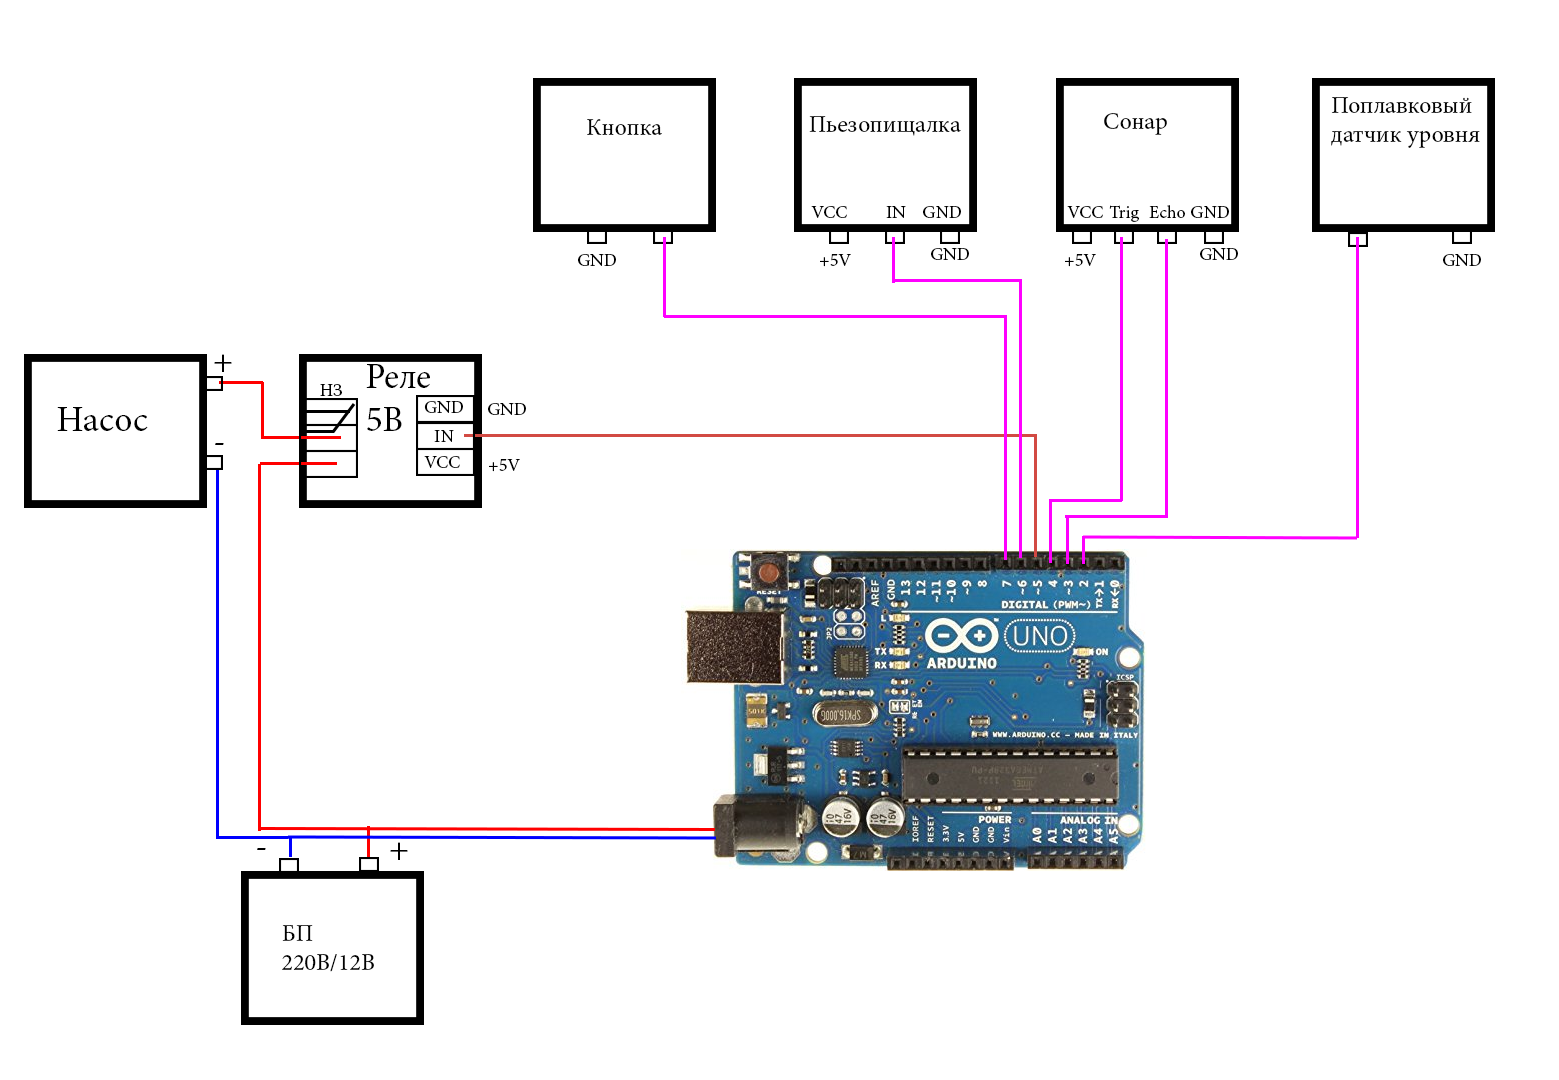
Would like to note:
1. I solved the problem of the lack of GND and 5V connectors by soldering the wiring to these terminals and supplying the sensors I needed from WAGA terminal blocks, where you can pick up 5 wires.
2. Sonar is conveniently attached with rubber bands to the tank cover. Try to achieve perpendicularity of the radiator to the surface of the water.
3. A hose is attached to the tank with a stationery clip so that it does not jump out of the tank.
4. I removed the drops from the pallet through a fitting printed on a 3D printer. In the lowest point of the drain pan of the coffee machine we drill a 9 mm hole under it, insert it there and seal the connection. The model for the hose fitting for diameters of 8/10 mm below the link.
1) 2 bottles of 19 liters;
2) Arduino Uno;
3) Power supply 12 Volt;
4) Submersible pump BI0002156;
5) Ultrasonic distance sensor HC-SR04 (I will call it sonar);
6) Float level straight;
7) Button to interact with the person;
8) 5 volt relay;
9) Piezopischalka;
10) housing;
11) To heaps of jumpers dad-mom, mom-mom;
Of the tools: electrical tape, knife, sealant, drill, drill, soldering iron with all due.
The general scheme is shown below.
We assemble according to the “principle” scheme below the entire structure. GND from each element we pull on any GND output Arduino, the same story with + 5V. Following the number of channels will give you the advantage of not reworking the pin numbers in the program, which will be lower.
Would like to note:
1. I solved the problem of the lack of GND and 5V connectors by soldering the wiring to these terminals and supplying the sensors I needed from WAGA terminal blocks, where you can pick up 5 wires.
2. Sonar is conveniently attached with rubber bands to the tank cover. Try to achieve perpendicularity of the radiator to the surface of the water.
3. A hose is attached to the tank with a stationery clip so that it does not jump out of the tank.
4. I removed the drops from the pallet through a fitting printed on a 3D printer. In the lowest point of the drain pan of the coffee machine we drill a 9 mm hole under it, insert it there and seal the connection. The model for the hose fitting for diameters of 8/10 mm below the link.
Fitting / Choke by slimercorp on Sketchfab
We program
Thanks to Chupakabra303 for the GeekTimes article ! Without timers, signal edge detectors would not cope with programming. Honestly, it’s very hard to work with Arduino, which was not originally sharpened for pseudo-parallelism of tasks like real PLCs.
We will measure the level once every 0.5 s, it is necessary that the echo from the last measurement subsides in the almost closed space of the water tank, if measured more often - nothing sensible will come out.
Communicates Arduino in the following way. When an error occurs, it beeps N times with a pause of 10 seconds, N is the error number.
N squeaks:
1 - overflow bottle to drain or break in the sensor line in this bottle with the controller.
2 - a problem with an ultrasonic level sensor (sonar), it is either recessed or any of the wires has moved.
3 - water is not supplied when you try to pour it. Problems: there is no water in a bottle of clean water, a pump, a relay, power, wires.
In order to acknowledge an error (gesture “I understood”), a person presses the button 1 time, Arduino squeals high for 1 second, says what is accepted, I am silent. The person at this time takes measures to correct the problem, the Arduino in this mode beeps 1 time in 1 minute, reminding of itself. After correcting the problem, the person presses the button 2 times within 3 seconds (the “check the system” gesture), then the Arduino will either give an error again with a squeak, or squeal once, saying that everything is fine, “I’m working further”.
In addition, implemented:
- debug information on the COM port, to debug the system, for example, to debug the position of the sonar, so that it gives the desired level;
- squeak squeaker without stopping the execution of the program (respectively, with the control of the button presses).
Source:
#include <Ultrasonic.h> #include <plcStandardLib_1.h> //============================================================= // R_TRIG R_TRIG1; R_TRIG R_TRIG2; R_TRIG R_TRIG3; R_TRIG R_TRIG4; F_TRIG F_TRIG1; bool TrashFull; // bool igotit; // , bool check_pls; // bool PumpUp; // bool NoFlow; // bool Pressed; // bool beep_pause_superlong; // bool beep_pause_superlong_end; // bool beep_pause_long; // bool beep_pause_long_end; // bool beep_pause_short; // bool beep_pause_short_end; // bool beep_on; // bool beep_duration_end; // bool beep_granted; // bool Pressed_now; // bool UnPressed_now; // bool time_end; // bool reset; // int mode; // int error; // int n_pressed; // 2 int k_beep; // float us_level_raw; // , float us_level_filt; //// , float level; // float level0; // long t0; // long time_to_destroy; // 2 //============================================================= //============================================================= // Ultrasonic ultrasonic(4, 3); // 3 - Echo, 4 - Trig const int LevelTrashPin = 2; // const int RelayPin = 5; // const int BeepPin = 6; // const int ButtonPin = 7; // //============================================================= //============================================================= // // TON TON1(50); // 50, // TON TON2(50); // 50, TOF TOF1(50); // 50, TON TON3(10000); // 10 , TON TON4(1500); // 1.5, TON TON5(1500); // 1.5, TON TON6(10000); // 10 , TON TON7(60000); // 1 , TON TON8(1000); // 1 , DEBUG INFO TON TON9(500); // 0.5 , //============================================================= //============================================================= // , const int f_mode=500; // const int f_error=100; // const int t_nc=5000; // (time_no_control) const int dLevel_cp=3; // (cp - control period) const int button_cp=3000; // const float w_level=0.3; // const float us_level_filt_fault=0.1; // const float HeightTank = 20; // const float HighLevel = 15; // const float LowLevel = 3; // const bool debug_on=true; // Serial //============================================================= void setup() { Serial.begin(9600); // : COM . pinMode(LevelTrashPin, INPUT_PULLUP); pinMode(RelayPin, OUTPUT); pinMode(BeepPin, OUTPUT); pinMode(ButtonPin,INPUT_PULLUP); igotit=false; check_pls=false; NoFlow=false; beep_pause_long=false; beep_pause_short=false; beep_on=false; beep_pause_superlong=false; beep_pause_long=false; beep_pause_short=false; beep_on=false; k_beep=0; t0=millis(); mode=1; tone(BeepPin,f_mode,1000); // , } void loop() { //============================================================= // // - , - , - . // , TrashFull=TON1.Run((digitalRead(LevelTrashPin))); // // , , // - // - // , - // - , , // () // () if (TOF1.Run((digitalRead(ButtonPin)))==false) {Pressed=true;} if (TON2.Run((digitalRead(ButtonPin)))==true) {Pressed=false;} // if (TON9.Run(!TON9.Q)) {us_level_raw=ultrasonic.distanceRead();}; us_level_filt=(1-w_level)*us_level_filt+w_level*us_level_raw; // 0 HeightTank ; level=constrain((HeightTank-us_level_filt), 0, HeightTank) ; //============================================================= //============================================================= // //NoFlow,igotit,check_pls // dLevel_cp . // , , time_end=TON3.Run(PumpUp && !reset); if ((R_TRIG1.Run(PumpUp)==true) | (reset==true)) {level0=level;} // if ((time_end==true) && (level-level0<dLevel_cp)) {NoFlow=true;} else {NoFlow=false;} // if ((time_end==true) && (NoFlow==false)) {reset=true;} else {reset=false;} // // . Pressed_now=R_TRIG2.Run(Pressed); // UnPressed_now=F_TRIG1.Run(Pressed); // if ((mode==2) | (mode==3)) { time_to_destroy=(button_cp-(millis()-t0)); // button_cp 0 if ((Pressed_now==true) && (n_pressed==0) && (time_to_destroy<0)) {t0=millis();} // if ((UnPressed_now==true) && (time_to_destroy>=0)) {n_pressed=n_pressed+1;} // if (time_to_destroy<0) {n_pressed=0;} } // - "i got it"/ . // , . : // 1 3 if ((mode==2) && (n_pressed==1)) {igotit=true; n_pressed==0;} // - "check_pls"/ . // // . : // 2 3 if ((mode==3) && (n_pressed==2)) {check_pls=true; n_pressed==0;} //============================================================= //============================================================= // // , 1 if ((mode==1) && (TrashFull==true) && (millis()>t_nc)) {mode=2; error=1;} // , 2 if ((mode==1) && (us_level_filt<us_level_filt_fault) && (millis()>t_nc)) {mode=2; error=2;} // , 3 if ((mode==1) && (NoFlow==true) && (millis()>t_nc)) {mode=2; error=3;} // - if ((mode==2) && (igotit==true)) {mode=3; error=0; igotit=false;} // if ((mode==3) && (check_pls==true)) {mode=1; check_pls=false;} //============================================================= //============================================================= // // : 1 - , ; 2 - , ; 3 - , ; if (mode==1) { // if (level<=LowLevel) {PumpUp=true;} // - if (level>HighLevel) {PumpUp=false;} // - } if ((mode==2) | (mode==3)) {PumpUp=false;} // //============================================================= //============================================================= // (Digital Output) // if (PumpUp==true) {digitalWrite(RelayPin, LOW);} else {digitalWrite(RelayPin, HIGH);} // delay, // 1- , , if (R_TRIG3.Run(mode==1)==true) {tone(BeepPin,f_mode,1000); beep_on=false; beep_pause_short=false; beep_pause_long=false; beep_pause_superlong=false; k_beep=0;} beep_duration_end=TON4.Run(beep_on); // beep_pause_short_end=TON5.Run(beep_pause_short); // beep_pause_long_end=TON6.Run(beep_pause_long); // beep_pause_superlong_end=TON7.Run(beep_pause_superlong); // // 2-, if (mode==2) { // : beep_granted=!beep_pause_long && !beep_pause_short && (k_beep<error); // if (beep_granted==true) {tone(BeepPin, f_error); beep_on=true;} // , , , - if (beep_duration_end==true) { noTone(BeepPin); k_beep=k_beep+1; //- beep_on=false; // if (error>k_beep) {beep_pause_short=true; beep_pause_long=false;} else {beep_pause_long=true; beep_pause_short=false;} } // , if (beep_pause_short_end==true) {beep_pause_short=false;} // , if (beep_pause_long_end==true) {beep_pause_long=false; k_beep=0;} } // , if (R_TRIG4.Run(mode==3)==true) {tone(BeepPin,f_mode,1000); beep_on=false; beep_pause_short=false; beep_pause_long=false; beep_pause_superlong=true;} // , if (mode==3) { beep_granted=!beep_pause_superlong; // 1 if (beep_granted==true) {tone(BeepPin, f_error); beep_on=true;} // , if (beep_duration_end==true) { noTone(BeepPin); beep_on=false; // beep_pause_superlong=true; } // , if (beep_pause_superlong_end==true) {beep_pause_superlong=false;} } //============================================================= //============================================================= // Debug, if ((debug_on==true) && (TON8.Run(!TON8.Q))) { // Serial.write(27); Serial.print("[2J"); // clear screen Serial.write(27); Serial.print("[H"); // cursor to home // Serial.println("=================Debug info of ArduOsch================="); Serial.println("=================DicreteInputs=========================="); Serial.print("LevelTrashPin="); Serial.print((digitalRead(LevelTrashPin))); Serial.print("| ButtonPin="); Serial.print(digitalRead(ButtonPin)); Serial.print("| US_raw="); Serial.print(us_level_raw); Serial.print("| US_filtered="); Serial.println(us_level_filt); Serial.println("=================DicreteInputs after processing========="); Serial.print("TrashFull="); Serial.print(TrashFull); Serial.print("| ButtonPressed="); Serial.print(Pressed); Serial.print("| Level="); Serial.println(level); Serial.println("=================NoFlow condition======================="); Serial.print("PumpUp="); Serial.print(PumpUp); Serial.print(" Time_end="); Serial.print(time_end); Serial.print(" Reset="); Serial.print(reset); Serial.print("| Level0==="); Serial.print(level0); Serial.print("| TON3_EST="); Serial.print(TON3.PT-TON3.ET); Serial.print("| NoFlow="); Serial.println(NoFlow); Serial.println("=================How mush was man clicked on button?===="); Serial.print("TimeToDestroy="); Serial.print(time_to_destroy); Serial.print("| t0="); Serial.print(t0); Serial.print("| n_pressed="); Serial.println(n_pressed); Serial.println("=================What is the system state?=============="); Serial.print("Mode="); Serial.print(mode); Serial.print("| error="); Serial.println(error); Serial.println("=================Beep code=============="); Serial.print("beep_granted="); Serial.print(beep_granted); Serial.print("| beep_pause_superlong="); Serial.print(beep_pause_superlong); Serial.print("| beep_pause_long="); Serial.print(beep_pause_long); Serial.print("| beep_pause_short="); Serial.println(beep_pause_short); Serial.print("k_beep="); Serial.print(k_beep); Serial.print("| beep_on="); Serial.println(beep_on); } //============================================================= } Video and photo
Video demonstration of how it all works:
Who does not want to watch the video, here are a couple of photos:
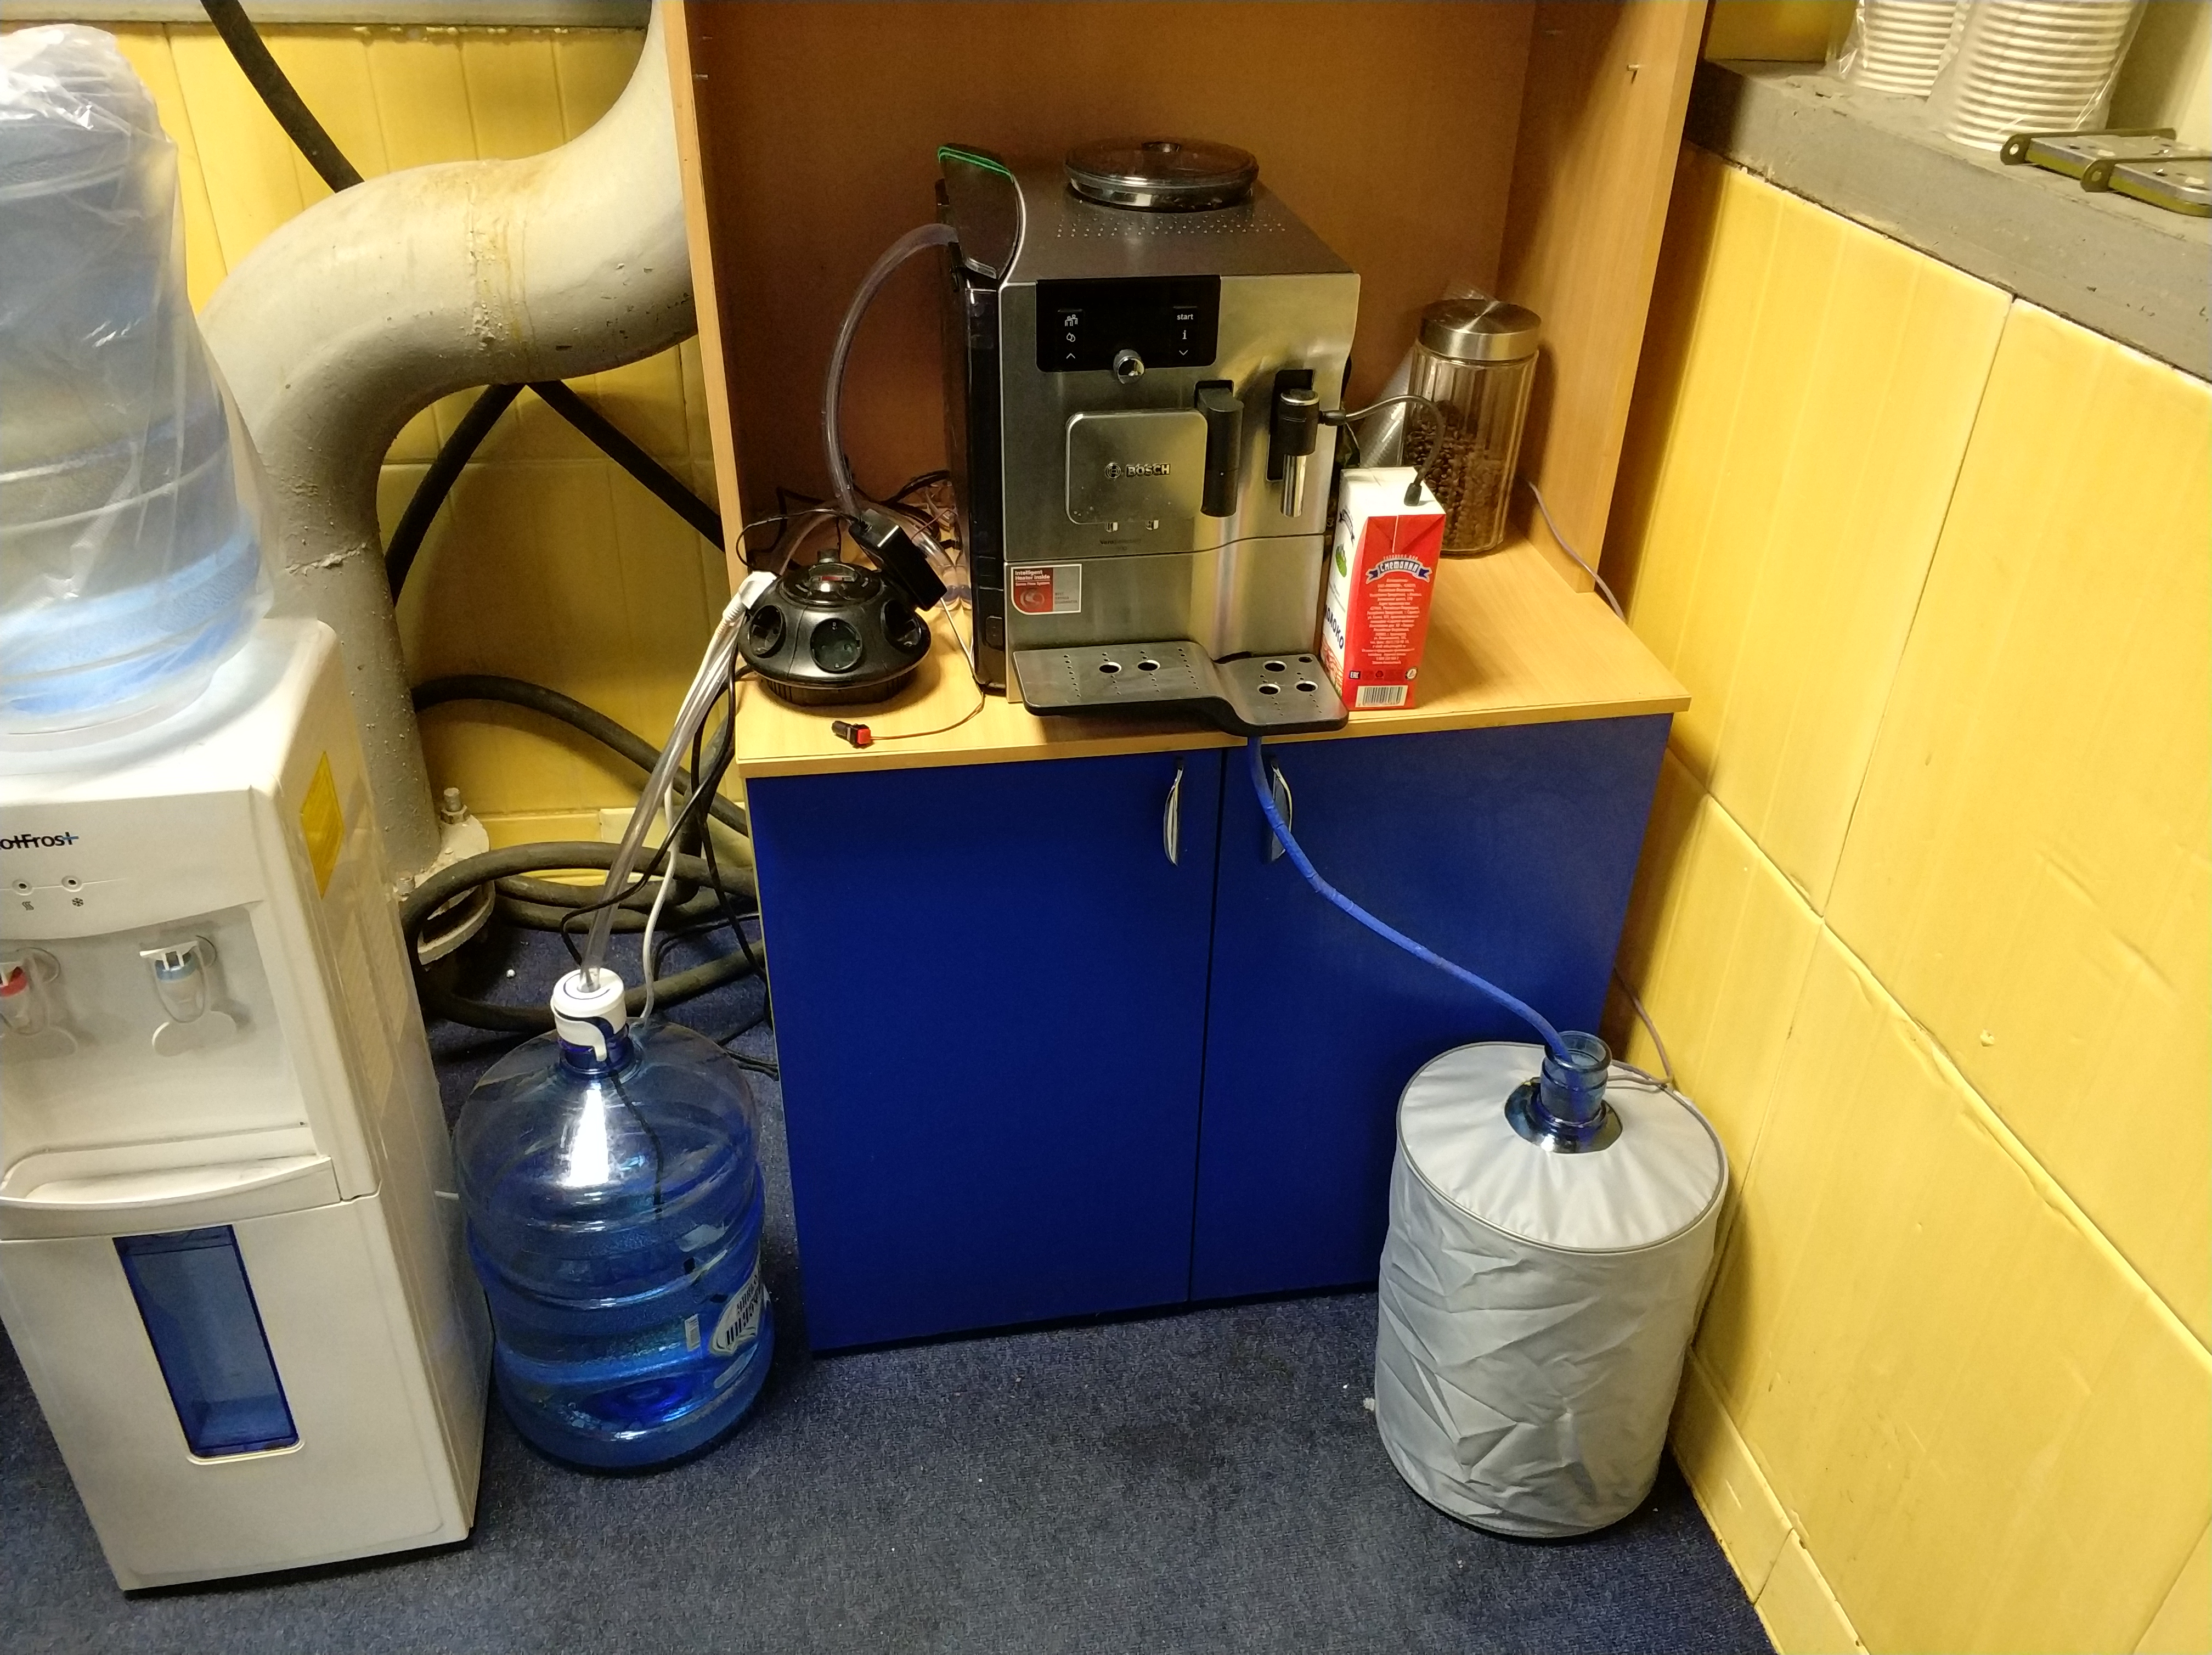


As the case used almost the only available case in Kazan, just gray, as a temporary solution (which is more permanent than temporary?), Then you can order beautiful covers, for example, with the company logo.
Instead of conclusion
Now we change clean water every 4 days, pour out liquid from the bottle for draining on Friday, for 5 days there was no smell. Everyone is happy. Know only pour out and change bottles. No Sabantui, enough.
I did it all on enthusiasm, which I sometimes have more than enough, I really wanted to use a coffee machine without the nerves, that she needed to clean the tray. Made the first option, where a couple of lines that starts / stops the pump level and beeps when the "trash" overflows. But then I thought and decided to do it conscientiously, with the diagnostics of sensors, actuators, so that the pump lived longer with our intensive operation, there were no leakages and misunderstandings between ArduOsch and my colleagues, in the end it all turned into a pretty big code. He wrote an article in the style of fiction, so that they could look-read in the morning over a cup of coffee, laugh what people do sometimes.
All all the best!
Source: https://habr.com/ru/post/350358/
All Articles