Vue.js + Asp.Net Core MVC + TypeScript and more Bootstrap4

Using the standard Asp.Net Core MVC template in Visual Studio 2017, we create a new project, translate it into the fourth Bootsrtrap, and embed the modular application Vue.js there in TypeScript.
We get a simple, visible and easy preparation for creating your web applications on VS2017 using Vue.js and TypeScript. The familiar development environment in which you can perform most of the coding and debugging, as well as quick reassembly of the application, make the work quite comfortable.
Only the standard TypeScript compiler and VS2017 take part in the generation of the JavaScript code of the application, which greatly narrows the circle of suspects when glitches occur. And this, in turn, is also a big saving of time and nerves.
The material is designed for those able to cope with VS2017 and familiar with the progressive JavaScript framework Vue.js.
Content
Introduction
Project TryVueMvc
- Creation of a starting pig
- Install NPM packages
- Setting up a bundling and minification
- Setting the TypeScript compiler
- Creating and building AppHello
- Correction _Layout.cshtml
- Correction Index.cshtml
- Build and bundling from the command line
Conclusion
Introduction
The expected result of this tutorial is a component of Vue.js, embedded on one of the pages of the Asp.Net Core MVC application, in which Bootstrap4 will provide an adaptive interface of the application (adaptation for devices with different screen sizes).
The assembly of the main js-bundle of the application will be performed by the TypeScript compiler. Bundler & Minifier will make the rest of the bundles, including those for external vendor libraries. Along the way, Bundler & Minifier minimizes everything you need. The html-page will be generated on the server by the Asp.NetCore MVC application using the Razor view renderer. Downloading and launching the js-script of the application will be done using SystemJS (easy to replace with RequireJS).
Along the way, we configure the build and bundling of the application from the command line via dotnet bulild , dotnet bundle .
As you can see, it’s not possible to “figure it out for three” in pure form - each participant in the process tries to drag in his company. The most successful thing that happened, at least temporarily, would get rid of the Webpack, which was dragging a lot of things with it.
In this tutorial we will make the order the application AppHello. In the future, it can be replaced with your own. For this, it will be enough to replace ts-files, html-templates and css-files.
Project TryVueMvc
For this article on github posted solution VS2017 project TryVueMvc. Other projects are planned to be added to this decision - please ignore them.
Creating a starting pig
To begin with we create starting preparation for application. As a starting point, we use the ASP.NET Core Web Application project using the MVC pattern (model-view-controller).

The contents of wwwroot / need to clear, leave only favicon.ico. At the time of this writing, the standard Asp.Net Core MVC application template came with Bootstrap3, so the wwwroot / directory will contain the files of the libraries used. We will not need them, because Bootstrap we will install in node_modules, then we transfer necessary in wwwroot /.
Installing NPM packages
We define the NPM (Node.js package manager) configuration. To do this, add the NPM configuration file to the project under the name package.json.
We need the Vue, SystemJS and Bootstrap4 packages. The latter, in turn, requires jQuery and Popper.js.
{ "version": "1.0.0", "name": "asp.net", "private": true, "dependencies": { "jquery": "^3.3.1", "popper.js": "^1.12.9", "bootstrap": "^4.0.0", "vue": "^2.5.13", "systemjs": "^0.21.0" } } Usually, new NPM packages are automatically installed after changes to package.json. Otherwise, force the command to restore the packages.
Setting up a bundling and minification
In the created application, we refuse to use the CDN (Content Delivery Network or Content Distribution Network); we use libraries of external suppliers in bundles, minify and put them in wwwroot / dist /.
We divide external libraries into 2 parts: vendor1 and vendor2 (it is vue). The assembly of app-bandle.js is done by TypeScript, therefore here we only minify it.
| Bundle files | Sources | minfy |
|---|---|---|
| vendor1.js + vendor1.min.js | node_modules / jquery / dist / jquery.js, node_modules / popper.js / dist / umd / popper.js, node_modules / bootstrap / dist / js / bootstrap.js, node_modules / systemjs / dist / system.src.js | true |
| vendor1.css | node_modules / bootstrap / dist / css / bootstrap.css | false |
| vendor1.min.css | node_modules / bootstrap / dist / css / bootstrap.min.css | false |
| vendor2.js + vendor2.min.js | node_modules / vue / dist / vue.js | true |
| app-bandle.min.js | wwwroot / dist / app-bandle.js | true |
| app-templates.html | ClientApp / ** / *. Html | false |
| main.css + main.min.css | ClientApp / ** / *. Css | true |
Create an empty ClientApp folder, because it is specified in bundleconfig.json (otherwise it will be an abuse). The bundleconfig.json file should already be in the project, it only remains to configure it correctly.
[ { "outputFileName": "wwwroot/dist/vendor1.js", "inputFiles": [ "node_modules/jquery/dist/jquery.js", "node_modules/popper.js/dist/umd/popper.js", "node_modules/bootstrap/dist/js/bootstrap.js", "node_modules/systemjs/dist/system.src.js" ], "minify": { "enabled": true, "renameLocals": true }, "sourceMap": true }, { "outputFileName": "wwwroot/dist/vendor1.css", "inputFiles": [ "node_modules/bootstrap/dist/css/bootstrap.css" ], "minify": { "enabled": false } }, { "outputFileName": "wwwroot/dist/vendor1.min.css", "inputFiles": [ "node_modules/bootstrap/dist/css/bootstrap.min.css" ], "minify": { "enabled": false } }, { "outputFileName": "wwwroot/dist/vendor2.js", "inputFiles": [ "node_modules/vue/dist/vue.js" ], "minify": { "enabled": true, "renameLocals": true }, "sourceMap": true }, { "outputFileName": "wwwroot/dist/main.css", "inputFiles": [ "ClientApp/**/*.css" ], "minify": { "enabled": true } }, { "outputFileName": "wwwroot/dist/app-bandle.min.js", "inputFiles": [ "wwwroot/dist/app-bandle.js" ], "minify": { "enabled": true, "renameLocals": true } }, { "outputFileName": "wwwroot/dist/app-templates.html", "inputFiles": [ "ClientApp/**/*.html" ], "minify": { "enabled": false, "renameLocals": false } } ] After saving the changes to bundleconfig.json, bundles from vendor1 and vendor2 should appear in the wwwroot / dist directory. The bundles of our application will appear after creating the necessary source files.
TypeScript Compiler Setup
In the properties of the project VS2017 there is a tab "Assembly TypeScript", in which through a convenient interface you can set most of the necessary properties of the compiler. But some of the properties of the compiler, anyway, will have to be defined and edited in the TryVueMvc.csproj file by hand. Those interested can use this method of setting up a TypeScript compiler.
If you plan to use Webpack or other build systems in parallel, then tsconfig.json is best. We add this file and set it up according to the given sample.
{ "compilerOptions": { "noImplicitAny": false, "noEmitOnError": true, "removeComments": false, "sourceMap": true, "target": "es5", "module": "system", "outFile": "wwwroot/dist/app-bandle.js", "moduleResolution": "node", "esModuleInterop": true }, "include": [ "./ClientApp/**/*.ts" ] } Creating and building AppHello
In our example, the project organization variant is used, when CSS files are not the property of individual components, but are defined for the entire application centrally.
Create a ClientApp / css folder for shared css files. Create a folder ClientApp / components for ts-files and html-templates component. In the ClientApp directory, create an index.ts file that is used as an entry point to the application. Add the remaining files of the client application AppHello.
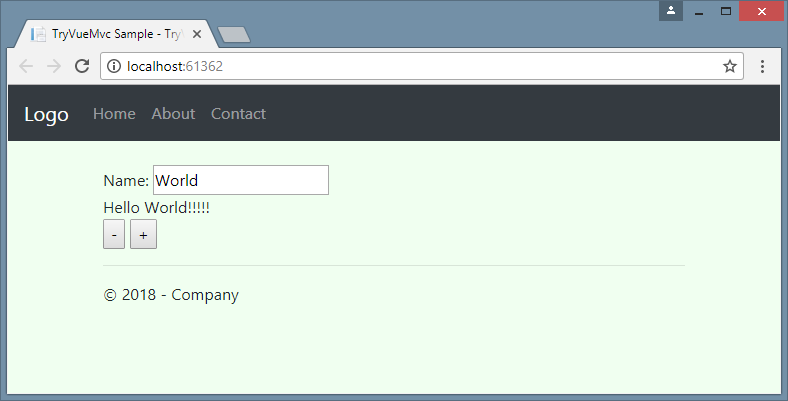
// ClientApp/index.ts import Vue from "vue"; import AppHelloComponent from "./components/AppHello"; let v = new Vue({ el: "#app-root", template: '<AppHelloComponent />', //render: h => h(AppHelloComponent), components: { AppHelloComponent } }); // ClientApp/components/AppHello.ts import Vue from "vue"; import HelloComponent from "./Hello"; export default Vue.extend({ template:'#app-hello-template', data() { return { name: "World" } }, components: { HelloComponent } }); <!-- ClientApp/components/AppHello.html --> <template id="app-hello-template"> <div> Name: <input v-model="name" type="text" /> <hello-component :name="name" :initial-enthusiasm="5" /> </div> </template> // ClientApp/components/Hello.ts import Vue from "vue"; export default Vue.extend({ template:'#hello-template', props: ['name', 'initialEnthusiasm'], data() { return { enthusiasm: this.initialEnthusiasm } }, methods: { increment() { this.enthusiasm++; }, decrement() { if (this.enthusiasm > 1) { this.enthusiasm--; } }, }, computed: { exclamationMarks(): string { return Array(this.enthusiasm + 1).join('!'); } } }); <!-- ClientApp/components/Hello.html --> <template id="hello-template"> <div> <div class="greeting">Hello {{name}}{{exclamationMarks}}</div> <button @click="decrement">-</button> <button @click="increment">+</button> </div> </template> /* ClientApp/css/site.css */ body { margin: 5rem; background-color: honeydew; } After building the project and UpdateBundle, ready-to-use files should appear in the wwwroot / dist directory: app-bandle.js, app-templates.html, main.css.
_Layout.cshtml Correction
To use Boostrap 4 instead of 3, you need to tweak the contents of the Views / Shared / _Layout.cshtml file. As an example, use the template Bootstrap StarterTemplate from the official site of the product. The result of crossing _Layout.cshtml with this template is shown under the spoiler.
<!DOCTYPE html> <html> <head> <meta charset="utf-8" /> <meta name="viewport" content="width=device-width, initial-scale=1.0" /> <title>@ViewData["Title"] - TryVueMvc</title> <environment include="Development"> <link rel="stylesheet" href="~/dist/vendor1.css" /> <link rel="stylesheet" href="~/dist/main.css" asp-append-version="true" /> </environment> <environment exclude="Development"> <link rel="stylesheet" href="~/dist/vendor1.min.css" /> <link rel="stylesheet" href="~/dist/main.min.css" asp-append-version="true" /> </environment> </head> <body> <nav class="navbar navbar-expand-md navbar-dark bg-dark fixed-top"> <a class="navbar-brand" asp-area="" asp-controller="Home" asp-action="Index">Logo</a> <button class="navbar-toggler" type="button" data-toggle="collapse" data-target="#navbarsDefault" aria-controls="navbarsDefault" aria-expanded="false" aria-label="Toggle navigation"> <span class="navbar-toggler-icon"></span> </button> <div class="collapse navbar-collapse" id="navbarsDefault"> <ul class="navbar-nav mr-auto"> <li class="nav-item"><a class="nav-link" asp-area="" asp-controller="Home" asp-action="Index">Home</a></li> <li class="nav-item"><a class="nav-link" asp-area="" asp-controller="Home" asp-action="About">About</a></li> <li class="nav-item"><a class="nav-link" asp-area="" asp-controller="Home" asp-action="Contact">Contact</a></li> </ul> </div> </nav> <main role="main" class="container"> @RenderBody() <hr /> <footer> <p>© 2018 - Company</p> </footer> </main> <environment include="Development"> <script src="~/dist/vendor1.js"></script> </environment> <environment exclude="Development"> <script src="~/dist/vendor1.min.js"></script> </environment> @RenderSection("Scripts", required: false) </body> </html> The Asp.Net Core MVC application uses the Razor engine to generate html views. Please note that at the same time we implemented the ability to switch to minified bundles via the environment configuration (the ASPNETCORE_ENVIRONMENT property). An example of conditional generation of links to the required bundles is given below:
... <environment include="Development"> <link rel="stylesheet" href="~/dist/vendor1.css" /> <link rel="stylesheet" href="~/dist/main.css" asp-append-version="true" /> </environment> <environment exclude="Development"> <link rel="stylesheet" href="~/dist/vendor1.min.css" /> <link rel="stylesheet" href="~/dist/main.min.css" asp-append-version="true" /> </environment> ... Adjustment Index.cshtml
In our example, a variant of the web application is used, which at the start can do without Vue.js. Please note that in _Layout.cshtml there is no download of the main application bundle and the Vue.js libraries. The components of Vue.js are used only on the Index.cshtml page. If you move the components Vue.js from the start page, you can greatly reduce the start time of the application.
@* Views/Home/Index.cshtml *@ @using Microsoft.AspNetCore.Hosting @inject IHostingEnvironment hostingEnv @{ var vueUrl = hostingEnv.IsDevelopment() ? "dist/vendor2.js" : "dist/vendor2.min.js"; var mainUrl = hostingEnv.IsDevelopment() ? "dist/app-bandle.js" : "dist/app-bandle.min.js"; ViewData["Title"] = "TryVueMvc Sample"; } <section id="app-templates"></section> <div id="app-root">loading..</div> @section Scripts{ <script> System.config({ map: { //"vue": "dist/vendor2.js" "vue": "@vueUrl" } }); $.get("dist/app-templates.html").done(function (data) { $('#app-templates').append(data); SystemJS.import('@mainUrl').then(function (m) { SystemJS.import('index'); }); }); </script> } } The text Views / Home / Index.cshtml should be understandable for those working with Asp.Net Core. Just in case, I will explain in more detail.
Using the DI (Dependency Injection) mechanism, we get to the properties of the environment and determine which bundles we will use.
@using Microsoft.AspNetCore.Hosting @inject IHostingEnvironment hostingEnv @{ var vueUrl = hostingEnv.IsDevelopment() ? "dist/vendor2.js" : "dist/vendor2.min.js"; var mainUrl = hostingEnv.IsDevelopment() ? "dist/app-bandle.js" : "dist/app-bandle.min.js"; ViewData["Title"] = "TryVueMvc Sample"; } ... Determine the place of insertion of the bundle with vue-templates, as well as the point of implementation of the application Vue.js:
<section id="app-templates"></section> <div id="app-root">loading..</div> We load a bundle with vue-templates and paste it into the # app-templates section. Then we load System.js, which, in turn, loads all the necessary and starts the js-script of the application.
... <script> System.config({ map: { //"vue": "dist/vendor2.js" "vue": "@vueUrl" } }); $.get("dist/app-templates.html").done(function (data) { $('#app-templates').append(data); SystemJS.import('@mainUrl').then(function (m) { SystemJS.import('index'); }); }); </script> ... The application is completely ready, you can run the standard for VS2017 way.
Build and Bundle from the command line
If there is no need to rebuild the application via the command line, you can skip this step. It may even be worth to miss it - there are glitches with rebuilding in VS2017, if you do not take into account some features of VS2017.
For a project created from scratch, the dotnet build will only dotnet build DLL, and the TypeScript compiler will not be called. Naturally, the dotnet team does not know anything at all about the Bundler & Minifier extension.
Therefore, you need to install a pair of NuGet pakes: "Microsoft.TypeScript.MSBuild", "BundlerMinifier.Core". Then, in the TryVueMvc.csproj file, make the changes required by the official documentation for these products.
<!-- TryVueMvc.csproj --> <Project Sdk="Microsoft.NET.Sdk.Web"> ... <ItemGroup> <DotNetCliToolReference Include="BundlerMinifier.Core" Version="2.6.362" /> </ItemGroup> <Import Project="$(MSBuildExtensionsPath32)\Microsoft\VisualStudio\v$(VisualStudioVersion)\TypeScript\Microsoft.TypeScript.targets" Condition="Exists('$(MSBuildExtensionsPath32)\Microsoft\VisualStudio\v$(VisualStudioVersion)\TypeScript\Microsoft.TypeScript.targets')" /> </Project> Now the application can be built and run not only in the VS2017 environment, but also through the command line in the TryVueMvc project directory:
npm install dotnet build dotnet bundle dotnet run Conclusion
Vue.js is positioned as a very easy-to-learn framework. It is argued that the learning curve of competitors is much steeper. From my point of view, this is true.
Unless, it is difficult for those who use Asp.Net Core and VS2017 to create Vue.js applications in TypeScript. There are not many useful examples and articles on the Internet for this combination of products and technologies used.
I hope that this tutorial will help to reduce the starting barrier when creating applications Vue.js + Asp.Net Core MVC + TypeScript.
Announcement of the continuation
I plan to publish another tutorial, in which we replace the AppHello with an AppGrid, created on the basis of the example of Grid Component Example from the official site Vue.js. Along the way, we see that we need to throw out, when replacing with your application.

If possible, I will try to describe the solution I use for solving a strict typing problem when using TypeScript (without decorators and vue-class-component).
Thanks
- The idea of the title picture and the inscription from here .
- Photo for the title picture from here .
- The Bootstrap StarterTemplate template from the official Bootstrap site was partially used.
Links
- Learn more about creating an AppHello from scratch: Vue.js + Asp.NETCore + TypeScript Application without a Webpack .
- My example for this tutorial is on github .
')
Source: https://habr.com/ru/post/350332/
All Articles