Creating a game on Lua and LÖVE - 4
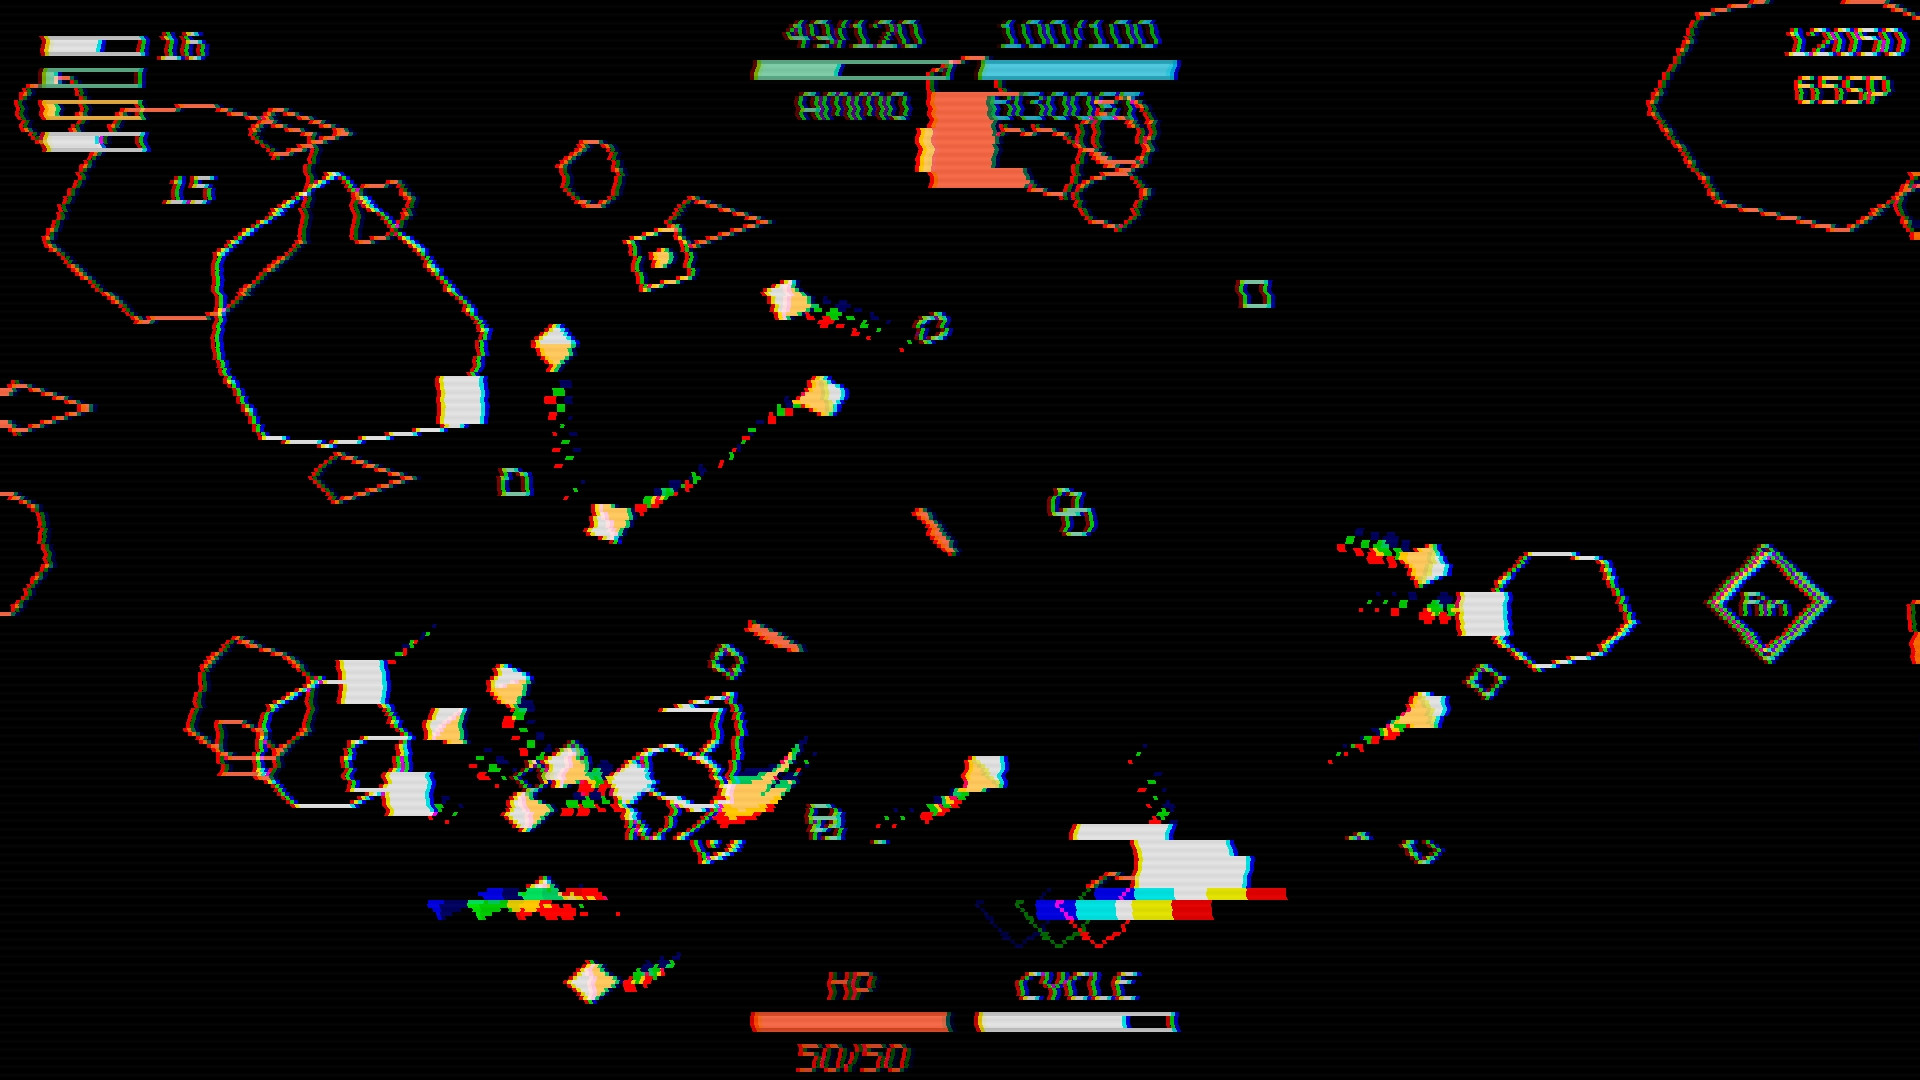
Table of contents
- Article 1
- Part 1. Game cycle
- Part 2. Libraries
- Part 3. Rooms and areas
- Part 4. Exercises
- Article 2
- Part 5. Basics of the game
- Part 6. Basics of the Player Class
- Article 3
- Part 7. Player Parameters and Attacks
- Part 8. Enemies
- Article 4
- Part 9. Director and game cycle
- Part 10. Code Writing Practices
- Part 11. Passive skills
- Article 5
- Part 12. Other Passive Skills
13. Skill Tree
14. Console
15. Final
Part 9: Director and Game Cycle
Introduction
In this part we will complete the implementation of the basics of the whole game with a minimum amount of content. We will study the director (Director) - the code that will manage the creation of enemies and resources. Then we will consider restarting the game after the player dies. And after that we will deal with a simple points system, as well as a basic UI, so that the player can know about his performance.
')
Producer
Director (Director) is a piece of code that controls the creation of enemies, attacks and resources in the game. The goal of the game is to survive as long as possible and score as many points as possible. The difficulty of the game is determined by the ever-increasing number and complexity of the enemies created. This complexity will be fully controlled by the code that we will now begin to write.
The rules that the director will follow are fairly simple:
- Every 22 seconds the difficulty increases;
- The duration of each difficulty of creating enemies will be based on the points system:
- Each difficulty (or round) has a certain amount of points that can be used;
- Enemies are worth some constant amount of points (the harder the enemy, the more expensive it is);
- The higher the level of difficulty, the more points the director has;
- Enemies are randomly selected to build for the duration of the round, until the director runs out of glasses.
- Every 16 seconds a resource is created (HP, SP or Boost);
- Every 30 seconds an attack is created.
We'll start by creating a
Director object, which will be a regular object (not one that inherits from a GameObject, but that used in the Area). In it we put our code: Director = Object:extend() function Director:new(stage) self.stage = stage end function Director:update(dt) end We can create an object and create an instance of it in the Stage room as follows:
function Stage:new() ... self.director = Director(self) end function Stage:update(dt) self.director:update(dt) ... end We want the Director object to have a link to the Stage room, since we need to create enemies and resources, and the only way to do this is to use
stage.area . The director will also need access to the time, so he needs the appropriate update.We will begin with rule 1, define the simple attribute
difficulty and a few auxiliary ones to control the time for increasing this attribute. This temporary change code will be the same as that used in the acceleration or cycle mechanisms of the Player. function Director:new(...) ... self.difficulty = 1 self.round_duration = 22 self.round_timer = 0 end function Director:update(dt) self.round_timer = self.round_timer + dt if self.round_timer > self.round_duration then self.round_timer = 0 self.difficulty = self.difficulty + 1 self:setEnemySpawnsForThisRound() end end Thus, the
difficulty increases every 22 seconds in accordance with rule 1. We can also call the setEnemySpawnsForThisRound function, which will execute rule 2.The first part of rule 2 is that each difficulty has a certain amount of points that can be spent. The first thing we need is to determine how many levels of complexity we want to do in the game and how we will set these points: manually or through some kind of formula. I decided to choose the second option so that the game was endless and it became more and more difficult until the player could cope with it anymore. I decided that the game would have 1024 levels of difficulty, because this is a fairly large number that someone is unlikely to achieve.
The number of points assigned to each difficulty will be determined by a simple formula, which I arrived at through trial and error. Again, these things are more related to the design of the game, so I will not waste time explaining my decisions. You can try your own ideas if you think you can do better.
Scoring will be performed according to the following formula:
- On difficulty 1 there are 16 points;
- Starting from complexity 2, the following four-stage formula is applied:
- Difficulty i has a sum of difficulty points i-1 + 8
- Difficulty i + 1 has a sum of difficulty points i
- The difficulty of i + 2 has a sum of difficulty points (i + 1) /1.5
- Difficulty i + 3 has a sum of difficulty points (i + 2) * 2
In code, it looks like this:
function Director:new(...) ... self.difficulty_to_points = {} self.difficulty_to_points[1] = 16 for i = 2, 1024, 4 do self.difficulty_to_points[i] = self.difficulty_to_points[i-1] + 8 self.difficulty_to_points[i+1] = self.difficulty_to_points[i] self.difficulty_to_points[i+2] = math.floor(self.difficulty_to_points[i+1]/1.5) self.difficulty_to_points[i+3] = math.floor(self.difficulty_to_points[i+2]*2) end end That is, for example, the first 14 difficulty levels will have the following number of points:
-
1 - 16
2 - 24
3 - 24
4 - 16
5 - 32
6 - 40
7 - 40
8 - 26
9 - 56
10 - 64
11 - 64
12 - 42
13 - 84
That is, it turns out that first there is a certain level of points that lasts for three rounds, then it drops by one round, and then increases significantly in the next round, which becomes a new plateau lasting about three rounds, then it jumps again in the next round, which becomes a new plateau, lasting about three rounds, and then this cycle repeats endlessly. Thus, we create an interesting cycle “normalization -> relaxation -> intensification”, with which you can experiment.
An increase in the number of points follows a very fast and hard rule, that is, for example, with a difficulty of 40, a round will have approximately 400 points. Since the enemies are worth a constant amount of points, and each round must spend all the points given to him, the game quickly becomes oversaturated and at some point the players can no longer win. But this is quite normal, because that is the design of the game. Her goal - to score the maximum number of points in such conditions.
Having dealt with this, we can try to implement the second part of rule 2, that is, determine the value of each enemy. So far we have created only two types of enemies, so this is rather trivial, but in one of the following parts we will return to this after we create more enemies. Now the code might look like this:
function Director:new(...) ... self.enemy_to_points = { ['Rock'] = 1, ['Shooter'] = 2, } end This is a simple table in which, by the name of the enemy, we can get the number of points to create it.
The last part of rule 2 is the implementation of the
setEnemySpawnsForThisRound function. But before we get to it, I want to introduce you to a very important construction related to chances and probabilities. We will use it throughout the game.Chancelist
Suppose we want X to occur 25% of the time, Y to occur 25% of the time, and Z - 50% of the time. In the usual way, this can be implemented with a function like
love.math.random - to make it generate a value from 1 to 100, and then check where the value is. If it is less than 25, then we say that event X occurred, if from 25 to 50, then event Y, and if greater than 50, then event Z.The big problem with this implementation is that we cannot guarantee that when you run
love.math.random 100 times, X will occur exactly 25 times. If we do it 10,000 times, then the probability will probably be close to 25%, but often we need to have more control over the situation. Therefore, the simple solution is to create what I call a “list of changes” ( chanceList ).The chanceList list works as follows: we generate a list with values from 1 to 100. When we need to get a random value from this list, we call the
next function. This function will give us a random value from the list, say, 28. This means that event Y will occur. The difference is that when we call a function, we also remove the selected random value from the list. In essence, this means that 28 will never again fall out and the event Y now has a slightly lower probability than the other two events. The more often we call next , the more empty the list becomes, and when it becomes completely empty, we simply recreate all 100 numbers again.Thus, we can guarantee that event X will occur exactly 25 times, event Y - also exactly 25, and event Z - exactly 50 times. We can also make it so that instead of generating 100 numbers, the function generates 20. In this case, event X will occur 5 times, Y - also 5 times, and Z - 10 times.
The interface for this principle works in a fairly simple way:
events = chanceList({'X', 25}, {'Y', 25}, {'Z', 50}) for i = 1, 100 do print(events:next()) --> will print X 25 times, Y 25 times and Z 50 times end events = chanceList({'X', 5}, {'Y', 5}, {'Z', 10}) for i = 1, 20 do print(events:next()) --> will print X 5 times, Y 5 times and Z 10 times end events = chanceList({'X', 5}, {'Y', 5}, {'Z', 10}) for i = 1, 40 do print(events:next()) --> will print X 10 times, Y 10 times and Z 20 times end We will create the
utils.lua function in chanceList and use some of the Lua features that we covered in the second part of this tutorial.First, we need to realize that this function will return an object for which we should be able to call the
next function. The easiest way to achieve this is to simply give this object a simple table that looks like this: function chanceList(...) return { next = function(self) end } end Here we get all possible definitions of values and probabilities as
... which we will process in more detail later. Then we return a table that has a function next . This function receives self as the only argument, since we know that calling the function with : transfers as its first argument itself. That is, inside the function next self refers to a table that is returned by chanceList .Before defining what is inside the
next function, we can define several attributes that this function will have. The first is the chance_list itself, which will contain the values returned by the next function: function chanceList(...) return { chance_list = {}, next = function(self) end } end Initially this table is empty and will be filled in the
next function. In our example: events = chanceList({'X', 3}, {'Y', 3}, {'Z', 4}) The
chance_list attribute will look something like this: .chance_list = {'X', 'X', 'X', 'Y', 'Y', 'Y', 'Z', 'Z', 'Z', 'Z'} We will need another attribute called
chance_definitions , which will store all the values and probabilities passed to the chanceList function: function chanceList(...) return { chance_list = {}, chance_definitions = {...}, next = function(self) end } end And that's all we need. Now we can go to the
next function. We need two behaviors from this function: it must return a random value according to the probabilities described in chance_definitions , and also restore the internal chance_list when it reaches zero elements. Assuming the list is filled with elements, we can implement the first behavior as follows: next = function(self) return table.remove(self.chance_list, love.math.random(1, #self.chance_list)) end We simply select a random item inside the
chance_list table and return it. Due to the internal structure of the elements, all restrictions are satisfied.And now the most important part - we will build the
chance_list table chance_list . It turns out that we can use to build the list the same code that will be used to empty it. It will look like this: next = function(self) if #self.chance_list == 0 then for _, chance_definition in ipairs(self.chance_definitions) do for i = 1, chance_definition[2] do table.insert(self.chance_list, chance_definition[1]) end end end return table.remove(self.chance_list, love.math.random(1, #self.chance_list)) end Here we first determine whether the size of the
chance_list zero. This will be true when you first call next , and also when the list is empty after a lot of calls. If this is true, then we begin to bypass the chance_definitions table, which contains tables that we call chance_definition with the values and probabilities of these values. That is, if we called the function chanceList like this: events = chanceList({'X', 3}, {'Y', 3}, {'Z', 4}) That
chance_definitions table looks like this: .chance_definitions = {{'X', 3}, {'Y', 3}, {'Z', 4}} And when we
chance_definitions[1] this list, chance_definitions[1] refers to the value, and chance_definitions[2] refers to the number of times the value is found in the chance_list . Knowing this, to fill the list we simply insert chance_definition[1] into chance_list chance_definition[2] times. And we do the same for all chance_definitions tables.If we test it, we will see that the system works:
events = chanceList({'X', 2}, {'Y', 2}, {'Z', 4}) for i = 1, 16 do print(events:next()) end Producer
Let's return to the director: we wanted to implement the second part of rule 2, which is associated with the implementation of
setEnemySpawnsForThisRound . The first thing we want to do is determine the likelihood of creating each enemy. Different levels of complexity will have different probabilities of creation, and we will need to set at least the first few difficulties manually. Then the subsequent difficulties will be set randomly, because they will have so many points that the player will be too overloaded anyway.So, here are some of the first levels of difficulty:
function Director:new(...) ... self.enemy_spawn_chances = { [1] = chanceList({'Rock', 1}), [2] = chanceList({'Rock', 8}, {'Shooter', 4}), [3] = chanceList({'Rock', 8}, {'Shooter', 8}), [4] = chanceList({'Rock', 4}, {'Shooter', 8}), } end These are not final values, but merely examples. At the first difficulty, only stones will be created; shooting enemies will be added to the second, but there will be fewer of them than stones; in the third difficulty, both enemies will be created in approximately the same quantities; finally, the fourth will create more shooting enemies than stones.
For difficulties from 5 to 1024, we will simply ask each enemy random probabilities:
function Director:new(...) ... for i = 5, 1024 do self.enemy_spawn_chances[i] = chanceList( {'Rock', love.math.random(2, 12)}, {'Shooter', love.math.random(2, 12)} ) end end When we realize more enemies, we will manually create the first 16 difficulties, and after complexity 17 we will do it randomly. In general, a player with a fully-filled skill tree will most often not be able to pass above difficulty level 16, so this will be the right moment to stop.
We now turn to the
setEnemySpawnsForThisRound function. The first thing we do is use the creation of enemies in the list according to the enemy_spawn_chances table until we run out of points for the current difficulty level. It might look something like this: function Director:setEnemySpawnsForThisRound() local points = self.difficulty_to_points[self.difficulty] -- Find enemies local enemy_list = {} while points > 0 do local enemy = self.enemy_spawn_chances[self.difficulty]:next() points = points - self.enemy_to_points[enemy] table.insert(enemy_list, enemy) end end Thus, the local table of
enemy_list will be filled with the rows Rock and Shooter according to the probabilities of the current complexity. We put this code inside a while loop, which stops execution when the number of remaining points reaches zero.After that, we need to decide when, in the interval of 22 seconds of the current round, each of the enemies within the
enemy_list table will be created. It might look something like this: function Director:setEnemySpawnsForThisRound() ... -- Find enemies spawn times local enemy_spawn_times = {} for i = 1, #enemy_list do enemy_spawn_times[i] = random(0, self.round_duration) end table.sort(enemy_spawn_times, function(a, b) return a < b end) end Here we make sure that each enemy in
enemy_list assigned a random number between 0 and round_duration , stored in the enemy_spawn_times table. We will sort this table so that the values are in order. That is, if our enemy_list table looks like this: .enemy_list = {'Rock', 'Shooter', 'Rock'} then the
enemy_spawn_times table will look like this: .enemy_spawn_times = {2.5, 8.4, 14.8} This means that Rock will be created in 2.5 seconds, Shooter will be created in 8.4 seconds, and another Rock will be created in 14.8 seconds after the start of the round.
Finally, we need to set the creation of the enemies by calling
timer:after : function Director:setEnemySpawnsForThisRound() ... -- Set spawn enemy timer for i = 1, #enemy_spawn_times do self.timer:after(enemy_spawn_times[i], function() self.stage.area:addGameObject(enemy_list[i]) end) end end And here everything is pretty straightforward. We go through the list of
enemy_spawn_times and set the creation of enemies from enemy_list in accordance with the numbers in the first table. The last thing to do is to call this function once when starting the game: function Director:new(...) ... self:setEnemySpawnsForThisRound() end If we do not do this, then the enemies will begin to be created only after 22 seconds. We can also, at launch, add the creation of an attack resource so that the player can replace his attack, but this is not necessary. Be that as it may, if we run the code now, then everything will work as intended!
At this moment we will leave the director alone, but we will return to him in the next articles when we add more content to the game!
Exercises with the director
116. (CONTENT) Implement rule 3. It should work as a rule 1, but instead of increasing complexity one of the three resources specified in the list should be created. The probabilities of creating each of the resources must meet the following definition:
function Director:new(...) ... self.resource_spawn_chances = chanceList({'Boost', 28}, {'HP', 14}, {'SkillPoint', 58}) end 117. (CONTENT) Implement rule 4. It should work as a rule 1, only instead of increasing complexity, a random attack should be created.
118. The while loop, which is searching for created enemies, has one big problem: it can be stuck forever in an endless loop. Imagine a situation in which there is only one point left, but enemies standing one point (for example, Rock) can no longer be created, because the current level of difficulty does not create Rock. Find a common solution to this problem, without changing the price of enemies, the number of points in difficulty levels and not relying on the fact that the problem is solved by the possibility of creating enemies (for example, forcing all levels of difficulty to always create enemies with low cost).
Game cycle
We now turn to the game cycle. Here we will make it so that the player can play again and again - when a player dies, he starts the level again. In the finished game, the cycle will be slightly different, because after death the player must move to the Console room, but since we do not have a Console room yet, we will simply restart the Stage room. It will be convenient to check memory problems here, because we will restart the Stage room again and again.
Due to the way we structured the code, this is incredibly easy to do. We will define the
finish function in the Stage class, which uses gotoRoom to switch to another Stage room. This function looks like this: function Stage:finish() timer:after(1, function() gotoRoom('Stage') end) end gotoRoom will deal with the destruction of the previous instance of the Stage and the creation of a new one so that we do not have to destroy the objects manually. The only thing we need to take care of is to set the player attribute in the Stage class to nil in its destroy function, otherwise the Player object will not be deleted correctly.The
finish function can be called from the Player object itself when the player dies: function Player:die() ... current_room:finish() end We know that
current_room is a global variable containing the current active room, and when the die function is called for the player, the only active room will be the Stage, so everything will work as it should. If we run the code, it will work as we expected. If the player dies, then after 1 second a new room of the Stage starts and you can start the game again.It is worth noting that everything worked out so simply because we structured our game in accordance with the principle of rooms and areas. If we structured everything differently, it would be much more difficult, and because of this (in my opinion) many people get confused when creating a game in LÖVE. We can structure the system the way we need, but it is easy to do so that some aspects, such as restarting the game, are not so easy to implement. It is important to understand the role that our chosen architecture plays.
Score
The main goal of the game is to score maximum points, so we need to create an account system. This is also quite simple compared to what we have already done. To do this, we just need to create the
score attribute in the Stage class, which will track the points we collect. After the game is completed, this score will be saved somewhere, and we will be able to compare it with previous records. For now, we'll skip the part with the comparison of points and focus only on the basics. function Stage:new() ... self.score = 0 end Now we can increase the score when performing actions that increase it. While we will have the following rules for scoring:
- Picking up a resource of ammunition adds 50 points to the score
- Picking up an acceleration resource adds 150 points to the score.
- Picking up a skill point resource adds 250 points to the score.
- Choosing an attack resource adds 500 points to the score.
- Destruction Rock adds 100 points to the score
- Destruction Shooter adds 150 points to the score
Rule 1 we implement as follows 1:
function Player:addAmmo(amount) self.ammo = math.min(self.ammo + amount, self.max_ammo) current_room.score = current_room.score + 50 end We move to the most obvious place - where the event occurs (in our case it is a function
addAmmo), and then simply add here the code that changes the account. Just as we did for the function finish, here we can access the Stage room through current_room, because the Stage room is the only one that can be active in this case.Exercises with a score
119. (CONTENT) Implement the rules from 2 to 6. They are very simple to implement and very similar to the one I gave for example.
Ui
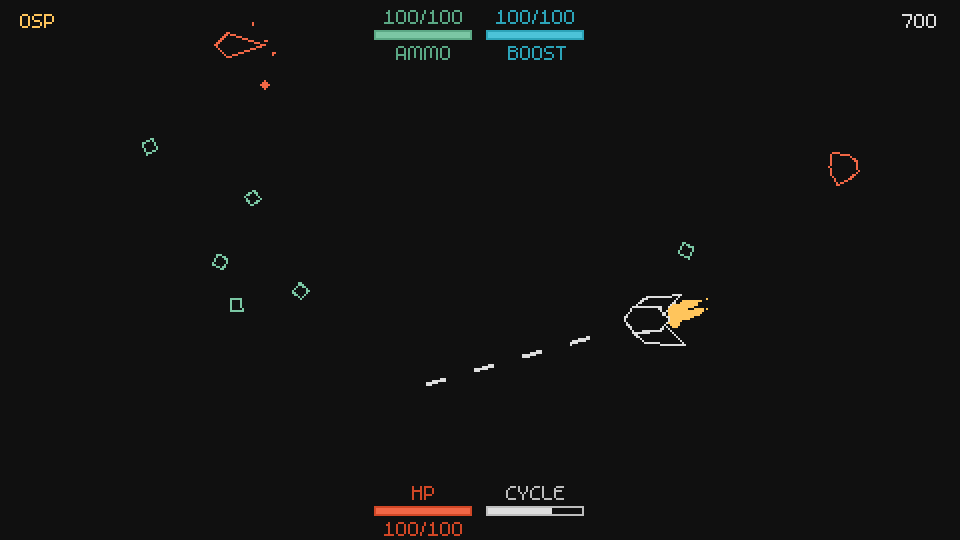
Now for the user interface (UI). In the finished game, it will look like this:
The number of available skill points is indicated in the upper left corner, the score is shown in the upper right part, and the player’s main characteristics are shown in the upper and lower part of the screen. Let's start by counting. All we want to do here is to display a number in the upper right corner of the screen. It might look like this:
function Stage:draw() love.graphics.setCanvas(self.main_canvas) love.graphics.clear() ... love.graphics.setFont(self.font) -- Score love.graphics.setColor(default_color) love.graphics.print(self.score, gw - 20, 10, 0, 1, 1, math.floor(self.font:getWidth(self.score)/2), self.font:getHeight()/2) love.graphics.setColor(255, 255, 255) love.graphics.setCanvas() ... end We want to draw the UI on top of everything else, and this can be implemented in two ways. We can either create an object called UI and set its attribute
depthso that it is drawn on top of everything, or we can just draw over the Area in the canvas main_canvasthat the Stage room uses. I decided to choose the second method, but they both work.In the code above, we used to set the font
love.graphics.setFont: function Stage:new() ... self.font = fonts.m5x7_16 end And then we draw the account in the appropriate position in the upper right corner of the screen. We have shifted half the width of the text so that the account is centered on this position, and does not start in it, otherwise, when the numbers are too large (> 10,000), the text may go beyond the borders of the screen.
The text of skill points is also created in about the same simple way, so we leave it for the exercise.
We now turn to the second important part of the UI, that is, to the central elements. We will start with health (HP). We need to draw three elements: a word denoting a parameter (in our case, “HP”), a bar indicating the parameter’s fullness, and numbers showing the same information, but in a more accurate form.
We'll start by drawing the strip:
function Stage:draw() ... love.graphics.setCanvas(self.main_canvas) love.graphics.clear() ... -- HP local r, g, b = unpack(hp_color) local hp, max_hp = self.player.hp, self.player.max_hp love.graphics.setColor(r, g, b) love.graphics.rectangle('fill', gw/2 - 52, gh - 16, 48*(hp/max_hp), 4) love.graphics.setColor(r - 32, g - 32, b - 32) love.graphics.rectangle('line', gw/2 - 52, gh - 16, 48, 4) love.graphics.setCanvas() end First, we will draw this rectangle in position
gw/2 - 52, gh - 16, and its width will be equal 48. That is, both bars will be drawn relative to the center of the screen with a small gap of 8 pixels. From this we can also understand that the position of the bar on the right will be gw/2 + 4, gh - 16.This bar will be a filled rectangle with color
hp_color, and its outline will be a rectangle with color hp_color - 32. Since we cannot subtract from the table, we need to divide the table hp_colorinto separate components and subtract from each.The only strip that will change in any way is the filled rectangle, whose width will change according to the relation
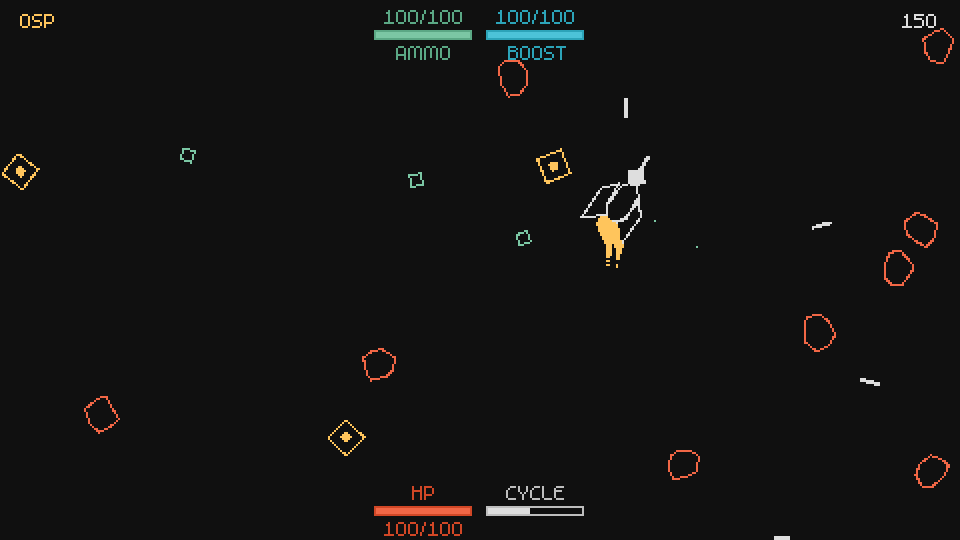
hp/max_hp. For example, if it hp/max_hpis 1, then HP is full. If 0.5, thenhphas half the size max_hp. If 0.25, then 1/4 of the size. And if we multiply this ratio by the width that the strip should have, then we get a beautiful visualization of the player’s HP fill. If we implement it, the game will look like this:
Here you can see that when a player takes damage, the bar responds accordingly.
Now similarly to that. as we have drawn the number of points, we can draw the text of HP:
function Stage:draw() ... love.graphics.setCanvas(self.main_canvas) love.graphics.clear() ... -- HP ... love.graphics.print('HP', gw/2 - 52 + 24, gh - 24, 0, 1, 1, math.floor(self.font:getWidth('HP')/2), math.floor(self.font:getHeight()/2)) love.graphics.setCanvas() end Here again, just as we did for the account, we need the text to be centered relatively
gw/2 - 52 + 24, that is, relative to the center of the strip, that is, we need to shift it to the width of this text typed in this font (and we do this with the help of the function getWidth).Finally, we can also simply draw the HP numbers under the bar:
function Stage:draw() ... love.graphics.setCanvas(self.main_canvas) love.graphics.clear() ... -- HP ... love.graphics.print(hp .. '/' .. max_hp, gw/2 - 52 + 24, gh - 6, 0, 1, 1, math.floor(self.font:getWidth(hp .. '/' .. max_hp)/2), math.floor(self.font:getHeight()/2)) love.graphics.setCanvas() end Here apply the same principle. We need the text to be centered, so we need to shift it to its width. Most of these coordinates were obtained by trial and error, so if you wish, you can try other distances.
Exercises with UI
120. (CONTENT) Implement the UI for the Ammo parameter. The position of the bar is equal to
gw/2 - 52, 16.121. (CONTENT) Implement the UI for the Boost parameter. The position of the bar is equal to
gw/2 + 4, 16.122. (CONTENT) Implement the UI for the Cycle parameter. The position of the bar is equal to
gw/2 + 4, gh - 16.the end
And on this we completed the first main part of the game. This is the basic skeleton of the entire game with a minimum amount of content. The second half (in five or so parts) will be entirely devoted to adding content to the game. The structure of the parts will become more like this part, in which I do something once, and then in the exercises you implement the same idea for other elements.
However, the next part will be a short break in which I will share my thoughts on the practice of writing code and explain the architectural solutions and the structure of the code I have chosen. You can skip it if you are only interested in creating the game, because it will be a more categorical part, not so strongly associated with the game itself as the rest.
Part 10: Code Writing Practices
Introduction
In this part, I’ll talk about recommended coding practices and how they are applied or not applicable to what we are doing in this series of tutorials. If you read it from the very beginning and did most of the exercises (especially those labeled as “content”), then you are likely to encounter solutions that raise questions from the point of view of programming practices: huge if / elseif chains, global functions, huge functions, huge classes that perform a bunch of operations, copy-and-paste and duplicate code instead of proper abstraction, and so on.
If you already have programming experience in another field, then you know what you shouldn’t do, so in this part I would like to explain in more detail some of these solutions. Unlike all the previous parts, this will be very categorical and possibly erroneous, so you can skip it without any problems. We will not consider anything directly related to the game, even when, for the context of what I am talking about, I will give examples from the game we create. In this part we will talk about two main aspects: global variables and abstractions. First, we will discuss when and where global variables can be used, and second, we will more broadly consider how and when to abstract or generalize.
In addition, if you bought a tutorial, then in the code base for this article I added a code that was previously marked in the exercises as “content,” namely, the graphics for all player’s ships, all attacks, and objects for all resources, because I will use them here as examples.
Global variables
Usually people are advised to avoid using global variables. There are many different discussions of this topic and the rationale for this advice is quite logical. In general, the main problem with using global variables is that they make things more unpredictable than necessary. Here is what is written on the last link:
— , , . , , ( ), .
, , , . , , .
And all this is very correct and reasonable. But in such discussions the context is always forgotten . The advice given above is logical as a general guide, but if you begin to look at a specific situation in detail, you will find that you need to clearly understand whether this applies to your case or not.
And this is the idea that I will repeat throughout the article, because I deeply believe in it: advice that is useful to teams of several people and in software development that will be supported for several years / decades does not work as well for developers - single indie video game. When you write code mostly on your own, you can go for simplifications that are not allowed by the team. And when you write video games, you can simplify even more, compared to other types of software, because games are usually supported for a short time.
This difference in contexts manifests itself when it comes to global variables. In my opinion, you can use global variables when you know how and why to use them. We want to maximize their benefits and at the same time avoid their disadvantages. And in this sense, we also need to take into account the advantages we have: first, we write the code ourselves, and secondly, we write video games.
Types of global variables
In my opinion, there are three types of global variables: those that are mostly read, those that are mainly written, and those that are often read and written.
Type 1
The first type is global variables that are often read but rarely written. Variables of this type are harmless, because in fact they do not actually increase the unpredictability of the program. These are simply existing values that are always or almost always constant. They can also be considered as constants.
An example of a variable of this type in our game is a variable
all_colorscontaining a list of all colors. These colors never change and never write to this table. At the same time, it is read from different objects, for example, when we need to get a random color.Type 2
The second type is global variables, which are often written and rarely read. Such variables are almost harmless, because they also do not increase the unpredictability of the program. These are simply storages of values that will be used in very specific and manageable conditions.
So far, there are no variables in our game that correspond to this definition, but an example is a table containing data on how a player plays, and then, when leaving the game, sending all data to the server. We will constantly write to this table all sorts of information in different places of the code base, but it will be read and, perhaps, slightly changed, only when we decide to send it to the server.
Type 3
The third type is global variables with active read and write. They represent a real threat and actually increase unpredictability, in many ways complicating our work. When people say “do not use global variables,” they mean this type.
There are several such variables in our game, but I think it will be the most noticeable
current_room. Already her name itself implies some uncertainty, since the current room can be an object Stage, or an object Console, or an object SkillTree, or any other type of Room object. I decided that for our game this would be an acceptable decrease in clarity.The main point of this division of global variables into types is to understand the problem a little deeper and, so to speak, separate the wheat from the chaff. Our productivity would suffer greatly if we took this too dogmatically and avoided global variables with all our strength. Avoiding them with all your strength is worthwhile for teams and people who have been involved in software support for years, but it is unlikely that the variable will
all_colorsinterfere with us in the long run. As long as we monitor variables like current_roomand do not allow them to be too multiple or too confusing (for example, it current_roomchanges only when a function is called gotoRoom), we can control everything.When you see or want to use a global variable, then first think about what type it will be. If it is type 1 or 2, then most likely it will not cause problems. If it has type 3, then it is important to think about when and how often it will be read and written. If you very often write to it from random objects in the entire code base and read from random objects throughout the code base, then you probably should not make it global. If you rarely write to it from a very small set of objects, and read it from random objects across the entire code base, this is still not very good, but it may be acceptable. The point is to think about such problems critically, and not just follow some dogmatic rules.
Abstraction and copying
When I talk about abstractions, I mean the layer of code that is extracted from repetitive or similar code for reuse in a more limited and clear way. For example, in our game there are such lines:
local direction = table.random({-1, 1}) self.x = gw/2 + direction*(gw/2 + 48) self.y = random(16, gh - 16) And they are the same for all objects that should be created to the left or right of the screen in a random position along the y axis. It seems that these three lines are still in the beginning about 6-7 objects. The argument in favor of abstraction here is that if these strings are repeated in several objects, then we must abstract them in some way so that the objects can use this abstraction, rather than repeating the strings in the code base. We can implement this abstraction through inheritance, components, a function, or some other mechanism. In our discussion, all these different ways will be considered one topic, because they all demonstrate the same problems.
Now that you know what I'm talking about, let's look at the question in more detail. From my point of view, the main discussion of these problems is whether to add a new code with existing abstractions, or to freely add a new code. I mean that when we have abstractions that help us in some way, they also have (often hidden) costs that can slow us down in other ways.
Abstraction
In the example above, we can create some function / component / parent class in which these three lines will be encapsulated, so that it will not be necessary to repeat them everywhere. Since components are at the peak of fashion today, let's take them and implement the SpawnerComponent component (but again, don't forget that this applies to functions / inheritance / admixtures and other similar methods of abstraction / reuse of code). We can initialize it as
spawner_component = SpawnerComponent(), and it will magically process for us all the logic of the spawn of objects. In our example, these are three lines, but the same logic applies to more complex behaviors.The advantages of this solution are that now everything connected with the logic of the spawn of objects is in one place under one interface. This means that when we want to make some changes in the behavior of the spawn, then it will be enough for us to change it only in one place, and not to change the code manually in the set of files. The advantages of this are well understood and I will not question them.
However, such a solution has its own costs, which are most often ignored when people “sell” you some kind of solution. Costs become apparent when we want to add some kind of new behavior that looks like the old one, but not completely. And in games this happens often.
So, for example, suppose that we need to add objects that spawn exactly in the middle of the screen. We have two options: either change the SpawnerComponent to accept this new behavior, or create a new component that implements this new behavior. In our case, the obvious choice would be to change the SpawnerComponent, but in more complex examples the choice may not be so obvious. The point here is that since we need to add a new code taking into account the existing code (in our case, this is SpawnerComponent), for this we will need more mental effort taking into account the fact that we need to decide where and where to add functionality instead of calmly add it.
Copypasting
An alternative solution, which is applied now in our code base, is that these three lines are inserted wherever this behavior is needed. The disadvantages of this solution are that if we need to change the behavior of the spawn, we will have to monotonously go through all the files and change them all. In addition, the behavior of the spawn is not properly encapsulated in a separate environment, that is, when new behaviors are added to the game, it will be more difficult to separate it from everything else (most likely, they will not forever be just these three lines).
However, such a solution has its advantages. In the case when we want to add objects that are created exactly in the middle of the screen, we just need to copy these lines from the previous object and change the last one:
local direction = table.random({-1, 1}) self.x = gw/2 + direction*(gw/2 + 48) self.y = gh/2 In this case, adding a new behavior, similar to the previous one, is completely trivial and does not require any mental effort (unlike a solution with SpawnerComponent).
Then the question arises - if both methods have their advantages and disadvantages, which of them should be used by default? Usually, people say that the default is to use the first method and we don’t have to save such duplicate code for a long time, because it “smells bad”. But in my opinion you need to do the opposite. By default, we must use duplicate code and abstract it only when absolutely necessary. And the reason for this ...
Frequency and types of changes
I found a good way to find out if some piece of code should be abstracted: you need to look at how often it changes and how it can change. I discovered two basic types of change: unpredictable and predictable changes.
Unpredictable changes
Unpredictable changes are changes that fundamentally change behavior, much more than simple minor changes. In the example of spawn behavior, an unpredictable change would be, for example, that instead of accidentally creating enemies to the left and right of the screen, they would be created based on the position given by the procedural generator algorithm. We cannot predict fundamental changes of this type.
Such changes often occur at the earliest stages of development, when we have some vague idea of the game, but there are no details. You can cope with such changes by choosing the default copy-and-paste method, because the more abstractions we create, the more difficult it will be to implement all these intersecting changes in the code base.
Predictable changes
Predictable changes are changes that modify behavior in a minor and definite way. In the example shown above with the behavior of spawn, a predictable change will be an example in which we need to create objects exactly in the middle of the screen along the y axis. This change changes the behavior of the spawn, but it is very little and does not completely destroy the basis of the work of the behavior of the spawn.
Such changes are becoming more frequent when the game matures, because by that time we already have most of the systems, and we only need to make small variations or additions to the same fundamental aspects. Such changes can be considered by analyzing the frequency of change of the corresponding code. If it changes frequently and these changes are predictable, then you should choose abstraction. If it changes rarely, then by default it is worth choosing copy-pasting.
The main point of dividing the changes into these two types is that they allow us to analyze the situation more clearly and make more conscious decisions. Our productivity will suffer if we dogmatically default to abstracting everything and avoiding duplicate code at all costs. Avoiding by all means is suitable for teams and people working on software that should be supported for a long time, but not suitable for indie games created alone.
When you feel the desire to generalize something, then think hard whether it is necessary. If this code fragment changes infrequently, then you should not worry about it. If it changes frequently, how is it predictable or unpredictable? If it changes unpredictably, then too much work and attempts to encapsulate are likely to be a waste of time, because encapsulation will prevent you from having to make major changes to the game. If it changes predictably, then there is a possibility that abstraction can actually help us. The point is to think about these issues critically, and not just blindly follow some dogmatic rule.
Examples
There are other examples in our game that can be used for a deeper discussion of these problems:
Move left / right
This aspect is very similar to the spawn code, that is, the behavior of all entities moving left or right in a straight line. That is, this applies to multiple enemies and most resources. The code that controls this behavior looks something like this and repeats itself for all these entities:
function Rock:new(area, x, y, opts) ... self.w, self.h = 8, 8 self.collider = self.area.world:newPolygonCollider(createIrregularPolygon(8)) self.collider:setPosition(self.x, self.y) self.collider:setObject(self) self.collider:setCollisionClass('Enemy') self.collider:setFixedRotation(false) self.v = -direction*random(20, 40) self.collider:setLinearVelocity(self.v, 0) self.collider:applyAngularImpulse(random(-100, 100)) ... end function Rock:update(dt) ... self.collider:setLinearVelocity(self.v, 0) end Depending on the entity, the setting of the collider may vary slightly, but in general it is almost the same. As in the spawn code, we can decide that it is a good idea to abstract this code into something else, for example, in LineMovementComponent.
The analysis here will be the same as before. We need to think about how often this behavior changes for all these entities. The correct answer: almost never. The behavior is that some of these entities should move left / right, the direction is chosen and will not change, so there is no point in taking care of it, that is, we can completely repeat the code in the entire code base.
The graphics of the player’s ships and their tracks
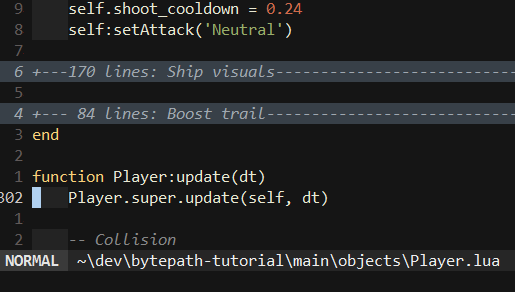
If you have done most of the exercises, then in the Player class there is code that looks like this:
Gif
In fact, these are two huge if / elseifs, one controls the graphics of various ships, and the other controls the traces of these ships. The first thing to think about when looking at this code is that it needs to be CLEARED. But again, is it necessary? Unlike the previous examples, this code is not repeated in many different places, that is, it’s just a bunch of sequential code.
You can also think about abstracting all these different types of ships into separate files, determine the differences in these files, and in the Player class just read these files so that all the code is clean and beautiful. And this can really be done, but in my opinion this refers to the case of optional abstraction. Personally, I prefer to have a simple code that is clearly visible, and not scattered across several levels of abstraction. If this huge piece of code at the beginning of the Player class really annoys you, then you can put it in a function and place it at the end of the class. Or use the folding that should be supported by your editor. Here's how, for example, the collapse in my editor looks like:
Class size Player
The Player class now consists of about 500 lines. In the next part, where we add passive skills, it will grow to about 2000 lines. When you see this, your natural response will be to make the code more beautiful and clean. And here again it is worth asking yourself the question - is it really necessary to do this? In most games, the Player class contains most of the functionality and often people make great efforts to ensure that it does not become such a huge class in which everything happens.
But for the same reasons that I decided not to abstract the graphics and traces of the ships from the previous example, in my opinion it does not make sense to abstract all these different logical parts that make up the player’s class. Therefore, instead of creating separate files for player movement, player collisions, player attacks, and so on, I consider it best to put all this in one file and get the Player class of 2000 lines. The ratio of benefits and costs of finding everything in one place and without layers of abstractions between elements is higher than the ratio of benefits and costs with the proper abstraction of elements (in my opinion!).
Entity-Component-System
Finally, the most popular "meme" for lonely developers in recent years has been ECS. I think, in view of the above, you already understand what my position on this matter is, but I will explain it anyway. The advantages of the ECS pattern are clearly visible and, I think, everyone understands them. What people do not understand is his faults.
To begin with, by definition, ECS is a more complex system. Its meaning is that when you add more functionality to the game, you can reuse components and create new entities from them. But the obvious costs (which people often ignore) are that at the beginning of development, you spend much more time creating reusable components than is necessary. And as I mentioned in the section on abstraction / copy-and-pick, when you create elements and default behavior so that they are abstract, adding code to the code base becomes a much more costly task, because you have to add it taking into account existing abstractions and structures. And this is very noticeable in games based on components.
Moreover, I believe that most indie games never reach the point where the ECS architecture begins to justify itself. Look at this scientific chart drawn by me, and it will become clear to you:
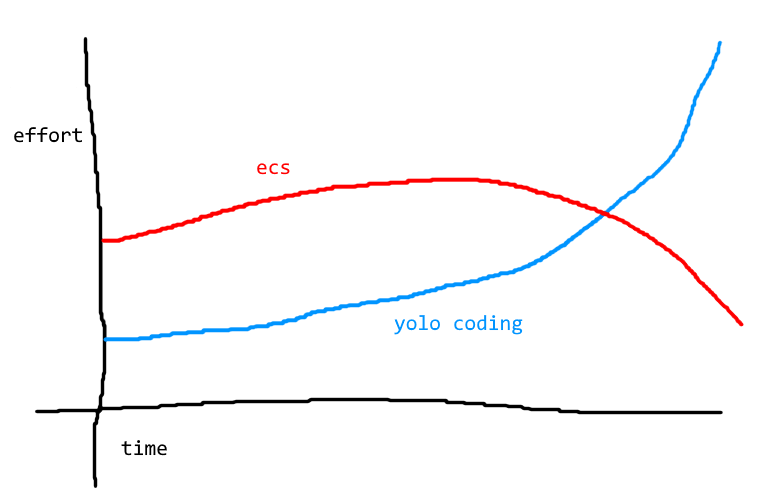
The point is that at the beginning “yolo-coding” (which I advocate in this part of the article) requires less effort compared to ECS. Over time, as the project progresses, yolo coding costs increase, while ECS costs decrease. Then comes the moment when ECS becomes more efficient than yolo-coding. I believe that most indie games, with very few exceptions (at least in my opinion), will never reach this intersection of two lines.
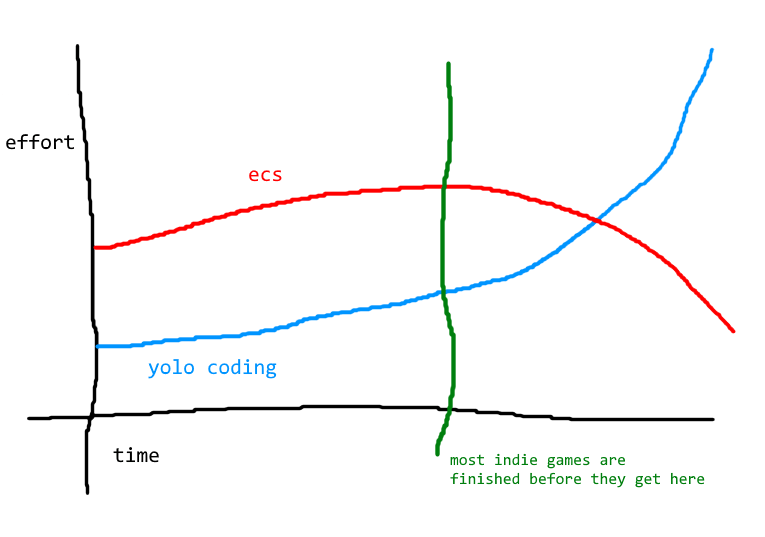
And if in your case this is the case, but in my opinion it is, then there is no point in using something like ECS. This also applies to many other programming techniques and practices that are advertised by many people. In fact, this whole part of the tutorial is about this thought. There are things that are rewarded in the long term, but not suitable for the development of indie games, because for them the long term never comes.
END
Anyway, I think that I have spoken enough on these issues. If you take something from this article, then just keep in mind that most of the programming recommendations that can be found on the Internet are intended for teams working on software that requires support for a long time. Your context as an indie video game developer is completely different, so you should always be critical about whether the advice given by other people is right for you. Often they are suitable because there are aspects of programming that are useful in any context (for example, the correct naming of variables), but sometimes they are not suitable. And if you do not pay attention to this, then slow down and become less productive.
At the same time, if you work in a large company and create software that has to be supported for a long time, and are used to related practices and programming styles, then trying to write code at home for your game in another style I described can be a failure. Therefore, you also need to take into account the “natural” coding environment for you and how much the programming environment I described for indie game developers is far from you, as well as how well you can switch between them. I want to say that you need to be critical of your programming practices, how they approach the specific context and how convenient you are to use them.
Part 11: Passive Skills
Introduction
In this part we will consider the implementation of all passive skills of the game. In total, there will be approximately 120 different elements in the game, and this is enough to turn into a very large skill tree (for example, in the tree I created, about 900 nodes).
In this part of the article there will be a lot of exercises labeled as “content.” They work as follows: first I will show you how something is done, and then I will give a bunch of exercises in which you need to do the same, but for other parameters. For example, I will show how to implement the HP multiplier, that is, the characteristic that multiplies the player's HP by a certain percentage, and then in the exercises I will ask you to realize the Ammo and Boost multipliers. In fact, everything will be a little more complicated, but in general the meaning is as follows.
After we finish with the implementation of the entire code of this part, we will have implemented a large proportion of the game content, after which it will be necessary to complete small details, for example, building a huge skill tree from the passive skills we have implemented.
Types of characteristics
Before embarking on everything, we first need to decide on the types of passive skills that will be in our game. I have already decided what I want to do, so I will just follow my plan, but you can safely deviate from it and come up with your own ideas.
The game will have three main types of passive values: resources, characteristics multipliers and probabilities.
- — HP, Boost Ammo.
max_value,current_value. HP , , . - — , . , , « 10%». , , . , 50%,
max_v.mvspd_multiplier1.5, 1.5 ( 50%). - Probabilities are the chances of performing some event. The player will also be able to choose an additional probability of performing certain events in certain conditions. For example, “Increased by 5% probability of a queue for a cycle”, that is, at the end of a cycle (the interval of 5 seconds implemented by us), the player has a 5% chance of releasing a queue from shells. If a player chooses many such nodes, then the probability increases and the queues will occur more often.
Also, the game will have an additional type of nodes and additional mechanics: important nodes and temporary bonuses.
- Important nodes are nodes that somehow change the logic of the game (although not always). For example, we will have a node replacing HP with an energy shield. Thanks to the shield, the player can withstand double damage, if he doesn’t take damage for a while, the shield is recharged, in addition, the time of invulnerability becomes half as long. Such nodes will not occur as often as others, but they can be very powerful and combined in interesting ways.
- Temporary bonuses are temporary increases in parameters. Sometimes a player may receive a temporary bonus, which, for example, increases attack speed by 50% for 4 seconds.
Having learned all this, we can proceed. First, let's see how the resource parameters in our code base should now look like:
function Player:new(...) ... -- Boost self.max_boost = 100 self.boost = self.max_boost ... -- HP self.max_hp = 100 self.hp = self.max_hp -- Ammo self.max_ammo = 100 self.ammo = self.max_ammo ... end The values of the movement code should look like this:
function Player:new(...) ... -- Movement self.r = -math.pi/2 self.rv = 1.66*math.pi self.v = 0 self.base_max_v = 100 self.max_v = self.base_max_v self.a = 100 ... end And the cycle values should look like this (for the sake of integrity, I renamed all previous references with the word "tick" to "cycle"):
function Player:new(...) ... -- Cycle self.cycle_timer = 0 self.cycle_cooldown = 5 ... end HP multiplier
So let's start with the HP multiplier. In the simplest case, it is enough for us to define a variable
hp_multiplierthat initially has a value of 1, and then apply all the increases from the tree to this variable and at some point multiply it by max_hp. Let's start with the first: function Player:new(...) ... -- Multipliers self.hp_multiplier = 1 end Secondly, we need to assume that we get the increase in HP from the tree. To do this, we need to decide how these increases will be transmitted and how they will be determined. Here I have to cheat a bit (because I have already written this game) and say that the tree nodes will be defined in the following format:
tree[2] = {'HP', {'6% Increased HP', 'hp_multiplier', 0.06}} This means that node 2 is called
HP, has a description 6% Increased HPand affects the variable hp_multiplierat 0.06 (6%). There is a function treeToPlayerthat receives all 900 of these node definitions and applies them to the player object. It is also important to note that the variable name used in the definition of the node must be the same name that is defined in the player object, otherwise it will not work. This is a very subtly connected and error-prone way, but as I said in the previous part, you can put up with such things, because we write everything alone.The last question is: when we multiply
hp_multiplierbymax_hp? The natural choice is to simply do it in the constructor, because it is in him that a new player is created, and a new player is created when creating a new Stage room, which also happens when a new game starts. However, we will do this at the very end of the constructor, after all the resources, factors, and probabilities are determined: function Player:new(...) ... -- treeToPlayer(self) self:setStats() end Therefore, in the function
setStatswe can do the following: function Player:setStats() self.max_hp = self.max_hp*self.hp_multiplier self.hp = self.max_hp end That is, if we, for example, assign the
hp_multipliervalue 1.5 and start the game, we note that the player will have 150 HP instead of 100.It should be noted that here we must also assume the existence of a function
treeToPlayerand transfer the player's object to this function. Later, when we write the skill tree code and implement this function, it will set the values of all multipliers based on the bonuses from the tree, and after setting the values, we can call setStatsto use them to change player parameters.123. (CONTENT) Implement the variable
ammo_multiplier.124. (CONTENT) Implement the variable
boost_multiplier.Easy HP
Now let's talk about simple features. Simple characteristics are a direct increase in some characteristic, not based on percentages. We implement them for HP by defining a variable
flat_hpthat is added to max_hp(before multiplying by a factor): function Player:new(...) ... -- Flats self.flat_hp = 0 end function Player:setStats() self.max_hp = (self.max_hp + self.flat_hp)*self.hp_multiplier self.hp = self.max_hp end As before, when we specify a node in the tree, we want to bind it to the corresponding variable, so, for example, a node that adds a simple HP will look like this:
tree[15] = {'Flat HP', {'+10 Max HP', 'flat_hp', 10}} 125. (CONTENT) Implement the variable
flat_ammo.126. (CONTENT) Implement the variable
flat_boost.127. (CONTENT) Implement a variable
ammo_gainthat is added to the amount of ammunition received when a player selects a resource. Change the calculations in the function accordingly addAmmo.Self-guided shells
The next passive skill that we will implement will be “Probability of a shot by a homing projectile when selecting ammunition,” but for now we will focus on the part with the self-guided projectiles. One of the attacks that the player will have is a homing projectile, so now we are implementing it.
The homing function will be activated by the projectile when its
attackvalue is assigned to the attribute 'Homing'. The homing code will be the same as the code used for the Ammo resource: function Projectile:update(dt) ... self.collider:setLinearVelocity(self.v*math.cos(self.r), self.v*math.sin(self.r)) -- Homing if self.attack == 'Homing' then -- Move towards target if self.target then local projectile_heading = Vector(self.collider:getLinearVelocity()):normalized() local angle = math.atan2(self.target.y - self.y, self.target.x - self.x) local to_target_heading = Vector(math.cos(angle), math.sin(angle)):normalized() local final_heading = (projectile_heading + 0.1*to_target_heading):normalized() self.collider:setLinearVelocity(self.v*final_heading.x, self.v*final_heading.y) end end end The only thing that will be different is the definition of the variable
target. For an Ammo object, the variable targetpoints to the player's object, but in the case of a projectile, it will indicate the nearest enemy. To get the nearest enemy, we can use the function getAllGameObjectsThatdefined in the Area class and apply a filter that will select only objects that are enemies and are close enough. To do this, we must first determine which of the objects are enemies, and which objects are not. The easiest way to do this is to create a global table enemiesthat will contain a list of rows with the names of the enemy classes. That is, globals.luawe can add the following definition: enemies = {'Rock', 'Shooter'} When new enemies are added to the game, we will add their lines to this table accordingly. Now that we know which types of objects are enemies, we can easily select them:
local targets = self.area:getAllGameObjectsThat(function(e) for _, enemy in ipairs(enemies) do if e:is(_G[enemy]) then return true end end end) We use a string
_G[enemy]to access the class definition of the current row that we loop through. That is, _G['Rock']returns a table containing the class definition Rock. We looked at this in several parts of the tutorial, so you should already understand why this works.For another condition, we need to select only those enemies that are within a certain radius from the projectile. Through trial and error, I came to a radius of 400 units that is not small enough that the projectile could not find a suitable target, and not so large that the projectile too often tried to hit enemies behind the screen:
local targets = self.area:getAllGameObjectsThat(function(e) for _, enemy in ipairs(enemies) do if e:is(_G[enemy]) and (distance(ex, ey, self.x, self.y) < 400) then return true end end end) distanceIs a function that we can define in utils.lua. It returns the distance between two positions: function distance(x1, y1, x2, y2) return math.sqrt((x1 - x2)*(x1 - x2) + (y1 - y2)*(y1 - y2)) end And after that the enemies will have to be on the list
targets. Then the only thing we need is to choose one of them at random and indicate it as the targetprojectile is heading to: self.target = table.remove(targets, love.math.random(1, #targets)) And all this should look like this:
function Projectile:update(dt) ... self.collider:setLinearVelocity(self.v*math.cos(self.r), self.v*math.sin(self.r)) -- Homing if self.attack == 'Homing' then -- Acquire new target if not self.target then local targets = self.area:getAllGameObjectsThat(function(e) for _, enemy in ipairs(enemies) do if e:is(_G[enemy]) and (distance(ex, ey, self.x, self.y) < 400) then return true end end end) self.target = table.remove(targets, love.math.random(1, #targets)) end if self.target and self.target.dead then self.target = nil end -- Move towards target if self.target then local projectile_heading = Vector(self.collider:getLinearVelocity()):normalized() local angle = math.atan2(self.target.y - self.y, self.target.x - self.x) local to_target_heading = Vector(math.cos(angle), math.sin(angle)):normalized() local final_heading = (projectile_heading + 0.1*to_target_heading):normalized() self.collider:setLinearVelocity(self.v*final_heading.x, self.v*final_heading.y) end end end At the end of the block, where we get a new target, there is an additional line in which we assign the
self.targetvalue nil in the case when the target is killed. Due to this, when the target for the projectile ceases to exist, the self.targetvalue nil is assigned and a new target is obtained, because the condition will be satisfied not self.target, after which the whole process is repeated. It is also important to mention that after receiving the goal, we do not do any more calculations, so there is no need to worry about the speed of the function getAllGameObjectsThat, which naively bypasses in the loop all the living objects in the game.The next thing we need to change is the behavior of the object of the projectile when it is not self-guided or when the target is missing. It would be logical to use first
setLinearVelocityto set the velocity of the projectile, and then reuse it inside the cycle if self.attack == 'Homing', since the speed will only change if the projectile is actually homing and if there is a target. But for some reason, this leads to all sorts of problems, so we have to call setLinearVelocityonly once, that is, write something like this: -- Homing if self.attack == 'Homing' then ... -- Normal movement else self.collider:setLinearVelocity(self.v*math.cos(self.r), self.v*math.sin(self.r)) end It's a bit more confusing than the previous one, but it works. And if we test all this and create a shell, the attribute of
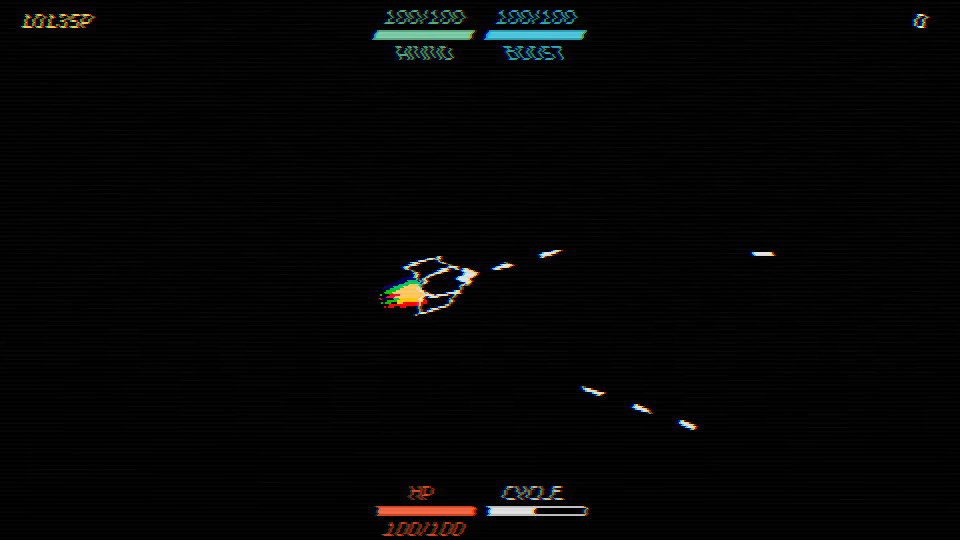
attackwhich is assigned a value 'Homing', then it should look like this:
128. (CONTENT) Implement the attack
Homing. Its definition in the attack table looks like this: attacks['Homing'] = {cooldown = 0.56, ammo = 4, abbreviation = 'H', color = skill_point_color} And the attack itself will look like this:

Notice that the projectile for this attack (as well as for the others we create) is slightly different. This is a diamond, half painted white, half in the color of the attack (in this case
skill_point_color), which also has a track that has the color of the player.The probability of firing a homing projectile in the selection of ammunition
Now we can go to what we want to implement, namely to the passive skill associated with probability. This skill is likely to work when selecting a resource of ammunition. We will store this probability in a variable
launch_homing_projectile_on_ammo_pickup_chance, and when selecting a resource Ammo, we will call a function that “throws out on the dice” the probability of the event being executed.But before we can do this, we need to specify how we will process these probabilities. As I said in one of the previous parts, here we will also apply the concept of the list
chanceList. If an event has a probability of 5%, then we need to make sure that these 5% are observed fairly enough, so it is logical to use chanceList.We do it like this: after calling a function
setStatsin the Player constructor, we will also call a function generateChancesthat will create all the chanceList lists that apply throughout the game. Since the game will have many different events for which you need to “roll a cube”, we will put all the chanceList lists in the table chancesand arrange everything so that when we need to “roll the cube” on the likelihood of doing something, we could do something like: if self.chances.launch_homing_projectile_on_ammo_pickup_chance:next() then -- launch homing projectile end We can set the table
chancesmanually, that is, each time we add a new type variable _chancein which the probability of a certain event will be stored, we will also add and generate generateChancesits chanceList list in the function . But here we can do a little smarter and decide that every variable that deals with probabilities will end in _chance, and use this to our advantage: function Player:generateChances() self.chances = {} for k, v in pairs(self) do if k:find('_chance') and type(v) == 'number' then end end end Here we go through all the key-value pairs inside the player's object and return true when we find the attribute containing the substring in the name
_chance, as well as being a number. If both of these conditions are true, then, based on our own decision, this is a variable related to the likelihood of an event. That is, we just need to create then the chanceList and add it to the table chances: function Player:generateChances() self.chances = {} for k, v in pairs(self) do if k:find('_chance') and type(v) == 'number' then self.chances[k] = chanceList({true, math.ceil(v)}, {false, 100-math.ceil(v)}) end end end Thus, we will create a chanceList of 100 values,
vof which will be true, and 100-v- false. That is, if the only “probability” type variable defined in the player's object was launch_homing_projectile_on_ammo_pickup_chance, and it has a value of 5 (meaning a 5% probability of making an event), then chanceList will have 5 true values and 95 false values, which gives us the desired result.And then if we call
generateChancesfor the player constructor: function Player:new(...) ... -- treeToPlayer(self) self:setStats() self:generateChances() end Then everything will work fine. Now we can define a variable
launch_homing_projectile_on_ammo_pickup_chance: function Player:new(...) ... -- Chances self.launch_homing_projectile_on_ammo_pickup_chance = 0 end And if you want to test the operation of this “die roll” system, you can assign a value of 50 and call it several times
:next()to see what happens.The implementation of the shot will occur through the function
onAmmoPickupthat is called when selecting the Ammo resource: function Player:update(dt) ... if self.collider:enter('Collectable') then ... if object:is(Ammo) then object:die() self:addAmmo(5) self:onAmmoPickup() ... end end And this function will work as follows:
function Player:onAmmoPickup() if self.chances.launch_homing_projectile_on_ammo_pickup_chance:next() then local d = 1.2*self.w self.area:addGameObject('Projectile', self.x + d*math.cos(self.r), self.y + d*math.sin(self.r), {r = self.r, attack = 'Homing'}) self.area:addGameObject('InfoText', self.x, self.y, {text = 'Homing Projectile!'}) end end As a result, it will look like this:
129. (CONTENT) Implement a passive skill
regain_hp_on_ammo_pickup_chance. The amount of HP recovered will be 25. It should be added using a function addHPthat adds the specified amount of HP to the value hp, checking that it does not exceed max_hp. In addition, an object must be created InfoTextwith text 'HP Regain!'and color hp_color.130. (CONTENT) Implement a passive skill
regain_hp_on_sp_pickup_chance. The amount of HP recovered will be 25. It should be added using a function addHPthat adds the specified amount of HP to the value hp, checking that it does not exceed max_hp. An object must also be created InfoTextwith text 'HP Regain!'and color hp_color. In addition, you need to add a function to the Player class.onSPPickup, and all the work must be done in it (in the same way as it was with the function onAmmoPickup).Acceleration area
The following passive skills that we want to implement are “Probability of creating an acceleration area when selecting HP” and “Probability of creating an acceleration area when selecting SP”. We already know how to implement the part “when selecting a resource”, so we will focus on the “area of acceleration”. The field of acceleration is a simple circle that increases the speed of the player’s attacks while he is in it. This acceleration of attack speed will be used as a multiplier, so it would be logical to start with an attack speed multiplier.
ASPD multiplier
We can define the ASPD multiplier simply as a variable
aspd_multiplierand then multiply this variable by the time of the “respite” between shooting: function Player:new(...) ... -- Multipliers self.aspd_multiplier = 1 end function Player:update(dt) ... -- Shoot self.shoot_timer = self.shoot_timer + dt if self.shoot_timer > self.shoot_cooldown*self.aspd_multiplier then self.shoot_timer = 0 self:shoot() end end The main difference is that for this multiplier, smaller values are better than big ones. Usually, if the value of the multiplier is 0.5, then it reduces by half the parameter to which it is applied. That is, for HP, the speed and almost everything else is bad. However, for attack speeds, smaller values are better, and this is easily explained by the code shown above. Since we apply a multiplier to a variable
shoot_cooldown, smaller values mean that the pause will be shorter, that is, the player will shoot faster. We use this knowledge when creating an object HasteArea.Acceleration area
Now that we have an ASPD multiplier, we can go back to the area. Here we want to create a circular area that will decrease
aspd_multiplierby a certain amount while the player is in it. To achieve this, we will create a new object HasteAreathat will control the logic to check whether the player is inside and set the appropriate values. The basic structure of this object is as follows: function HasteArea:new(...) ... self.r = random(64, 96) self.timer:after(4, function() self.timer:tween(0.25, self, {r = 0}, 'in-out-cubic', function() self.dead = true end) end) end function HasteArea:update(dt) ... end function HasteArea:draw() love.graphics.setColor(ammo_color) love.graphics.circle('line', self.x, self.y, self.r + random(-2, 2)) love.graphics.setColor(default_color) end To implement the logic of applying the effect, we need to track the player’s entry / exit from the area and change the value
aspd_multiplierwhen it happens. You can do it like this: function HasteArea:update(dt) ... local player = current_room.player if not player then return end local d = distance(self.x, self.y, player.x, player.y) if d < self.r and not player.inside_haste_area then -- Enter event player:enterHasteArea() elseif d >= self.r and player.inside_haste_area then -- Leave event player:exitHasteArea() end end We use a variable
inside_haste_areato track whether a player is in the area. This variable takes the value true inside enterHasteAreaand false inside exitHasteArea, that is, these functions will be called only when these events occur in the object HasteArea. In the Player class, both functions will simply apply the necessary modifications: function Player:enterHasteArea() self.inside_haste_area = true self.pre_haste_aspd_multiplier = self.aspd_multiplier self.aspd_multiplier = self.aspd_multiplier/2 end function Player:exitHasteArea() self.inside_haste_area = false self.aspd_multiplier = self.pre_haste_aspd_multiplier self.pre_haste_aspd_multiplier = nil end Thus, when a player enters an area, his attack speed doubles, and when he leaves an area, he returns to normal. One important point that is easy to miss here is that there is a temptation to put all the logic inside the object
HasteArea, and not to link it with the player through a variable inside_haste_area. We cannot do this because if we do, then problems will arise when the player simultaneously enters several areas at the same time or leaves them. In the current form, the existence of a variable inside_haste_areameans that we will apply the bonus only once, even if the player is on top of three intersecting HasteArea objects.131. (CONTENT) Implement a passive skill
spawn_haste_area_on_hp_pickup_chance. The object InfoTextmust be created with text.'Haste Area!' .In addition, you need to add a function to the Player class onHPPickup.132. (CONTENT) Implement a passive skill
spawn_haste_area_on_sp_pickup_chance. The object InfoTextmust be created with text.'Haste Area!' .The probability of creating an SP in a loop
The next effect will be
spawn_sp_on_cycle_chance. We fully know how to implement it. The “in cycle” part behaves very much like “when selecting a resource”; the only difference is that we will call the function onCyclewhen executing a new cycle, and not when selecting a resource. And the “creation of SP” part is just the creation of a new SP resource, the implementation of which is known to us.So, for the first part we need to enter the function
cycleand call onCycle: function Player:cycle() ... self:onCycle() end Then we add a variable to the Player
spawn_sp_on_cycle_chance: function Player:new(...) ... -- Chances self.spawn_sp_on_cycle_chance = 0 end And so we will also automatically add a new chanceList, which is the probability of this variable. Thanks to this, we can add the functionality necessary functions
onCycle: function Player:onCycle() if self.chances.spawn_sp_on_cycle_chance:next() then self.area:addGameObject('SkillPoint') self.area:addGameObject('InfoText', self.x, self.y, {text = 'SP Spawn!', color = skill_point_color}) end end And this should work as intended:
Chance to shoot the line when killing an enemy
The next skill is
barrage_on_kill_chance. The only thing that we do not know yet is the part with the “queue”. Triggering an event during a kill is similar to the previous one, except that instead of calling during the execution of a cycle, we will call the player’s function onKillwhen the enemy dies.Therefore, we first add a variable to the Player
barrage_on_kill_chance: function Player:new(...) ... -- Chances self.barrage_on_kill_chance = 0 end Then we will create a function
onKilland call it when the enemy dies. There are two approaches to challenge onKillwhen a player dies. The first is to simply call a function from a function dieor hiteach enemy. The problem here is that when adding new enemies we will have to add the same calling code to all of them onKill. The second option is to challenge onKillif there is a collision with an enemy of the object Projectile. The problem here is that some projectiles can collide with enemies, but not kill them (because enemies have more HP or a projectile does less damage), so we need to find a way to check if the enemy is actually dead. It turns out that performing this check is quite simple, so I will choose this method: function Projectile:update(dt) ... if self.collider:enter('Enemy') then ... if object then object:hit(self.damage) self:die() if object.hp <= 0 then current_room.player:onKill() end end end end The only thing we need to do after calling the function of the
hitenemy is simply to check if the enemy's HP is zero. If it is equal, then it means that he is dead, and we can call onKill.We now turn to the queue itself. By default, 8 shells will be fired at intervals of 0.05 seconds between shots ranging from-math.pi / 8 to + math.pi / 8. In addition, the projectiles of the queue will have an attack that the player has. That is, if a player shoots homing shells, then all the shells of the queue will also be homing. In the code, this can be written as:
function Player:onKill() if self.chances.barrage_on_kill_chance:next() then for i = 1, 8 do self.timer:after((i-1)*0.05, function() local random_angle = random(-math.pi/8, math.pi/8) local d = 2.2*self.w self.area:addGameObject('Projectile', self.x + d*math.cos(self.r + random_angle), self.y + d*math.sin(self.r + random_angle), {r = self.r + random_angle, attack = self.attack}) end) end self.area:addGameObject('InfoText', self.x, self.y, {text = 'Barrage!!!'}) end end Most of the code is pretty simple. The only thing worth mentioning is that we use the inside of the for loop
afterto separate the creation of shells with a pause of 0.05 seconds. In all other respects, we simply create a projectile with given limitations. All this should look like this:
In the exercises below (and in all the others after them) do not forget to create objects
InfoTextwith the corresponding colors so that the player can understand what is happening.133. (CONTENT) Implement a passive skill
spawn_hp_on_cycle_chance.134. (CONTENT) Implement a passive skill
regain_hp_on_cycle_chance. The number of recovered HP should be equal to 25.135. (CONTENT) Implement a passive skill
regain_full_ammo_on_cycle_chance.136. (CONTENT) Implement a passive skill
change_attack_on_cycle_chance. New attack is chosen randomly.137. (CONTENT) Implement a passive skill
spawn_haste_area_on_cycle_chance.138. (CONTENT) Implement a passive skill
barrage_on_cycle_chance.139. (CONTENT) Implement a passive skill
launch_homing_projectile_on_cycle_chance.140. (CONTENT) Implement a passive skill
regain_ammo_on_kill_chance. The number of recovered ammunition should be equal to 20.141. (CONTENT) Implement a passive skill
launch_homing_projectile_on_kill_chance.142. (CONTENT) Implement a passive skill
regain_boost_on_kill_chance. The number of recovered acceleration should be equal to 40.143. (CONTENT) Implement a passive skill
spawn_boost_on_kill_chance.Getting Accelerated ASPD When Killing
We have already implemented a passive skill similar to "Accelerating ASPD" using an object
HasteArea. Now we want to implement another one in which we will have a chance to get an increase in the speed of attacks after killing an enemy. However, if we try to implement it in the same way as the previous acceleration of ASPD, we will soon encounter problems. To refresh your memories, I’ll give an example of how acceleration is implemented in HasteArea: function HasteArea:update(dt) HasteArea.super.update(self, dt) local player = current_room.player if not player then return end local d = distance(self.x, self.y, player.x, player.y) if d < self.r and not player.inside_haste_area then player:enterHasteArea() elseif d >= self.r and player.inside_haste_area then player:exitHasteArea() end end Then
enterHasteAreathey exitHasteArealook like this: function Player:enterHasteArea() self.inside_haste_area = true self.pre_haste_aspd_multiplier = self.aspd_multiplier self.aspd_multiplier = self.aspd_multiplier/2 end function Player:exitHasteArea() self.inside_haste_area = false self.aspd_multiplier = self.pre_haste_aspd_multiplier self.pre_haste_aspd_multiplier = nil end If we tried to implement the passive skill in the
aspd_boost_on_kill_chancesame way, it would look something like this: function Player:onKill() ... if self.chances.aspd_boost_on_kill_chance:next() then self.pre_boost_aspd_multiplier = self.aspd_multiplier self.aspd_multiplier = self.aspd_multiplier/2 self.timer:after(4, function() self.aspd_multiplier = self.pre_boost_aspd_multiplier self.pre_boost_aspd_multiplier = nil end) end end Here we just do the same thing as haste in HasteArea. We save the current attack speed multiplier, reduce it by half, and then after a specified period of time (4 seconds in our case), restore the original value. The problem with this implementation arises when we want to combine the effect of these bonuses.
Imagine a situation in which a player entered HasteArea and then accelerated ASPD after killing an enemy. The problem here is that if a player leaves HasteArea before four seconds, then his variable
aspd_multiplierwill be restored to the value before the ASPD accelerates, that is, when leaving the area, all other acceleration bonuses will speed up the attacks.Also imagine that the player is actively accelerating ASPD and he is entering the HasteArea area. After the completion of the acceleration action, the HasteArea effect will also be reset, since it will
pre_boost_aspd_multiplierrestore to a aspd_multipliervalue that does not take into account the increase in the HasteArea attack speed. But more importantly, when the player leaves HasteArea, he will have a constantly increased attack speed, because the stored attack speed at the entrance will be that increased by the acceleration of ASPD.Therefore, this problem can be solved by introducing several variables:
function Player:new(...) ... self.base_aspd_multiplier = 1 self.aspd_multiplier = 1 self.additional_aspd_multiplier = {} end Instead of one variable
aspd_multiplier, we will have base_aspd_multiplierand additional_aspd_multiplier. The variable aspd_multiplierwill store the current factor taking into account all accelerations. base_aspd_multiplierwill contain the original multiplier, taking into account only the percentage increase. That is, if we get from the tree an increase in the attack speed by 50%, it will be applied in the constructor (c setStats) to base_aspd_multiplier. Then it additional_aspd_multiplierwill contain all the added values of all accelerations. That is, when the player is in HasteArea, we will add the corresponding value to this table, and then in each frame multiply its amount by the base. Therefore, for example, the update function will be as follows: function Player:update(dt) ... self.additional_aspd_multiplier = {} if self.inside_haste_area then table.insert(self.additional_aspd_multiplier, -0.5) end if self.aspd_boosting then table.insert(self.additional_aspd_multiplier, -0.5) end local aspd_sum = 0 for _, aspd in ipairs(self.additional_aspd_multiplier) do aspd_sum = aspd_sum + aspd end self.aspd_multiplier = self.base_aspd_multiplier/(1 - aspd_sum) end With this method, in each frame we will recalculate the variable
aspd_multiplierin accordance with the value of the base, as well as all the accelerations. We will have a few more factors that function in a very similar way, so I will create a common object for this, since repeating the code with different variable names every time will be tedious.The object
Statlooks like this: Stat = Object:extend() function Stat:new(base) self.base = base self.additive = 0 self.additives = {} self.value = self.base*(1 + self.additive) end function Stat:update(dt) for _, additive in ipairs(self.additives) do self.additive = self.additive + additive end if self.additive >= 0 then self.value = self.base*(1 + self.additive) else self.value = self.base/(1 - self.additive) end self.additive = 0 self.additives = {} end function Stat:increase(percentage) table.insert(self.additives, percentage*0.01) end function Stat:decrease(percentage) table.insert(self.additives, -percentage*0.01) end And we use it to solve the problem of attack speed as follows:
function Player:new(...) ... self.aspd_multiplier = Stat(1) end function Player:update(dt) ... if self.inside_haste_area then self.aspd_multiplier:decrease(100) end if self.aspd_boosting then self.aspd_multiplier:decrease(100) end self.aspd_multiplier:update(dt) ... end We will be able to access the attack speed multiplier at any time after the call
aspd_multiplier:update, referring to aspd_multiplier.value, which will return the correct result in accordance with the base and all the possible accelerations. Therefore, we must change the way the variable is used aspd_multiplier: function Player:update(dt) ... -- Shoot self.shoot_timer = self.shoot_timer + dt if self.shoot_timer > self.shoot_cooldown*self.aspd_multiplier.value then self.shoot_timer = 0 self:shoot() end end Here we simply replace
self.shoot_cooldown*self.aspd_multiplieron self.shoot_cooldown*self.aspd_multiplier.value, because otherwise it will not work anything. In addition, we have to change something else here. The way the variable works is aspd_multiplierso far contrary to how all the other variables of the game work. When we say that we have increased HP by 10%, we know that it hp_multiplieris equal to 1.1, but when we say that we have increased by 10% ASPD, it aspd_multiplieris actually equal to 0.9. We can change this and make it aspd_multiplierbehave in the same way as other variables, with the division instead of multiplying shoot_cooldown: if self.shoot_timer > self.shoot_cooldown/self.aspd_multiplier.value then Thus, if we get an increase in ASPD by 100%, then its value will be equal to 2 and we will halve the pause between shots, which is exactly what we achieved. In addition, we need to change the way bonuses are applied and instead of calling for them
decreasewe will call increase: function Player:update(dt) ... if self.inside_haste_area then self.aspd_multiplier:increase(100) end if self.aspd_boosting then self.aspd_multiplier:increase(100) end self.aspd_multiplier:update(dt) end In addition, you need to remember that since it
aspd_multiplieris an object Stat, and not just a number, then when you implement the tree and import its values into the Player object, we will have to process them in a different way. Therefore, in the above function, treeToPlayerwe will have to take this into account.Anyway, in this way we can easily implement correctly the “getting accelerated ASPD during a murder”:
function Player:new(...) ... -- Chances self.gain_aspd_boost_on_kill_chance = 0 end function Player:onKill() ... if self.chances.gain_aspd_boost_on_kill_chance:next() then self.aspd_boosting = true self.timer:after(4, function() self.aspd_boosting = false end) self.area:addGameObject('InfoText', self.x, self.y, {text = 'ASPD Boost!', color = ammo_color}) end end We can also remove functions
enterHasteAreaand exitHasteArea, and also slightly change the operation of the HasteArea object: function HasteArea:update(dt) HasteArea.super.update(self, dt) local player = current_room.player if not player then return end local d = distance(self.x, self.y, player.x, player.y) if d < self.r then player.inside_haste_area = true elseif d >= self.r then player.inside_haste_area = false end end Instead of the complex logic that we used earlier, we simply set the
inside_haste_areaPlayer object attribute to true or false depending on whether it is in the region, and then, due to the way we implemented the object Stat, the application of the acceleration rate of attacks received from HasteArea will be performed automatically.144. (CONTENT) Implement a passive skill
mvspd_boost_on_cycle_chance. “Increasing MVSPD” gives the player a 50 percent increase in movement speed for 4 seconds. Also implement the variable mvspd_multiplierand multiply it in the appropriate place.145. (CONTENT) Implement a passive skill
pspd_boost_on_cycle_chance. “Increasing PSPD” gives the shells created by the player a 100 percent increase in speed by 4 seconds. Also, implement the variablepspd_multiplierand multiply it in the appropriate place.146. (CONTENT) Implement a passive skill
pspd_inhibit_on_cycle_chance. “Reducing PSPD” gives the shells created by the player a 50 percent reduction in speed by 4 seconds.During acceleration
The following passive skills that we will implement are the latest skills such as “with probability of an event”. All the skills we considered earlier were related to the likelihood of accomplishing something at some event (killing, cycle, selecting a resource ...) and the following will not differ, because they will be probabilities of doing something during acceleration (Boost) ship.
First of all, we implement
launch_homing_projectile_while_boosting_chance. It will work like this: there is a normal probability of a shot by a homing projectile, and this probability will be checked in the interval of 0.2 seconds when performing acceleration (Boost). This means that if we accelerate within 1 second, “probability cubes” will be thrown 5 times.A good way to implement this is to define two new functions:
onBoostStartandonBoostEnd. They will activate the passive skill at the start of acceleration and deactivate it at the end of acceleration. To add these two functions, we need to change the acceleration code slightly: function Player:update(dt) ... -- Boost ... if self.boost_timer > self.boost_cooldown then self.can_boost = true end ... if input:pressed('up') and self.boost > 1 and self.can_boost then self:onBoostStart() end if input:released('up') then self:onBoostEnd() end if input:down('up') and self.boost > 1 and self.can_boost then ... if self.boost <= 1 then self.boosting = false self.can_boost = false self.boost_timer = 0 self:onBoostEnd() end end if input:pressed('down') and self.boost > 1 and self.can_boost then self:onBoostStart() end if input:released('down') then self:onBoostEnd() end if input:down('down') and self.boost > 1 and self.can_boost then ... if self.boost <= 1 then self.boosting = false self.can_boost = false self.boost_timer = 0 self:onBoostEnd() end end ... end Here we add
input:pressedand input:releasedthat return true only when these events occur, and thanks to this we can be sure that onBoostStartthey onBoostEndwill only be called when these events occur. We also add inside the conditional design input:down onBoostEndin case the player does not release the button, but the amount of acceleration available to him ends, and therefore the acceleration ends.We now turn to parts with
launch_homing_projectile_while_boosting_chance: function Player:new(...) ... -- Chances self.launch_homing_projectile_while_boosting_chance = 0 end function Player:onBoostStart() self.timer:every('launch_homing_projectile_while_boosting_chance', 0.2, function() if self.chances.launch_homing_projectile_while_boosting_chance:next() then local d = 1.2*self.w self.area:addGameObject('Projectile', self.x + d*math.cos(self.r), self.y + d*math.sin(self.r), {r = self.r, attack = 'Homing'}) self.area:addGameObject('InfoText', self.x, self.y, {text = 'Homing Projectile!'}) end end) end function Player:onBoostEnd() self.timer:cancel('launch_homing_projectile_while_boosting_chance') end Here, at the beginning of acceleration, we call
timer:everyto test the probability of firing a homing projectile every 0.2 seconds, and then, when the acceleration ends, we cancel this timer. Here is what it looks like when the probability of an event is 100%: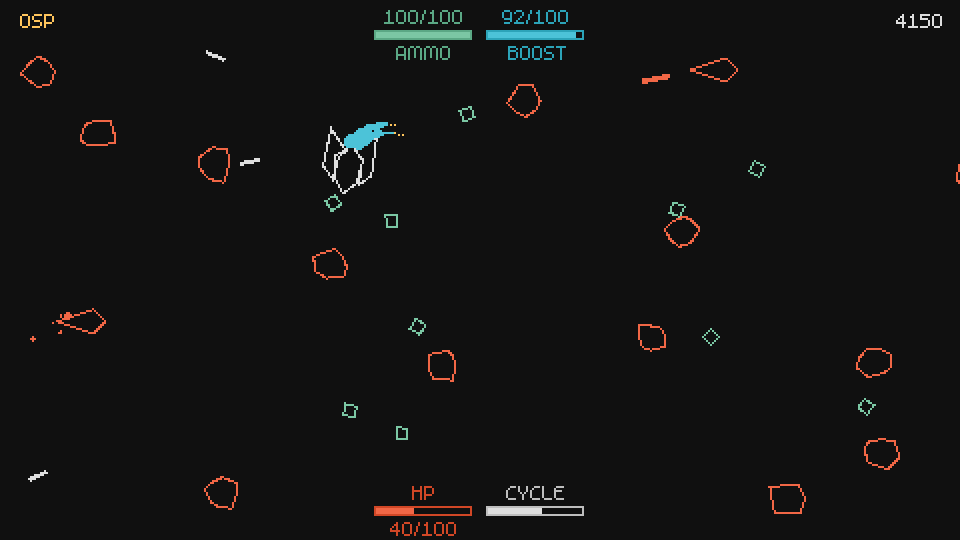
147. (CONTENT) Implement the variable
cycle_speed_multiplier. This variable, depending on its value, increases or decreases the speed of the cycle. That is, for example, if it cycle_speed_multiplieris equal to 2, and the cycle duration defaults to 5 seconds, then the use of a variable will lead to a decrease in the cycle duration to 2.5 seconds.148. (CONTENT) Implement a passive skill
increased_cycle_speed_while_boosting. This variable should be of type boolean and signal whether the speed of the cycle should increase when the player performs the acceleration. Acceleration should be an increase in cycle speed multiplier by 200%.149. (CONTENT) Implement a passive skill
invulnerability_while_boosting. This variable is of type boolean and indicates whether the player should be invulnerable during acceleration. Use the existing attribute invinciblethat is responsible for the invulnerability of the player.Increased Acceleration Luck
The last type of passive “on acceleration” skill that we will implement is “increased success on acceleration”. Before implementing it, we need to implement a parameter
luck_multiplier. Luck is one of the basic parameters of the game; it increases the likelihood of performing the desired events. Suppose we have a 10 percent chance of hitting a projectile with a kill. If it luck_multiplieris equal to 2, then this probability becomes 20 percent.The way the skill is implemented is extremely simple. All passive “probability” skills pass through a function
generateChances, so we can simply implement it here: function Player:generateChances() self.chances = {} for k, v in pairs(self) do if k:find('_chance') and type(v) == 'number' then self.chances[k] = chanceList( {true, math.ceil(v*self.luck_multiplier)}, {false, 100-math.ceil(v*self.luck_multiplier)}) end end end And here we just multiply
vby luck_multiplierand it should work exactly as it should. Due to this, we can realize the passive skill increased_luck_while_boostingas follows: function Player:onBoostStart() ... if self.increased_luck_while_boosting then self.luck_boosting = true self.luck_multiplier = self.luck_multiplier*2 self:generateChances() end end function Player:onBoostEnd() ... if self.increased_luck_while_boosting and self.luck_boosting then self.luck_boosting = false self.luck_multiplier = self.luck_multiplier/2 self:generateChances() end end Here we implement it as originally done for the object
HasteArea. We can do it now because we will not have any other passive skills that give the player an increase in luck, that is, we don’t need to worry about a few bonuses that can override each other. If we had a few passive skills that give an increase in luck, we would have to make them an object Stat, as was the case with aspd_multiplier.In addition, it is important that when changing the luck multiplier, we also re-call
generateChancesOtherwise, our increase in luck will not affect anything. Such a solution has a flaw - all lists are reset, so if a list accidentally selected a series of unsuccessful “throws” and then was reset, then again it can re-select a series of unsuccessful “throws” instead of using the chanceList property, in which over time the selection of less successful shots becomes less likely. But this is a very frivolous problem, which personally does not bother me very much.HP creation probability multiplier
Now we will consider
hp_spawn_chance_multiplierwhich increases the likelihood that when the director creates a new resource, this resource will be HP. If you remember how the director works, then this implementation will be pretty simple: function Player:new(...) ... -- Multipliers self.hp_spawn_chance_multiplier = 1 end function Director:new(...) ... self.resource_spawn_chances = chanceList({'Boost', 28}, {'HP', 14*current_room.player.hp_spawn_chance_multiplier}, {'SkillPoint', 58}) end In Part 9, we looked at creating the probability of spawn for each of the resources. These probabilities are stored in the chanceList
resource_spawn_chances, so all we need is to use hp_spawn_chance_multiplierto increase the likelihood that the HP resource will be created in accordance with the multiplier.In addition, it is important to initialize in the Stage room of the director after the Player, since the Director depends on the variables of the Player, while the Player does not depend on the Director at all.
150. (CONTENT) Implement a passive skill
spawn_sp_chance_multiplier.151. (CONTENT) Implement a passive skill
spawn_boost_chance_multiplier.Given all that we have implemented earlier, the following exercises may seem difficult. I did not consider most of the aspects of their implementation, but they are quite simple compared to what we did earlier, so they are easy to write.
152. (CONTENT) Implement a passive skill
drop_double_ammo_chance. When an enemy dies, there must be a chance that he will create two Ammo objects instead of one.153. (CONTENT) Implement a passive skill
attack_twice_chance. When a player attacks, there must be a probability of calling the function shoottwice.154. (CONTENT) Implement a passive skill
spawn_double_hp_chance. When a director creates an HP resource, there must be a chance that instead of one, he will create two HP objects.155. (CONTENT)Implement a passive skill
spawn_double_sp_chanceWhen a director creates a SkillPoint resource, there must be a chance that he will create two instead of one SkillPoint object.156. (CONTENT) Implement a passive skill
gain_double_sp_chance. When a player selects a SkillPoint resource, there must be a chance that he will get two skill points instead of one.The frequency of creating enemies
enemy_spawn_rate_multiplierwill control how quickly Director changes the difficulty levels. By default, this happens every 22 seconds, but if it enemy_spawn_rate_multiplieris 2, then it will happen every 11 seconds. The implementation of this is also quite simple: function Player:new(...) ... -- Multipliers self.enemy_spawn_rate_multiplier = 1 end function Director:update(dt) ... -- Difficulty self.round_timer = self.round_timer + dt if self.round_timer > self.round_duration/self.stage.player.enemy_spawn_rate_multiplier then ... end end That is, here we simply divide
round_durationby enemy_spawn_rate_multiplierto get the desired duration of the round.157. (CONTENT) Implement a passive skill
resource_spawn_rate_multiplier.158. (CONTENT) Implement a passive skill
attack_spawn_rate_multiplier.And there will be more exercises on other passive skills. Basically, these are multipliers that cannot be attributed to any class of passive skills we have discussed above, but they should be fairly easy to implement.
159. (CONTENT) Implement a passive skill
turn_rate_multiplier. This passive skill increases or decreases the turning speed of a player’s ship.160. (CONTENT) Implement a passive skill
boost_effectiveness_multiplier. This passive skill increases or decreases acceleration effectiveness. This means that if a variable has a value of 2, then acceleration will work twice as fast or slower.161. (CONTENT) Implement a passive skill
projectile_size_multiplier. This is a passive skill that increases or decreases the size of projectiles.162. (CONTENT) Implement a passive skill
boost_recharge_rate_multiplier. This is a passive skill that increases or decreases the acceleration recharge rate.163. (CONTENT) Implement a passive skill
invulnerability_time_multiplier. This is a passive skill that increases or decreases the player’s invulnerability time when damage is dealt.164. (CONTENT) Implement a passive skill
ammo_consumption_multiplier. This passive skill increases or decreases the amount of ammunition consumed during all attacks.165. (CONTENT) Implement a passive skill
size_multiplier. This passive skill increases or decreases the size of the player’s ship. It should be noted that the positions of all traces of all ships, as well as the positions of projectiles must be changed accordingly.166. (CONTENT) Implement a passive skill
stat_boost_duration_multiplier. This passive skill increases or decreases the duration of the time bonuses given to the player.Shells passive skills
Now we look at a few passive projectile skills. These passive skills will fundamentally change the behavior of our shells. The same ideas can also be implemented in the object
EnemyProjectile, after which we will be able to create enemies using some of these skills. For example, there is a passive skill that causes projectiles to rotate around a ship, rather than fly straight. Later we will add an enemy around whom piles of shells will fly, and in both cases the same technology will be used.90 degree change
We will call this passive skill
projectile_ninety_degree_change. He will periodically change the angle of the projectile to 90 degrees. It will look like this:
Notice that the projectile moves approximately in the same direction in which it moved when fired, but the angle quickly changes by 90 degrees each time. This means that changing the angle is not completely random, and we need to think about it well.
The simple way is to make a
projectile_ninety_degree_changeboolean variable that will affect when true. Since we are going to apply this effect in the class Projectile, we have two options on how to read the value from it projectile_ninety_degree_changefrom the Player: either transfer it to the table optswhen creating a new projectile as a function shoot, or read it directly from the Player, accessing throughcurrent_room.player. I will take the second path, because it is simpler and there are no serious flaws in it, except that we will have to replace current_room.playerit with something else when we move part of this code to EnemyProjectile. All this will look something like this: function Player:new(...) ... -- Booleans self.projectile_ninety_degree_change = false end function Projectile:new(...) ... if current_room.player.projectile_ninety_degree_change then end end Now we need to change the projectile angle by 90 degrees each time within the conventional design of the Projectile constructor, but also take into account its original direction. The first thing we can do is randomly change the angle to either 90 or -90 degrees. It will look like this:
function Projectile:new(...) ... if current_room.player.projectile_ninety_degree_change then self.timer:after(0.2, function() self.ninety_degree_direction = table.random({-1, 1}) self.r = self.r + self.ninety_degree_direction*math.pi/2 end) end end 
Now we need to figure out how to turn the projectile in a different direction, and then turn it back in another, and then again, and so on. Since this is a periodic action, repeated infinitely, we can use
timer:every: function Projectile:new(...) ... if current_room.player.projectile_ninety_degree_change then self.timer:after(0.2, function() self.ninety_degree_direction = table.random({-1, 1}) self.r = self.r + self.ninety_degree_direction*math.pi/2 self.timer:every('ninety_degree_first', 0.25, function() self.r = self.r - self.ninety_degree_direction*math.pi/2 self.timer:after('ninety_degree_second', 0.1, function() self.r = self.r - self.ninety_degree_direction*math.pi/2 self.ninety_degree_direction = -1*self.ninety_degree_direction end) end) end) end end First, we turn the projectile in the direction opposite to the initial rotation, that is, now it is directed at the initial angle. Then, after only 0.1 seconds, we turn it again in the same direction, so that it is directed in the opposite direction to the first turn. If at first he was directed to the right when fired, then the following happens: after 0.2 seconds he turns up, after 0.25 seconds again to the right, after 0.1 seconds - down, and then after 0.25 seconds he repeats the process, turning first to the right, then up, then down , and so on.
It is also important that at the end of each cycle
everywe change the direction in which it should turn, otherwise it will not fluctuate between the up / down directions and will move up / down rather than in a straight line. By implementing this, we get the following:
167. (CONTENT) Implement a passive skill
projectile_random_degree_changethat changes the angle of the projectile at random. Unlike turns at 90 degrees, shells in this case should not restore their original direction.168. (CONTENT) Implement a passive skill
angle_change_frequency_multiplier. This skill increases or decreases the rate of change of the angles of the previous two passive skills. If angle_change_frequency_multiplier, for example, is 2, then instead of changing the angles after 0.25 and 0.1 seconds, they will change after 0.125 and 0.05 seconds.Wave shells
Instead of intermittently changing the angle of the projectile, we can do it smoothly using the function
timer:tween, thus obtaining the effect of a wave projectile:
The idea here is almost the same as in the previous examples, only using
timer:tween: function Projectile:new(...) ... if current_room.player.wavy_projectiles then local direction = table.random({-1, 1}) self.timer:tween(0.25, self, {r = self.r + direction*math.pi/8}, 'linear', function() self.timer:tween(0.25, self, {r = self.r - direction*math.pi/4}, 'linear') end) self.timer:every(0.75, function() self.timer:tween(0.25, self, {r = self.r + direction*math.pi/4}, 'linear', function() self.timer:tween(0.5, self, {r = self.r - direction*math.pi/4}, 'linear') end) end) end end Because of how it works
timer:every, in the code it does not begin to perform its functions until the end of the initial time, so we first perform one iteration of the loop manually, and then execute each loop. In the first iteration, we also use the initial value of math.pi / 8 instead of math.pi / 4, because we want the projectile to oscillate two times smaller than necessary, because it is initially in the middle position (as it was just shot Player), and not on one of the oscillation boundaries.169. (CONTENT) Implement a passive skill
projectile_waviness_multiplier. This skill increases or decreases the target angle that the projectile should reach when performing tween. For example, if If projectile_waviness_multiplieris 2, then the arc of its trajectory will be twice the normal.Acceleration and braking of shells
Now we turn to several passive skills that change the speed of the projectile. The first is “Fast -> Slow”, and the second “Slow -> Fast”, that is, the projectile starts at a high or low speed and then goes to low or high speed. Here’s what “Fast -> Slow” looks like:
We implement it in a rather simple way. The skill “Fast -> Slow” is realized by a fast tween speed with a doubling of the initial value, and then after some time a decrease in tween to half the initial value. And for another skill, we just do the reverse operation.
function Projectile:new(...) ... if current_room.player.fast_slow then local initial_v = self.v self.timer:tween('fast_slow_first', 0.2, self, {v = 2*initial_v}, 'in-out-cubic', function() self.timer:tween('fast_slow_second', 0.3, self, {v = initial_v/2}, 'linear') end) end if current_room.player.slow_fast then local initial_v = self.v self.timer:tween('slow_fast_first', 0.2, self, {v = initial_v/2}, 'in-out-cubic', function() self.timer:tween('slow_fast_second', 0.3, self, {v = 2*initial_v}, 'linear') end) end end 170. (CONTENT) Implement a passive skill
projectile_acceleration_multiplier. This skill controls the amount of acceleration as the speed increases from the original value.171. (CONTENT) Implement a passive skill
projectile_deceleration_multiplier. This skill controls the amount of inhibition when the speed decreases from the initial value.Shield shells
It will be a bit more difficult to realize them, because there are more moving parts in them. The end result should look like this:

As you can see, the shells revolve around the player and borrow his direction of movement. We can do this with the parametric equation of a circle. In general, if we want A to rotate around B with a certain radius R, then we can do something like this:
Ax = Bx + R*math.cos(time) Ay = By + R*math.sin(time) Where
timeis a variable whose value increases with time. Before proceeding with the implementation, let's prepare everything else. shield_projectile_chancethe variable will not be a boolean, but a variable of the “probability” type, that is, each time a new projectile is created, there will appear a probability that it will begin to rotate around the player. function Player:new(...) ... -- Chances self.shield_projectile_chance = 0 end function Player:shoot() ... local shield = self.chances.shield_projectile_chance:next() if self.attack == 'Neutral' then self.area:addGameObject('Projectile', self.x + 1.5*d*math.cos(self.r), self.y + 1.5*d*math.sin(self.r), {r = self.r, attack = self.attack, shield = shield}) ... end Here we define a variable
shieldfor which the die rolls on whether this projectile should rotate around the player, after which we transfer it to the optschallenge table addGameObject. Here we need to repeat this step for each of the available attacks. Since we will have similar changes in the future, we can do something like this instead: function Player:shoot() ... local mods = { shield = self.chances.shield_projectile_chance:next() } if self.attack == 'Neutral' then self.area:addGameObject('Projectile', self.x + 1.5*d*math.cos(self.r), self.y + 1.5*d*math.sin(self.r), table.merge({r = self.r, attack = self.attack}, mods)) ... end Thus, in the future it will be enough for us to add everything to the table
mods. The function table.mergeis not yet defined, but based on how we use it here, you can guess what it does. function table.merge(t1, t2) local new_table = {} for k, v in pairs(t2) do new_table[k] = v end for k, v in pairs(t1) do new_table[k] = v end return new_table end It simply merges the two tables with their values into a new one, and then returns it.
Now we can proceed to the implementation of the functional itself
shield. First, we want to define variables such as radius, rotational speed, and so on. For now, I define them as follows: function Projectile:new(...) ... if self.shield then self.orbit_distance = random(32, 64) self.orbit_speed = random(-6, 6) self.orbit_offset = random(0, 2*math.pi) end end orbit_distancedenotes the radius around the player. orbit_speedwill be multiplied by time, that is, at larger absolute values, the projectile will move faster, and at smaller values, it will move more slowly. Negative values cause the projectile to move in a different direction, which adds a bit of randomness. orbit_offset- this is the initial angular displacement that each projectile has. It also adds a bit of randomness and does not allow all shells to be created in approximately one position. And now, when we have determined all this, we can apply the parametric equation of a circle to the position of the projectile: function Projectile:update(dt) ... -- Shield if self.shield then local player = current_room.player self.collider:setPosition( player.x + self.orbit_distance*math.cos(self.orbit_speed*time + self.orbit_offset), player.y + self.orbit_distance*math.sin(self.orbit_speed*time + self.orbit_offset)) end ... end It is important to insert this code after all other calls that can be used for
setLinearVelocity, otherwise nothing will work. We also need to remember to add a global variable timeand increment it in each frame by dt. If we do everything right, it will look like this: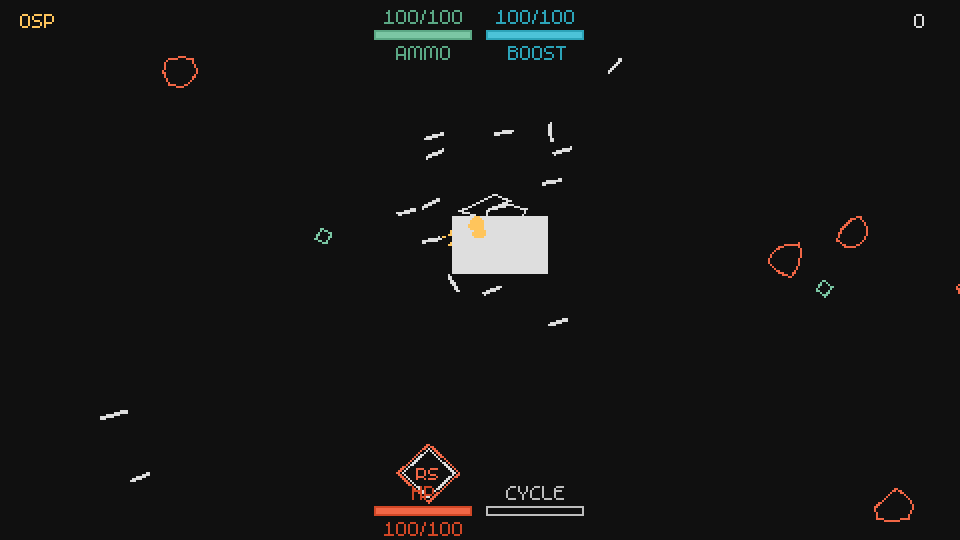
The task is completed, but it looks all not quite right. The most incorrect thing is that when rotating around a player, the angles of the shells are not taken into account. One way to fix this is to store the last frame of the projectile position and get the angle of the vector that constitutes the subtraction from the current position of the previous position. The code is worth a thousand words, so let's better see what it looks like:
function Projectile:new(...) ... self.previous_x, self.previous_y = self.collider:getPosition() end function Projectile:update(dt) ... -- Shield if self.shield then ... local x, y = self.collider:getPosition() local dx, dy = x - self.previous_x, y - self.previous_y self.r = Vector(dx, dy):angle() end ... -- At the very end of the update function self.previous_x, self.previous_y = self.collider:getPosition() end Thus, we set a variable
rin which the angle of the projectile will be stored, taken into account during rotation. Since we use setLinearVelocitythis angle, when the projectile is drawn in Projectile:drawand used Vector(self.collider:getLinearVelocity()):angle())to get direction, everything will be set according to how the variable is set r. And all this will look like this: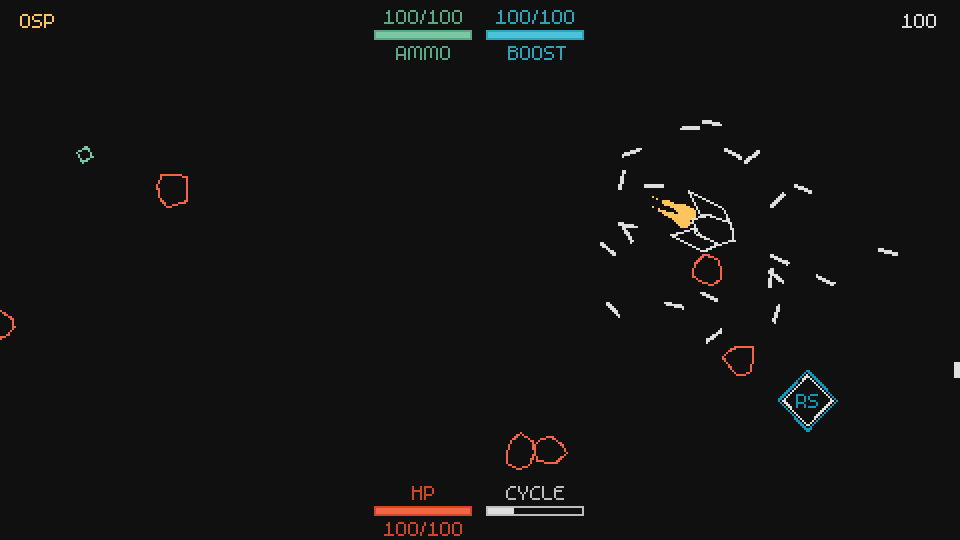
Now everything looks right. In the GIF shown above, one small problem can be noticed - after firing shells, when they turn into shield shells, they do not do this instantly. For 1-2 frames, they look like ordinary shells, and then disappear and appear, already rotating around the player. One way to solve this problem is to simply hide all shield shells for 1-2 frames, and then display them:
function Projectile:new(...) ... if self.shield then ... self.invisible = true self.timer:after(0.05, function() self.invisible = false end) end end function Projectile:draw() if self.invisible then return end ... end And finally, shields will be too powerful weapons if they exist permanently, until they collide with the enemy, so we need to add the lifetime of the projectile, after which it must be destroyed:
function Projectile:new(...) ... if self.shield then ... self.timer:after(6, function() self:die() end) end end Thus, after 6 seconds of existence, the shield shells will be destroyed.
END
I will end there, because the editor in which I am writing this article starts to slow down due to its volume. In the next part, we will continue to implement other passive skills, as well as add all player attacks, enemies, and associated passive skills. In addition, the next part will be the completion of the implementation of all the content of the game. All other parts after it will consider displaying this content to the player (SkillTree and Console rooms).
If you like this series of tutorials, then you can stimulate me to write something similar in the future:
By purchasing a tutorial on itch.io, you will have access to the complete source code of the game, answers to the exercises from parts 1-9, the code broken into parts of the tutorial (the code will look like it should look at the end of each part) and the key games on Steam.
Source: https://habr.com/ru/post/350316/
All Articles