Learn to be a full stack developer. Writing an application on React / Redux / Webpack / ASP.NET Core 2.0 / EF Core
It's no secret that .net is now used in most cases as a development backend tool, and in client development for the last 5 years, js has ruled the community with its ecosystem and development tools. This disgrace every year reinforces the gap between the front end and the back end, and the bar for entering the region is getting higher and higher, the developers are beginning to divide into two camps and such a thing as a full-stack goes.
Yes, under Node.js you can write a server, but for back-end development, nevertheless, .net is the undisputed leader. In my opinion, js is very difficult to write a flexible and easily supported backend, although perhaps many will disagree with me.
Let'shit the rally off-road try, despite all this, write a SPA application with a back-up on the .net core and a client on js, from the development tools we will use the beloved Visual Studio.
')
After this tutorial, I hope the web and back-end developers will find it easier to find their footing in the enemy area and figure out which way to go for more in-depth study. Go!
1. Visual Studio 2017 (with a tick when installing. NET Core cross platform development). We will write the server in .net core 2.0 so we need a studio exactly> = 2017, because support in studio 2015 ended with core 1.1
2. Node.js with the Node Package Manager (NPM) installed. Node.js in our project we need only for 2 web development tools — this is Webpack (for building and processing various preloaders of our client code) and NPM (for installing js utilities / components / packages)
We will deal with the development of a very simple blog that can display a list of posts on the main page, go to a separate page with comments (with the ability to comment), authorize the owner and give him the opportunity to write a new post.
The backend will be a restful api set for the client, the base will be using ms sql. To work with the database - EntityFramework Core, Code First approach.
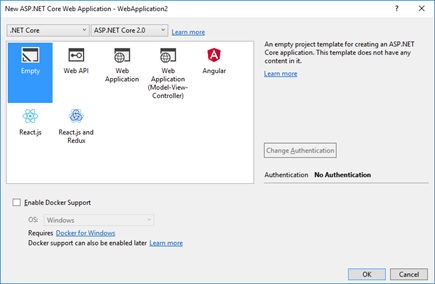
We create an empty ASP.NET Core Web Application project, and we will continue to write everything we need with our hands.
In the new project, in the Startup class (the Startup.cs file), which is the main configuration file in the asp.net core, we will enable the MVC service and middleware (for more information about the middleware chain and user request processing using middleware layers, see the microsoft documentation ) . As it is known in asp.net core, all static content (js / css / img) must be placed in the wwwroot folder (by default, if no other folder is specified), in order for this content to be given to the end user, we must prescribe another layer of middleware - call extension method UseStaticFiles. As a result, we get the Startup class with the following code:
Now let's do business logic. Let's create in our solution two new projects Class Library (.NET Standart):
And add references to the DBRepository for the Models project, and to the ASP.NET PersonalPortal project for the DBRepository and Models projects.
Thus, we isolate the repository, application, and model from each other. And in the future, for example, we can replace the assembly of work with the DBRepository base with another assembly that works with the base not through EF Core, but through some other ORM or through ado.net. Or, for example, we can connect the repository assembly and models, not to the web application, but to the desktop.
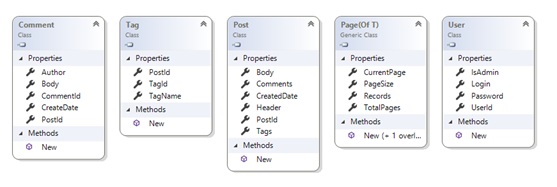
Next, we will add classes to the Models project, which will be further mapped onto tables in the database, I will not dwell on this in detail, on the class diagram, in my opinion, everything speaks for itself:
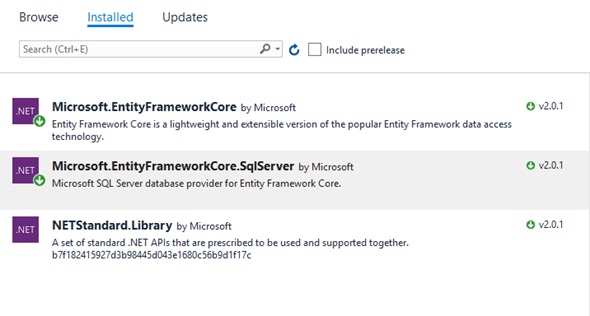
Now let's move on to the DBRepository project and install two nuget packages that we need to work with EF Core — Microsoft.EntityFrameworkCore and provider of MS SQL Server Microsoft.EntityFrameworkCore.SqlServer
Let's create an inheritor from the DBContext class, the main EF class is the entry point for working with data. And the factory (interface + implementation) that will create this context. For what we need a factory, we will understand later.
The code is very simple - in the factory we configure dbcontext to work with SQL Server and pass the connection string to the database (no connection string anywhere ...). Extension method UseSqlServer came to us from Microsoft.EntityFrameworkCore.SqlServer.
Let's use the popular “Repository” pattern and create intermediary classes that will “fence off” our final consumer classes from working with the database and EntityFramework in particular.
Add a BaseRepository class, an IBlogRepository interface, and its BlogRepository implementation.
BaseRepository will be, as the name implies, the base class for all classes created by us intermediaries. In the constructor, it takes a connection string and a factory to create an EF context.
In the BlogRepository class, without delaying them, we have already implemented a method for getting a list of posts with paginated output.
In line 1, we finally create a context for working with the database. In line 2, using LINQ methods, which EF translates into sql scripts, we write a request to get the desired page of posts along with tags (using the Include method). It is important to remember that LINQ methods are executed lazy, and therefore the base itself will be accessed only after calling the ToListAsync method in line 3 (and CountAsync). After the data has been received, the context of working with the database must be closed (to wrap its creation in using, as was done in this case).
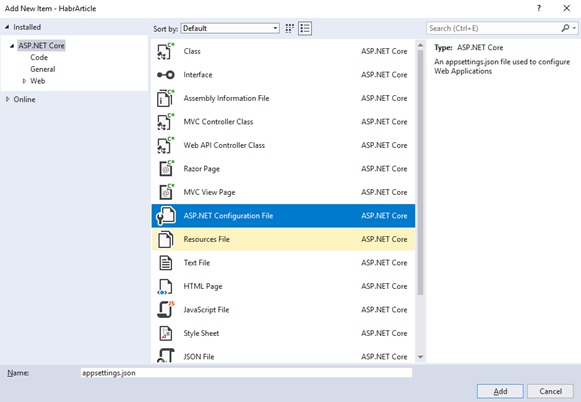
Let's go back to the project with the web application and add the configuration file. The created file will already contain a field with a connection string, we only need to edit it and indicate the current database and server.
In the Startup class, we register the implementation of the repository and factory classes. The .NET Core IoC container is already out of the box, so we’ll use it. And add the Startup (IConfiguration configuration) constructor to access the configuration file, a configuration instance will already be injected by WebHostBuilder. Next, we take ConnectionString from the configuration file.
In lines 1 and 2, we register implementations using the AddScope method.
In general, there are 3 methods for registering an implementation — AddScope, AddTransient, AddSingleton, they differ only in the lifetime of the instance being registered.
AddScope - an instance is created 1 time for each request from the client to the server.
AddTransient - every time a dependency is created, a new instance is created.
AddSingleton - the instance is created in a single copy and does not change between requests.
Read more in the documentation .
Now we will create a controller with the API method and we can already feel something with our hands.
The IBlogRepository dependency is automatically resolved by the IoC container.
Press F5, we’ll add url to our api method in the address bar of our browser - localhost : 64422 / api / blog / page and ... we get the following, if of course we have correctly changed the connection string:
The fact is that our base is not there yet, and of course EF cannot open a non-existent base. You need to somehow inform that if there is no database, EF should create it.
You can simply call the context.Database.EnsureCreated method before accessing the database, but more often use the migration mechanism. It allows, if we have changed the data scheme, carefully apply it to the database without losing the existing data. Let's try.
For the migration utility to work, it is necessary that the heir of the DBContext class (in our case, the RepositoryContext class) be accessible from outside, and the migration utility at launch can "pull out" it and use it for its own needs. To do this, we must:
or register the RepositoryContext in the services, but we don’t really want to tie the context to our project, it’s not for nothing that we created intermediary classes to the repositories
either implement the following interface
Choose the last option.
Don't let another factory bother you to create a context, it is needed ONLY for the migration utility.
So, we implement the interface:
The implementation is very simple - we pull out the connection string from the config, create and return a DBContext.
Now open the Powershell console, select the DBRepository project and add the migration.
Voila, the migration has been created, the Migrations folder has been added to the DBRepository project, containing new files with automatically generated classes and Up methods for the migration increment, Down for decrement.
The previous team we just created classes in our project, now we need to apply the migration to the base.

Let's write in the code the automatic application to the database, so that every time during the next migration, do not manually call the Update-Database command and so that those who continue to work with our code will apply all the migrations and create the base.
Go to the file Program.cs and write the following cherished lines.
In line 1 we create a config, in line 2 we create a new scope to get an instance RepositoryContextFactory (do we remember that we registered it with the lifetime of the scope? There is no instance without the scope), in line 3 DBContext.Database.Migrate () rolls onto the database all migrations that are not yet in the database. And if this is the first call when there is no base, then it creates it. Further dispozim skoup, since we don't need it anymore.
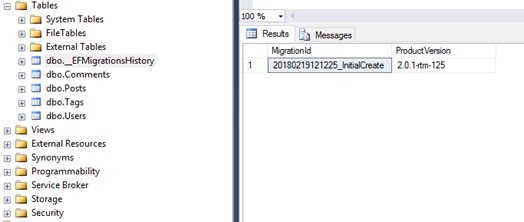
And how does the migration mechanism know which migrations are already in the database, and which ones are not yet? Everything is very simple. At execution, a table __EFMigrationsHistory is created, where the names of all migrations that were applied are recorded.
The following migrations are added by analogy - changes are made to the date model, the Add-Migration <migration_name> command is executed, the utility compares new changes with the previous migration and generates a new class with the results.
With the back, at this stage, we have almost figured out, you can go to the front, but we face a dilemma - to develop the front in a separate project and then host separately or leave it in the same project as web api, which of course will facilitate the development and deploy Also, there are already ready templates in Visual Studio, which routine things such as routing and webpack assembling turn magic into middleware using the Microsoft.AspNetCore.SpaServices nuget package.
The first option is certainly more flexible, it allows you to deploy the web and backseps separately, to develop them in different environments, but the second option also has a right to exist, in our case, it still outweighs the simplicity and visibility, therefore, we will make an effort and courageously let's go through the second, easier way.
Create a client application container view (Views / Home / Index.cshtml), a controller that will give it away and prescribe routing.
It's time foramazing stories to get down to the visual part of our application. Node.js with the package manager (NPM) should already be in place for us, if not, you need to install it (https://nodejs.org).
Here we need to make a reservation that Visual Studio has a template for creating a SPA application in conjunction with the asp.net core, but we will be guided by the principle, if you want to figure out something, do it yourself. Moreover, in my opinion, that template is somewhat redundant and much there will have to be deleted.
Create a web project. Open the command line, go to the folder where we have it, created in the .net core web application studio, and execute the npm init command. Fill in a series of parameters that the utility will ask, or just press enter and at the output you will receive the package.json file which will be the equivalent of “* .csproj“ for the web.

Next you need to download a number of npm packages that must have for our further development. You can install each package individually by running the npm i <package_name> [--save-dev] command, or write all the dependencies right away in our project file and run npm install. To save time and space in the article I will give package.json with all dependencies.
In this file, in addition to the standard generated fields, we see 2 sections - devDependencies and dependencies, this is the list of packages we put. The difference between one section and the other is that in the devDependencies section, we prescribe the packages that are required ONLY for building our application — various loaders, preloaders, converters, packers, and in the dependencies section — packages that are necessary for development, which we will import and use for writing code.
Briefly run through the packages:
After executing the npm install command, we will create a node_modules folder in the directory with the web application, and all the written packages and their dependencies will be downloaded there. A package-lock.json file should also be created with a description of all dependencies.
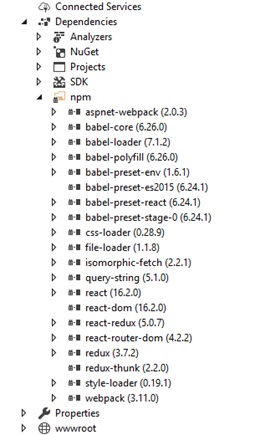
Well, Visual Studio should see these packages and display them under the Dependencies tab.
Next, go to the Startup.cs file and prescribe the middleware magic mentioned above. To do this, we need to put the Microsoft.AspNetCore.SpaServices package, well, or it already exists in the Microsoft.AspNetCore.All package.
In line 1, we enable webpack support, now we will not have a headache for the assembly of client resources and we will not have to manually start it every time, register somewhere in PostBuildEvents, or keep the console window open with the webpack –watch running. With this line, we create a webpack instance in memory that will track changes in files and run an incremental build.
In line 2, we include support for client routing. I will try to briefly describe the problem that this line solves. As you know, the SPA philosophy is such that the user is always loaded with one page in the browser and new data is loaded with ajax requests. And all the routing, which changes in the browser's request line, is not really server resources, but client-side "emulation of requests" to these resources. The user still remains on the same page. There are no problems if the user goes to the right resource consistently, but if he decides to go directly to this resource directly, then problems will appear.
For example, your application is located at www.mytestsite.com . The user found interesting content on the page www.mytestsite.com/home/news?id=1 and decided to throw the link to a friend or girlfriend. A friend / girlfriend gets this link, copies it to the browser, and gets a 404 error. The problem here is that the server does not physically have this resource and the web server has no idea how to route this url, because we have a SPA application and because client routing was organized.
So line 2 in Startup.cs gives the container a page for all such requests, it arrives to the client and the application resolves the routing on the client.
Now we need to create a config file for webpack (webpack.config.js), guided by which, webpack will use various preprocessors and build our application. Create it in the same place where we have package.json.
Briefly run through the config. For detailed documentation, it is better to refer to official sources . There is also an excellent screencast on the webpack , unfortunately, it is only on webpack 1.x, but the main things and concepts can be seen there.
So, first of all we need to specify the entry point of the webpack to our sources - the value of the entry field, this is it dear.
Further in the output we indicate where the webpack should put the result of its work (bundle).
In devtool we indicate that you need to create a source-map so that when debugging you do not need to climb a huge bundle, but link to the source code.
And finally, in the module section, we indicate which loaders need to be connected. For now, let's connect only the babel module and the presets for it - react to transform jsx syntax, es2015 to support ES6, stage-0 to use new js features
Well, we are done with the configuration, and finally we are ready to start the development itself.
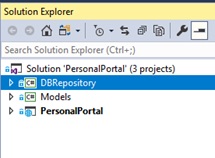
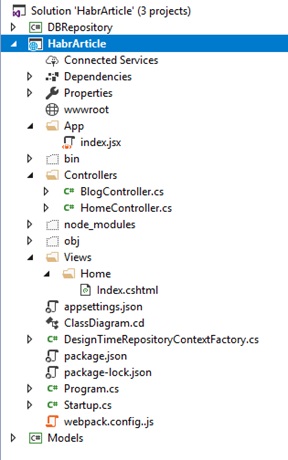
Let's create the App directory in the root of our asp.net core application, and add the index.jsx file in it. I will give below a screen from the solution explorer so that you do not get lost.
In index.jsx we will write the following:
This will be the entry point to our client application. In short, in the top 2 lines we import everything for development on React, in the third line we import our App component container, which we will write below. In the 4th line, we render this component in the DOM element with id = "content".
Record of the form <App /> this is JSX, so we can work with components as with xml and write markup in js files. Without processing the corresponding preset babel, we would need to call the React.createElement method each time, which would significantly deteriorate readability and complicate the writing of components.
Create an app.jsx file, which I mentioned above:
What's so interesting. -, export default class App extends React.Component , .
-, react-router-dom . Router – root , , Switch Route . , ( — www.mytestsite.com ) Blog, /about (www.mytestsite.com/about) About.
Header, About, Blog , . 3 , app.jsx, , , div
header.jsx .
, Link. , , , , , .
, . , webpack, - Index.cshtml

Of course, visual beauty is still not enough, but css, styles, pictures and other marathon guidance are not included in the scope of this article.
Click on the links and make sure that the page does not reload, and the query string in the browser changes its url. Works? Let's go further.
Now it's time to think about the architecture of our client application, and generally about the organization of the location of files, components, etc. On this topic, of course, many copies are broken, many holivars have passed, and one of the approaches is that it is convenient to group files around functions (features). Let's stick to this rule in our front-end project.
As for the architecture, we will use the now popular Redux. When we set up the webpack we already installed all the necessary packages for it (redux, redux-thunk, react-redux). Read more about Redux in the documentation . There is its full translation into Russian .
So, let's do our blog, namely the output of the message feed.
Redux. – action/reducer/store/view. , , (store) (reducers), , () , .
view, - , actions, (/ , ..) reducers, , .
Thus, we have a division of responsibility and a unidirectional data flow, which is convenient to maintain and cover with tests.
So far, perhaps, this does not sound very clear, but using the example of receiving / displaying a message feed, we will analyze the architecture in more detail.
In the app / blog / directory, create the redux infrastructure files. blogActions.jsx, blogReducer.jsx, blogConstants.jsx (for storing action keys).
Let's go to blogActions.jsx and write a method for getting the list of posts from the server.
getPosts , state.dispath() reducers , . recievePosts errorReceive. GET_POSTS_SUCCESS, GET_POSTS_ERROR, reducer .
blogReducer.jsx , .
It's simple, the method-reducer receives the current state and action as input. By switch determines what action happened, changes the state and returns a new copy of it. initialState is not difficult to guess, the default state.
Ok, now we need to put it all together and make it work.
Go to the file blog.jsx, assign the markup and connect our redux infrastructure.
What we have?
1. Blog, , .
2. mapProps, -.
3. mapDispath, action -.
4. connect, - Blog redux- – this.props, .
react-redux Provider store.
- , .
!
, , — actions/reducer connect react-.
, createStore, , ( ) , store . combineReducers.
, . JSON Web Token (JWT).
:
1.
2. , , , .
3. , localStorage , , .
4. , , , .
nuget asp.net core — Microsoft.AspNetCore.Authentication.JwtBearer, , Microsoft.AspNetCore.All.
JWT . (AddJwtBearer) .
.
API . GetIdentity ( ), /, , , 401 .
Using. . .
, , , 'Bearer' + token
, , . , , , , , , CI/CD . , , - .
, .
github .
Thank!
Yes, under Node.js you can write a server, but for back-end development, nevertheless, .net is the undisputed leader. In my opinion, js is very difficult to write a flexible and easily supported backend, although perhaps many will disagree with me.
Let's
')
After this tutorial, I hope the web and back-end developers will find it easier to find their footing in the enemy area and figure out which way to go for more in-depth study. Go!
So, we will need
1. Visual Studio 2017 (with a tick when installing. NET Core cross platform development). We will write the server in .net core 2.0 so we need a studio exactly> = 2017, because support in studio 2015 ended with core 1.1
2. Node.js with the Node Package Manager (NPM) installed. Node.js in our project we need only for 2 web development tools — this is Webpack (for building and processing various preloaders of our client code) and NPM (for installing js utilities / components / packages)
What are we going to write?
We will deal with the development of a very simple blog that can display a list of posts on the main page, go to a separate page with comments (with the ability to comment), authorize the owner and give him the opportunity to write a new post.
Part 1. Backend
The backend will be a restful api set for the client, the base will be using ms sql. To work with the database - EntityFramework Core, Code First approach.
We create an empty ASP.NET Core Web Application project, and we will continue to write everything we need with our hands.
In the new project, in the Startup class (the Startup.cs file), which is the main configuration file in the asp.net core, we will enable the MVC service and middleware (for more information about the middleware chain and user request processing using middleware layers, see the microsoft documentation ) . As it is known in asp.net core, all static content (js / css / img) must be placed in the wwwroot folder (by default, if no other folder is specified), in order for this content to be given to the end user, we must prescribe another layer of middleware - call extension method UseStaticFiles. As a result, we get the Startup class with the following code:
Startup.cs
public class Startup { public void ConfigureServices(IServiceCollection services) { services.AddMvc(); } public void Configure(IApplicationBuilder app, IHostingEnvironment env) { if (env.IsDevelopment()) { app.UseDeveloperExceptionPage(); } app.UseStaticFiles(); app.UseMvc(); } } Now let's do business logic. Let's create in our solution two new projects Class Library (.NET Standart):
- DBRepository where we will work with the database via EntityFramework Core
- Models, where the data classes of our application will lie
And add references to the DBRepository for the Models project, and to the ASP.NET PersonalPortal project for the DBRepository and Models projects.
Thus, we isolate the repository, application, and model from each other. And in the future, for example, we can replace the assembly of work with the DBRepository base with another assembly that works with the base not through EF Core, but through some other ORM or through ado.net. Or, for example, we can connect the repository assembly and models, not to the web application, but to the desktop.
Next, we will add classes to the Models project, which will be further mapped onto tables in the database, I will not dwell on this in detail, on the class diagram, in my opinion, everything speaks for itself:
Now let's move on to the DBRepository project and install two nuget packages that we need to work with EF Core — Microsoft.EntityFrameworkCore and provider of MS SQL Server Microsoft.EntityFrameworkCore.SqlServer
Let's create an inheritor from the DBContext class, the main EF class is the entry point for working with data. And the factory (interface + implementation) that will create this context. For what we need a factory, we will understand later.
RepositoryContext.cs
public class RepositoryContext : DbContext { public RepositoryContext(DbContextOptions<RepositoryContext> options) : base(options) { } public DbSet<Post> Posts { get; set; } public DbSet<Comment> Comments { get; set; } public DbSet<Tag> Tags { get; set; } public DbSet<User> Users { get; set; } } RepositoryContextFactory.cs
public class RepositoryContextFactory : IRepositoryContextFactory { public RepositoryContext CreateDbContext(string connectionString) { var optionsBuilder = new DbContextOptionsBuilder<RepositoryContext>(); optionsBuilder.UseSqlServer(connectionString); return new RepositoryContext(optionsBuilder.Options); } } The code is very simple - in the factory we configure dbcontext to work with SQL Server and pass the connection string to the database (no connection string anywhere ...). Extension method UseSqlServer came to us from Microsoft.EntityFrameworkCore.SqlServer.
Let's use the popular “Repository” pattern and create intermediary classes that will “fence off” our final consumer classes from working with the database and EntityFramework in particular.
Add a BaseRepository class, an IBlogRepository interface, and its BlogRepository implementation.
BaseRepository.cs
public abstract class BaseRepository { protected string ConnectionString { get; } protected IRepositoryContextFactory ContextFactory { get; } public BaseRepository(string connectionString, IRepositoryContextFactory contextFactory) { ConnectionString = connectionString; ContextFactory = contextFactory; } } BaseRepository will be, as the name implies, the base class for all classes created by us intermediaries. In the constructor, it takes a connection string and a factory to create an EF context.
BlogRepository.cs
public class BlogRepository : BaseRepository, IBlogRepository { public BlogRepository(string connectionString, IRepositoryContextFactory contextFactory) : base(connectionString, contextFactory) { } public async Task<Page<Post>> GetPosts(int index, int pageSize, string tag = null) { var result = new Page<Post>() { CurrentPage = index, PageSize = pageSize }; using (var context = ContextFactory.CreateDbContext(ConnectionString)) // 1 { var query = context.Posts.AsQueryable(); if (!string.IsNullOrWhiteSpace(tag)) { query = query.Where(p => p.Tags.Any(t => t.TagName == tag)); } result.TotalPages = await query.CountAsync(); query = query.Include(p => p.Tags).Include(p => p.Comments).OrderByDescending(p => p.CreatedDate).Skip(index * pageSize).Take(pageSize); // 2 result.Records = await query.ToListAsync(); //3 } return result; } } In the BlogRepository class, without delaying them, we have already implemented a method for getting a list of posts with paginated output.
In line 1, we finally create a context for working with the database. In line 2, using LINQ methods, which EF translates into sql scripts, we write a request to get the desired page of posts along with tags (using the Include method). It is important to remember that LINQ methods are executed lazy, and therefore the base itself will be accessed only after calling the ToListAsync method in line 3 (and CountAsync). After the data has been received, the context of working with the database must be closed (to wrap its creation in using, as was done in this case).
Let's go back to the project with the web application and add the configuration file. The created file will already contain a field with a connection string, we only need to edit it and indicate the current database and server.
In the Startup class, we register the implementation of the repository and factory classes. The .NET Core IoC container is already out of the box, so we’ll use it. And add the Startup (IConfiguration configuration) constructor to access the configuration file, a configuration instance will already be injected by WebHostBuilder. Next, we take ConnectionString from the configuration file.
Startup.cs
public Startup(IConfiguration configuration) { Configuration = configuration; } public IConfiguration Configuration { get; } public void ConfigureServices(IServiceCollection services) { services.AddMvc(); services.AddScoped<IRepositoryContextFactory, RepositoryContextFactory>(); // 1 services.AddScoped<IBlogRepository>(provider => new BlogRepository(Configuration.GetConnectionString("DefaultConnection"), provider.GetService<IRepositoryContextFactory>())); // 2 } public void Configure(IApplicationBuilder app, IHostingEnvironment env) { if (env.IsDevelopment()) { app.UseDeveloperExceptionPage(); } app.UseStaticFiles(); app.UseMvc(); } In lines 1 and 2, we register implementations using the AddScope method.
In general, there are 3 methods for registering an implementation — AddScope, AddTransient, AddSingleton, they differ only in the lifetime of the instance being registered.
AddScope - an instance is created 1 time for each request from the client to the server.
AddTransient - every time a dependency is created, a new instance is created.
AddSingleton - the instance is created in a single copy and does not change between requests.
Read more in the documentation .
Now we will create a controller with the API method and we can already feel something with our hands.
Controllers / BlogController.cs
[Route("api/[controller]")] public class BlogController : Controller { IBlogRepository _blogRepository; public BlogController(IBlogRepository blogRepository) { _blogRepository = blogRepository; } [Route("page")] [HttpGet] public async Task<Page<Post>> GetPosts(int pageIndex, string tag) { return await _blogRepository.GetPosts(pageIndex, 10, tag); } } The IBlogRepository dependency is automatically resolved by the IoC container.
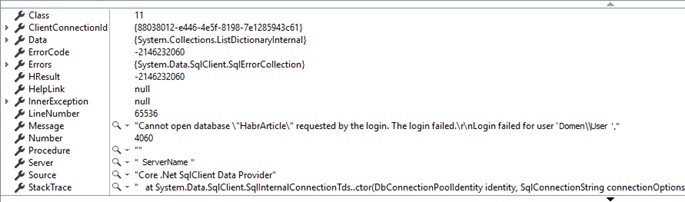
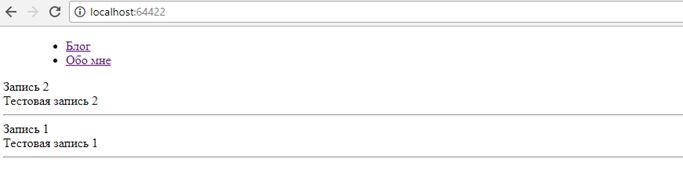
Press F5, we’ll add url to our api method in the address bar of our browser - localhost : 64422 / api / blog / page and ... we get the following, if of course we have correctly changed the connection string:
The fact is that our base is not there yet, and of course EF cannot open a non-existent base. You need to somehow inform that if there is no database, EF should create it.
You can simply call the context.Database.EnsureCreated method before accessing the database, but more often use the migration mechanism. It allows, if we have changed the data scheme, carefully apply it to the database without losing the existing data. Let's try.
For the migration utility to work, it is necessary that the heir of the DBContext class (in our case, the RepositoryContext class) be accessible from outside, and the migration utility at launch can "pull out" it and use it for its own needs. To do this, we must:
or register the RepositoryContext in the services, but we don’t really want to tie the context to our project, it’s not for nothing that we created intermediary classes to the repositories
services.AddDbContext<RepositoryContext>(options => options.UseSqlServer(Configuration.GetConnectionString("DefaultConnection"))); either implement the following interface
public interface IDesignTimeDbContextFactory<out TContext> where TContext : DbContext { TContext CreateDbContext([NotNullAttribute] string[] args); } Choose the last option.
Don't let another factory bother you to create a context, it is needed ONLY for the migration utility.
So, we implement the interface:
DesignTimeRepositoryContextFactory.cs
public class DesignTimeRepositoryContextFactory : IDesignTimeDbContextFactory<RepositoryContext> { public RepositoryContext CreateDbContext(string[] args) { var builder = new ConfigurationBuilder() .SetBasePath(Directory.GetCurrentDirectory()) .AddJsonFile("appsettings.json"); var config = builder.Build(); var connectionString = config.GetConnectionString("DefaultConnection"); var repositoryFactory = new RepositoryContextFactory(); return repositoryFactory.CreateDbContext(connectionString); } } The implementation is very simple - we pull out the connection string from the config, create and return a DBContext.
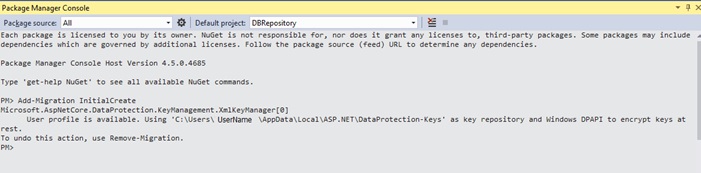
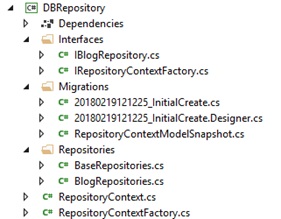
Now open the Powershell console, select the DBRepository project and add the migration.
Add-Migration InitialCreate -Project DBRepository Voila, the migration has been created, the Migrations folder has been added to the DBRepository project, containing new files with automatically generated classes and Up methods for the migration increment, Down for decrement.
The previous team we just created classes in our project, now we need to apply the migration to the base.
Update-Database Let's write in the code the automatic application to the database, so that every time during the next migration, do not manually call the Update-Database command and so that those who continue to work with our code will apply all the migrations and create the base.
Go to the file Program.cs and write the following cherished lines.
Program.cs
public static void Main(string[] args) { var host = BuildWebHost(args); var builder = new ConfigurationBuilder() .SetBasePath(Directory.GetCurrentDirectory()) .AddJsonFile("appsettings.json"); //1 var config = builder.Build(); // 1 using (var scope = host.Services.CreateScope()) //2 { var services = scope.ServiceProvider; var factory = services.GetRequiredService<IRepositoryContextFactory>(); factory.CreateDbContext(config.GetConnectionString("DefaultConnection")).Database.Migrate(); // 3 } host.Run(); } public static IWebHost BuildWebHost(string[] args) => WebHost.CreateDefaultBuilder(args) .UseStartup<Startup>() .Build(); In line 1 we create a config, in line 2 we create a new scope to get an instance RepositoryContextFactory (do we remember that we registered it with the lifetime of the scope? There is no instance without the scope), in line 3 DBContext.Database.Migrate () rolls onto the database all migrations that are not yet in the database. And if this is the first call when there is no base, then it creates it. Further dispozim skoup, since we don't need it anymore.
And how does the migration mechanism know which migrations are already in the database, and which ones are not yet? Everything is very simple. At execution, a table __EFMigrationsHistory is created, where the names of all migrations that were applied are recorded.
The following migrations are added by analogy - changes are made to the date model, the Add-Migration <migration_name> command is executed, the utility compares new changes with the previous migration and generates a new class with the results.
With the back, at this stage, we have almost figured out, you can go to the front, but we face a dilemma - to develop the front in a separate project and then host separately or leave it in the same project as web api, which of course will facilitate the development and deploy Also, there are already ready templates in Visual Studio, which routine things such as routing and webpack assembling turn magic into middleware using the Microsoft.AspNetCore.SpaServices nuget package.
The first option is certainly more flexible, it allows you to deploy the web and backseps separately, to develop them in different environments, but the second option also has a right to exist, in our case, it still outweighs the simplicity and visibility, therefore, we will make an effort and courageously let's go through the second, easier way.
Create a client application container view (Views / Home / Index.cshtml), a controller that will give it away and prescribe routing.
Startup.cs
... app.UseMvc(routes => { routes.MapRoute( name: "DefaultApi", template: "api/{controller}/{action}"); }); ... Part 2. Frontend
It's time for
Here we need to make a reservation that Visual Studio has a template for creating a SPA application in conjunction with the asp.net core, but we will be guided by the principle, if you want to figure out something, do it yourself. Moreover, in my opinion, that template is somewhat redundant and much there will have to be deleted.
Create a web project. Open the command line, go to the folder where we have it, created in the .net core web application studio, and execute the npm init command. Fill in a series of parameters that the utility will ask, or just press enter and at the output you will receive the package.json file which will be the equivalent of “* .csproj“ for the web.
Next you need to download a number of npm packages that must have for our further development. You can install each package individually by running the npm i <package_name> [--save-dev] command, or write all the dependencies right away in our project file and run npm install. To save time and space in the article I will give package.json with all dependencies.
package.json
{ "name": "personalportal", "version": "1.0.0", "description": "", "main": "index.js", "scripts": { "test": "echo \"Error: no test specified\" && exit 1" }, "author": "", "license": "ISC", "devDependencies": { "babel-core": "^6.26.0", "babel-loader": "^7.1.2", "babel-preset-env": "^1.6.0", "babel-preset-es2015": "^6.24.1", "babel-preset-react": "^6.16.0", "babel-preset-stage-0": "^6.24.1", "aspnet-webpack": "^2.0.3", "css-loader": "^0.28.7", "file-loader": "^1.1.6", "style-loader": "^0.19.1", "webpack": "^3.11.0" }, "dependencies": { "babel-polyfill": "^6.26.0", "isomorphic-fetch": "^2.2.1", "query-string": "^5.0.1", "react": "^16.2.0", "react-dom": "^16.2.0", "react-redux": "^5.0.6", "react-router-dom": "^4.2.2", "redux": "^3.7.2", "redux-thunk": "^2.2.0" } } In this file, in addition to the standard generated fields, we see 2 sections - devDependencies and dependencies, this is the list of packages we put. The difference between one section and the other is that in the devDependencies section, we prescribe the packages that are required ONLY for building our application — various loaders, preloaders, converters, packers, and in the dependencies section — packages that are necessary for development, which we will import and use for writing code.
Briefly run through the packages:
- We need babel- * packages, firstly, to use jsx syntax when writing React components, instead of dull calls to js functions (below, when we write our front part, we will understand what is jsx syntax), secondly, to use modern pleasing to the eye, js syntax and not worry about its compatibility with old (within reasonable limits) browsers.
- The webpack package is the main, incredibly powerful tool for building our web application.
- React react / react-dom packages.
- The react-router-dom package for client routing in our SPA application.
- redux / react-redux / redux-thunk - packages for organizing the architecture of our front part.
- Isomorphic-fetch, query-string are simply convenient packages that simplify the work with the query browser string and server requests.
After executing the npm install command, we will create a node_modules folder in the directory with the web application, and all the written packages and their dependencies will be downloaded there. A package-lock.json file should also be created with a description of all dependencies.
Well, Visual Studio should see these packages and display them under the Dependencies tab.
Next, go to the Startup.cs file and prescribe the middleware magic mentioned above. To do this, we need to put the Microsoft.AspNetCore.SpaServices package, well, or it already exists in the Microsoft.AspNetCore.All package.
Startup.cs
public void Configure(IApplicationBuilder app, IHostingEnvironment env, ILoggerFactory loggerFactory) { if (env.IsDevelopment()) { app.UseDeveloperExceptionPage(); app.UseWebpackDevMiddleware(); // 1 } app.UseStaticFiles(); app.UseMvc(routes => { routes.MapRoute( name: "DefaultApi", template: "api/{controller}/{action}"); routes.MapSpaFallbackRoute("spa-fallback", new { controller = "Home", action = "Index" }); // 2 }); } In line 1, we enable webpack support, now we will not have a headache for the assembly of client resources and we will not have to manually start it every time, register somewhere in PostBuildEvents, or keep the console window open with the webpack –watch running. With this line, we create a webpack instance in memory that will track changes in files and run an incremental build.
In line 2, we include support for client routing. I will try to briefly describe the problem that this line solves. As you know, the SPA philosophy is such that the user is always loaded with one page in the browser and new data is loaded with ajax requests. And all the routing, which changes in the browser's request line, is not really server resources, but client-side "emulation of requests" to these resources. The user still remains on the same page. There are no problems if the user goes to the right resource consistently, but if he decides to go directly to this resource directly, then problems will appear.
For example, your application is located at www.mytestsite.com . The user found interesting content on the page www.mytestsite.com/home/news?id=1 and decided to throw the link to a friend or girlfriend. A friend / girlfriend gets this link, copies it to the browser, and gets a 404 error. The problem here is that the server does not physically have this resource and the web server has no idea how to route this url, because we have a SPA application and because client routing was organized.
So line 2 in Startup.cs gives the container a page for all such requests, it arrives to the client and the application resolves the routing on the client.
Now we need to create a config file for webpack (webpack.config.js), guided by which, webpack will use various preprocessors and build our application. Create it in the same place where we have package.json.
webpack.config.js
'use strict'; const webpack = require('webpack'); const path = require('path'); const bundleFolder = "./wwwroot/assets/"; const srcFolder = "./App/" module.exports = { entry: [ srcFolder + "index.jsx" ], devtool: "source-map", output: { filename: "bundle.js", publicPath: 'assets/', path: path.resolve(__dirname, bundleFolder) }, module: { rules: [ { test: /\.jsx$/, exclude: /(node_modules)/, loader: "babel-loader", query: { presets: ["es2015", "stage-0", "react"] } } ] }, plugins: [ ] }; Briefly run through the config. For detailed documentation, it is better to refer to official sources . There is also an excellent screencast on the webpack , unfortunately, it is only on webpack 1.x, but the main things and concepts can be seen there.
So, first of all we need to specify the entry point of the webpack to our sources - the value of the entry field, this is it dear.
Further in the output we indicate where the webpack should put the result of its work (bundle).
In devtool we indicate that you need to create a source-map so that when debugging you do not need to climb a huge bundle, but link to the source code.
And finally, in the module section, we indicate which loaders need to be connected. For now, let's connect only the babel module and the presets for it - react to transform jsx syntax, es2015 to support ES6, stage-0 to use new js features
Well, we are done with the configuration, and finally we are ready to start the development itself.
Let's create the App directory in the root of our asp.net core application, and add the index.jsx file in it. I will give below a screen from the solution explorer so that you do not get lost.
In index.jsx we will write the following:
index.jsx
import React from 'react' //1 import { render } from 'react-dom' //2 import App from './containers/app.jsx' //3 render( <App />, document.getElementById('content') ) //4 This will be the entry point to our client application. In short, in the top 2 lines we import everything for development on React, in the third line we import our App component container, which we will write below. In the 4th line, we render this component in the DOM element with id = "content".
Record of the form <App /> this is JSX, so we can work with components as with xml and write markup in js files. Without processing the corresponding preset babel, we would need to call the React.createElement method each time, which would significantly deteriorate readability and complicate the writing of components.
render( React.createElement(App, null, null), document.getElementById('content') ) Create an app.jsx file, which I mentioned above:
app.jsx
import React from 'react'; import ReactDOM from 'react-dom'; import { BrowserRouter as Router, Route, Switch} from 'react-router-dom'; import Header from './header/header.jsx'; import About from './about/about.jsx'; import Blog from './blog/blog.jsx'; export default class App extends React.Component { render() { return ( <Router> <div> <Header /> <main> <Switch> <Route path="/about" component={About} /> <Route path="/" component={Blog} /> </Switch> </main> </div> </Router> ); } }; What's so interesting. -, export default class App extends React.Component , .
-, react-router-dom . Router – root , , Switch Route . , ( — www.mytestsite.com ) Blog, /about (www.mytestsite.com/about) About.
Header, About, Blog , . 3 , app.jsx, , , div
about.jsx
import React from 'react'; export default class About extends React.Component { render() { return ( <div> </div> ); } }; header.jsx .
header.jsx
import React from 'react'; import { Link } from 'react-router-dom'; export default class Header extends React.Component { render() { return ( <header> <menu> <ul> <li> <Link to="/"></Link> </li> <li> <Link to="/about"> </Link> </li> </ul> </menu> </header> ); } }; , Link. , , , , , .
, . , webpack, - Index.cshtml
Index.cshtml
<!DOCTYPE html> <html> <head> <meta name="viewport" content="width=device-width" /> <script type="text/javascript"> constants = { getPage: '@Url.RouteUrl("DefaultApi", new {controller = "Blog", action = "page" })' } </script> <title>Index</title> </head> <body> <div id="content"> </div> <script type="text/javascript" src="@Url.Content("~/assets/bundle.js")"></script> </body> </html> Of course, visual beauty is still not enough, but css, styles, pictures and other marathon guidance are not included in the scope of this article.
Click on the links and make sure that the page does not reload, and the query string in the browser changes its url. Works? Let's go further.
Now it's time to think about the architecture of our client application, and generally about the organization of the location of files, components, etc. On this topic, of course, many copies are broken, many holivars have passed, and one of the approaches is that it is convenient to group files around functions (features). Let's stick to this rule in our front-end project.
As for the architecture, we will use the now popular Redux. When we set up the webpack we already installed all the necessary packages for it (redux, redux-thunk, react-redux). Read more about Redux in the documentation . There is its full translation into Russian .
So, let's do our blog, namely the output of the message feed.
Redux. – action/reducer/store/view. , , (store) (reducers), , () , .
view, - , actions, (/ , ..) reducers, , .
Thus, we have a division of responsibility and a unidirectional data flow, which is convenient to maintain and cover with tests.
So far, perhaps, this does not sound very clear, but using the example of receiving / displaying a message feed, we will analyze the architecture in more detail.
In the app / blog / directory, create the redux infrastructure files. blogActions.jsx, blogReducer.jsx, blogConstants.jsx (for storing action keys).
Let's go to blogActions.jsx and write a method for getting the list of posts from the server.
blogActions.jsx
import { GET_POSTS_SUCCESS, GET_POSTS_ERROR } from './blogConstants.jsx' import "isomorphic-fetch" export function receivePosts(data) { return { type: GET_POSTS_SUCCESS, posts: data } } export function errorReceive(err) { return { type: GET_POSTS_ERROR, error: err } } export function getPosts(pageIndex = 0, tag) { return (dispatch) => { let queryTrailer = '?pageIndex=' + pageIndex; if (tag) { queryTrailer += '&tag=' + tag; } fetch(constants.getPage + queryTrailer) .then((response) => { return response.json() }).then((data) => { dispatch(receivePosts(data)) }).catch((ex) => { dispatch(errorReceive(err)) }); } } getPosts , state.dispath() reducers , . recievePosts errorReceive. GET_POSTS_SUCCESS, GET_POSTS_ERROR, reducer .
blogConstants.jsx
export const GET_POSTS_SUCCESS = 'GET_POSTS_SUCCESS' export const GET_POSTS_ERROR = 'GET_POSTS_ERROR' blogReducer.jsx , .
blogReducer.jsx
import { GET_POSTS_SUCCESS, GET_POSTS_ERROR } from './blogConstants.jsx' const initialState = { data: { currentPage: 0, totalPages: 0, pageSize: 0, records: [] }, error: '' } export default function blog(state = initialState, action) { switch (action.type) { case GET_POSTS_SUCCESS: return { ...state, data: action.posts, error: '' } case GET_POSTS_ERROR: return { ...state, error: action.error } default: return state; } } It's simple, the method-reducer receives the current state and action as input. By switch determines what action happened, changes the state and returns a new copy of it. initialState is not difficult to guess, the default state.
Ok, now we need to put it all together and make it work.
Go to the file blog.jsx, assign the markup and connect our redux infrastructure.
blog.jsx
import React from 'react'; import ReactDOM from 'react-dom'; import { connect } from 'react-redux'; import { getPosts } from './blogActions.jsx' class Blog extends React.Component { componentDidMount() { this.props.getPosts(0); } render() { let posts = this.props.posts.records.map(item => { return ( <div key={item.postId} className="post"> <div className="header">{item.header}</div> <div className="content">{item.body}</div> <hr /> </div> ); }); return ( <div id="blog"> {posts} </div> ); } }; let mapProps = (state) => { return { posts: state.data, error: state.error } } let mapDispatch = (dispatch) => { return { getPosts: (index, tags) => dispatch(getPosts(index, tags)) } } export default connect(mapProps, mapDispatch)(Blog) What we have?
1. Blog, , .
2. mapProps, -.
3. mapDispath, action -.
4. connect, - Blog redux- – this.props, .
react-redux Provider store.
index.jsx
import React from 'react' import { render } from 'react-dom' import { createStore, applyMiddleware } from 'redux' import { Provider } from 'react-redux' import thunk from 'redux-thunk' import App from './app.jsx' import blogReducer from './blog/blogReducer.jsx' function configureStore(initialState) { return createStore(blogReducer, initialState, applyMiddleware(thunk)) } const store = configureStore() render( <Provider store={store}> <App /> </Provider>, document.getElementById('content') ) - , .
!
, , — actions/reducer connect react-.
, createStore, , ( ) , store . combineReducers.
rootReducer.jsx
import { combineReducers } from 'redux' import blog from './blog/blogReducer.jsx' import header from './header/headerReducer.jsx' export default combineReducers({ blog, header }) index.jsx
… import rootReducer from './rootReducer.jsx' function configureStore(initialState) { return createStore(rootReducer, initialState, applyMiddleware(thunk)) } … 3.
, . JSON Web Token (JWT).
:
1.
2. , , , .
3. , localStorage , , .
4. , , , .
nuget asp.net core — Microsoft.AspNetCore.Authentication.JwtBearer, , Microsoft.AspNetCore.All.
JWT . (AddJwtBearer) .
Startup.cs
... public void ConfigureServices(IServiceCollection services) { services.AddMvc(); services.AddAuthentication(JwtBearerDefaults.AuthenticationScheme) .AddJwtBearer(options => { options.RequireHttpsMetadata = false; options.SaveToken = true; options.TokenValidationParameters = new TokenValidationParameters { ValidIssuer = "ValidIssuer", ValidAudience = "ValidateAudience", IssuerSigningKey = new SymmetricSecurityKey(Encoding.UTF8.GetBytes("IssuerSigningSecretKey")), ValidateLifetime = true, ValidateIssuerSigningKey = true, ClockSkew = TimeSpan.Zero }; }); services.AddScoped<IRepositoryContextFactory, RepositoryContextFactory>(); services.AddScoped<IBlogRepository>(provider => new BlogRepository(Configuration.GetConnectionString("DefaultConnection"), provider.GetService<IRepositoryContextFactory>())); } ... .
Startup.cs
public void Configure(IApplicationBuilder app, IHostingEnvironment env, ILoggerFactory loggerFactory) { if (env.IsDevelopment()) { app.UseDeveloperExceptionPage(); app.UseWebpackDevMiddleware(); } app.UseStaticFiles(); app.UseAuthentication(); … } API . GetIdentity ( ), /, , , 401 .
IdentityController.cs
[Route("token")] [HttpPost] public async Task<IActionResult> Token([FromBody]IdentityViewModel model) { var identity = await GetIdentity(model.Username, model.Password); if (identity == null) { return Unauthorized(); } var now = DateTime.UtcNow; var jwt = new JwtSecurityToken( issuer: AuthOptions.ISSUER, audience: AuthOptions.AUDIENCE, notBefore: now, claims: identity, expires: now.Add(TimeSpan.FromMinutes(AuthOptions.LIFETIME)), signingCredentials: new SigningCredentials(AuthOptions.GetSymmetricSecurityKey(), SecurityAlgorithms.HmacSha256)); var encodedJwt = new JwtSecurityTokenHandler().WriteToken(jwt); return Ok(encodedJwt); } private async Task<IReadOnlyCollection<Claim>> GetIdentity(string userName, string password) { List<Claim> claims = null; var user = await _service.GetUser(userName); if (user != null) { var sha256 = new SHA256Managed(); var passwordHash = Convert.ToBase64String(sha256.ComputeHash(Encoding.UTF8.GetBytes(password))); if (passwordHash == user.Password) { claims = new List<Claim> { new Claim(ClaimsIdentity.DefaultNameClaimType, user.Login), }; } } return claims; } Using. . .
BlogController.cs
[Authorize] [Route("post")] [HttpPost] public async Task AddPost([FromBody] AddPostRequest request) { await _blogService.AddPost(request); } , , , 'Bearer' + token
fetch(constants.post, { method: 'POST', headers: { 'Content-Type': 'application/json', 'Authorization': 'Bearer ' + token }, body: JSON.stringify({ header: header, body: body, tags: tags }) Conclusion
, , . , , , , , , CI/CD . , , - .
, .
github .
Thank!
Source: https://habr.com/ru/post/350298/
All Articles