Creating a Telegram bot to get information on the Dogecoin wallet
Since the description of the blockchain technology in 2008 and the first implementation in 2009 (Bitcoin) to the present, more than a thousand cryptocurrencies have been created. An ICO is held every few days. Many are engaged in mining or playing on cryptocurrency exchanges.
Due to the fact that currencies are unstable and their rate is constantly changing, in order to avoid losing savings, it is important to be able to receive up-to-date information on the rate and status of your accounts as soon as possible.
Since information about the blockchain is publicly available, access to it is possible through web services and mobile applications. To monitor the status of accounts convenient to use multicurrency mobile applications. However, due to the high speed of creating new cryptocurrencies, not all developers have time to add their support, and the user is forced to install other applications with the required currency, which affects the convenience and the occupied memory size of the device. This is where another trend of our time comes to the rescue - chat bots, the management APIs of which are provided by most instant messengers.
')
Consider creating a chat bot for Telegram, which provides information about the accounts of a cryptocurrency such as Dogecoin. Dogecoin was introduced in 2013 and is named after the internet meme Doge. Often used to collect donations and charity.
Register bot in Telegram
Let's start with the registration of the bot in the messenger. To do this, we find in the Telegram the father of all bots - BotFather, send him the command “/ newbot” and fill in the required parameters: the displayed (DogeWallet) and unique name (DogeWalletBot). After this, BotFather will provide a bot access token. At this point, you can finish with registration, but for ease of use, we also enter a description of the bot, an image and a list of commands that will appear after entering the “/” symbol:
- setwallet - sets the address of the Dogecoin wallet;
- balance - returns the balance of the entered or default address of the DogeCoin wallet;
- received - returns Dogecoin received by the entered wallet address or the default address;
- sent - returns Dogecoin sent by the specified wallet address or default address;
- qrcode - returns the QR-code of the specified address or the default address;
- report - returns a report on the transactions of the specified address or the default address;
- rate - returns the current Dogecoin rate in US dollars and Bitcoins
- help - shows all available commands.
Presets
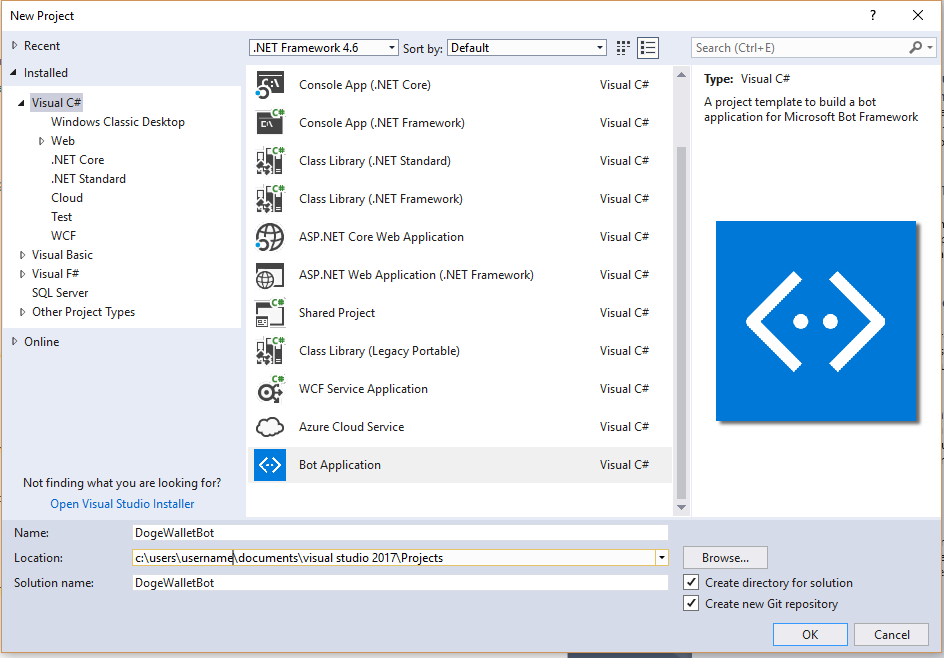
Now that the bot has been registered and the main functionality has been defined, one can proceed to the choice of the development platform. We will write a bot on the Microsoft Bot Framework, because it provides ample opportunities for working with dialogs and a large set of supported communication channels (which provides the ability to quickly launch a bot in another messenger almost without rewriting the code), select C # as the language (you can also use Node.js).
To get started, you need Visual Studio 2015 or higher, bot application templates, Bot Controller, Bot Dialog and Bot Framework Emulator - for details, the installation procedure is described in the Microsoft Bot Framework documentation.
Creating a bot, processing commands
Create a project from the template "Bot Application".
In the project structure, you can observe classes such as MessagesController and RootDialog. The application's entry point, which accepts all incoming messages, is the Post method of the class MessagesController. It contains the following code:
public async Task<HttpResponseMessage> Post([FromBody]Activity activity) { if (activity.Type == ActivityTypes.Message) { await Conversation.SendAsync(activity, () => new Dialogs.RootDialog()); } else { HandleSystemMessage(activity); } var response = Request.CreateResponse(HttpStatusCode.OK); return response; } Messages that are text are sent to the RootDialog for further processing, and all others to the HandleSystemMessage method of the MessagesController class. Messages that are not text can be a message about adding a user or bot to a chat, the beginning or end of a dialogue.
The RootDialog class, like all dialogs, implements the IDialog interface and must contain the StartAsync method. The first message received by the bot enters this method. By default, it contains a call to context.Wait (MessageReceivedAsync) —that is, the method that handles the next message is set (but, since not a single handler of the received message was installed, the MessageReceivedAsync call will occur immediately after StartAsync).
Modify the MessageReceivedAsync method so that instead of sending the received message back to the user, it handles the commands defined earlier.
private async Task MessageReceivedAsync(IDialogContext context, IAwaitable<object> result) { var activity = await result as Activity; // if "/setwallet" command if (activity.Text == "/setwallet") { context.Call(new SetWalletDialog(), SetWalletDialogResumeAfter); } // if "/setwallet [address]" command else if (activity.Text.Contains("/setwallet")) { var forvardedMsg = context.MakeMessage(); forvardedMsg.Text = activity.Text; await context.Forward(new SetWalletDialog(), SetWalletDialogResumeAfter, forvardedMsg, CancellationToken.None); } // if "/balance [address]" command else if (activity.Text.Contains("/balance")) { var forvardedMsg = context.MakeMessage(); forvardedMsg.Text = activity.Text; await context.Forward(new GetBalanceDialog(), GetBalanceDialogResumeAfter, forvardedMsg, CancellationToken.None); } else { if (activity.Text == "/start") //start conversation await GreetUser(context, result); else if (activity.Text == "/help") //show help await ShowHelp(context); context.Wait(MessageReceivedAsync); } } The "/ setwallet" command is processed first: if only this command is entered without specifying an address, the SetWalletDialog dialog is invoked using the context.Call method. It accepts parameters such as a new called dialog and a function that is called when the called dialog ends (SetWalletDialogResumeAfter). It is worth noting that the Microsoft Bot Framework uses such a structure as a stack of dialogs - that is, the RootDialog is first called, which in turn calls SetWalletDialog, placing it on top of the stack. While he is at the top, all messages will come to him (not counting the global dialogues that can take control if necessary). When creating a new dialog, the StartAsync method of the SetWalletDialog class is called immediately:
public async Task StartAsync(IDialogContext context) { var msg = context.Activity.AsMessageActivity(); if (msg.Text == "/setwallet") await context.PostAsync("Enter DogeCoin wallet address, please!"); context.Wait(MessageReceivedAsync); } Provided that the command does not contain an address, a message is displayed, urging the user to enter the address. Then the next message handler is installed and input is expected.
If a command is received that also contains the address ("/ setwallet [address]"), then the new dialog is invoked using the Forward method. This method differs from Call in that it sends the message further to the called dialog and, after the StartAsync method is completed, it does not wait for input, and the message is immediately passed to the MessageReceivedAsync method of the SetWalletDialog class. Consider this method.
private async Task MessageReceivedAsync(IDialogContext context, IAwaitable<IMessageActivity> result) { var message = await result; string address = ""; if ((message.Text != null) && (message.Text.Trim().Length > 0)) { if (message.Text.Contains(" ")) //if "/setwallet [address]" command { address = message.Text.Replace("/setwallet ", "").Trim(); } else address = message.Text; try { var balance = await Client.GetBalanceAsync(address); if (balance.Success == 1) { context.UserData.SetValue("wallet", address); context.Done(address); } else await ProcessErrors(context); } catch(Exception ex) { await ProcessErrors(context); } } } The message is analyzed if it contains a space (that is, both the command and the address), then this address is allocated and stored in a variable. This option is triggered when the Forward dialog is called. If the message does not contain a space (it is assumed that the address is entered after the bot has sent a message to suggest entering it), then the address is saved to the variable without processing. This case occurs when creating a dialogue using the Call method. Next, the address is checked for existence by trying to get its balance. If this succeeds, the address is stored in the internal storage of the MS Bot Framework (context.UserData.SetValue ("wallet", address)) and the SetWalletDialog dialog ends, is removed from the stack (context.Done (address)) and passes the address to the parent dialog.
In case of error (wrong address), errors are processed in the ProcessErrors method:
private async Task ProcessErrors(IDialogContext context) { --attempts; if (attempts > 0) { await context.PostAsync(ExceptionMessage); context.Wait(MessageReceivedAsync); } else { /* Fails the current dialog, removes it from the dialog stack, and returns the exception to the parent/calling dialog. */ context.Fail(new TooManyAttemptsException(ExceptionFinalMessage)); } } The user is given several attempts to enter the correct address, then the dialog ends with an error message (context.Fail (new TooManyAttemptsException (ExceptionFinalMessage))) and control is passed to RootDialog.
After the child dialog is completed, the [DialogClassName] ResumeAfter method is called in the parent, where the result of the child dialog is further processed and the context.Wait (MessageReceivedAsync) method is called to indicate the recipient of the next message.
Other commands are processed in the same way with only one difference - they are always transmitted by the Forward method, since they do not require the input of a clarifying message (in the case of entering a command without an argument, the address is taken from the repository (context.UserData.TryGetValue ("wallet", out address) ).
Let us dwell on getting data for output by the bot, and in particular on the Client.GetBalanceAsync method presented earlier. Client is a static class that provides access to data on cryptocurrency wallets. It contains methods that access the corresponding services API. This project uses APIs from projects such as dogechain.info and chain.so. Consider the GetBalanceAsync method:
public static async Task<BalanceEntity> GetBalanceAsync(string address) { return await GetAsync<BalanceEntity>($"address/balance/{address}"); } This is where the generic data retrieval method is called, complementing the query and indicating the type of data returned. The type of data returned is described in a simple POCO class BalanceEntity:
public class BalanceEntity { public string Balance { get; set; } public int Success { get; set; } } Consider the GetAsync method:
public static async Task<T> GetAsync<T>(string path) { InitClient(); T entity = default(T); HttpResponseMessage response = await client.GetAsync(path); if (response.IsSuccessStatusCode) { var jsonString = await response.Content.ReadAsStringAsync(); entity = JsonConvert.DeserializeObject<T>(jsonString); } return entity; } This method initializes a new instance of the HttpClient class in the InitClient method:
public static void InitClient() => InitClient(WebApiHost); public static void InitClient(string webApiHost) { WebApiHost = webApiHost; if (client != null && !string.IsNullOrEmpty(WebApiHost) && client.BaseAddress.AbsoluteUri == WebApiHost) return; client = new HttpClient { BaseAddress = new Uri(WebApiHost) }; client.DefaultRequestHeaders.Accept.Clear(); client.DefaultRequestHeaders.Accept.Add(new MediaTypeWithQualityHeaderValue("application/json")); } Next, a request is made to the server providing the data about the wallet, and in case of successful receipt of the json object, it is converted to the corresponding class.
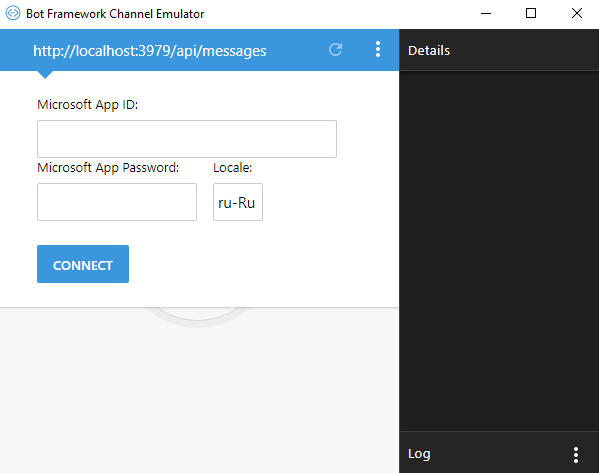
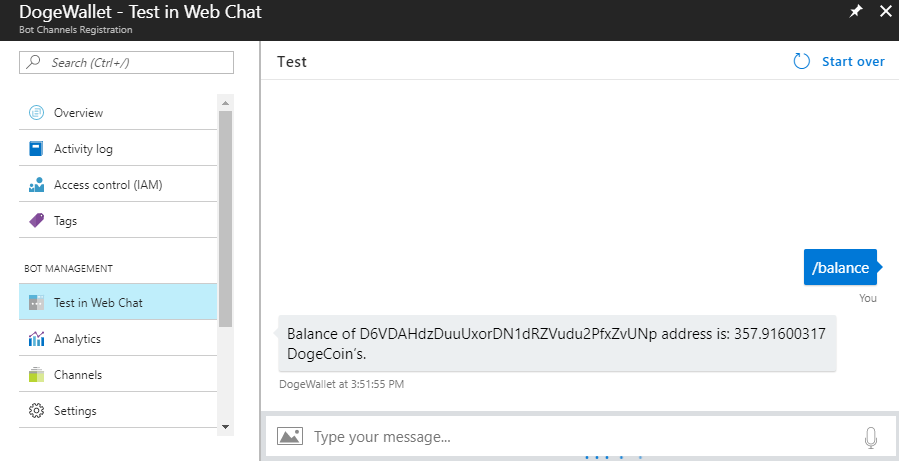
After the implementation of the main commands, you can check the operation of the bot. To do this, use the emulator downloaded earlier. Enter the address where the bot is running and click CONNECT. Enter the command "/ setwallet" - the bot tells us to enter the address of the wallet. We enter.
And the bot reports that it successfully saved it.
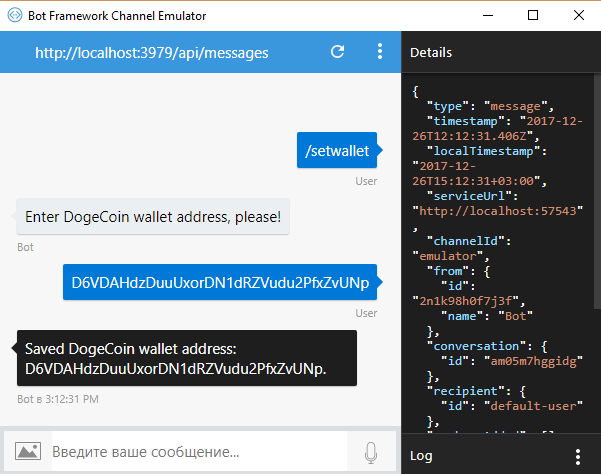
Check the balance with the command "/ balance" and find out that there are a little more than 357 dogs on the account: "Balance of D6VDAHdzDuuUxorDN1dRZVudu2PfxZvUNp address is: 357.91600317 DogeCoin's".
Add a greeting sent to the user during the first access to the bot. Since we use Telegram as a platform for communication, the first message received by the bot will be “/ start”. Process it, as well as the “/ help” command in the MessageReceivedAsync of the RootDialog class:
if (activity.Text == "/start") //start conversation await GreetUser(context, result); else if (activity.Text == "/help") //show help await ShowHelp(context); context.Wait(MessageReceivedAsync); When a command is received, we call the appropriate methods, and then set the method to process the next received message. The GreetUser method sends a greeting message and shows help about the commands, ShowHelp only shows help.
private async Task GreetUser(IDialogContext context, IAwaitable<object> result) { await SendGreetMessage(context); await ShowHelp(context); } In the SendGreetMessage method, a greeting message is created and a Doge image is attached:
private async Task SendGreetMessage(IDialogContext context) { var qrMsg = context.MakeMessage(); qrMsg.Text = "Welcome, Young Shibe!\r\n"; qrMsg.Attachments.Add(new Attachment() { ContentUrl = "http://www.stickpng.com/assets/images/5845e608fb0b0755fa99d7e7.png", ContentType = "image/png", Name = " " }); await context.PostAsync(qrMsg); } The new attachment contains such parameters as ContentUrl - the path to the image, ContentType - the attachment type, and Name - the name.
Register bot in MS Bot Framework
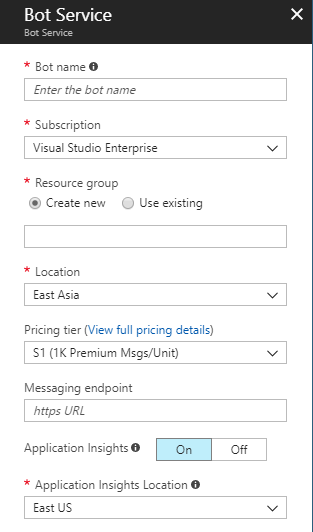
After creating the bot and debugging locally using the emulator, you can start deploying on the server and registering with Azure (previously registered at botframework.com, but recently migrated to Azure and it is recommended to create new bots there). We publish our bot on Windows hosting (unfortunately, Bot Builder does not support Core in the current version) or in Azure. After that we register the bot. To do this, go to portal.azure.com, click the button for creating a new resource (New) and enter “bot” in the search. From the list, select the Bot Channels Registration and click "Create".

We fill in the fields and enter the address of our deployed bot as Messaging Endpoint, adding “/ api / messages” - dogewalletbot.azurewebsites.net/api/messages .
After creating “Bot Channels Registration”, go to it and in the “Settings” tab, look for the Microsoft App ID and the Manage link next to it. Go through it to apps.dev.microsoft.com and click the button "Create a new password." We remember the Microsoft App ID and password (MicrosoftAppPassword) and enter them into our bot's Web.config in the appSettings section. After that, the connection between the bot and the channels should work. Check in the previously created service Bot Channels Registration in the section "Test in Web Chat":
Next, connect the channel to connect with Telegram. Click Channels, select Telegram and enter the token provided by BotFather. Go to the Telegram, add the bot and click "Start".
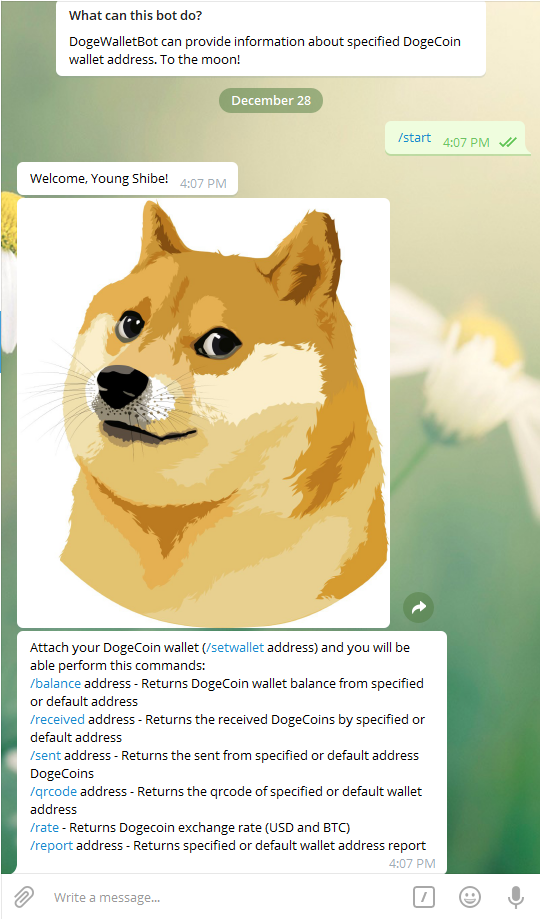
The bot, having received the “/ start” command, responds with a greeting and help. The processing of the remaining commands also takes place.
Report creation
We implement the sending of the incoming transaction report to the wallet address in the form of a list “transaction id, value” in PDF format. To do this, we use the FastReport.Net report generator and the Telegram API (Telegram.Bot) library to send pdf to the Telegram server.
Transaction data will be received at chain.so/api/v2/get_tx_received/DOGE [address]. The answer will be converted to the class of the following structure:
public class ReceivedTransactionsResponse { public string Status { get; set; } public ReceivedTransactionsEntity Data { get; set; } } public class ReceivedTransactionsEntity { public string Address { get; set; } public List<ReceivedTransaction> Txs { get; set; } } public class ReceivedTransaction { public string Txid { get; set; } public string Value { get; set; } public string Confirmations { get; set; } } The method of obtaining data about the transactions of the Client class is as follows:
public static async Task<List<ReceivedTransaction>> GetReceivedTransactions(string address) { WebApiHost = WebApiHostChainSo; var trs = await GetAsync<ReceivedTransactionsResponse>($"get_tx_received/DOGE/{address}"); WebApiHost = WebApiHostDogechain; return trs?.Data?.Txs; } It overrides the URL of the API call at the beginning of the method and returns it back before completion.
After getting the list of transactions in the ReportDialog class, the SendReport method is called:
private async Task SendReport(IDialogContext context, string address, List<ReceivedTransaction> transactions) { Reporter repr = new Reporter(); if (context.Activity.ChannelId != "telegram") return; using (MemoryStream pdfReport = repr.GetReceivedTransactionsPdf(address, transactions)) { TelegramBotClient client = new TelegramBotClient("telegram_bot_token"); var me = await client.GetMeAsync(); var chatId = context.Activity.From.Id; await client.SendDocumentAsync(chatId, new FileToSend("Received transactions.pdf", pdfReport), "First 100 received transactions."); } } It, in turn, creates a report in the Reporter class. Then a TelegramBotClient is created and a pdf report is sent.
Consider the GetReceivedTransactionsPdf method of the Reporter class:
public MemoryStream GetReceivedTransactionsPdf(string address, List<ReceivedTransaction> transactions, string afterTXID = null) { string appData = HostingEnvironment.MapPath("~/App_Data/"); Config.WebMode = true; Report = new Report(); Report.Load(appData + "TransactionsReport.frx"); Report.RegisterData(transactions, "txs"); Report.GetDataSource("txs").Enabled = true; (Report.FindObject("Data1") as DataBand).DataSource = Report.GetDataSource("txs"); Report.Prepare(); PDFExport pdf = new PDFExport(); MemoryStream exportStream = new MemoryStream(); Report.Export(pdf, exportStream); exportStream.Position = 0; return exportStream; } At the beginning, the Config.WebMode = true line sets the mode of FastReport.Net, which prevents the appearance of loading indicators and other graphics that are not needed in the web mode. Next, the previously prepared report from the App_Data folder is loaded. The report contains the report title, pages and DataBand. There are two text objects (TextObject) on the data band to display the transaction number and its value.

After the report is loaded, the data is connected using the Report.RegisterData method, enabling the connected data source and assigning it to the Data band. Then it is exported to PDF and returned to the Stream containing the report.
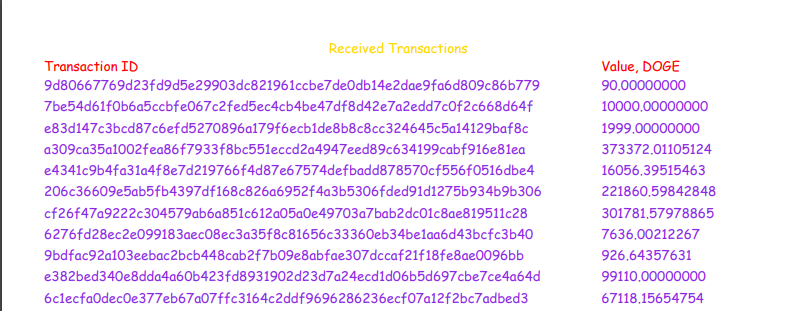
Check team work. Let's send a message to the Telegram - / report DRapidDiBYggT1zdrELnVhNDqyAHn89cRi and get a message in reply.
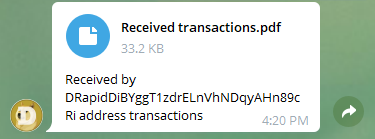
Open the file and see the list of incoming transactions and their values.
Conclusion
The source code for the project is available on GitHub .
Currently, for full use of the MS Bot Framework, full .Net Framework and Windows hosting is required, which increases the cost of bots maintenance, however, in the next version, it is planned to add Core support for Microsoft.Bot.Builder. Unfortunately, the release date is not yet known.
useful links
Source: https://habr.com/ru/post/349900/
All Articles