How we do AB-DOC
In this article, I want to talk about us and how we do AB-DOC — serverless web application that provides an interface to Amazon S3 storage. Read more about AB-DOC in our previous article . Now we will talk about the technological solutions that underlie AB-DOC. I'll tell you how we built the development and deployment process.

In the photo I am at my desk in my home, where I work 90% of the time.
')
We have a small team , we develop web applications for business automation. In addition to completing projects to order, we have created and are developing two online services:
AB-DOC does not work all our team, but only two people: me and IgorBB .

So what is AB-DOC?
Serverless applications are now a powerful trend in the world of web development. In simple terms, these are applications that operate entirely on the basis of cloud service providers. Their benefits derive from the characteristics of the cloud services that make them work — this is fault tolerance and scalability. In addition, as with cloud services, their costs are directly dependent on the load. If there is no load, then the cost is zero. It is very comfortable and cool.
But there is a downside. The first drawback of serverless applications is a complex development process. That is, during the initial setup of the infrastructure, and building the development process, they require more effort than regular web applications that have a server. The second drawback is that such applications are usually dependent on the vendor and transferring them to another cloud provider can be a daunting task.
We create applications in Amazon Web Services, so later in the article everything will be related to this cloud provider.
Serverless applications usually have a backend. The backend is a database in the form of a DynamoDB service (NOSQL DBMS) or RDS (relational DBMS). The code for the backend is implemented as Lambda functions, which are accessed via the API Gateway.
AB-DOC has none of this. He has no backend and server code at all (at least for now).
The AB-DOC architecture looks like this.
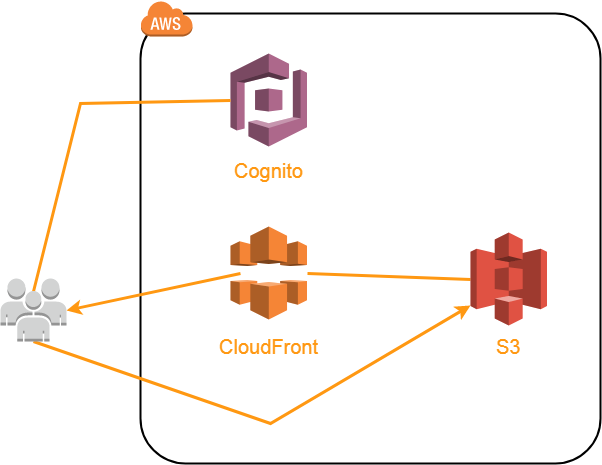
Application code (HTML, CSS, JavaScript, etc.) is placed in a separate S3 batch and is sent via CDN CloudFront. In principle, it would be possible to give directly from S3, because for the buckets you can enable the function of hosting static content.
The reason we need CloudFront is not only to speed up the loading of content, but also because we needed a way to redirect all links to index.html. AB-DOC is a single-page-application (SPA), so when requesting any URL, we need the user to load index.html. Next, based on the requested URL, JavaScript loads the necessary content for the user using ajax. We do not use front-end frameworks, so we wrote our own small router.
So, in order to redirect all the URLs to index.html, we set up our own 404 error handling rule in CloudFront (page not found).

Thanks to this rule, CloudFront, when requesting any non-existent URL on our resource, gives index.html with a response code of 200. That's all the magic for implementing a SPA with hosting code in S3.
User content is also placed in S3, in a separate batch, and is also provided via CloudFront. Custom content includes a tree structure (Json), document content (HTML), images embedded in documents and attached files (various formats).
Then we will discuss the individual, interesting in my opinion, the nuances of the implementation of our application.
After downloading the code to the user's browser, AB-DOC first performs authentication and authorization of the user. For this we use Cognito.
Let me remind you that authentication is the process of authenticating a user, and authorization is the process of endowing this user with certain rights to work in the program.
Cognito consists of 3 services:
If you have not had experience with Cognito services, it will be difficult to understand why each of them is needed. I write, as I understand it.
This is a managed service that provides registration, authentication (authentication) of users and storage of their accounts. It allows you to customize the data fields for each user (that is stored), password complexity policy, whether you will use MFA, various triggers that can be triggered during registration, entry, and so on. Here you can configure the messages that the service will send to verify the email when registering users.
External identity providers (Facebook, Google, Amazon or SAML) can be attached to the User pool. When you log in through an external provider, an account is created in your User pool. This basically works if you use the login pages hosted in the Cognito service itself. That is, you need to redirect users to login to a special URL of the form your-app.auth. [Region] .amazoncognito.com. You can customize the look of this page so that it looks like the look of your application. After logging in, the user will be returned to your application. I did not like this implementation option.
For a long time, I tried to implement integration of the User pool with external providers using the Amazon Cognito Identity SDK for JavaScript. Theoretically, this is also possible, but I could not find any documentation on this topic and I gave up. It was 2-3 months ago.
Unlike User Pools, this service is responsible for authorizing users, that is, empowering them with certain powers to access AWS services (S3, for example).
For this service to work, you need to create an Identity pool and configure authentication providers with which it will work. Your User pool can act as authentication providers, as well as a number of external providers such as Amazon, Facebook, Google, Twitter, OpenID, SAML, or even an authentication provider that you create yourself.
In AB-DOC, we use our User pool and one external provider, Google, as authentication providers. Therefore, users have 2 options:
The process of empowering the Identity pool is pretty simple. For Identity pool are selected in 2 roles from AWS Identity and Access Management (IAM): for authenticated and unauthenticated users.
For each role in IAM, you can link any policies that will arbitrarily give users the necessary rights. Customization is possible through the use of variables in policies. For example, in order to give write access to users only within their folder in the S3 batch, we use this variable in the resource description
Thus, instead of $ {cognito-identity.amazonaws.com:sub} for each user, its ID in the Identity pool is substituted into the policy. Each user works inside his folder in the batch, whose name corresponds to his id in the Identity pool.
The word folder here could be put in quotes, because in fact there are no folders in S3. This is a flat file system. Each file simply has a key (Key), and the division into "folders" is conditional.
This service provides data storage for users of the application. Data placed in Sync is stored as key-value sets (Datasets), which are tied to the user id in the Identity pool. Thus, Sync allows you to save arbitrary information on all users, through which they are not authenticated: whether it is User pool or an external provider. In addition, Sync provides synchronization of data sets between all devices on which the user works in the application.
In general, authorization is built on tokens. The JavaScript code responsible for it currently makes up more than 1/3 of the entire application code. That is, this is quite a voluminous topic, and maybe I will write a separate article about it in the future.
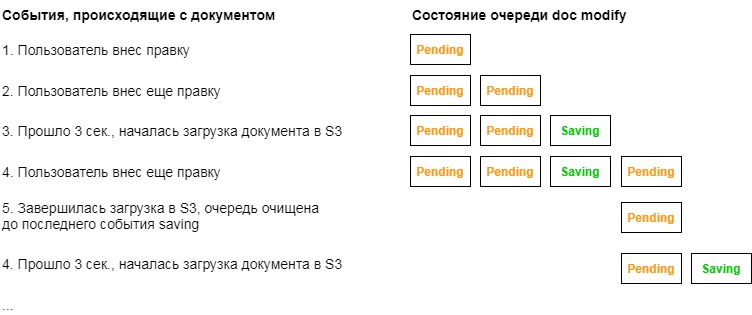
AB-DOC itself keeps track of and saves the changes that the user makes when editing tree nodes or document contents.
The operation of this mechanism is based on JavaScript timers: setInterval (). Separate timers are created for the tree and for the document, which check once every 3 seconds whether the changes have appeared, and if so, save them in S3. Timers in the application are centrally created via the TIMERS object.
For centralized change tracking, we wrote an ACTIVITY object, which is responsible for event queue management. The queue is formed in accordance with the options of content that the user can create. The tree has its own queue, the document has its own queue, each queue has its own queue, and so on.
The events recorded in the queue can be of two types: pending or saving. The logic of the queues as follows.
When the user makes some editing, a wait event is added to the desired queue. In the tree, events are added directly from the code that handles changes, and changes to documents are tracked thanks to Mutation Observer.
Then, when the corresponding timer is triggered, a save event is added to the queue, and the process of uploading changes to S3 begins. After a successful download, this queue is cleared until the last save event. At the time of cleaning in the queue there may be new wait events that will wait for the next 3 second cycle.
This is how it looks in the example of the doc modify queue, which is responsible for document changes.
The change indicator in the header reflects the status of the event queues.
When nothing happens and all queues are empty, the indicator is not displayed.

If there are waiting events in the queues, it is represented by an orange pencil.

If there are queues in which the saving process is in progress, the indicator turns white.

If the queues are not empty, and the user tries to close the browser or just leave the page, then the window.onbeforeunload () function will work. She will warn the user that his edits have not yet survived. He can either wait for the save to finish or leave the page, losing the last changes.
The indicator is written to the $ update variable:
Again, using the example of a document, the process looks like this. When you open a document, the event handler changes the content of the document (inside it is Mutation Observer). The handler simply adds the wait event to the doc queue to modify:
The document timer every 3 seconds checks the doc modify queue for wait events and loads the document content into S3 if necessary, and then clears the queue:
There is a funny moment here, due to the fact that loading in S3 is usually very fast. Therefore, so that the save indicator does not flicker, we use Promise.all (), which is triggered when the two Promise completes: the actual s3.upload () and the small setTimeout () with a duration of 0.8 seconds. It is necessary for the indicator to show saving for at least 0.8 seconds, even if, in fact, the changes loaded faster.
Each user in S3 is allocated a separate folder whose name matches its id in the Identity pool. In the root of this folder, AB-DOC saves the tree.json file, which stores the structure of the user's tree.
The file format for tree.json is:
This structure is used unchanged as a data source for zTree when rendering a tree.
Each document is stored in a separate subfolder, the name of which coincides with the document guid. Inside this folder is saved file index.html, which actually is a document. In addition to this file, images inserted into the document are saved as separate objects in the document folder, and all files attached to the document are stored in the attachments subfolder.
All data is downloaded directly from the user's browser to S3 using the AWS JavaScript SDK upload () function. She is able to upload files to S3, breaking them into parts (multipart upload) and doing it in several streams.
For example, the files attached to the document are loaded into 4 streams in this way, with splitting into parts of 6 MB each. This code works inside the abDoc object (document), self in this case = this object.
The httpUploadProgress event allows you to track download progress and update the progress bar of the file.
The s3 object (AWS JavaScript SDK) uses credentials, which include the id Identity pool, user id token and authentication provider name. All calls to the S3 service are made with the transfer of the user’s token id. The user is endowed with those rights that are specified in the policy associated with the role, which in turn is set in the Identity pool. The same principle works with other AWS services via the JavaScript SDK. Id token has a short lifespan (1 hour), after which you need to get a new id token with the help of refresh token. Refresh token has a lifespan of 365 days.
At first glance it may seem that this is a very simple thing, but it is not quite so.

We made an indicator of the free space in the form of a basket: narrow at the bottom and diverging up. We wanted to make the basket visually consistent with how the basket would be filled in the physical world. That is, at first it is filled quickly, since it is narrower from below. And as you fill, the level rises more and more slowly due to its expansion upwards.
To realize this, we used the Gauss area formula for quadrilaterals.

Using this formula, using the coordinates of the basket points, we can calculate the area of the entire basket - this corresponds to the maximum free space limit of 1 GB. Further, based on the value of the volume filled by the user, we calculate, using a simple proportion, the area of the part of the basket that will be occupied by the user.
Having occupied the user space, it remains to calculate the Y-coordinate of the upper boundary of the filled space based on the above formula. The X-coordinates of the upper points of the occupied space are displayed through the tangent of the angle of the basket. In general, as a result of the output Y, I got, although terrible in appearance, but the usual quadratic equation. On the board it is in the lower right corner.

On the board, size indicates the length of the side of the square into which the basket fits. For example, size = 30 on the blackboard. It was necessary to derive a general formula, so I used the notation size.
Now, when I write these lines, vague doubts crept in. Probably, I was very wise and could be inferred much easier, considering that the figures are equi-sided trapeziums ...
To draw the indicator, we used the amazing SVG.js library, which allows you to draw SVG graphics in JavaScript. And you can not just draw, but also manipulate graphic primitives, do animation, and even hang event handlers on graphic elements. The last opportunity, however, we did not use.
We do not plan to create a separate mobile application. Because the mobile application needs to be additionally installed, which users do not like to do very much. And because for this, you will actually need to make a separate application, which will complicate the support and development of the project. Instead, we are going to follow the path of a progressive web application (Progressive Web App or PWA). But at the moment AB-DOC is not. So far we have just tried to make work in the application from mobile browsers as complete and convenient as possible.
On mobile devices with a screen width of less than 600px, the application begins to behave somewhat differently. On such devices, it works only in one of two modes: tree or document. In general, we were able to fully maintain functionality on touch devices, including drag'n drop tree nodes and attachment of files to documents.
However, while the application does not allow working with documents without an Internet connection. This is a key feature that will be implemented when creating a PWA.
One of the difficulties that we faced when working to adapt the application on mobile devices is the lack of convenient tools for testing.
It is not difficult to open an application running on the developer’s local machine from a mobile device. You can go to the local address via Wi-Fi. You can create a domain for this and send it to your external IP, and forward the port to the local machine on the router. And then this domain will become the address of the application on the local machine.
There is also an option using Wi-Fi via a usb adapter if it is not possible to get into the settings of the router. He came up with IgorBB . You can read more about this option in my AB-DOC tree: https://ab-doc.com/eu-west-1_a01c087d-a71d-401c-a599-0b8bbacd99e5/d4b68bc3-2f32-4a3a-a57c-15cb697e8ef3 .
The main problem with testing is that there is no developer console in mobile browsers. For now, we display debug information through alert (), which of course is not a good option. But we have not yet implemented a more adequate method.
The development process is fairly simple, since only two people work on the project. We use git and a private BitBucket repository. The master branch is production code. Only from it we do. We work on all functions / errors in separate branches. Each branch corresponds to a separate task in our own task tracker AB-TASKS . We try to merge the branches with the master and deploy.
The deployment process is that we need to load the application code into the S3 baket. There are some nuances.
As I wrote above, we use CloudFront to upload content. We need to provide a mechanism whereby the content will almost always be delivered from the CloudFront cache, but when we upload an updated version of the file (image, css, js, html or any other file), CloudFront must update the file in its cache. Otherwise, there may be unpleasant situations in which the user receives, for example, some of the files from the cache, and some updated from the source (S3). This can lead to unpredictable consequences.
To return the application code, we use a separate CloudFront Distribution with one source in the form of an S3 baket, containing the source code AB-DOC, and with two caching rules (Cache Behaviors).
The caching rule determines how CloudFront will cache certain files. To configure the rule, a request pattern is set (* .html or images / *. Jpg and the like) and settings that will be applied when the request matches the specified pattern. Settings include HTTP methods for which caching is active, TTL parameters or the lifetime of objects in the cache (min, max, default), compression, and based on what caching is actually performed (are the parameters taken into account, cookies ...), plus a number of other parameters.
We set up 2 caching rules:
This is where the AWS documentation describes how the various TTL and cache-control settings are combined.
Query parameters make caching easy to manage. For all files we add the conditional version of the file as a parameter: filename.extension? V = 123 . If the file is changed, you only need to change the value of the parameter, and this will force CloudFront to return the file not from the cache, but by referring to the source.
However, it would be very tiring to track changes to files and manually updating links to them, and by and large it is impossible. We would constantly forget to do it. Therefore, we wrote a bash script that does this automatically. At the same time, it performs a number of functions for the full deployment of the application code in S3.
Here are the actions he performs:
In the photo I am at my desk in my home, where I work 90% of the time.
')
We have a small team , we develop web applications for business automation. In addition to completing projects to order, we have created and are developing two online services:
AB-DOC does not work all our team, but only two people: me and IgorBB .
So what is AB-DOC?
Serverless architecture
Serverless applications are now a powerful trend in the world of web development. In simple terms, these are applications that operate entirely on the basis of cloud service providers. Their benefits derive from the characteristics of the cloud services that make them work — this is fault tolerance and scalability. In addition, as with cloud services, their costs are directly dependent on the load. If there is no load, then the cost is zero. It is very comfortable and cool.
But there is a downside. The first drawback of serverless applications is a complex development process. That is, during the initial setup of the infrastructure, and building the development process, they require more effort than regular web applications that have a server. The second drawback is that such applications are usually dependent on the vendor and transferring them to another cloud provider can be a daunting task.
We create applications in Amazon Web Services, so later in the article everything will be related to this cloud provider.
Serverless applications usually have a backend. The backend is a database in the form of a DynamoDB service (NOSQL DBMS) or RDS (relational DBMS). The code for the backend is implemented as Lambda functions, which are accessed via the API Gateway.
AB-DOC has none of this. He has no backend and server code at all (at least for now).
The AB-DOC architecture looks like this.
Application code (HTML, CSS, JavaScript, etc.) is placed in a separate S3 batch and is sent via CDN CloudFront. In principle, it would be possible to give directly from S3, because for the buckets you can enable the function of hosting static content.
The reason we need CloudFront is not only to speed up the loading of content, but also because we needed a way to redirect all links to index.html. AB-DOC is a single-page-application (SPA), so when requesting any URL, we need the user to load index.html. Next, based on the requested URL, JavaScript loads the necessary content for the user using ajax. We do not use front-end frameworks, so we wrote our own small router.
So, in order to redirect all the URLs to index.html, we set up our own 404 error handling rule in CloudFront (page not found).
Thanks to this rule, CloudFront, when requesting any non-existent URL on our resource, gives index.html with a response code of 200. That's all the magic for implementing a SPA with hosting code in S3.
User content is also placed in S3, in a separate batch, and is also provided via CloudFront. Custom content includes a tree structure (Json), document content (HTML), images embedded in documents and attached files (various formats).
Then we will discuss the individual, interesting in my opinion, the nuances of the implementation of our application.
Authentication and authorization
After downloading the code to the user's browser, AB-DOC first performs authentication and authorization of the user. For this we use Cognito.
Let me remind you that authentication is the process of authenticating a user, and authorization is the process of endowing this user with certain rights to work in the program.
Cognito consists of 3 services:
- User Pools
- Federated Identities
- Sync
If you have not had experience with Cognito services, it will be difficult to understand why each of them is needed. I write, as I understand it.
User Pools
This is a managed service that provides registration, authentication (authentication) of users and storage of their accounts. It allows you to customize the data fields for each user (that is stored), password complexity policy, whether you will use MFA, various triggers that can be triggered during registration, entry, and so on. Here you can configure the messages that the service will send to verify the email when registering users.
External identity providers (Facebook, Google, Amazon or SAML) can be attached to the User pool. When you log in through an external provider, an account is created in your User pool. This basically works if you use the login pages hosted in the Cognito service itself. That is, you need to redirect users to login to a special URL of the form your-app.auth. [Region] .amazoncognito.com. You can customize the look of this page so that it looks like the look of your application. After logging in, the user will be returned to your application. I did not like this implementation option.
For a long time, I tried to implement integration of the User pool with external providers using the Amazon Cognito Identity SDK for JavaScript. Theoretically, this is also possible, but I could not find any documentation on this topic and I gave up. It was 2-3 months ago.
Federated Identities
Unlike User Pools, this service is responsible for authorizing users, that is, empowering them with certain powers to access AWS services (S3, for example).
For this service to work, you need to create an Identity pool and configure authentication providers with which it will work. Your User pool can act as authentication providers, as well as a number of external providers such as Amazon, Facebook, Google, Twitter, OpenID, SAML, or even an authentication provider that you create yourself.
In AB-DOC, we use our User pool and one external provider, Google, as authentication providers. Therefore, users have 2 options:
- Create a new account (create a login password, confirm email). In this case, an account is created for it in the User pool and then an entry is created in the Identity pool, thanks to which it obtains the necessary permissions.
- Sign in with your google account. Then the account in the User pool is not created, the user simply creates an entry in the Identity pool, and he is given the necessary permissions to work with the application.
The process of empowering the Identity pool is pretty simple. For Identity pool are selected in 2 roles from AWS Identity and Access Management (IAM): for authenticated and unauthenticated users.
For each role in IAM, you can link any policies that will arbitrarily give users the necessary rights. Customization is possible through the use of variables in policies. For example, in order to give write access to users only within their folder in the S3 batch, we use this variable in the resource description
... "Resource": [ "arn:aws:s3:::ab-doc-storage/${cognito-identity.amazonaws.com:sub}", "arn:aws:s3:::ab-doc-storage/${cognito-identity.amazonaws.com:sub}/*", ] ... Thus, instead of $ {cognito-identity.amazonaws.com:sub} for each user, its ID in the Identity pool is substituted into the policy. Each user works inside his folder in the batch, whose name corresponds to his id in the Identity pool.
The word folder here could be put in quotes, because in fact there are no folders in S3. This is a flat file system. Each file simply has a key (Key), and the division into "folders" is conditional.
Sync
This service provides data storage for users of the application. Data placed in Sync is stored as key-value sets (Datasets), which are tied to the user id in the Identity pool. Thus, Sync allows you to save arbitrary information on all users, through which they are not authenticated: whether it is User pool or an external provider. In addition, Sync provides synchronization of data sets between all devices on which the user works in the application.
In general, authorization is built on tokens. The JavaScript code responsible for it currently makes up more than 1/3 of the entire application code. That is, this is quite a voluminous topic, and maybe I will write a separate article about it in the future.
Track changes and event queues
AB-DOC itself keeps track of and saves the changes that the user makes when editing tree nodes or document contents.
The operation of this mechanism is based on JavaScript timers: setInterval (). Separate timers are created for the tree and for the document, which check once every 3 seconds whether the changes have appeared, and if so, save them in S3. Timers in the application are centrally created via the TIMERS object.
For centralized change tracking, we wrote an ACTIVITY object, which is responsible for event queue management. The queue is formed in accordance with the options of content that the user can create. The tree has its own queue, the document has its own queue, each queue has its own queue, and so on.
The events recorded in the queue can be of two types: pending or saving. The logic of the queues as follows.
When the user makes some editing, a wait event is added to the desired queue. In the tree, events are added directly from the code that handles changes, and changes to documents are tracked thanks to Mutation Observer.
Then, when the corresponding timer is triggered, a save event is added to the queue, and the process of uploading changes to S3 begins. After a successful download, this queue is cleared until the last save event. At the time of cleaning in the queue there may be new wait events that will wait for the next 3 second cycle.
This is how it looks in the example of the doc modify queue, which is responsible for document changes.
The change indicator in the header reflects the status of the event queues.
When nothing happens and all queues are empty, the indicator is not displayed.
If there are waiting events in the queues, it is represented by an orange pencil.
If there are queues in which the saving process is in progress, the indicator turns white.
If the queues are not empty, and the user tries to close the browser or just leave the page, then the window.onbeforeunload () function will work. She will warn the user that his edits have not yet survived. He can either wait for the save to finish or leave the page, losing the last changes.
The indicator is written to the $ update variable:
$update = $('#update'); Object code TIMERS
//TIMERS object //tracks all timers and prevents memory leaks //call TIMERS.set('name') to create new timer //call TIMERS.<timer_name>.destroy() to destroy timer //call TIMERS.<timer_name>.execute() to execute timer TIMERS = { on: true, //timers are ON when true set: function(callback, interval, name){ if(['on', 'set', 'execute', 'destroy', 'Timer'].indexOf(name) !== -1){ throw new Error('Invalid timer name: ' + name); } if(this.hasOwnProperty(name) && this[name].id !== 0){ //automatically clears previous timer this[name].destroy(); } if(this.on || PRODUCTION){ this[name] = new this.Timer(callback, interval); } else { this[name] = { id: 0, execute: callback, destroy: function(){ void(0); } } } }, Timer: function(callback, interval){ //timer constructor this.id = setInterval(callback, interval); this.execute = callback; this.destroy = function(){ clearInterval(this.id); }; } }; ACTIVITY object code
//ACTIVITY object //stores activities states and updates indicator in navbar. //Activities: doc edit, file [guid] upload, file [guid] delete or whatever. //Two possible states: pending or saving. //Each activity on each specific object must be reported independently! //"saving" class is "!important", so it dominates if both classes are active ACTIVITY = { lines: {}, //each activity has own line of pending and saving events push: function (activity, state){ var self = this; if(this.lines.hasOwnProperty(activity)){ this.lines[activity].push(state); } else { this.lines[activity] = [state]; } this.refresh(); return self; }, get: function(activity){ var self = this; if(this.lines.hasOwnProperty(activity)){ var length = this.lines[activity].length; return this.lines[activity][length-1]; } else { return undefined; } }, flush: function(activity){ var self = this; if(this.lines.hasOwnProperty(activity)){ var index = this.lines[activity].indexOf('saving'); if(index !== -1){ this.lines[activity] = this.lines[activity].slice(index+1); } } this.refresh(); return self; }, drop: function(activity){ var self = this; if (this.lines.hasOwnProperty(activity)){ delete this.lines[activity]; this.refresh(); } return self; }, refresh: function(){ var keys = Object.keys(this.lines), pending = false, saving = false; for (var i = 0; i < keys.length; i++) { pending = pending || this.lines[ keys[i] ].indexOf('pending') !== -1; saving = saving || this.lines[ keys[i] ].indexOf('saving') !== -1; } pending ? $update.addClass('pending') : $update.removeClass('pending'); saving ? $update.addClass('saving') : $update.removeClass('saving'); } } Again, using the example of a document, the process looks like this. When you open a document, the event handler changes the content of the document (inside it is Mutation Observer). The handler simply adds the wait event to the doc queue to modify:
editor.on('text-change', function () { ACTIVITY.push('doc modify', 'pending'); }); The document timer every 3 seconds checks the doc modify queue for wait events and loads the document content into S3 if necessary, and then clears the queue:
TIMERS.set(function () { if(ACTIVITY.get('doc modify') === 'pending'){ ACTIVITY.push('doc modify', 'saving'); var params = { Bucket: STORAGE_BUCKET, Key: self.ownerid + '/' + self.docGUID + '/index.html', Body: self.editor.root.innerHTML, ContentType: 'text/html', ContentDisposition: abUtils.GetContentDisposition('index.html'), ACL: 'public-read' }; Promise.all([ s3.upload(params).promise(), new Promise(function(res, rej) { setTimeout(res, 800); }) ]).then(function(){ ACTIVITY.flush('doc modify'); }).catch(function(){ g.abUtils.onWarning(g.abUtils.translatorData['couldNotSave'][g.LANG]); }); } }, 3000, 'doc'); There is a funny moment here, due to the fact that loading in S3 is usually very fast. Therefore, so that the save indicator does not flicker, we use Promise.all (), which is triggered when the two Promise completes: the actual s3.upload () and the small setTimeout () with a duration of 0.8 seconds. It is necessary for the indicator to show saving for at least 0.8 seconds, even if, in fact, the changes loaded faster.
Download and store data in S3
Each user in S3 is allocated a separate folder whose name matches its id in the Identity pool. In the root of this folder, AB-DOC saves the tree.json file, which stores the structure of the user's tree.
The file format for tree.json is:
[ { "id": "GUID ()", "name": " ()", "children": [ { "id": "...", "name": "...", "children": [...] }, { "id": "...", "name": "...", "children": [...] }, ... ] }, { "id": "GUID ()", "name": " ()", "children": [ { "id": "...", "name": "...", "children": [...] }, { "id": "...", "name": "...", "children": [...] }, ... ] }, ... ] This structure is used unchanged as a data source for zTree when rendering a tree.
Each document is stored in a separate subfolder, the name of which coincides with the document guid. Inside this folder is saved file index.html, which actually is a document. In addition to this file, images inserted into the document are saved as separate objects in the document folder, and all files attached to the document are stored in the attachments subfolder.
All data is downloaded directly from the user's browser to S3 using the AWS JavaScript SDK upload () function. She is able to upload files to S3, breaking them into parts (multipart upload) and doing it in several streams.
For example, the files attached to the document are loaded into 4 streams in this way, with splitting into parts of 6 MB each. This code works inside the abDoc object (document), self in this case = this object.
ACTIVITY.push('doc file upload', 'saving'); var fileGUID = abUtils.GetGUID(), key = self.ownerid + '/' + self.docGUID + '/attachments/' + fileGUID, partSize = 6 * 1024 * 1024; var file_obj = { guid: fileGUID, name: file.name, iconURL: abUtils.mimeTypeToIconURL(file.type), key: key, size: file.size, percent: '0%', abortable: file.size > partSize //only multipart upload can be aborted }; var params = { Bucket: STORAGE_BUCKET, Key: key, Body: file, ContentType: file.type, ContentDisposition: abUtils.GetContentDisposition(file.name), ACL: 'public-read' }; var upload = s3.upload(params, {partSize: partSize, queueSize: 4}); upload.on('httpUploadProgress', function(e) { var $file = $('.file-container[data-guid='+fileGUID+']'); if(!$file.hasClass('freeze')){ file_obj.percent = Math.ceil(e.loaded * 100.0 / e.total) + '%'; var $file_size = $file.find('.file-size'); $file_size.css('width', file_obj.percent); if($file_size.attr('data-text')){ $file_size.text( file_obj.percent ); } } }); upload.send(function(err, data) { if(err) { if (err.name !== 'RequestAbortedError') { abUtils.onError(err); } } else { var params = { Bucket: data.Bucket, Prefix: data.Key }; s3.listObjectsV2(params, function(err, data) { if (err) { abUtils.onError(err); } else { file_obj.modified = data.Contents[0].LastModified; self.updateFilesList(); ACTIVITY.flush('doc file upload'); } }); } }); The httpUploadProgress event allows you to track download progress and update the progress bar of the file.
The s3 object (AWS JavaScript SDK) uses credentials, which include the id Identity pool, user id token and authentication provider name. All calls to the S3 service are made with the transfer of the user’s token id. The user is endowed with those rights that are specified in the policy associated with the role, which in turn is set in the Identity pool. The same principle works with other AWS services via the JavaScript SDK. Id token has a short lifespan (1 hour), after which you need to get a new id token with the help of refresh token. Refresh token has a lifespan of 365 days.
Free Space Indicator
At first glance it may seem that this is a very simple thing, but it is not quite so.
We made an indicator of the free space in the form of a basket: narrow at the bottom and diverging up. We wanted to make the basket visually consistent with how the basket would be filled in the physical world. That is, at first it is filled quickly, since it is narrower from below. And as you fill, the level rises more and more slowly due to its expansion upwards.
To realize this, we used the Gauss area formula for quadrilaterals.
Using this formula, using the coordinates of the basket points, we can calculate the area of the entire basket - this corresponds to the maximum free space limit of 1 GB. Further, based on the value of the volume filled by the user, we calculate, using a simple proportion, the area of the part of the basket that will be occupied by the user.
Having occupied the user space, it remains to calculate the Y-coordinate of the upper boundary of the filled space based on the above formula. The X-coordinates of the upper points of the occupied space are displayed through the tangent of the angle of the basket. In general, as a result of the output Y, I got, although terrible in appearance, but the usual quadratic equation. On the board it is in the lower right corner.
On the board, size indicates the length of the side of the square into which the basket fits. For example, size = 30 on the blackboard. It was necessary to derive a general formula, so I used the notation size.
Now, when I write these lines, vague doubts crept in. Probably, I was very wise and could be inferred much easier, considering that the figures are equi-sided trapeziums ...
To draw the indicator, we used the amazing SVG.js library, which allows you to draw SVG graphics in JavaScript. And you can not just draw, but also manipulate graphic primitives, do animation, and even hang event handlers on graphic elements. The last opportunity, however, we did not use.
Here is the function that draws the indicator.
function() { var size = 32, bucket_capacity = this.maxUsedSpace, space_occupied = this.userUsedSpace + this.userUsedSpaceDelta + this.userUsedSpacePending; //bucket coords var bx1 = 2, bx2 = 5, bx3 = size - bx2, bx4 = size - bx1, by1 = 2, by2 = size - by1, by3 = by2, by4 = by1, tg_alpha = (bx2 - bx1) / (by2 - by1); //calculate areas var barea = Math.abs(bx1*by2 + bx2*by3 + bx3*by4 + bx4*by1 - bx2*by1 - bx3*by2 - bx4*by3 - bx1*by4) / 2, sarea = Math.min(1.0, space_occupied / bucket_capacity) * barea; //calculate y of the occupied space (see sizeIndicator.jpg for details) var a = -2*tg_alpha, b = 3*tg_alpha*by2 + bx3 + size - 3*bx2 + tg_alpha*by3, c = bx2*by2 - tg_alpha*Math.pow(by2, 2) + 2*bx2*by3 - bx3*by2 - size*by3 - tg_alpha*by2*by3 + 2*sarea, D = Math.pow(b, 2) - 4*a*c, y = (-b + Math.sqrt(D)) / (2*a); //occupied space coords var sx1 = Math.ceil(bx2 - by2*tg_alpha + y*tg_alpha), sx2 = bx2, sx3 = bx3, sx4 = size - sx1, sy1 = Math.ceil(y)-2, sy2 = by2, sy3 = by3, sy4 = sy1; //draw if(!this.sizeIndicator){ this.sizeIndicator = SVG('sizeIndicator'); this.sizeIndicator.space = this.sizeIndicator .polygon([sx1,sy1, sx2,sy2, sx3,sy3, sx4,sy4]) //occupied space .fill('#DD6600'); this.sizeIndicator.bucket = this.sizeIndicator .polyline([bx1,by1, bx2,by2, bx3,by3, bx4,by4]).fill('none') //bucket shape .stroke({ color: '#fff', width: 3, linecap: 'round', linejoin: 'round' }); } else { this.sizeIndicator.space .animate(2000) .plot([sx1,sy1, sx2,sy2, sx3,sy3, sx4,sy4]); } //update tooltip $('#sizeIndicator').attr('title', g.abUtils.GetSize(space_occupied) + ' / ' + g.abUtils.GetSize(bucket_capacity)); } Pro mobile version
We do not plan to create a separate mobile application. Because the mobile application needs to be additionally installed, which users do not like to do very much. And because for this, you will actually need to make a separate application, which will complicate the support and development of the project. Instead, we are going to follow the path of a progressive web application (Progressive Web App or PWA). But at the moment AB-DOC is not. So far we have just tried to make work in the application from mobile browsers as complete and convenient as possible.
On mobile devices with a screen width of less than 600px, the application begins to behave somewhat differently. On such devices, it works only in one of two modes: tree or document. In general, we were able to fully maintain functionality on touch devices, including drag'n drop tree nodes and attachment of files to documents.
However, while the application does not allow working with documents without an Internet connection. This is a key feature that will be implemented when creating a PWA.
One of the difficulties that we faced when working to adapt the application on mobile devices is the lack of convenient tools for testing.
It is not difficult to open an application running on the developer’s local machine from a mobile device. You can go to the local address via Wi-Fi. You can create a domain for this and send it to your external IP, and forward the port to the local machine on the router. And then this domain will become the address of the application on the local machine.
There is also an option using Wi-Fi via a usb adapter if it is not possible to get into the settings of the router. He came up with IgorBB . You can read more about this option in my AB-DOC tree: https://ab-doc.com/eu-west-1_a01c087d-a71d-401c-a599-0b8bbacd99e5/d4b68bc3-2f32-4a3a-a57c-15cb697e8ef3 .
The main problem with testing is that there is no developer console in mobile browsers. For now, we display debug information through alert (), which of course is not a good option. But we have not yet implemented a more adequate method.
Development and deployment
The development process is fairly simple, since only two people work on the project. We use git and a private BitBucket repository. The master branch is production code. Only from it we do. We work on all functions / errors in separate branches. Each branch corresponds to a separate task in our own task tracker AB-TASKS . We try to merge the branches with the master and deploy.
The deployment process is that we need to load the application code into the S3 baket. There are some nuances.
As I wrote above, we use CloudFront to upload content. We need to provide a mechanism whereby the content will almost always be delivered from the CloudFront cache, but when we upload an updated version of the file (image, css, js, html or any other file), CloudFront must update the file in its cache. Otherwise, there may be unpleasant situations in which the user receives, for example, some of the files from the cache, and some updated from the source (S3). This can lead to unpredictable consequences.
To return the application code, we use a separate CloudFront Distribution with one source in the form of an S3 baket, containing the source code AB-DOC, and with two caching rules (Cache Behaviors).
The caching rule determines how CloudFront will cache certain files. To configure the rule, a request pattern is set (* .html or images / *. Jpg and the like) and settings that will be applied when the request matches the specified pattern. Settings include HTTP methods for which caching is active, TTL parameters or the lifetime of objects in the cache (min, max, default), compression, and based on what caching is actually performed (are the parameters taken into account, cookies ...), plus a number of other parameters.
We set up 2 caching rules:
- The first rule for HTML files. Small TTLs are set in their caching settings (Minimum TTL = 100 seconds). Provided that we set max-age = 0 for these files, the minimum TTL is applied, that is, HTML files after 100 seconds are considered expired, and CloudFront contacts the source to check if there is a more recent version of the file.
- The second rule for all other files. For these files, we do not set the cache-control max-age file headers, so the maximum of two values is used for them: minimum TTL and default TTL. In our case, this is 86400 seconds or 24 hours, that is, they are cached for a long time. But beyond that, in the rule settings, we indicate that CloudFront should “look” at the request parameters when caching objects.
This is where the AWS documentation describes how the various TTL and cache-control settings are combined.
Query parameters make caching easy to manage. For all files we add the conditional version of the file as a parameter: filename.extension? V = 123 . If the file is changed, you only need to change the value of the parameter, and this will force CloudFront to return the file not from the cache, but by referring to the source.
However, it would be very tiring to track changes to files and manually updating links to them, and by and large it is impossible. We would constantly forget to do it. Therefore, we wrote a bash script that does this automatically. At the same time, it performs a number of functions for the full deployment of the application code in S3.
Here are the actions he performs:
- It scans all HTML files. With grep it finds all references to images, styles, scripts. Checks the timestamp of the last change of each file using the stat command. If the file has changed since the last pass of the script, it uses sed to update the timestamp in the v = [timestamp] parameter in the file reference.
- In the script config, you can indicate to it which JavaScript files we want to assemble into a single bundle. , babel . .
- S3 HTML , :
aws s3 sync $PACKAGE s3://"$bucket"/ --delete --acl public-read --exclude "*.html" aws s3 sync $PACKAGE s3://"$bucket"/ --delete --acl public-read --cache-control max-age=0 --exclude "*" --include "*.html"
#! /bin/bash # This script is used for deployment # It uploads files to the bucket, corrects timestamps of files included in HTML, bundles js scripts. # To use this script you need a config file: # .service/deploy.config : # bucket=mybucket # exclude=.git/*,.service/*,secret_file # Files and directories to exclude from uploading # bundle=script1.js,script2.js,script3.js # Scripts listed here would be removed from HTML files and bundeled into a single file, which will be minified. A separate bundle is created for every HTML file # You also need to install babel-cli and babel-preset-minify from npm: # npm install --save-dev babel-cli # npm install --save-dev babel-preset-minify # If you want this script to correct timestamps in HTML, you should include them with a ?v=<number> : <link rel="apple-touch-icon" sizes="180x180" href="/apple.png?ver=v123"> # You can use following options: # -v,--verbose - for detailed output # -n,--no-upload - do not upload result into bucket VERBOSE=false NO_UPLOAD=false PACKAGE="package" TMP="$PACKAGE/.temp" CONFIG=".service/deploy.config" PATH="$PATH:./node_modules/.bin" function log() { local message=$1 if [ "$VERBOSE" = true ] ; then echo $message fi } function error() { echo "$1" } bundle_n=0 function create_bundle() { local html_source_file=$1 echo "Creating bundle for \"$html_source_file\"..." #this is a grep command local grep0="$BUNDLE_GREP $html_source_file" #name before babel local bundle_before_babel="$TMP/ab.doc.bundle$bundle_n.js" #name to be used in html local bundle_after_babel_src="scripts/ab.doc.bundle$bundle_n.min.js" #name after babel local bundle_after_babel="$PACKAGE/$bundle_after_babel_src" $grep0 | while read -rx; do log "Adding \"$x\" to bundle" echo -en "//$x\n" >> $bundle_before_babel cat $x >> $bundle_before_babel echo -en "\n" >> $bundle_before_babel done # if files for bundling were found in html if [ -f $bundle_before_babel ] then #putting bundle through babel log "\"$bundle_before_babel\" >===(babel)===> \"$bundle_after_babel\"" npx --no-install babel "$bundle_before_babel" --out-file "$bundle_after_babel" --presets=minify #removing bundeled scripts from file log "Removing old scripts from \"$html_source_file\"..." sed="sed -i.bak -e \"" grep1="$BUNDLE_GREP -n $html_source_file" lines=($($grep1 | cut -f1 -d:)) for ln in ${lines[*]} do sed="$sed$ln d;" done sed="$sed\" $html_source_file" eval $sed #adding bundle instead of old scripts log "Adding bundle to \"$html_source_file\"..." current_time=$(stat -c %Y .$filename) sed -i.bak -e "${lines[0]}i<script src=\"/$bundle_after_babel_src?ver=v$current_time\"></script>" $html_source_file rm $html_source_file.bak bundle_n=$(expr $bundle_n + 1) fi } function update_versions() { local html_source_file=$1 local found=0 local modified=0 #set file versions according to modify timestamp echo "Updating file versions in \"$html_source_file\"..." grep -oE "\"[^\"]+\?ver=v[^\"]+\"" $html_source_file | while read -r href ; do ((found++)) local href="${href//\"/}" local current_timestamp=$(echo $href | grep -oE "[0-9]+$") local filename="${href/?ver=v[0-9]*/}" local new_timestamp=$(stat -c %Y $PACKAGE$filename) log $new_timestamp if [ "$current_timestamp" != "$new_timestamp" ] then ((modified++)) sed -i "s|$filename?ver=v[0-9]*|$filename?ver=v$new_timestamp|g" $html_source_file fi log "Found $found, modified $modified" done } function init_directory() { local path=$1 log "Creating empty directory \"$path\"" if [ -d "$path" ]; then log "\"$path\" already exists. Removing \"$path\"" rm -rf "$path" fi mkdir "$path" } echo "==== Initialization ====" # check flags while [[ $# -gt 0 ]] do key="$1" case $key in -v|--verbose) VERBOSE=true shift ;; -n|--no-upload) NO_UPLOAD=true shift ;; *) shift ;; esac done if [ ! -f $CONFIG ]; then error "Could not load config \"$CONFIG\"." exit -1 fi . $CONFIG exclude=${exclude//,/ } if ! npm list babel-preset-minify > /dev/null ; then error "babel-preset-minify is not installed" exit -2 fi if ! npm list babel-cli > /dev/null ; then error "babel-cli is not installed" exit -3 fi if [ -v bundle ]; then log "Using bundle" bundle=${bundle//,/ } BUNDLE_GREP="grep " for b in $bundle do BUNDLE_GREP="$BUNDLE_GREP -o -e $b " done else log "Not using bundle" fi # create package and tmp directories echo "==== Creating temporary directories ====" init_directory "$PACKAGE" init_directory "$TMP" # copying everything into package excluding files listed in $exclude copy="tar -c --exclude \"$PACKAGE\" " files_to_exclude="$exclude $bundle" #( "${exclude[@]}" "${bundle[@]}" ) for e in $files_to_exclude do log "Excluding $e" copy="$copy --exclude \"$e\"" done copy="$copy . | tar -x -C $PACKAGE" eval $copy echo "==== Working with HTML files ====" for f in $(find $PACKAGE -name '*.html') do if [ -v bundle ]; then create_bundle $f fi update_versions $f done rm -rf $TMP if [ "$NO_UPLOAD" = false ] ; then echo "==== S3 upload ====" #upload to S3 aws s3 sync $PACKAGE s3://"$bucket"/ --delete --acl public-read --exclude "*.html" aws s3 sync $PACKAGE s3://"$bucket"/ --delete --acl public-read --cache-control max-age=0 --exclude "*" --include "*.html" fi echo "==== Cleaning up ====" rm -rf $PACKAGE exit 0 Source: https://habr.com/ru/post/349808/
All Articles