Implementation of a prototype of mobile / web clients and a server for an enterprise equipment control system
The customer was interested in a system that would simplify control over the condition of the equipment at the enterprises of the industry. The existing control procedure consists of regular rounds of equipment installed in workshops (along routes) and filling in paper forms, indicating in them instrument readings and external signs of malfunctions.
Since full automation (with the control of all parameters by sensors and data transfer from them over the network) is technically and organizationally impossible, it was proposed to partially automate the procedure. Namely, at the inspection sites (control points), hang NFC tags, and bypass employees to issue smartphones with an application that fixes the attachment of the smartphone to the tag and offers to enter the parameters required for each point. The data is then transmitted to the server, from where it can be viewed by the supervisor in the browser (with marks of exceeding permissible values, statistics, etc.).
')
Javascript was chosen for implementation, specifically - a bundle in the form of NodeJS, React + Redux, React-Native (with the exchange between them through GraphQL). This allowed the use of one language for the server, client and mobile application. Before, I didn’t come across the listed technologies (except Javascript), so the article largely reflects the experience of exploring them.
Functional system and organization of the database
Entities and their relationship
'checkpoint' - control point, equivalent to piece of equipment
'param' - Control point parameters
'unit' - Unit of parameter
'range' - The range of values allowed for this parameter.
'checkup' - fact of passing checkpoints on one of the routes
'check' - The fact of checking the control point during the tour (contains comments on the point)
'checkvalue' - The actual value of one parameter when checking a checkpoint
'firm' - Company
'plant' - Company Enterprise
'shop' - Workshop of the enterprise
'route' - Route in the shop
'rclink' - Linking a control point to a route (determines the order of visiting points on a given route)
'position' - user position
'user' - User

The binding of control points to routes is performed not directly, but through intermediate rclinks. This is due to the fact that within the same workshop there can be several routes, and along the same control points - on different routes, in a different order, and not necessarily all. Therefore, it uses a bidirectional list.
All described entities are represented in the database by tables of the same name (in the plural - that is, routes, checkpoints, etc.). Record identifiers are global and are generated via node-uuid on the server (in React Native — via react-native-uuid ) with the addition of the type (for debugging convenience)
Example: 0ec74560-9da3-11e7-b19a-b5183ad4a4a8_checkpoint
For each record, the record creation date, the date it was changed (dt_crt, dt_mod), the last synchronization date (dt_sync), the synchronization session identifier (sync_id), and the id of the user who created or changed the record (user_crt_id, user_mod_id) are recorded in all tables.
The database structures on the server and in the mobile application are identical (for this reason SQLite was chosen for the server part).
Before starting work in the web interface, organizations and their structure are created. The highest level of hierarchy is organization (firm), which contains production objects (plants). Each object has in its composition shop (shops). The level of the workshops is technically basic - access to positions is allowed to them (positions), control points are added, there are routes within the workshops, etc.
Users (users) technically only provide the ability to enjoy the rights of posts and may have different interface settings.
Control points
The key essence of the system is the concept of a checkpoint (checkpoint). The point of a detour (checkup) is to visit the control points and remove the values of the parameters of the equipment placed on them (checkvalue) for subsequent storage and evaluation.
The initial addition of the control point is carried out in the context of a given workshop (shop), via the web interface. In this case, the NFC tag is entered into the form by touching the NFC smartphone tag.
Also, in the process of adding a point, one or several parameters (params) and valid ranges of values (ranges) are attached to it. To parameters - their units of measurement (units), which are also attached to the organization (firms). Those. each organization can have its own set of units.
Parameters can be of two types - float (number) and boolean (value of the form yes / no). The third type (text) is reserved.
For each parameter, the minimum and maximum acceptable values must be specified. When showing crawl results, values out of range will be highlighted in red.
The created control points can be tied to one or several routes (route) in a given order for each route. Those. the same point may be part of different routes.
The order is set by the intermediate table rclinks, where for each point-route pair the next and previous point id is specified (null for the first and last).
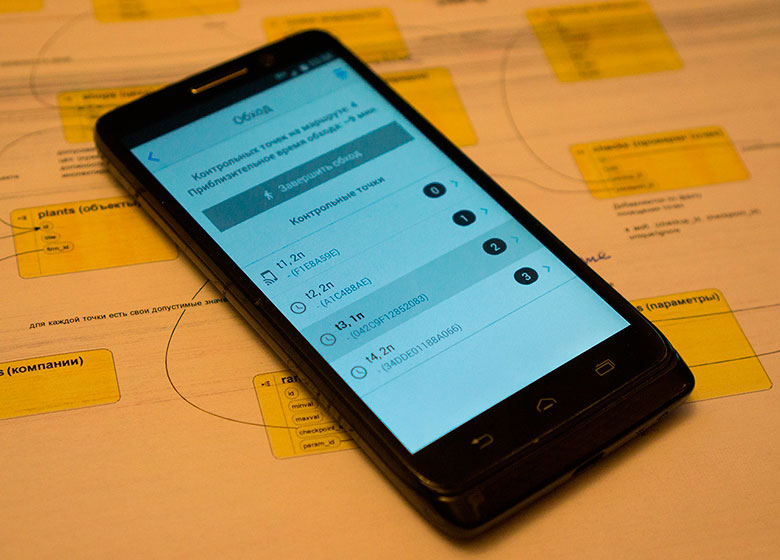
Crawling process
When performing a crawl, the mobile application functions as follows:
The user presses the “Start tour” button in the route proposed by him or his chosen route. This creates a checkup. When selecting a control point, the user fills in the values of the parameter fields received by the application from params, units. When they are saved, a check is created for a given point in the context of this traversal, in which also notes on the point are saved and the created check values are attached to check, in which the values of each of the entered parameters are saved.
After saving the values of the parameters, the point is considered checked (because check is created for it) and the next point is expected (in accordance with rclinks.next_id) point on this route.
In this case, already checked points can be edited again (until the end of the tour). Skipping the same points is not allowed.
Server side (backend)
The server part is implemented on NodeJS, SQLite, GraphQL and allows you to:
1. Store data
2. Provide access to data from mobile and web applications with appropriate access control
For the server, express is used (graphql-server-express and express-jwt are joined with it). SQLite - through node-sqlite (supports promises).
The server consists of schema.js, which describes the types and methods for GraphQL queries (using Apollo Server ), resolvers.js (with the methods described in the schema), connectors.js (with all logic and SQL queries to the database) and, in fact, primary server.js
server.js
Hidden text
import express from 'express'; import { graphqlExpress, graphiqlExpress } from 'graphql-server-express'; import bodyParser from 'body-parser'; import cors from 'cors'; import { schema } from './schema'; import { execute, subscribe } from 'graphql'; import { createServer } from 'http'; import { SubscriptionServer } from 'subscriptions-transport-ws'; import db from 'sqlite'; import connectors from './connectors'; import jwt from'express-jwt'; const { GQLSERVERLOCAL, GQLSERVERPROD, WEBSERVER, PATH, DATABASE, AUTH } = require('./config'); let p = db.open(DATABASE.NAME).then(db =>{ console.error("SQLite: DB ok "); }).catch(error => { console.error("SQLite: DB error: " + error); }); const server = express(); const corsOptions = { origin(origin, callback){ callback(null, true); }, credentials: true }; server.use(cors(corsOptions)); server.use(PATH.GQL, bodyParser.json(), jwt({ secret: AUTH.secret, credentialsRequired: false, getToken: function fromHeaderOrQuerystring (req) { if (req.headers.authorization && req.headers.authorization.split(' ')[0] === 'Bearer') { return req.headers.authorization.split(' ')[1]; } else if (req.query && req.query.token) { return req.query.token; } return null; } }), graphqlExpress(req => ({ schema: schema, context: { user: req.user ? connectors.findUser(req.user.id) : Promise.resolve(null), }, // context resolvers.js }))); // , websockets const ws = createServer(server); server.use(PATH.GIQL, graphiqlExpress({ endpointURL: PATH.GQL, subscriptionsEndpoint: `ws://${GQLSERVERPROD.HOST}:${GQLSERVERPROD.PORT}/subscriptions` })); ws.listen(GQLSERVERPROD.PORT, () => { console.log(`GraphQL Server v1 is now running on ${GQLSERVERPROD.HOST}:${GQLSERVERPROD.PORT}`); new SubscriptionServer({ execute, subscribe, schema }, { server: ws, path: PATH.SUBS, }); }); scheme.js
Hidden text
[...] type DeletePlantResult { rows_changed: Int error: String } input IdsInput { ids: [String] } deletePlant(data: IdsInput): DeletePlantResult [...] resolvers.js
Hidden text
import connectors from './connectors'; export const resolvers = { Mutation: { [...] deletePlant: (root, params, context) => { // context , server.js [...] const errors = []; const {data} = params const ids = data.ids.map(function(id){ return "'" + id + "'" }).join(",") return connectors.deletePlant(ids) .then(rows_changed => ({ rows_changed, errors })) .catch((err) => { if (err.code && err.message) { errors.push({ key: err.code, value: err.message }); return { errors }; } }); },//deletePlant } [...] } connectors.js
Hidden text
deletePlant(ids) { return new Promise((resolve, reject) => { return db.run(` DELETE FROM 'plants' WHERE id IN(${ids}) `) .then((plant) => { resolve(plant.changes); }) .catch((err) => { return reject(err); }); }) },//deletePlant 
Implemented bilateral non-incremental data synchronization between the server and the mobile application. From the server to the mobile application are transmitted
positions, shops, routes, rclinks, checkpoints, ranges, params, units, users
(for synchronization, a sample of only the records related to the workshops allowed for the position (position) of the user of the mobile application) is formed. Those. composition of the sample is determined by the position.
The results of the rounds - checkups, checks, checkvalues are transferred from the mobile application to the server.
Web client (frontend)
The web client is implemented on React + Redux and allows you to:
1. To form in the system the organizational structure of the organization (industrial facilities, shops, users, their positions), schemes and detour mode (routes through workshops, control points on the routes, their parameters)
2. To control the mode and results of the conducted rounds on routes at facilities and in workshops, to review the values of parameters entered by the inspector at control points, their deviations from the specified allowable values, various statistics
3. Register and authorize registered users, provide them access to resources
All pages are represented by React components and are divided into two groups - user (main interface) and administrative (for control, selective viewing and editing database tables).

Navigation is implemented on react-router — the store stores the current context in which the user is located, gradually being filled with updateContext () calls. In the links, only the path to the component is transferred (except for the administrative pages where you can specify the object id in the query string). From the context data at the top of each page, a navigation bar is constructed showing where the user is located.
The context is automatically saved to local storage via redux-persist .
The layout is adaptive (bootstrap), most of the components of the pages at the base have a table on react-bootstrap-table , whose cells are filled with the results of the GraphQL query, whose parameters are the id of objects taken from the context and the query string.
Where necessary, custom formatters / renderers are defined for the cells (display of dates, editing with a choice from the list, etc.)
Apollo is used for GraphQL (both in the web client and in the mobile application).
A typical component of a simple page with an editable table looks like this:
components / PlantsPage.js:
Hidden text
import React from 'react'; import { BootstrapTable, TableHeaderColumn } from 'react-bootstrap-table'; import { reduxForm } from 'redux-form'; import { Button, ProgressBar } from 'react-bootstrap'; [...] class PlantsPage extends React.Component { addEmptyItem() { this.props.addPlant({ variables: {data: {firm_id:this.props.params.firm_id, user_crt_id:'system_user',user_mod_id:'system_user'}} }); } [...] }; render() { if (this.props.data.loading) return <ProgressBar active bsStyle="info" now={100} />; return ( <div className="container"> <h1></h1> <BootstrapTable data={ this.props.data.getPlants.plants } [...] > <TableHeaderColumn dataField='title' [...] ></TableHeaderColumn> [...] </BootstrapTable> <Button [...] onClick={ () => { this.addEmptyItem(); } }> </Button> </div> ) } } [...] export default PlantsPage; components / PlantsContainer.js:
Hidden text
import React from 'react'; import { withRouter } from 'react-router'; import { connect } from 'react-redux'; import gql from 'graphql-tag'; import { graphql, compose } from 'react-apollo'; import PlantsPage from "../components/PlantsPage"; class PlantsContainer extends React.Component { render() { return <PlantsPage {...this.props} />; } }//class const gqlGetPlants = gql` query getForPlants($firm_id:String!,$object_id:String!,$holding_id:String!) { getPlants(firm_id: $firm_id) { plants { id, title, shops_count, [...] }, errors { key, value, } }, } `; const gqlGetPlantsProps = { options: (ownProps) => ({ pollInterval: 0, variables: { firm_id: ownProps.params.firm_id, object_id: ownProps.params.firm_id, holding_id: 'all', }, }), } const gqlAddPlant = gql` mutation ($data: PlantInput) { addPlant(data: $data) { id, errors { key value } } } `; const gqlAddPlantProps = { name: 'addPlant', options: { refetchQueries: [ 'getForPlants', ], }, }; [...] const PlantsWithData = compose( graphql(gqlUpdatePlant, gqlUpdatePlantProps), graphql(gqlGetPlants, gqlGetPlantsProps), [...] )(withRouter(PlantsContainer)); const PlantsWithDataAndDispatch = connect( null, // mapStateToProps null, // mapDispatchToProps )(PlantsWithData); export default PlantsWithDataAndDispatch For pop-up notifications and error messages used react-redux-toastr
Where required forms (checkpoint creation, registration, login, profile editing, etc.), redux-form was used.
The principle of working with forms is as follows:
components / ProfilePage.js:
Hidden text
import React from 'react'; import { Field, reduxForm } from 'redux-form'; import { Button, ControlLabel, FormGroup, Alert } from 'react-bootstrap'; const renderErrors = (errors) => ( <Alert bsStyle="warning"> {errors.map((error, index) => <span key={index}>{error.value}</span>)} </Alert> ); class ProfilePage extends React.Component { render() { const errors = this.props.errors <= 0 ? null : renderErrors(this.props.errors) const { handleSubmit } = this.props; return ( <div className="container"> <form onSubmit={handleSubmit} > <FormGroup controlId="firstname"> <ControlLabel>:</ControlLabel> <Field className="form-control" id="firstname" name="firstname" type="text" component="input" placeholder=" (: '')"/> </FormGroup> [...] {errors} <Button type="submit" bsStyle="primary"> </Button> </form> </div> ) } } ProfilePage = reduxForm({ form: 'ProfileForm', enableReinitialize: true, })(ProfilePage); // enableReinitialize: true, - export default ProfilePage; containers / ProfileContainer.js:
Hidden text
import React from 'react'; import { withRouter } from 'react-router'; import { connect } from 'react-redux'; import gql from 'graphql-tag'; import { graphql, compose } from 'react-apollo'; import ProfilePage from '../components/ProfilePage'; import { toastr } from 'react-redux-toastr' const jwtDecode = require('jwt-decode'); class ProfileContainer extends React.Component { constructor(props) { super(props); this.state = { errors: [] }; } handleSubmit(data) { this.props.updateProfile({ variables: { data: { firstname: data.firstname, [...] }, id: jwtDecode(localStorage.getItem('token')).id }}) .then((response) => { this.setState({ errors: [] }); if (response.data.updateProfile.errors.length <= 0) { toastr.success('*', ' ', {showCloseButton: false}) } else { this.setState({ errors: response.data.updateProfile.errors }); } }) .catch((err) => { console.error(err); toastr.error('*', ' ', {showCloseButton: false}) }); }//handleSubmit render() { return <ProfilePage {...this.props} onSubmit={this.handleSubmit.bind(this)} errors={this.state.errors} />; } }//class const gqlGetProfile = gql` query getProfile ($user_id: String!) { getProfile(user_id: $user_id) { profile { id, firstname, [...] }, errors { key, value }, } } `; const gqlGetProfileProps = { options: (ownProps) => ({ variables: { user_id: jwtDecode(localStorage.getItem('token')).id, }, }), props: ({ ownProps, data }) => { if (data.loading) { return { initialValues: { test: [] }, errors: [] }; }; return { initialValues: data.getProfile.profile, errors: data.getProfile.errors, }; } } const gqlUpdateProfile = gql` mutation ($data: ProfileInput, $id : String) { updateProfile(data: $data, id : $id) { token, errors { key, value }, } } `; const gqlUpdateProfileProps = { name: 'updateProfile', options: { refetchQueries: [ 'getProfile', ], }, }; const ProfileWithData = compose( graphql(gqlUpdateProfile, gqlUpdateProfileProps), graphql(gqlGetProfile, gqlGetProfileProps), )(withRouter(ProfileContainer)); const ProfileWithDataAndDispatch = connect( null, null )(ProfileWithData); export default ProfileWithDataAndDispatch Mobile app
The mobile application is implemented for Android 4.4+ (NFC) smartphones, using React-Native, Redux, SQLite.
The application allows you to:
1. To conduct rounds - i.e. Record visits to specified route control points using contactless NFC tags and save the associated parameters and notes in the database
2. Synchronize data — get routes from the server, parameters of control points, a mode of their crawling, and send data to the server using crawls and values recorded at control points

Similar to the web client, the mobile application has components for pages (screens), however the layout is on Flex and from the Android UI components. Forms are made through the redux-form and react-native-clean-form , but this is a pretty curved solution, except for the prototype.
There is also navigation between the screens, but instead of the react-router web client, it uses react-native-router-flux ).
There are queries to the database, but they are not executed via GraphQL to the server, but directly through calls to actions in which the reactant-native-sqlite-storage accesses the local SQLite database (given that asynchronous requests are used by redux-thunk )
GraphQL in a mobile application is used only to synchronize data with the server and send messages to the server with NFC id tags and with responses to debugging queries to the database (see below). The main work with the application occurs offline.
The component for the screen looks like this:
containers / CheckpointContainer.js
Hidden text
import React, { Component } from 'react'; import { connect } from 'react-redux'; import { bindActionCreators } from 'redux'; import CheckpointPage from '../components/CheckpointPage'; import { saveCheckpoint } from '../actions/CheckpointsActions'; import { Actions } from 'react-native-router-flux'; import { ToastAndroid } from 'react-native'; class CheckpointContainer extends Component { handleSubmit = (data, dispatch) => { return new Promise((resolve) => { setTimeout(() => { this.props.saveCheckpoint(this.props.checkpoint_id,this.props.checkup_id,data.check_note,data.params).then((result)=>{ ToastAndroid.showWithGravity(' ', ToastAndroid.SHORT, ToastAndroid.BOTTOM); return true; }).catch((error)=>{ ToastAndroid.showWithGravity(' ', ToastAndroid.SHORT, ToastAndroid.BOTTOM); }) resolve(); }, 100) }) } render() { return <CheckpointPage {...this.props} onSubmit={this.handleSubmit.bind(this)} /> } }//class const mapStateToProps = (state) => { return { stateValues: state.checkpointData, }; }; const mapDispatchToProps = (dispatch) => { return bindActionCreators ({ saveCheckpoint: (checkpoint_id, checkup_id, note,formData) => saveCheckpoint(checkpoint_id, checkup_id, note, formData), }, dispatch); } export default connect(mapStateToProps, mapDispatchToProps)(CheckpointContainer); components / CheckpointPage.js
Hidden text
import React, { Component } from 'react' import styles from '../styles'; import { reduxForm } from 'redux-form/immutable' import { ActionsContainer, Button, FieldsContainer, Fieldset, Form, } from 'react-native-clean-form' import { Input, } from 'react-native-clean-form/redux-form-immutable' import { View, Text, StyleSheet, } from 'react-native' class CheckpointPage extends Component { render() { const { handleSubmit, submitting, onSubmit } = this.props return ( <View style={{marginTop: 80, flex:1, flexDirection: 'column', }}> <Form> <FieldsContainer> <Fieldset label=":" last> { this.props.stateValues.params.map((param, i) => { [...] }) } </Fieldset> <Fieldset label=":" last> <Input name="check_note" label=":" placeholder=", ..." multiline={true} numberOfLines={2} inlineLabel={false} /> </Fieldset> </FieldsContainer> <ActionsContainer> <Button icon="md-checkmark" iconPlacement="right" onPress={handleSubmit(onSubmit)} submitting={submitting}></Button> </ActionsContainer> </Form> </View> ) } } export default reduxForm({ form: 'Form', enableReinitialize: true, keepDirtyOnReinitialize: true, })(CheckpointPage) actions / CheckpointsActions.js
Hidden text
import * as types from '../actions/ActionTypes'; var uuid = require('react-native-uuid'); [...] export function saveCheckpointSuccess(data) { return { type: 'SAVE_CHECKPOINT_SUCCESS', data }; } function txUpdateChecks(result, check_id, note) { console.log('CheckpointsActions/txUpdateChecks:', check_id, note); return new Promise(function(resolve, reject) { db.transaction((tx)=>{ tx.executeSql(`UPDATE checks SET note = '${note}', dt_mod = '${nowSQL()}' WHERE checks.id = '${check_id}'`).then(([tx,results]) =>{ result = results.rowsAffected; resolve(result); }).catch((error) => { reject(error); });//catch executeSql });//db.transaction })//return }//txUpdateChecks() [...] export function saveCheckpoint(checkpoint_id, checkup_id, note, values) { return (dispatch) => { let result; return txSelectChecks(checkup_id,checkpoint_id).then((check_id) => { if (!check_id) { txInsertChecks(result,checkpoint_id,checkup_id,note).then((check_id) => txInsertCheckValues(result,check_id,values)) .then((result) => { dispatch(saveCheckpointSuccess(result)); }).catch(error => { dispatch(dbFailed({method:'saveCheckpoint !check_id',error})); }); }//if else { txUpdateChecks(result,check_id,note).then((result) => txUpdateCheckValues(result,check_id,values)) .then((result) => { dispatch(saveCheckpointSuccess(result)); }).catch(error => { dispatch(dbFailed({method:'txUpdateChecks/tx',error})); }); }//else }).catch(error => { dispatch(dbFailed({method:'txSelectChecks/tx',error})); }); }//return }//saveCheckpoint : Actions.routesPage({shop_id:'6f6853d0-a642-11e7-83e7-792a5b00d12c_shop'}); Reading NFC tags
As already mentioned, in order to identify control points, it was intended to provide them with NFC tags. Despite the fact that there are different types of such tags, in this case the matter is simplified by the fact that for identification it is enough to read their id, which (depending on the type of tag) looks, for example, as “F1: E8: A5: 9E” or “ 04: 2C: 9F: 12: 85: 20: 83. " For testing purposes, any maps are suitable - maps for subway, bank, etc.
Strangely enough, among the native React-Native modules for Android there was nothing related to NFC. Of the outsiders, then, there was only one module , which I (and, it seems, other people, too) couldn’t get to work.
Native modules consist of two parts - one for Javascript, the second for Java. I do not write in Java but, looking at the examples and looking through the documentation, I squeezed out a couple of dozen lines that read the NFC id cards and pulled the js handler. I will not hide - when my module was working, I was pretty surprised.
The problem with third-party native modules is also the fact that to install them (at least in some cases - I came across such modules) you need to use your hands to crawl into several files like android / app / src / main / java / [...] /MainApplication.java, android / settings.gradle, android / app / build.gradle. Then it creates all sorts of unpleasant situations with the subsequent installation of other packages. I don’t know if this is a flaw in which authors like me or React Native’s problem. One way or another, the module has earned. Further, it was necessary to register in AndroidManifest.xml:
Hidden text
[...] <uses-permission android:name="android.permission.NFC" /> [...] <intent-filter> <action android:name="android.nfc.action.TECH_DISCOVERED"/> </intent-filter> <meta-data android:name="android.nfc.action.TECH_DISCOVERED" android:resource="@xml/nfc_tech_filter" /> [...] nfc_tech_filter.xml, , NFC : <resources xmlns:xliff="urn:oasis:names:tc:xliff:document:1.2"> <tech-list> <tech>android.nfc.tech.IsoDep</tech> </tech-list> <tech-list> <tech>android.nfc.tech.NfcA</tech> </tech-list> <tech-list> <tech>android.nfc.tech.NfcB</tech> </tech-list> <tech-list> <tech>android.nfc.tech.NfcF</tech> </tech-list> <tech-list> <tech>android.nfc.tech.NfcV</tech> </tech-list> <tech-list> <tech>android.nfc.tech.Ndef</tech> </tech-list> <tech-list> <tech>android.nfc.tech.NdefFormatable</tech> </tech-list> <tech-list> <tech>android.nfc.tech.MifareClassic</tech> </tech-list> <tech-list> <tech>android.nfc.tech.MifareUltralight</tech> </tech-list> <tech-list> <tech>android.nfc.tech.NfcBarcode</tech> </tech-list> </resources> In the application itself, everything is already simple:
const nfcListener = DeviceEventEmitter.addListener('NFCCardID', data => { console.log('NFC id', data.id) [...] }) In the emulator, to simulate the attachment of a smartphone to the NFC tag, I did not invent anything smarter than a similar handler for the “Back” button. By the way - it is strange that in the Android emulator is not provided at least the NFC simulation. Indeed, in the NFC smartphones is found far from the first year.
When creating control points (in a web application), it is necessary to place their NFC id in the database. In order not to make complicated dances with external USB NFC readers or transfer id from third-party applications on a smartphone (such as this ), the NFC id was read by the mobile application itself and transferred to the web client via the server.
For this, the GraphQL subscriptions mechanism is used.
The mobile application is transferred to the "Snap points" mode in which, when an NFC tag is attached and the "Send" button is clicked,
sendTag method ({variables: {tag: {shop_id: 1, tag_id: data.tagId}}})
This call starts the sendTag method on the server, inside which it is called
pubsub.publish ('tagSent', {tagSent: newMessage, shop_id: '1'});
This ultimately results in a call to the updateQuery method in the web client, to which tag_id is passed, after which it is placed in the required field of the web form.
Below are the source fragments of all components of the application that implement this functionality:
Mobile app:
index.android.js
Hidden text
[...] import { SubscriptionClient, addGraphQLSubscriptions } from 'subscriptions-transport-ws'; wsClient = new SubscriptionClient(`ws://10.0.2.2:3002/subscriptions`, { reconnect: true, timeout: 10000, } ) const networkInterfaceWithSubscriptions = addGraphQLSubscriptions( networkInterface, wsClient, ); function dataIdFromObject (result) { if (result.__typename) { if (result.id !== undefined) { return `${result.__typename}:${result.id}`; } } return null; } const client = new ApolloClient({ networkInterface: networkInterfaceWithSubscriptions, customResolvers: { Query: { channel: (_, args) => { return toIdValue(dataIdFromObject({ __typename: 'Channel', id: 1 })) }, }, }, dataIdFromObject, }); [...] components / CheckpointAttachPage.js
Hidden text
[...] <Button title=' ' icon={{name:'tap-and-play'}} buttonStyle={styles.button} onPress={ () => { this.props.sendTag({variables: { tag: {shop_id : 1, tag_id : data.tagId} } }).then(res => { ToastAndroid.showWithGravity(` `, ToastAndroid.SHORT, ToastAndroid.BOTTOM); } ).catch(error =>{ ToastAndroid.showWithGravity(` (?)`, ToastAndroid.SHORT, ToastAndroid.BOTTOM); }) ; } } /> [...] containers / CheckpointAttachContainer.js
Hidden text
[...] const gqlSendTag = gql` mutation sendTag($tag: TagInput!) { sendTag(tag: $tag) { tag_id shop_id title } } `; const gqlSendTagProps = { name: 'sendTag', options: { }, }; [...] Server:
server.js
Hidden text
import express from 'express'; import { createServer } from 'http'; const server = express(); [...] const ws = createServer(server); server.use(PATH.GIQL, graphiqlExpress({ endpointURL: PATH.GQL, subscriptionsEndpoint: `ws://${GQLSERVERLOCAL.HOST}:${GQLSERVERLOCAL.PORT}/subscriptions` })); ws.listen(GQLSERVERLOCAL.PORT, () => { new SubscriptionServer({ execute, subscribe, schema }, { server: ws, path: PATH.SUBS, }); }); [...] schema.js
Hidden text
type Mutation { [...] sendTag(tag: TagInput!): Tag } [...] input TagInput{ shop_id: String tag_id: String title: String } type Tag { shop_id: String tag_id: String title: String } type Subscription { tagSent(shop_id: String): Tag } [...] resolvers.js
Hidden text
import { PubSub } from 'graphql-subscriptions'; import { withFilter } from 'graphql-subscriptions'; const pubsub = new PubSub(); [...] export const resolvers = { Mutation: { sendTag: (root, { tag }) => { const newMessage = { title: tag.title, shop_id: tag.shop_id, tag_id: tag.tag_id }; pubsub.publish('tagSent', { tagSent: newMessage, shop_id: '1'}); return newMessage; }, [...] }, Subscription: { tagSent: { subscribe: withFilter(() => pubsub.asyncIterator('tagSent'), (payload, variables) => { return payload.shop_id === variables.shop_id; }), }, [...] }, } Web client:
index.js
Hidden text
[...] import { SubscriptionClient, addGraphQLSubscriptions } from 'subscriptions-transport-ws'; wsClient = new SubscriptionClient(`ws://localhost:3002/subscriptions`, { reconnect: true, }) const networkInterfaceWithSubscriptions = addGraphQLSubscriptions( networkInterface, wsClient, ); function dataIdFromObject (result) { if (result.__typename) { if (result.id !== undefined) { return `${result.__typename}:${result.id}`; } } return null; } const client = new ApolloClient({ networkInterface: networkInterfaceWithSubscriptions, customResolvers: { Query: { channel: (_, args) => { return toIdValue(dataIdFromObject({ __typename: 'Channel', id: 1 })) }, }, }, dataIdFromObject, }); [...] components / AddCheckpointPage.js
Hidden text
import { Field } from 'redux-form'; [...] <Field className="form-control" id="tag_id" name="tag_id" type="text" component="input" placeholder=" ' '"/> [...] containers / AddCheckpointContainer.js
Hidden text
[...] import { change as changeFieldValue } from 'redux-form'; const tagSubscription = gql` subscription tagSent($shop_id: String) { tagSent(shop_id: $shop_id) { tag_id shop_id title }, } ` class AddCheckpointContainer extends React.Component { componentWillMount() { this.props.data.subscribeToMore({ document: tagSubscription, variables: { shop_id: 1, }, onError: (err) => console.error('subscribeToMore ERROR:',err), updateQuery: (prev, {subscriptionData}) => { console.log('updateQuery:',subscriptionData) this.props.changeFieldValue("addCheckpointForm", "tag_id", subscriptionData.data.tagSent.tag_id); } }); }//componentWillMount() [...] } At the end of the analysis - a small video showing the operation of the mobile application and the web client:
Development and Debugging Tools
Everything was written and debugged under Windows 7, but for demonstration to the customer it was transferred to a linux server. As for the development environment, I'm a Sublime fan. However, I should note that glitch syntax highlighting of queries inside the js code regularly glitches happen. Painfully there it is all unconventionally combined. A couple of times the idea arose to try VSCode (but for the time being I hold on)

Installing nodejs under Win7 did not cause any special problems, but with the installation and configuration of the Android SDK so that everything then began to move together, I had to tinker well.
As for debugging tools, for the web client this is the usual Chrome Dev tools with the Apollo Client Developer Tools and Redux DevTools extensions. For the mobile application - React Native Debugger (almost the same, only implemented separately on Electron).
I note that for local debugging with an emulator, instead of localhost, you need to use the address 10.0.2.2
In addition, for the convenience of debugging in the clients themselves and the server, I implemented the ability to send SQL queries to the SQLite database in the smartphone, either directly from the smartphone (from the Debug menu), or remotely from the web application.
In the second case, this is done through the GraphQL subscription mechanism, via web sockets. The web application calls sendDebugRequest () on the server, which generates the message newDebugRequestCreated, to which the mobile application is subscribed. In a mobile application, upon receiving this message, execSql () is executed. The result of the request is sent to the server by calling sendDebugResponse (), which in turn generates a newDebugResponseCreated message to which the web application is subscribed. In fact, this is a kind of chat, just from a mobile application, it is not a person who “answers”, but a database.
To view and edit SQLite files under Win7 I went very well (after sorting through various options) - SQLiteStudio .
A useful little thing is that you can use util.inspect () so that the console.log () server is nicely and completely outputting objects.
const util = require('util') util.inspect.defaultOptions.showHidden = false util.inspect.defaultOptions.depth = null util.inspect.defaultOptions.maxArrayLength = 1000 util.inspect.defaultOptions.colors = true [...] console.log("data: ", util.inspect(data)) Also in connection with the server - all the time I forget that if the variable is promise, then to see the result in the server log is not in the form of "[Promise]".
variable.then(function(result) { console.log('!',result) }) Authorization / Authentication
When performing registration, the web client calls the server signUp method, where a hash is generated from the entered password using bcrypt.hash , which, together with the email (login), is placed in the database.
- signIn, email ( bcrypt.compare). signIn jwt.sign , -.
- localStorage http GraphQL ( network.use applyMiddleware req.options.headers.authorization = `Bearer ${token}`)
, GraphQL , server.js http Authorization, express-jwt , user.id, , context, ( connectors.js). , jwt() «credentialsRequired: false», ( SignIn SignUp ).
, , . , , (email, ) . — nfc_id ( , NFC ) , bcrypt.compare React Native.
, .
Problems
, . :
- , , . — , - , — . , - , .. , , . — , - , , 10-20% . — , .
: , node_modules/ 200mb (!) — . , , ( ), . - webpack/babel — . , — - « », create-react-app create-react-native-app . , , . , , ( , eslint service-worker.js, )
- ( — Win7) , . , , , . , react-native run-android --variant=release (, , assets/) - ( , \android\.gradle ).
, , , ( — ) , . , .
apk — gradle , , - , , (!) .. . , , .
, , , , ( ), .
, ?
- :
- React Router 4 ( 3)
- react-native-router-flux ()
- NFC , . .
- Apollo GraphQL GraphQL ( ).
- react-bootstrap-table react-bootstrap-table2 - ( react-table).
- , Bootstrap. , Material UI . , .
- Sequilize . , - , SQLite , ( , ) redux store.
, , store, state, — , , . - React Native drawer (, - , — ). , react-navigation , react-native-router-flux .
- , — . redux-form , . React Native . redux form react react native. .
, , ( , , , ): « WhatsApp» ( React-Native, NodeJS, GraphQL) , , GraphQL: Dive intro GraphQL .
Source: https://habr.com/ru/post/349762/
All Articles