Five reasons to like Flutter.
At the Google I / O '17 conference, Google introduced Flutter, a new open source library for creating mobile apps.

As you may know, Flutter is a solution for developing cross-platform mobile applications with a nice user interface. The approach used by Flutter to design interfaces is similar to that used in web applications, therefore, familiarizing yourself with this library, you will find many similarities with HTML / CSS technologies.
If you listen to the fact that the library creators talk about Flutter, it turns out that this library simplifies and accelerates the development of web applications that are pleasing to the eye. It sounds good, but when I first looked at Flutter, I did not quite understand the reason for the emergence of the next cross-platform solution. There are many similar technologies, among them - Xamarin, PhoneGap, Ionic, React Native. We all know that in the development of cross-platform mobile applications there is a wealth of choice, and the fact that different technologies have their pros and cons. I was not sure that Flutter could offer something truly new and interesting that distinguishes it from the crowd of competitors. However, when I met Flutter closer, I was in for a surprise.
Flutter library has many features that can be very interesting from the point of view of Android developers. In this article I want to tell you about what I particularly liked in this library.
You may be wondering what Flutter has to offer new things about how this library works. Maybe you are interested in finding out how Flutter is different from React Native. Here I will not go into deep technical jungle, as I have already written about it. If you are interested, you can look here and here .
')
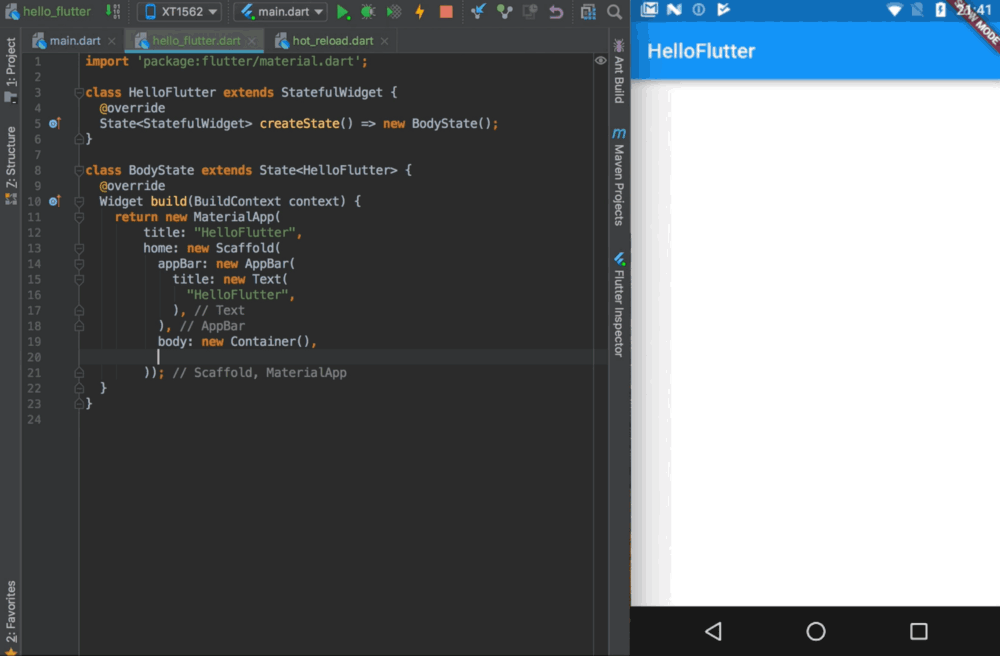
If you talk about Flutter in a nutshell, then we have the SDK, which allows you to create hybrid mobile applications. In particular, this means the possibility of using the same code base on Android and iOS platforms. The code is written in Dart , in a language developed by Google, which will seem very familiar to you if you know Java. Instead of XML files, so-called layout trees are used here, which look like this:
As you can see, the page layout is built from nested components (widgets). The root widget is represented by the
Here all this is shown very briefly, just to bring you up to date. If you are interested in details about building layouts with Flutter, take a look at this material.
Now I propose to consider the five features of Flutter, which seemed to me the most interesting and worthy of attention.
Let's start with a simple application. It has three buttons. Each of them is designed to change the color of the text. It looks like this:
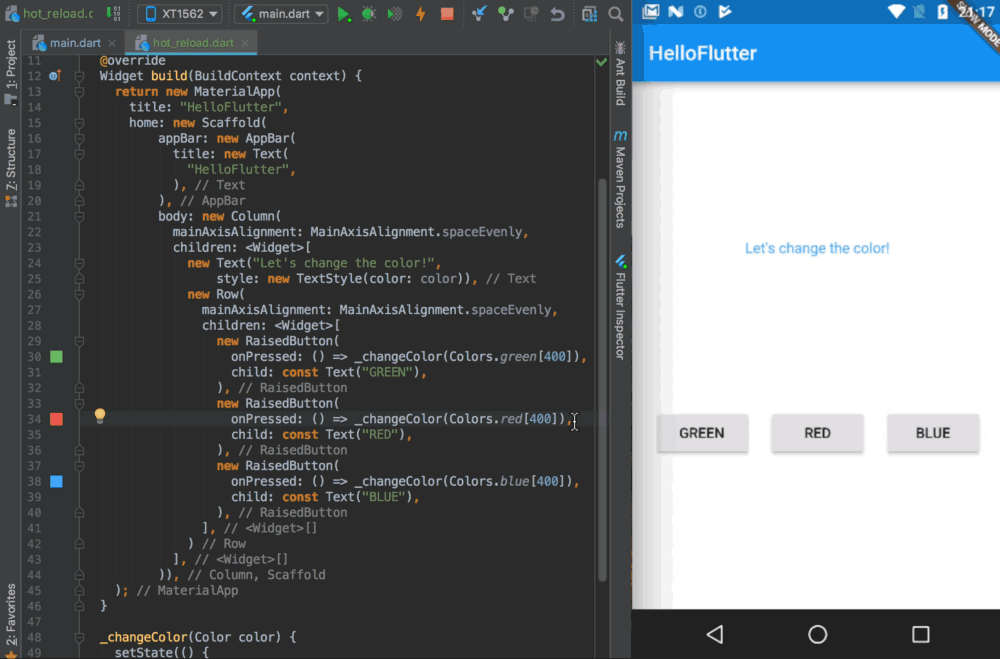
Application with three buttons that change the color of the text
Now we will use one of the most interesting features of Flutter - a hot reboot. This mechanism allows you to instantly rebuild the project, as if we are talking about a regular web page. Let's look at it in action:

Hot reboot
What are we doing here? We change something in the code (in particular, the text on the button), then click on the
A hot reboot is a mechanism that is not only noticeable in speed. He is also quite intelligent. If you have some data that is already displayed on the page, or affect the appearance of its elements (in our example, this is the text color), you can change the code describing the interface during the program execution, and if after that perform a hot reboot, previously displayed data will "survive" after a reboot.
Another great feature of Flutter is that this library has a very impressive set of built-in user interface components. In fact, there are two sets of widgets - widgets in the style of Material Design (for Android) and in the style of Cupertino (for iOS). From them you can choose what you need. For example, this is how adding a new
Adding the FloatingActionButton widget to the application page
The best part is cross-platform. For example, if a widget in the style of Material Design or Cupertino is added to the project, it will look the same on any device on the Android or iOS platform. As a result, the developer may not worry about the appearance of the interface created by him on different devices.
As you can see in the previous figure, using Flutter is very easy to create user interfaces. This is possible thanks to the fundamental principle of Flutter, according to which everything is represented by widgets. The application class is the MaterialApp widget, the layout structure is the Scaffold widget, and all other page elements, such as AppBar , Drawer , SnackBar , are also represented by widgets. The same approach applies to such actions as, for example, the alignment of elements. For example, in order to align the label in the center, it is enough to place the corresponding element in the

Element alignment
Thanks to this approach, creating a user interface comes down to the simple task of assembling a layout from many different small elements.
The principle discussed here is combined with another basic idea on which Flutter is based. Namely, we are talking about the fact that here preference is given to composition over inheritance. This means that if you need to create a new widget, then instead of extending the
Usually it is necessary that applications for Android look not as applications for iOS. The differences are not only in the colors of the interface elements, but also in size and in the style of the widgets. To ensure the correct display of application interfaces on different platforms, you can use the following topics:
The impact of the themes on the appearance of Flutter applications
Here you can see that the
Although Flutter is still in the alpha version, this library has already gathered a very large and active community around itself. Thanks to this, Flutter supports many packages (libraries, like Gradle dependencies in Android). Among the packages available are those that help to work with images, perform HTTP requests, share data, store settings, work with sensors, use the capabilities of Firebase. And, of course, all this can be used when developing for Android, and when developing for iOS.
If you, after learning about Flutter, want to learn this library, perhaps it would be best to start with the step-by-step lessons posted on the Google Codelabs resource. In particular, here is a tutorial on basic working methods that demonstrates the process of creating a user interface. Here you can find a guide to using the features of Firebase in applications created using Flutter.
And here you can look at the interfaces created using Flutter and experiment with them.
Dear readers! What tools do you use to develop cross-platform mobile apps?
As you may know, Flutter is a solution for developing cross-platform mobile applications with a nice user interface. The approach used by Flutter to design interfaces is similar to that used in web applications, therefore, familiarizing yourself with this library, you will find many similarities with HTML / CSS technologies.
If you listen to the fact that the library creators talk about Flutter, it turns out that this library simplifies and accelerates the development of web applications that are pleasing to the eye. It sounds good, but when I first looked at Flutter, I did not quite understand the reason for the emergence of the next cross-platform solution. There are many similar technologies, among them - Xamarin, PhoneGap, Ionic, React Native. We all know that in the development of cross-platform mobile applications there is a wealth of choice, and the fact that different technologies have their pros and cons. I was not sure that Flutter could offer something truly new and interesting that distinguishes it from the crowd of competitors. However, when I met Flutter closer, I was in for a surprise.
Flutter library has many features that can be very interesting from the point of view of Android developers. In this article I want to tell you about what I particularly liked in this library.
Why do you need another mobile SDK?
You may be wondering what Flutter has to offer new things about how this library works. Maybe you are interested in finding out how Flutter is different from React Native. Here I will not go into deep technical jungle, as I have already written about it. If you are interested, you can look here and here .
')
If you talk about Flutter in a nutshell, then we have the SDK, which allows you to create hybrid mobile applications. In particular, this means the possibility of using the same code base on Android and iOS platforms. The code is written in Dart , in a language developed by Google, which will seem very familiar to you if you know Java. Instead of XML files, so-called layout trees are used here, which look like this:
import 'package:flutter/material.dart'; class HelloFlutter extends StatelessWidget { @override Widget build(BuildContext context) { return new MaterialApp( title: "HelloFlutter", home: new Scaffold( appBar: new AppBar( title: new Text("HelloFlutter"), ), body: new Container( child: new RaisedButton(onPressed: _handleOnPressed), ), ), ); } } As you can see, the page layout is built from nested components (widgets). The root widget is represented by the
MaterialApp object (this is the entire application), then there is the Scaffold widget (the main layout structure), inside which the AppBar is located (analogous to the Toolbar in Android) and the Container widget that represents the body element of the page. Inside the page body are widgets representing the interface elements - like text boxes and buttons.Here all this is shown very briefly, just to bring you up to date. If you are interested in details about building layouts with Flutter, take a look at this material.
Now I propose to consider the five features of Flutter, which seemed to me the most interesting and worthy of attention.
1. Hot reboot
Let's start with a simple application. It has three buttons. Each of them is designed to change the color of the text. It looks like this:
Application with three buttons that change the color of the text
Now we will use one of the most interesting features of Flutter - a hot reboot. This mechanism allows you to instantly rebuild the project, as if we are talking about a regular web page. Let's look at it in action:
Hot reboot
What are we doing here? We change something in the code (in particular, the text on the button), then click on the
Hot Reload button (at the top of IDE IntelliJ) and almost immediately see how the code changes worked on the page.A hot reboot is a mechanism that is not only noticeable in speed. He is also quite intelligent. If you have some data that is already displayed on the page, or affect the appearance of its elements (in our example, this is the text color), you can change the code describing the interface during the program execution, and if after that perform a hot reboot, previously displayed data will "survive" after a reboot.
2. A set of widgets in the styles of Material Design and Cupertino
Another great feature of Flutter is that this library has a very impressive set of built-in user interface components. In fact, there are two sets of widgets - widgets in the style of Material Design (for Android) and in the style of Cupertino (for iOS). From them you can choose what you need. For example, this is how adding a new
FloatingActionButton to the page looks like:Adding the FloatingActionButton widget to the application page
The best part is cross-platform. For example, if a widget in the style of Material Design or Cupertino is added to the project, it will look the same on any device on the Android or iOS platform. As a result, the developer may not worry about the appearance of the interface created by him on different devices.
3. Widgets are the basis of everything.
As you can see in the previous figure, using Flutter is very easy to create user interfaces. This is possible thanks to the fundamental principle of Flutter, according to which everything is represented by widgets. The application class is the MaterialApp widget, the layout structure is the Scaffold widget, and all other page elements, such as AppBar , Drawer , SnackBar , are also represented by widgets. The same approach applies to such actions as, for example, the alignment of elements. For example, in order to align the label in the center, it is enough to place the corresponding element in the
Center widget using the Cmd/Ctrl + Enter key combination:Element alignment
Thanks to this approach, creating a user interface comes down to the simple task of assembling a layout from many different small elements.
The principle discussed here is combined with another basic idea on which Flutter is based. Namely, we are talking about the fact that here preference is given to composition over inheritance. This means that if you need to create a new widget, then instead of extending the
Widget class (in Android this is done by extending the View class), the new widget is assembled from several existing ones.4. Themes for Android and iOS
Usually it is necessary that applications for Android look not as applications for iOS. The differences are not only in the colors of the interface elements, but also in size and in the style of the widgets. To ensure the correct display of application interfaces on different platforms, you can use the following topics:
The impact of the themes on the appearance of Flutter applications
Here you can see that the
Toolbar ( AppBar ) has different colors and output options. This is done using the Theme.of(context).platform , which allows you to get information about the current platform (Android or iOS): import 'package:flutter/material.dart'; class HelloFlutter extends StatelessWidget { @override Widget build(BuildContext context) { return new MaterialApp( title: "HelloFlutter", theme: new ThemeData( primaryColor: Theme.of(context).platform == TargetPlatform.iOS ? Colors.grey[100] : Colors.blue), home: new Scaffold( appBar: new AppBar( elevation: Theme.of(context).platform == TargetPlatform.iOS ? 0.0 : 4.0, title: new Text( "HelloFlutter", ), ), body: new Center(child: new Text("Hello Flutter!")), )); } } 5. Possibilities for expanding the functionality
Although Flutter is still in the alpha version, this library has already gathered a very large and active community around itself. Thanks to this, Flutter supports many packages (libraries, like Gradle dependencies in Android). Among the packages available are those that help to work with images, perform HTTP requests, share data, store settings, work with sensors, use the capabilities of Firebase. And, of course, all this can be used when developing for Android, and when developing for iOS.
Results
If you, after learning about Flutter, want to learn this library, perhaps it would be best to start with the step-by-step lessons posted on the Google Codelabs resource. In particular, here is a tutorial on basic working methods that demonstrates the process of creating a user interface. Here you can find a guide to using the features of Firebase in applications created using Flutter.
And here you can look at the interfaces created using Flutter and experiment with them.
Dear readers! What tools do you use to develop cross-platform mobile apps?
Source: https://habr.com/ru/post/349622/
All Articles