Flask Mega-Tutorial, Part XII: Dates and Times (Edition 2018)
Flask Mega-Tutorial, Part XII: Dates and Times (Edition 2018)
Miguel grinberg


This is the twelfth part of the Flask Mega-Tutorial series in which I will tell you how to work with date and time in such a way that users would not depend on what time zone they are in.
For reference, below is a list of articles in this series.
- Chapter 1: Hello world!
- Chapter 2: Templates
- Chapter 3: Web Forms
- Chapter 4: Database
- Chapter 5: User Logins
- Chapter 6: Profile Page and Avatars
- Chapter 7: Error Handling
- Chapter 8: Subscribers, Contacts, and Friends
- Chapter 9: Pagination
- Chapter 10: Email Support
- Chapter 11: Reconstruction
- Chapter 12: Date and Time (This article)
- Chapter 13: I18n and L10n
- Chapter 14: Ajax
- Chapter 15: Improving Application Structure
- Chapter 16: Full Text Search
- Chapter 17: Deploying to Linux
- Chapter 18: Deploying to Heroku
- Chapter 19: Deploying to Docker Containers
- Chapter 20: JavaScript Magic
- Chapter 21: User Notifications (Available April 24, 2018)
- Chapter 22: Reference Tasks (Available May 1, 2018)
- Chapter 23: Application Programming Interfaces (APIs) (Available May 8, 2018)
Note 1: If you are looking for old versions of this course, this is here .
Note 2: If suddenly you would like to speak in support of my (Miguel) work, or simply do not have the patience to wait for the article for a week, I (Miguel Greenberg) offer the full version of this manual (in English) in the form of an electronic book or video. For more information, visit learn.miguelgrinberg.com .
One aspect of my Microblog application that I ignored for a long time is the display of the date and time. So far, I just let Python display the datetime object in the User model and completely ignored it in the Post model.
GitHub links for this chapter: Browse , Zip , Diff .
Hellish time zone
Using Python functionality on the server to display the date and time that users display in their web browsers is not a good idea. Consider the following example. I write this at 4:06 PM on September 28, 2017. My time zone at the time I write this is PDT (or UTC-7, if you will). In the Python interpreter, I get the following:
>>> from datetime import datetime >>> str(datetime.now()) '2017-09-28 16:06:30.439388' >>> str(datetime.utcnow()) '2017-09-28 23:06:51.406499' A call to datetime.now() returns the correct time for my location, and a call to datetime.utcnow() returns the time in the UTC time zone. If I could ask people living in different parts of the world to run this code at the same time with me, the datetime.now() function would return different results for each person, but datetime.utcnow() will always return one value in same time regardless of location. So which option do you think is better to use in a web application that is likely to be available to users all over the world?
Obviously, the server must manage time that is independent of location. If this application develops and you need to use multiple production servers in different regions around the world, I would not want each server to write time stamps to the database according to different time zones, because this will make it difficult to work with this data. Since UTC is the most used uniform time zone and is supported in the datetime class, this is what you need! And I will use it.
But in this version there is one important problem. For users in different time zones, it will be difficult to determine when a recording was actually made if they see the time in the UTC time zone. They need to understand in advance that the time is displayed in UTC and you need to be able to mentally adjust the time to your time zone. Imagine a user in the PDT time zone, which sends something at 3:00 pm, and immediately sees that the message appears with a UTC time at 10:00 pm or, more precisely, 10:00 pm. It will look confusing.
Although the standardization of UTC timestamps makes a lot of sense from a server point of view, but it creates difficulties with the user experience. The purpose of this chapter is to solve this problem by saving all the timestamps managed on the server in UTC.
Time zone conversion
The obvious solution to this problem is to convert all timestamps from UTC to each user's local time. This allows the server to continue using UTC for consistency, while on-the-fly conversion, adapted for each user, solves the convenience problem. The complexity of this solution lies in determining the location of each user.
Many websites have a configuration page where users can specify their time zone. This will require me to add a new page with a form in which I present to users a drop-down list with a list of time zones. Users will be prompted to enter their time zone when they first access the site, as part of their registration.
Although this is a worthy solution that solves the problem, it is a bit strange to ask users to enter some of the information that they have already configured in their operating system. It seems to be more effective if I could just find out the time zone setting from the local computer.
As it turns out, the web browser knows the user's time zone and provides it through standard JavaScript APIs. In fact, there are two ways to use time zone information accessible via JavaScript:
The “old school” approach would be to have the web browser somehow send information about the time zone to the server when the user first logs into the application. You can do this by calling Ajax or, even easier, with a meta refresh tag . Once the server has defined a time zone, it can save it in a session or write it to a user’s record in the database, and then set up all the time stamps while the templates are displayed.
- The “new school” approach would be to not change the situation on the server and allow converting from UTC to a local time zone on the client using JavaScript.
Both options are working, but the second has a big advantage. Knowing the time zone is not always enough to represent the date and time in the format expected by the user. The browser also has access to the locale configuration of the system, which defines such things as AM / PM and 24-hour format, DD / MM / YYYY vs. MM / DD / YYYY, and many other cultural or regional styles.
And if this is not enough, there is another advantage in favor of the “new school”. There is an open source library that does it all!
Introducing Moment.js and Flask-Moment
Moment.js - a small open source JavaScript library takes the task of displaying the date and time to a completely different level, as it provides all possible formatting options. And some time ago I created Flask-Moment, a small Flask extension that simplified the inclusion of Moment.js in your application.
Let's start with installing Flask-Moment:
(venv) $ pip install flask-moment This extension is added to the Flask application in the usual way:
app/__init__.py : Create an instance of Flask-Moment. # ... from flask_moment import Moment app = Flask(__name__) # ... moment = Moment(app) Unlike other extensions, Flask-Moment works along with moment.js , so all application templates must include this library. To make this library always available, I am going to add it to the base template. This can be done in two ways. It would seem that the most direct way is to explicitly add the <script> tag that imports the library. But Flask-Moment offers an even simpler option by providing the function moment.include_moment() , which generates the <script> :
app / templates / base.html: Add moment.js to the base template.
... {% block scripts %} {{ super() }} {{ moment.include_moment() }} {% endblock %} The scripts block I added here is another one exported by the Flask-Bootstrap basic template. This is the place where the javascript import (s) should be included. This block differs from the previous one in that it already comes with some content defined in the base template. All I want to do is add the moment.js library without losing the basic content. And this is achieved using the super() instruction, which saves content from the base template. If you define a block in your template without using super() , then any content defined for this block in the base template will be lost.
Using Moment.js
Moment.js provides the browser with the moment class available. The first step to create a timestamp is to create an object of this class, transferring the required timestamp in ISO 8601 format . Here is an example:
t = moment('2017-09-28T21:45:23Z') If you are not familiar with the ISO 8601 standard format for dates and times, the format is as follows: {{ year }}-{{ month }}-{{ day }}T{{ hour }}:{{ minute }}:{{ second }}{{ timezone }} . I have already decided that I will only work with the UTC time zone, so the last part will always be Z , which is UTC in the ISO 8601 standard.
The moment object provides several methods for different display options. The following are some of the most common options:
moment('2017-09-28T21:45:23Z').format('L') "09/28/2017" moment('2017-09-28T21:45:23Z').format('LL') "September 28, 2017" moment('2017-09-28T21:45:23Z').format('LLL') "September 28, 2017 2:45 PM" moment('2017-09-28T21:45:23Z').format('LLLL') "Thursday, September 28, 2017 2:45 PM" moment('2017-09-28T21:45:23Z').format('dddd') "Thursday" moment('2017-09-28T21:45:23Z').fromNow() "7 hours ago" moment('2017-09-28T21:45:23Z').calendar() "Today at 2:45 PM" In this example, a moment object is created, initialized by a line on September 28, 2017 at 9:45 pm UTC. You can see that all the parameters I tried above are displayed in UTC-7, which is the time zone configured on my computer. You can enter the commands above into the console of your browser, making sure that the page where you open the console contains moment.js. You can do this in the microblog if you made changes above by turning on moment.js, as well as on https://momentjs.com/ .
Notice how different methods create different representations. With format() you control the output format with a format name string similar to the Python strftime function. The fromNow() and calendar() methods are interesting because they display a timestamp relative to the current time, so you get an output string, such as "a minute ago" or "two hours later", etc.
If you were working directly in JavaScript, the above calls would return a string with a timestamp display. So to add this text to the right place on the page, you need to use JavaScript to work with the DOM . The Flask-Moment extension greatly simplifies the use of moment.js, allowing your templates that include the moment object to turn on the required JavaScript magic to display the time on the page in the correct way.
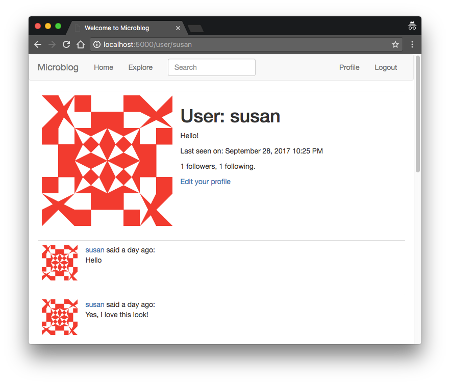
Let's look at the timestamp that appears on the profile page. The current user.html template allows Python to generate a string representation of time. Now I can do this time stamp with Flask-Moment as follows:
app / templates / user.html: Timestamp using moment.js.
{% if user.last_seen %} <p>Last seen on: {{ moment(user.last_seen).format('LLL') }}</p> {% endif %} As you can see, Flask-Moment uses a syntax similar to the JavaScript library syntax, with one small difference, which is that the moment() argument is now a Python datetime object, not an ISO 8601 string. This moment () call in the template also automatically generates the necessary javascript code to insert rendered labels at the right place in the DOM.
The second place where you can use Flask-Moment and moment.js is in the _post.html sub-template, which is called from the index and user pages. In the current version of the template, each message was preceded by the line "username says:". Now I can add a timestamp using fromnow() :
app / templates / _post.html: The timestamp of the message subpattern.
<a href="{{ url_for('user', username=post.author.username) }}"> {{ post.author.username }} </a> said {{ moment(post.timestamp).fromNow() }}: <br> {{ post.body }} This is how both of these time stamps look when rendered using Flask-Moment and moment.js:
PS from translator
If you suddenly need, like me, display the date in a language other than English, for example Russian. The flask-moment extension has the lang() method in its arsenal for this purpose.

app / templates / base.html: Added the lang method to the moment.js block in the base template.
... {% block scripts %} {{ super() }} {{ moment.include_moment() }} {{ moment.lang('ru') }} <!-- --> {% endblock %} ')
Source: https://habr.com/ru/post/349604/
All Articles