UWP game: Where to start
Hi, Habr! Today we are launching an experimental series of articles. You immerse yourself in a reality show for self-taught programmers, in which Alexey Plotnikov , one of the members of our Microsoft Developer community, will talk about how he creates the game on UWP. Under the cut - the first part, with a description of the project idea and the answer to a simple question: “What do you need to lay from the very beginning?” Don't forget to leave comments, you can influence the development process.

')
Let's start with dating. My name is Alexey Plotnikov and was previously mentioned in this blog as “An active member of the community”. This is the most comprehensive presentation, since I am not an employee of the company and, even, I am not a professional developer. I am a self-taught programmer using VB.NET as a development language, the author of several articles, a couple of interesting projects and hundreds of useful answers on the MSDN forums. However, despite the fact that the development for me is just a hobby, I have extensive experience, which I plan to share with you in this cycle.
By the way, about the content. It will be focused mainly on newcomers to UWP, but experienced in development as a whole. This cycle is ideal for WPF developers and developers of other platforms who have decided to try their hand at developing UWP / .Net. And taking into account the constant references to the documentation and guides from MS, the cycle may be on the strengths and beginners who want to get acquainted with the development on .Net, starting with the UWP, and are not lazy to read not only step-by-step tutorials, but also dry documentation. However, certain topics of the cycle may be useful for experienced developers, since they plan to touch on some life hacks and even bypass unsuccessful documentation solutions that you for some reason blindly followed.
And before we begin to get acquainted with the future project, on the basis of which the cycle will be built, I would like to give a couple of lines (and maybe a couple of paragraphs) to the reasoning about why it is needed at all. Let's be honest, developing for the Windows store is at least not fashionable. A cool idea, implemented as a mobile app, will bring a lot of money on iOS and millions of users on Android.
There are at least several reasons to study UWP development using .Net. Firstly, if you are a WPF developer, then the migration will be as smooth and painless as possible for you. Secondly, no matter how cool other mobile platforms are, they still remain “mobile”!
The Universal Windows Platform, in its very name, speaks of the capabilities of the platform and the breadth of potential devices on which your application can work. Of course, you will be right if you say that now Windows 10 is used mainly on desktops, but the rapidly changing market can change the balance of power in two accounts in favor of Windows 10 as the most popular OS on all possible devices. So why shouldn't we take advantage of such “mobile” facilities as automated distribution, convenient publication and updating on the whole range of devices, and not only on mobile?
Finally, it's time to talk about the project, on the basis of which this cycle will be built.
The idea of the project originated in the wake of the popularity of cryptocurrency and is a fairly simple game. The game will be called “Crypto Farm” and, as you probably guessed, the gameplay will be built on mining cryptocurrency. A more detailed description of the gameplay will be considered during the cycle in those articles where it will be necessary. It is important to understand that this cycle is about developing on UWP, and not about this game, so it will only be a support for articles that I will try to make as abstract as possible and applicable to different, and not just game, scenarios.
During the development and writing of articles, I plan to cover the following topics:
This is not a complete list of topics that are planned to be covered and, probably, many will arise due to your responses to articles as they appear. I also plan to devote a few articles to the arising difficulties and mistakes made.
But, perhaps, enough of the prefaces and it's time to start developing.
If, after reading the title, you suddenly decided to skip this article, thinking that it would not cause you any difficulties with creating a UWP project, you will be right in part.
On the one hand, it is very difficult to make critical mistakes at such a simple stage. But on the other hand, you can make your life much easier by doing everything right from the very beginning. In addition, at the end of the article, I will share personal preferences in creating a project that may be useful to experienced developers.
I will create my project in the Russian-language Visual Studio Professional 2017. This edition is paid, or provided by subscription (as in my case), but for full-fledged work on the UWP application, it is optional. You will only need to download the free Visual Studio Community on the official Visual Studio website.
For some reason, many novice developers believe that applications created in the Community are forbidden to publish on a paid basis or in any other way, to earn on the development in this edition, but this is not true. Until you become a large company whose main source of millions in revenue is application development, you can safely use the Community without fear of claims from Microsoft.
So, we start the Visual Studio (further VS) and if you did not change anything, we immediately see the start screen. This screen contains quick access to open and create projects, as well as the latest news for developers. Since this screen changes from version to version, I will not refer to its items, and in the old way I will go to the menu "File> Create Project ...". In the window that opens, you can see the list of templates for all projects sorted by types and programming languages that we can create in this version of VS.
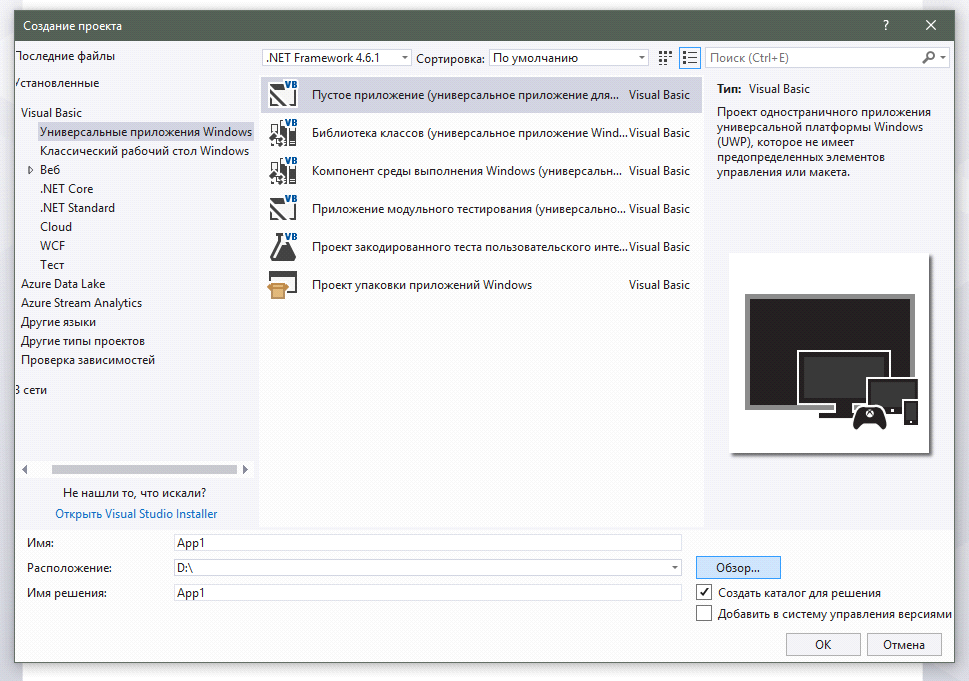
We need the section "Universal Windows Applications" and the topmost template "Empty Application (Universal Application for Windows)". By the way, if you developed applications for Windows 8 / 8.1, which were denoted by the abbreviation WinRT, then remember that the list of templates was not limited to an empty application. There were also additional templates for multipage applications that involved quickly creating a project based on your data.
I have to admit that the presence of these “fast” templates, in my opinion, was a mistake that led to the creation of thousands of unattractive and similar applications that flooded the Windows store, and this slightly tarnished its image. Although on the other hand, then the Windows store just appeared and it was critically lacking content.
After selecting the desired project template, you need to select its name, location, and again the name, but this time to solve. The solution in VS is to unite several projects together, which I, by the way, will separately discuss in one of the following articles. In principle, at the stage of the initial creation of the project, its name and the name of the solution can be left the same. We should also mention the name of the project in Cyrillic. In principle, no one forbids you to use the Russian text in the title or even use spaces, but old programmer scars begin to itch a lot from such actions. By giving the project a name in Latin and without spaces, you will definitely save yourself from any potential problems with the storage and synchronization of the project, so I recommend that you do this.
It also remains to decide what to do with the two checkboxes in the lower right corner of the project creation window. The first one (“Create a directory for a solution”) will help you if you choose a certain shared folder as the target location for the project, but not prepared in advance. A very handy feature and it is not for nothing that it is marked by default. The second item of additional parameters, called “Add to the version control system”, we will leave unchecked, and I will explain why later in the article.
So, the coveted “OK” button is pressed and, it would seem, it is possible to begin to study the structure of the project, but no. Before us is another dialog box asking you to select the target and minimum versions for your UWP application.
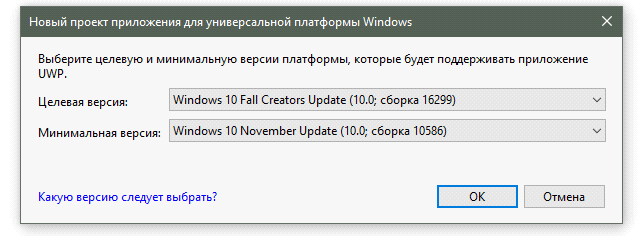
If you are a developer of WPF or other projects in VS and have already begun to yawn from the previous paragraphs, then it's time to wake up, because we have a very important choice that significantly affects the number of potential users, as well as the labor costs during development. I have to admit, I am very surprised that in most of the manuals we are offered to simply press “OK”, without changing anything, without understanding the topic at all. I, not so much for the readers, as at one time, for myself, carefully studied the issue and now I share my reflections with you.
The most obvious thing that comes to mind when trying to sort out the question is to click on the link in this window, which will lead us to the documentation page with a description of these parameters. A rather useful page, which, unfortunately, practically does not answer the question “Why should we push ourselves into any framework at all?” And doesn’t make the conscious choice of this framework much easier.
I will begin by answering the question of what caused this framework. It's all about Microsoft marketers, who said that companies need to release an OS with one name, and then supplement and improve it, attributing only version numbers. And these numbers should be displayed only in the system information and not particularly bulging. As a result, all that an ordinary user knows is that Windows 10 is installed on his computer (or other supported device), which is periodically updated for some reason. This is a very smart solution, since even the very first and almost forgotten build of Windows 10 is still Windows 10 and works to the benefit of general statistics. And we, as developers, are also extremely profitable, because over time the army of potential users of our application will only grow.
Unfortunately, the fee for this approach is that we need to carefully monitor the use of new functions in the application to ensure its maximum compatibility on a larger range of Windows 10 assemblies, because, as you understand, functions that are only available in assembly 16299 will not work for user build 10240.
But I never answered why we need a range of versions. The choice of the minimum and target versions is due to the ability to make our application adaptive to different assemblies of Windows 10 with minimal sacrifices. We do not need to sacrifice functionality for the sake of maximum coverage, or, on the contrary, coverage for the sake of new functions. We are offered to choose how much we are willing to sacrifice each individual item, and in any case it is necessary to sacrifice. Even if you select the maximum range - from the earliest to the latest version - and get the maximum coverage and the full range of functions, we will have to spend a lot of time adapting the code, which will significantly stretch and complicate the development process.
For example, this may occur if the application is transferred from another platform or simply using crutches based on outdated API features. Just in case, add that the target version should not be perceived by you as the maximum. Of course, your application will continue to work properly in the next versions of Windows, but at the same time it will turn to the version of the API that it is aimed at.
Let's move to the minimum version. I recommend to put it equal to the version of Windows, which is currently the most statistically popular version. So we get a maximum of users, depriving themselves of the hassle of checking the compatibility of the code for a particular version. Naturally, if you are sure that your user is stuck on an earlier build, then you should select it as the minimum. But to choose the same for the target and minimum versions - the idea is not the most successful. Updating Windows is not only fast, and as a result, not all old computers are covered, therefore, to drive an application into the framework of a single assembly is an unjustified decision.
Finally, all the preludes are passed and you can start exploring the contents of the created project. You can examine its files and folders in the Solution Explorer.
Let's see:
The newly created project is fully operational, and you can start it by pressing "F5". After launching the application, it will appear in the list of installed applications in the Start menu, from where it can also be launched.
And the last thing I want to mention is adding a project to the version control system. There are several popular version control systems (hereinafter referred to as Git), but Team Services is best suited for a novice developer. This is a free tool for publishing applications in remote storage, as well as for team development. Even if you do not need such powerful features as collaborating on a project, creating code branches and individual builds, the ability to synchronize and backup is very difficult to underestimate.
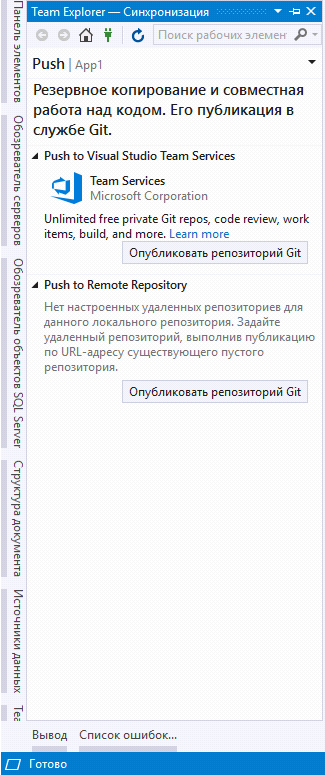
So, let's publish the newly created application in Team Services. To do this, in the lower right corner of VS, you need to click on the words “Add to version control system> Git”. In the “Team Explorer - Synchronization” window that opens, click on “Publish Git Repository”.
In order for subsequent manipulations to run smoothly, you must be registered on the Team Services website and have your own domain in this system. This is done quite simply. In the main synchronization window, click the “Learn more” link that will send you to the Team Services website. On this site, select "Start work for free" and follow the instructions. After creating your domain, it will become your hub in which you can track projects, view the change history, assign a team and much more, but now we just close the site and return to VS.
After the preparatory work, select "Publish Git repository", and now it remains only to choose your account, domain name and publish the project. If everything went well, the synchronization window will display a list of actions that you can perform directly from VS. We are most interested in the "Changes" and "Synchronization" items.
In fact, we still haven't uploaded the whole project to Git. First we need to fix all the changes made to the project, which include the creation of the project. To do this, go to the "Changes" section, fill in the description of the changes made, and then click on "Commit all". Team Services allows you to track the history of changes to the project, and - if necessary - to return to an early point, or just to see what and when we added, so choose a descriptive description that in the future will help you quickly find the desired point in the development process. For example, now we can specify in the description of the fixation: “Creating a project”.
After all changes are committed, they need to be synchronized with Git. To do this, go to the "Synchronization" section and select the appropriate link. Synchronization works in both directions, and if you recorded and unloaded the changes on another computer, then at the time of synchronization they will be loaded on it. This is also useful if you have lost the project files that were previously uploaded to Git. Just synchronize the project without local fixing, and they will return.
With this, the topic of creating a UWP project can be considered closed, however, since this cycle of articles is written in parallel with the development of a live project, I decided to supplement this article with personal recommendations on the initial configuration of the project, which I developed in the process of working with UWP.
The information below is aimed at WPF developers, is a personal experience and should not be taken as a reference.
In fact, I knowingly recommended ignoring the tick “Add to version control system” at the very beginning of the project creation, although I then described this process without changing anything in the project. I myself publish only after adding some additional elements to the project.
First, the ConvertersAndStyle folder is added to the project, into which I place files with converters and resource dictionaries:
As you probably understand, I chose the names of folders and files based on their functions. You can give them any names that are convenient for you.
After adding the resource files, we need to add an indication of them in the App.xaml file:
Now we can access resources from these files anywhere in the application.
The second thing I want to point out is the selection of a separate folder for images. Since I often write the paths to pictures manually, I use simpler and more intuitive names of folders and files. The main folder for storing images in my projects is called Images , and I use the Assets folder only for logos - those that are shown on the tile, in the list of applications and in the store.
Next is to prepare our application for localization. To do this, create at least two folders. The first one for the native language (in our case, Russian) should be called “ru”, and the second for the international one - “en”. In this case, folder names play an important role and there is no need to call them differently. You can also add folders for additional languages if you plan to localize the application into several languages. A complete list of available folder names for different languages can be found here .
In each of the folders you need to add a file type "Resource File (.resw)", leaving its default name. In more detail about the localization of the application and what to do with these files, I will discuss in a separate article of the cycle.
And after all these manipulations, you can publish the application to the version control system, after which the project is completely ready for immediate work.
The next article of the cycle will be devoted to creating your own start screen, and, I hope, will bring something new against the background of existing articles on this topic.
Before starting this experiment, we conducted a survey on this topic. His results can be found here .I give the word to the author.
')
- Part 1: Where to start
- Part 2: Advanced Splash Screen
- Part 3: The style of the mother's son's girlfriend
- Part 4: Receiving user data (voluntary)
- Part 5: Where do you keep the data?
Intro
Let's start with dating. My name is Alexey Plotnikov and was previously mentioned in this blog as “An active member of the community”. This is the most comprehensive presentation, since I am not an employee of the company and, even, I am not a professional developer. I am a self-taught programmer using VB.NET as a development language, the author of several articles, a couple of interesting projects and hundreds of useful answers on the MSDN forums. However, despite the fact that the development for me is just a hobby, I have extensive experience, which I plan to share with you in this cycle.
By the way, about the content. It will be focused mainly on newcomers to UWP, but experienced in development as a whole. This cycle is ideal for WPF developers and developers of other platforms who have decided to try their hand at developing UWP / .Net. And taking into account the constant references to the documentation and guides from MS, the cycle may be on the strengths and beginners who want to get acquainted with the development on .Net, starting with the UWP, and are not lazy to read not only step-by-step tutorials, but also dry documentation. However, certain topics of the cycle may be useful for experienced developers, since they plan to touch on some life hacks and even bypass unsuccessful documentation solutions that you for some reason blindly followed.
And before we begin to get acquainted with the future project, on the basis of which the cycle will be built, I would like to give a couple of lines (and maybe a couple of paragraphs) to the reasoning about why it is needed at all. Let's be honest, developing for the Windows store is at least not fashionable. A cool idea, implemented as a mobile app, will bring a lot of money on iOS and millions of users on Android.
There are at least several reasons to study UWP development using .Net. Firstly, if you are a WPF developer, then the migration will be as smooth and painless as possible for you. Secondly, no matter how cool other mobile platforms are, they still remain “mobile”!
The Universal Windows Platform, in its very name, speaks of the capabilities of the platform and the breadth of potential devices on which your application can work. Of course, you will be right if you say that now Windows 10 is used mainly on desktops, but the rapidly changing market can change the balance of power in two accounts in favor of Windows 10 as the most popular OS on all possible devices. So why shouldn't we take advantage of such “mobile” facilities as automated distribution, convenient publication and updating on the whole range of devices, and not only on mobile?
Finally, it's time to talk about the project, on the basis of which this cycle will be built.
The idea of the project originated in the wake of the popularity of cryptocurrency and is a fairly simple game. The game will be called “Crypto Farm” and, as you probably guessed, the gameplay will be built on mining cryptocurrency. A more detailed description of the gameplay will be considered during the cycle in those articles where it will be necessary. It is important to understand that this cycle is about developing on UWP, and not about this game, so it will only be a support for articles that I will try to make as abstract as possible and applicable to different, and not just game, scenarios.
During the development and writing of articles, I plan to cover the following topics:
- Creating a project. What you need to lay from the very beginning to get maximum convenience and expandability in the future.
- Start screen. More lively and more interesting outside, effective inside.
- Multiplayer items. User identification. How? Where to store data? How much is it?
- The structure of the application. How many pages are needed. Transitions between them.
- Design and styling. Several articles devoted to the appearance of the application. From the preparation of graphic materials to the stylization of controls.
- Create your own controls. When there is not enough and you need to create your own.
- Background events. Live tiles and notifications. Important elements of user interaction that must be present in each UWP application.
- Monetization. Types of earnings. Which way to choose and how to effectively integrate.
- Debugging on different devices, resolutions and aspect ratios.
- Assembly and publication of the application.
- Support after publication. Work to achieve high marks and positive reviews.
This is not a complete list of topics that are planned to be covered and, probably, many will arise due to your responses to articles as they appear. I also plan to devote a few articles to the arising difficulties and mistakes made.
But, perhaps, enough of the prefaces and it's time to start developing.
Creating a project. What should be laid from the very beginning?
If, after reading the title, you suddenly decided to skip this article, thinking that it would not cause you any difficulties with creating a UWP project, you will be right in part.
On the one hand, it is very difficult to make critical mistakes at such a simple stage. But on the other hand, you can make your life much easier by doing everything right from the very beginning. In addition, at the end of the article, I will share personal preferences in creating a project that may be useful to experienced developers.
I will create my project in the Russian-language Visual Studio Professional 2017. This edition is paid, or provided by subscription (as in my case), but for full-fledged work on the UWP application, it is optional. You will only need to download the free Visual Studio Community on the official Visual Studio website.
For some reason, many novice developers believe that applications created in the Community are forbidden to publish on a paid basis or in any other way, to earn on the development in this edition, but this is not true. Until you become a large company whose main source of millions in revenue is application development, you can safely use the Community without fear of claims from Microsoft.
So, we start the Visual Studio (further VS) and if you did not change anything, we immediately see the start screen. This screen contains quick access to open and create projects, as well as the latest news for developers. Since this screen changes from version to version, I will not refer to its items, and in the old way I will go to the menu "File> Create Project ...". In the window that opens, you can see the list of templates for all projects sorted by types and programming languages that we can create in this version of VS.
We need the section "Universal Windows Applications" and the topmost template "Empty Application (Universal Application for Windows)". By the way, if you developed applications for Windows 8 / 8.1, which were denoted by the abbreviation WinRT, then remember that the list of templates was not limited to an empty application. There were also additional templates for multipage applications that involved quickly creating a project based on your data.
I have to admit that the presence of these “fast” templates, in my opinion, was a mistake that led to the creation of thousands of unattractive and similar applications that flooded the Windows store, and this slightly tarnished its image. Although on the other hand, then the Windows store just appeared and it was critically lacking content.
After selecting the desired project template, you need to select its name, location, and again the name, but this time to solve. The solution in VS is to unite several projects together, which I, by the way, will separately discuss in one of the following articles. In principle, at the stage of the initial creation of the project, its name and the name of the solution can be left the same. We should also mention the name of the project in Cyrillic. In principle, no one forbids you to use the Russian text in the title or even use spaces, but old programmer scars begin to itch a lot from such actions. By giving the project a name in Latin and without spaces, you will definitely save yourself from any potential problems with the storage and synchronization of the project, so I recommend that you do this.
It also remains to decide what to do with the two checkboxes in the lower right corner of the project creation window. The first one (“Create a directory for a solution”) will help you if you choose a certain shared folder as the target location for the project, but not prepared in advance. A very handy feature and it is not for nothing that it is marked by default. The second item of additional parameters, called “Add to the version control system”, we will leave unchecked, and I will explain why later in the article.
So, the coveted “OK” button is pressed and, it would seem, it is possible to begin to study the structure of the project, but no. Before us is another dialog box asking you to select the target and minimum versions for your UWP application.
If you are a developer of WPF or other projects in VS and have already begun to yawn from the previous paragraphs, then it's time to wake up, because we have a very important choice that significantly affects the number of potential users, as well as the labor costs during development. I have to admit, I am very surprised that in most of the manuals we are offered to simply press “OK”, without changing anything, without understanding the topic at all. I, not so much for the readers, as at one time, for myself, carefully studied the issue and now I share my reflections with you.
The most obvious thing that comes to mind when trying to sort out the question is to click on the link in this window, which will lead us to the documentation page with a description of these parameters. A rather useful page, which, unfortunately, practically does not answer the question “Why should we push ourselves into any framework at all?” And doesn’t make the conscious choice of this framework much easier.
I will begin by answering the question of what caused this framework. It's all about Microsoft marketers, who said that companies need to release an OS with one name, and then supplement and improve it, attributing only version numbers. And these numbers should be displayed only in the system information and not particularly bulging. As a result, all that an ordinary user knows is that Windows 10 is installed on his computer (or other supported device), which is periodically updated for some reason. This is a very smart solution, since even the very first and almost forgotten build of Windows 10 is still Windows 10 and works to the benefit of general statistics. And we, as developers, are also extremely profitable, because over time the army of potential users of our application will only grow.
Unfortunately, the fee for this approach is that we need to carefully monitor the use of new functions in the application to ensure its maximum compatibility on a larger range of Windows 10 assemblies, because, as you understand, functions that are only available in assembly 16299 will not work for user build 10240.
But I never answered why we need a range of versions. The choice of the minimum and target versions is due to the ability to make our application adaptive to different assemblies of Windows 10 with minimal sacrifices. We do not need to sacrifice functionality for the sake of maximum coverage, or, on the contrary, coverage for the sake of new functions. We are offered to choose how much we are willing to sacrifice each individual item, and in any case it is necessary to sacrifice. Even if you select the maximum range - from the earliest to the latest version - and get the maximum coverage and the full range of functions, we will have to spend a lot of time adapting the code, which will significantly stretch and complicate the development process.
On a note! Adaptive code is special conditions in the program that determine whether this or that function is available to us. This condition allows, on the one hand, to use new functions where they are available, and on the other, to allow the application to work without errors in those versions of Windows where these functions do not yet exist. Examples of adaptive code will appear in future articles in this series.So, what should you choose as the target and minimum version? For the target version, I recommend choosing the highest possible value. It is important to understand that with each update of Windows 10, not only new functions appear, but old ones also improve. Whereas applications targeting early assemblies will use the API of the assembly they are aimed at. Therefore, choosing the most recent version as the target, we get not only new functions, but also better and more modern old ones. Knowing this, we can also decide when to choose an earlier build as the target. But this is only necessary if the mechanisms that we plan to use have ceased to work in the latest builds.
For example, this may occur if the application is transferred from another platform or simply using crutches based on outdated API features. Just in case, add that the target version should not be perceived by you as the maximum. Of course, your application will continue to work properly in the next versions of Windows, but at the same time it will turn to the version of the API that it is aimed at.
Let's move to the minimum version. I recommend to put it equal to the version of Windows, which is currently the most statistically popular version. So we get a maximum of users, depriving themselves of the hassle of checking the compatibility of the code for a particular version. Naturally, if you are sure that your user is stuck on an earlier build, then you should select it as the minimum. But to choose the same for the target and minimum versions - the idea is not the most successful. Updating Windows is not only fast, and as a result, not all old computers are covered, therefore, to drive an application into the framework of a single assembly is an unjustified decision.
Finally, all the preludes are passed and you can start exploring the contents of the created project. You can examine its files and folders in the Solution Explorer.
Let's see:
- Folder Assets . In this folder, by design, you should store the resources of your application, such as, for example, pictures. By default, this folder contains mandatory patch images that act as a logo, and I'll talk about them in more detail in one of the articles in this series. By the way, you do not need to store these and other resources in this folder. As, actually, you have no restrictions on the number of folders and subfolders with resources.
- The App.xaml file and its associated App.xaml.cs / vb perform almost the same function as the Application in WPF. In App.xaml, you can register application resources, as well as specify the preferred theme (light or dark) in the RequestedTheme property. In the code file you can manage the life cycle of the application. The topic of the life cycle of UWP applications is quite extensive and you can read more about what it is here . Also, the App.xaml.cs / vb file can be used to host the global variables of the application, but this depends on the programming pattern you decide to use. For example, MVVM is more suitable for UWP, which I will not use, but I highly recommend it to experienced developers.
- The App1_TemporaryKey.pfx file is a temporary certificate that signs your application and is needed so that it can run on the device. We don't need to know anything more about him. We will not have to work with him.
- The MainPage.xaml file and its associated MainPage.xaml.cs / vb is the main page of the application. The difference from WPF applications is that here we work not with windows, but with pages. The UWP application window is usually the same, and the application pages are loaded in it, between which you switch, like navigating through the site pages in the browser. In more detail about pages and navigation in UWP I will tell in one of the next articles.
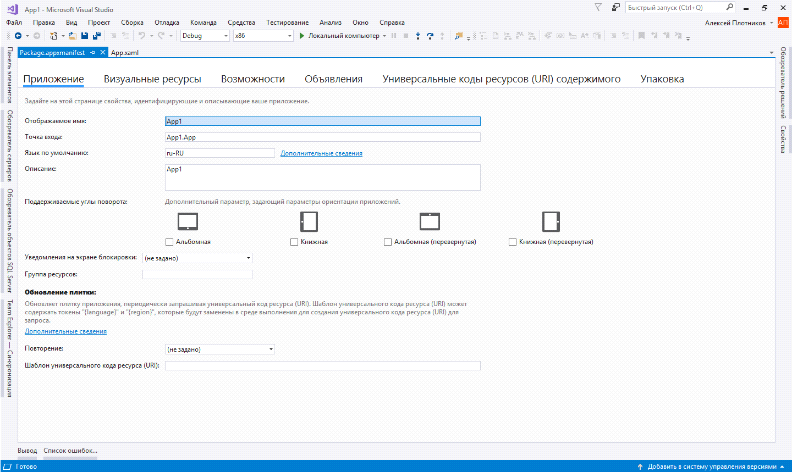
- And the last, automatically created project file, is the Package.appxmanifest file. This, as you understand, is the project manifest that contains the main announcements. This file has a convenient editor, which is called by double-clicking. In this editor, you can set the important parameters of the application, set the location of logos, set the capabilities of the application and declare the contracts that it will use. In the course of this cycle, I will regularly refer to different settings of the manifest and consider them in more detail. Also note that in the documentation it is often found an indication in which parameters of the manifest which keys should be marked. In these cases, the documentation refers to the text version of the manifest. You can open it by right-clicking on the manifest file and selecting the item “Open with ...” and further - “Editor (text) XML”.
The newly created project is fully operational, and you can start it by pressing "F5". After launching the application, it will appear in the list of installed applications in the Start menu, from where it can also be launched.
And the last thing I want to mention is adding a project to the version control system. There are several popular version control systems (hereinafter referred to as Git), but Team Services is best suited for a novice developer. This is a free tool for publishing applications in remote storage, as well as for team development. Even if you do not need such powerful features as collaborating on a project, creating code branches and individual builds, the ability to synchronize and backup is very difficult to underestimate.
So, let's publish the newly created application in Team Services. To do this, in the lower right corner of VS, you need to click on the words “Add to version control system> Git”. In the “Team Explorer - Synchronization” window that opens, click on “Publish Git Repository”.
In order for subsequent manipulations to run smoothly, you must be registered on the Team Services website and have your own domain in this system. This is done quite simply. In the main synchronization window, click the “Learn more” link that will send you to the Team Services website. On this site, select "Start work for free" and follow the instructions. After creating your domain, it will become your hub in which you can track projects, view the change history, assign a team and much more, but now we just close the site and return to VS.
After the preparatory work, select "Publish Git repository", and now it remains only to choose your account, domain name and publish the project. If everything went well, the synchronization window will display a list of actions that you can perform directly from VS. We are most interested in the "Changes" and "Synchronization" items.
In fact, we still haven't uploaded the whole project to Git. First we need to fix all the changes made to the project, which include the creation of the project. To do this, go to the "Changes" section, fill in the description of the changes made, and then click on "Commit all". Team Services allows you to track the history of changes to the project, and - if necessary - to return to an early point, or just to see what and when we added, so choose a descriptive description that in the future will help you quickly find the desired point in the development process. For example, now we can specify in the description of the fixation: “Creating a project”.
After all changes are committed, they need to be synchronized with Git. To do this, go to the "Synchronization" section and select the appropriate link. Synchronization works in both directions, and if you recorded and unloaded the changes on another computer, then at the time of synchronization they will be loaded on it. This is also useful if you have lost the project files that were previously uploaded to Git. Just synchronize the project without local fixing, and they will return.
With this, the topic of creating a UWP project can be considered closed, however, since this cycle of articles is written in parallel with the development of a live project, I decided to supplement this article with personal recommendations on the initial configuration of the project, which I developed in the process of working with UWP.
The information below is aimed at WPF developers, is a personal experience and should not be taken as a reference.
In fact, I knowingly recommended ignoring the tick “Add to version control system” at the very beginning of the project creation, although I then described this process without changing anything in the project. I myself publish only after adding some additional elements to the project.
First, the ConvertersAndStyle folder is added to the project, into which I place files with converters and resource dictionaries:
- The file Converters.cs / vb is a regular “class” file, in which the converters used in the application are then placed.
- The ConverterDictionary.xaml file is a file of the “Resource Dictionary” type in which we will write links to our converters. Since most of the converters will be used throughout the application, it is better to define them in one file and not in the resources of each individual page.
- The ApplicationStyle.xaml file is also a resource dictionary, and in it we will define all the resources associated with the application style.
As you probably understand, I chose the names of folders and files based on their functions. You can give them any names that are convenient for you.
After adding the resource files, we need to add an indication of them in the App.xaml file:
<Application x:Class="CriptoFarm.App" xmlns="http://schemas.microsoft.com/winfx/2006/xaml/presentation" xmlns:x="http://schemas.microsoft.com/winfx/2006/xaml" xmlns:local="using:CriptoFarm" RequestedTheme="Light"> <Application.Resources> <ResourceDictionary> <ResourceDictionary.MergedDictionaries> <ResourceDictionary Source="ConvertersAndStyle/ConverterDictionary.xaml"/> <ResourceDictionary Source="ConvertersAndStyle/ApplicationStyle.xaml"/> </ResourceDictionary.MergedDictionaries> </ResourceDictionary> </Application.Resources> </Application> Now we can access resources from these files anywhere in the application.
The second thing I want to point out is the selection of a separate folder for images. Since I often write the paths to pictures manually, I use simpler and more intuitive names of folders and files. The main folder for storing images in my projects is called Images , and I use the Assets folder only for logos - those that are shown on the tile, in the list of applications and in the store.
Next is to prepare our application for localization. To do this, create at least two folders. The first one for the native language (in our case, Russian) should be called “ru”, and the second for the international one - “en”. In this case, folder names play an important role and there is no need to call them differently. You can also add folders for additional languages if you plan to localize the application into several languages. A complete list of available folder names for different languages can be found here .
In each of the folders you need to add a file type "Resource File (.resw)", leaving its default name. In more detail about the localization of the application and what to do with these files, I will discuss in a separate article of the cycle.
And after all these manipulations, you can publish the application to the version control system, after which the project is completely ready for immediate work.
The next article of the cycle will be devoted to creating your own start screen, and, I hope, will bring something new against the background of existing articles on this topic.
Source: https://habr.com/ru/post/349402/
All Articles