Develop isomorphic RealWorld applications with SSR and Progressive Enhancement. Part 2 - Hello World
In the previous part of the tutorial, we learned what a RealWorld project is, defined the objectives of the tutorial, chose a technology stack and wrote a simple Express web server as the basis for an isomorphic frontend.
In this part, we will finish the server part and write an isomorphic “Hello World” in Ractive , as well as collect all this using a Webpack .

Thanks in advance to all those who continue to read this tutorial! If you are really seriously interested in the topic of universal web applications, then you should also familiarize yourself with the series of articles on the same topic “Universal React + Express Applications” . This will be especially interesting for those who like to write a lot of code (I do not).
')
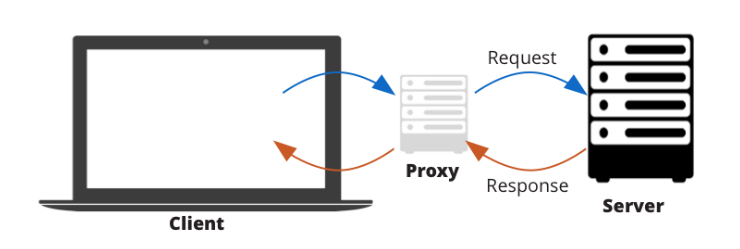
So, based on the selected “high-level” architecture described in the first part, it is necessary to organize the proxying of requests to the backend server through the front-end.
To do this, first examine the specification for the REST API project RealWorld . The API itself is located at: conduit.productionready.io/api
Since I don’t like to write extra code, I won’t reinvent the wheel and use the express-http-proxy module. This module is able not only to proxy http-requests, but also provides a number of “hooks” for different stages of this process, which, obviously, we still need.
First, we will write a simple json-config for our API, where we will define the URL where to proxy, as well as some additional settings.
./config/api.json
“Https”: true means that even if the original request was made via http, it should be proxied to https. Convenient when working with localhost.
In the first part I prepared a special “api middleware” for proxying requests. It's time to write it:
./middleware/api.js
Perhaps this is enough for now. Already, all requests for / api / * frontend will be proxied to the backend server. In other words, if you request GET / api / articles from the front-end server, the answer will be JSON of the form:
Since we plan to work not only with GET requests, but also with all possible REST verbs (POST / PUT / DELETE), as well as execute requests without JS on the client (i.e. by means of html forms), Make a couple of changes to the main web server file from the first part:
./server.js
Please note that we will parse the request body both in json (via ajax) and urlencoded (submit forms). The method-override module will overwrite the http request method with the one specified in the special URL Query parameter _method . This is due to the fact that html forms only support the GET and POST methods. It will work like this:
If JS is disabled on the client and the form has been accepted, this module will automatically replace the original POST for us with PUT and the proxy will receive a valid REST verb for further proxying. Simply and without straining.
As a result, we have a full-fledged proxy requests for the backend, as well as support for requests from html-forms.

At once I want to make a reservation, here by “initial state” I mean not the initial state of the application data, but the set of input parameters with which the application should run. For each specific project, a similar set of parameters will be different, or it may be absent altogether. Base case - the presence or absence of authorization.
Most likely, the initial state was set by your user during the previous session (for example, logged into the account) and after the user returned, he expects to see the application with this initial state (logged in).
The standard SPA is first loaded onto the page, the scripts are launched, and then requests for data are made. At this point, the script can get the initial state parameters based on the browser data or something else, and only then make requests to the API.
Unlike SPA, an isomorphic application has no, relatively speaking, a “loader”. Isomorphic application in this part looks more like an ordinary website. In other words, the initial state must be received at the time of the first synchronous request so that the page rendered on the server fully corresponds to the state that the user expects. Of course, there are cases when developers are lazy and then we see the server rendering a page with some default state, then scripts are run on the client and the client does all the work again. This is not the right approach, and the manifesto of this project is clearly written - no crutches (Section 7)!
This question is being solved, perhaps, by the only available method at the moment - with the help of cookies (I think many immediately guessed when they saw the poster). Yes, indeed, cookies are actually the only official way to transfer the initial state between several synchronous requests to the server. Of course, if we are talking about the browser.
Well, since we are well aware that in terms of the storage of cookies, it’s not very suitable (only 4Kb), and most importantly, we don’t understand exactly which parameters of the initial state we will eventually have to use, and the hand stretches to the sessions! Thus, ordinary sessions, when a session_id (sid) is recorded in a cookie, and a whole pile of data associated with this identifier is stored on the server.
I think in general terms it is clear why we need it and, again, I will not invent anything here. I will take the classic express-session , nadpiguyu little of its parameters and we get quite a working mechanism without any difficulties.
In the main config, add the “session” object with the settings for the module.
./config/common.json
Several key settings for our cookies - you should always set httpOnly and sameSite . When switching to SSL, it will be possible to activate also secure (the cookie will be sent only when working via https).
Add this module to the web server file:
./server.js
Now, among other things, we have a mechanism for storing and transferring the initial state of the application between several synchronous requests. Since this task is entirely due to the peculiarities of working with the browser, the front-end server is the best place for such things. If we did such things on the backend, it could affect other types of clients (for example, mobile), for which there is no need for such tricks. This is another advantage of universal web applications - we get a secure environment (front-end server) in which we can perform front-dependent tasks without sacrificing security and unnecessarily “clog up” the backend with such things. This is especially true when the backend works with many types of clients.

Well, as long as it looks pretty simple, but what the hell do you say, where is isomorphism? Everything will be, but for a start, let's deal with such a part of it as Server-side rendering (SSR) .
To begin, write a simple isomorphic “hello world” using RactiveJS .
./src/app.js
This file is the entry point of our isomorphic application. Let's take a closer look at it.
RactiveJS exports the constructor of the same name with which you can create Ractive-instances, as well as Ractive-components (more on this in the following sections). To many, this approach may remind VueJS and this is no accident . In fact, Ractive is one of the prototypes for Vue and their api are still very similar.
But let’s go back to the code and first find out exactly which static properties of the constructor I set for this application. First, it is Ractive.DEBUG and Ractive.DEBUG_PROMISES with which we enable or disable informational error messages depending on the current environment.
Next comes the Ractive.defaults.enhance flag, which activates one of the key aspects of isomorphism — reuse of markup resulting from SSR on the client side. This is what is often called the incomprehensible term hydrate .
By default, this flag is set to false and this line of code activates this option for all Ractive components at once . In other words, with a single line of code, you can make your application on Ractive re-use markup from the server. At the same time, if a separate component does not suddenly require "hydration", it can be turned off locally through its options .
Finally, two more flags that I always put on:
As a result, I create an object with options for the application instance. Where I inform in what existing DOM element to render the application ( el ), I define some kind of test pattern ( template ), while in the form of a string. I define an object with data ( data ) and a single calculated property ( fullName ).
It looks pretty stupid, because for now we are writing only “Hello world” and its goal is to test SSR and “hydration” on the client. Later I will tell you how we can check it.
Now we will write the server “app middleware” , into which all requests that do not fall into the proxy fall.
./middleware/app.js
Everything is straightforward. If you noticed, the main application file (./src/app.js) exports a function that returns a new Ractive instance, i.e. essentially a new application object. This is not very important when the code is executed on the client - we will most likely not create more than one instance of the application within the tab. However, to execute code on the stateful nodejs server, it is extremely important to be able to create a new application object for each synchronous request. I think this is obvious.
So, at the time of the request, we are creating a new application object. Create an object with meta tags (statically so far), and then 2 lines of code with the most notorious SSR :
Just like that, it works in Ractive . And yes, the functionality of component styles is already available from the box.
Next, I destroy the current application instance by calling the teardown () method and rendering the "./views/index.html" server template with the received values while sending a response. That's the whole great and terrible SSR .

Now a little "whiskers." So, we have a daddy "./views" where the server templates will lie and we expect it to have the very “single-page” index.html in which we will render our wonderful isomorphic application. However, we will not write index.html .
That's because the final client bundles generated by the Webpack must be written at build time with its help. So you have to create a template for the template ! ;-)
./views/_index.html
There is also nothing special here, just a full-fledged HTML file, with a doctype, all sorts of meta tags, links to style files and fonts that RealWorld provides, and so on. Here we see how the meta tags for title , description and keywords will be templated. Also note that component styles are simply placed on the page in a style tag. And of course, our rendered application is placed in the element with the corresponding identifier. It is in this html element that the application will search and “hydrogenate” the markup on the client (the same #app tag, which is usually empty at the classic SPA approach)
After building the client code, Webpack will register all the bundle files in the connection sequence and with the names provided by the project and its config at the end of this file (immediately before the closing body tag), and also generate the final index.html (in the next section). ). This is how it is.

I promised that I would not use any specific tools for writing an isomorphic application. The same applies to Webpack and its configs.
Therefore, I will simply take the existing webpack configuration that I used for the previous demo project (in more detail in the first part) and will use it in this form as it is. Moreover, this config file also got into that demo project from some other project and was practically not finalized. There even remained rudiments, which are essentially not needed in these projects, but they do not interfere and I am too lazy to cut them out. It works and fine.
Unlike the absolute majority of tutorials and starters-whales on an isomorphic topic, I will not write separate webpack-configs for the client and server. Moreover, I won’t build bundles for the server at all. All application files on the server will work without any manipulations with them.
As I said, learning how to work with Webpack is beyond the scope of this tutorial.My task is to show that you can write universal web applications without any specific configs. And yet I will pay attention to some key points.
The entry point is with us ./src/app.js
Bundles are generated in the folder ./dist and referred to the following rules:
All code, except the 3rd-party modules, is passed through Babel:
The most ambiguous piece of the config:
I used to use WrapperPlugin purely in order to apply a strict mode at once for the entire app bundle. However, for universal web applications, I also use it to export an application as IIFE , i.e. Immediately start the application as soon as the bundle is downloaded. Unfortunately, Webpack does not support IIFE as a libraryTarget . Perhaps this is the only piece of the config that I added for the isomorphic project. Although even he has no direct relation to it, because I could call the function manually.
Next, I bring all 3rd-party modules into a separate bundle:
As promised, I add bundles to the end of my template for the template and generate index.html :
I clean the output directory and copy the static assets there:
The remaining parts of the config are not of interest in the context of the project. There are all sorts of UglifyJSPlugin , BundleAnalyzerPlugin and other useful and not very things.

The two files announced in the first part of the tutorial were left without implementation: “req middleware” and “err middleware” . The latest file is the usual Error-handling middleware express. With it, we will give a special page (./views/error.html) with purely server errors, or json, if a server error occurred during an ajax request. While it will look something like this:
The slightly strange format of the json-response is due to the fact that I immediately mimic the error format adopted in the RealWorld specification . For unification, so to speak.
The second “req middleware” will be left idle for now, but I'm sure it will come in handy.

I’m sure that everything, so I’m aware of how to check the SSR operation - just open the " View page code " and see that the #app tag is not empty (as is usually the case in SPA), but contains the markup of our application. Cool, with hydrate a little more difficult.
The attentive eye could notice this incomprehensible piece of code, which, as it were, “neither to the village nor the city” is present in our index.html server template :
It is with his help that we can check whether our “hydration” is working or not. Open the console and enter:
If true , then the item was not redrawn by client code. You can also experiment and set the value Ractive.defaults.enhance = false; , rebuild and restart the application and make sure that in this case this check returns false . Which means the client code redrawn the markup.
Thus, both SSR and “hydration” work fine with both static and dynamic, as well as very dynamic values (calculated properties). What was required to check.
→ Repository
→ Demo
In the next part of this tutorial, we will solve two more key problems of isomorphic web applications:isomorphic routing and navigation , and repeated fetching and initial data state . Despite the fact that I am going to devote a separate article to these issues, the solution itself will take us literally 5 lines of application code. Do not switch!
Thanks for attention!If you like it, stay tuned! All involved in the holiday and good luck!
UPD: Developing an isomorphic RealWorld application with SSR and Progressive Enhancement. Part 3 - Routing & Fetching
In this part, we will finish the server part and write an isomorphic “Hello World” in Ractive , as well as collect all this using a Webpack .
Thanks in advance to all those who continue to read this tutorial! If you are really seriously interested in the topic of universal web applications, then you should also familiarize yourself with the series of articles on the same topic “Universal React + Express Applications” . This will be especially interesting for those who like to write a lot of code (I do not).
')
Disclaimer
This tutorial is intended primarily for frontend-developers of the middle and higher levels. Who are familiar with modern development tools and know what SPA and isomorphism are.
As part of the tutorial, questions of installing npm-modules, introductory acquaintance with webpack, working with the command line or other basic things for today will NOT be revealed. I presume that for most readers routine operations for setting up the environment and working with development tools, etc. already familiar and debugged.
As part of the tutorial, questions of installing npm-modules, introductory acquaintance with webpack, working with the command line or other basic things for today will NOT be revealed. I presume that for most readers routine operations for setting up the environment and working with development tools, etc. already familiar and debugged.
We finish the server
Proxy requests
So, based on the selected “high-level” architecture described in the first part, it is necessary to organize the proxying of requests to the backend server through the front-end.
Why so
In the comments to the first part of the tutorial, a reasonable question was asked - why proxy requests to the backend? From the point of view of the isomorphic approach, this is not necessarily the case. Especially if you like difficulties and solving nonstandard problems, in non-obvious ways.
However, practice shows that this method is the fastest, most convenient and painless solution of a number of issues and problems of isomorphism, which will be discussed further.
In addition, proxying opens up some additional features:
Etc. etc.
However, practice shows that this method is the fastest, most convenient and painless solution of a number of issues and problems of isomorphism, which will be discussed further.
In addition, proxying opens up some additional features:
- Interception of client attacks, such as XSS / CSRF / etc .;
- Hiding the backend of the server + there is no need to enable CORS on the backend;
- Isomorphic caching capabilities for data and queries;
- More secure work with sessions / tokens / so forth;
- Interception of requests / responses and making point changes;
- API point adaptation for client's needs;
- Change of authorization methods;
- Simplified implementation of asynchronous “stateful” functionality over synchronous “stateless” backends;
- Work on top of several backends (or microservices);
Etc. etc.
To do this, first examine the specification for the REST API project RealWorld . The API itself is located at: conduit.productionready.io/api
Since I don’t like to write extra code, I won’t reinvent the wheel and use the express-http-proxy module. This module is able not only to proxy http-requests, but also provides a number of “hooks” for different stages of this process, which, obviously, we still need.
First, we will write a simple json-config for our API, where we will define the URL where to proxy, as well as some additional settings.
./config/api.json
{ "backendURL": "https://conduit.productionready.io", "timeout": 3000, "https": true } “Https”: true means that even if the original request was made via http, it should be proxied to https. Convenient when working with localhost.
In the first part I prepared a special “api middleware” for proxying requests. It's time to write it:
./middleware/api.js
const proxy = require('express-http-proxy'); const config = require('../config/api.json'); module.exports = () => (req, res, next) => { proxy(config.backendURL, { https: config.https, timeout: config.timeout })(req, res, next); }; Perhaps this is enough for now. Already, all requests for / api / * frontend will be proxied to the backend server. In other words, if you request GET / api / articles from the front-end server, the answer will be JSON of the form:
{ "articles":[...], "articlesCount": 100 } Since we plan to work not only with GET requests, but also with all possible REST verbs (POST / PUT / DELETE), as well as execute requests without JS on the client (i.e. by means of html forms), Make a couple of changes to the main web server file from the first part:
./server.js
const methodOverride = require('method-override'); server.use(express.json()); server.use(express.urlencoded({ extended: true })); server.use(methodOverride('_method')); Please note that we will parse the request body both in json (via ajax) and urlencoded (submit forms). The method-override module will overwrite the http request method with the one specified in the special URL Query parameter _method . This is due to the fact that html forms only support the GET and POST methods. It will work like this:
<form action="/something?_method=PUT" method="POST"> ..... </form> If JS is disabled on the client and the form has been accepted, this module will automatically replace the original POST for us with PUT and the proxy will receive a valid REST verb for further proxying. Simply and without straining.
About rewriting the http method
An interesting fact is that some “gurus” of RESTful services suggest using a similar query parameter when designing REST API on backends. Well, like, we want to think about those clients of our API that support only a limited list of HTTP methods.
However, in fact, this is relevant only for browser html forms. In this case, it is not very reasonable to support such a narrow case on the backend, which is used by various types of clients. Most of which do not need this feature. At the same time, the use of this technology within the framework of the frontend-north is quite justified for itself, and most importantly does not affect the interests of other types of clients. This is how it is.
However, in fact, this is relevant only for browser html forms. In this case, it is not very reasonable to support such a narrow case on the backend, which is used by various types of clients. Most of which do not need this feature. At the same time, the use of this technology within the framework of the frontend-north is quite justified for itself, and most importantly does not affect the interests of other types of clients. This is how it is.
Full server.js code
const express = require('express'), helmet = require('helmet'), compress = require('compression'), cons = require('consolidate'), methodOverride = require('method-override'); const app = require('./middleware/app'), api = require('./middleware/api'), req = require('./middleware/req'), err = require('./middleware/err'); const config = require('./config/common'); const server = express(); server.engine('html', cons.mustache); server.set('view engine', 'html'); server.use(helmet()); server.use(express.json()); server.use(express.urlencoded({ extended: true })); server.use(methodOverride('_method')); server.use(compress({ threshold: 0 })); server.use(express.static('dist')); server.use(req()); server.all('/api/*', api()); server.use(app()); server.use(err()); server.listen(config.port); As a result, we have a full-fledged proxy requests for the backend, as well as support for requests from html-forms.
Initial state problem
At once I want to make a reservation, here by “initial state” I mean not the initial state of the application data, but the set of input parameters with which the application should run. For each specific project, a similar set of parameters will be different, or it may be absent altogether. Base case - the presence or absence of authorization.
Most likely, the initial state was set by your user during the previous session (for example, logged into the account) and after the user returned, he expects to see the application with this initial state (logged in).
The standard SPA is first loaded onto the page, the scripts are launched, and then requests for data are made. At this point, the script can get the initial state parameters based on the browser data or something else, and only then make requests to the API.
Unlike SPA, an isomorphic application has no, relatively speaking, a “loader”. Isomorphic application in this part looks more like an ordinary website. In other words, the initial state must be received at the time of the first synchronous request so that the page rendered on the server fully corresponds to the state that the user expects. Of course, there are cases when developers are lazy and then we see the server rendering a page with some default state, then scripts are run on the client and the client does all the work again. This is not the right approach, and the manifesto of this project is clearly written - no crutches (Section 7)!
This question is being solved, perhaps, by the only available method at the moment - with the help of cookies (I think many immediately guessed when they saw the poster). Yes, indeed, cookies are actually the only official way to transfer the initial state between several synchronous requests to the server. Of course, if we are talking about the browser.
Well, since we are well aware that in terms of the storage of cookies, it’s not very suitable (only 4Kb), and most importantly, we don’t understand exactly which parameters of the initial state we will eventually have to use, and the hand stretches to the sessions! Thus, ordinary sessions, when a session_id (sid) is recorded in a cookie, and a whole pile of data associated with this identifier is stored on the server.
I think in general terms it is clear why we need it and, again, I will not invent anything here. I will take the classic express-session , nadpiguyu little of its parameters and we get quite a working mechanism without any difficulties.
In the main config, add the “session” object with the settings for the module.
./config/common.json
{ "port": 8080, "session": { "name": "_sid", "secret": "ntVA^CUnyb=6w3HAgUEh+!ur4gC-ubW%7^e=xf$_G#wVD53Cgp%7Gp$zrt!vp8SP", "resave": false, "rolling": false, "saveUninitialized": false, "cookie": { "httpOnly": true, "secure": false, "sameSite": true } } } Several key settings for our cookies - you should always set httpOnly and sameSite . When switching to SSL, it will be possible to activate also secure (the cookie will be sent only when working via https).
Add this module to the web server file:
./server.js
const session = require('express-session'); server.use(session(config.session)); Full server.js code
const express = require('express'), helmet = require('helmet'), compress = require('compression'), cons = require('consolidate'), methodOverride = require('method-override'), session = require('express-session'); const app = require('./middleware/app'), api = require('./middleware/api'), req = require('./middleware/req'), err = require('./middleware/err'); const config = require('./config/common'); const server = express(); server.engine('html', cons.mustache); server.set('view engine', 'html'); server.use(helmet()); server.use(session(config.session)); server.use(express.json()); server.use(express.urlencoded({ extended: true })); server.use(methodOverride('_method')); server.use(compress({ threshold: 0 })); server.use(express.static('dist')); server.use(req()); server.all('/api/*', api()); server.use(app()); server.use(err()); server.listen(config.port); Now, among other things, we have a mechanism for storing and transferring the initial state of the application between several synchronous requests. Since this task is entirely due to the peculiarities of working with the browser, the front-end server is the best place for such things. If we did such things on the backend, it could affect other types of clients (for example, mobile), for which there is no need for such tricks. This is another advantage of universal web applications - we get a secure environment (front-end server) in which we can perform front-dependent tasks without sacrificing security and unnecessarily “clog up” the backend with such things. This is especially true when the backend works with many types of clients.
Hello world
Well, as long as it looks pretty simple, but what the hell do you say, where is isomorphism? Everything will be, but for a start, let's deal with such a part of it as Server-side rendering (SSR) .
To begin, write a simple isomorphic “hello world” using RactiveJS .
./src/app.js
const Ractive = require('ractive'); Ractive.DEBUG = (process.env.NODE_ENV === 'development'); Ractive.DEBUG_PROMISES = Ractive.DEBUG; Ractive.defaults.enhance = true; Ractive.defaults.lazy = true; Ractive.defaults.sanitize = true; const options = { el: '#app', template: `<div id="msg">Static text! + {{message}} + {{fullName}}</div>`, data: { message: 'Hello world', firstName: 'Habr', lastName: 'User' }, computed: { fullName() { return this.get('firstName') + ' ' + this.get('lastName'); } } }; module.exports = () => new Ractive(options); This file is the entry point of our isomorphic application. Let's take a closer look at it.
RactiveJS exports the constructor of the same name with which you can create Ractive-instances, as well as Ractive-components (more on this in the following sections). To many, this approach may remind VueJS and this is no accident . In fact, Ractive is one of the prototypes for Vue and their api are still very similar.
But let’s go back to the code and first find out exactly which static properties of the constructor I set for this application. First, it is Ractive.DEBUG and Ractive.DEBUG_PROMISES with which we enable or disable informational error messages depending on the current environment.
Next comes the Ractive.defaults.enhance flag, which activates one of the key aspects of isomorphism — reuse of markup resulting from SSR on the client side. This is what is often called the incomprehensible term hydrate .
Theory of hydrate
In simple terms, the trick is that after the application is initialized on the client, it may “want” to re-render all the markup instead of the markup that came from the server (SSR). Not that this is super bad for isomorphism - we still get SEO support and many other goodies. However, in any case, this is highly irrational.
Therefore, it is important not only to be able to do SSR (many people can do this now). It’s good when your framework can do this “hydration”, i.e. can analyze the current markup and data in order to understand that the result of repeated rendering of the application or its individual components will be the same markup, which means that it is not necessary (or necessary, but partially). Next, simply “liven up” the existing markup, i.e. “Hang” all the necessary event-licensers, handlers or whatever else he needs.
All this is relatively recent with all the representatives of the “big three”. Ractive learned this even earlier, which is why he uses his own term “enhance” , instead of the one entered with the “hydrate” reaction. Just then there was still no such term)))
Ractive.defaults.enhance = true; By default, this flag is set to false and this line of code activates this option for all Ractive components at once . In other words, with a single line of code, you can make your application on Ractive re-use markup from the server. At the same time, if a separate component does not suddenly require "hydration", it can be turned off locally through its options .
Finally, two more flags that I always put on:
- Ractive.defaults.sanitize allows you to cut unsafe html tags during template parsing.
- Ractive.defaults.lazy tells the framework to use late DOM events (change, blur) instead of immediately executed (keyup, keydown) for two-way bindings (yes, double-binding taxis).
About the two-way bindings
All the "two-way bindings" of the haters and the "one-way data flow" users will ask to refrain from holivar in the comments. It is not a question of religion. If you think that double-binding of data for you personally is a threat, then do not use it and you will be right. You never have to put yourself in danger in vain.
In my applications, I, as a rule, actively use double binding where necessary and convenient, and so far I have not experienced any serious problems with it. Fortunately, Ractive is not a very religious framework and does not enter into the developer any of its own moral and ethical principles. The approach that Ractive uses is perfectly described on the main page of his site:
After that, all your components will lose the possibility of double binding, unless of course you want to enable it for a particular component ( twoway: true in the options) or even a specific input field (twoway directive = “true” ). As a rule, it is convenient.
In my applications, I, as a rule, actively use double binding where necessary and convenient, and so far I have not experienced any serious problems with it. Fortunately, Ractive is not a very religious framework and does not enter into the developer any of its own moral and ethical principles. The approach that Ractive uses is perfectly described on the main page of his site:
Unlike other frameworks, Ractive works for you , not the other way around. It doesn’t want you to use it. It also adapts to the approach. You're not locked in a framework-specific way of thinking. If you’re on your own, you’ll be able to find out aboutIf you hate or are afraid of double binding, this problem is solved in Ractive in one line:
Ractive.defaults.twoway = false; After that, all your components will lose the possibility of double binding, unless of course you want to enable it for a particular component ( twoway: true in the options) or even a specific input field (twoway directive = “true” ). As a rule, it is convenient.
An interesting case with lazy
Could not resist. The fact is that lazy can be used not only globally and locally for each component, but also pointwise as a directive input field. In addition, lazy can accept not only Boolean, but also a number - the number of milliseconds for the delay.
Using this remarkable property, you can, for example, very quickly and succinctly solve one of the frequently encountered tasks of web development - the search query string:
Working example
Using this remarkable property, you can, for example, very quickly and succinctly solve one of the frequently encountered tasks of web development - the search query string:
<input type="search" value="{{q}}" lazy="1000"/> Working example
As a result, I create an object with options for the application instance. Where I inform in what existing DOM element to render the application ( el ), I define some kind of test pattern ( template ), while in the form of a string. I define an object with data ( data ) and a single calculated property ( fullName ).
It looks pretty stupid, because for now we are writing only “Hello world” and its goal is to test SSR and “hydration” on the client. Later I will tell you how we can check it.
Now we will write the server “app middleware” , into which all requests that do not fall into the proxy fall.
./middleware/app.js
const run = require('../src/app'); module.exports = () => (req, res, next) => { const app = run(); const meta = { title: 'Hello world', description: '', keywords: '' }, content = app.toHTML(), styles = app.toCSS(); app.teardown(); res.render('index', { meta, content, styles }); }; Everything is straightforward. If you noticed, the main application file (./src/app.js) exports a function that returns a new Ractive instance, i.e. essentially a new application object. This is not very important when the code is executed on the client - we will most likely not create more than one instance of the application within the tab. However, to execute code on the stateful nodejs server, it is extremely important to be able to create a new application object for each synchronous request. I think this is obvious.
So, at the time of the request, we are creating a new application object. Create an object with meta tags (statically so far), and then 2 lines of code with the most notorious SSR :
- app.toHTML () - renders the current state of the application in a string;
- app.toCSS () - collects all the “component specific” styles already broken by namespaces and also returns them as a string.
Just like that, it works in Ractive . And yes, the functionality of component styles is already available from the box.
Next, I destroy the current application instance by calling the teardown () method and rendering the "./views/index.html" server template with the received values while sending a response. That's the whole great and terrible SSR .
Server Templates
Now a little "whiskers." So, we have a daddy "./views" where the server templates will lie and we expect it to have the very “single-page” index.html in which we will render our wonderful isomorphic application. However, we will not write index.html .
That's because the final client bundles generated by the Webpack must be written at build time with its help. So you have to create a template for the template ! ;-)
./views/_index.html
<!doctype html> <html lang="en" dir="ltr"> <head> <meta charset="utf-8"> <meta http-equiv="X-UA-Compatible" content="IE=edge"> <meta name="description" content="{{ meta.description }}"> <meta name="keywords" content="{{ meta.keywords }}"/> <meta name="viewport" content="width=device-width, initial-scale=1.0, minimum-scale=1.0"> <title>{{ meta.title }}</title> <link rel="stylesheet" href="//code.ionicframework.com/ionicons/2.0.1/css/ionicons.min.css"> <link rel="stylesheet" href="//fonts.googleapis.com/css?family=Titillium+Web:700|Source+Serif+Pro:400,700|Merriweather+Sans:400,700|Source+Sans+Pro:400,300,600,700,300italic,400italic,600italic,700italic"> <link rel="stylesheet" href="//demo.productionready.io/main.css"> <link rel="shortcut icon" type="image/x-icon" href="/favicon.ico"> <link rel="icon" type="image/png" href="/img/favicon.png"> <link rel="apple-touch-icon" href="/img/favicon.png"> <link rel="manifest" href="/manifest.json"> <style> {{& styles }} </style> </head> <body> <div id="app"> {{& content }} </div> <script> window.msgEl = document.getElementById('msg'); </script> </body> </html> There is also nothing special here, just a full-fledged HTML file, with a doctype, all sorts of meta tags, links to style files and fonts that RealWorld provides, and so on. Here we see how the meta tags for title , description and keywords will be templated. Also note that component styles are simply placed on the page in a style tag. And of course, our rendered application is placed in the element with the corresponding identifier. It is in this html element that the application will search and “hydrogenate” the markup on the client (the same #app tag, which is usually empty at the classic SPA approach)
After building the client code, Webpack will register all the bundle files in the connection sequence and with the names provided by the project and its config at the end of this file (immediately before the closing body tag), and also generate the final index.html (in the next section). ). This is how it is.
Webpack
I promised that I would not use any specific tools for writing an isomorphic application. The same applies to Webpack and its configs.
Therefore, I will simply take the existing webpack configuration that I used for the previous demo project (in more detail in the first part) and will use it in this form as it is. Moreover, this config file also got into that demo project from some other project and was practically not finalized. There even remained rudiments, which are essentially not needed in these projects, but they do not interfere and I am too lazy to cut them out. It works and fine.
Unlike the absolute majority of tutorials and starters-whales on an isomorphic topic, I will not write separate webpack-configs for the client and server. Moreover, I won’t build bundles for the server at all. All application files on the server will work without any manipulations with them.
Why is that
The short answer is: for the server, the build has no practical meaning.
More specifically: I often have to work with many different environments, and the only one that is completely under my control is the front-end server. Therefore, I used to write my code based on the capabilities of the environment controlled by me and on the server I do not need all kinds of transpilers, minification of the code, and especially assembly of the code in bundles. However, all this is necessary for an indefinite list of uncontrolled environments, so the client code is collected by the webpack with all the frills.
More specifically: I often have to work with many different environments, and the only one that is completely under my control is the front-end server. Therefore, I used to write my code based on the capabilities of the environment controlled by me and on the server I do not need all kinds of transpilers, minification of the code, and especially assembly of the code in bundles. However, all this is necessary for an indefinite list of uncontrolled environments, so the client code is collected by the webpack with all the frills.
As I said, learning how to work with Webpack is beyond the scope of this tutorial.My task is to show that you can write universal web applications without any specific configs. And yet I will pay attention to some key points.
The entry point is with us ./src/app.js
entry: { app: [ path.resolve(__dirname, 'src/app'), ] }, Bundles are generated in the folder ./dist and referred to the following rules:
output: { path: path.resolve(__dirname, 'dist'), publicPath: '/', filename: `[name]-${ VERSION }.bundle.[hash].js`, chunkFilename: `[name]-${ VERSION }.bundle.[chunkhash].js`, }, All code, except the 3rd-party modules, is passed through Babel:
{ test: /\.(js)$/, exclude: /(node_modules|bower_components)/, loader: 'babel-loader', }, The most ambiguous piece of the config:
new WrapperPlugin({ test: /\app(.*).js$/, header: '(function(){"use strict";\nreturn\t', footer: '\n})()();' }), I used to use WrapperPlugin purely in order to apply a strict mode at once for the entire app bundle. However, for universal web applications, I also use it to export an application as IIFE , i.e. Immediately start the application as soon as the bundle is downloaded. Unfortunately, Webpack does not support IIFE as a libraryTarget . Perhaps this is the only piece of the config that I added for the isomorphic project. Although even he has no direct relation to it, because I could call the function manually.
Next, I bring all 3rd-party modules into a separate bundle:
new webpack.optimize.CommonsChunkPlugin({ name: 'vendor', minChunks: ({ resource }) => ( resource !== undefined && resource.indexOf('node_modules') !== -1 ) }), As promised, I add bundles to the end of my template for the template and generate index.html :
new HtmlWebpackPlugin({ template: './views/_index.html', filename: '../views/index.html', minify: { html5: true }, hash: true, cache: true, showErrors: false, }), I clean the output directory and copy the static assets there:
new CleanWebpackPlugin(['dist']), new CopyWebpackPlugin([{ from: 'assets', force: true }]), The remaining parts of the config are not of interest in the context of the project. There are all sorts of UglifyJSPlugin , BundleAnalyzerPlugin and other useful and not very things.
A little more server
The two files announced in the first part of the tutorial were left without implementation: “req middleware” and “err middleware” . The latest file is the usual Error-handling middleware express. With it, we will give a special page (./views/error.html) with purely server errors, or json, if a server error occurred during an ajax request. While it will look something like this:
module.exports = () => (err, req, res, next) => { res.status(500); (req.accepts(['html', 'json']) === 'json') ? res.json({ errors: { [err.name]: [err.message] } }) : res.render('error', { err }); }; The slightly strange format of the json-response is due to the fact that I immediately mimic the error format adopted in the RealWorld specification . For unification, so to speak.
The second “req middleware” will be left idle for now, but I'm sure it will come in handy.
module.exports = () => (req, res, next) => next(); Testing SSR and hydrate
I’m sure that everything, so I’m aware of how to check the SSR operation - just open the " View page code " and see that the #app tag is not empty (as is usually the case in SPA), but contains the markup of our application. Cool, with hydrate a little more difficult.
The attentive eye could notice this incomprehensible piece of code, which, as it were, “neither to the village nor the city” is present in our index.html server template :
window.msgEl = document.getElementById('msg'); It is with his help that we can check whether our “hydration” is working or not. Open the console and enter:
msgEl === document.getElementById('msg'); If true , then the item was not redrawn by client code. You can also experiment and set the value Ractive.defaults.enhance = false; , rebuild and restart the application and make sure that in this case this check returns false . Which means the client code redrawn the markup.
Thus, both SSR and “hydration” work fine with both static and dynamic, as well as very dynamic values (calculated properties). What was required to check.
→ Repository
→ Demo
In the next part of this tutorial, we will solve two more key problems of isomorphic web applications:isomorphic routing and navigation , and repeated fetching and initial data state . Despite the fact that I am going to devote a separate article to these issues, the solution itself will take us literally 5 lines of application code. Do not switch!
Thanks for attention!If you like it, stay tuned! All involved in the holiday and good luck!
UPD: Developing an isomorphic RealWorld application with SSR and Progressive Enhancement. Part 3 - Routing & Fetching
Source: https://habr.com/ru/post/349354/
All Articles