Installation of a certification authority in the enterprise. Part 3
And here is the final third part of our series of articles about the certification center at the enterprise. Today we will look at how to deploy certificate services using Windows Server 2016 as an example. Let's talk about preparing a domain controller, preparing a web server, installing root and issuing certification authorities, and updating certificates. Look under the cat!

The following abbreviations and abbreviations have been used in this part of the series:
To deploy the certificate service, we need four machines running Windows Server 2016 that will perform the following functions:
PKI deployment will be phased on each server in the order in which they are listed above. Preparing a domain controller will be limited to providing Active Directory functions, GPOs and accounts.
Before deploying a PKI, you must ensure that the Active Directory domain is operational and that all the necessary servers (namely, the web server and the subordinate CA) are entered into the domain. And also, that prepared the necessary accounts. At this stage, we only need an account with Enterprise Admins rights.
The next step is to configure the autoenrollment policy. This policy will be required during the operation of certificate services for the automatic issuance and renewal of expired certificates on clients. The policy is configured in the configuration of the computer and user:
The policy in both sections must be configured as shown in the following image:

The configured group policy object (GPO) must be docked to the domain root. This procedure must be repeated in all domains of the current Active Directory forest.
Next, you need to create a CNAME record with the name CDP on the DNS server, which will point to the web server (IIS). This procedure must be performed both on the internal and external (which serves the zone on the Internet) DNS servers. You can create an entry using PowerShell:
On the web server, we need to do the following: install IIS (if not already installed), create a shared folder, and configure the website to use this folder.
To install IIS, you can use the following command:
According to our configuration table (see part 2), to store CA certificates and revocation lists we will need a shared folder with the network name PKI in the following path: C: \ InetPub \ wwwroot \ PKIdata
After that, you need to issue NTFS permissions to write to this folder for the group Cert Publishers.
Now we need to create a separate website called “CDP” and hostname “cdp.contoso.com”:
In our scenario, the issuing CA will publish the Delta CRL, which contains the plus sign “+” in the file name (for example, contoso-pica + .crl). By default, IIS will regard this character in the request as a metacharacter and will not allow customers to download the recall list. To do this, you need to enable double escaping in the IIS settings in order to treat the plus sign in the query as a literal:
The actual installation of the CA will involve several steps:
Before installing the root CA, you need to once again return to the configuration tables:
In the table, I selected only those parameters that are set before and during the installation process. The remaining parameters will be adjusted after installation.
Preliminary configuration files are necessary for a number of settings that cannot be set during component installation (neither using the GUI, nor using the command line or PowerShell). These usually include the CA certificate extension settings. For example, to configure the Certificate Policies certificate extension, you need to use a preliminary configuration file in which the extension parameters are configured. For Microsoft ADCS, this file is the CAPolicy.inf file, which should be located in the following path:% windir% \ CAPolicy.inf. The syntax of this file can be found in the following article: How CA Certificates Work . Since we will not make any specific or non-standard settings in the root CA certificate, we will not need the preliminary configuration file now.
First you need to add installation components for AD CS:
After that, consult the previous table to determine the installation parameters. Based on the data in the table, let's set the parameters for the Install-AdcsCertificationAuthority cmdlet :
After installing the CA component, you must configure the operating parameters of the CA. Consider again the elements that we need to configure:
* - copied to IIS server
To configure the CA settings, we will use the BATCH script using the certutil.exe utility:
A number of teams need a more detailed explanation. Commands with customization extensions CRL Distribution Points and Authority Information Access have a specific syntax. First, the publication and distribution paths are indicated in one line and are separated by the newline character "\ n". Each path begins with a number and is separated from the path itself by a colon. This number at the beginning of the path indicates the bit mask of the publication flags for a particular path. The value of each bit for the CDP and AIA extensions is shown in the following table:
If you take the path for CDP: 1:% windir% \ system32 \ CertSrv \ CertEnroll \ %% 3 %% 8.crl, then the number 1 at the beginning of the line indicates that this is the path to the physical location of the file (Publich CRLs to this location) . Other options are not used here. To include the path that will be published in the issued certificates, we will use the option “Include in the CDP extension of issued certificates” with a numerical value of 2. The same principle applies to the other paths.
Each path includes variables with a double percent sign "%%". These are variables that the CA will automatically fill in when forming the path based on the type of variable.
The following table contains a description of all available variables and their brief description:
In our particular case, only two variables will be used: <CertificateName> and <CRLNameSuffix>. For the original CA certificate, these variables are empty. When updating the CA certificate, the variable will be replaced with “(index)”, where index is the CA certificate number. Indexing starts from scratch. For example, the file name for a subsequent CA certificate will look like: contoso-rca (1) .crt. And so on. The same applies to the variable, only here the index of the key pair of CA will be indicated.
Special attention should be paid to the team, which includes the audit of operations on the CA server, which are recorded in the Security.evtx system log. These include all basic operations: starting / stopping the service, sending a request, issuing or rejecting a certificate, issuing a revocation list. This line can be found in almost every post-installation script for the CA, which can be found in similar articles on the Internet. And almost no one bothers himself in a detailed explanation of the mechanism of his work, just copy from article to article.
The peculiarity of CA audit is that setting the audit flags on the CA is a necessary but not sufficient condition. The audit mechanism is based on logging events in the Security.evtx log, which, in turn, depends on the setting of the Audit Object Access policy in group policies. Those. Without setting group policies, there will be no audit.
Experienced administrators know where the inclusion of Audit Object Access leads to the avalanche creation of journal entries from other OS components. For example, auditing file system access, registry, other installed roles, etc. As a result, the journal can literally fill up in a day or two. Therefore, effective use of auditing requires measures to filter unnecessary events, for example, using the function of subscribing to events of interest. There is no point in an audit if no one can read it and analyze it effectively. But this topic is already beyond the scope of this article.
After the root CA is installed and configured, make sure that everything went smoothly:
If everything is fine, then copy the contents of the C: \ CertData folder to the IIS server in the PKIData folder. The root CA certificate can already be imported to all devices that will use our PKI.
To import a certificate to domain clients, it is enough to load it into Active Directory and after updating group policies on clients, the certificate will be installed in local certificate stores throughout the forest. To publish a certificate in AD, run the following command:
To install the certificate on clients in workgroups and mobile devices, you need to use other tools that you have at your disposal. For example, System Center Configuration Manager or Mobile Device Management. If there are no suitable tools, you can copy and install the certificate on computers using the certutil.exe utility. To install the certificate in the local certificate store, run the following command:
As in the case of the root CA, installing the issuing CA involves four steps:
If we didn’t need the pre-installation configuration file for the root CA, then we will need it for the issuing CA. In it, we will configure the Certificate Policies and Basic Constraints extensions for the CA certificate. If everything is clear with the politicians, then in the Basic Constraints extension we forbid the issuance of certificates to other CAs from the issuing CA, since we have a two-level hierarchy and adding new levels only complicates our structure and increases the time spent on checking certificates by customers. Also disable the automatic loading of templates from Active Directory to the list of issued templates. By default, the CA server loads a certain set of certificate templates for issuance. This is harmful for two reasons:
Therefore, we configure the CA so that the list of templates for issue will be empty. This can be done only through CAPolicy.inf. In our case, it will have the following content:
The file named CAPolicy.inf must be copied to the Windows system folder before installing the CA.
First you need to add installation components for AD CS:
After that, look at the installation table to determine the installation parameters:
In the table, I selected only those parameters that are set during the installation process. The remaining parameters will be adjusted after installation. Based on this data , let's create the parameters for the Install-AdcsCertificationAuthority cmdlet :
After executing this command, a message will be displayed that the installation of the CA is not complete and to complete it you need to send a generated request (located in the root of the system disk) to the higher-level CA and receive a signed certificate. Therefore, we find a file with the extension “.req” in the root of the system disk and copy it to the root CA and perform the following commands on the root CA:
The resulting file (subca.crt) must be copied back to the publishing CA and complete the installation:
We install the issued certificate on the CA and start the certificate service. After successful installation, you can start the Certification Authorities MMC snap-in (certsrv.msc) and make sure that the certificate is successfully installed and the CA is in a working state. Now it is up to the post-installation configuration.
By analogy with the root CA, we need to configure a number of parameters on the issuing CA. To do this, we will again write the BATCH script using the certutil.exe utility. But first, let's look at the installation table and find out the parameters that we need to configure:
A similar table is compiled for the issuing CA.
We will take the script from the root CA as a basis and change only individual fragments:
Note that in the CRLDistribution Points paths, the publication flags have been changed (the Delta CRL publication has been added) and the variable% 9 has been added to the file name to support the unique name for the delta.
Here we no longer create a folder in the root of the system disk, but use the PKI network folder on the IIS server, where we directly copy the certificate file and publish revocation lists.
After the publishing CA is installed and configured, make sure that everything went smoothly:
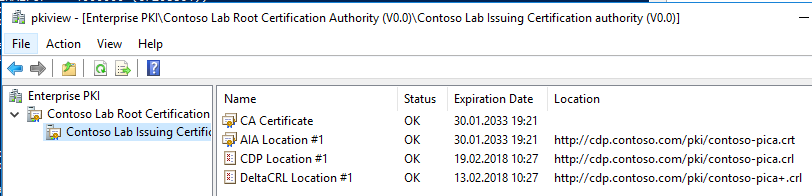
, . ( , , ) Enterprise PKI Health (pkiview.msc). . . , . :

:
Enterprise PKI Health , , PKI .
, , , . , , PKI.
, Active Directory . Certificate Templates MMC (certtmpl.msc). :
, . , Duplicate Template . , . , Contoso Web Server, Contoso Smart Card Logon . .
Windows Server 2012, . :
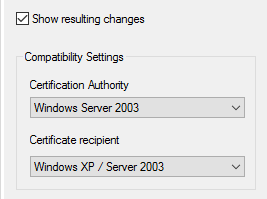
(, Windows 7 ), . , CNG (Cryptography Next Generation), , . , Windows Server 2003/Windows XP, . , , .NET, System Center, (AD FS) .. ( ).
, .NET, CryptoAPI. , , IIS, Remote Desktop Services.
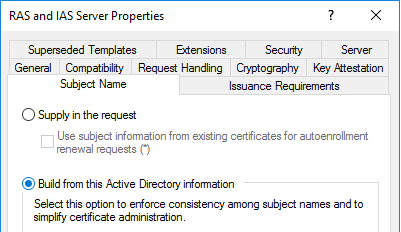
Subject Subject Alternative Names
Subject Subject Alternative Names: . , Subject Name.
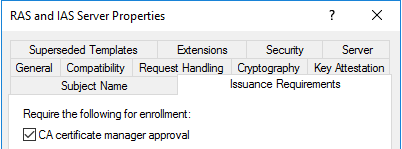
( ), , . (, -) . . , Issuance Requirements «CA certificate manager approval».
, . , Active Directory. . , Pending Requests , . Those. , . .
Active Directory configuration naming context, . . .
. , .
:
, , ?
. 15 , 5 (. ). , 10 . , .
. , , . , .
: :
Microsoft . , , . . . Microsoft . :
.
. , .
Microsoft Active Directory Certificate Services :
. . . :
. REG .
, :
, .
 — PowerShell Public Key Infrastructure, Microsoft MVP: Cloud and Datacenter Management 2009 PowerShell PKI. 9 PKI . PKI PowerShell .
The first part of the series
')
The second part of the series
Glossary
The following abbreviations and abbreviations have been used in this part of the series:
- PKI ( Public Key Infrastructure ) is a public key infrastructure, a set of tools (technical, material, human, etc.), distributed services and components, used together to support crypto tasks based on private and public keys. Since the abbreviation PKI is not common, hereafter, the more familiar English-language abbreviation PKI will be used.
- X.509 is the ITU-T standard for public key infrastructure and privilege management infrastructure.
- CA ( Certification Center ) - a service that issues digital certificates. A certificate is an electronic document confirming that the public key belongs to the owner.
- CRL ( Certificate Revocation List ) - certificate revocation list. A signed electronic document published by the CA and containing a list of revoked certificates whose validity was terminated due to external reasons. For each revoked certificate, its serial number, date and time of revocation, as well as the reason for revocation (optional) are indicated. Applications can use the CRL to confirm that the certificate presented is valid and not revoked by the publisher ... Applications can use the CRL to confirm that the certificate presented is valid and not revoked by the publisher.
- SSL ( Secure Sockets Layer ) or TLS ( Transport Layer Security ) is a technology that ensures the security of data transmission between a client and a server over open networks.
- HTTPS ( HTTP / Secure ) - secure HTTP, is a special case of using SSL.
- Internet PKI is a set of standards, agreements, procedures and practices that provide a single (unified) data transmission protection mechanism based on the X.509 standard over open data transmission channels.
- CPS ( Certificate Practice Statement ) is a document that describes the procedures for managing public key infrastructure and digital certificates.
General deployment plan
To deploy the certificate service, we need four machines running Windows Server 2016 that will perform the following functions:
- Domain controller - necessary for the functioning of the Active Directory domain;
- Web server - will provide access to CA certificates and reviews for clients;
- Root CA - will perform the functions of the root CA;
- Subordinate CA - will perform the functions of the publishing CA.
PKI deployment will be phased on each server in the order in which they are listed above. Preparing a domain controller will be limited to providing Active Directory functions, GPOs and accounts.
Domain controller preparation
Before deploying a PKI, you must ensure that the Active Directory domain is operational and that all the necessary servers (namely, the web server and the subordinate CA) are entered into the domain. And also, that prepared the necessary accounts. At this stage, we only need an account with Enterprise Admins rights.
A number of operations on a subordinate CA require Enterprise Admins rights, since a record is made in the configuration naming context. If this is the root domain of the forest, then Domain Admins rights are sufficient for these operations.
The next step is to configure the autoenrollment policy. This policy will be required during the operation of certificate services for the automatic issuance and renewal of expired certificates on clients. The policy is configured in the configuration of the computer and user:
- Computer Configuration \ Policies \ Windows Settings \ Security Settings \ Public Key Infrastructure \ Certificate Services Client - Auto-Enrollment
- User Configuration \ Policies \ Windows Settings \ Security Settings \ Public Key Infrastructure \ Certificate Services Client - Auto-Enrollment
The policy in both sections must be configured as shown in the following image:
The configured group policy object (GPO) must be docked to the domain root. This procedure must be repeated in all domains of the current Active Directory forest.
Next, you need to create a CNAME record with the name CDP on the DNS server, which will point to the web server (IIS). This procedure must be performed both on the internal and external (which serves the zone on the Internet) DNS servers. You can create an entry using PowerShell:
Add-DnsServerResourceRecord -CName -Name "cdp" -HostNameAlias "iis.contoso.com" -ZoneName "contoso.om" Web server preparation
On the web server, we need to do the following: install IIS (if not already installed), create a shared folder, and configure the website to use this folder.
- Installing IIS
To install IIS, you can use the following command:
Install-WindowsFeature -Name Web-Server, Web-WebServer -IncludeManagementTools - Creating a PKIdata folder
According to our configuration table (see part 2), to store CA certificates and revocation lists we will need a shared folder with the network name PKI in the following path: C: \ InetPub \ wwwroot \ PKIdata
New-Item -ItemType Directory -Path C:\InetPub\wwwroot -Name PKIdata -Force New-SmbShare -Path C:\inetpub\wwwroot\PKIdata -Name PKI -FullAccess everyone After that, you need to issue NTFS permissions to write to this folder for the group Cert Publishers.
- Website creation
Now we need to create a separate website called “CDP” and hostname “cdp.contoso.com”:
New-Website -Name CDP -HostHeader cdp.contoso.com -PhysicalPath C:\inetpub\wwwroot\PKIdata New-WebVirtualDirectory -Site cdp -Name pki -PhysicalPath C:\inetpub\wwwroot\PKIdata - Enable Delta CRL support
In our scenario, the issuing CA will publish the Delta CRL, which contains the plus sign “+” in the file name (for example, contoso-pica + .crl). By default, IIS will regard this character in the request as a metacharacter and will not allow customers to download the recall list. To do this, you need to enable double escaping in the IIS settings in order to treat the plus sign in the query as a literal:
Import-Module -Name WebAdministration Set-WebConfigurationProperty -PSPath 'MACHINE/WEBROOT/APPHOST' -Filter /system.webServer/security/requestFiltering -name allowdoubleescaping -Value 'true' Installing a root CA
The actual installation of the CA will involve several steps:
- Preparation of pre-installation configuration files (CAPolicy.inf);
- Installing the CA component;
- Perform post-install configuration;
- Check installation.
Before installing the root CA, you need to once again return to the configuration tables:
| Parameter name | Parameter value |
|---|---|
| CA Server | |
| CA class | Standalone CA |
| CA type | Root CA |
| Certificate | |
| Certificate name | Contoso Lab Root Certification authority |
| Additional suffix | OU = Division Of IT, O = Contoso Pharmaceuticals, C = US |
| Key provider | RSA # Microsoft Software Key Storage Provider |
| Key length | 4096 bits |
| Signature algorithm | SHA256 |
| Validity | 15 years |
Preconfiguration
Preliminary configuration files are necessary for a number of settings that cannot be set during component installation (neither using the GUI, nor using the command line or PowerShell). These usually include the CA certificate extension settings. For example, to configure the Certificate Policies certificate extension, you need to use a preliminary configuration file in which the extension parameters are configured. For Microsoft ADCS, this file is the CAPolicy.inf file, which should be located in the following path:% windir% \ CAPolicy.inf. The syntax of this file can be found in the following article: How CA Certificates Work . Since we will not make any specific or non-standard settings in the root CA certificate, we will not need the preliminary configuration file now.
Installing the CA component
First you need to add installation components for AD CS:
Install-WindowsFeature AD-Certificate, ADCS-Cert-Authority -IncludeManagementTools After that, consult the previous table to determine the installation parameters. Based on the data in the table, let's set the parameters for the Install-AdcsCertificationAuthority cmdlet :
Install-AdcsCertificationAuthority -CACommonName "Contoso Lab Root Certification Authority" ` -CADistinguishedNameSuffix "OU=Division Of IT, O=Contoso Pharmaceuticals, C=US" ` -CAType StandaloneRootCA ` -CryptoProviderName "RSA#Microsoft Software Key Storage Provider" ` -KeyLength 4096 ` -HashAlgorithmName SHA256 ` -ValidityPeriod "years" ` -ValidityPeriodUnits 15 ` -DatabaseDirectory $(Join-Path $env:SystemRoot "System32\CertLog") Final setting
After installing the CA component, you must configure the operating parameters of the CA. Consider again the elements that we need to configure:
| Parameter name | Parameter value |
|---|---|
| CA Server | |
| Validity of issued certificates | 15 years |
| CRT Publish Points | 1) Default 2) C: \ CertData \ contoso-rca < CertificateName > .crt3) IIS: \ InetPub \ PKIdata \ contoso-rca < CertificateName > .crt * |
| CRT Distribution Points | 1) cdp.contoso.com/pki/contoso-rca < CertificateName > .crt |
| CRL Publish Points | 1) Default 2) C: \ CertData \ contoso-rca < CRLNameSuffix > .crt3) IIS: \ InetPub \ PKIdata \ contoso-rca < CRLNameSuffix > .crt * |
| CRL distribution points | 1) cdp.contoso.com/pki/contoso-rca < CRLNameSuffix > .crt |
| Certificate | |
| CRL composition | Base CRL |
| Base CRL | |
| Type of | Base CRL |
| Validity | 6 months |
| Extension of validity | 1 month |
| Signature algorithm | SHA256 |
| Publish to AD | Not |
Customization script
To configure the CA settings, we will use the BATCH script using the certutil.exe utility:
:::::::::::::::::::::::::::::::::::::::::::::::::::::::::::::::::::::::::::::::::::::::: :: Root CA post-installation script :: :::::::::::::::::::::::::::::::::::::::::::::::::::::::::::::::::::::::::::::::::::::::: :: (::) :: :: SET CrlLocal=C:\CertData\contoso-rca%%8.crl SET CDP=http://cdp.contoso.com/pki/contoso-rca%%8.crl SET AIA=http://cdp.contoso.com/pki/contoso-rca%%4.crt :: , . :: , CertEnroll Windows. md C:\CertData :: . certutil -setreg CA\CRLPublicationURLs "1:%windir%\system32\CertSrv\CertEnroll\%%3%%8.crl\n1:%CrlLocal%\n2:%CDP%" certutil -setreg CA\CACertPublicationURLs "1:%windir%\system32\CertSrv\CertEnroll\%%1_%%3%%4.crt\n2:%AIA%" :: , :: CertData ren %windir%\system32\CertSrv\CertEnroll\*.crt contoso-rca.crt copy %windir%\system32\CertSrv\CertEnroll\contoso-rca.crt C:\CertData :: certutil -setreg CA\ValidityPeriodUnits 15 certutil -setreg CA\ValidityPeriod "Years" :: certutil -setreg CA\CRLPeriodUnits 180 certutil -setreg CA\CRLPeriod "Days" certutil -setreg CA\CRLOverlapPeriod "Months" certutil -setreg CA\CRLOverlapUnits 1 :: ( Delta CRL) certutil -setreg CA\CRLDeltaPeriodUnits 0 :: - certutil -setreg ca\CRLFlags +CRLF_DISABLE_ROOT_CROSS_CERTS :: certutil –setreg ca\CRLFlags +CRLF_PUBLISH_EXPIRED_CERT_CRLS :: ** certutil -setreg CA\AuditFilter 127 :: , Windows Server 2016 . :: Windows Server 2016 SHA256. Certutil -setreg ca\csp\CNGHashAlgorithm SHA256 :: . net stop certsvc && net start certsvc :: . certutil -CRL A number of teams need a more detailed explanation. Commands with customization extensions CRL Distribution Points and Authority Information Access have a specific syntax. First, the publication and distribution paths are indicated in one line and are separated by the newline character "\ n". Each path begins with a number and is separated from the path itself by a colon. This number at the beginning of the path indicates the bit mask of the publication flags for a particular path. The value of each bit for the CDP and AIA extensions is shown in the following table:
| MMC checkmark name | Numerical value | MMC checkmark name | Numerical value |
|---|---|---|---|
| Publish CRLs to this location. | one | Include in the AIA extension of issued certificates. | 2 |
| Include in the CDP extension of issued certificates. | 2 | Include in the Online Certificate Status. Protocol (OCSP) extension. | 32 |
| Include in CRLs. Clients use this to find Delta CRL locations. | four | ||
| Include in all CRLs. Specifies where to publish in AD DS when publishing manually. | eight | ||
| Publish Delta CRLs to this location. | 64 | ||
| Include in the IDP extension of issued CRLs. | 128 |
Each path includes variables with a double percent sign "%%". These are variables that the CA will automatically fill in when forming the path based on the type of variable.
The first percent sign is used as an escape symbol, so that the command line processor interprets the next percent sign as a literal. The fact is that the percent sign in the CMD command processor is a service character. The CA server also uses the percent sign to indicate that it is a variable. To avoid conflict in the shell, a sequence of two percent signs is used.
The following table contains a description of all available variables and their brief description:
| Variable in the CDP and AIA Extensions Editor | Variable in script | Where used | Value |
|---|---|---|---|
< ServerDNSName > | %one | CDP / AIA | Full DNS server name CA |
< ServerShortName > | % 2 | CDP / AIA | The short (NetBIOS) name of the CA server |
< CaName > | % 3 | CDP / AIA | CA name (CN attribute in certificate) |
< CertificateName > | %four | AIA | Certificate Index CA. Used only when renewing a CA certificate. |
< ConfigurationContainer > | % 6 | CDP / AIA | Path to configuration naming context in Active Directory |
< CATruncatedName > | % 7 | CDP / AIA | The shortened (sanitized) name of the CA certificate. In general, will match the full name of the CA |
< CRLNameSuffix > | %eight | CDP | The key index of the CA that signed this CRL. Used when updating a key CA pair. |
< DeltaCRLAllowed > | %9 | CDP | Adds a suffix for the delta CRL (“+” sign). |
< CDPObjectClass > | %ten | CDP | Object Class in Active Directory |
< CAObjectClass > | %eleven | CDP / AIA | Object Class in Active Directory |
Special attention should be paid to the team, which includes the audit of operations on the CA server, which are recorded in the Security.evtx system log. These include all basic operations: starting / stopping the service, sending a request, issuing or rejecting a certificate, issuing a revocation list. This line can be found in almost every post-installation script for the CA, which can be found in similar articles on the Internet. And almost no one bothers himself in a detailed explanation of the mechanism of his work, just copy from article to article.
The peculiarity of CA audit is that setting the audit flags on the CA is a necessary but not sufficient condition. The audit mechanism is based on logging events in the Security.evtx log, which, in turn, depends on the setting of the Audit Object Access policy in group policies. Those. Without setting group policies, there will be no audit.
Experienced administrators know where the inclusion of Audit Object Access leads to the avalanche creation of journal entries from other OS components. For example, auditing file system access, registry, other installed roles, etc. As a result, the journal can literally fill up in a day or two. Therefore, effective use of auditing requires measures to filter unnecessary events, for example, using the function of subscribing to events of interest. There is no point in an audit if no one can read it and analyze it effectively. But this topic is already beyond the scope of this article.
Other settings
After the root CA is installed and configured, make sure that everything went smoothly:
- Open the Certification Authorities MMC snap-in (certsrv.msc), make sure that the service is running;
- Select the properties of the CA node and check the certificate fields to match the expected values;
- Locate the CertData folder in the root of the system disk and make sure that there are two files there: the certificate and the revocation list. Verify that the fields in the revocation list are as expected.
If everything is fine, then copy the contents of the C: \ CertData folder to the IIS server in the PKIData folder. The root CA certificate can already be imported to all devices that will use our PKI.
To import a certificate to domain clients, it is enough to load it into Active Directory and after updating group policies on clients, the certificate will be installed in local certificate stores throughout the forest. To publish a certificate in AD, run the following command:
Certutil -f -dspublish path\contoso-rca.crt RootCA To install the certificate on clients in workgroups and mobile devices, you need to use other tools that you have at your disposal. For example, System Center Configuration Manager or Mobile Device Management. If there are no suitable tools, you can copy and install the certificate on computers using the certutil.exe utility. To install the certificate in the local certificate store, run the following command:
Certutil -f -addstore Root path\contoso-rca.crt Installing a publishing CA
As in the case of the root CA, installing the issuing CA involves four steps:
- Preparation of pre-installation configuration files (CAPolicy.inf);
- Installing the CA component;
- Perform post-install configuration;
- Verify installation and configuration.
Pre-installation configuration
If we didn’t need the pre-installation configuration file for the root CA, then we will need it for the issuing CA. In it, we will configure the Certificate Policies and Basic Constraints extensions for the CA certificate. If everything is clear with the politicians, then in the Basic Constraints extension we forbid the issuance of certificates to other CAs from the issuing CA, since we have a two-level hierarchy and adding new levels only complicates our structure and increases the time spent on checking certificates by customers. Also disable the automatic loading of templates from Active Directory to the list of issued templates. By default, the CA server loads a certain set of certificate templates for issuance. This is harmful for two reasons:
- Domain controllers almost instantly detect the appearance of a CA in the forest, and even with the automatic issue policy disabled, they themselves request certificates.
- Administrators themselves must determine which templates they will use in the organization.
Therefore, we configure the CA so that the list of templates for issue will be empty. This can be done only through CAPolicy.inf. In our case, it will have the following content:
; INI [Version] Signature= "$Windows NT$" ; , . ; AllIssuancePolicies. [PolicyStatementExtension] Policies = AllIssuancePolicy ; . Certificate Practice ; Statement (CPS) [AllIssuancePolicy] URL = http://cdp.contoso.com/pki/contoso-cps.html OID = 2.5.29.32.0 [BasicConstraintsExtension] IsCA = True PathLegth = 0 IsCritical = True ; [certsrv_server] ; LoadDefaultTemplates = 0 The file named CAPolicy.inf must be copied to the Windows system folder before installing the CA.
Installing the CA component
First you need to add installation components for AD CS:
Install-WindowsFeature AD-Certificate, ADCS-Cert-Authority -IncludeManagementTools After that, look at the installation table to determine the installation parameters:
| Parameter name | Parameter value |
|---|---|
| CA Server | |
| CA class | Enterprise CA |
| CA type | Subordinate ca |
| Automatic template loading | Not |
| Certificate | |
| Certificate name | Contoso Lab Issuing Certification authority |
| Additional suffix | OU = Division Of IT, O = Contoso Pharmaceuticals, C = US |
| Key provider | RSA # Microsoft Software Key Storage Provider |
| Key length | 4096 bits |
| Signature algorithm | SHA256 |
| Validity | 15 years (determined by superior CA) |
| Issuing policies | 1) Name: All Issuance Policies OID = 2.5.29.32.0 URL = http: //cdp.contoso.com/pki/contoso-cps.html |
| Basic Constraints | isCA = True (certificate type - CA certificate) PathLength = 0 (the creation of other intermediate CAs under the current CA is prohibited). |
Install-AdcsCertificationAuthority -CACommonName "Contoso Lab Issuing Certification authority" ` -CADistinguishedNameSuffix "OU=Division Of IT, O=Contoso Pharmaceuticals, C=US" ` -CAType EnterpriseSubordinateCa ` -CryptoProviderName "RSA#Microsoft Software Key Storage Provider" ` -KeyLength 4096 ` -HashAlgorithmName SHA256 After executing this command, a message will be displayed that the installation of the CA is not complete and to complete it you need to send a generated request (located in the root of the system disk) to the higher-level CA and receive a signed certificate. Therefore, we find a file with the extension “.req” in the root of the system disk and copy it to the root CA and perform the following commands on the root CA:
# . certreq -submit 'C:\CA-01.contoso.com_Contoso Lab Issuing Certification authority.req' # . # 2 certutil -resubmit 2 # . # , certreq -retrieve 2 C:\subca.crt The resulting file (subca.crt) must be copied back to the publishing CA and complete the installation:
certutil -installcert c:\subca.crt net start certsvc We install the issued certificate on the CA and start the certificate service. After successful installation, you can start the Certification Authorities MMC snap-in (certsrv.msc) and make sure that the certificate is successfully installed and the CA is in a working state. Now it is up to the post-installation configuration.
Final setting
By analogy with the root CA, we need to configure a number of parameters on the issuing CA. To do this, we will again write the BATCH script using the certutil.exe utility. But first, let's look at the installation table and find out the parameters that we need to configure:
A similar table is compiled for the issuing CA.
| Parameter name | Parameter value |
|---|---|
| CA Server | |
| Validity of issued certificates | Maximum: 5 years (the rest is controlled by certificate templates) |
| Publish to AD (containers) | AIA NTAuthCertificates |
| CRL composition | Base CRL Delta CRL |
| CRT Publish Points | 1) Default 2) \\ IIS \ PKI \ contoso-pica < CertificateName > .crt |
| CRT Distribution Points | 1) cdp.contoso.com/pki/contoso-pica < CertificateName > .crt |
| CRL Publish Points | 1) Default 2) \\ IIS \ PKI \ contoso-pica < CRLNameSuffix > < DeltaCRLAllowed > DeltaCRLAllowed |
| CRL distribution points | 1) cdp.contoso.com/pki/contoso-pica < CRLNameSuffix > < DeltaCRLAllowed > DeltaCRLAllowed |
| Base CRL | |
| Type of | Base CRL |
| Validity | Week 1 |
| Extension of validity | Default |
| Signature algorithm | SHA256 |
| Publish to AD | Not |
| Delta CRL | |
| Type of | Delta CRL |
| Validity | 1 day |
| Extension of validity | Default |
| Signature algorithm | SHA256 |
| Publish to AD | Not |
:::::::::::::::::::::::::::::::::::::::::::::::::::::::::::::::::::::::::::::::::::::::: :: Issuing CA post-installation script :: :::::::::::::::::::::::::::::::::::::::::::::::::::::::::::::::::::::::::::::::::::::::: :: (::) :: :: SET CrlLocal=\\IIS\PKI\contoso-pica%%8%%9.crl SET CDP=http://cdp.contoso.com/pki/contoso-pica%%8%%9.crl SET AIA=http://cdp.contoso.com/pki/contoso-pica%%4.crt :: . certutil -setreg CA\CRLPublicationURLs "1:%windir%\system32\CertSrv\CertEnroll\%%3%%8%%9.crl\n65:%CrlLocal%\n6:%CDP%" certutil -setreg CA\CACertPublicationURLs "1:%windir%\system32\CertSrv\CertEnroll\%%1_%%3%%4.crt\n2:%AIA%" :: , :: ren %windir%\system32\CertSrv\CertEnroll\*.crt contoso-pica.crt copy %windir%\system32\CertSrv\CertEnroll\contoso-pica.crt \\IIS\PKI :: certutil -setreg CA\ValidityPeriodUnits 5 certutil -setreg CA\ValidityPeriod "Years" :: :: CRL certutil -setreg CA\CRLPeriodUnits 1 certutil -setreg CA\CRLPeriod "weeks" :: Delta CRL certutil -setreg CA\CRLDeltaPeriodUnits 1 certutil -setreg CA\CRLDeltaPeriod "days" :: ** certutil -setreg CA\AuditFilter 127 :: Certificate Policies certutil -setreg Policy\EnableRequestExtensionList +"2.5.29.32" :: OcspRevNoCheck, :: (Online Responder OCSP ) certutil -v -setreg policy\editflags +EDITF_ENABLEOCSPREVNOCHECK :: , Windows Server 2016 . :: Windows Server 2016 SHA256. Certutil -setreg ca\csp\CNGHashAlgorithm SHA256 :: . net stop certsvc && net start certsvc :: . certutil -CRL Note that in the CRLDistribution Points paths, the publication flags have been changed (the Delta CRL publication has been added) and the variable% 9 has been added to the file name to support the unique name for the delta.
Here we no longer create a folder in the root of the system disk, but use the PKI network folder on the IIS server, where we directly copy the certificate file and publish revocation lists.
Other settings
After the publishing CA is installed and configured, make sure that everything went smoothly:
- Open the Certification Authorities MMC snap-in (certsrv.msc), make sure that the service is running
- Select the properties of the CA node and check the certificate fields to match the expected values.
- PKI ( IIS) , ( ) ( , ). , .
, . ( , , ) Enterprise PKI Health (pkiview.msc). . . , . :
:
Enterprise PKI Health , , PKI .
Recommendations
, , , . , , PKI.
, Active Directory . Certificate Templates MMC (certtmpl.msc). :
, . , Duplicate Template . , . , Contoso Web Server, Contoso Smart Card Logon . .
Windows Server 2012, . :
(, Windows 7 ), . , CNG (Cryptography Next Generation), , . , Windows Server 2003/Windows XP, . , , .NET, System Center, (AD FS) .. ( ).
, .NET, CryptoAPI. , , IIS, Remote Desktop Services.
Subject Subject Alternative Names
Subject Subject Alternative Names: . , Subject Name.
( ), , . (, -) . . , Issuance Requirements «CA certificate manager approval».
, . , Active Directory. . , Pending Requests , . Those. , . .
Active Directory configuration naming context, . . .
. , .
:
- ;
- ;
- ;
- ( ).
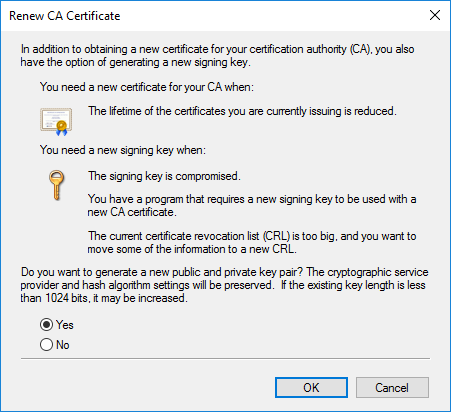
, , ?
. 15 , 5 (. ). , 10 . , .
. , , . , .
: :
Microsoft . , , . . . Microsoft . :
- Certificate validation fails when a certificate has multiple trusted certification paths to root CAs .
- «0x80092013, CRYPT_E_REVOCATION_OFFLINEA» error message when you try to verify a certificate that has multiple chains in Windows Server 2008 or in Windows Vista.
.
Backup
. , .
Microsoft Active Directory Certificate Services :
- Certification Authority MMC (certsrv.msc);
- certutil.exe -backup.
. . . :
HKLM\System\CurrentControlSet\Services\CertSvc . REG .
, :
- ;
- ;
- ;
- ;
- .
, .
about the author
— PowerShell Public Key Infrastructure, Microsoft MVP: Cloud and Datacenter Management 2009 PowerShell PKI. 9 PKI . PKI PowerShell .Source: https://habr.com/ru/post/349202/
All Articles