Protect your Xamarin apps with Dotfuscator
This is a translation of the story by Joe Sewell, a developer on the Dotfuscator team at PreEmptiveSolutions.
Let's be honest: releasing a library, a desktop application, or a mobile application can be a painful experience. As soon as you publish your program in open access for the whole world, you to some extent lose control over how it is used. In particular, developers often deal with the threat of reverse engineering.
On many platforms and in many languages, code obfuscation tools are a known way to protect against reverse engineering. For example, if you are a developer on the Android platform, you may already be using ProGuard to shorten and obfuscate Java code.
Now, Xamarin developers have access to the same type of protection across all major mobile device families, from Android and iOS to Universal Windows (UWP). The tool for the job is called Dotfuscator, the Community Edition version of which is available in Visual Studio.
')
Today we look at how obfuscation can protect the Xamarin application. Android from reverse engineering, and how you can apply the same protection to your own Xamarin applications in just a few simple steps.
Obfuscation is the process by which the compiled application code is transformed into functionally identical code that is more difficult to reverse engineer. This is usually done using an automatic obfuscation tool or obfuscator. The following is a simple example to illustrate how code obfuscation protects applications from reverse engineering.
Consider the C # method below in the source code for the Xamarin.Android game:
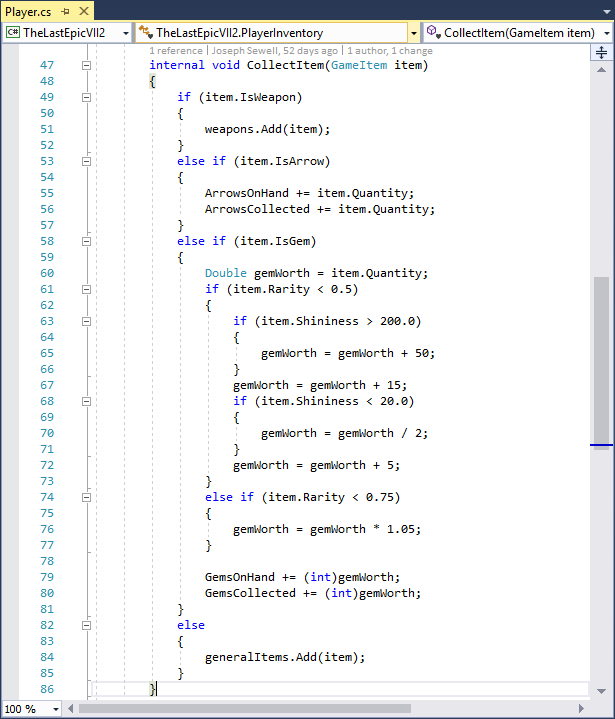
When the developers of this game are ready to embed it in a device or upload it to an app store, they compile the source code into libraries and then pack these libraries into an application bundle. In this example, the developers have packaged the library in an APK file for distribution to Android devices.
However, once the application is laid out in the app store, the “bad person” can easily get and open the APK, generating decompiled code that is almost identical to the source code in the original:
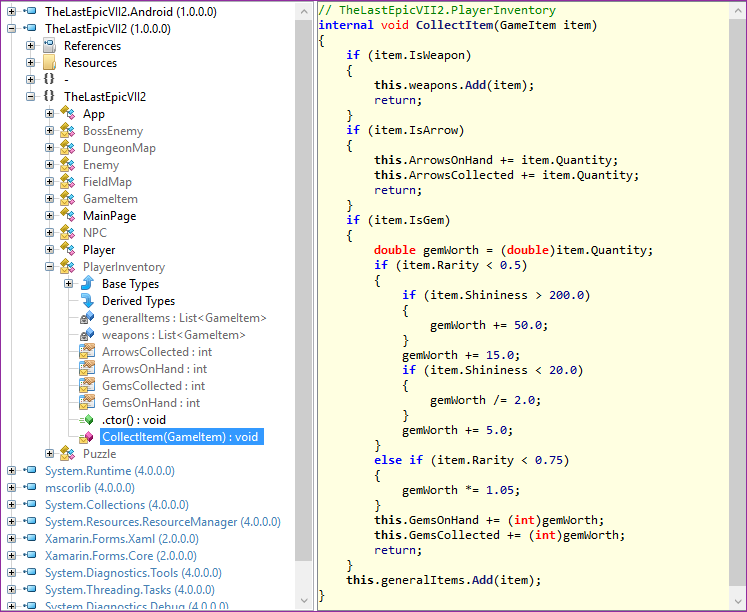
Note that the type, method, and element identifiers here are the same as in the source code, even if the code elements are usually not available outside the project (for example, they are marked internal ("internal")). Also note that the flow of general method commands, for example, the order of if statements (“if”), is clearly visible.
If developers have already launched libraries through the Dotfuscator Community Edition version before distributing the APK, the reverse development results will be different:

The code is protected by obfuscation when renaming - the main form of obfuscation code. Properties with the simplest names, for example,
Now let's move on to how to integrate obfuscation when renaming using Dotfuscator's Community Edition into the build process of your Xamarin application. As an example, we will use the Xamarin.Android application mentioned in the previous section. You can repeat everything with your own Xamarin app, including iOS and UWP versions.
We will use the Dotfuscator PreEmptive Protection - obfuscator and protection tool from .NET, which now also supports Xamarin.
Note: These steps assume that you are developing your application in VisualStudio 2017 for Windows.
First of all, you need to install Dotfuscator on your development machine. Since we are using the Dotfuscator command line interface, you will also need to register your copy and write the path to the interface.
1. Go to the Dotfuscator Downloads page on PreEmptive Solutions.
2. Download the latest version of Dotfuscator Community Edition (CE) for Visual Studio 2017.
3. Open the VSIX file you downloaded and follow the instructions.
4. Open Visual Studio 2017 and select Tools - PreEmptive Protection - Dotfuscator to launch the Dotfuscator Community Edition user interface.
5. You will need to register your copy of Dotfuscator before you can use the command line interface. Dotfuscator will issue a registration request when you open it for the first time; follow these instructions.
6. You need to know the path to the command line interface in order to configure the integration of the assembly later. To find this path:
To simplify the integration process, the Dotfuscator team created the MSBuild targets target file that your Xamarin projects can reference. You can download it here.
Save the PreEmptive.Dotfuscator.Xamarin.targets file to a directory with your solution, under version control.
Modify the project to use assembly integration. Next, you need to change the project file for a project in Visual Studio that you want to obfuscate.
Now you can build a Dotfuscator protected application. To do this:
For more information on continuing development with obfuscation, see the “Continuing Development” section in the Dotfuscator User Manual.
There are some cases when an application assumes that the name of a code element at compile time will be the same as when the application is running. This is particularly true for Xamar and reflection based Xamarin applications. Obfuscation by renaming may violate this premise and cause the application after obfuscation to behave differently.
Although newer versions of Dotfuscator are more capable of working with such scripts automatically, in some cases, manual configuration may be required. For instructions and examples, see the “Identify Exceptions from Renaming” page in the Dotfuscator User Manual.
Instead of the free version of Dotfuscator Community Edition, you can also obfuscate your Xamarin applications in the Dotfuscator Professional Edition. Professional Edition is licensed for use in commercial products, free samples are available on request.
To see the difference between the Community and Professional versions, consider the example of the game mentioned above. If developers missed their catalogs through Dotfuscator Professional Edition instead of Community Edition, the reverse development results will look something like this:
In addition to obfuscation by renaming, this code is also obfuscated by changing the control flow. Source code operators are interspersed with difficult to read blocks of “switching” in seemingly arbitrary order, which makes it very difficult to execute commands. This and other advanced obfuscation forms are contained exclusively in the Dotfuscator Professional Edition.
In this post, we saw how you can use Dotfuscator to protect Xamarin directories and applications from reverse engineering. Although we used an Android-based application as an example, the same steps can be performed for projects based on iOS and UWP, so you can protect your application no matter what platform it runs.
For more information on how to protect Xamarin projects with the Dotfuscator, see the Xamarin page in the Dotfuscator User Manual. There you will also find a git repository showing how to integrate Dotfuscator into the Xamarin application for all three platforms.
Let's be honest: releasing a library, a desktop application, or a mobile application can be a painful experience. As soon as you publish your program in open access for the whole world, you to some extent lose control over how it is used. In particular, developers often deal with the threat of reverse engineering.
On many platforms and in many languages, code obfuscation tools are a known way to protect against reverse engineering. For example, if you are a developer on the Android platform, you may already be using ProGuard to shorten and obfuscate Java code.
Now, Xamarin developers have access to the same type of protection across all major mobile device families, from Android and iOS to Universal Windows (UWP). The tool for the job is called Dotfuscator, the Community Edition version of which is available in Visual Studio.
')
Today we look at how obfuscation can protect the Xamarin application. Android from reverse engineering, and how you can apply the same protection to your own Xamarin applications in just a few simple steps.
How obfuscation protects applications
Obfuscation is the process by which the compiled application code is transformed into functionally identical code that is more difficult to reverse engineer. This is usually done using an automatic obfuscation tool or obfuscator. The following is a simple example to illustrate how code obfuscation protects applications from reverse engineering.
Consider the C # method below in the source code for the Xamarin.Android game:
When the developers of this game are ready to embed it in a device or upload it to an app store, they compile the source code into libraries and then pack these libraries into an application bundle. In this example, the developers have packaged the library in an APK file for distribution to Android devices.
However, once the application is laid out in the app store, the “bad person” can easily get and open the APK, generating decompiled code that is almost identical to the source code in the original:
Note that the type, method, and element identifiers here are the same as in the source code, even if the code elements are usually not available outside the project (for example, they are marked internal ("internal")). Also note that the flow of general method commands, for example, the order of if statements (“if”), is clearly visible.
If developers have already launched libraries through the Dotfuscator Community Edition version before distributing the APK, the reverse development results will be different:
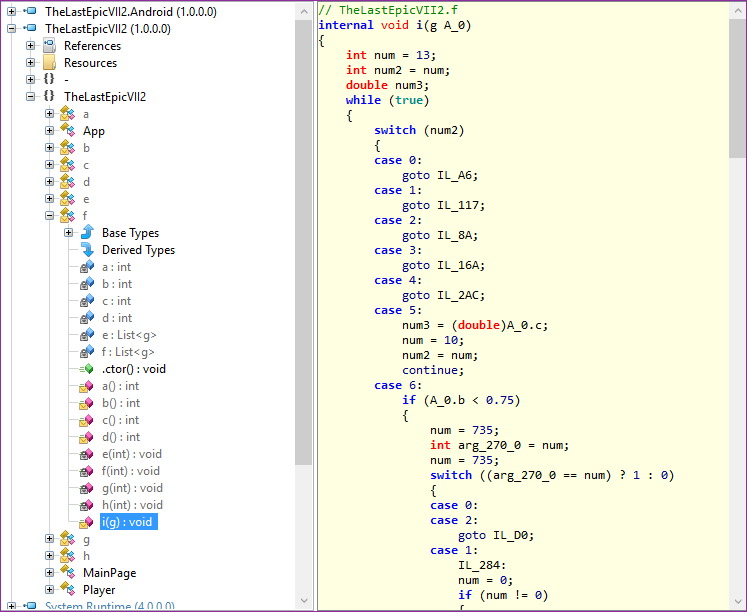
The code is protected by obfuscation when renaming - the main form of obfuscation code. Properties with the simplest names, for example,
ArrowsOnHand , are replaced by the method of naming non-intuitive names, for example, b and g. Other code elements are also similarly renamed. This makes reading and compiling decompiled code very difficult, since important contextual keys provided by names are missing.How to obfuscate your application
Now let's move on to how to integrate obfuscation when renaming using Dotfuscator's Community Edition into the build process of your Xamarin application. As an example, we will use the Xamarin.Android application mentioned in the previous section. You can repeat everything with your own Xamarin app, including iOS and UWP versions.
We will use the Dotfuscator PreEmptive Protection - obfuscator and protection tool from .NET, which now also supports Xamarin.
Note: These steps assume that you are developing your application in VisualStudio 2017 for Windows.
Install and configure Dotfuscator
First of all, you need to install Dotfuscator on your development machine. Since we are using the Dotfuscator command line interface, you will also need to register your copy and write the path to the interface.
To install and configure Dotfuscator:
1. Go to the Dotfuscator Downloads page on PreEmptive Solutions.
2. Download the latest version of Dotfuscator Community Edition (CE) for Visual Studio 2017.
- Although Dotfuscator is included in Visual Studio, PreEmptive Solutions periodically releases important Dotfuscator updates between releases of Visual Studio updates. Installing Dotfuscator in this way ensures that you get the latest version.
3. Open the VSIX file you downloaded and follow the instructions.
4. Open Visual Studio 2017 and select Tools - PreEmptive Protection - Dotfuscator to launch the Dotfuscator Community Edition user interface.
5. You will need to register your copy of Dotfuscator before you can use the command line interface. Dotfuscator will issue a registration request when you open it for the first time; follow these instructions.
- To register later or check your registration status, find the Registration status in the upper right corner of the Dotfuscator Community Edition start page.
6. You need to know the path to the command line interface in order to configure the integration of the assembly later. To find this path:
- Browse to the installation directory for your Visual Studio 2017 installation. For example, the default installation directory for Visual Studio 2017 Professional is C: \ Program Files (x86) \ Microsoft Visual Studio \ 2017 \ Professional.
- This directory contains the Dotfuscator Community Edition extension files in * \ Common7 \ IDE \ Extensions \ PreEmptiveSolutions \ DotfuscatorCE.
- The dotfuscatorCLI.exe file is the Dotfuscator Community Edition command line interface.
- Write down the full path to the exe file for future use.
Download the build integration file
To simplify the integration process, the Dotfuscator team created the MSBuild targets target file that your Xamarin projects can reference. You can download it here.
Save the PreEmptive.Dotfuscator.Xamarin.targets file to a directory with your solution, under version control.
Modify the project to use assembly integration. Next, you need to change the project file for a project in Visual Studio that you want to obfuscate.
To edit your project file:
- Determine which build configurations of the project you want to protect. Usually these are all configurations, except Debug configurations (debugging). For more detailed instructions, see the “Choose What to Protect” section of the full documentation.
- Open the project file in a text editor. An example of a C # project file would be `YourProjectName.csproj`.
- Determine the relative path from this file to the assembly integration file that you downloaded.
- Import the build integration file by adding the following line to the file just before the / Project fragment:
- Import Project = ".. \ .. \ PreEmptive.Dotfuscator.Xamarin.targets" /, replacing the relative path defined in Step 3.
- Under the PropertyGroup fragment without the Condition attribute, add the following fragments:
- DotfuscatorXamarinCliPathC: \ pathto \ dotfuscatorCLI.exe / DotfuscatorXamarinCliPath, replacing the full path to the Dotfuscator Community Edition command line interface that you recorded earlier.
- DotfuscatorXamarinConfigFileNameDotfuscatorConfig.xml / DotfuscatorXamarinConfigFileName
- DotfuscatorXamarinGenerateNewConfigFiletrue / DotfuscatorXamarinGenerateNewConfigFile
- For each integration configuration of the assembly selected in Step 1, find the corresponding PropertyGroup and add the following snippet:
- DotfuscatorXamarinEnabledtrue / DotfuscatorXamarinEnabled
- After the last ItemGroup snippet, add the following:
- ItemGroupNone Include = "DotfuscatorConfig.xml" // ItemGroup
- Save and close the file.
Build the application
Now you can build a Dotfuscator protected application. To do this:
- Open or reload your project in Visual Studio
- Choose a solution build configuration that verifies the build configuration of the project you want to protect.
- Build a project
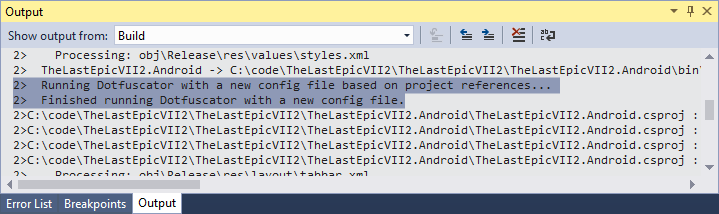
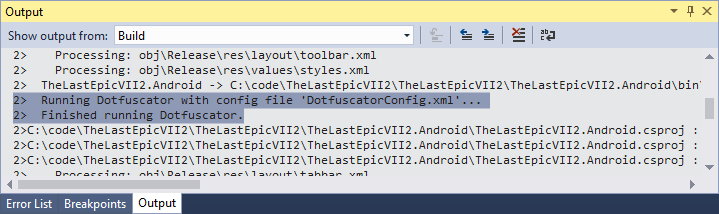
- After this first build, determine if the build result contains the following lines regarding the Dotfuscator:
- Adding the DotfuscatorConfig.xml file to your project. This is the Dotfuscator configuration file, which tells Dotfuscator how to obfuscate your code. It is recommended to check it in the version control system.
- In the directory and file structure, locate the new DotfuscatorReports directory in your project directory. This directory contains information on how the project was obfuscated, including information on how to deploy the renaming process back. You should process this directory similarly to the build result and make sure that the version control system ignores it.
- Test your application. If you see errors, you may need to further configure the Dotfuscator in order to achieve the correct behavior, see the next section for help.
- Continue to develop your application, collecting it as usual. When the Dotfuscator is used at build time, the build result will contain the following lines:
For more information on continuing development with obfuscation, see the “Continuing Development” section in the Dotfuscator User Manual.
Rename configuration
There are some cases when an application assumes that the name of a code element at compile time will be the same as when the application is running. This is particularly true for Xamar and reflection based Xamarin applications. Obfuscation by renaming may violate this premise and cause the application after obfuscation to behave differently.
Although newer versions of Dotfuscator are more capable of working with such scripts automatically, in some cases, manual configuration may be required. For instructions and examples, see the “Identify Exceptions from Renaming” page in the Dotfuscator User Manual.
Advanced obfuscation
Instead of the free version of Dotfuscator Community Edition, you can also obfuscate your Xamarin applications in the Dotfuscator Professional Edition. Professional Edition is licensed for use in commercial products, free samples are available on request.
To see the difference between the Community and Professional versions, consider the example of the game mentioned above. If developers missed their catalogs through Dotfuscator Professional Edition instead of Community Edition, the reverse development results will look something like this:
In addition to obfuscation by renaming, this code is also obfuscated by changing the control flow. Source code operators are interspersed with difficult to read blocks of “switching” in seemingly arbitrary order, which makes it very difficult to execute commands. This and other advanced obfuscation forms are contained exclusively in the Dotfuscator Professional Edition.
findings
In this post, we saw how you can use Dotfuscator to protect Xamarin directories and applications from reverse engineering. Although we used an Android-based application as an example, the same steps can be performed for projects based on iOS and UWP, so you can protect your application no matter what platform it runs.
For more information on how to protect Xamarin projects with the Dotfuscator, see the Xamarin page in the Dotfuscator User Manual. There you will also find a git repository showing how to integrate Dotfuscator into the Xamarin application for all three platforms.
Source: https://habr.com/ru/post/349084/
All Articles