Rekit Studio: IDE for React Applications
Today we publish a translation of the material by Nate Wang, the creator of Rekit. Here he talks about a new stable release of the system, Rekit Studio . This is a full-fledged IDE for developing applications created using React, Redux and React Router technologies. He says that his team has been creating complex web applications with Rekit for more than a year.
The previous version of Rekit Studio was called Rekit Portal. She did not support code editing features. Now, thanks to the Monaco Editor , the one used in the VS Code , and thanks to the wonderful prettier code formatter , Rekit Studio makes it convenient to work with the code. That is why the word “studio” appeared in the name of the system.
 Rekit Studio
Like other IDEs, in addition to editing the text of programs, Rekit Studio is able to generate template code, supports the ability to create dependency diagrams, helps the developer to refactor, build, unit test projects, contains convenient tools for navigating through the code. Rekit Studio takes on such tasks as setting up a project, configuring a webpack, organizing a directory structure. Rekit Studio is an environment that contains tools for managing projects. This is what distinguishes it from ordinary code editors, like Sublime Text or VS Code.
')
Before we continue the story about Rekit Studio, we suggest watching this demo video on the practical use of this IDE to manage Redux actions.
As you can see, the developer’s task when using Rekit Studio is to implement the main functionality of the application, while the development environment takes on the implementation of routine operations.
The continuation of the material is best read, while simultaneously testing independently what is going to be discussed in Rekit Studio. You can do this by using one of the following two methods:

Installing Rekit, Creating and Running an Application
After starting the application, go to http: // localhost: 6075 . This address is used by Rekit Studio by default.
As you can see, Rekit Studio is just one of the npm packages in your project, the environment in which the IDE runs is the browser. Thanks to this approach, each application has its own copy of Rekit Studio, as a result, you will never run into problems regarding version compatibility.
Almost all front-end IDE developers contain simple tools for viewing folder and file structures. As a result, project navigation organized by the means of these IDEs does not take into account the features of the projects, which programmers do not like. Code editors are not aware of the role of files, that is, they are not aware that one file is a component, another is an action, they do not know which style file belongs to a component, where the routing rules are defined, and so on . Without such information, unfortunately, it is impossible to organize a more convenient project navigation, it is impossible to improve the situation.
Rekit Studio, working with projects, follows the pattern of organization of a scalable web application. And based on this, Rekit Studio understands the role of individual parts of the project. Read more about it here and here .
Based on the template, Rekit Studio knows which files are components, which are actions, where the routing rules are defined, and so on. Therefore, the project observer can show the project structure in a meaningful way. For example, as shown below.
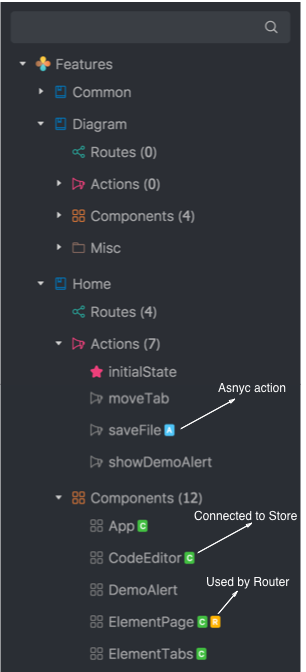
Project Explorer
IDE Rekit Studio is aware of the features of the project elements, for example, which actions are asynchronous (marked with a blue A icon), which components are connected to the Redux repository (marked with a green C icon), which components are controlled by the React router (they have an orange icon R), that is, used in some routing rules.
Thanks to a powerful browser, you can easily navigate between project elements and get a lot of information about elements without opening them or reading their code.
It should be said that the project browser only shows files from the
Like any other real IDE, such as Eclipse for Java or Visual Studio for .Net, Rekit Studio helps you create template code with user interface tools that are extremely easy to work with. For example, to create a component, right-click the appropriate node in the project browser and select
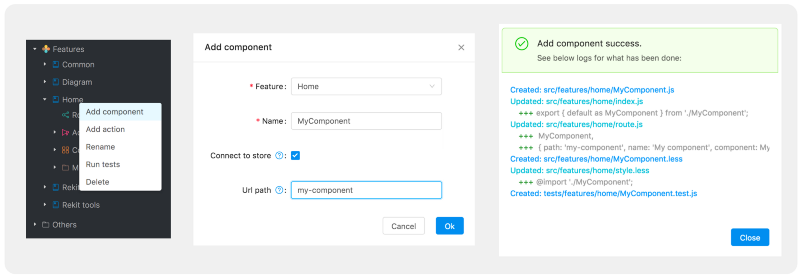
Add component
In addition to entering the name of the component, here you can specify whether it is connected to the Redux repository, whether it is used in the React router rule. After clicking the
To create asynchronous Redux actions, Rekit Studio uses, by default,

Add asynchronous action
Another approach to creating asynchronous actions involves using
All file names, function or variable names, follow the predefined rules described here in Rekit Studio. Therefore, even if you, when creating a component, enter a name like
The code templates in question are always created using the recommended development approaches. All you need to do is add the working application code to them, everything else will be done automatically. When the code is generated, it can be freely edited.
When creating a large application, refactoring is very important. This allows you to make the code clean, readable and well managed. Some of the important aspects of refactoring are renaming, moving, deleting project elements. When working with modern tools for the development of the frontend, the work on refactoring is extremely complicated. For example, if we need to rename an asynchronous action, we usually need to edit several files and modify many dozens of lines of code in various places. Suppose we want to change the name of an asynchronous action from
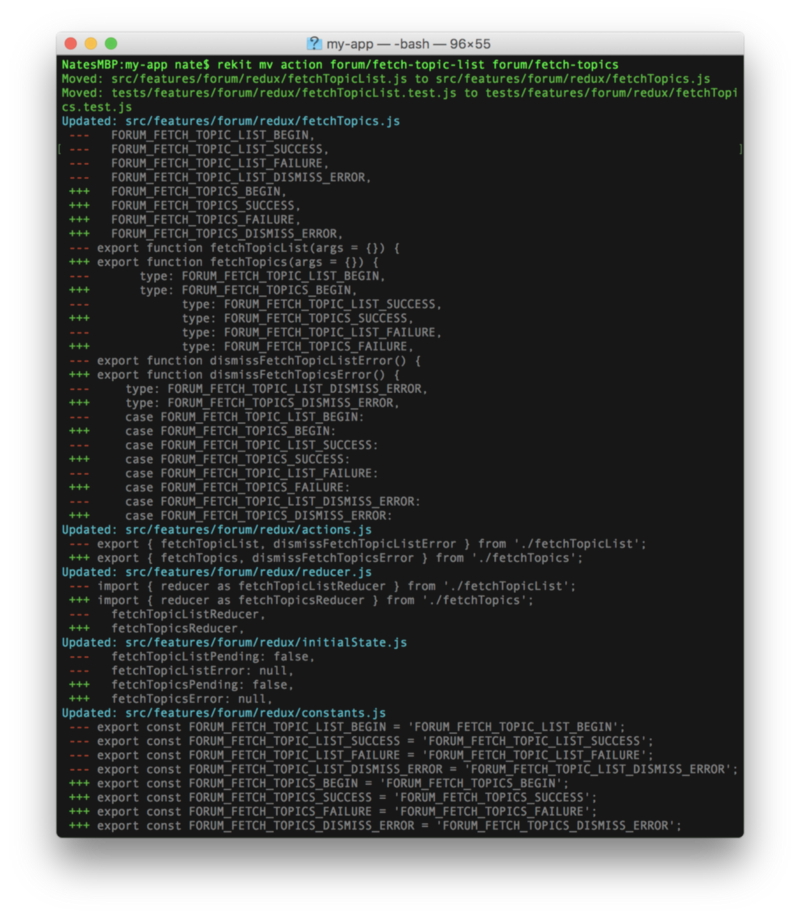
Rename asynchronous action and changes made to the project
It looks so crazy that very few people want to do it all manually. The same inconvenience accompanies the movement or removal of components and actions. Without instrumental support, all of these problems discourage many of us from refactoring code. This leads to the fact that our projects become difficult to manage very soon after the start of work on them.
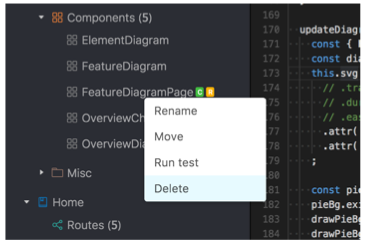
Now, thanks to Rekit Studio, to rename, move or delete a component, just use the corresponding right-click menu item. Rekit Studio will do everything that is needed automatically, and the developer can look at the log in order to see the list of actions performed.
Refactoring
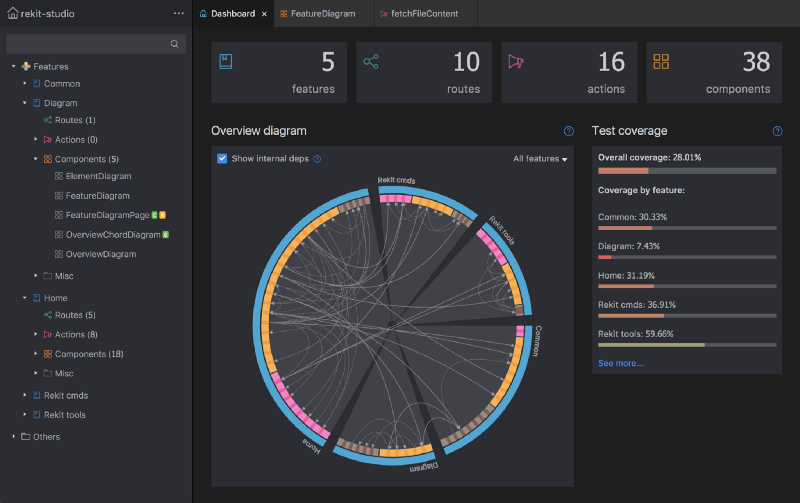
As a project grows, the interactions and interdependencies of its components become complex. Excessive complication of the relationship of parts of projects is fraught with problems, resulting in the complexity of code support. Assistance in analyzing the links between parts of a project can be provided by appropriate tools. In Rekit Studio such tools are available. We are talking about dependency diagrams.
This diagram is displayed on a page with a control panel (on the home page). With it, you can not only see the dependencies between the functionality of the application (in Rekit terminology, they are called features and are high-level component parts of applications), but also analyze the relationship between ordinary modules like components and actions. Thanks to the overview diagram, you can understand, for example, the complexity of the task of refactoring any component. The more dependencies there are, the more carefully you should handle the application component.
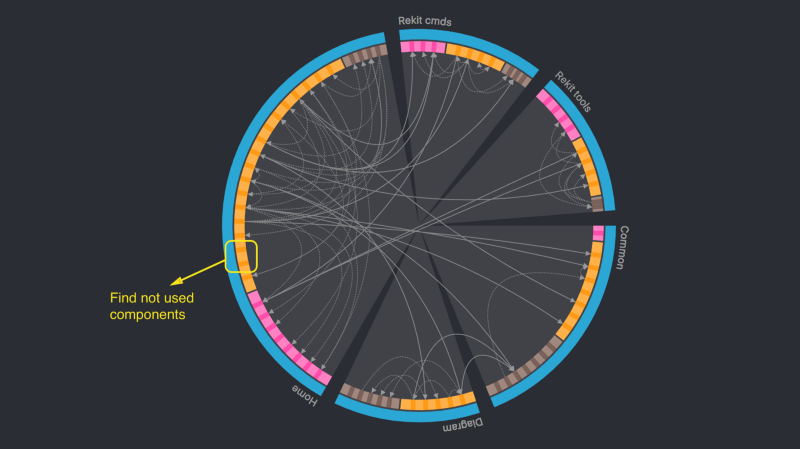
Search for unused components
This chart also helps in finding unused modules. For example, the figure above shows a diagram for a project in which, in the
If you open an element from the project browser, you can, in the corresponding panel, see the element diagram. With its help, you can evaluate the interaction of the element with other parts of the project.
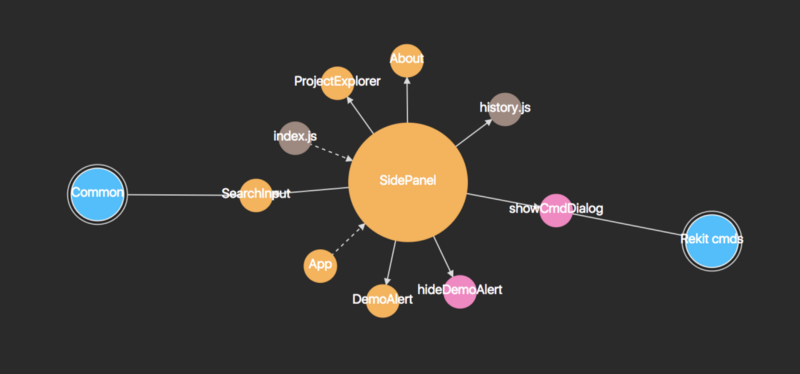
Element Chart
For example, the figure above shows a diagram for a
Like other full-fledged IDEs, Rekit Studio can build and test projects. By default, Rekit Studio will try to run the
To build a project, select the

Build project
Then you will see an indicator of the operation and information about the results of the assembly. Before deploying a production server, you can check the build results by contacting the development server, which is available at http: // localhost: 6077 .
To run unit tests, you can either run them all by selecting

Run tests and test results
The above shows the results of the functionality tests
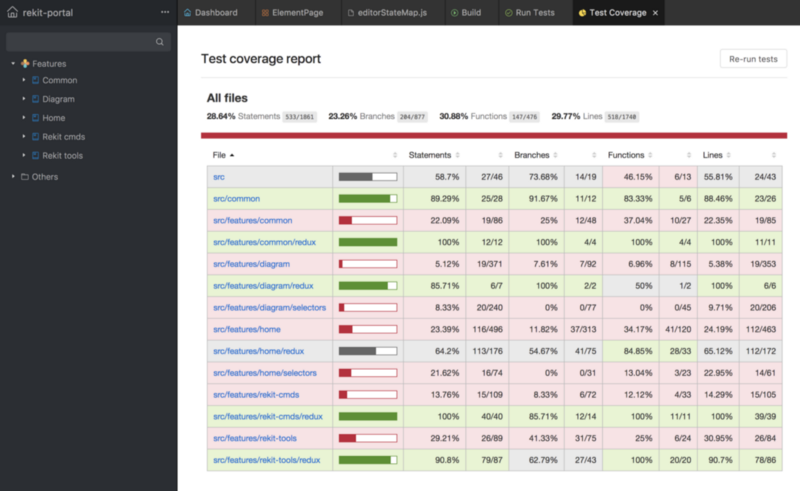
Test Report
Above we have already said that Rekit Studio can create templates for the functionality of projects, actions, components. If you need to create some new elements, like selectors, or you need to change the standard template code, for example, use
In addition to the above graphical user interface, Rekit Studio has a command line interface with which you can manage projects. In fact, both Rekit Studio and Rekit CLI use
If your project uses Rekit Portal, it is very easy to switch to Rekit Studio, since IDE Rekit Studio is fully compatible with projects created in Rekit Portal. All you need is to install Rekit Studio and update the script to start the system in
If you already have a project created on the basis of React, Redux and React Router, you can convert it to a Rekit project, which will give you the opportunity to use Rekit Studio to work with this project. Usually this is not particularly difficult (although in order to explain this, a separate article will be needed). In a nutshell, in order to transfer an existing project to Rekit Studio, you need to reorganize the files and code, as is customary in Rekit.
It should be noted that Rekit Studio is still at an early stage of development, although we have been using it to create web applications for quite some time and we like working in this IDE. We continue to work on Rekit and use this IDE to solve our everyday tasks. Here are some improvements that are planned for Rekit:
In fact, this list can be expanded - it all depends on the needs of Rekit users.
Although frontend development technologies evolve very quickly, Rekit, which is just a toolbox and not a framework, has been showing high stability for about two years. The principles on which IDE Rekit Studio is based do not depend on technology.
As a result, I would like to note that Rekit does not provide any SDK or npm-packages for your application. It is only a tool for creating and managing projects. And without Rekit, you can use any text editors to write code, you can use the terminal to run scripts for a project created in Rekit. Thus, using Rekit does not mean dependency on it.
Dear readers! Do you plan to use Rekit Studio in your projects?

The previous version of Rekit Studio was called Rekit Portal. She did not support code editing features. Now, thanks to the Monaco Editor , the one used in the VS Code , and thanks to the wonderful prettier code formatter , Rekit Studio makes it convenient to work with the code. That is why the word “studio” appeared in the name of the system.
Like other IDEs, in addition to editing the text of programs, Rekit Studio is able to generate template code, supports the ability to create dependency diagrams, helps the developer to refactor, build, unit test projects, contains convenient tools for navigating through the code. Rekit Studio takes on such tasks as setting up a project, configuring a webpack, organizing a directory structure. Rekit Studio is an environment that contains tools for managing projects. This is what distinguishes it from ordinary code editors, like Sublime Text or VS Code.
')
Before we continue the story about Rekit Studio, we suggest watching this demo video on the practical use of this IDE to manage Redux actions.
As you can see, the developer’s task when using Rekit Studio is to implement the main functionality of the application, while the development environment takes on the implementation of routine operations.
Installing and running Rekit Studio
The continuation of the material is best read, while simultaneously testing independently what is going to be discussed in Rekit Studio. You can do this by using one of the following two methods:
- Connect to the interactive demo environment available at http://demo.rekit.org/ . This is an instance of Rekit Studio running in read-only mode. Therefore, working with it, it is impossible to make changes to the project opened in the IDE (this is the Rekit code).
- Create an application using Rekit yourself. To do this, you need to complete only three steps:
Installing Rekit, Creating and Running an Application
After starting the application, go to http: // localhost: 6075 . This address is used by Rekit Studio by default.
As you can see, Rekit Studio is just one of the npm packages in your project, the environment in which the IDE runs is the browser. Thanks to this approach, each application has its own copy of Rekit Studio, as a result, you will never run into problems regarding version compatibility.
Modes for viewing project files and code
Almost all front-end IDE developers contain simple tools for viewing folder and file structures. As a result, project navigation organized by the means of these IDEs does not take into account the features of the projects, which programmers do not like. Code editors are not aware of the role of files, that is, they are not aware that one file is a component, another is an action, they do not know which style file belongs to a component, where the routing rules are defined, and so on . Without such information, unfortunately, it is impossible to organize a more convenient project navigation, it is impossible to improve the situation.
Rekit Studio, working with projects, follows the pattern of organization of a scalable web application. And based on this, Rekit Studio understands the role of individual parts of the project. Read more about it here and here .
Based on the template, Rekit Studio knows which files are components, which are actions, where the routing rules are defined, and so on. Therefore, the project observer can show the project structure in a meaningful way. For example, as shown below.
Project Explorer
IDE Rekit Studio is aware of the features of the project elements, for example, which actions are asynchronous (marked with a blue A icon), which components are connected to the Redux repository (marked with a green C icon), which components are controlled by the React router (they have an orange icon R), that is, used in some routing rules.
Thanks to a powerful browser, you can easily navigate between project elements and get a lot of information about elements without opening them or reading their code.
It should be said that the project browser only shows files from the
src project folder, so it has good performance. However, if you want to edit files outside the src folder, such as package.json or .gitignore , you may need a plain text editor.Code generation
Like any other real IDE, such as Eclipse for Java or Visual Studio for .Net, Rekit Studio helps you create template code with user interface tools that are extremely easy to work with. For example, to create a component, right-click the appropriate node in the project browser and select
Add Component .Add component
In addition to entering the name of the component, here you can specify whether it is connected to the Redux repository, whether it is used in the React router rule. After clicking the
OK button, the system will generate all the necessary code and make the necessary settings. The results of all this can be seen in the log of operations. For example, there may be entries about the creation of a less / scss file for styling and a file with tests, information about adding a React router rule to access the component by URL (if the corresponding setting is specified), and so on. Here, in fact, there is nothing supernatural. Rekit Studio simply helps the developer to do what had to be done manually before, and thanks to the magazine, the programmer knows exactly what was done.To create asynchronous Redux actions, Rekit Studio uses, by default,
redux-thunk .Add asynchronous action
Another approach to creating asynchronous actions involves using
redux-saga . To do this, install the plugin rekit-plugin-redux-saga . We'll talk about plugins below.All file names, function or variable names, follow the predefined rules described here in Rekit Studio. Therefore, even if you, when creating a component, enter a name like
my component in the name input field, Rekit converts it to MyComponent . Thanks to this approach, all the names in the project are always uniform.The code templates in question are always created using the recommended development approaches. All you need to do is add the working application code to them, everything else will be done automatically. When the code is generated, it can be freely edited.
Refactoring tools
When creating a large application, refactoring is very important. This allows you to make the code clean, readable and well managed. Some of the important aspects of refactoring are renaming, moving, deleting project elements. When working with modern tools for the development of the frontend, the work on refactoring is extremely complicated. For example, if we need to rename an asynchronous action, we usually need to edit several files and modify many dozens of lines of code in various places. Suppose we want to change the name of an asynchronous action from
fetchTopics to fetchTopicList . To do this, the project will have to make the following changes:Rename asynchronous action and changes made to the project
It looks so crazy that very few people want to do it all manually. The same inconvenience accompanies the movement or removal of components and actions. Without instrumental support, all of these problems discourage many of us from refactoring code. This leads to the fact that our projects become difficult to manage very soon after the start of work on them.
Now, thanks to Rekit Studio, to rename, move or delete a component, just use the corresponding right-click menu item. Rekit Studio will do everything that is needed automatically, and the developer can look at the log in order to see the list of actions performed.
Refactoring
Project analysis using charts
As a project grows, the interactions and interdependencies of its components become complex. Excessive complication of the relationship of parts of projects is fraught with problems, resulting in the complexity of code support. Assistance in analyzing the links between parts of a project can be provided by appropriate tools. In Rekit Studio such tools are available. We are talking about dependency diagrams.
Review chart
This diagram is displayed on a page with a control panel (on the home page). With it, you can not only see the dependencies between the functionality of the application (in Rekit terminology, they are called features and are high-level component parts of applications), but also analyze the relationship between ordinary modules like components and actions. Thanks to the overview diagram, you can understand, for example, the complexity of the task of refactoring any component. The more dependencies there are, the more carefully you should handle the application component.
Search for unused components
This chart also helps in finding unused modules. For example, the figure above shows a diagram for a project in which, in the
Home functionality, there are two unused components. Usually such components can be easily removed. Removing unnecessary code helps reduce the complexity of the project and reduce the size of the application package.Element Chart
If you open an element from the project browser, you can, in the corresponding panel, see the element diagram. With its help, you can evaluate the interaction of the element with other parts of the project.
Element Chart
For example, the figure above shows a diagram for a
SidePanel — a complex component that uses many other components and actions. In addition, it has dependencies on other application functionality. Perhaps this component should be refactored in order to simplify it and improve its usability.Build and test
Like other full-fledged IDEs, Rekit Studio can build and test projects. By default, Rekit Studio will try to run the
npm run build to build the project and the npm test — [test-file-pattern] type command npm test — [test-file-pattern] to run unit tests.To build a project, select the
Build item in the main menu:Build project
Then you will see an indicator of the operation and information about the results of the assembly. Before deploying a production server, you can check the build results by contacting the development server, which is available at http: // localhost: 6077 .
To run unit tests, you can either run them all by selecting
Run tests from the main menu, or select a specific test to run.Run tests and test results
The above shows the results of the functionality tests
diagram . If you run all the tests of the project, a test coverage report will be created. You can view it from the main menu.Test Report
Plugin support system
Above we have already said that Rekit Studio can create templates for the functionality of projects, actions, components. If you need to create some new elements, like selectors, or you need to change the standard template code, for example, use
redux-saga instead of redux-thunk to create asynchronous actions, you can do this by creating plug-ins. Here you can read details about the Rekit Studio plugin system.Command line interface
In addition to the above graphical user interface, Rekit Studio has a command line interface with which you can manage projects. In fact, both Rekit Studio and Rekit CLI use
rekit-core to manage project elements. The command line system supports more types of plug-ins than Rekit Studio. If we talk about the development of the system, we plan to improve support for plug-ins and create a unified interface for working with them.Transition from Rekit Portal to Rekit Studio
If your project uses Rekit Portal, it is very easy to switch to Rekit Studio, since IDE Rekit Studio is fully compatible with projects created in Rekit Portal. All you need is to install Rekit Studio and update the script to start the system in
server.js . Here is a description of this process.Convert an existing project to a Rekit project
If you already have a project created on the basis of React, Redux and React Router, you can convert it to a Rekit project, which will give you the opportunity to use Rekit Studio to work with this project. Usually this is not particularly difficult (although in order to explain this, a separate article will be needed). In a nutshell, in order to transfer an existing project to Rekit Studio, you need to reorganize the files and code, as is customary in Rekit.
About the development of Rekit
It should be noted that Rekit Studio is still at an early stage of development, although we have been using it to create web applications for quite some time and we like working in this IDE. We continue to work on Rekit and use this IDE to solve our everyday tasks. Here are some improvements that are planned for Rekit:
- Improved syntax highlighting.
- Support for your own ESlint rules.
- Improved code completion, for example, regarding module names.
- Quickly open files using the
Cmd + Photkeys. - Support for multiple unsaved files. Now only one file can remain in an unsaved state, which is aimed at protecting against the loss of code changes.
- Support for more types of charts.
- Support for the ability to create, rename and delete regular files, in addition to component files and actions.
- Integration with Storybook.
- TypeScript support.
- Support server rendering.
In fact, this list can be expanded - it all depends on the needs of Rekit users.
Results
Although frontend development technologies evolve very quickly, Rekit, which is just a toolbox and not a framework, has been showing high stability for about two years. The principles on which IDE Rekit Studio is based do not depend on technology.
As a result, I would like to note that Rekit does not provide any SDK or npm-packages for your application. It is only a tool for creating and managing projects. And without Rekit, you can use any text editors to write code, you can use the terminal to run scripts for a project created in Rekit. Thus, using Rekit does not mean dependency on it.
Dear readers! Do you plan to use Rekit Studio in your projects?
Source: https://habr.com/ru/post/349080/
All Articles