Simple Stack Fragment
Good time of day, dear readers of Habr! I want to bring to your attention an article based on my experience in the Single Activity Architecture, in particular, with a stack of user views.
When I first met Single Activity Architecture, I had many questions: “How can I manage the moment of adding and deleting fragments?”, “How can you keep the button pressed back?”, “Is it possible to run a fragment on the result?”, ”How can I understand when a user returned to the fragment? ”and so on.
The first question is almost trivial. You can create a single navigation class in which to transfer the fragment manager and use the transition function to the screen.
The second question is also partially resolved by notifying the navigation class that a click on the back button has occurred. But in this case, the navigator begins to be something more than just a keeper of paths, logic appears in it, which, in my opinion, is absolutely not justified. But should someone in the system handle forward and backward movements?
')
There are also some difficulties with returning a user to the fragment. One of the most critical, in my opinion, is the repeated call to onCreateView. As we all know, there appears a custom view as a View. I also think it is no secret to anyone that this operation is quite voracious.
The result is a class with a large number of transition logic, the creation of fragments of various kinds, questionable inserts of “very useful functionality” into the methods of processing a transition back (if the user added something on the previous screen, it is necessary to add it to the list). In my opinion, this is not exactly what is required of the class that is responsible for navigating within the application. The smart solution is to delegate part of the functionality to other parts of the system. Thus, the essence of the stack of fragments appeared in my program.
The requirements for the stack of fragments are almost trivial: add a fragment, go back, go to, except for some nuances. For me, as a designer, the main problem was the life cycle of the added / removed fragments. Also a problem was the completion of the fragment with the result and sending the result to the consumer. Fortunately, the solution was found rather quickly. The internal logical structure I chose a slightly improved stack: a layer cake. The idea is that the layers are stacked on the cake. As a cake for our abstract cake, you can consider the entry point to the application (main fragment, home page, etc.). Layers in turn have the following properties:
If you deviate from the sweet example, the addition is a transaction consisting of hiding the previous fragment and adding a new one. Also in this operation, I added an alert to the hidden fragment that the user had gone from it, and a limit on the size of the stack. The delete operation is more ornate, so everything is in more detail.
The logic that is responsible for sending the result from the vendor fragment to the fragment is reasonable to put in a separate class. For example, an imaginary screen for adding a record to the user's diary could return the added record for subsequent processing to the called block of the program. This is a kind of onActivityResult.
If we present all of the above in the diagram, it will look like this.
To ensure performance, I created a separate ResultUtils class and a ResultableFragment interface.
A consumer can be any fragment that extends the ResultableFragment interface. This interface consists of a single function void onFragmentResult (final int requestCode, final int resultCode, final Bundle data). This function is similar to onActivityResult.
The implementation of the ResultUtils class is a set of the following methods:
I also needed an interface that combines all the fragments that obey the new life cycle. I called this interface LifeBoundFragment. The following methods are included:
Working through the external interface of the stack, I identified the following main functions:
I myself have organized the stack on a LinkedList structure. The most interesting, from my point of view, are the methods: push (final T target, final int requestCode), pop () and popToTarget (Class target).
As mentioned earlier, this method adds a new fragment to the screen, hides the previous one and adds keys to the new one. In order to hide the internal implementation, I created a private method pushFragment , which was responsible for all the logic of adding and deleting a fragment. The pushFragment method returns Pair <Fragment, Fragment>. This is essentially the direction of movement, where the key is a fragment from which the user goes, and the value is where. As planned, when adding a fragment, we need to notify the fragment that is hidden, that the user leaves it. To do this, it is enough to make sure that the hidden fragment extends the LifeBoundFragment interface, and send the onUserLeaveScreen event.
Also in this method it is worth adding commitments through the ResultUtils utility class using the addPromise method.
The most interesting here is the pushFragment method:
In this method, all the main manipulation of the stack takes place, the previous fragment is hidden and the number of stack elements is limited.
The pop () method is also a kind of collective method.
A feature of this method is the sendResultIfPossible call of the ResultUtils class.
The basic logic of the popFragment method is quite predictable. So I don’t see any sense in lingering on it.
This method, in my opinion, is the most interesting. It combines almost everything.
When I started developing the ResultUtils class functionality, one of my internal limitations was that the result when going backwards is passed along the chain. Based on this limitation, the onFragmentResult method will be called along the chain until it hits the root call. The fragments located in the middle of the chains, I began to call transit. Indeed, they receive an onFragmentResult call, in which they can set the result for the next fragment of the chain.
In my opinion, a flexible, simple and reliable fragment management system was obtained. At the moment I have been able to successfully apply this approach in a number of projects in which I participated. Of the minuses that I encountered when using this approach is leanback (Android TV), but in part the system itself does not have to Single Activity Architecture. Next, I plan to come up with a mechanism for storing / restoring history, launching an application with a given history (it will be useful for push notifications). Thanks for attention!
When I first met Single Activity Architecture, I had many questions: “How can I manage the moment of adding and deleting fragments?”, “How can you keep the button pressed back?”, “Is it possible to run a fragment on the result?”, ”How can I understand when a user returned to the fragment? ”and so on.
The first question is almost trivial. You can create a single navigation class in which to transfer the fragment manager and use the transition function to the screen.
The second question is also partially resolved by notifying the navigation class that a click on the back button has occurred. But in this case, the navigator begins to be something more than just a keeper of paths, logic appears in it, which, in my opinion, is absolutely not justified. But should someone in the system handle forward and backward movements?
')
There are also some difficulties with returning a user to the fragment. One of the most critical, in my opinion, is the repeated call to onCreateView. As we all know, there appears a custom view as a View. I also think it is no secret to anyone that this operation is quite voracious.
The result is a class with a large number of transition logic, the creation of fragments of various kinds, questionable inserts of “very useful functionality” into the methods of processing a transition back (if the user added something on the previous screen, it is necessary to add it to the list). In my opinion, this is not exactly what is required of the class that is responsible for navigating within the application. The smart solution is to delegate part of the functionality to other parts of the system. Thus, the essence of the stack of fragments appeared in my program.
The requirements for the stack of fragments are almost trivial: add a fragment, go back, go to, except for some nuances. For me, as a designer, the main problem was the life cycle of the added / removed fragments. Also a problem was the completion of the fragment with the result and sending the result to the consumer. Fortunately, the solution was found rather quickly. The internal logical structure I chose a slightly improved stack: a layer cake. The idea is that the layers are stacked on the cake. As a cake for our abstract cake, you can consider the entry point to the application (main fragment, home page, etc.). Layers in turn have the following properties:
- When you add a layer in the first place it is created. Then carefully laid on the cake or layer that is on top.
- When removing a layer, the lower layer becomes visible, and the removed layer is ejected. And really, why do we need a layer smeared in cream?
If you deviate from the sweet example, the addition is a transaction consisting of hiding the previous fragment and adding a new one. Also in this operation, I added an alert to the hidden fragment that the user had gone from it, and a limit on the size of the stack. The delete operation is more ornate, so everything is in more detail.
The logic that is responsible for sending the result from the vendor fragment to the fragment is reasonable to put in a separate class. For example, an imaginary screen for adding a record to the user's diary could return the added record for subsequent processing to the called block of the program. This is a kind of onActivityResult.
If we present all of the above in the diagram, it will look like this.
Scheme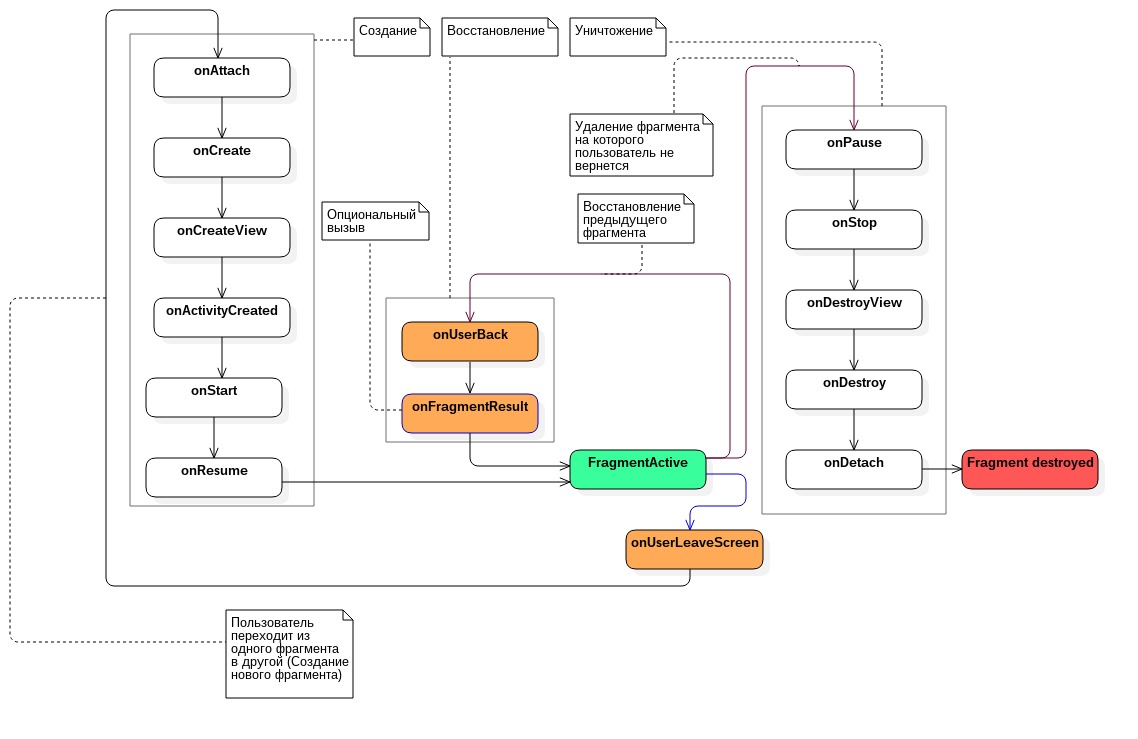
Effective fragments
To ensure performance, I created a separate ResultUtils class and a ResultableFragment interface.
A consumer can be any fragment that extends the ResultableFragment interface. This interface consists of a single function void onFragmentResult (final int requestCode, final int resultCode, final Bundle data). This function is similar to onActivityResult.
public interface ResultableFragment { void onFragmentResult(final int requestCode, final int resultCode, final Bundle data); } The implementation of the ResultUtils class is a set of the following methods:
- void addPromise (final Fragment currentFragment, final Fragment targetFragment, final int requestCode) - this method creates certain obligations (by the requestCode key) from the target fragment to the current one. Here the current fragment is where the user goes from, and the target is where he wants to go. The commitment system is a HashMap <Integer, Integer> in which the key is the hash of the current fragment, and the value is requestCode.
- void sendResultIfPossible (final Pair <Fragment, Fragment> fromToFragmentPair) - to call the onFragmentResult method and pass the corresponding parameters. Why whenever possible? Because not every fragment wants to send or receive results. If successful, the result of the commitment can be considered fulfilled, and they are removed from the structure.
- void setResult (final Fragment fragment, final Bundle data, final int resultCode) - designed to set the result to the fragment. The result, as well as the key, is stored in the arguments of this fragment.
- void onBackPressed (final Pair <Fragment, Fragment> fromToFragmentPair) - used to process the back button, sets the result “fragment closed” with empty data.
Advanced Life Cycle Techniques
I also needed an interface that combines all the fragments that obey the new life cycle. I called this interface LifeBoundFragment. The following methods are included:
- onUserLeaveScreen - called when the user leaves the screen;
- onUserBack - called when the user returns to the screen.
public interface LifeBoundFragment { void onUserLeaveScreen(); void onUserBack(); } Stack
Working through the external interface of the stack, I identified the following main functions:
- pushEntryPoint (Fragment home) - this method is designed to add an entry point to the stack. In my case, this is a home fragment (the fragment, on which the user leaves the application by pressing the back button).
- push (Fragment target) - add a new fragment to the stack.
- push (final T target, final int requestCode) - add a new fragment to the stack with a request for some result.
- popToTarget (Class target) - go down until we meet the requested fragment. If such a fragment is not found, then stop the descent at our entry point.
- pop is a direct transition backwards.
- boolean handleBackPressed - this method is passed from activation to the stack upon the onBackPressed event. Returns true if the stack can handle pressing back. Otherwise false.
- onActivityPause, onActivityResume are activation lifecycle methods. These methods call the corresponding LifeBoundFragment methods to notify that the user has left / returned to the current screen.
I myself have organized the stack on a LinkedList structure. The most interesting, from my point of view, are the methods: push (final T target, final int requestCode), pop () and popToTarget (Class target).
Push method (final T target, final int requestCode)
As mentioned earlier, this method adds a new fragment to the screen, hides the previous one and adds keys to the new one. In order to hide the internal implementation, I created a private method pushFragment , which was responsible for all the logic of adding and deleting a fragment. The pushFragment method returns Pair <Fragment, Fragment>. This is essentially the direction of movement, where the key is a fragment from which the user goes, and the value is where. As planned, when adding a fragment, we need to notify the fragment that is hidden, that the user leaves it. To do this, it is enough to make sure that the hidden fragment extends the LifeBoundFragment interface, and send the onUserLeaveScreen event.
Also in this method it is worth adding commitments through the ResultUtils utility class using the addPromise method.
@Override public void push(final Fragment target, final int resultCode) { final Pair<Fragment, Fragment> fromToFragmentPair = pushFragment(target); callPauseIfPossible(fromToFragmentPair.first); mResultUtils.addPromise(fromToFragmentPair.first, fromToFragmentPair.second, resultCode); } The most interesting here is the pushFragment method:
private Pair<Fragment, Fragment> pushFragment(final Fragment navigationTargetFragment) { final FragmentTransaction fragmentTransaction = mFragmentManager.beginTransaction(); if (mStackLinkedList.size() >= STACK_SIZE) { final Fragment outOfStackFragment = mStackLinkedList.remove(1); fragmentTransaction.remove(outOfStackFragment); } final Fragment leaveFragment = mStackLinkedList.getLast(); fragmentTransaction.hide(leaveFragment); mStackLinkedList.add(navigationTargetFragment); fragmentTransaction.add(R.id.fragmentContainer, navigationTargetFragment); fragmentTransaction.commit(); return new Pair<>(leaveFragment, navigationTargetFragment); } In this method, all the main manipulation of the stack takes place, the previous fragment is hidden and the number of stack elements is limited.
Pop () method
The pop () method is also a kind of collective method.
A feature of this method is the sendResultIfPossible call of the ResultUtils class.
@Override public void pop() { final Pair<Fragment, Fragment> fromToFragmentPair = popFragment(); mResultUtils.sendResultIfPossible(fromToFragmentPair); } The basic logic of the popFragment method is quite predictable. So I don’t see any sense in lingering on it.
PopFragment method
private Pair<Fragment, Fragment> popFragment() { final Fragment leaveFragment = mStackLinkedList.removeLast(); final Fragment targetFragment = mStackLinkedList.getLast(); final FragmentTransaction fragmentTransaction = mFragmentManager.beginTransaction(); fragmentTransaction.remove(leaveFragment); callResumeIfPossible(targetFragment); fragmentTransaction.show(targetFragment); fragmentTransaction.commit(); return new Pair<>(leaveFragment, targetFragment); } PopToTarget method
This method, in my opinion, is the most interesting. It combines almost everything.
When I started developing the ResultUtils class functionality, one of my internal limitations was that the result when going backwards is passed along the chain. Based on this limitation, the onFragmentResult method will be called along the chain until it hits the root call. The fragments located in the middle of the chains, I began to call transit. Indeed, they receive an onFragmentResult call, in which they can set the result for the next fragment of the chain.
@Override public void popToTarget(final Class<? extends Fragment> target) { final FragmentTransaction fragmentTransaction = mFragmentManager.beginTransaction(); final Iterator<Fragment> iterator = mStackLinkedList.descendingIterator(); Pair<Fragment, Fragment> fromTransactionFragmentToCurrent = null; while (iterator.hasNext()) { final Fragment targetFragment = iterator.next(); if (targetFragment.getClass() == target) { break; } fragmentTransaction.remove(targetFragment); iterator.remove(); fromTransactionFragmentToCurrent = new Pair<>(targetFragment, mStackLinkedList.getLast()); if (mStackLinkedList.getLast().getClass() != target) { mResultUtils.sendResultIfPossible( fromTransactionFragmentToCurrent); } } final Fragment frontFragment = mStackLinkedList.getLast(); callResumeIfPossible(frontFragment); mResultUtils.sendResultIfPossible(fromTransactionFragmentToCurrent); fragmentTransaction.show(frontFragment); fragmentTransaction.commit(); } In custody
In my opinion, a flexible, simple and reliable fragment management system was obtained. At the moment I have been able to successfully apply this approach in a number of projects in which I participated. Of the minuses that I encountered when using this approach is leanback (Android TV), but in part the system itself does not have to Single Activity Architecture. Next, I plan to come up with a mechanism for storing / restoring history, launching an application with a given history (it will be useful for push notifications). Thanks for attention!
Source: https://habr.com/ru/post/348996/
All Articles