Git: Newbies Tips - Part 2
In the second part of our tutorial for newbies in Git, we talk about managing branches, how they merge, and how pointers work. The first article you can read on the link .
The concept of branches is not so simple. Imagine that you need to make many changes to the files in your working directory, but this work is experimental - it’s not a fact that everything will turn out well. You would not want your changes to be seen by other employees until the work is completed. Maybe just commit nothing until then? This is a bad option. We already know that frequent commits and pushes are a guarantee of the safety of your work, as well as the opportunity to see the history of changes. Fortunately, Git has a branch mechanism that allows us to commit and push, but not interfere with other employees.
Before you begin experimental changes, you must create a branch. The branch has a name. Let it be called my test work. Now all your commits will go exactly there. Before that, they were going to the main development branch - we will call it master. In other words, you used to be in the master branch (although you didn’t know it), but now you switched to the my test work branch. It looks like this:
')

After commit "3" a branch was created and your new commits "4" and "5" went into it. And your colleagues stayed in the master branch, so their new commits “6”, “7”, “8” are added to the master branch. History has ceased to be linear.
What is the impact? Employees now do not see changes to the files that you do. And you do not see their changes in their work files. Although you can still see the history of changes in the master branch.
So, now you will be able to do your experimental work without disturbing anyone. If its results do not suit you, you simply switch to the master branch (to its last commit - in the picture it is commit “8”). At the time of switching, the files in your working folder will become the same as those of your colleagues, and your changes will disappear. Now your working copy has become a cast from commit "8". From the picture you can see that it does not contain your changes made in the my test work branch.
Now we know that everyone can create branches and work independently. You can take turns working in one branch, then in another - switching between them. The branch switches the checkout command.
Branches are used not only for temporary independent work. Often we simultaneously prepare several versions of the game. For example, one version is almost ready for publication and programmers make the latest fixes to it. At the same time, game designers are already doing the next update. They cannot work in the previous version because:
In short, from the branches a lot of benefit. But back to the example of your experimental work. In the previous chapter, we decided that it failed. You have returned to the master branch and have lost the changes made to the my test work branch. And if everything worked out? You want to transfer your changes to the master branch so that they can be seen by the employees who work with it. Git can help - run the command merge from the my test work branch to the master branch:

Here, commit “8” is a special commit called merge-commit. When we execute the merge command, the system itself creates this commit. It combines the changes of your colleagues from commits "5", "6", "7", as well as your work from commits "3", "4".
Changes from commits "1" and "2" are not necessary to merge, because they were made before the branch was created. So, there were originally both in the master branch and in the my test work branch.
The merge command does not send anything to origin. Its only result is a merge-commit (in the figure, a circle with the number 8) that will appear on your computer. It needs to be fired, like your regular commits. Only after this merge-commit will go to origin - then colleagues will see the result of your work by making a pull.
In the previous chapter, we learned how to make a new branch, work in it and upload changes to the main branch. In the picture after merging the branches merged together. Does this mean that now in the my test work branch it is impossible to work now - it has already merged with the master? No, you can continue to commit to the my test work branch and periodically merge to the main branch. What it looks like:
Please note that the segments connecting the branches are not horizontal - this way it is shown from which branch to which one was. In this situation, there were two merge and both from the right branch to the left. The result of the first merge was merge-commit "7", and the second merge-commit "10". Since merzh comes from the right branch to the left, then, for example, in the cast of "8" there are changes that were made in commit "3". But in the cast "11" there are no changes that were made in commit "5". Make sure you understand the reason for this. If not, re-read the chapters on branches again.
In the previous example, we were always merging from the my test work branch to the master branch. Is it possible to merge in the opposite direction and does this make sense? Can. There is.
If you work long in your branch, it is recommended to periodically merge into it from the main branch. It is necessary that you work with the current versions of files that other people change. What it looks like:
Here are two merge from my test work to master and one merge in the opposite direction. The result of the reverse join is merge-commit "8". Thanks to him, for example, the cast of commit "11" contains changes from commit "7". But there are no changes from the commit "9" in the cast of "11", because this commit was made after the merge.
How does git distinguish commits? In the pictures, for simplicity, we have labeled them with their sequence numbers. In fact, every commit in Git is indicated by this line:
e09844739f6f355e169f701a5b7ae02c214d5fb0
These are the “names” of commits that Git automatically gives them when they are created. In general, such strings are called “hash”. Each commit has a different hash. If you want to tell someone about a particular commit, you can send the hash of this commit to the person. Knowing the hash, he will be able to find this commit (if this is your commit, then, of course, you must first push it).
Now we dive a little into how Git stores information about branches. It seems that the internal structure of Git should not worry us, but it will allow us to understand much better what happens when performing operations in Git. And you, in turn, can avoid a number of mistakes.
Let's get acquainted with the concept of "pointer". In a simplified form, the pointer consists of its name and hash. Here is an example pointer:
master - e09844739f6f355e169f701a5b7ae02c214d5fb0
Then you say: “master is a familiar name! We have the so-called main working branch ". And this coincidence is not accidental. Git uses pointers to denote branches. The idea is simple: if a new branch is needed, Git creates a new pointer, gives it the name of the branch and writes the hash of the last (most recent) commit branch to it. Vetka created!
Thanks to the hash in the pointer, we can say that the pointer refers or “points” to the last commit of the branch. This is enough for Git to perform all operations on branches. That is, no other information about which commits belong to which branch Git does not store. That's all minimalistic.
Each branch has its own pointer. When a new commit is added to a branch, the hash in the pointer changes to “point” again to the last commit. This can be represented as moving the branch pointer to the last commit from the last but one.
If you ask Git to switch to another branch (the checkout command), it is enough to find the pointer with the name of this branch and take the hash of the last commit from it. Now Git knows how your working directory files should look like (like a cast of this commit). Git brings files to this form - and the switch to the branch happened.
If you do not quite understand the idea of pointers and how they relate to branches, reread the chapter again. In Git, much is tied to pointers, so it is important to clearly understand the mechanics of their work. Fortunately, it is not complicated at all, just a bit unusual. You just need to get used to it.
So, we know that pointers are things that have a name, and they refer to a particular commit (they store its hash). We know that, if necessary, Git creates a pointer to its latest commit and moves it forward with each new commit.
Pointers are used not only for branches. There is a special pointer head. It indicates a commit that is the state of your working directory. Got an idea? Here is an example:
Here we see two branches, which are represented by two pointers: master and test. We are in the master branch and the files of our working directory correspond to the “4” commit cast. How do we know this? From the fact that the head pointer points to commit "4". More precisely, it points to the master pointer, which points to commit "4". Why not point directly to commit "4"? Why such a trick pointing to the pointer? So Git means that we are now in the master branch.
We can put the head pointer on any commit - for this there is a checkout command. Recall that the commit shows head, in this state there will be files in the working directory (this is a property of the head pointer). Therefore, moving the head pointer to another commit, we will force Git to change the files in our working directory. This may be necessary, for example, to roll back to the old version of the working files and see how everything was there. And then you can go back to the last commit of the master branch (checkout master). If we do checkout test (see the picture), then head will point to the test pointer, which points to the last commit of the test branch. Files in the working directory will change to the cast "6". So we switched to the test branch.
To summarize The permutation of the head special pointer causes the working directory files to be replaced with the cast of this commit. But only when the head points to a pointer of a branch, Git thinks that we are in this branch.
And what happens if head points to a commit directly (stores its hash)? This state is called the detached head. You can switch to it in time to see how the files of the working directory looked on one of the commits in the past.
Switching (both between branches and between regular commits) is performed with the checkout command.
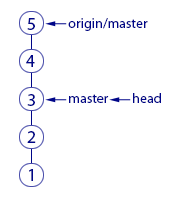
Since the remote repository (origin) is the same as ours, does it also have its own branch pointers? Right. For example, there is a master pointer that refers to the most recent commit in this thread.
It is interesting that when we pick up fresh commits from origin with the pull command, then copies of the pointers from there are downloaded along with the commits. In order not to confuse our master pointer and the one that downloaded from origin, the second one is displayed here as origin / master. It should be understood that origin / master does not show the current state of the master pointer in the remote repository, it is only a copy of it at the time of the execution of the fetch or pull commands.
master and origin / master may point to different commits. It will become clearer if you look at the picture:

This shows the situation when we took fresh commits (with the pull command), made two new commits, but have not yet made a push. As a result, our local master points to the last commit. And origin / master is the last known state of the pointer from the remote repository. Therefore, he and "behind".
After the push command, the two top commits will go to origin and it is logical that origin / master will move up and also point to our last commit, just like master.
Could it be that origin / master will be the opposite higher and master lower? Can. Here's how it turns out. The pull command takes fresh commits and immediately puts them into the working directory. Immediately after the pull command, both the origin / master and master pointers will point to the same last commit. But there is another command fetch. She, like pull, downloads the latest commits from origin, but is not in a hurry to update the working directory. Graphically, it looks like this (if you don’t have unsolicited commits):
Before the fetch command, the master pointer pointed to commit "3" and this was the last commit in our repository. After fetch, two new commits "4" and "5" were downloaded. In the remote repository, the master pointer was obviously pointing to commit "5". This pointer was downloaded to us along with commits, and now we see it as origin / master, pointing to "5". Everything is logical.
Why might fetch be needed? For example, you are not ready to change the state of the working directory, but just want to have a look, what are your colleagues doing there? You fetch and learn their commits. When you're ready, make the merge command. It will apply the previously downloaded commits to your working directory.
Since in this simple example you did not have any uncommitted commits, the merge team will not have to combine anything. It will simply move the master and head pointers - now they will show on commit "5". Like origin / master.
You may notice that there is nothing really complicated in the described mechanics. There are only many details that have to painstakingly understand. But Git - he is.
In the final part of the article we will talk about where the branch came from, why push gives an error and what a rebase is. And, of course, let's summarize.
→ Git: tips for newbies - part 1
→ Git: tips for newbies - part 2
→ Git: tips for newbies - part 3
Chapter 8. Branches
The concept of branches is not so simple. Imagine that you need to make many changes to the files in your working directory, but this work is experimental - it’s not a fact that everything will turn out well. You would not want your changes to be seen by other employees until the work is completed. Maybe just commit nothing until then? This is a bad option. We already know that frequent commits and pushes are a guarantee of the safety of your work, as well as the opportunity to see the history of changes. Fortunately, Git has a branch mechanism that allows us to commit and push, but not interfere with other employees.
Before you begin experimental changes, you must create a branch. The branch has a name. Let it be called my test work. Now all your commits will go exactly there. Before that, they were going to the main development branch - we will call it master. In other words, you used to be in the master branch (although you didn’t know it), but now you switched to the my test work branch. It looks like this:
')
After commit "3" a branch was created and your new commits "4" and "5" went into it. And your colleagues stayed in the master branch, so their new commits “6”, “7”, “8” are added to the master branch. History has ceased to be linear.
What is the impact? Employees now do not see changes to the files that you do. And you do not see their changes in their work files. Although you can still see the history of changes in the master branch.
So, now you will be able to do your experimental work without disturbing anyone. If its results do not suit you, you simply switch to the master branch (to its last commit - in the picture it is commit “8”). At the time of switching, the files in your working folder will become the same as those of your colleagues, and your changes will disappear. Now your working copy has become a cast from commit "8". From the picture you can see that it does not contain your changes made in the my test work branch.
Chapter 9. Merging branches
Now we know that everyone can create branches and work independently. You can take turns working in one branch, then in another - switching between them. The branch switches the checkout command.
Branches are used not only for temporary independent work. Often we simultaneously prepare several versions of the game. For example, one version is almost ready for publication and programmers make the latest fixes to it. At the same time, game designers are already doing the next update. They cannot work in the previous version because:
- Their changes should not appear in the current version;
- Any changes can break something, so before publishing the version you need to make as few changes as possible.
In short, from the branches a lot of benefit. But back to the example of your experimental work. In the previous chapter, we decided that it failed. You have returned to the master branch and have lost the changes made to the my test work branch. And if everything worked out? You want to transfer your changes to the master branch so that they can be seen by the employees who work with it. Git can help - run the command merge from the my test work branch to the master branch:
Here, commit “8” is a special commit called merge-commit. When we execute the merge command, the system itself creates this commit. It combines the changes of your colleagues from commits "5", "6", "7", as well as your work from commits "3", "4".
Changes from commits "1" and "2" are not necessary to merge, because they were made before the branch was created. So, there were originally both in the master branch and in the my test work branch.
The merge command does not send anything to origin. Its only result is a merge-commit (in the figure, a circle with the number 8) that will appear on your computer. It needs to be fired, like your regular commits. Only after this merge-commit will go to origin - then colleagues will see the result of your work by making a pull.
Chapter 10. Several Mergies from Branch A to Branch B
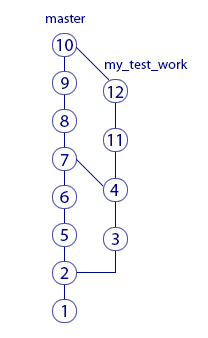
In the previous chapter, we learned how to make a new branch, work in it and upload changes to the main branch. In the picture after merging the branches merged together. Does this mean that now in the my test work branch it is impossible to work now - it has already merged with the master? No, you can continue to commit to the my test work branch and periodically merge to the main branch. What it looks like:
Please note that the segments connecting the branches are not horizontal - this way it is shown from which branch to which one was. In this situation, there were two merge and both from the right branch to the left. The result of the first merge was merge-commit "7", and the second merge-commit "10". Since merzh comes from the right branch to the left, then, for example, in the cast of "8" there are changes that were made in commit "3". But in the cast "11" there are no changes that were made in commit "5". Make sure you understand the reason for this. If not, re-read the chapters on branches again.
Chapter 11. Merzh between branches in both directions
In the previous example, we were always merging from the my test work branch to the master branch. Is it possible to merge in the opposite direction and does this make sense? Can. There is.
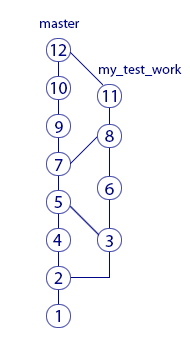
If you work long in your branch, it is recommended to periodically merge into it from the main branch. It is necessary that you work with the current versions of files that other people change. What it looks like:
Here are two merge from my test work to master and one merge in the opposite direction. The result of the reverse join is merge-commit "8". Thanks to him, for example, the cast of commit "11" contains changes from commit "7". But there are no changes from the commit "9" in the cast of "11", because this commit was made after the merge.
Chapter 12. commits and their hashes
How does git distinguish commits? In the pictures, for simplicity, we have labeled them with their sequence numbers. In fact, every commit in Git is indicated by this line:
e09844739f6f355e169f701a5b7ae02c214d5fb0
These are the “names” of commits that Git automatically gives them when they are created. In general, such strings are called “hash”. Each commit has a different hash. If you want to tell someone about a particular commit, you can send the hash of this commit to the person. Knowing the hash, he will be able to find this commit (if this is your commit, then, of course, you must first push it).
Chapter 13. Branches and Pointers
Now we dive a little into how Git stores information about branches. It seems that the internal structure of Git should not worry us, but it will allow us to understand much better what happens when performing operations in Git. And you, in turn, can avoid a number of mistakes.
Let's get acquainted with the concept of "pointer". In a simplified form, the pointer consists of its name and hash. Here is an example pointer:
master - e09844739f6f355e169f701a5b7ae02c214d5fb0
Then you say: “master is a familiar name! We have the so-called main working branch ". And this coincidence is not accidental. Git uses pointers to denote branches. The idea is simple: if a new branch is needed, Git creates a new pointer, gives it the name of the branch and writes the hash of the last (most recent) commit branch to it. Vetka created!
Thanks to the hash in the pointer, we can say that the pointer refers or “points” to the last commit of the branch. This is enough for Git to perform all operations on branches. That is, no other information about which commits belong to which branch Git does not store. That's all minimalistic.
Each branch has its own pointer. When a new commit is added to a branch, the hash in the pointer changes to “point” again to the last commit. This can be represented as moving the branch pointer to the last commit from the last but one.
If you ask Git to switch to another branch (the checkout command), it is enough to find the pointer with the name of this branch and take the hash of the last commit from it. Now Git knows how your working directory files should look like (like a cast of this commit). Git brings files to this form - and the switch to the branch happened.
If you do not quite understand the idea of pointers and how they relate to branches, reread the chapter again. In Git, much is tied to pointers, so it is important to clearly understand the mechanics of their work. Fortunately, it is not complicated at all, just a bit unusual. You just need to get used to it.
Chapter 14. The head pointer
So, we know that pointers are things that have a name, and they refer to a particular commit (they store its hash). We know that, if necessary, Git creates a pointer to its latest commit and moves it forward with each new commit.
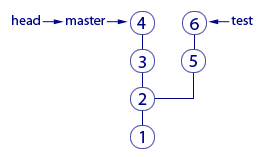
Pointers are used not only for branches. There is a special pointer head. It indicates a commit that is the state of your working directory. Got an idea? Here is an example:
Here we see two branches, which are represented by two pointers: master and test. We are in the master branch and the files of our working directory correspond to the “4” commit cast. How do we know this? From the fact that the head pointer points to commit "4". More precisely, it points to the master pointer, which points to commit "4". Why not point directly to commit "4"? Why such a trick pointing to the pointer? So Git means that we are now in the master branch.
We can put the head pointer on any commit - for this there is a checkout command. Recall that the commit shows head, in this state there will be files in the working directory (this is a property of the head pointer). Therefore, moving the head pointer to another commit, we will force Git to change the files in our working directory. This may be necessary, for example, to roll back to the old version of the working files and see how everything was there. And then you can go back to the last commit of the master branch (checkout master). If we do checkout test (see the picture), then head will point to the test pointer, which points to the last commit of the test branch. Files in the working directory will change to the cast "6". So we switched to the test branch.
To summarize The permutation of the head special pointer causes the working directory files to be replaced with the cast of this commit. But only when the head points to a pointer of a branch, Git thinks that we are in this branch.
And what happens if head points to a commit directly (stores its hash)? This state is called the detached head. You can switch to it in time to see how the files of the working directory looked on one of the commits in the past.
Switching (both between branches and between regular commits) is performed with the checkout command.
Chapter 15. Origin / master pointer
Since the remote repository (origin) is the same as ours, does it also have its own branch pointers? Right. For example, there is a master pointer that refers to the most recent commit in this thread.
It is interesting that when we pick up fresh commits from origin with the pull command, then copies of the pointers from there are downloaded along with the commits. In order not to confuse our master pointer and the one that downloaded from origin, the second one is displayed here as origin / master. It should be understood that origin / master does not show the current state of the master pointer in the remote repository, it is only a copy of it at the time of the execution of the fetch or pull commands.
master and origin / master may point to different commits. It will become clearer if you look at the picture:
This shows the situation when we took fresh commits (with the pull command), made two new commits, but have not yet made a push. As a result, our local master points to the last commit. And origin / master is the last known state of the pointer from the remote repository. Therefore, he and "behind".
After the push command, the two top commits will go to origin and it is logical that origin / master will move up and also point to our last commit, just like master.
Could it be that origin / master will be the opposite higher and master lower? Can. Here's how it turns out. The pull command takes fresh commits and immediately puts them into the working directory. Immediately after the pull command, both the origin / master and master pointers will point to the same last commit. But there is another command fetch. She, like pull, downloads the latest commits from origin, but is not in a hurry to update the working directory. Graphically, it looks like this (if you don’t have unsolicited commits):
Before the fetch command, the master pointer pointed to commit "3" and this was the last commit in our repository. After fetch, two new commits "4" and "5" were downloaded. In the remote repository, the master pointer was obviously pointing to commit "5". This pointer was downloaded to us along with commits, and now we see it as origin / master, pointing to "5". Everything is logical.
Why might fetch be needed? For example, you are not ready to change the state of the working directory, but just want to have a look, what are your colleagues doing there? You fetch and learn their commits. When you're ready, make the merge command. It will apply the previously downloaded commits to your working directory.
Since in this simple example you did not have any uncommitted commits, the merge team will not have to combine anything. It will simply move the master and head pointers - now they will show on commit "5". Like origin / master.
You may notice that there is nothing really complicated in the described mechanics. There are only many details that have to painstakingly understand. But Git - he is.
In the final part of the article we will talk about where the branch came from, why push gives an error and what a rebase is. And, of course, let's summarize.
→ Git: tips for newbies - part 1
→ Git: tips for newbies - part 2
→ Git: tips for newbies - part 3
Source: https://habr.com/ru/post/348864/
All Articles