Game development under NES in C. Chapters 7-10. Work with the joystick. Sprite collisions
Gently moving to writing a game. This part describes how to work with joysticks and sprite collisions.

User input
Working with joysticks is pretty simple. Pressing the buttons of the first joystick is read at $ 4016, and the second - $ 4017. It is enough to read once per frame, immediately after updating the PPU and setting the scroll.
I always bring two variables to each joystick: for the buttons pressed now and for pressing in the last frame. To get the buttons pressed, you need to write down $ 4016 first 1 and then 0. Then read 8 values from there - these will be the values corresponding to the button presses on the joystick. They will exit in order A, B, Select, Start, Up, Down, Left, Right. They are convenient to keep the bit shift and logical operations.
It is also convenient to define bit masks for buttons. This will allow receiving events with fast and visual bitwise operations.
#define RIGHT 0x01 #define LEFT 0x02 #define DOWN 0x04 #define UP 0x08 #define START 0x10 #define SELECT 0x20 #define B_BUTTON 0x40 #define A_BUTTON 0x80 Use the meta-list from the last lesson and move it around the screen. This piece was much more convenient to write in Assembler, there is no need to delve into it.
To call an assembler function from C code, we need its prototype. Linker will bring them together at his compilation stage.
void Get_Input(void);
It is not necessary to declare a function as void, it is more for uniformity of code. I strongly recommend using __fastcall__, because in this case the last (or only) argument will be passed through registers A and X - this is faster than through the stack. The 8-bit argument is passed through the register A, 16-bit - in the A / X pair, 32-bit - A / X / sreg, where sreg is the 16-bit variable in the zero memory page. Details are described in the compiler documentation .
But back to Get_Input (). If we call this function once after each frame, then it will assemble and bring all the keystrokes into a convenient format.
Now you can move the little man around the screen with the joystick. All assembly code is moved to the file asm4c.s. Build scripts are also corrected. And the joystick event handler is in a separate function:
void move_logic(void) { if ((joypad1 & RIGHT) != 0){ state = Going_Right; ++X1; } if ((joypad1 & LEFT) != 0){ state = Going_Left; --X1; } if ((joypad1 & DOWN) != 0){ state = Going_Down; ++Y1; } if ((joypad1 & UP) != 0){ state = Going_Up; --Y1; } } Sprite collisions
The easiest way to detect the collision of two sprites. Here we will consider the metasprite with the size of 16x16 points. In principle, this can be considered a standard for most NES games.
Collision detection is implemented by comparing the coordinates of the edges of objects. It turns out a bunch of fairly obvious comparisons. It is convenient to determine the positions of the sprites through the coordinate of the upper left corner, and then calculate the borders. It looks like this:
A_left_side_X = A_X + 3; // - A_right_side_X = A_X + 12; // A_top_Y = A_Y; // A_bottom_Y = A_Y + 15; // // if (A_left_side_X <= B_right_side_X && A_right_side_X >= B_left_side_X && A_top_Y <= B_bottom_Y && A_bottom_Y >= B_top_Y){ // } Left indent is needed for correct processing of a blank edge.
But integer overflow will give us a nasty surprise. If the sprite leaves on the right edge of the screen, to the A_X = 250 area, then A_X + 12 = 6, and this is obviously wrong. We need to check the edges and assign the value 255 in case of overflow. This is not ideal, but it works well. It is possible to add a 16-bit variable under the coordinate, but inefficiently - the check code on collisions is performed for many sprites every frame, and the 6502 processor is not strong in such large numbers. Or you can forcefully limit the approach of the sprites to the edges.
A_left_side_X = A_X + 3; if (A_left_side_X < A_X) A_left_side_X = 255; // In the following example, object B will move by itself with the code from the previous chapter, and A will be controlled by a joystick. Each time you touch them, the counter will increase by 1. The check will take place once per frame. We will store the counter as an integer variable for each digit of the counter and do manual transfers.
if (score5 > 9){ ++score4; score5 = 0; } if (score4 > 9){ ++score3; score4 = 0; } if (score3 > 9){ ++score2; score3 = 0; } if (score2 > 9){ ++score1; score2 = 0; } if (score1 > 9){ // score1 = 0; score2 = 0; score3 = 0; score4 = 0; score5 = 0; } Each time the counter is updated, a flag is set, according to which the counter is redrawn in the next frame. We can change sprites only during the V-blank period. This event is caught through the NMI handler.
void PPU_Update (void) { PPU_ADDRESS = 0x20; PPU_ADDRESS = 0x8c; PPU_DATA = score1+1; // , - "0", - "1", PPU_DATA = score2+1; // PPU_DATA = score3+1; PPU_DATA = score4+1; PPU_DATA = score5+1; } 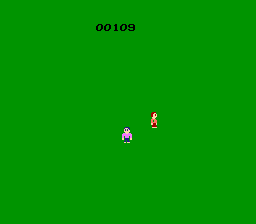
Entire background drawing
Now we can show sprites - in the period of V-blank or forcibly turning off the screen. V-blank is only enough for 2 rows of tiles, and in the second case, you need to skip a couple of frames for a full redraw - the screen will fill with the default background.
The second option is simpler and requires less code. It is very convenient to draw backgrounds in the NES Screen Tool, and it supports saving name tables with RLE compression. They are unpacked by a simple decoder in Assembler. We will not go into details, but take the ready-made code.
We will change the background when you click Start on the joystick. Also, make sure that with a long press of the button, the drawing is done only once - otherwise several launches of the render may overlap, which is oh.
The logic is something like this:
- Read joystick registers every frame
- If Start is pressed in this frame, and for the frame before it was not pressed ...
- Set the screen blanking flag
- In the nearest V-blank screen extinguish
- Render everything you need
- In the next V-blank turn on the screen
void Draw_Background(void) { All_Off(); PPU_ADDRESS = 0x20; // $2000 = #0 PPU_ADDRESS = 0x00; UnRLE(All_Backgrounds[which_BGD]); // Wait_Vblank(); // , V-blank All_On(); ++which_BGD; if (which_BGD == 4) // which_BGD = 0; } const unsigned char * const All_Backgrounds[]={n1,n2,n3,n4}; // 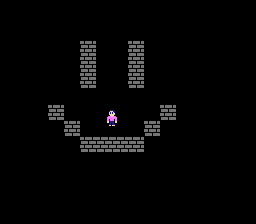
Background collisions
Slightly more difficult to track collisions of sprites with the background. We will accept by default that we use 16x16 square metatayles, and sprites of the same size. Most games use this scheme. The sprite will move to one of the four sides at 1 pixel per frame, and each frame will check for collisions.
Usually, the sprite moves first, checks for contact, and this touch is processed. We will distribute it in two coordinates - first we will shift and check horizontally, and then vertically.
Reading from PPU is a pain. It is necessary to calculate the address of the current name table, and request it from PPU during V-blank, so that there is enough time to work the game logic and update sprites. We will not do that.
We need to store the map of background metatails in one RAM page. The same map can be used to quickly calculate collisions, if there are only two types of tiles - we make the zero passable for the character, and the first is not. If you need more types of tiles, then the table of terrain should be stored separately. In principle, the cards can be stored in the ROM cartridge.
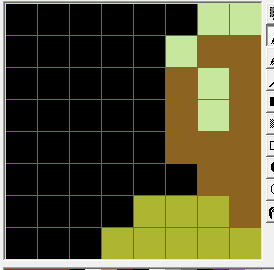
A collision map can be conveniently created in the Tiled editor. Metatails (all two) are drawn in the NES Screen Tool and transferred to Tiled through a cropped up to 256x256. He can export to .csv - one per background. This file had to be slightly corrected - to add the title of the constant
const unsigned char c2[]={ 0,0,0,0,0,0,0,0,0,0,0,0,0,0,0,0, 0,0,0,0,0,0,0,0,0,0,0,0,0,0,0,0, 0,0,0,0,0,0,0,0,0,0,0,0,0,0,0,0, 0,0,0,0,0,1,0,0,1,0,0,0,0,0,0,0, 0,0,0,0,0,1,0,0,1,0,0,0,0,0,0,0, 0,0,0,0,0,1,0,0,1,0,0,0,0,0,0,0, 0,0,0,0,0,0,0,0,0,0,0,0,0,0,0,0, 0,0,0,1,0,0,0,0,0,0,1,0,0,0,0,0, 0,0,0,0,1,0,0,0,0,1,0,0,0,0,0,0, 0,0,0,0,0,1,1,1,1,0,0,0,0,0,0,0, 0,0,0,0,0,0,0,0,0,0,0,0,0,0,0,0, 0,0,0,0,0,0,0,0,0,0,0,0,0,0,0,0, 0,0,0,0,0,0,0,0,0,0,0,0,0,0,0,0, 0,0,0,0,0,0,0,0,0,0,0,0,0,0,0,0, 0,0,0,0,0,0,0,0,0,0,0,0,0,0,0,0 }; Now you can import it into C code and refer to the pointer to the array.
The Start button handler will draw the next background and load the collision map into RAM at $ 300- $ 3FF. To do this, I had to tweak the config - add a MAP segment at $ 300 and $ 100. The code simply prescribes an empty array in this segment.
#pragma bss-name(push, “MAP”) unsigned char C_MAP[256]; The exact address is also convenient for debugging in FCEUX - you can enter the debugger in the running game and see what and how.
And this is how the collision map is loaded from ROM to RAM:
p_C_MAP = All_Collision_Maps[which_BGD]; // ROM for (index = 0;index < 240; ++index){ C_MAP[index] = p_C_MAP[index]; // RAM } But after some time I rewrote it with memcpy - copying by bytes takes 42,688 processor cycles, which is 9 times longer than memcpy.
void __fastcall__ memcpy (void* dest, const void* src, int count); p_C_MAP = All_Collision_Maps[which_BGD]; // memcpy (C_MAP, p_C_MAP, 240); But that's not all. The third approach to the projectile was with the Assembler - it came out 4% faster. I think that while it is not worth it. Although it is possible that in the big game these processor clock cycles will not be enough, and you will have to squeeze everything out of the console.
The logic of checking for collisions with the background is something like
- Move the sprite horizontally
- We consider its left and right edge - there are transparent stripes along the edges, they should be taken into account
- If we moved to the right, then we check if the right upper or lower corner of the sprite has fallen into the forbidden tile.
- If left, then vice versa.
if ((joypad1 & RIGHT) != 0){ // corner = ((X1_Right_Side & 0xf0) >> 4) + (Y1_Top & 0xf0); // if (C_MAP[corner] > 0) X1 = (X1 & 0xf0) + 3; // - // corner = ((X1_Right_Side & 0xf0) >> 4) + (Y1_Bottom & 0xf0); if (C_MAP[corner] > 0) X1 = (X1 & 0xf0) + 3; // - } +3 you need to compensate for the 3-pixel transparent edges of the sprite.
Verification of collisions vertically is done similarly. Apparently, the code will not work if the sprite moves faster than 1 point / frame.
We must remember that the sprite is always drawn at 1 point lower than expected. An amendment can be made before updating the vertical coordinate in OAM. In platformers, this is usually sufficient. Games with a view from the top may look strange - the character will fall into the texture a bit.
Source. Three implementations of copying the map are spaced apart in different projects - so much clearer.
lesson8.zip - cycle
lesson8B.zip - memcpy
lesson8C.zip - Assembler
Github
')
Source: https://habr.com/ru/post/348820/
All Articles