Creating an atmospheric Victorian city from modules
Michael Andrews told how he used the modular approach to create a beautiful fragment of a fictional city; interesting work with lighting and architecture.
Hi, my name is Michael Andrews . I am twenty years old, I am a student from northern New Jersey. Now I am a third year student at Champlain College with a degree in game graphics and animation. I specialize in modeling solid-state props, texturing and graphics environments. Until recently, I worked only on educational projects, created various props and environments for the development of my artistic and technical skills. The college program gave me the tools I needed to work successfully after graduation. I just finished a semester in Montreal, where I studied with Vincent Joyal (Vincent Joyal), who helped me understand the graphics of my surroundings and taught me how to create decent work.
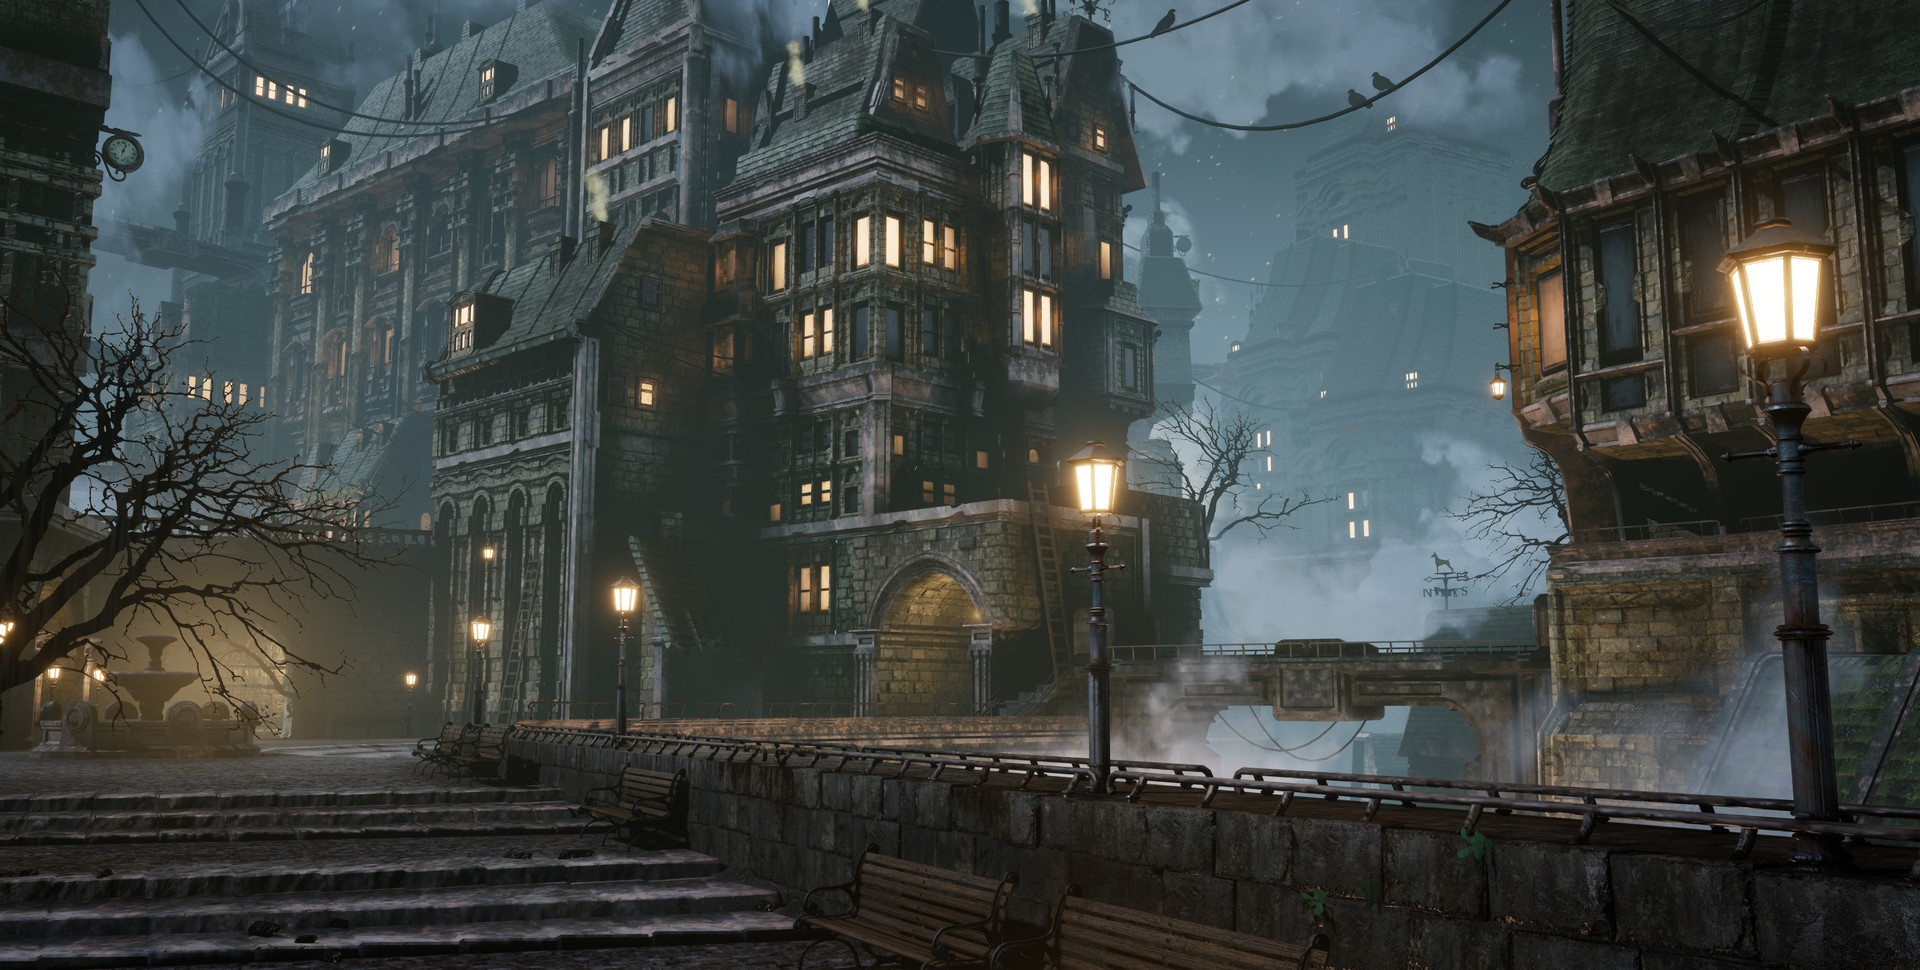
At the beginning of each project, I first look at the big picture and decide which major aspects I want to convey. My current work is based on the concept of Giorgio Grecu. From the very beginning I knew that I wanted to convey the scale and atmosphere of the painting. I realized that for me this concept stood out from the rest with its lighting, architecture and smoke / fog. The transfer of these aspects has become the main complexity of the project. Another major difficulty was the layout of the foreground. I decided not to use people in this work, because they would greatly distract the viewer from the composition. This problem was solved by adding new levels on the ground plane in the form of stairs. I also added benches, a fountain, another arch, small leaves and other details that made the space more filled. In addition to the foreground, a serious task was to create a large number of modules and the scale of the architecture itself. It took a few hours to make the modeling interesting and at the same time still believable.
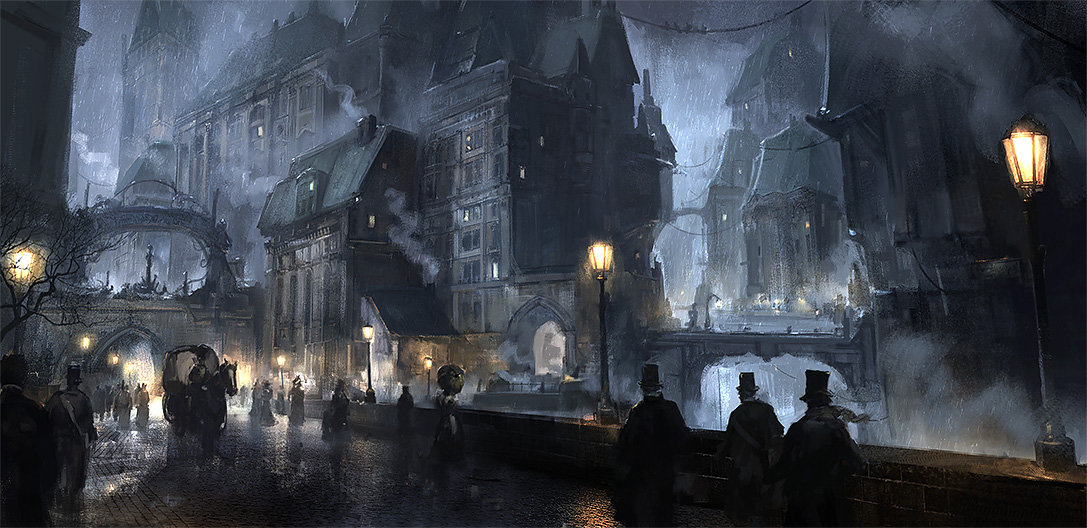
Giorgio Grecu Concept
')
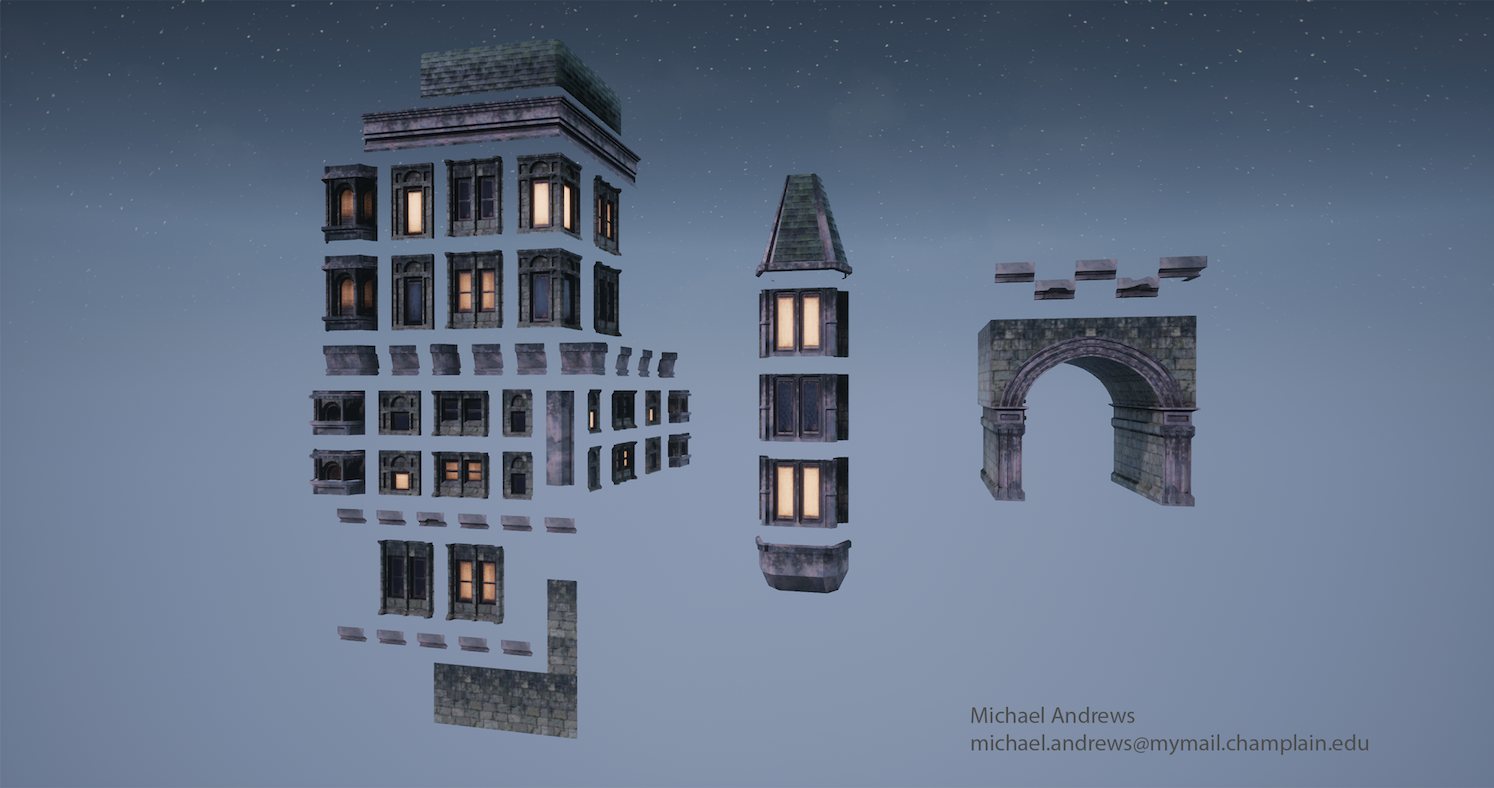
One of the reasons why I was so interested in the implementation of this project was architecture. I adore modeling and the thought of creating intricate Victorian architecture was very tempting. In the concept that I took as a basis, some details were missing, so I took advantage of artistic freedom by adding details and designs in these places. To begin the work process, I transferred the image to Photoshop and measured the approximate height of the buildings. I made sure that this is a very useful technique, it allows you to maintain the scale of objects relative to each other. Sometimes I “rounded up” the dimensions to exaggerate some aspects and make the scene bigger. At this stage, I worked with large cubes, sketching the overall composition. Having achieved the scale and perspective I needed, I started modeling. Most of the modules themselves are quite simple, but some of them remain complex, and when assembling the parts they complement each other, creating an interesting architecture.
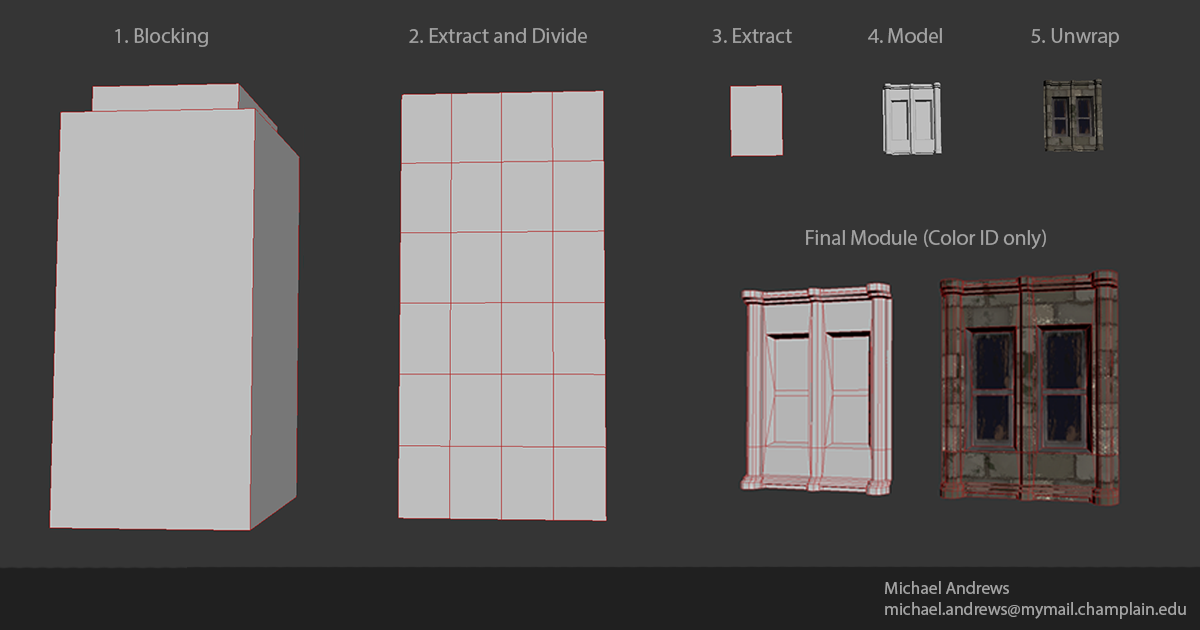
To begin with, I broke each building into modules, selecting the most efficient way. I was looking for repetitive architecture, patterns and those fragments that appear in the picture only in conjunction with others. I also learned how to create modules as flexibly as possible so that they can be used in other parts of the scene. For example, the tower in the depth of the scene on the left is completely assembled from already created modules. It gave me more time to work with other aspects of the environment.
The most difficult part of the modular workflow was to connect all the parts so that they fit perfectly in the Unreal engine grid. All these modules must be compatible with each other, otherwise I would not be able to use them in other parts of the scene. This process is equally dependent on planning, and on trial and error. When working on this stage, Vincent Joyal taught me a useful phrase: “Our god is the grid.” The grid determines everything in the scene.

After I created all the modules and achieved their correct connection, it only remained to repeat the concept where it is possible and create an interesting architecture where it is impossible. In my work process, I took the figures I used to create sketches of buildings, selected the plane I needed and divided it into the required number of parts.
I selected the modules for this part of the building and modeled each module in each of the sections. So I could guarantee that all the fragments are in the right places and correctly connected to each other.
For a start, I decided on what I take from the concept, and what I will reject. I decided that the lights and the trees give the scene a lot, so I left them. Then I used my own artistic flair and added other minor touches to my surroundings. I felt that the foreground without people seemed very empty, so I added stairs, benches and a fountain. In addition to them, I also placed small leaves between bricks to increase the amount of detail in the foreground.
The remaining parts are created and placed to destroy the sense of "ideal" 3D. I think this was one of the most important lessons I learned from Vince and this project. I did not want me to have completely flat, sharp edges that destroyed the realism of the scene. Therefore, I placed wires between the buildings, added a clock to the side of the building, put weathercocks on the roofs and modeled several tiles. To finish with the details, I planted birds on the wires, added hanging lamps, several ladders and scattered stones on the ground. All this was necessary to destroy the effect of the 3D-model and fill the boring and empty areas.
The process of creating every detail was very different. For example, benches, lampposts, weathervanes and fountains are fully modeled and textured. Trees, birds and clouds are flat rectangles. I found an image or silhouette, created a material with it and a transparency map, and then applied it all to the plane. For wires, I used a cable actor from the Unreal Engine 4. I wanted to consciously locate the details to help the viewer's gaze slide around the scene, rather than snatching out small details at random.
Everything in the scene I have textured with the help of Substance Designer . Buildings, lampposts, land, benches, roofs - everything was created using SD. I made this decision because I wanted to develop my skills in working with this program; besides, I think it's very powerful.
There are several different types of textures in the scene. There are cropped and tile textures used for the whole architecture, as well as for the surface of the earth, and the unique textures I used for props. I tried to use textures several times and create instances where possible. For example, metal from a lamppost was also used for metal on a bench and weather vane.
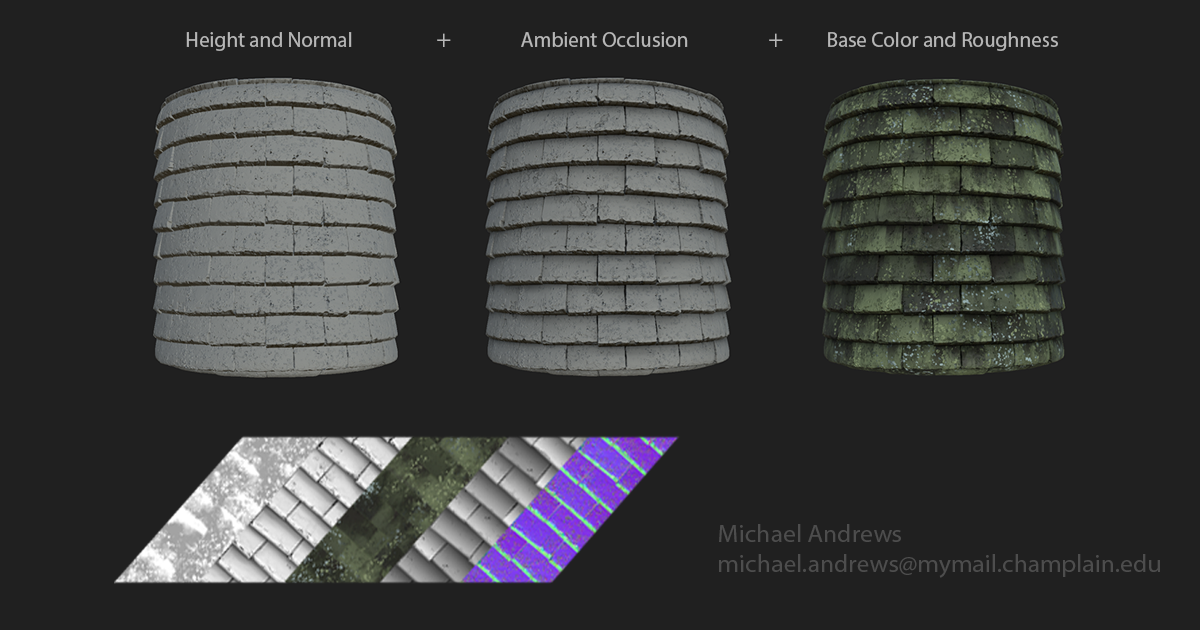
The approach to tile textures was the same. After I got an idea about the material and collected references, I started off with a normal map. I always start any texture with normals, because very much is affected by changes in height on a surface or object. I work with a cube and a height map that I convert to a normal map. I do this in order to have control over the grayscale map obtained when working with height differences. Next, I switch to the normal map to independently control the intensity of the normals of some minor details.
Finished with normals, I turn to color and roughness. I work on these cards almost simultaneously, because they influence each other in many ways. A change in roughness often means a change in color in the material, the reverse is also true. Sometimes it is better to show a change in the material through a change in color, and sometimes by varying roughness. Roughness is an incredibly important card and you should never underestimate it.
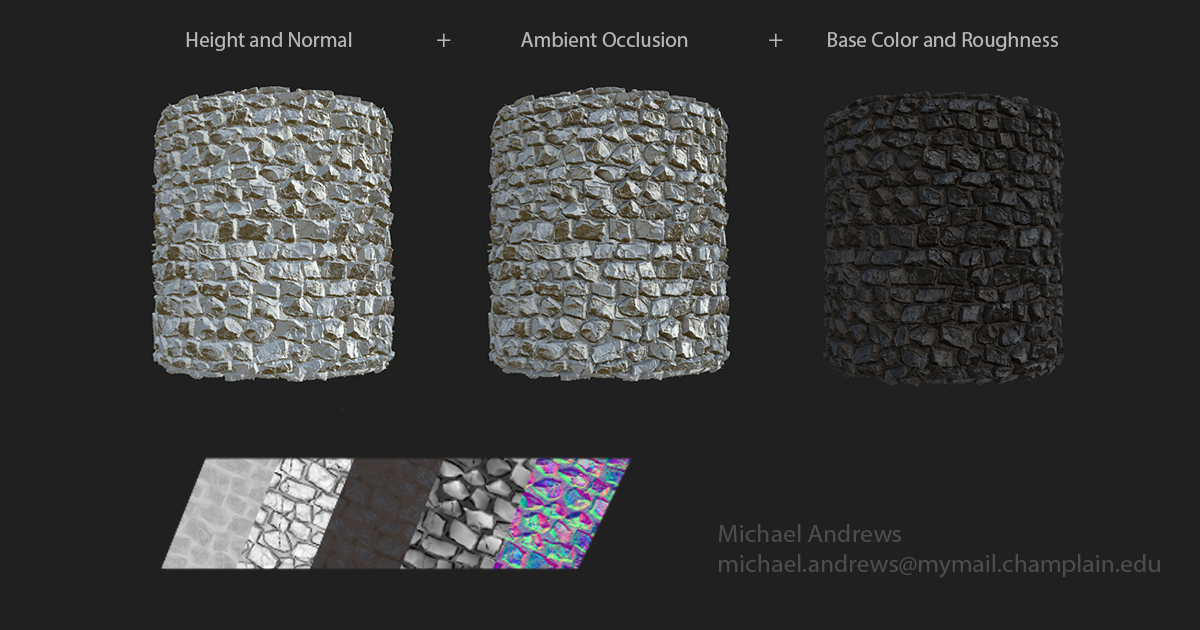
It was very difficult to make materials visible and interesting in such a dark light, but I found a simple solution; I increased the intensity of the normals of all the textures to such an extent that they should look terrible, and then continued to increase the intensity. Thanks to this and careful work with the ambient occlusion map, my textures are well readable at a great distance.
After completing the textures, I performed a UV scan of each module for texture. At this stage, the workflow for creating props is different from working on modules. Props first unfold and then texturized, and the modules unfold on the texture itself. Before transferring the props to my scene in Designer, I scan them. This process allowed me to bake cards from a high-poly model. I baked the normal, AO, position and color ID cards. All of them greatly accelerate texturing (unless of course there are errors at the end of the baking process). I used world space normals and a position map for realistic generation of details such as dirt and rust. However, when working on props, I still started off with the normals, and only then went on to color and roughness.

Most of the scene is lit by a single light source, and then toned and corrected with post-processing effects. Artificial lighting required more attention. All windows have an emissive map glowing orange because I wanted the color of the lighting to resemble the light of candles. Then I worked on each window individually and manually positioned point sources in each window so that the light spreads to the surrounding architecture of the window. I changed the color so that it matches the emissive map and adjusts the brightness so that the resulting effect suits me. I did the same with the light sources inside the arches and lanterns. It was difficult to choose the right brightness so that the lighting from the windows still remained noticeable, but atmospheric lighting was the dominant source of light. Through trial and error, I managed to get the effect I was aiming for. I was going to make a flickering candlelight shader using the help of my other teacher, Bruno Afonseca, but since the final render was supposed to be a static image, I abandoned the idea.
In this project, I did not use Photoshop at all, it was completely created in UE4. I created smoke using a combination of several different techniques.
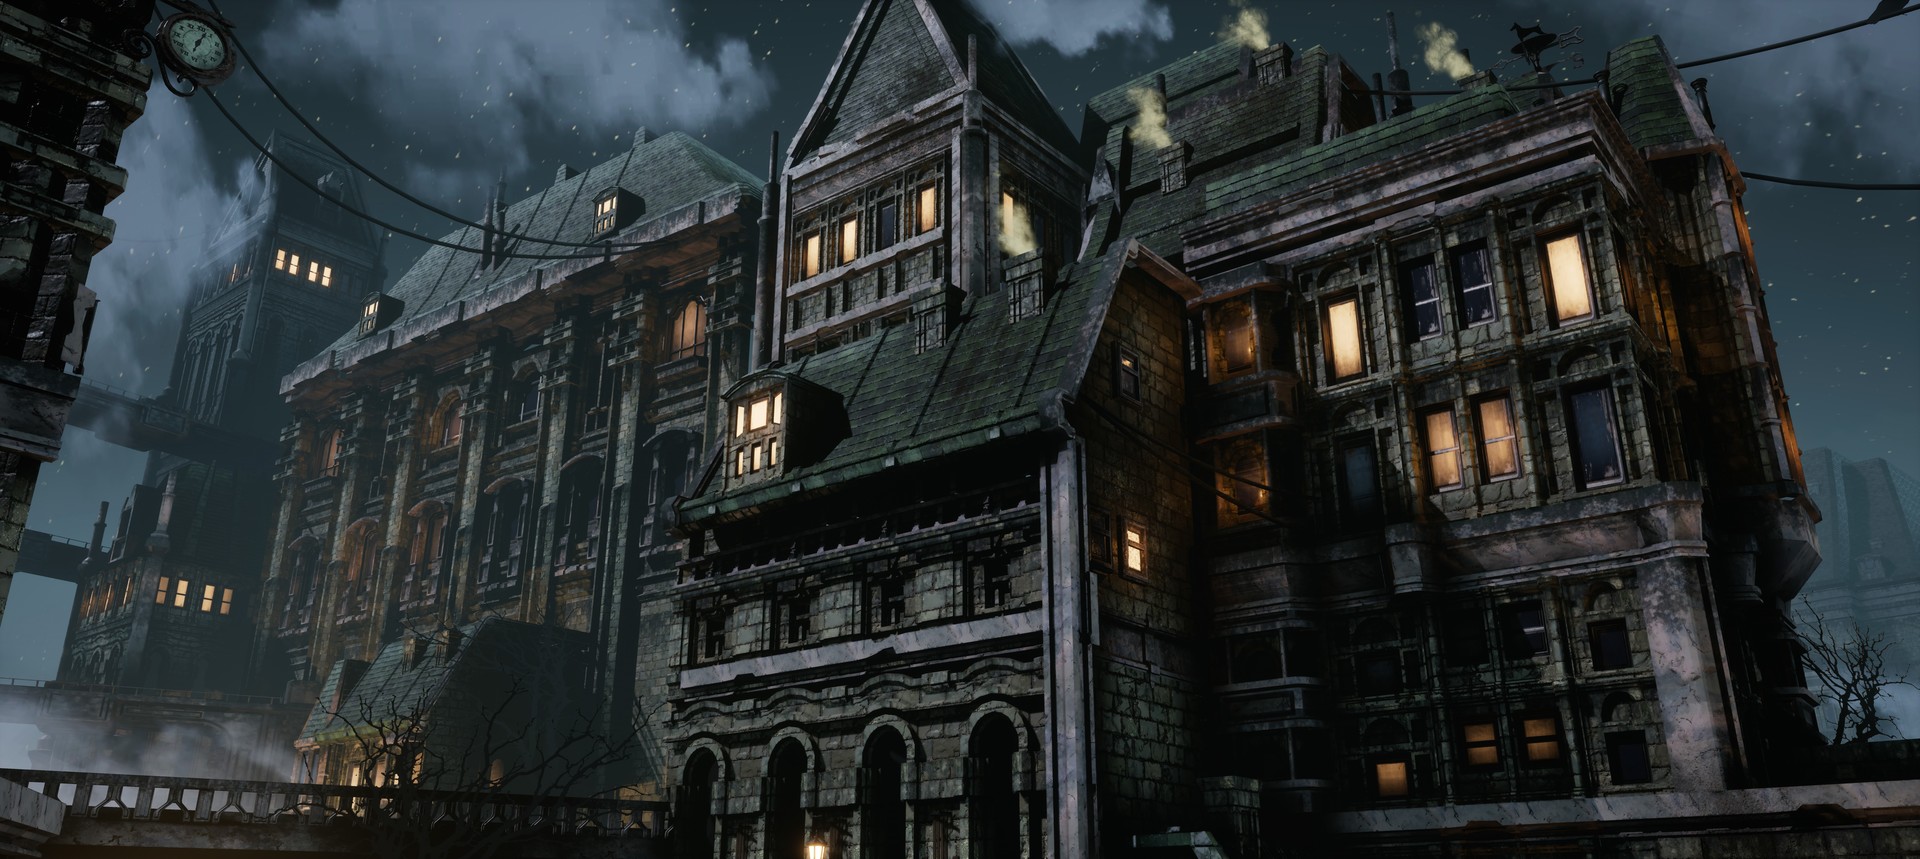
First, I added an exponential height fog from UE4 to get the aerial perspective I wanted to achieve for buildings deep behind. Then I added the volume fog option to get a halo / scatter effect around the lights and light sources inside the arches. I had to tinker a bit with this, because then I first used the Unreal volume fog effect, but over time I managed to achieve the desired result. The final touches were clouds, which are simple planes with superimposed images of clouds and a transparency map.
If I was going to transfer this scene to the game, I would have better optimized it first. I would optimize the textures as much as possible, cleaned up and simplified some nodes and baked the information of the normals into more props. I would also work more on the environment and expand it. Modules should be great for building lots of new buildings.
Michael Andrews , College Champlain, was interviewed by Kirill Tokarev.
Introduction
Hi, my name is Michael Andrews . I am twenty years old, I am a student from northern New Jersey. Now I am a third year student at Champlain College with a degree in game graphics and animation. I specialize in modeling solid-state props, texturing and graphics environments. Until recently, I worked only on educational projects, created various props and environments for the development of my artistic and technical skills. The college program gave me the tools I needed to work successfully after graduation. I just finished a semester in Montreal, where I studied with Vincent Joyal (Vincent Joyal), who helped me understand the graphics of my surroundings and taught me how to create decent work.
Project
At the beginning of each project, I first look at the big picture and decide which major aspects I want to convey. My current work is based on the concept of Giorgio Grecu. From the very beginning I knew that I wanted to convey the scale and atmosphere of the painting. I realized that for me this concept stood out from the rest with its lighting, architecture and smoke / fog. The transfer of these aspects has become the main complexity of the project. Another major difficulty was the layout of the foreground. I decided not to use people in this work, because they would greatly distract the viewer from the composition. This problem was solved by adding new levels on the ground plane in the form of stairs. I also added benches, a fountain, another arch, small leaves and other details that made the space more filled. In addition to the foreground, a serious task was to create a large number of modules and the scale of the architecture itself. It took a few hours to make the modeling interesting and at the same time still believable.
Giorgio Grecu Concept
')
Architecture
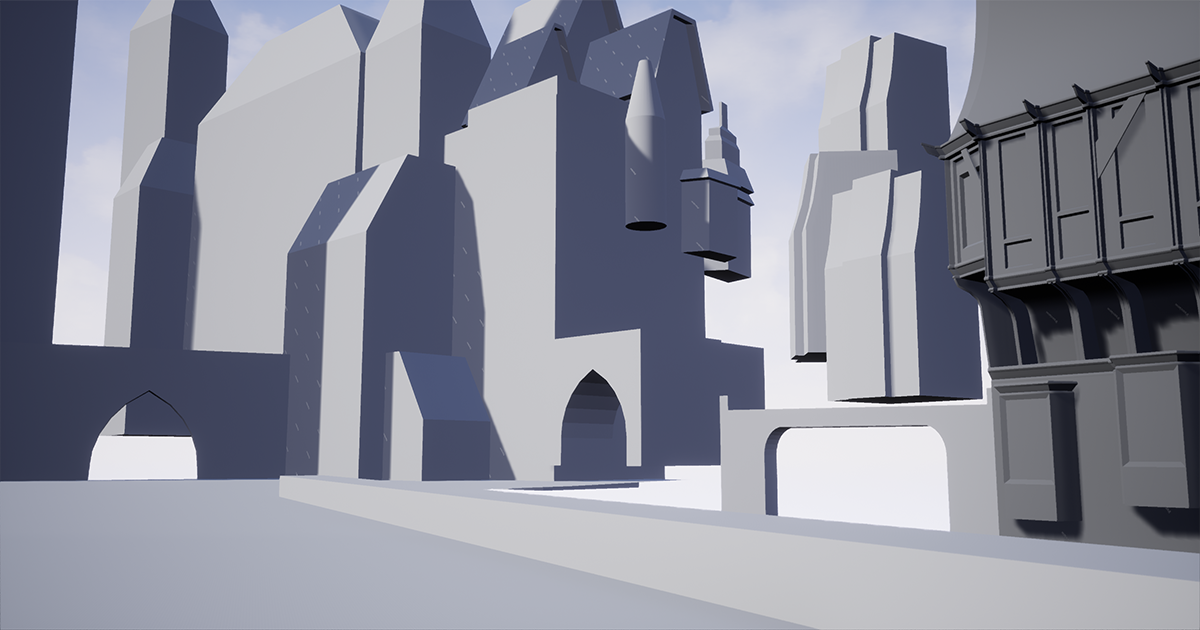
One of the reasons why I was so interested in the implementation of this project was architecture. I adore modeling and the thought of creating intricate Victorian architecture was very tempting. In the concept that I took as a basis, some details were missing, so I took advantage of artistic freedom by adding details and designs in these places. To begin the work process, I transferred the image to Photoshop and measured the approximate height of the buildings. I made sure that this is a very useful technique, it allows you to maintain the scale of objects relative to each other. Sometimes I “rounded up” the dimensions to exaggerate some aspects and make the scene bigger. At this stage, I worked with large cubes, sketching the overall composition. Having achieved the scale and perspective I needed, I started modeling. Most of the modules themselves are quite simple, but some of them remain complex, and when assembling the parts they complement each other, creating an interesting architecture.
To begin with, I broke each building into modules, selecting the most efficient way. I was looking for repetitive architecture, patterns and those fragments that appear in the picture only in conjunction with others. I also learned how to create modules as flexibly as possible so that they can be used in other parts of the scene. For example, the tower in the depth of the scene on the left is completely assembled from already created modules. It gave me more time to work with other aspects of the environment.
The most difficult part of the modular workflow was to connect all the parts so that they fit perfectly in the Unreal engine grid. All these modules must be compatible with each other, otherwise I would not be able to use them in other parts of the scene. This process is equally dependent on planning, and on trial and error. When working on this stage, Vincent Joyal taught me a useful phrase: “Our god is the grid.” The grid determines everything in the scene.
After I created all the modules and achieved their correct connection, it only remained to repeat the concept where it is possible and create an interesting architecture where it is impossible. In my work process, I took the figures I used to create sketches of buildings, selected the plane I needed and divided it into the required number of parts.
I selected the modules for this part of the building and modeled each module in each of the sections. So I could guarantee that all the fragments are in the right places and correctly connected to each other.
Details
For a start, I decided on what I take from the concept, and what I will reject. I decided that the lights and the trees give the scene a lot, so I left them. Then I used my own artistic flair and added other minor touches to my surroundings. I felt that the foreground without people seemed very empty, so I added stairs, benches and a fountain. In addition to them, I also placed small leaves between bricks to increase the amount of detail in the foreground.
The remaining parts are created and placed to destroy the sense of "ideal" 3D. I think this was one of the most important lessons I learned from Vince and this project. I did not want me to have completely flat, sharp edges that destroyed the realism of the scene. Therefore, I placed wires between the buildings, added a clock to the side of the building, put weathercocks on the roofs and modeled several tiles. To finish with the details, I planted birds on the wires, added hanging lamps, several ladders and scattered stones on the ground. All this was necessary to destroy the effect of the 3D-model and fill the boring and empty areas.
The process of creating every detail was very different. For example, benches, lampposts, weathervanes and fountains are fully modeled and textured. Trees, birds and clouds are flat rectangles. I found an image or silhouette, created a material with it and a transparency map, and then applied it all to the plane. For wires, I used a cable actor from the Unreal Engine 4. I wanted to consciously locate the details to help the viewer's gaze slide around the scene, rather than snatching out small details at random.
Materials
Everything in the scene I have textured with the help of Substance Designer . Buildings, lampposts, land, benches, roofs - everything was created using SD. I made this decision because I wanted to develop my skills in working with this program; besides, I think it's very powerful.
There are several different types of textures in the scene. There are cropped and tile textures used for the whole architecture, as well as for the surface of the earth, and the unique textures I used for props. I tried to use textures several times and create instances where possible. For example, metal from a lamppost was also used for metal on a bench and weather vane.
The approach to tile textures was the same. After I got an idea about the material and collected references, I started off with a normal map. I always start any texture with normals, because very much is affected by changes in height on a surface or object. I work with a cube and a height map that I convert to a normal map. I do this in order to have control over the grayscale map obtained when working with height differences. Next, I switch to the normal map to independently control the intensity of the normals of some minor details.
Finished with normals, I turn to color and roughness. I work on these cards almost simultaneously, because they influence each other in many ways. A change in roughness often means a change in color in the material, the reverse is also true. Sometimes it is better to show a change in the material through a change in color, and sometimes by varying roughness. Roughness is an incredibly important card and you should never underestimate it.
It was very difficult to make materials visible and interesting in such a dark light, but I found a simple solution; I increased the intensity of the normals of all the textures to such an extent that they should look terrible, and then continued to increase the intensity. Thanks to this and careful work with the ambient occlusion map, my textures are well readable at a great distance.
After completing the textures, I performed a UV scan of each module for texture. At this stage, the workflow for creating props is different from working on modules. Props first unfold and then texturized, and the modules unfold on the texture itself. Before transferring the props to my scene in Designer, I scan them. This process allowed me to bake cards from a high-poly model. I baked the normal, AO, position and color ID cards. All of them greatly accelerate texturing (unless of course there are errors at the end of the baking process). I used world space normals and a position map for realistic generation of details such as dirt and rust. However, when working on props, I still started off with the normals, and only then went on to color and roughness.
Lighting
Most of the scene is lit by a single light source, and then toned and corrected with post-processing effects. Artificial lighting required more attention. All windows have an emissive map glowing orange because I wanted the color of the lighting to resemble the light of candles. Then I worked on each window individually and manually positioned point sources in each window so that the light spreads to the surrounding architecture of the window. I changed the color so that it matches the emissive map and adjusts the brightness so that the resulting effect suits me. I did the same with the light sources inside the arches and lanterns. It was difficult to choose the right brightness so that the lighting from the windows still remained noticeable, but atmospheric lighting was the dominant source of light. Through trial and error, I managed to get the effect I was aiming for. I was going to make a flickering candlelight shader using the help of my other teacher, Bruno Afonseca, but since the final render was supposed to be a static image, I abandoned the idea.
Smoke
In this project, I did not use Photoshop at all, it was completely created in UE4. I created smoke using a combination of several different techniques.
First, I added an exponential height fog from UE4 to get the aerial perspective I wanted to achieve for buildings deep behind. Then I added the volume fog option to get a halo / scatter effect around the lights and light sources inside the arches. I had to tinker a bit with this, because then I first used the Unreal volume fog effect, but over time I managed to achieve the desired result. The final touches were clouds, which are simple planes with superimposed images of clouds and a transparency map.
How could this project work in a game?
If I was going to transfer this scene to the game, I would have better optimized it first. I would optimize the textures as much as possible, cleaned up and simplified some nodes and baked the information of the normals into more props. I would also work more on the environment and expand it. Modules should be great for building lots of new buildings.
Michael Andrews , College Champlain, was interviewed by Kirill Tokarev.
Source: https://habr.com/ru/post/348786/
All Articles