3D engine written in MS Excel formulas

Screenshot game screen
This article is devoted to how I could write a 3D engine only on Excel formulas. I implemented the following functionality:
- infinite procedurally generated maze map
- real-time ray tracing
- occlusion calculation
- rendering the simplest lighting
- lighting and computing shader
- natural motion engine
- macros are not used in 3D engine
* To control the game by pressing the keys, you need macros that control movement using one simple copy instruction.
')
You can download the file and test it yourself!
Files
- File without vba: http://public.cbel.free.fr/?file=Doom.xlsx
- File with vba to intercept keystrokes: http://public.cbel.free.fr/?file=Doom.xls-v1.1.xlsm
- File with vba and high resolution: http://public.cbel.free.fr/?file=Doom-HD.xls-v1.1.xlsm
- A file with vba and buttons instead of hot keys: http://public.cbel.free.fr/downloads/?file=Doom.xls-Buttons-v1.1.xlsm
Context
The computer science teacher once told us: “Any calculations can be performed in any programming language, even through spreadsheet formulas.”
At first, no matter how wise the phrase seemed to be, the mention in this Excel list looked silly ...
Then, after studying the Turing machine, the phrase became completely true for us, although not completely realizable.
Having received many years of experience with Excel, we already realized that the only limitation of the Excel formula is the lack of input-output methods.
But the set of problems solved solely by formulas still looks impressive.
Anyway, this work is not just some kind of boasting ... I had good reasons for it.
Spreadsheets are a powerful tool that everyone should learn, because it can be used in almost any business task.
However, when most people come to solving more complex problems, they tend to use the VBA language, without even really understanding why.
And when they begin to study it, they try to use it to solve any kinds of problems, even for a simple search or visualization.
Today I teach Excel, so I will try to explain to people why writing a macro in VBA to solve any task without a good knowledge of programming is not only a waste of time, but also a serious risk of reducing the quality of the spreadsheet.
When used in business formulas have the following advantages over macros:
- They are faster to write for any person if he is not a professional analyst programmer
- They are easier to support anyone, not just a professional programmer. (Most often, macros become useless after their developer leaves.)
- Guaranteed quality due to constant checking of values. (Forced use of the "development through testing" technique)
- They are more effective in the long run due to the process of creating formulas in the “think before writing” style.
- And they are most certainly much better integrated into the spreadsheet creation tool itself and follow the initial spreadsheet design pattern, while macros often turn out to be specific constructs that require further active support.
Note: these clauses mainly refer to procedures used as macros; an additional function written in VBA can increase efficiency without compromising quality.
That's how I came to writing my game: it became a clear demonstration that macros are usually not needed even for solving the most complex tasks.
More specifically, I found only two cases in which VBA was required:
- Adding specific input or output (as I did here to receive key events), because the formula is always limited to changes in the cell itself.
- Some complex tasks (for example, optimization) in which the calculations take too much time and / or space. But such tasks are quite rare in real life.
In the rest of this article, I will explain how spreadsheets work in various aspects of the game.
Map
My spreadsheet was supposed to be a Doom-style maze game.
It was possible to create for it a permanent, hand-built map, perhaps looped around the edges, but it would require additional space, searches, and initial design development.
At the same time, the idea of a procedurally generated infinite map seemed to be a much more interesting goal.
To create a randomly generated map, we need to be consistent, so the rand () function cannot be used, because we cannot control the initial state (seed) of the random number generator.
The initial states of the random number generator must be the positions (x; y) on the map so that we can get different values for each position, and we cannot get the result of the previous random number as the initial state for the next, or we will have to store the entire map from the very beginning .
Regular hash functions, while ensuring the high quality of random numbers, turned out to be too expensive, so I needed to find another solution.
Experiments with a fractal generator also turned out to be quite expensive and gave interesting results only for a small part of the map.
Then I discovered the middle-square method, which is actually not very “random” because it uses sequential initial states. But he suggested to me the idea that you can take the decimal part of any other calculation.
I found out that if we take the decimal parts sin (x) + cos (y), then finally we get beautiful numbers without any traceable pattern, and the computation time is surprisingly short.
For obtaining decimal parts, the mathematical functions mod () and floor () are much more efficient compared to the text function of the substring mid ().
I wanted to make the map look like a rat labyrinth, so I created blocks that were not solid, so that they looked like a labyrinth, not like a cave (in Minecraft style).
That is, we need thin walls with two possible walls for each square. Then we can take two blocks of numbers along with the same random value.
Two parameters control the density of the walls.
Given these rules, we can either display a maze, or test any wall with a given position using ray tracing.
It is worth noting that the map is “flat”, without ups and downs. It was possible to add a relief using a relief generator (Diamond-Square would be suitable because it could be written without a recursive function), but the whole subsequent process would greatly facilitate cutting holes in the floor and ceiling with an additional level value.
So it looks like we're in hell.
Ray tracer
The ray tracer must determine for each pixel of the screen which first surface the beam touches and receive information from it (distance, angle of light, color, etc.).
In addition, the ray tracer requires an additional beam propagating from this point (reflections, transparency), which directly increases the computational cost.
Occlusion
The first difficult moment will be finding the first object in the path of each ray.
Since the maze is actually flat with horizontal walls, the nearest found wall will be the same for all pixels of one column.
That is, the process can be simplified to horizontal “radar” in one dimension.
Then we have no choice but to check the beam on the first probable wall, then on the second probable, and so on, until we find the right one.
Determining which wall to check is just a trigonometric task.
And since we have only two types of walls, we can test both types, and then save only the closest one.
One of the limitations of Excel is the absence of a conditional loop, and to save time, you can only skip the loop body. Therefore, we need to limit the maximum verification distance, considering that if at this distance the wall is not found, then it is not.
Floor and ceiling
To determine the ceiling and the floor, we only need to determine where the wall ends.
A separate sheet changes the distance to the floor or ceiling depending on the vertical angle.
Then for each pixel we determine whether the wall is farther than the ceiling or the floor, and set the pixel color accordingly.
Effective comparison is implemented using only the projection of the distance to the wall and to the floor / ceiling along the axis of the camera. The final distance is then obtained using the previously calculated distance coefficient in the distance shader. Constant precomputed values are needed to save resources.
Lighting
The final illumination is taken from the illumination shader, which is the light of the torch, in the direction of the camera (and the weapon).
When the surface is exactly horizontal to the beam of light, a reflection is also added.
The wall can only be horizontal (if you add a tilt, it simply shifts the screen window up and down without turning the camera)
For each angle of the radar, we get the angle between the beam and the nearest found wall.
The reflection coefficient is simply a function of the angle.
In the end, the lighting becomes the result of the function of the coefficient of distance, ceiling / floor or resolution of the walls, the reflection coefficient and the shader coefficient of the lighting.
Display screen
Effective display is implemented using conditional formatting - the color gradient depends on the value of the cell.
Hiding the value is done by formatting the cell.
Collisions with walls
The player must not pass through the walls, otherwise it will destroy the whole point of the maze.
In addition, the player should not stick to the wall when in contact with it. It should move, sliding along the wall, until it hits a corner.
It is also necessary to observe the minimum distance between the wall and the player in order to avoid graphic problems and make the walls thick.
It turned out that it is rather difficult to process all possible variants of the player’s wall and positions relative to this wall.
2 5 variants were studied and three possible outcomes were tied to them (for each displacement axis) in order to obtain results for as few checks as possible.
Despite the fact that this seemed to be the shortest part of the game, the offset table became the most difficult to implement. (10 times larger than the map, twice the wall recognition code.)
The enemies
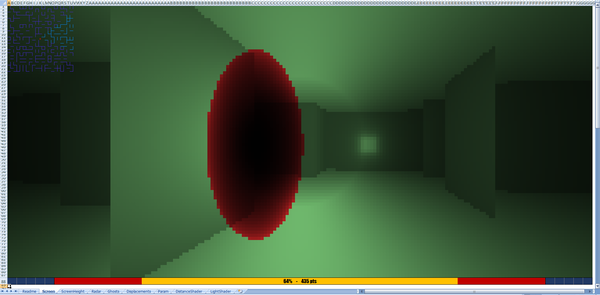
Hello, red ghost!
Graphic rendering
The difficulty with the enemies was to get a shape that can be easily placed in front of the wall, easily rendered at any distance, and which will be more interesting than a simple cube.
A whole separate sheet is devoted to the calculation of the shape of the spheres, taking into account the horizontal radius and vertical height of the ovoid. To animate a creature, use the height / width ratio.
In the rendering of walls and ceilings, only one color gradient is used, but Excel allows using two successive (non-merging) gradients. Therefore, enemies can be displayed in a different color. For this gradient, you can use a range of values below 0, despite the fact that the value 0 is black.
The changing transparency turned out to be no more difficult than the smooth rendering of the surface of the sphere. The beam gets the thickness of the sphere, making the pixel more colored.
At the boundary of the sphere, low thickness retains only the default color value of the wall behind it with a negative coefficient for turning it into a monster color. Illumination color filter provides transparency on the border of the sphere.
Here, calculations are also performed in the horizontal plane, and the maximum amount of calculations is prepared before completing the 3D calculations for each pixel.
Enemy behavior
To avoid the implementation of complex and poor procedural behavior, enemies will not react to the player's actions. Their position is determined only by time, they move along a complex trajectory so that the pattern is not so noticeable.
So that the position, speed and acceleration were continuous (for smooth motion), I made the trajectory a kind of end fractal of a large circle with small circular variations added to it. The ratio between the circles (and even the x / y ratio) is random and unnatural, so the path never self-loops. To get a good random deterministic path generator, I created a separate sheet that displays the path.
Since the trajectories can not take into account the walls, I was forced to leave the monsters the opportunity to pass through them.
At each moment of time several trajectories are calculated. The entire maze is inhabited by the same ten enemies located in the grid at a considerable distance so that the player cannot see two identical monsters at the same time.
You can reduce / increase the grid of repetitions to increase / decrease the density of the location of enemies. At the same time, it is necessary to closely monitor the final displacement of the monster so that it is not excessive, and the speed that changes when scaling.
Having created a limited number of guided enemies, you can copy them throughout the maze.
Enemy attacks
The animation of the enemies is done using their radius / height ratios. Since the attack of the enemy must be clearly visible, but at the same time slow enough for the player to respond, the enemies simply increase in radius when they notice the player. Growth corresponds to an exponential function simulating an explosion.
The scope of each monster is calculated on the radar tab, taking into account the location of the walls.
The player takes damage when he is within the radius of the enemy. If a player deliberately climbs inside the enemy, the same thing happens.
This creates the effect of damage to the player - a simple effect of negative color in full screen.
Another effect is also added - canceling the rendering of all other enemies when causing damage to a player.
A player's life is listed as one of the elements of his status, which is processed in stages, as is his position.
Player attacks
Each enemy receives a status value, which determines his remaining life and the phase of the attack. With some values, the enemies are simply not displayed, with some others, the enemies slowly regenerate, and the latter causes the enemy to explode.
This simplified model allows the player to prevent the attack of the enemy, reducing his life to zero.
To increase the difficulty, the difficulty of aiming at small enemies, which remain at a far distance, is added, and the ammunition needs recharging after a while.
When killing the enemy simply goes into a state of inactivity and slow regeneration. Since several enemies repeat throughout the map, not one of them can be completely destroyed.
Death and restart
When a player’s life drops to zero, most of his actions stop and the end game screen appears.
This screen is rendered using another lighting shader. A negative effect is applied to the color to emphasize damage.
The gradual display of the “game over” message is implemented with the help of a small coefficient increasing as a power function. This allows future pixels to remain hidden until they appear, when the degree becomes large enough.
Shifting down is a simple offset of the lighting shader to which other messages have been added, for example, high scores and restarting the game.
Points must be drawn with pixels using a very low resolution font.
When restarting, a new initial parameter is generated, and the player himself is sent to another point so as not to meet the same enemies.
Source: https://habr.com/ru/post/348704/
All Articles