Wireless network protection: WIPS. Part 1: Mojo AirTight
Good day to residents of Habr. You might think that wireless intrusion detection systems are anti-aircraft guns standing around the perimeter of a wireless network and continuously rotating radar plates ...

But no, in the harsh reality, everything is more prosaic. This post I want to share our experience with two solutions WIPS (Wireless Intrusion Prevention System). In the first part, I’ll tell you what WIPS is and why it is needed, and I’ll give you a brief overview of the key features of the Mojo AirTight product and a description of the required settings. In the second part I plan to consider a similar solution from Cisco.
I think every network engineer in his life came across the concept of IPS / IDS. In modern reality, every self-respecting firewall offers this functionality. Equipment manufacturers pound themselves loudly in the chest and measure themselves with “independent” examination results - whose NGFW catches various malicious programs better. It is not a problem to find a good article with recommendations for setting up this class of equipment.
')
Unfortunately, with WIPS everything is not so rosy: there is little sensible material (especially in Russian) and mostly marketing brochures, not descriptions of settings. The vendor's documentation, of course, helps, but often the answers to the questions of interest are found in different sources and in order to guess where to look, you need to know half the answer to the question.
Having worked with various solutions of this class, I decided to write my more technical guide and share it with the world.
My article does not pretend to the completeness of the functionality of the solutions described below and is not the ultimate truth. Use the experience of the "author" at your own risk.
WIPS is a system that monitors the surrounding radio using sensors (usually they are the same access points that they distribute Wi-Fi), analyzes the received information about radio signal sources, their interactions and anomalous (unusual) activities and prevents actions conflicting with customized intrusion prevention policies.
Different WIPS systems use different algorithms to identify "offenders" and mechanisms to prevent their activities. However, despite the differences in methods, the list of threats with which each system tries to fight is about the same (as my personal experience shows, not always the stated functionality is 100% effective).
Now the specifics.
Mojo AirTight from Mojo Networks is the first system I’ve been working with. This is a complete wireless access and WIPS solution.
The system has a traditional architecture: access points and Wi-Fi-controller + WIPS control system. A cloud version of the controller is also provided, but I do not think that this option is in demand in our country.
Access points can be used in 3 modes:
Mojo AirTight Wireless Intrusion Prevention System (WIPS) is a virtual machine that combines the functionality of a wireless network controller and WIPS, licensed by the number of connected points (in any mode). A separate WIPS functionality license is not required.
The principle of operation of the Mojo AirTight WIPS is quite simple - all detected users and access points are classified into 5 categories: Authorized, Misconfigured, External, Unknown, Rogue.
Authorized - trusted access points and clients connected to them.
Misconfigured - access points that are trusted but configured incorrectly regarding the IPS policy.
External - access points and clients connected to them that are neither trusted nor malicious. Wifi neighbors in general.
Unknown - access points and clients connected to them that have not yet been classified or for the classification of which there is not enough information.
Rogue - malicious access points and clients connected to them.
The classification is carried out automatically, but in the case of an incorrect classification, the system administrator can manually assign any category (except Misconfigured).
Accordingly, access points directly connected to the Mojo management server are considered authorized; access points connected to another controller with which the system is integrated (I will talk about integration possibilities a little later); Points that are not connected to Mojo, but whose settings comply with the IPS security policy.
Misconfigured - points whose settings do not comply with the WIPS policy (for example, the point uses WPA, and the WIPS policy only requires WPA2-Personal). They can be connected to a Mojo management server or another Wi-Fi controller with which the system is integrated.
Rogue are considered to be access points connected to a wired network monitored by Mojo but not authorized (a case where someone stuck an extra access point into the network that is not serviced by the corporate wireless controller). Also, the list of malicious ones includes points that transmit corporate SSIDs (but not authorized by the criteria described above) and SSIDs that are in the black list.
Well, all other points are classified as external.
Based on the classification results, the actions described in the WIPS policy are applied to points and users. The policy involves the smooth interaction of Authorized objects, the other categories can be limited. It is recommended to prohibit interaction with Rogue and Misconfigured objects, but not to apply any restrictions to objects of the External group.
It should be remembered that the system is extremely "vindictive." If a point or a user has been classified as a rogue once, then they will remain as such until the administrator “justifies” them. Therefore, the following situation is possible: the neighbors in the business center accidentally stuck their access point to the wrong switch in the switching room. After some time, they realized their mistake and fixed the error, but Mojo had already found and classified their point. And he began to apply to it the actions defined by the policy - for example, to silence attempts to connect users to them. After that, Mojo reclassifies the remaining visible points with the same parameters (the same SSID, the same model of points, etc.) belonging to the neighboring Wi-Fi, and the same fate awaits them. Here is such a blood feud.
I will dwell on the installation and configuration of the system.
After the image is deployed in a virtualization environment, we get the following console view:

Please note that the license of this product is tied to its MAC address. Since the MAC address of a virtual machine may change when it is migrated in a virtualization environment, I recommend manually assigning it. If the address changes, the license will “fly off” and you will have to either ask the vendor to re-issue the license to the new MAC, or return the old MAC and reboot.
We enter the default login / password config / config and run the initial initialization wizard. During initialization, we will be offered the following:
During initial initialization, it is important to specify a working NTP and DNS server. If this is not done, the web interface may not start and further system configuration will not be possible, reconfiguration of these parameters via the console and reboot will be required. You also need to specify DNS-Suffix. This parameter is needed in order to correctly work out the server's autodiscovery mechanism for access points. It must match on the Mojo server, on the DNS server and on each access point.
Next, follow the web interface and “enter” the license file. To obtain a license file (after purchase, of course), you must contact the manufacturer and provide it with the MAC address of the server. The system has no trial and grace periods.

After that, we have a ready-to-configure system ... but it lacks the most important - access points. There is a separate nuance with access points: at a time, an access point can only be in one of 3 modes (AP, Sensor, Network Detector).
The main catch is that the point cannot simultaneously transmit information and scan the air, prevent the invasion. So for WIPS to work, you need to plan the placement of individual points that perform only this task.
In order for access points to automatically connect to the Mojo server, WIPS is required to get an IP address, DNS server address and DNS-Suffix via DHCP. Also on the DNS server there must be an entry for the name “wifi-security-server” pointing to the Mojo server. In principle, each point can be adjusted by hand, but this is not our method.
When working through firewalls, you must ensure that the interactions described below are resolved.
By default, points are connected to the system in “AP” mode. After that they can be switched to the required mode. It is also possible to configure a device profile that will automatically switch all connected APs to the desired mode.
But, as usual, there is one caveat: if a point cannot find a controller for a long time, then from grieving it falls into a lethargic dream and only restarts the problem after presetting the firewall / routing / DNS.
Points in the network detector mode must be configured manually via an SSH / console connection. The meaning of this mode is that the point on the trunk connects to all VLANs of the LAN and searches for signs of a wired connection of unauthorized access points. If it finds it, then start spoofing their MAC address and in every way interfere with their lives. This device behavior can cause switch discontent so it is also recommended to pre-configure them. The network detector setting itself is quite simple: you need to change the operation mode, configure the trunk (specify the VLAN list), configure the network settings for each VLAN (set the IP address and network mask), specify which VLAN to knock on the Mojo server and which address.
Actually, the initial setup of the system is completed when the management server and access points have seen each other. I will not dwell in detail on setting up Wi-Fi using Mojo tools - this process is no different from setting up a wireless network on the equipment of any other vendor. Next, I will talk about setting up the services required for WIPS, and WIPS itself in particular.
Next you need to configure the "map" of the network. To do this, you need to configure the "topology": create special entities - "buildings" and "floors" (in any case, do not use the Cyrillic alphabet - the system does not support it). For each "floor" - download the floor plan and mark the location of all sensors and legitimate access points.
Creating topology elements is done in the Locations >> Add Location menu. Map loading - Locations >> Building X> Floor Y> Add layout. When loading a map, you need to specify the length and width of the room and select the units of measurement. Unfortunately, the map is just a drawing (in jpg format) without the possibility to indicate any objects on it (for example, walls).
Adding a sensor / access point to the plan is carried out in the menu: Locations >> Building X> Floor Y> Show device list. From the appeared list of devices, the sensor / point needs to be “dragged” onto the placement on the map.
The map should be as accurate as possible, as well as the placement of sensors and access points on it. This is required for the correct operation of the positioning mechanism (details below).
Setting up an IPS requires sequentially performing the three steps.
One tick separates us from the start of prevention according to the configured policies.
I do not consider it necessary to describe in detail how the counter-attacker proceeds. This can be found in the vendor documentation or, say:
here
One of the advantages of this system is the ability to integrate with a third-party Wi-Fi controller. Thus, you can spread the functionality - Wi-Fi distributes one device (and admins it to 1 person), and watches it - another (and, accordingly, it can be a zone of responsibility of another person).

Integration with Cisco WLC, Aruba Mobility Controllers and HP MSM Controller is supported. The interaction is carried out via SNMP. There is no need to configure anything here - you need to specify the IP address from the controller, select the SNMP version, specify the name of the community, the credentials (in case of SNMPv3) and tick what parameters we want to receive from the controller. For WIPS, in principle, all that is needed is information about the APs and clients, but you can mark with a tick and information about the points that each access point sees, served by the controller with which we set up the interaction. This can be useful in the following situation - let's say the controller with which we integrate serves several buildings at the same time. In building “A” we have our own Mojo sensors — they see everything themselves, and they don’t need help from the AP; but we don’t have sensors in building “B”, and then we can get information about the radio participants from the controller. Of course, the system will not be able to force the "suppression" to work, controlled by the controller, but it is quite possible to classify what they see in this way. And if in building “B” we classify a rogue point in this way, the system will generate an Alarm and the administrator will be able to see it in the interface and take action. Not automatically, of course, but at least somehow.
In general, this is all about configuring the integration. Once again I will clarify: in order for the points received from a third-party Wi-Fi controller to become authorized, it is necessary to configure IPS, as I wrote above. If this is not done, they will become misconfigured.
True, this mechanism does not always work correctly. For example, I had to face a bug, because of which all Cisco 1600 points received from the WLC were not automatically added to authorized ones for some reason and were generally displayed as several separate points (by the number of SSIDs). I had to classify them with my hands to avoid problems with WIPS.
One of the most interesting features of this system is the positioning of Wi-Fi network objects. Theoretically, the setting of this mechanism is not required and it works out of the box. In practice, for everything to be beautiful, as in the example below, very careful card setup and sensor calibration are necessary. Calibration is a system building a graph of triangulation of objects and determine the distance to them. The system shows the actual and expected graphics, and ideally they should be the same. But, given the presence of walls and other objects generating noise, a good result for accurate positioning is 70% of the graphs. It all comes down to the optimal location of the points in the room and the correct setting of the map (the nuances here, of course, are the sea). There are other features - firstly, the system receives information from access points controlled by a third-party Wi-Fi controller at regular intervals, and if you use this information for positioning a moving object, then when comparing current data from sensors with data from an access point, it is five minutes prescription position will be "slightly" inaccurate. Secondly, when creating a room map, it is not possible to specify objects that impair the passage of a signal. For example, an electrical panel located on the floor can significantly distort the picture.
How it works?
For example, a malicious intruder appeared on the network and we need to find him.
Go to the Monitoring> Security tab, find the client of interest to us and select the Locate option - circled in black in the screenshot (in this example, I simply added the neighboring access point to the black list and all its clients automatically became “evil”).
After these simple manipulations we will get a blue square on the map (if everything was set up correctly and calibrated).
In the screenshot is an example of positioning, when the system is properly calibrated.
In general, the solution showed itself quite well and I did not meet any more specific problems (except those described in the text). However, the need to put separate points for data transfer and separate points for WIPS seems to me somewhat strange, since Most of the competing solutions are able to combine this functionality at one point (with a deterioration of the coverage radius, but still to combine). And in order for the positioning to work, as in the example, you need to very accurately draw up a diagram, plan the placement of the sensors and dance with a tambourine. However, all tests for detecting test violators, extra points connected to the wired network, and preventing clients from connecting to wireless networks as a whole (the main thing not to experiment with blocking on the bosses is offended) were successful. DoS counteraction does not work very well - sensory frequencies are coped with the frequency jammer, and detection only helps in the search because starts to fail. And when countering standard attacks such as connection flood, forced disconnection, etc. degradation of network bandwidth is still noticeable. But finding the source is still becoming easier.
With is for Cisco.
To be continued.
Artem Bobrikov, Jet Infosystem Information Security Design Engineer
But no, in the harsh reality, everything is more prosaic. This post I want to share our experience with two solutions WIPS (Wireless Intrusion Prevention System). In the first part, I’ll tell you what WIPS is and why it is needed, and I’ll give you a brief overview of the key features of the Mojo AirTight product and a description of the required settings. In the second part I plan to consider a similar solution from Cisco.
Lyrical digression
I think every network engineer in his life came across the concept of IPS / IDS. In modern reality, every self-respecting firewall offers this functionality. Equipment manufacturers pound themselves loudly in the chest and measure themselves with “independent” examination results - whose NGFW catches various malicious programs better. It is not a problem to find a good article with recommendations for setting up this class of equipment.
')
Unfortunately, with WIPS everything is not so rosy: there is little sensible material (especially in Russian) and mostly marketing brochures, not descriptions of settings. The vendor's documentation, of course, helps, but often the answers to the questions of interest are found in different sources and in order to guess where to look, you need to know half the answer to the question.
Having worked with various solutions of this class, I decided to write my more technical guide and share it with the world.
My article does not pretend to the completeness of the functionality of the solutions described below and is not the ultimate truth. Use the experience of the "author" at your own risk.
What is WIPS and why is it needed?
WIPS is a system that monitors the surrounding radio using sensors (usually they are the same access points that they distribute Wi-Fi), analyzes the received information about radio signal sources, their interactions and anomalous (unusual) activities and prevents actions conflicting with customized intrusion prevention policies.
Different WIPS systems use different algorithms to identify "offenders" and mechanisms to prevent their activities. However, despite the differences in methods, the list of threats with which each system tries to fight is about the same (as my personal experience shows, not always the stated functionality is 100% effective).
- RogueAP is a malicious access point that fully or partially copies the “look” of this (the same SSID name or with some differences) and is intended to implement the MiTM attack and / or compromise the credentials of a careless user.
- Ad-hoc is an operation mode in which a device connected to a LAN distributes Wi-Fi to others and, as a result, provides access to the LAN.
- DoS - denial of service attack. In the realities of wireless networks, this is mostly flood messages by deauthenticating users or cluttering up the radio with useless messages (noise) in order to degrade network performance.
- MAC-Spoofing - faking the address of the sender of messages with the aim to impersonate a client / AP.
- BruteForce - selection of a Wi-Fi password by full brute force / dictionary attack.
- Attacks on known encryption and authorization protocol vulnerabilities - WEP, WPA, WPS, etc.
Now the specifics.
Mojo airtest
general description
Mojo AirTight from Mojo Networks is the first system I’ve been working with. This is a complete wireless access and WIPS solution.
The system has a traditional architecture: access points and Wi-Fi-controller + WIPS control system. A cloud version of the controller is also provided, but I do not think that this option is in demand in our country.
Access points can be used in 3 modes:
- AP - normal access point
- Sensor - access point in WIPS / WIDS mode
- Network Detector is an access point that scans wired segments.
Mojo AirTight Wireless Intrusion Prevention System (WIPS) is a virtual machine that combines the functionality of a wireless network controller and WIPS, licensed by the number of connected points (in any mode). A separate WIPS functionality license is not required.
Principle of operation
The principle of operation of the Mojo AirTight WIPS is quite simple - all detected users and access points are classified into 5 categories: Authorized, Misconfigured, External, Unknown, Rogue.
Authorized - trusted access points and clients connected to them.
Misconfigured - access points that are trusted but configured incorrectly regarding the IPS policy.
External - access points and clients connected to them that are neither trusted nor malicious. Wifi neighbors in general.
Unknown - access points and clients connected to them that have not yet been classified or for the classification of which there is not enough information.
Rogue - malicious access points and clients connected to them.
The classification is carried out automatically, but in the case of an incorrect classification, the system administrator can manually assign any category (except Misconfigured).
Accordingly, access points directly connected to the Mojo management server are considered authorized; access points connected to another controller with which the system is integrated (I will talk about integration possibilities a little later); Points that are not connected to Mojo, but whose settings comply with the IPS security policy.
Misconfigured - points whose settings do not comply with the WIPS policy (for example, the point uses WPA, and the WIPS policy only requires WPA2-Personal). They can be connected to a Mojo management server or another Wi-Fi controller with which the system is integrated.
Rogue are considered to be access points connected to a wired network monitored by Mojo but not authorized (a case where someone stuck an extra access point into the network that is not serviced by the corporate wireless controller). Also, the list of malicious ones includes points that transmit corporate SSIDs (but not authorized by the criteria described above) and SSIDs that are in the black list.
Well, all other points are classified as external.
Based on the classification results, the actions described in the WIPS policy are applied to points and users. The policy involves the smooth interaction of Authorized objects, the other categories can be limited. It is recommended to prohibit interaction with Rogue and Misconfigured objects, but not to apply any restrictions to objects of the External group.
It should be remembered that the system is extremely "vindictive." If a point or a user has been classified as a rogue once, then they will remain as such until the administrator “justifies” them. Therefore, the following situation is possible: the neighbors in the business center accidentally stuck their access point to the wrong switch in the switching room. After some time, they realized their mistake and fixed the error, but Mojo had already found and classified their point. And he began to apply to it the actions defined by the policy - for example, to silence attempts to connect users to them. After that, Mojo reclassifies the remaining visible points with the same parameters (the same SSID, the same model of points, etc.) belonging to the neighboring Wi-Fi, and the same fate awaits them. Here is such a blood feud.
Initial setup
I will dwell on the installation and configuration of the system.
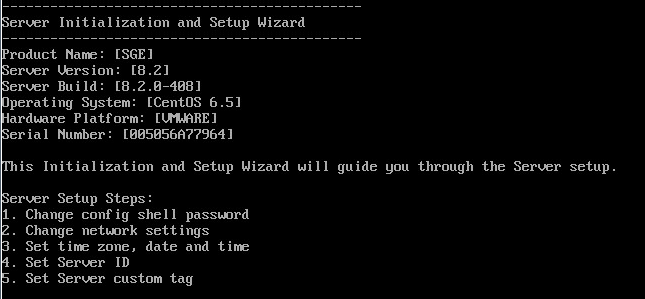
After the image is deployed in a virtualization environment, we get the following console view:
Please note that the license of this product is tied to its MAC address. Since the MAC address of a virtual machine may change when it is migrated in a virtualization environment, I recommend manually assigning it. If the address changes, the license will “fly off” and you will have to either ask the vendor to re-issue the license to the new MAC, or return the old MAC and reboot.
We enter the default login / password config / config and run the initial initialization wizard. During initialization, we will be offered the following:
During initial initialization, it is important to specify a working NTP and DNS server. If this is not done, the web interface may not start and further system configuration will not be possible, reconfiguration of these parameters via the console and reboot will be required. You also need to specify DNS-Suffix. This parameter is needed in order to correctly work out the server's autodiscovery mechanism for access points. It must match on the Mojo server, on the DNS server and on each access point.
Next, follow the web interface and “enter” the license file. To obtain a license file (after purchase, of course), you must contact the manufacturer and provide it with the MAC address of the server. The system has no trial and grace periods.
After that, we have a ready-to-configure system ... but it lacks the most important - access points. There is a separate nuance with access points: at a time, an access point can only be in one of 3 modes (AP, Sensor, Network Detector).
The main catch is that the point cannot simultaneously transmit information and scan the air, prevent the invasion. So for WIPS to work, you need to plan the placement of individual points that perform only this task.
In order for access points to automatically connect to the Mojo server, WIPS is required to get an IP address, DNS server address and DNS-Suffix via DHCP. Also on the DNS server there must be an entry for the name “wifi-security-server” pointing to the Mojo server. In principle, each point can be adjusted by hand, but this is not our method.
When working through firewalls, you must ensure that the interactions described below are resolved.
| Port | Using |
|---|---|
| TCP / 21 | FTP file transfer can be used to upload |
| TCP / 22 | Ssh |
| TCP / 25 | SMTP Integration - Used to send alerts |
| TCP / 80 | Downloading OS updates by access points to WIPS servers |
| TCP / 443 | Admin GUI |
| TCP / 1035 | Interaction between WIPS servers running in a cluster |
| TCP / 3851 | Interaction with AirTight Mobile - an endpoint client from Mojo Networks |
| TCP / 3852 | Open VPN using Cloud Integration Point (CIP) |
| TCP / 4433 | Used when authenticating clients with certificates / smart cards |
| TCP / 5432 | Interaction between PostgreSQL WIPS server cluster bases |
| TCP / 2002 | Port used for packet capture. On this port, the access point waits for commands from the server to initiate a traffic collection session. |
| Udp / 23 | NTP - time synchronization (both points and server interact) |
| Udp / 161 | SNMP (message reception) - required for integration with third-party controllers (for example, Cisco WLC) |
| Udp / 162 | SNMP - (sending messages) - required for integration with third-party controllers (for example, Cisco WLC) |
| Udp / 389 | LDAP - integration with LDAP for user authentication |
| Udp / 694 | Heartbeat between WIPS cluster servers |
| Udp / 514 | Syslog - integration with external SIEM |
| Udp / 1194 | Open VPN between servers in a cluster |
| Udp / 1812 | Radius - user authentication via radius server |
| Udp / 3851 | Information sharing with SpectraTalk access points |
By default, points are connected to the system in “AP” mode. After that they can be switched to the required mode. It is also possible to configure a device profile that will automatically switch all connected APs to the desired mode.
But, as usual, there is one caveat: if a point cannot find a controller for a long time, then from grieving it falls into a lethargic dream and only restarts the problem after presetting the firewall / routing / DNS.
Points in the network detector mode must be configured manually via an SSH / console connection. The meaning of this mode is that the point on the trunk connects to all VLANs of the LAN and searches for signs of a wired connection of unauthorized access points. If it finds it, then start spoofing their MAC address and in every way interfere with their lives. This device behavior can cause switch discontent so it is also recommended to pre-configure them. The network detector setting itself is quite simple: you need to change the operation mode, configure the trunk (specify the VLAN list), configure the network settings for each VLAN (set the IP address and network mask), specify which VLAN to knock on the Mojo server and which address.
Actually, the initial setup of the system is completed when the management server and access points have seen each other. I will not dwell in detail on setting up Wi-Fi using Mojo tools - this process is no different from setting up a wireless network on the equipment of any other vendor. Next, I will talk about setting up the services required for WIPS, and WIPS itself in particular.
Setting locations
Next you need to configure the "map" of the network. To do this, you need to configure the "topology": create special entities - "buildings" and "floors" (in any case, do not use the Cyrillic alphabet - the system does not support it). For each "floor" - download the floor plan and mark the location of all sensors and legitimate access points.
Creating topology elements is done in the Locations >> Add Location menu. Map loading - Locations >> Building X> Floor Y> Add layout. When loading a map, you need to specify the length and width of the room and select the units of measurement. Unfortunately, the map is just a drawing (in jpg format) without the possibility to indicate any objects on it (for example, walls).
Adding a sensor / access point to the plan is carried out in the menu: Locations >> Building X> Floor Y> Show device list. From the appeared list of devices, the sensor / point needs to be “dragged” onto the placement on the map.
The map should be as accurate as possible, as well as the placement of sensors and access points on it. This is required for the correct operation of the positioning mechanism (details below).
IPS setup
Setting up an IPS requires sequentially performing the three steps.
- Configure the allowed SSID policy . At this stage, we create a profile for each legitimate SSID, in which we specify the name of the SSID, its parameters (encryption, authentication method, etc.). The configuration is done in the menu Configuration> WIPS> Authorized WLAN policy> <Root location name>. After creating all the SSID profiles, you need to activate them for each location in accordance with what SSIDs may be present in a specific location. Policy settings for each location are made after clicking on the link "Click here to enable editing and customizing the policy". By default, policies are inherited from the root location.
- Configure IPS Policies .
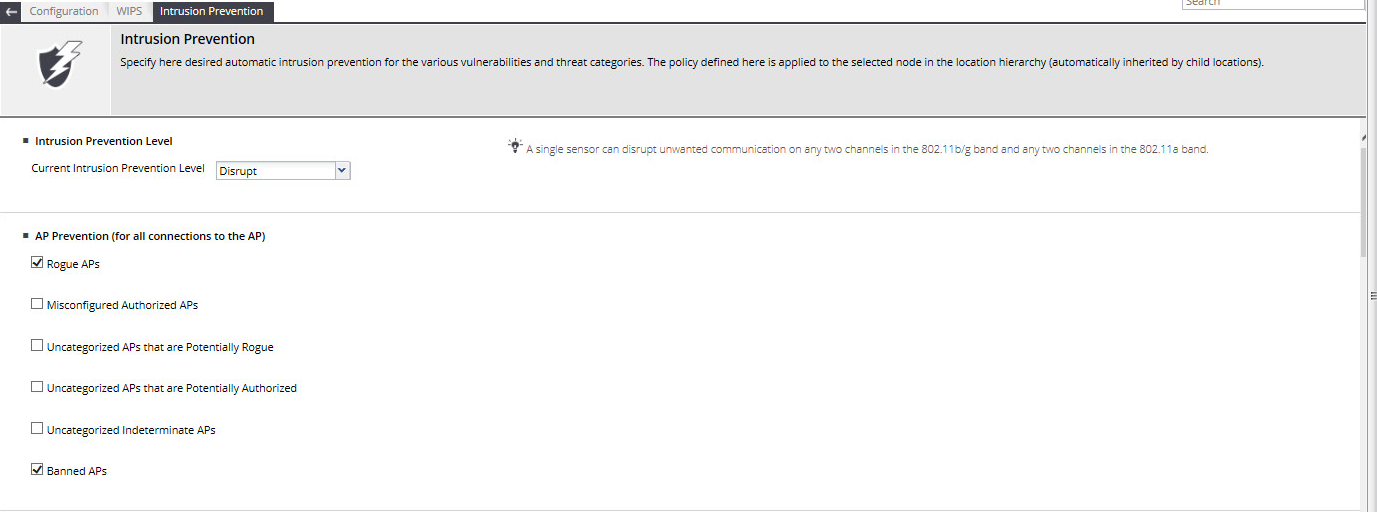
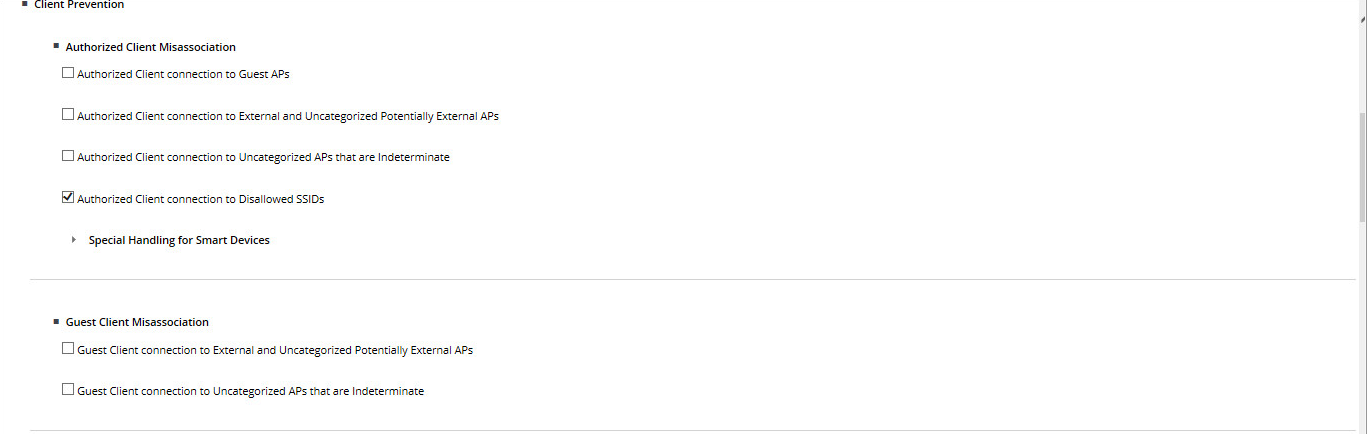
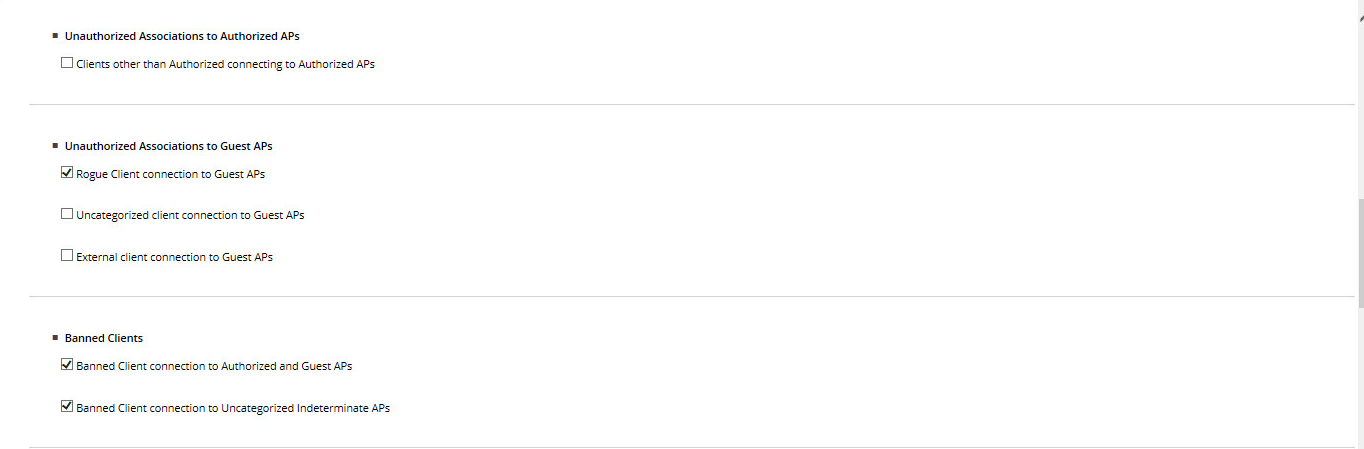

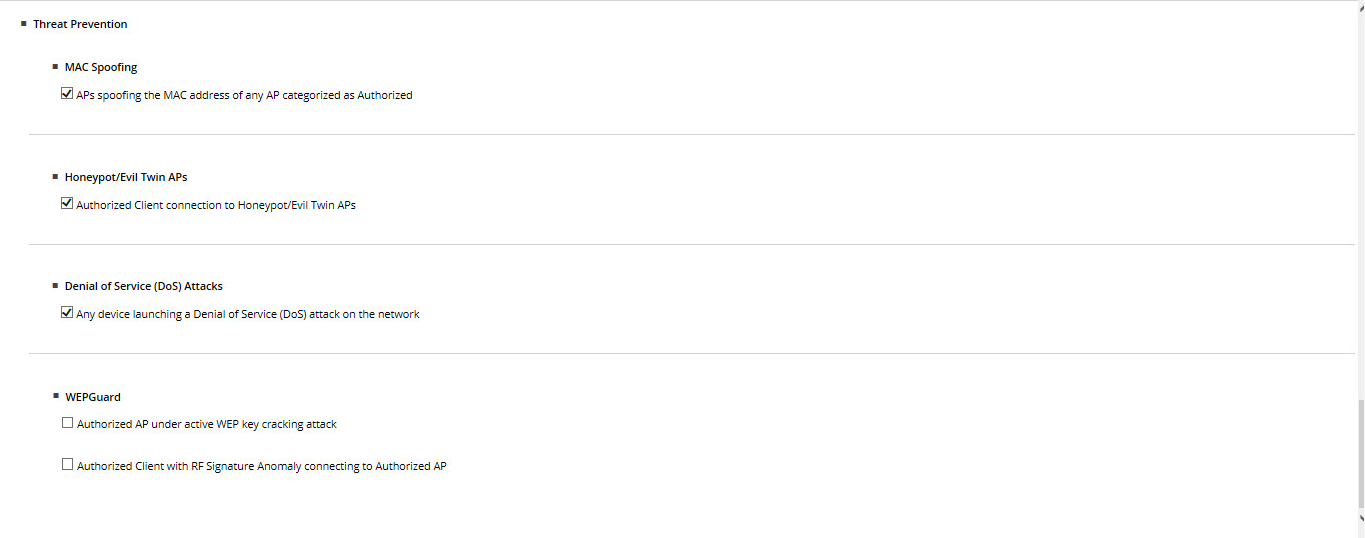
It's all pretty simple - tick the box next to the functionality of interest and everything. - Enable IPS . Before switching on, the system works as a WIDS - sees everything, but does not interfere.
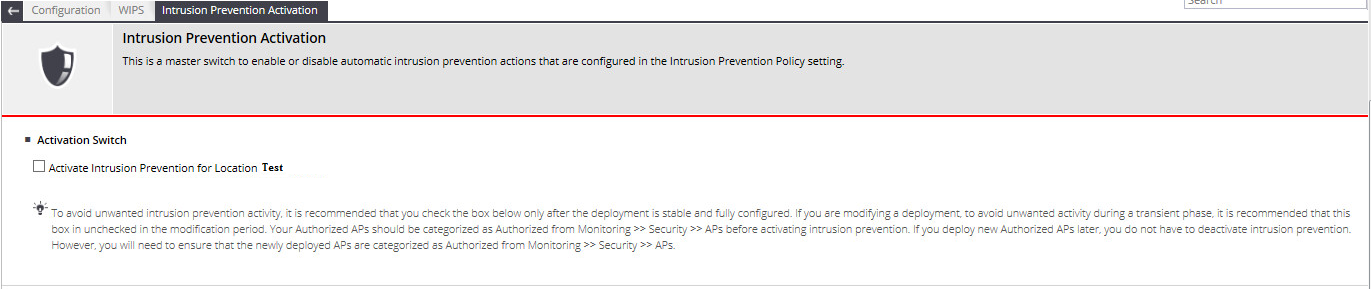
One tick separates us from the start of prevention according to the configured policies.
I do not consider it necessary to describe in detail how the counter-attacker proceeds. This can be found in the vendor documentation or, say:
here
Integration with existing Wi-Fi
One of the advantages of this system is the ability to integrate with a third-party Wi-Fi controller. Thus, you can spread the functionality - Wi-Fi distributes one device (and admins it to 1 person), and watches it - another (and, accordingly, it can be a zone of responsibility of another person).
Integration with Cisco WLC, Aruba Mobility Controllers and HP MSM Controller is supported. The interaction is carried out via SNMP. There is no need to configure anything here - you need to specify the IP address from the controller, select the SNMP version, specify the name of the community, the credentials (in case of SNMPv3) and tick what parameters we want to receive from the controller. For WIPS, in principle, all that is needed is information about the APs and clients, but you can mark with a tick and information about the points that each access point sees, served by the controller with which we set up the interaction. This can be useful in the following situation - let's say the controller with which we integrate serves several buildings at the same time. In building “A” we have our own Mojo sensors — they see everything themselves, and they don’t need help from the AP; but we don’t have sensors in building “B”, and then we can get information about the radio participants from the controller. Of course, the system will not be able to force the "suppression" to work, controlled by the controller, but it is quite possible to classify what they see in this way. And if in building “B” we classify a rogue point in this way, the system will generate an Alarm and the administrator will be able to see it in the interface and take action. Not automatically, of course, but at least somehow.
In general, this is all about configuring the integration. Once again I will clarify: in order for the points received from a third-party Wi-Fi controller to become authorized, it is necessary to configure IPS, as I wrote above. If this is not done, they will become misconfigured.
True, this mechanism does not always work correctly. For example, I had to face a bug, because of which all Cisco 1600 points received from the WLC were not automatically added to authorized ones for some reason and were generally displayed as several separate points (by the number of SSIDs). I had to classify them with my hands to avoid problems with WIPS.
Positioning Objects
One of the most interesting features of this system is the positioning of Wi-Fi network objects. Theoretically, the setting of this mechanism is not required and it works out of the box. In practice, for everything to be beautiful, as in the example below, very careful card setup and sensor calibration are necessary. Calibration is a system building a graph of triangulation of objects and determine the distance to them. The system shows the actual and expected graphics, and ideally they should be the same. But, given the presence of walls and other objects generating noise, a good result for accurate positioning is 70% of the graphs. It all comes down to the optimal location of the points in the room and the correct setting of the map (the nuances here, of course, are the sea). There are other features - firstly, the system receives information from access points controlled by a third-party Wi-Fi controller at regular intervals, and if you use this information for positioning a moving object, then when comparing current data from sensors with data from an access point, it is five minutes prescription position will be "slightly" inaccurate. Secondly, when creating a room map, it is not possible to specify objects that impair the passage of a signal. For example, an electrical panel located on the floor can significantly distort the picture.
How it works?
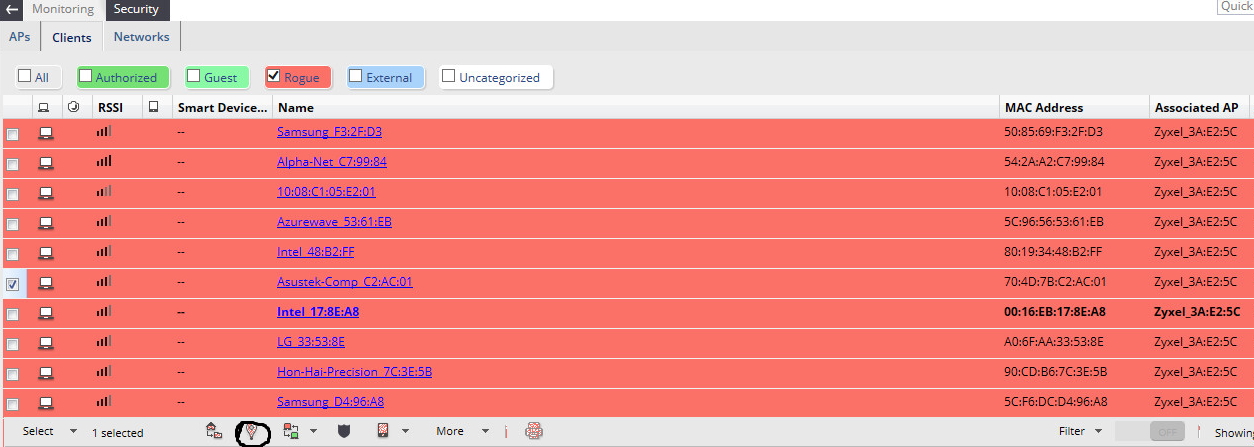
For example, a malicious intruder appeared on the network and we need to find him.
Go to the Monitoring> Security tab, find the client of interest to us and select the Locate option - circled in black in the screenshot (in this example, I simply added the neighboring access point to the black list and all its clients automatically became “evil”).
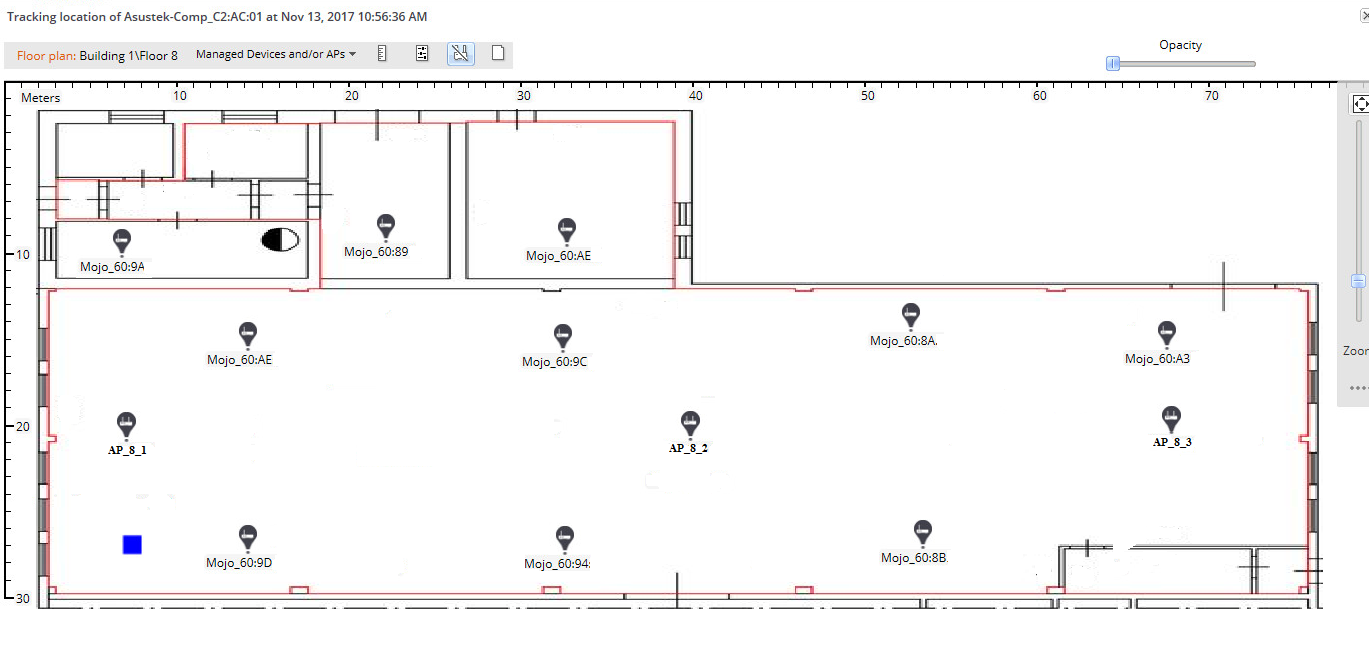
After these simple manipulations we will get a blue square on the map (if everything was set up correctly and calibrated).
In the screenshot is an example of positioning, when the system is properly calibrated.
Mini afterword
In general, the solution showed itself quite well and I did not meet any more specific problems (except those described in the text). However, the need to put separate points for data transfer and separate points for WIPS seems to me somewhat strange, since Most of the competing solutions are able to combine this functionality at one point (with a deterioration of the coverage radius, but still to combine). And in order for the positioning to work, as in the example, you need to very accurately draw up a diagram, plan the placement of the sensors and dance with a tambourine. However, all tests for detecting test violators, extra points connected to the wired network, and preventing clients from connecting to wireless networks as a whole (the main thing not to experiment with blocking on the bosses is offended) were successful. DoS counteraction does not work very well - sensory frequencies are coped with the frequency jammer, and detection only helps in the search because starts to fail. And when countering standard attacks such as connection flood, forced disconnection, etc. degradation of network bandwidth is still noticeable. But finding the source is still becoming easier.
With is for Cisco.
To be continued.
Artem Bobrikov, Jet Infosystem Information Security Design Engineer
Source: https://habr.com/ru/post/348692/
All Articles