Houses with Xeoma (CCTV and VMWARE ESXi)
Video surveillance / video recording systems are very popular now. And although there are many of them on the market, the desire to save money, especially for use at home or in the SOHO sector, often leads to the agony of choice.
In particular, I had the following conditions for a home NVR:
- the server side of the NVR running Linux in the VMWare ESXi virtual machine;
- low requirements for virtual machine resources when connecting 6-8 FullHD H.264 cameras;
- the ability to connect and manage the NVR server from a Windows computer and smartphone (Android);
- low cost (better free);
1. NVR with the ability to run the server side in a Linux environment
- ZoneMinder
free open source - Veyesys rapidvms
free open source - Xeoma
up to 8 cameras for free (it is impossible to use the free version in Linux without a graphical environment)
license cost for 1 camera is 875 rubles - AVReg (www.avreg.net)
up to 4 cameras for free
license cost for 1 camera 1000 rub - Line (www.devline.ru)
license cost for 1 camera is 1008 rubles - Trassir (www.dssl.ru)
the cost of a license for 1 camera is 2990 rubles - Orchid Core VMS
up to 4 cameras for free - Ivideon
up to 15 cameras for free
unable to install ivideon server without graphical environment
2. ZoneMinder
The first CCTV system that worked for a little over a year and was the first experience of using CCTV systems was ZoneMinder. Honestly, ZoneMinder is quite complicated to install and configure, but not even this has become the main problem in its use. The main problem appeared when I began to slowly replace old MJPEG cameras with H.264-camcorders. I don’t know how it is now, but the version with which I worked several years ago (1.28) did not support H.264 streams out of the box, but what worked to do by connecting ffmpeg, although it worked, but the processor was quite heavy, and the quality of motion detection left much to be desired. It simply turned out to either record video from the cameras almost continuously, or when the motion detection was “blunt”, I had to put up with the omission of “important” frames. In addition, apparently because of the furious load on the processor, the ffmpeg processes, decoding H.264, fell and often the record was not kept at all. I had to look for something else.
3. AVReg
In general, moved to AVReg. Installing AVReg is easier, but still far from trivial. AVReg worked in free mode, therefore, of the 6 installed cameras, recording was made only from 4, but the recording of video data was already stable. AVreg is more stable than ZoneMinder, video streams do not fall off. However, the complexity and non-triviality of the settings and the “coarse” interface were a bit annoying. The quality of motion detection also left much to be desired. AVReg recorded a lot, searching the archive of necessary events is inconvenient. In the end, as it seems to me now, the price of a license of 1000 rubles per camera for this project is greatly overestimated. Adequate price tag for AVReg 400 rubles per channel, not more.
In general, when working with the above projects, a lot of time was spent and what worked out in the end did not cause delight. From time to time, turning to Google for advice, what else is good about the NVR for Linux, I came to the conclusion that a small fee for high-quality software for organizing a video surveillance system is not such a bad idea.
4. Xeoma
The first thing that fell gaze was XEOMA .
I must say that the gaze fell well, because, as it turned out, the software for the NVR had all that I needed for the organization of home video surveillance:
- The system can work in Linux OS (as well as in Windows, MacOS, Android, iOS and ARM)
- The server part can be run separately from the client part (in fact, except for the free version, which has restrictions on connecting to the server over the network) in a bare console.
- The client interface can connect to the server from any OS (Linux, Windows, MacOS, Android, iOS and ARM)
- Support a huge number of video cameras.
- Easy installation and configuration.
- PTZ control.
- High quality motion detection.
- You can enable and use the web interface to access the system.
- A large number and high quality of video processing modules.
4.1. Installing XEOMA in a CentOS Linux virtual machine
As I wrote one of the key conditions for using the NVR is the ability to run it in a virtual environment (VMWare ESXi 6.5 on the i5-3570 @ 3.40Ghz / RAM 32Gb machine), and of course it is very desirable to minimize the resources consumed by the system.
In this regard, for the beginning, a VM with CentOS 7.3 was created, which was allocated quite modest resources:
- CPU: 1 core
- RAM: 2Gb
- HDD1: 20 Gb (system)
- HDD2: 200 Gb (video archive)
4.2. Launch Xeoma CCTV Console Server
The XEOMA server is launched not simply, but extremely simply. Honestly, I was very surprised by the process of installing and running the system in Linux, especially after the ordeal with ZoneMinder and AVReg.
Everything is simple:
- we install Linux in the minimum option;
- Downloading the right version of Xeoma (links here: http://felenasoft.com/xeoma/ru/download/ )
wget http://felenasoft.com/xeoma/downloads/xeoma_trial_standard_linux64.tgz
- we unpack the extorted archive;
tar xzf xeoma_trial_standard_linux64.tgz
- If necessary, set attributes for the application, allowing its launch
chmod u + x xeoma_trial_standard.app
- We find out the administrator password to connect to the server, for example from a Windows workstation;
./xeoma_trial_standard.app -showpassword
- we start Xeoma in the server mode (while for check in an interactive mode):
./xeoma_trial_standard.app -core
- configure the autorun of Xeoma and running the server as a Linux service (daemon) is also surprisingly simple, instead of the previous command, you need to do the following:
./xeoma_trial_standard.app -install -hiddenmode
4.3. Launch XEOMA client application
The workstation (running, for example, already under Windows) also needs to load the XEOMA software module on the above download page and start it with the command:
xeoma_trial_standard_win64.exe -client
A program running in client mode will automatically detect the xeoma server, connect to it (if it is on the same subnet), and offer a choice of automatic network scanning or manual input of cameras. The address of the Xeoma server can also be entered manually using the menu "Remote Access"> "Connect to a remote server":

Here we enter the IP address and access password obtained earlier (see section 4.2.):

As a result, we obtain approximately the following image:
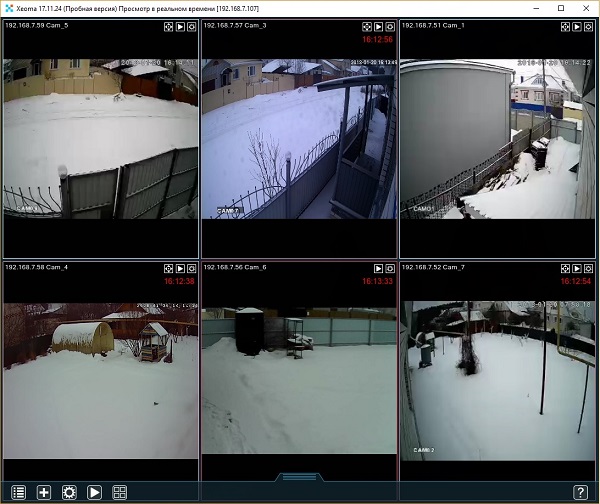
The actual configuration of Xeoma is as simple and intuitive as the installation of this system. A complete guide is available on the manufacturer's website.
4.4. Virtual machine resource consumption
Honestly, considering that Xeoma independently performs motion detection based on which it records a video stream, I had doubts about the adequacy of the 1st kernel for a virtual machine running a Xeoma server. However, the loading of a single nucleus with the included motion detection of 6 chambers was about 30-40% and remained within the specified limits even with activity on all chambers. In the absence of movement, the load fell below 20%:

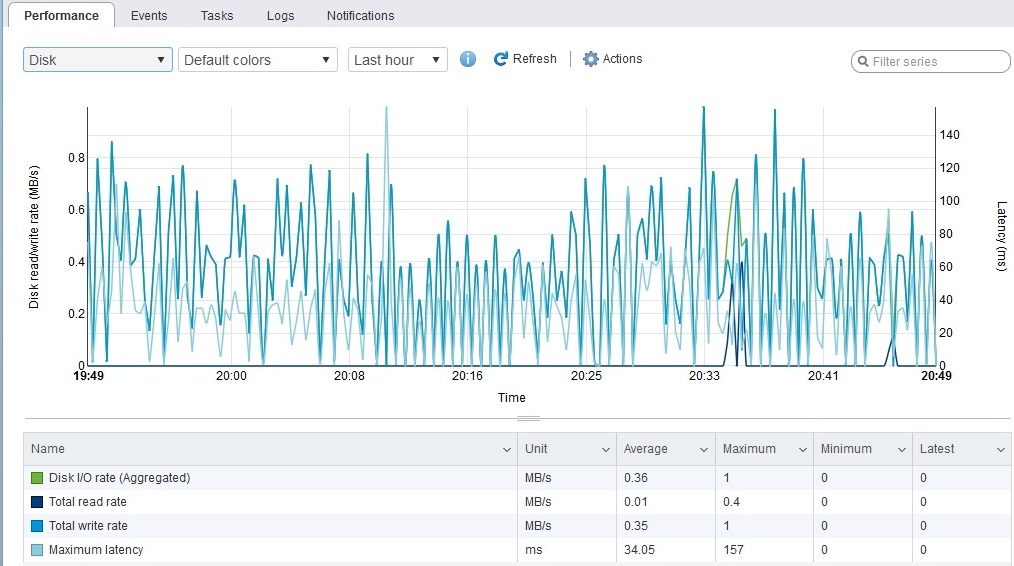
The average HDD Latency at maximum load is 35-50ms, which is quite a lot, but this delay corresponds to simultaneous recording of a video stream from 5-6 cameras. Such a load happens infrequently, but all the same it is necessary to allocate a separate disk for recording video streams, connecting it as an RDM disk :
The allocated disk space of 200 GB was enough to store video data from 6 HD video cameras for 2 weeks:
4.5. Optimize Xeoma Settings
4.5.1. Motion Detector
In general, the default detection and archive settings offered by Xeoma work quite normally without any changes, but considering the resource limitations of the virtual machine with the Xeoma server, and the lack of need for storing unnecessary information, I still recommend that you immediately make small changes to the settings of the detector module movements ":
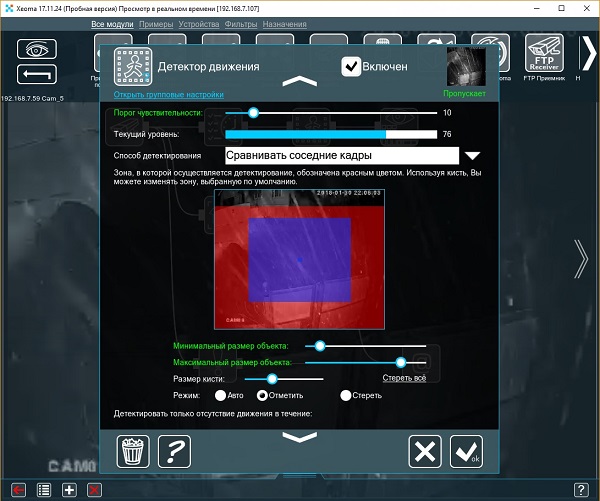
Change the threshold of sensitivity. It is necessary to observe a little the testimony of the current level of sensitivity with various changes in the video frame and decide on the minimum sensitivity threshold. I am satisfied with the value 10, at which the detector does not miss any movement in the chamber. The default value of 5 actually captures the “noise” of the cameras and minor changes in light, resulting in a large recording volume in the video archive.
Change the detection area . With the help of the brush and the "erase" mode, we delete the extra areas, the fixation of the movement in which we are not interested.
Change the minimum size of the object . More precisely, we increase a little. The size of the object "by default" is very small, which also leads to an erroneous triggering of the detector and excessive recording of frames that do not contain anything useful.
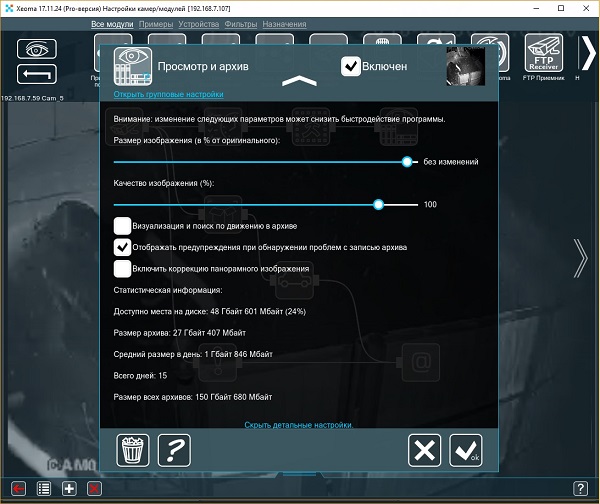
4.5.2. View and archive
The settings of the "View and Archive" module are also possible. You should slightly adjust it. My settings for example look like this:
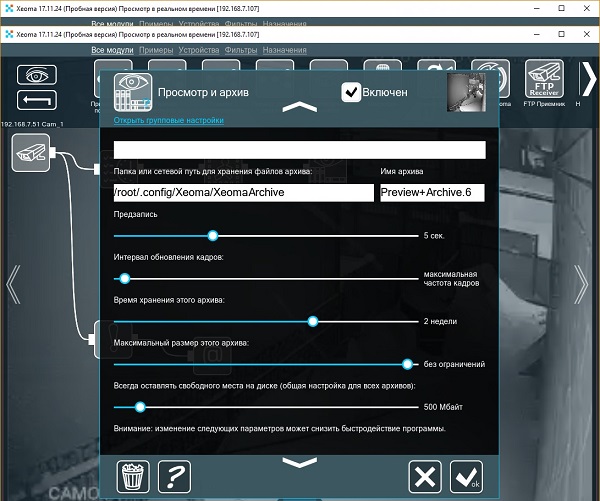
Prerecord. I set 5 seconds, which ensures that due to the buffering of video streams, information will be recorded in the video archive, not only from the beginning of motion detection, but also five seconds before it.
The storage time of this archive. Considering that the total available disk space allocated for the video archive is 200GB, 2 weeks turned out to be the optimal storage depth.
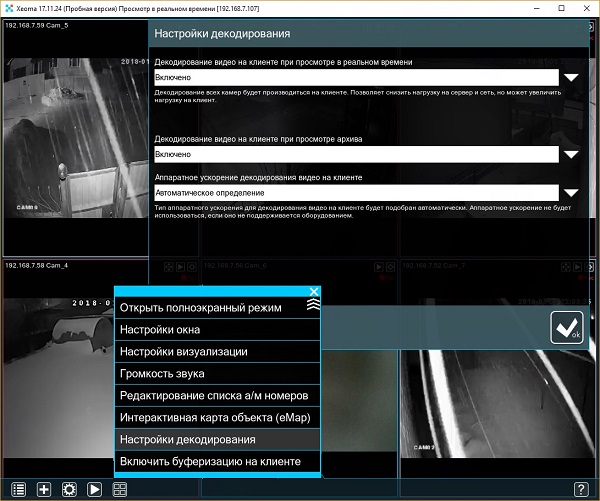
4.5.3. Decoding settings
To reduce server load, when connecting clients to it, it is recommended to decode video streams on clients. To do this, set the decoding settings as shown in the following figure:
4.6. Limitations when using virtualization
The work of Xeoma in a virtual environment, the manufacturer has established restrictions that may be critical for someone. In particular, the following instructions are written in the complete instructions for the system:
For licenses Xeoma (Xeoma Standard), Xeoma Pro, the transition from Xeoma Standard to Xeoma Pro and renewals added the ability to activate on any virtual machines. To do this, you need constant access to the Internet in a virtual machine. If the Internet is lost, the license can be deactivated, but it will be restored when the Internet connection is resumed.
It works as follows: When the Internet is lost, the Xeoma server on the virtual machine continues to work as if nothing had happened for 2 days, records the archives, allows the connection to the client, but it all works until the server is restarted.
If the server fails to restart via the Internet for a license activation upon restarting, the server will stop its productive work, i.e. data from the cameras will not be received, the archive will stop recording. When you try to start the client, you will see the following warning:

Now until you have the Internet Xeomu you can only use to view the archive. To do this, click "Continue Work".
However, after the resumption of access to the Internet, you will find one trouble (at least in the latest version 11/17/24). Despite the fact that with the renewal of access to the Internet, the Xeohm functionality will work in full, when you view information about your active license (Menu> Information> Active licenses), you will see the following:
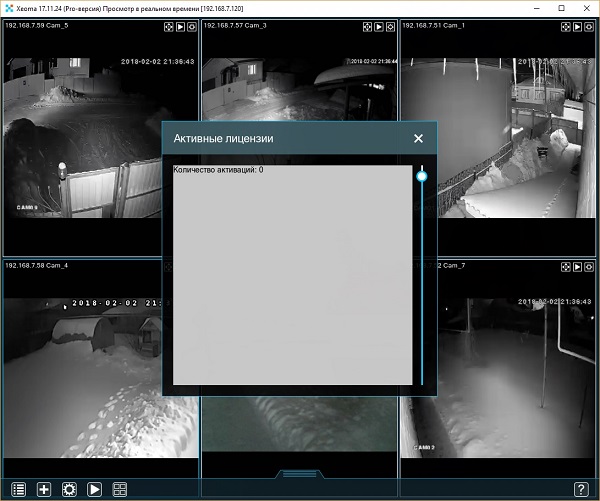
Waiting for a day with a little did not correct the situation, so I had to re-enter the license activation code manually.
Given the not quite understandable logic of Xeoma running in a virtual machine, I can recommend to protect myself from resetting the settings you made earlier, saving them in one of two ways:
- Using the menu in the GUI of the Xeoma client: Menu> Install> Restore> Save Settings (or Export Settings).
- Make a copy of the settings file /usr/local/Xeoma/settings.dat using Linux tools
findings
Xeoma is a very good video registration system. It certainly costs its money. This, as mentioned above, is 875 rubles per camera using a standard license. For 6 cameras, its use will cost about 5,000 rubles. Considering how much time you spend on achieving acceptable work for free solutions - this is certainly a low price.
I want to note the excellent motion detection system, which allows you to save and quickly find all significant events that fall under your video camera, without fear of missing something. Due to this, for a two-week recording from 6 FullHD-cameras it is enough to allocate only 200GB of disk space, whereas in many low-cost recorders (for example, based on CMS), in order not to miss events, you have to include a continuous recording, which for the same two weeks archive depth will require about 2Tb.
')
Source: https://habr.com/ru/post/348476/
All Articles