8-bit computer with BASIC and VGA-out on the Arduino
With the Arduino, you can assemble an 8-bit retro computer with a Basic (similar to the ZX Spectrum) with a color image output to a VGA monitor.
In addition, this project can be used as an easy way to display text messages on a monitor.

')
By itself, the idea of using Arduino to create a computer with BASIC is not new, but as far as I know, they all do not support the output of a color image. Some projects used LCD monitors, while others used the TVout library, which displays a black and white image. In addition, many of these projects require additional modules and special expansion cards. All you need to do is to have two Arduino, several resistors, plus connectors for the PS / 2 keyboard and VGA monitor.
For the project, two Arduino boards are needed: one will be the main one (or “master”), it will use the Tiny Basic Plus interpreter (this is the Tiny Basic port in C, adapted to support the Arduino). Also this Arduino controls the PS / 2 keyboard. The output from the first Arduino via the serial port is sent to the second Arduino, which uses the VGAx library to generate a VGA signal.
A BASIC program can be entered into a computer we assembled using a PS / 2 keyboard, and the result can be viewed on a VGA monitor: the resolution of the resulting image is 24 columns by 10 lines, the size of characters is 5x6 pixels, 4 colors are available.
After the introduction of the program, it can be stored in the non-volatile memory of the Arduino itself, and the program code provides for the management of the I / O pins of the Arduino.
TinyBasic Plus and the VGAx library work with the Arduino IDE 1.6.4.
If you already have a newer version installed, then the best solution is to download this version from the official site in .zip format, and unpack it into a separate folder. Here you can download this version for Windows.
Then we need the PS2keyboard library, you can download it from here. After downloading, simply unpack the archive, and copy its contents into “arduino-1.6.4 \ libraries”.
Next, download the TinyBasicPlus_PS2_VGAx.ino file, and flash it into the main Arduino.
This is a version of the regular TinyBasic Plus, where PS / 2 library support has been added.
More information about TiniBasic Plus and the manual (in English) can be found here .
If at this stage there are no problems (including compatibility issues), then Tiny Basic will automatically start when you turn on the Arduino. And it can be tested using the serial port on your PC. For these purposes, I use PuTTY , but you can use another similar program to your taste.
In the settings, you need to set the COM port correctly (the same one used in the Arduino), and the transfer rate = 4800.
And here you can already test our system by typing some program on Basic from the keyboard of your PC (later we connect the PS / 2 keyboard directly to the Arduino).
For example, you can type:
You can interrupt the endless loop of this program using the Ctrl + C key combination (this will not work if we do it using the PS / 2 keyboard).
Now connect the PS / 2 keyboard.
Information and library were taken from this material.
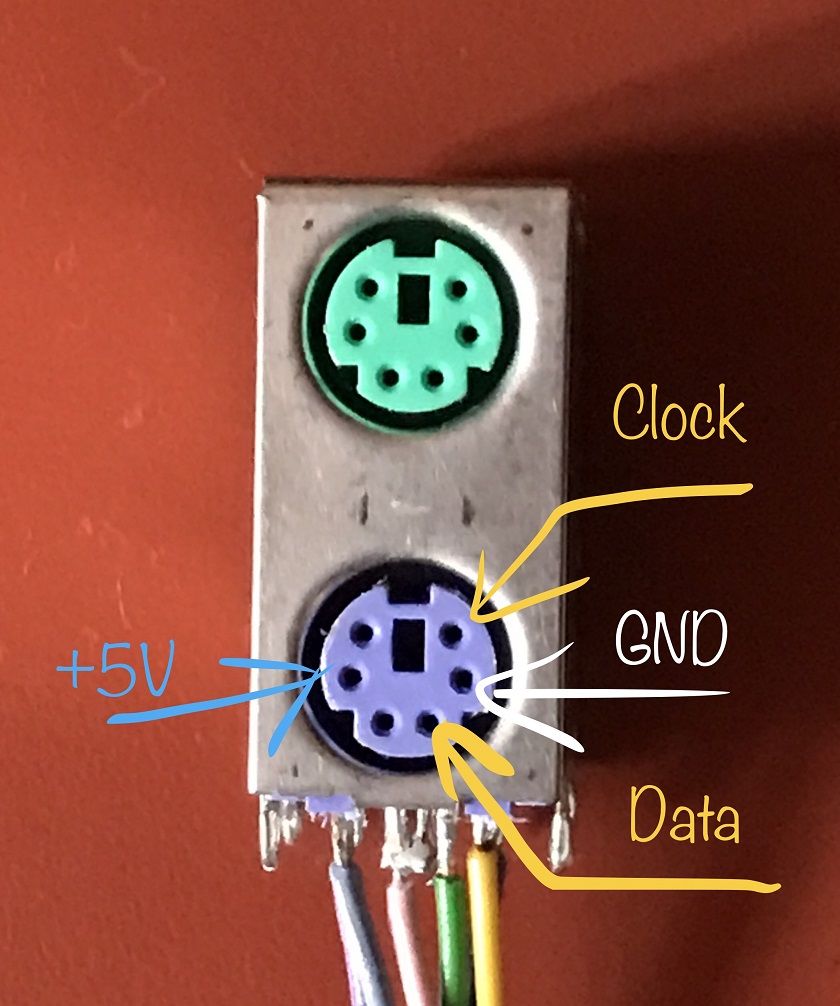
Essentially, you need to connect the following four pins:
Data keyboard to Arduino pin 8,
IRQ (clock) keyboard to Arduino pin 3;
as well as connect the earth (GND) and power + 5V, respectively.
I used the PS / 2 connector from the old non-working motherboard, it can be easily blown off with a hair dryer.
Pinout PS / 2 connector is in the picture:

First of all, download the VGAx-PC.ino code and copy it to your computer in a folder with the same name.
Then - download the VGAx library from GitHub. It needs to be placed in the Arduino IDE libraries subfolder.
IMPORTANT! This library works with Arduno IDE 1.6.4 and may not be compatible with other, newer versions.
Now load the VGAx-PC.ino into the second Arduino (I tested on the Arduino Nano, but there should be no problems with the Arduino Uno too).
Warning that there is little available memory is normal for our case. If there are no other errors, then everything is in order - and you can take a couple more steps to get your own 8-bit retro computer.
For this you need:
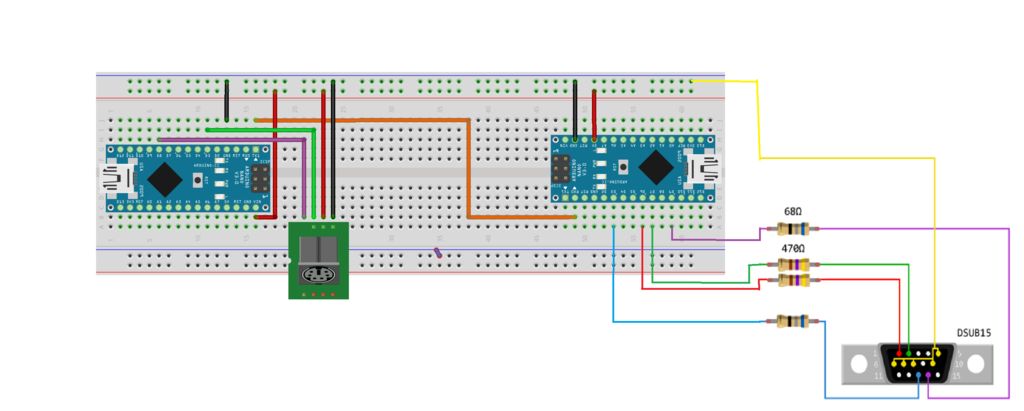
It remains to connect everything according to the scheme in the figure, and our 8-bit computer is ready!
Video, how it all works:
In addition, this project can be used as an easy way to display text messages on a monitor.
')
By itself, the idea of using Arduino to create a computer with BASIC is not new, but as far as I know, they all do not support the output of a color image. Some projects used LCD monitors, while others used the TVout library, which displays a black and white image. In addition, many of these projects require additional modules and special expansion cards. All you need to do is to have two Arduino, several resistors, plus connectors for the PS / 2 keyboard and VGA monitor.
For the project, two Arduino boards are needed: one will be the main one (or “master”), it will use the Tiny Basic Plus interpreter (this is the Tiny Basic port in C, adapted to support the Arduino). Also this Arduino controls the PS / 2 keyboard. The output from the first Arduino via the serial port is sent to the second Arduino, which uses the VGAx library to generate a VGA signal.
A BASIC program can be entered into a computer we assembled using a PS / 2 keyboard, and the result can be viewed on a VGA monitor: the resolution of the resulting image is 24 columns by 10 lines, the size of characters is 5x6 pixels, 4 colors are available.
After the introduction of the program, it can be stored in the non-volatile memory of the Arduino itself, and the program code provides for the management of the I / O pins of the Arduino.
1. Connect the main Arduino with the TinyBasic interpreter and PS / 2 keyboard
TinyBasic Plus and the VGAx library work with the Arduino IDE 1.6.4.
If you already have a newer version installed, then the best solution is to download this version from the official site in .zip format, and unpack it into a separate folder. Here you can download this version for Windows.
Then we need the PS2keyboard library, you can download it from here. After downloading, simply unpack the archive, and copy its contents into “arduino-1.6.4 \ libraries”.
Next, download the TinyBasicPlus_PS2_VGAx.ino file, and flash it into the main Arduino.
This is a version of the regular TinyBasic Plus, where PS / 2 library support has been added.
More information about TiniBasic Plus and the manual (in English) can be found here .
If at this stage there are no problems (including compatibility issues), then Tiny Basic will automatically start when you turn on the Arduino. And it can be tested using the serial port on your PC. For these purposes, I use PuTTY , but you can use another similar program to your taste.
In the settings, you need to set the COM port correctly (the same one used in the Arduino), and the transfer rate = 4800.
And here you can already test our system by typing some program on Basic from the keyboard of your PC (later we connect the PS / 2 keyboard directly to the Arduino).
For example, you can type:
10 PRINT "Hello, World!" 20 GOTO 10 RUN You can interrupt the endless loop of this program using the Ctrl + C key combination (this will not work if we do it using the PS / 2 keyboard).
Now connect the PS / 2 keyboard.
2. Connect the PS / 2 keyboard to the main Arduino
Information and library were taken from this material.
Essentially, you need to connect the following four pins:
Data keyboard to Arduino pin 8,
IRQ (clock) keyboard to Arduino pin 3;
as well as connect the earth (GND) and power + 5V, respectively.
I used the PS / 2 connector from the old non-working motherboard, it can be easily blown off with a hair dryer.
Pinout PS / 2 connector is in the picture:
3. Load the VGAx library and code into the second Arduino, and connect it with the main
First of all, download the VGAx-PC.ino code and copy it to your computer in a folder with the same name.
Then - download the VGAx library from GitHub. It needs to be placed in the Arduino IDE libraries subfolder.
IMPORTANT! This library works with Arduno IDE 1.6.4 and may not be compatible with other, newer versions.
Now load the VGAx-PC.ino into the second Arduino (I tested on the Arduino Nano, but there should be no problems with the Arduino Uno too).
Warning that there is little available memory is normal for our case. If there are no other errors, then everything is in order - and you can take a couple more steps to get your own 8-bit retro computer.
For this you need:
- two Arduino Uno Rev.3, or two Arduino Nano 3.x (based on ATmega328)
- DSUB15 connector, i.e. VGA jack or cable with a jack that doesn’t feel like cutting
- resistors: 2 to 68 ohms and 2 to 470 ohms
- PS2 connector
- wires
- optional: breadboard
It remains to connect everything according to the scheme in the figure, and our 8-bit computer is ready!
Video, how it all works:
Source: https://habr.com/ru/post/348380/
All Articles