Creating a bonus system in Unity
What would Sonic The Hedgehog be like without gold rings and high-speed boots, Super Mario without mushrooms, or Pac-Man without flashing dots? All these games would be much more boring!
Power-ups are an essential component of the gameplay, because they add new levels of complexity and strategy, prompting the player to act.
In this tutorial you will learn the following:
')
- Design and build a bonus system with the possibility of repeated use in other games.
- Use a message-based communication system in the game.
- Implement it all in a top view game using your own bonuses!
Note: this tutorial assumes that you are familiar with Unity and have at least an average knowledge of C #. If you need to refresh your knowledge, then study our other tutorials on Unity .
To repeat the tutorial's actions, you will need Unity 2017.1 or a newer version, so upgrade your version of Unity if you have not done so yet.
4MB GIF
Getting Started
The game on which we will work is a two-dimensional arcade with a view from above, where the player tries to dodge enemies; it is a bit like Geometry Wars, but without shooting (and without commercial success). Our hero in the helmet must dodge enemies in order to reach the exit; when faced with enemies, his health decreases. When health ends, the game over comes.
Download the project template for this tutorial and extract it to the desired folder. Open the project in Unity and examine the project folders:
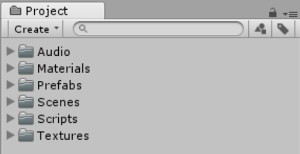
- Audio : contains game sound effect files.
- Materials : game materials.
- Prefabs : contains prefabs of the game, including the playing field, player, enemies, particles and bonuses.
- Scenes : here is the main scene of the game.
- Scripts : contains scripts of the C # game with detailed comments. You can explore these scripts if you want to get better at them before starting.
- Textures : source images used for the game and screen saver.
Open the scene called main and click on the Play button.
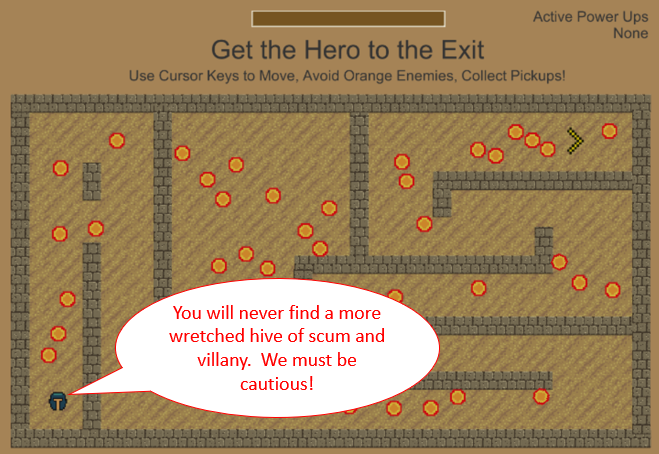
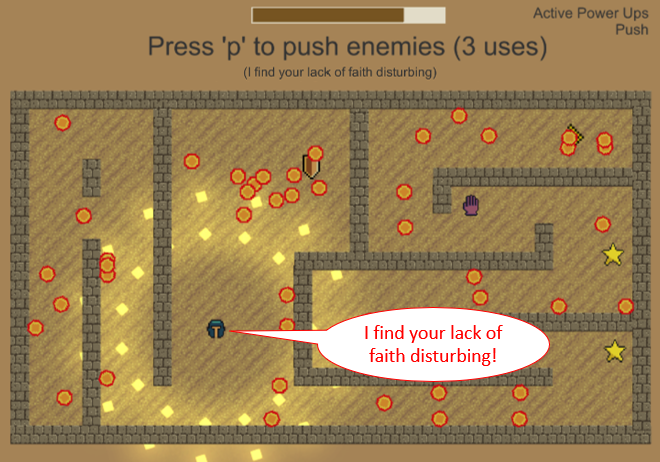
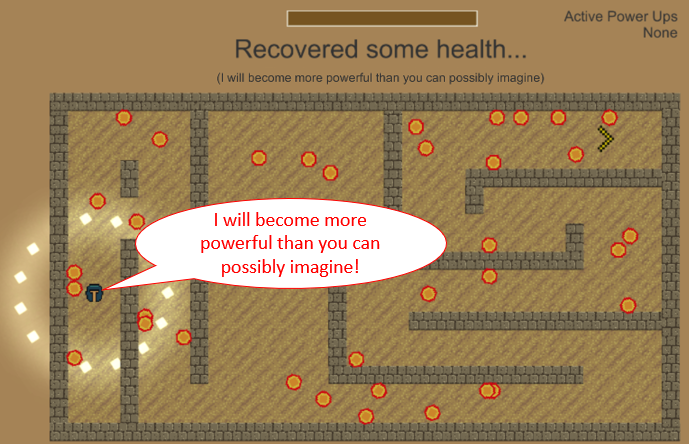
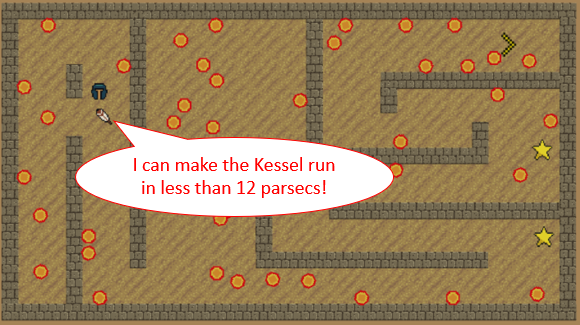
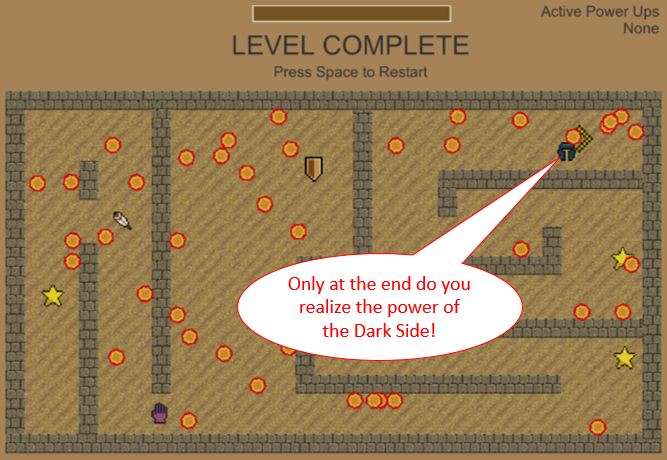
You will see that there are no bonuses in the game yet. Therefore, the level is difficult to pass and the game seems a bit boring. Our task is to add bonuses and liven up the game. When a player picks up a bonus, a quote from a famous movie series appears on the screen. See if you can recognize her. The answer will be at the end of the tutorial!
Bonus life cycle
A bonus has a life cycle consisting of several separate states:

- The first stage is the creation that is performed in the game process or at the development stage, when you manually place GameObject bonuses in the scene.
- Next comes the mode of attracting attention , when bonuses can become animated or otherwise attract the attention of the player.
- The collection stage is a pick-up action that triggers sounds, particle systems, or other special effects.
- The selection of the bonus leads to the performance of the payload , in which the bonus “does its job”. Anything can be a payload, from a modest increase in health to giving a player some amazing superpowers. The payload stage also triggers an expiration check . You can set up a bonus so that it ceases to act after a certain time, after the player is touched by the enemy, after several applications or after the fulfillment of any other condition of the game process.
- The validity check leads to the completion stage. The completion stage destroys the bonus and becomes the end of the cycle.
The above life cycle contains elements that should be used in any game, and elements that relate only to a particular game. For example, checking a player’s selection of a bonus should be used in each game, but a certain payload that makes a player invisible may be used only in this game. It is important to take this into account when creating a script logic design.
Create a simple star bonus

Most likely, you are familiar with the bonuses of the "entry level", which are gold coins, stars or rings, giving points or an increase in health. Now we will create a bonus star in the scene, which gives the player an instant health boost and increases the hero’s chances of passing the level alive.
To escape from the level, it will not be enough to count only on the stars, so that later we will add other bonuses that give our hero advantages in battle.
Create a new Sprite , name it PowerUpStar and position it directly above the hero at (X: 6, Y: -1.3) . To make the scene orderly, make the sprite a child of an empty GameObject PowerUps in the scene:
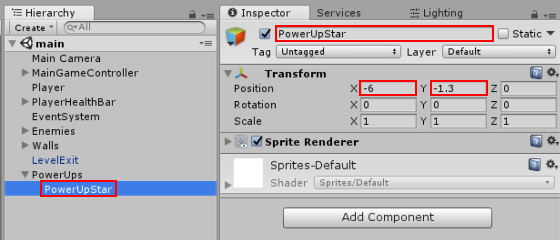
Now we will set the appearance of the sprite. Enter values for Transform Scale (X: 0.7, Y: 0.7) , in the Sprite Renderer component, assign a star to the Sprite slot, and for Pale color, select a pale brown color (R: 211, G: 221, B: 200) .
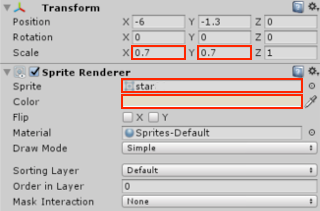
Add the Box Collider 2D component, check the Is Trigger checkbox and change the Size to (X: 0.2, Y: 0.2) :

We just created the first bonus! Run the game to make sure everything looks good. The bonus appears, but when you try to raise it, nothing happens. To fix this, we need scripts.
Separate game logic from class hierarchy
Being responsible developers, we want to spend our time optimally and reuse elements from previous projects. To apply this to the bonus system, we need to create its design with a class hierarchy . The class hierarchy divides the logic of bonuses into a reusable part of the engine and a part related only to a specific game. If you don’t know the idea of class and inheritance hierarchies, then we have a video explaining all these concepts .

The diagram above shows the
PowerUp class as the parent class. It contains game-independent logic, so we can reuse it “as is” in almost any other project. There is already a parent class in the tutorial project. The parent class controls the bonus life cycle, the various states that a bonus may have, it handles collisions, picking up a bonus, payloads, messages, and the termination of the bonus.The parent class implements a simple finite automaton that tracks the bonus life cycle. We need to implement a subclass and inspector values for each new bonus, and that’s it!
Bonus Coding Checklist
Note: to create a bonus script, we must create a subclass of the PowerUp class and ensure that all list items are executed. In the tutorial, we will refer to this list several times, so keep it handy!
- Implement
PowerUpPayloadto run the payload. - Optional: implement
PowerUpHasExpiredto remove the payload from the previous step. - Call
PowerUpHasExpiredwhen the bonus expires. If the validity expires immediately, check the ExpiresImmediately checkbox in the inspector, because in this case there is no need to callPowerUpHasExpired.
Let's think about what the bonus star does: it just gives a small boost to health. To do this, a small script is enough.
Create the first script for the bonus
Add a new script to the PowerOpStar GameObject, name it PowerUpStar and open it in the editor.
Gif
Add the following code, replace most of the initial Unity boilerplate code, leaving only the
using constructs at the beginning. class PowerUpStar : PowerUp { public int healthBonus = 20; protected override void PowerUpPayload() // 1 { base.PowerUpPayload(); // playerBrain.SetHealthAdjustment(healthBonus); } } The code is rather short, but it is enough to implement the logic of the star! The script matches all items in the checklist:
PowerUpPayloadgives the player some health,
callingplayerBrain.SetHealthAdjustment. The parent classPowerUphas already taken care of getting the link toplayerBrain. The fact that we have a parent class means that we have to callbase.PowerUpPayloadto ensure that all the underlying logic is executed before our code.- We do not need to implement
PowerUpHasExpired, because the addition of health is not canceled. - This bonus expires immediately, so we don’t need to write anything again; it is enough to put the ExpiresImmediately flag in the inspector. The time has come to save the method and return to Unity to make changes to the inspector.
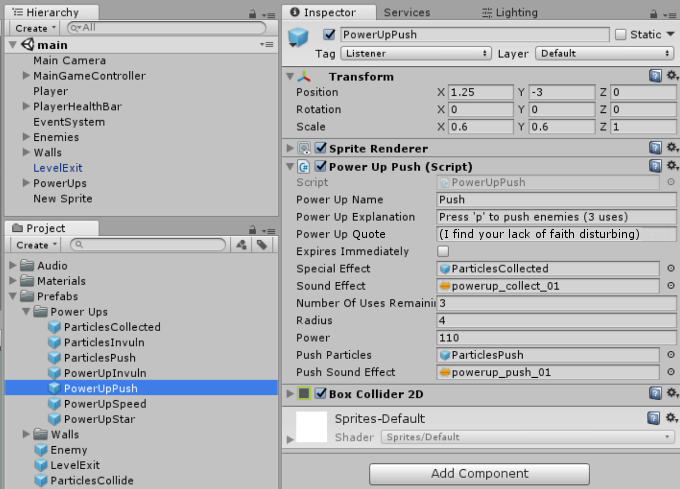
Creating the first bonus in the scene
After saving and returning to Unity GameObject, StarPowerUp will look like this in the inspector:

Enter the inspector values as follows:
- Power Up Name : Star
- Explanation : Recovered some health ...
- Power Up Quote : (I will probably not imagine)
- Expires Immediately : Checked
- Special Effect : drag the prefab from the Prefabs / Power Ups / ParticlesCollected project folder
- Sound Effect : drag a sound clip from the Audio / power_up_collect_01 project folder
- Health Bonus : 40
After you do this, the bonus will look like this:

After completing the PowerUpStar options, drag it to the Prefabs / Power Ups project tree folder to create the prefab.
Gif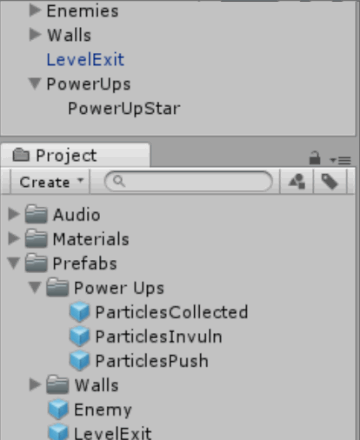
Use the new prefab to add a few stars on the right side of the scene.
Launch the scene and guide the hero to the first bonus. The selection of the bonus will be accompanied by wonderful sound effects and particles. Fine!
Message Based Communication
The next bonus we create requires background information. To get this information, we need GameObjects to learn how to exchange data with each other.
For example, when we select a bonus, the UI needs to know what information to display. When a player’s health changes, the energy bar should know what the updated level of health has become. This can be implemented in a number of ways, but several mechanisms are listed in the Unity manual .
Each method of communication has its pros and cons, and you can not pick one that is suitable for all occasions. In our game, we implement communications based on messages , as described in the Unity manual .
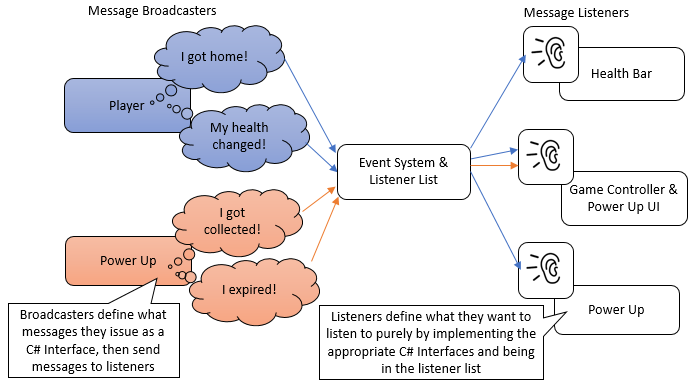
We can do GameObjects by sending messages , receiving messages , or both:

In the left part of the above scheme, the message transmitters are presented. You can consider them objects, “screaming” when something interesting happens. For example, if a player sends the message "I was touched." The right side of the diagram shows the message listeners . As the name implies, they listen to messages. Listeners are not required to listen to all messages; they only listen to messages they want to respond to.
Message transmitters can also be listeners. For example, the bonus sends messages, but also listens to the player's messages. A good example here can be a bonus, which expires when a player is hit by enemies.
It can be understood that in the presence of multiple transmitters and multiple listeners, there must be a plurality of intersecting lines between the left and right sides. To make our lives easier, Unity has an EventSystem component that sits in the middle:
Unity uses the extensible EventSystem component to process input. Also, this component controls most of the send and receive event logic.
Yes, a lot of theory, but to summarize: the message system will allow bonuses to conveniently listen to the gameplay and reduce the number of hard connections between objects. This will simplify the addition of new bonuses, especially in the later stages of development, because most of the messages will already be transmitted.
Stages of creating a communication based on messages
Before we start creating, we need a bit of theory. To broadcast a message, we need to perform the following steps:
- Transmitters define the message they want to transmit as the C # interface.
- The transmitters then transmit messages to listeners stored in the listener list.
See this video about C # interfaces if you need to refresh your knowledge.
In short, the interface defines the method signatures. Any class that implements the interface promises to provide functionality to these methods.
This can be seen more clearly with an example. Look at the code in the IPlayerEvents.cs file:
public interface IPlayerEvents : IEventSystemHandler { void OnPlayerHurt(int newHealth); void OnPlayerReachedExit(GameObject exit); } This C # interface has methods for
OnPlayerHurt and OnPlayerReachedExit . These are messages that a player can send. Now look at the SendPlayerHurtMessages method in the SendPlayerHurtMessages file. The lines labeled with numbers in the following code snippet are described below: private void SendPlayerHurtMessages() { // foreach (GameObject go in EventSystemListeners.main.listeners) // 1 { ExecuteEvents.Execute<IPlayerEvents> // 2 (go, null, // 3 (x, y) => x.OnPlayerHurt(playerHitPoints) // 4 ); } } The above method handles sending an
OnPlayerHurt message. The foreach bypasses all listeners stored in the EventSystemListeners.main.listeners list and calls ExecuteEvents.Execute for each listener that sends messages.Lets go over comments with numbers:
EventSystemListeners.main.listenersis a GameObjects list that is globally visible in theEventSystemListenerssingleton object. Any GameObject that wants to listen to all messages should be on this list. You can add GameObjects to this list by assigning aListenerto a GameObject in the inspector or by callingEventSystemListeners.main.AddListener.ExecuteEvents.Executeis a method provided by Unity that sends a GameObject message. The type in angle brackets is the name of the interface containing the message we want to send.- This defines a GameObject to which to send a message and
nullfor additional event information in accordance with the syntax example from the Unity manual . - Lambda expression This is a complex C # concept that we will not cover in this tutorial. In short, a lambda expression allows you to pass code to a method as a parameter. In our case, the code contains the message we want to send (
OnPlayerHurt) along with the parameters (playerHitPoints) itplayerHitPoints.
The project is already configured to send all the necessary messages. Some of them may be useful if you want to expand the project and add your own bonuses. By default, all interface names begin with the letter I:
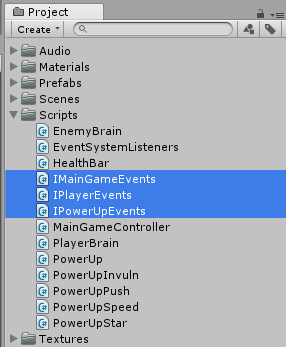
IPlayerEvents: used for messages when a player is touched or he gets to the exit.IPowerUpEvents: used for messages when a bonus is selected or its action ends.IMainGameEvents: used for messages when the player wins or loses.
All these interfaces are commented out in detail, so you can study them. It is not necessary to deal with them in this tutorial, if you want, you can move on.
Speed Bonus
Now that we know about communication based on messages, we will use it and listen to the message!
We will create a bonus, which gives the player extra speed until the moment he collides with something. The bonus will recognize the player’s collision by “listening” to the gameplay. More specifically, the bonus will be listened to by the player sending the message “I am hurt”
To listen to the message, we need to perform the following steps:
- Implement the appropriate C # interface to specify what the listener of the GameObject should listen to.
- Make it so that the listener for GameObjects is in the
EventSystemListeners.main.listenerslist.
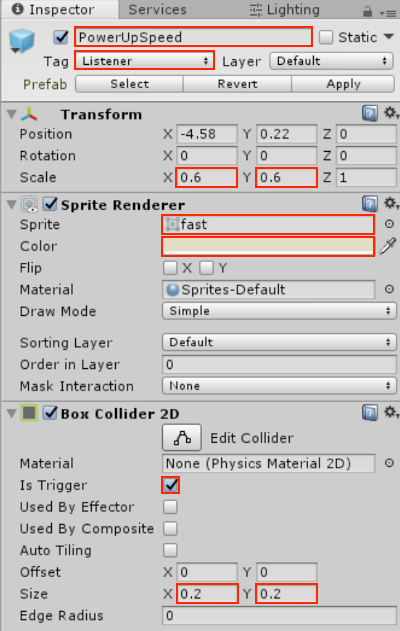
Create a new Sprite, name it
PowerUpSpeed and place it somewhere in the upper left corner of the arena above the player. Set its Scale values (X: 0.6, Y: 0.6) . This GameObject will be a listener, so select the Listener label in the inspector.Add a Box Collider 2D and change its Size to (X: 0.2, Y: 0.2) . In the Sprite Renderer component, assign the value fast to the Sprite and change its color as we did with the star. Do not forget to check the Is Trigger box. After this, the GameObject should look something like this:
Add this PowerObject a new PowerUpSpeed script and paste the following code into the script:
class PowerUpSpeed : PowerUp { [Range(1.0f, 4.0f)] public float speedMultiplier = 2.0f; protected override void PowerUpPayload() // 1 { base.PowerUpPayload(); playerBrain.SetSpeedBoostOn(speedMultiplier); } protected override void PowerUpHasExpired() // 2 { playerBrain.SetSpeedBoostOff(); base.PowerUpHasExpired(); } } Check the checklist items. The script performs each of the points as follows:
PowerUpPayload. Calls thebasemethod to provide a call to the parent class, then gives the player an acceleration. Note that the parent class definesplayerBrain, which contains a link to the player who collected the bonus.PowerUpHasExpired.We need to remove the acceleration given to the player, and then call thebasemethod.- The last item on the checklist is to call
PowerUpHasExpiredafter the expiration of the bonus. Later we will implement this by listening to the player's messages.
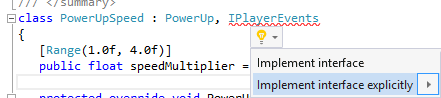
Modify the class declaration to implement an interface for player posts:
class PowerUpSpeed : PowerUp, IPlayerEvents Note: If you are working in Visual Studio, you canIPlayerEventsmouse over theIPlayerEventselement after entering it and select the Implement interface explicitly menu option. This will create a blank method.
Add or modify methods until they look like this, and make sure they are still part of the PowerUpSpeed class:
void IPlayerEvents.OnPlayerHurt(int newHealth) { // if (powerUpState != PowerUpState.IsCollected) { return; } // , PowerUpHasExpired(); // 3 } /// <summary> /// IPlayerEvents, /// </summary> void IPlayerEvents.OnPlayerReachedExit(GameObject exit) { } The
IPlayerEvents.OnPlayerHurt method IPlayerEvents.OnPlayerHurt called each time a player takes damage. This is part of “listening to broadcast messages.” In this method, we first make sure that the bonus responds only after selection. The code then calls PowerUpHasExpired in the parent class, which will handle the expiration logic.Save this method and return to Unity to make the necessary changes to the inspector.
Creating a speed increase bonus in a scene
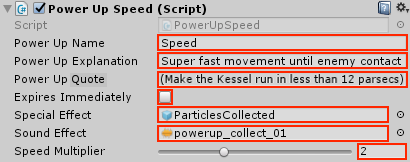
GameObject SpeedPowerUp will now look like this in the inspector:

Enter the following values in the inspector:
- Power Up Name : Speed
- Explanation : Super fast movement until enemy contact
- Power Up Quote : (Make the Kessel run in less than 12 parsecs)
- Expires Immediately : uncheck
- Special Effect : ParticlesCollected (same as star)
- Sound Effect power_up_collect_01 (same as star)
- Speed Multiplier : 2
After this bonus will look like this:
After adjusting the parameters of the Speed bonus in the way you want, drag it to the Prefabs / Power Ups project tree folder to create a prefab. We will not use it in the demo project, but for completeness it is worth doing it.
Launch the scene and move the hero to collect the speed bonus, after which he will receive additional speed, which will be maintained until contact with the enemy.
Repulsive bonus

The next bonus allows the player to push objects away from his path by pressing the P key; the number of its applications is limited. You are already familiar with the stages of creating a bonus, so in order not to clutter the text, I will consider only the most interesting parts of the code, and then create a prefab. This bonus does not need to listen to any messages.
Find and study the prefab of PowerUpPush in the project hierarchy. Open its script called PowerUpPush and examine the code.
You will see familiar methods that we have already considered. All interesting actions of the repulsive bonus occur in the Update method:
private void Update () { if (powerUpState == PowerUpState.IsCollected && //1 numberOfUsesRemaining > 0) //2 { if (Input.GetKeyDown ("p")) //3 { PushSpecialEffects (); //4 PushPhysics (); //5 numberOfUsesRemaining--; if (numberOfUsesRemaining <= 0) { PowerUpHasExpired (); //7 } } } } This is what happens in this code:
- The script should be executed only for collected bonuses.
- The script should be executed only if the number of uses is left.
- The script should be executed only when the player clicks P.
- The script starts the execution of a beautiful particle effect around the player.
- The script repels enemies from the player.
- The bonus is used again.
- If the number of uses has expired, then the bonus expires.
The repulsive bonus is very interesting to use, so it is worthwhile to place a couple in suitable places of the scene. Run the scene again and play with the new bonus.
Additional quest: Invulnerability Bonus
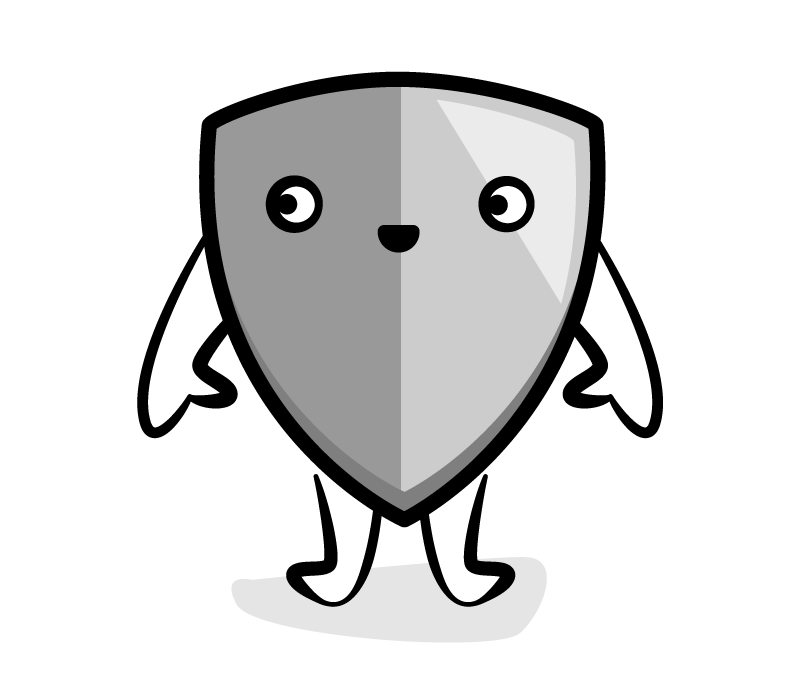
This section is optional, but quite interesting. Armed with the knowledge gained, create a bonus that makes the player invulnerable for a while.
Tips and tricks for this assignment:
- Sprite : locate the sprite in the Textures / shield project folder
- Power Up Name : Invulnerable
- Power Up Explanation : You are Invulnerable for a time
- Power Up Quote : (Great kid, don't get cocky)
- Coding : Go through the same checklist that we used for the star bonus and speed increase. You will need a timer controlling the expiration date of the bonus. The SetInvulnerability method in PlayerBrain will enable and disable invulnerability.
- Effects : the project contains a particle effect for a beautiful ripple effect around the player, while he remains invulnerable. The prefab is in Prefabs / Power Ups / Particles Invuln . You can make it a child instance of the player, while it is invulnerable.
Do you need a complete solution or do you want to compare your solution with ours? Then here it is:
Solution inside
Create a new Sprite, name it PowerUpInvuln and place it in (X: -0.76, Y: 1.29) . For Scale, set the values X: 0.7, Y: 0.7 . This GameObject will not listen to anyone, its validity will simply expire after a specified time, so there is no need to give it a tag in the inspector.
Add a Box Collider 2D and change the Size to X = 0.2, Y = 0.2. In the Sprite Renderer component, set the Sprite value to shield and select a color, as we used to do with other bonuses. Make sure the Is Trigger checkbox is checked. After this, the GameObject should look something like this:

Add to this GameObject a new PowerUpInvuln script and paste the following code into it:
Check the checklist items again. The script performs these clauses as follows:
Save the script, return to Unity and start the game. Now you can make your way through attacking enemies, not paying attention to health and safety, until the bonus expires!

Add a Box Collider 2D and change the Size to X = 0.2, Y = 0.2. In the Sprite Renderer component, set the Sprite value to shield and select a color, as we used to do with other bonuses. Make sure the Is Trigger checkbox is checked. After this, the GameObject should look something like this:
Add to this GameObject a new PowerUpInvuln script and paste the following code into it:
class PowerUpInvuln : PowerUp { public float invulnDurationSeconds = 5f; public GameObject invulnParticles; private GameObject invulnParticlesInstance; protected override void PowerUpPayload () // 1 { base.PowerUpPayload (); playerBrain.SetInvulnerability (true); if (invulnParticles != null) { invulnParticlesInstance = Instantiate (invulnParticles, playerBrain.gameObject.transform.position, playerBrain.gameObject.transform.rotation, transform); } } protected override void PowerUpHasExpired () // 2 { if (powerUpState == PowerUpState.IsExpiring) { return; } playerBrain.SetInvulnerability (false); if (invulnParticlesInstance != null) { Destroy (invulnParticlesInstance); } base.PowerUpHasExpired (); } private void Update () // 3 { if (powerUpState == PowerUpState.IsCollected) { invulnDurationSeconds -= Time.deltaTime; if (invulnDurationSeconds < 0) { PowerUpHasExpired (); } } } } Check the checklist items again. The script performs these clauses as follows:
PowerUpPayload: calls thebasemethod to call the parent class, then gives the player an invulnerability bonus. Also adds the pulsating effect of particles.PowerUpHasExpired: you must remove the received invulnerability bonus and then call thebasemethod.- The last item on the checklist is to call
PowerUpHasExpiredwhen the bonus expires. In our case, we useUpdate()to count down the past tense.
Save the script, return to Unity and start the game. Now you can make your way through attacking enemies, not paying attention to health and safety, until the bonus expires!
I hope you tried to solve the task before you looked at the solution!
Where to go next?
The finished project for this tutorial can be downloaded here .
If you want to further develop the project, you can do the following:
- Add more bonuses. How about a bonus shooting rays killing enemies?
- Create a factory class for randomly creating bonuses in the arena during the game.
- If you want to further explore Unity, then check out the Unity Games by Tutorials book from our store.
You still do not understand from which series of films these phrases? The answer is under the spoiler:
Answer
Hooray! You are probably the only person on the Internet who has clicked here! Answer: these are quotes from the Star Wars series.
Source: https://habr.com/ru/post/348328/
All Articles