Mobile devices from the inside. Study of tablet loading modes YB1-X90L
All publications from the series Mobile devices from the inside
1. The structure of images of partitions containing the file system. Part 1.
2. Memory layout, the structure of the description files and memory markup.
3. The structure of images of partitions containing the file system. Part 2.
4.What is GPT?
5. Change the memory layout of the tablet YB1.
6. Research of tablet loading modes YB1-X90L.
2. Memory layout, the structure of the description files and memory markup.
3. The structure of images of partitions containing the file system. Part 2.
4.What is GPT?
5. Change the memory layout of the tablet YB1.
6. Research of tablet loading modes YB1-X90L.
TABLE OF CONTENTS
1. Introduction
Let's continue to look at the YB1-X90L tablet, which I began to explore in a previous publication:

Fig.1 . General view of the tablet
Google search revealed that the tablet was created on the Intel Atom x5-Z8550 processor , which has 4 cores [1,2]. For the user, as always, there are 2 external controls of the standard purpose:
')
- Power button - turn on / off the tablet;
- Rocker Vol + / Vol- - volume control of the built-in speakers, which, by the way, are two.
Well, well, experimenting with them, I discovered that there are 4 boot options. So this article appeared ...
2. Modes of loading the tablet
A completely disabled tablet YB1-X90L can be turned on in four ways, i.e. run it in one of four modes of operation:
- BOOT - OS boot;
- FASTBOOT - FASTBOOT mode;
- TEST - test mode;
- DNX FASTBOOT - FASTBOOT for DNX.
Let's look at them in turn.
2.1. BOOT mode (OS boot)
This mode is used most often, because allows you to download the tablet for the work of an ordinary user. In this case, the standard firmware download MU: BOOTLOADER-> BOOT-> SYSTEM .
To load into this mode, you need to press the Power button on the power off tablet and hold it until a sound signal appears (approximately 1 second). After 3-5 seconds, the manufacturer’s company logo will appear on the screen:

Fig.2. Lenovo logo
Your further actions are due only to the desires and fantasy as a user.
Go to the next mode.
2.2. FASTBOOT mode
This mode is used to perform special actions to restore tablet operation. This loads FASTBOOT and waits for further instructions from the user.
To enter it on the off tablet, hold down the Vol + volume up button and then press the Power button. Hold them together until you hear a beep. Then the power button can be released (this is approximately 1 second after the start of the download), but continue to hold down the Vol + button until the manufacturer’s logo appears on the screen (approximately another 3-5 seconds). A few seconds after the appearance of the manufacturer's logo, a window appears with the inscription FASTBOOT MODE , in which you can select one of the modes of operation indicated by the yellow line in the selection window highlighted in Figure 3:

Fig.3. Modes of operation from FASTBOOT
In addition, this window also displays some service information: the serial number, loader lock status, protection mode status, etc. From this mode, you can execute any fastboot command yourself. If a tablet in this mode is connected to a PC, then using any terminal you can, for example, make a firmware of a tablet or any one partition, remove or set a bootloader lock, etc.
If you change the state of the selection window, you can run the following commands:
- boot to recovery mode ( RECOVERY MODE );
- reboot into OS ( REBOOT );
- restart bootloader ( RESTART BOOTLOADER );
- power off the tablet ( POWER OFF );
- OS Boot ( NORMAL BOOT ).
The command is selected with the Vol + and Vol- volume control buttons , and the selected command is launched using the Power button. Exiting this mode is possible either with the help of the FASTBOOT commands described above, or by turning off the tablet, i.e. holding the POWER button for 5-10 seconds.
Let's look at each of the modes separately.
2.2.1. RECOVERY MODE
When you select this command, the tablet will boot into recovery mode, i.e. RECOVERY . Accessibility by ADB and availability of ROOT access in this mode is determined only by the settings of the recovery mode itself. The stock version is not rich in features, so many users install custom-recovery as recovery , for example TWRP.
2.2.2. REBOOT mode
If you select this command, the tablet will be fully rebooted into the OS boot mode, similar to the BOOT mode ( see Section 2.1 ).
2.2.3. RESTART BOOTLOADER mode
Selecting this command will reboot into BOOTLOADER mode again .
2.2.4. POWER OFF mode
Selecting this command will completely power off the tablet.
2.2.5. NORMAL BOOT mode
Selecting this command will continue to boot the OS without rebooting.
2.3. Download to TEST mode
To enter the test mode with the tablet turned off, hold down the Vol- Volume down button and press the Power button. Hold them until you hear a beep. Then you can release the power button (this is approximately 1 second from the start of the download), but continue to hold down the Vol- button until the manufacturer’s logo appears on the screen (approximately another 3-5 seconds). Until full load in the TEST mode, it will take approximately 5 more seconds:
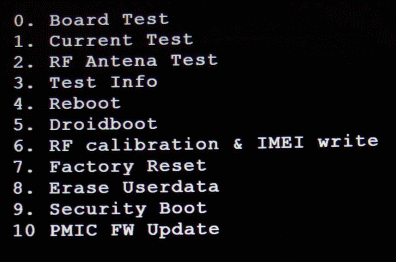
Fig.4. TEST command menu
In this mode, the following test commands can be executed:
- Board Test - selection of tablet tests.
- Current Test - the execution of previously selected (current) tests.
- RF Antena Test - RF antenna test.
- Test Info - test data.
- Reboot - reboot the tablet (exit from test mode).
- Droidboot
- RF calibration & IMEI write — calibrates RF and writes IMEI values.
- Factory Reset - reset to factory settings.
- Erase Userdata - clear (delete) the contents of the Userdata .
- Security Boot - boot in Security Boot mode.
- PMIC FW Update - Installing PMIC Updates .
Commands are navigated using the Vol + and Vol- volume buttons , and the selected command is launched using the Power button.
To exit this mode, execute the Reboot command — the OS will boot, or hold down the Power button for about 10 seconds. until shutdown.
2.4. Download to DNX FASTBOOT mode
This mode is designed to restore tablet loaders.
To enter this mode with the tablet turned off, hold down both the Vol + and Vol- volume control buttons at the same time and press the Power button. Hold them until you hear a beep. Then you can release the power button (this is about 1 second from the start of the download), but continue to hold down the Vol + and Vol- buttons until the manufacturer's logo appears on the screen (about another 3-5 seconds). DNX FASTBOOT MODE appears on the screen below the logo:

Fig.5 DNX mode
and the tablet will freeze, waiting for commands to work with DNX .
You can exit this mode only by turning off the tablet, i.e. holding the POWER button for 5-10 seconds.
3. Conclusion
We studied the boot modes and layout of the tablet's memory, in the next publication we will continue to perform practical actions and try, for example, to unlock the bootloader in order to install custom-recovery and get ROOT access.
4. Sources of information
1. Review of Lenovo Yoga Book: a guest from the future .
2. Review of the tablet-notebook Lenovo Yoga Book Android .
Source: https://habr.com/ru/post/348294/
All Articles