Isometric depth sorting for moving platforms
What we will create
In simple terms, sorting by depth can be explained as a way to identify elements that are near and far from the camera. Thus, we determine the order in which they must be aligned to match the correct depth in the scene.
In this tutorial, we will take a closer look at depth sorting for isometric levels, because we’ll also add moving platforms. This tutorial is not an introduction to the theory of isometry and is not dedicated to code. In it we will understand the logic and theory, and not to analyze the code. Unity is used as a tool, so sorting by depth is reduced to changing the
sortingOrder sprites. In other frameworks, it may be a change in the order along the Z axis or the drawing sequence.')
To learn the basics of the theory of isometry, read this tutorial . The code and the structure of the code correspond to my previous isometric tutorial . Study it if this tutorial seems complicated to you, because in it I will focus only on logic.
1. Levels without movement
If there are no moving elements on the isometric levels of your game or there are only a few characters running around the level, then the sorting by depth is quite simple. In such cases, the characters occupying the isometric tiles will be smaller than the tiles themselves, so they can simply use the same order of rendering / depth as the tile they occupy.
Let's call these fixed levels static. You can draw them in different ways to maintain the correct depth. Typically, level data is a two-dimensional array in which the rows and columns correspond to the rows and columns of the level.
Consider the next isometric level with just two lines and seven columns.
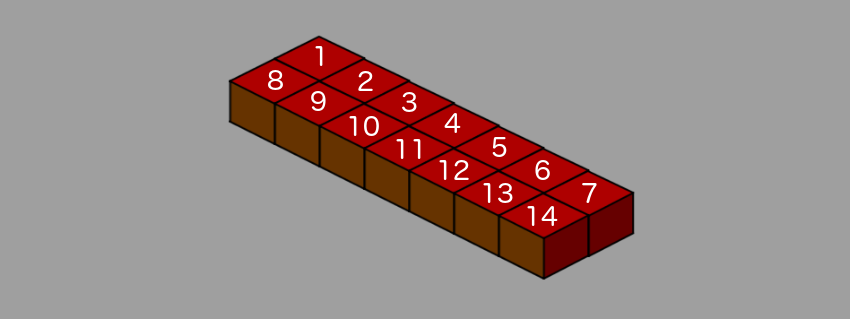
The numbers on the tiles correspond to their sorting order (
sortingOrder ), or depth, or order in Z, i.e. the order in which they need to be drawn. In this case, we first draw all the columns of the first row, starting with the first column with sortingOrder = 1.After drawing all the columns of the first row, the column closest to the camera has
sortingOrder = 7, and we move on to the next row. That is, each element in the second line will have a higher sortingOrder value than any element in the first line.It is in this order that tiles should line up to maintain the correct depth, because a sprite with a
sortingOrder value will overlap all other sprites with smaller sortingOrder values.As for the code, it simply performs a cyclic round of the rows and columns of the level array and the sequential assignment of
sortingOrder in increasing order. The result will not spoil even if we change the rows and columns in places, as seen in the figure below.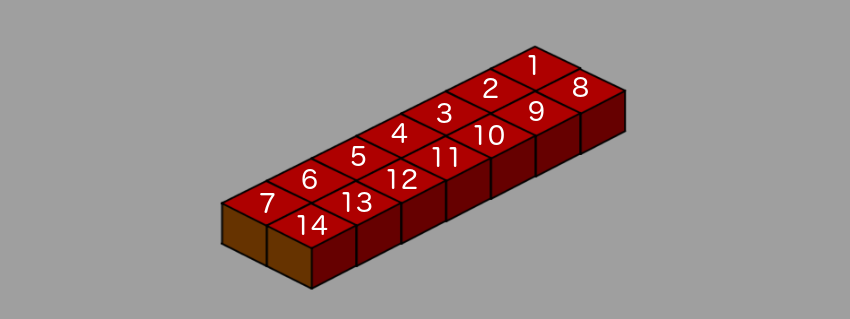
Here, before moving to the next line, we first completely draw the column. The perception of depth remains the same. That is, the logic of a static level consists in drawing either a full row or a full column, moving to the next and sequential assignment of
sortingOrder in increasing order.Adding height
If we consider the level as a building, so far we are drawing only the first floor. If we need to add a new floor to the building, then we just need to wait for the entire first floor to be drawn, and then repeat the same algorithm for the second one.
For the proper depth order, we waited for the line to complete, and then moved on to the next line. Similarly, we wait for the completion of all lines, and then proceed to the next floor. That is, for a level with one line and two floors, this will work as shown in the figure below.

Naturally, any tile on a higher floor will have a greater
sortingOrder than any tile on the bottom. As for the code, to add upper floors, it is enough for us to shift the y value of the screen coordinates for the tile depending on the floor it occupies. float floorHeight=tileSize/2.2f; float currentFloorHeight=floorHeight*floorLevel; // tmpPos=GetScreenPointFromLevelIndices(i,j); tmpPos.y+=currentFloorHeight; tile.transform.position=tmpPos; The
floorHeight value indicates the perceived height of the image of a tile isometric block, and floorLevel determines which floor the tile belongs to.2. Movement of tiles along the X axis
Sorting by depth in static isometric levels is not so difficult, right? Let's move on - we use the “first line” method, that is, we will first assign the
sortingOrder to the first line completely, and then move on to the next one. Let's look at the first moving tile or platform that moves along a single X axis.When I say that the movement occurs along the X axis, I mean the Cartesian, and not the isometric, coordinate system. Let's consider the level only with the lower floor, consisting of three rows and seven columns. We assume that in the second line there is only one tile that is moving. The level will look like the image below.
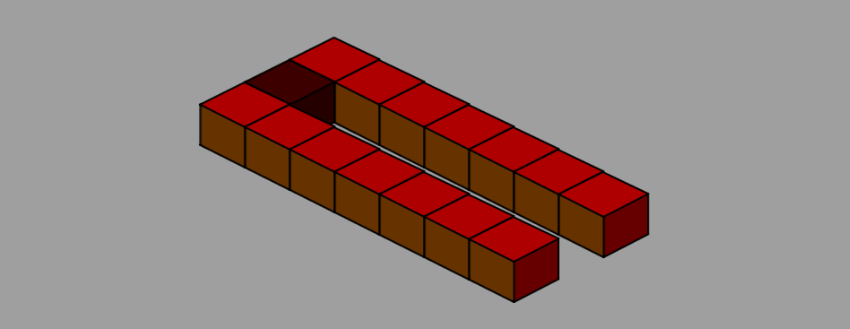
The dark tile is our mobile tile, and its
sortingOrder will be equal to 8, because there are 7 tiles in the first line. If the tile moves along the Cartesian X-axis, it will move along the “track” between the two lines. For all positions that he can occupy on his way, the tiles in line 1 will have a smaller sortingOrder .Similarly, all the tiles in line 2 will have a greater
sortingOrder value, regardless of the position of the dark tile in its path. Since we chose the “first line” method for assigning sortingOrder we do not need to do anything extra for moving along the X axis. This case is pretty simple.3. Movement of tiles along the Y axis
Problems begin to arise when we take on the Y axis. Let's imagine the level at which our dark tile moves along a rectangular track, as shown in the figure below. You can see the same situation in the Unity
MovingSortingProblem in the sources .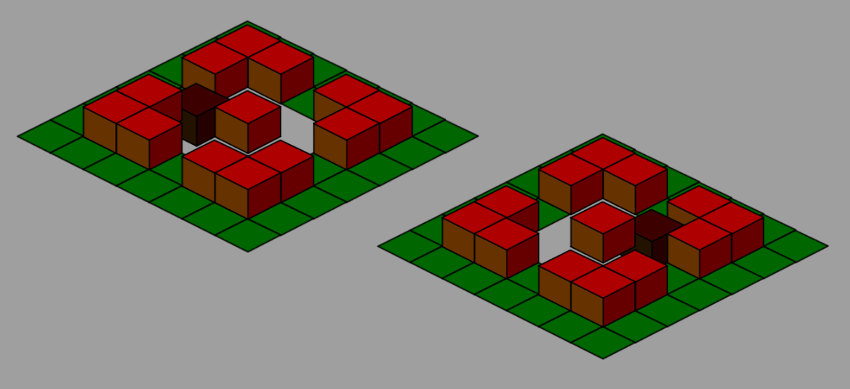
Using our “first line” approach, we can assign
sortingOrder rolling tile based on the line it currently occupies. When a tile is located between two lines, it is assigned a sortingOrder based on the line from which it moves. In this case, we cannot follow the ordinal sortingOrder in the string in which it moves. This destroys our depth sorting algorithm.Sort by block
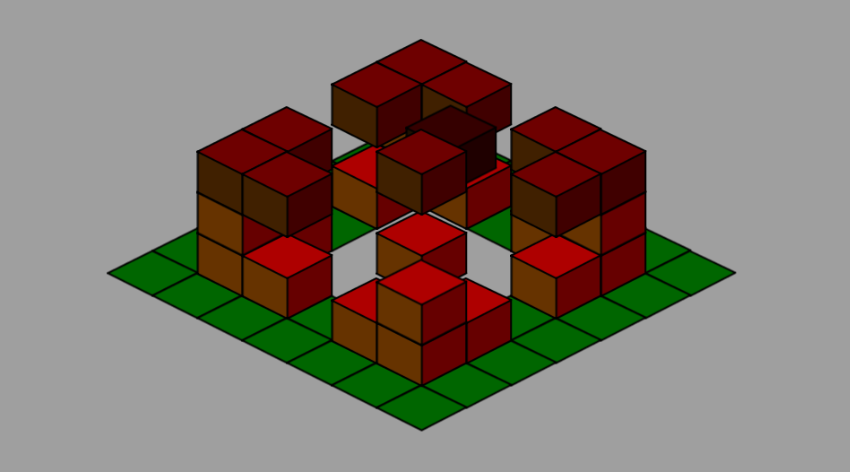
To solve this problem, we need to divide the level into different blocks, one of which is the problem block, which destroys our “first line” approach, and the rest blocks, which can use the “first line” approach without violations. To better understand this, look at the picture below.
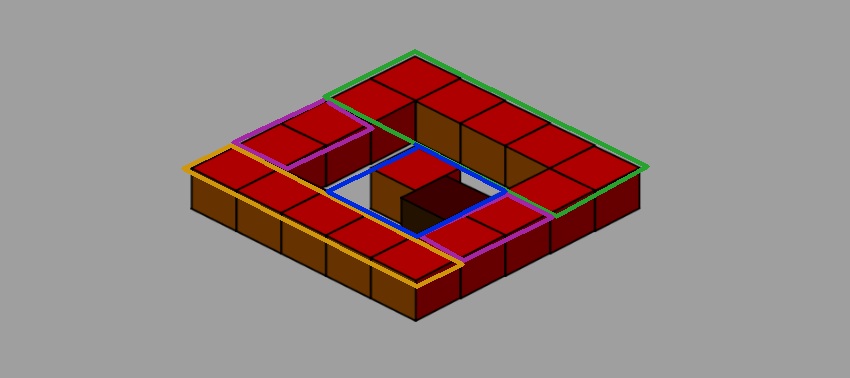
The 2x2 tile block indicated by the blue area is our problem block. All other blocks can use the “first line” approach. Let the drawing not confuse you - it shows the level that is already correctly sorted using our block algorithm. The blue block consists of two column tiles in rows, between which our dark tile is currently moving, and from the tiles directly to the left of them.
To solve the problem of the depth of the problem block, we can use the “first columns” approach only for this block. That is, for the green, pink and yellow blocks, we use “first the lines”, and for the blue ones - “first the columns”.
Note that we still need to assign
sortingOrder . First a green block, then a pink block on the left, then a blue block, then a pink block on the right, and finally a yellow block. When moving to the blue block, we break the order only in order to switch to the "first columns" method.As an alternative solution, we can also consider a 2x2 block to the right of the rolling tile column. (The interesting thing is that we don’t even need to change approaches, because
BlockSort in this case solves our problem itself.) The solution in action is shown in the BlockSort scene.
This algorithm is implemented in the following code.
private void DepthSort(){ Vector2 movingTilePos=GetLevelIndicesFromScreenPoint(movingGO.transform.position); int blockColStart=(int)movingTilePos.y; int blockRowStart=(int)movingTilePos.x; int depth=1; // for (int i = 0; i < blockRowStart; i++) { for (int j = 0; j < cols; j++) { depth=AssignDepth(i,j,depth); } } // for (int i = blockRowStart; i < blockRowStart+2; i++) { for (int j = 0; j < blockColStart; j++) { depth=AssignDepth(i,j,depth); } } // for (int i = blockRowStart; i < blockRowStart+2; i++) { for (int j = blockColStart; j < blockColStart+2; j++) { if(movingTilePos.x==i&&movingTilePos.y==j){ SpriteRenderer sr=movingGO.GetComponent<SpriteRenderer>(); sr.sortingOrder=depth;//assign new depth depth++;//increment depth }else{ depth=AssignDepth(i,j,depth); } } } // for (int i = blockRowStart; i < blockRowStart+2; i++) { for (int j = blockColStart+2; j < cols; j++) { depth=AssignDepth(i,j,depth); } } // for (int i = blockRowStart+2; i < rows; i++) { for (int j = 0; j < cols; j++) { depth=AssignDepth(i,j,depth); } } } 4. The movement of tiles along the Z axis
Z-axis motion is simulated movement on an isometric level. In essence, this is just a movement along the screen axis Y. On an isometric level with one floor, to add movement along the Z axis, you no longer need to do anything with the order if you have already implemented the block sorting method described above. This situation in action can be seen in the Unity
SingleLayerWave , where I added an additional wave motion along the Z axis to the lateral motion along the “track”.Z movement on multi-floor levels
Adding new floors to the level is, as mentioned above, just a matter of shifting the screen Y coordinate. If the tile does not move along the Z axis, then there is no need to do anything extra with sorting by depth. We can sort the first floor with movement by blocks, and then apply a “first row” sort to all subsequent floors. In action, this situation can be viewed in the Unity
BlockSortWithHeight .
A very similar depth problem occurs when the tile starts moving between floors. When using our approach, it can satisfy the sequential order of only one floor and destroys the sorting by the depth of the other floor. To cope with this problem of depth on the floors, we need to expand or change the sorting by blocks into three dimensions.
In essence, the problem lies in only two floors, between which the tile is currently moving. For all other floors, we can continue to use the existing sorting algorithm. Special requirements arise only in relation to these two floors, among which we can set the lower floor as follows, where
tileZOffset is the amount of movement along the Z axis of our moving tile. float whichFloor=(tileZOffset/floorHeight); float lower=Mathf.Floor(whichFloor); This means that
lower and lower+1 are floors requiring a special approach. The trick is to assign sortingOrder both these floors together, as shown in the code below. This corrects the order and solves the problem of sorting by depth. if(floor==lower){ // , depth=(floor*(rows*cols))+1; int nextFloor=floor+1; if(nextFloor>=totalFloors)nextFloor=floor; // for (int i = 0; i < blockRowStart; i++) { for (int j = 0; j < cols; j++) { depth=AssignDepth(i,j,depth,floor); depth=AssignDepth(i,j,depth,nextFloor); } } // for (int i = blockRowStart; i < blockRowStart+2; i++) { for (int j = 0; j < blockColStart; j++) { depth=AssignDepth(i,j,depth,floor); depth=AssignDepth(i,j,depth,nextFloor); } } // for (int i = blockRowStart; i < blockRowStart+2; i++) { for (int j = blockColStart; j < blockColStart+2; j++) { if(movingTilePos.x==i&&movingTilePos.y==j){ SpriteRenderer sr=movingGO.GetComponent<SpriteRenderer>(); sr.sortingOrder=depth;//assign new depth depth++;//increment depth }else{ depth=AssignDepth(i,j,depth,floor); depth=AssignDepth(i,j,depth,nextFloor); } } } // for (int i = blockRowStart; i < blockRowStart+2; i++) { for (int j = blockColStart+2; j < cols; j++) { depth=AssignDepth(i,j,depth,floor); depth=AssignDepth(i,j,depth,nextFloor); } } // for (int i = blockRowStart+2; i < rows; i++) { for (int j = 0; j < cols; j++) { depth=AssignDepth(i,j,depth,floor); depth=AssignDepth(i,j,depth,nextFloor); } } } In essence, we view the two floors as one and perform the block sorting for this single floor. Watch the code in action in the
BlockSortWithHeightMovement scene. Thanks to this approach, our tile can now move freely along either of two axes, without destroying the depth in the scene, as shown below.Conclusion
This tutorial was meant to explain the logic of the sorting algorithms by depth, and I hope you understand them. Obviously, we are considering relatively simple levels with only one moving tile.
It also does not consider inclined surfaces, because otherwise the tutorial would become too long. But when you understand the sorting logic, you can try to adapt the two-dimensional logic of the slopes to an isometric view.
The source code of all the examples in the tutorial is posted on Github .
Source: https://habr.com/ru/post/348138/
All Articles