Developing a static blog on Gatsby and Strapi
Static websites contain pages with unchanged content. Technically, this is a set of HTML files that, for each site visitor, look the same. Unlike dynamic websites, the development of such sites does not require server programming or databases. Publishing a static website is simple: files are uploaded to an ordinary web server or to some kind of storage. The two main benefits of static websites are security and speed. There is no database here, so there’s nothing to steal from here, and there is no need to programmatically generate a page for each request, which speeds up the work.
In order to simplify the creation of static websites, many open source tools have been created. For example, these are Jekyll , Hugo , Hexo , and others. Work on the preparation of site content is carried out by editing something like markup files, or through some kind of content management API. After the data is ready for publication, the generator takes this data, embeds it in the templates and creates a lot of HTML files ready for publication.

Today we will talk about the rapid development of projects using Gatsby - a generator of static progressive web applications, and Strapi - content management system. As a result, after you master this guide, you will have a working static blog and lots of ideas regarding its development.
We believe, before continuing, it is worth saying a few words about progressive web applications (Progressive Web Apps, PWA). These are web applications that use JavaScript heavily, and are distinguished by their reliability, speed and attractive appearance . PWA, thanks to the speed they provide for working with pages, and the fact that it’s convenient for users to interact with them, has become a standard way of building web interfaces. As a result, many front-end frameworks have emerged, such as Angular, Vue, and React.
Knowing the advantages of static websites and PWA, we decided to find a way to use both. The tool that allows this is called Gatsby.
')
Gatsby is an incredibly fast framework for developing websites on React. It allows you to create sites based on React in just minutes. Gatsby is suitable for projects of various sizes - from blogs to corporate websites.

Since projects created with the help of Gatsby are based on React, their pages do not reload when the user interacts with them, which makes such projects very fast. Gatsby supports a large set of plug-ins that allow, in particular, to use data from various sources (for example, markdown files, various content management systems, and so on). The center of the Gatsby data system is the “node” interface , which is used to model the data coming into Gatsby.
This project was created by Kyle Matthews , it was officially released in July 2017 and is already in use by dozens of companies .
As it has already become clear, Gatsby, in order for it to be able to generate HTML files, you need to take data for them from somewhere. In our case, the data source will be Strapi.
Strapi is a Node.js based content management framework. It allows you to quickly develop an API for working with data and occupies an intermediate position between the framework for Node.js and CMS without a user interface. Strapi allows you to develop APIs very quickly, which saves time.

Strapi has an extensible plugin system, it has a large set of built-in features. These include the admin panel, the authentication and permissions management system, the content management tools, the API generator, and so on.
Strapi is an open source project that distinguishes it from other CMS. In particular, this means that, firstly, it is completely free, and secondly - that the company that chooses Strapi, deploys CMS on its own servers, that is, these companies remain under its complete control. In addition, Strapi can be customized and expanded thanks to a plugin system.
Having described our tools, let's start developing a static blog.
We will use the Strapi features for API development and add data to the system, which will later turn into blog pages.
To work, Strapi needs Node 8 (or higher) and MongoDB . If your system has all this, you can install Strapi using npm:
Please note that Strapi v3 is still at the alpha version stage, but it will suit us.
Create a
Create an API framework inside this directory, for which we first go to this directory, and then execute the corresponding Strapi command there:
To start the Strapi server, first go to the appropriate subfolder of the project directory:
Then run the Node.js based server:
Now, if everything is done correctly, you can visit the project administration panel, which is located at http: // localhost: 1337 / admin .
Add the first user from the registration page .

The Strapi API is based on data structures called Content Types. This is the equivalent of framework models and content types in WordPress.
Create a content type named

Add a few articles to the database. To create an article, perform the following sequence of actions:
Create, using the same approach, two more articles.

For security reasons, access to the API is restricted by default. In order to open access, visit the section of authentication and permissions for the
Access to the author's API is also limited. Allow anonymous access by selecting the

Now that the API is ready, you can start developing a static website.
Install the Gatsby CLI with the following command:
In the previously created
Go to the project folder:
Start the server:
After that, you can view the website created by Gatsby by going to http: // localhost: 8000 / .
Data that is the basis of a static site may come from different sources. For example, these are markdown files, CSV files, WordPress materials (which can be handled by the JSON REST API plugin), and so on.
In order for Gatsby to do his job successfully, he needs to be able to communicate with various data sources. Therefore, Gatsby has a special layer - a data layer based on GraphQL .
In order to connect Gatsby to a data source, a plug-in is required to work with this data source. Such a plugin can be developed independently or selected from existing ones. In this example, we will use Strapi as a data source, which means we need a data source plugin for APIs built using Strapi. We have already developed such a plugin .
Install it:
This plugin needs some tweaking. Replace the contents of the
Now restart the server in order to allow Gatsby to accept the changes.
For a start, we want to display a list of articles. To do this, add the following content to the existing
At the end of the file we export
Then we pass the destructured object

In order to simplify the development of GraphQL queries, you can use the corresponding Gatsby interface. Take a look at it and try creating several queries.
Now what we are doing is like a blog, and that’s good. However, one important thing is still missing: the article view page.
Create a template containing a GraphQL query and set the displayed content. We will do this in the
It looks good, but at the moment Gatsby does not know when to display this template. Each article needs its own URL. We'll let Gatsby know about new URLs using the createPage function .
To do this, create a new function called
Restart the Gatsby server. Now links to articles should be working, clicking on them will open the pages of articles.

Articles are written by the authors. They deserve a separate page. The process of creating an author page is very similar to the process of creating an article page. First, create a template in the
Now update the
And finally, we will reboot the server and visit the author’s page by clicking on it from the page of viewing the article on the corresponding link.
Congratulations! You have just successfully created an incredibly fast and easy to manage blog! Since Strapi deals with content management, authors can write articles using a nice interface, and the developer only needs to periodically rebuild the blog to update its content.
What to do next?
You can easily continue working on this project in order to explore the useful features of Gatsby and Strapi. Here you can add a list of authors, article categories, commenting system based on the Strapi API or Disqus. In addition, you can, using the method proposed here, to create other web sites (online stores, corporate sites, and so on).
When your project is ready to work, you may want to post it on the Internet. Web projects generated by Gatsby can be published using the services of the services for hosting static sites such as Netlify, S3 / Cloudfront, GitHub pages, GitLab pages, Heroku pages, and so on. The Strapi API is a Node.js based system, so it can be deployed on the basis of Heroku or from any Linux virtual machine with Node.js installed on it.
The full version of the code that we have been looking at here can be found on GitHub . In order to see what is created there, in action, clone the repository, execute the
Dear readers! How do you create static websites? Do you plan to use the Gatsby-Strapi bundle in your projects?

In order to simplify the creation of static websites, many open source tools have been created. For example, these are Jekyll , Hugo , Hexo , and others. Work on the preparation of site content is carried out by editing something like markup files, or through some kind of content management API. After the data is ready for publication, the generator takes this data, embeds it in the templates and creates a lot of HTML files ready for publication.
Today we will talk about the rapid development of projects using Gatsby - a generator of static progressive web applications, and Strapi - content management system. As a result, after you master this guide, you will have a working static blog and lots of ideas regarding its development.
Static websites and progressive web applications
We believe, before continuing, it is worth saying a few words about progressive web applications (Progressive Web Apps, PWA). These are web applications that use JavaScript heavily, and are distinguished by their reliability, speed and attractive appearance . PWA, thanks to the speed they provide for working with pages, and the fact that it’s convenient for users to interact with them, has become a standard way of building web interfaces. As a result, many front-end frameworks have emerged, such as Angular, Vue, and React.
Knowing the advantages of static websites and PWA, we decided to find a way to use both. The tool that allows this is called Gatsby.
')
What is Gatsby?
Gatsby is an incredibly fast framework for developing websites on React. It allows you to create sites based on React in just minutes. Gatsby is suitable for projects of various sizes - from blogs to corporate websites.
Since projects created with the help of Gatsby are based on React, their pages do not reload when the user interacts with them, which makes such projects very fast. Gatsby supports a large set of plug-ins that allow, in particular, to use data from various sources (for example, markdown files, various content management systems, and so on). The center of the Gatsby data system is the “node” interface , which is used to model the data coming into Gatsby.
This project was created by Kyle Matthews , it was officially released in July 2017 and is already in use by dozens of companies .
As it has already become clear, Gatsby, in order for it to be able to generate HTML files, you need to take data for them from somewhere. In our case, the data source will be Strapi.
What is a Strapi?
Strapi is a Node.js based content management framework. It allows you to quickly develop an API for working with data and occupies an intermediate position between the framework for Node.js and CMS without a user interface. Strapi allows you to develop APIs very quickly, which saves time.
Strapi has an extensible plugin system, it has a large set of built-in features. These include the admin panel, the authentication and permissions management system, the content management tools, the API generator, and so on.
Strapi is an open source project that distinguishes it from other CMS. In particular, this means that, firstly, it is completely free, and secondly - that the company that chooses Strapi, deploys CMS on its own servers, that is, these companies remain under its complete control. In addition, Strapi can be customized and expanded thanks to a plugin system.
Having described our tools, let's start developing a static blog.
API setup with Strapi
We will use the Strapi features for API development and add data to the system, which will later turn into blog pages.
▍Installation Strapi
To work, Strapi needs Node 8 (or higher) and MongoDB . If your system has all this, you can install Strapi using npm:
$ npm i strapi@alpha -g Please note that Strapi v3 is still at the alpha version stage, but it will suit us.
▍ Creating a project Strapi
Create a
gatsby-strapi-tutorial directory: $ mkdir gatsby-strapi-tutorial Create an API framework inside this directory, for which we first go to this directory, and then execute the corresponding Strapi command there:
$ cd gatsby-strapi-tutorial $ strapi new api ▍Start server
To start the Strapi server, first go to the appropriate subfolder of the project directory:
$ cd api Then run the Node.js based server:
$ strapi start Now, if everything is done correctly, you can visit the project administration panel, which is located at http: // localhost: 1337 / admin .
▍Create first user
Add the first user from the registration page .
▍Creating Content Type
The Strapi API is based on data structures called Content Types. This is the equivalent of framework models and content types in WordPress.
Create a content type named
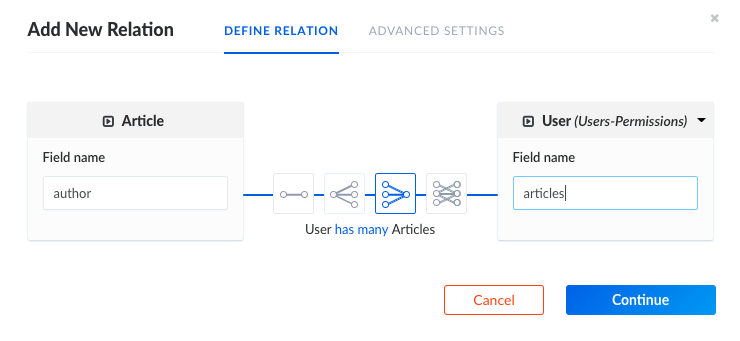
article with three fields: title (type string ), content (type text ), and author (type of relation , one author can have several articles).▍Add materials articles
Add a few articles to the database. To create an article, perform the following sequence of actions:
- Visit the article list page .
- Click
Add New Article. - Enter the data, link to the author, and submit the form.
Create, using the same approach, two more articles.
Access Settings
For security reasons, access to the API is restricted by default. In order to open access, visit the section of authentication and permissions for the
Guest role, select the action Article - find and save the changes. From now on, you should be able to request a list of articles .Access to the author's API is also limited. Allow anonymous access by selecting the
find action (in the Users & Permissions section) and saving the changes.Static website development
Now that the API is ready, you can start developing a static website.
▍Gatsby installation and project creation
Install the Gatsby CLI with the following command:
$ npm install --global gatsby-cli In the previously created
gatsby-strapi-tutorial folder, create a new blog: $ gatsby new blog ▍ Starting the Gatsby server in development mode
Go to the project folder:
$ cd blog Start the server:
$ gatsby develop After that, you can view the website created by Gatsby by going to http: // localhost: 8000 / .
▍Installing a plugin to work with a Strapi data source
Data that is the basis of a static site may come from different sources. For example, these are markdown files, CSV files, WordPress materials (which can be handled by the JSON REST API plugin), and so on.
In order for Gatsby to do his job successfully, he needs to be able to communicate with various data sources. Therefore, Gatsby has a special layer - a data layer based on GraphQL .
In order to connect Gatsby to a data source, a plug-in is required to work with this data source. Such a plugin can be developed independently or selected from existing ones. In this example, we will use Strapi as a data source, which means we need a data source plugin for APIs built using Strapi. We have already developed such a plugin .
Install it:
$ npm install --save gatsby-source-strapi This plugin needs some tweaking. Replace the contents of the
gatsby-config.js with the following: module.exports = { siteMetadata: { title: `Gatsby Default Starter`, }, plugins: [ `gatsby-plugin-react-helmet`, { resolve: `gatsby-source-strapi`, options: { apiURL: `http://localhost:1337`, contentTypes: [ // , Gatsby. `article`, `user` ] }, }, ], } Now restart the server in order to allow Gatsby to accept the changes.
List of articles
For a start, we want to display a list of articles. To do this, add the following content to the existing
src/pages/index.js : import React from 'react' import Link from 'gatsby-link' const IndexPage = ({ data }) => ( <div> <h1>Hi people</h1> <p>Welcome to your new Gatsby site.</p> <p>Now go build something great.</p> <ul> {data.allStrapiArticle.edges.map(document => ( <li key={document.node.id}> <h2><font color="#3AC1EF"> <Link to={`/${document.node.id}`}>{document.node.title}</Link> </font></h2> <p>{document.node.content}</p> </li> ))} </ul> <Link to="/page-2/">Go to page 2</Link> </div> ) export default IndexPage export const pageQuery = graphql` query IndexQuery { allStrapiArticle { edges { node { id title content } } } } ` At the end of the file we export
pageQuery - pageQuery query, which allows you to get a full list of articles. As you can see, we only need the fields id , title and content , and GraphQL allows us to get exactly what we need.Then we pass the destructured object
{ data } as an IndexPage parameter and, in order to get the output, we iterate over its field allStrapiArticles .In order to simplify the development of GraphQL queries, you can use the corresponding Gatsby interface. Take a look at it and try creating several queries.
▍A article viewing page
Now what we are doing is like a blog, and that’s good. However, one important thing is still missing: the article view page.
Create a template containing a GraphQL query and set the displayed content. We will do this in the
src/templates/article.js : import React from 'react' import Link from 'gatsby-link' const ArticleTemplate = ({ data }) => ( <div> <h1>{data.strapiArticle.title}</h1> <p>by <Link to={`/authors/${data.strapiArticle.author.id}`}>{data.strapiArticle.author.username}</Link></p> <p>{data.strapiArticle.content}</p> </div> ) export default ArticleTemplate export const query = graphql` query ArticleTemplate($id: String!) { strapiArticle(id: {eq: $id}) { title content author { id username } } } ` It looks good, but at the moment Gatsby does not know when to display this template. Each article needs its own URL. We'll let Gatsby know about new URLs using the createPage function .
To do this, create a new function called
makeRequest that is used to execute the GraphQL query. Then we export a function called createPage , in which we get a list of articles and create a page for each of them. This is all done in the gatsby-node.js file. Here's what we got: const path = require(`path`); const makeRequest = (graphql, request) => new Promise((resolve, reject) => { // , . resolve( graphql(request).then(result => { if (result.errors) { reject(result.errors) } return result; }) ) }); // Gatsby API "createPages". // , exports.createPages = ({ boundActionCreators, graphql }) => { const { createPage } = boundActionCreators; const getArticles = makeRequest(graphql, ` { allStrapiArticle { edges { node { id } } } } `).then(result => { // result.data.allStrapiArticle.edges.forEach(({ node }) => { createPage({ path: `/${node.id}`, component: path.resolve(`src/templates/article.js`), context: { id: node.id, }, }) }) }); // . return getArticles; }; Restart the Gatsby server. Now links to articles should be working, clicking on them will open the pages of articles.
Author's page
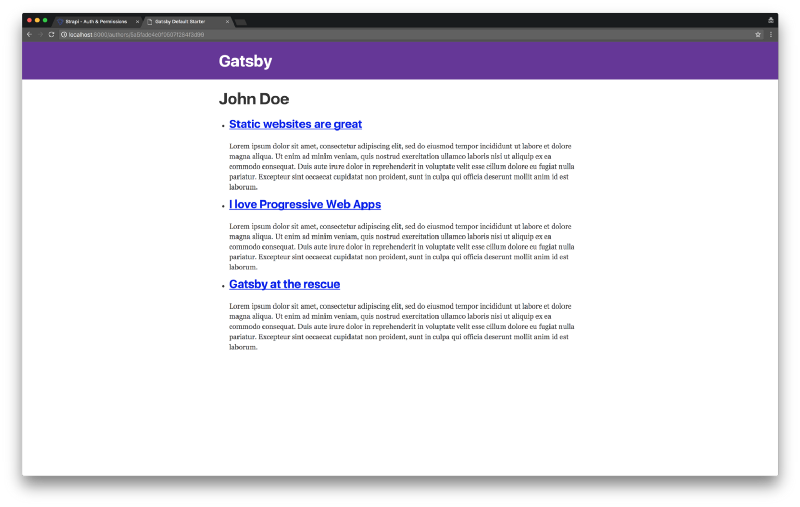
Articles are written by the authors. They deserve a separate page. The process of creating an author page is very similar to the process of creating an article page. First, create a template in the
src/templates/user.js : import React from 'react' import Link from 'gatsby-link' const UserTemplate = ({ data }) => ( <div> <h1>{data.strapiUser.username}</h1> <ul> {data.strapiUser.articles.map(article => ( <li key={article.id}> <h2><font color="#3AC1EF"> <Link to={`/${article.id}`}>{article.title}</Link> </font></h2> <p>{article.content}</p> </li> ))} </ul> </div> ) export default UserTemplate export const query = graphql` query UserTemplate($id: String!) { strapiUser(id: { eq: $id }) { id username articles { id title content } } } ` Now update the
gatsby-node.js file to create the corresponding links: const path = require(`path`); const makeRequest = (graphql, request) => new Promise((resolve, reject) => { // , . resolve( graphql(request).then(result => { if (result.errors) { reject(result.errors) } return result; }) ) }); // Gatsby API "createPages". // , exports.createPages = ({ boundActionCreators, graphql }) => { const { createPage } = boundActionCreators; const getArticles = makeRequest(graphql, ` { allStrapiArticle { edges { node { id } } } } `).then(result => { // . result.data.allStrapiArticle.edges.forEach(({ node }) => { createPage({ path: `/${node.id}`, component: path.resolve(`src/templates/article.js`), context: { id: node.id, }, }) }) }); const getAuthors = makeRequest(graphql, ` { allStrapiUser { edges { node { id } } } } `).then(result => { // . result.data.allStrapiUser.edges.forEach(({ node }) => { createPage({ path: `/authors/${node.id}`, component: path.resolve(`src/templates/user.js`), context: { id: node.id, }, }) }) }); // . return Promise.all([ getArticles, getAuthors, ]) }; And finally, we will reboot the server and visit the author’s page by clicking on it from the page of viewing the article on the corresponding link.
Results
Congratulations! You have just successfully created an incredibly fast and easy to manage blog! Since Strapi deals with content management, authors can write articles using a nice interface, and the developer only needs to periodically rebuild the blog to update its content.
What to do next?
You can easily continue working on this project in order to explore the useful features of Gatsby and Strapi. Here you can add a list of authors, article categories, commenting system based on the Strapi API or Disqus. In addition, you can, using the method proposed here, to create other web sites (online stores, corporate sites, and so on).
When your project is ready to work, you may want to post it on the Internet. Web projects generated by Gatsby can be published using the services of the services for hosting static sites such as Netlify, S3 / Cloudfront, GitHub pages, GitLab pages, Heroku pages, and so on. The Strapi API is a Node.js based system, so it can be deployed on the basis of Heroku or from any Linux virtual machine with Node.js installed on it.
The full version of the code that we have been looking at here can be found on GitHub . In order to see what is created there, in action, clone the repository, execute the
npm run setup command, start the Strapi server (go to the api folder and execute the strapi start command) and the Gatsby server (go to the blog folder and execute the npm run develop command npm run develop ).Dear readers! How do you create static websites? Do you plan to use the Gatsby-Strapi bundle in your projects?
Source: https://habr.com/ru/post/348068/
All Articles