Free Tesla K80 GPU for your experiments with neural networks
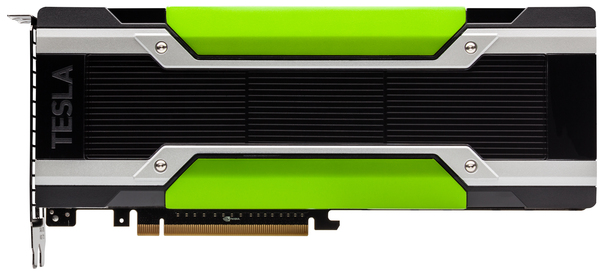
About a month ago, the Google service Colaboratory, which provides access to Jupyter laptops, included the ability to use the Tesla K80 GPU for free with 13 GB of video memory on board. If until now the only obstacle to immersion in the world of neural networks could be the lack of access to the GPU, now you can safely say, “Hold on Deep Learning, I'm coming!”.
I tried to use Colaboratory for working on kaggle tasks. Most of all I lacked the ability to conveniently save the trained tensorflow models and use the tensorboard. In this post, I want to share experiences and tell you how to add these features to colab. And finally, I'll show you how you can access the container via ssh and use the usual convenient tools bash, screen, rsync.
For a start, why is this interesting?
The presence of a GPU accelerator is a critical factor for the speed of learning deep learning models. Without a GPU, neural network training will take many hours / days and will not allow to fully experiment with the structure of the network. The amount of video memory is also important. More memory - you can install a larger batch size and use more complex models. Today, 13G is a good amount, if you want to get about the same on your desk, you will have to buy a GTX 1080 Ti level GPU.
What is Collaboration
This is a fork of the popular Jupyter notebook environment. Your laptops are available via google drive in .ipynb format and you can run them locally. Python 2.7 and 3.6 are supported. The code is executed on the server in the docker container. You can close the browser, all processes on the server will continue to work, and later you can connect to the server again. Docker container is given to you for temporary use for 12 hours. You have root privileges, and you can install and run any program inside the container. Collaboration (hereinafter referred to as colab) also supports collaboration on a laptop, like google docs. This is an excellent platform to start learning deep learning, machine learning. Many free courses, such as the Open Machine Learning Course, use the Jupyter notebook format for their study materials.
We start training
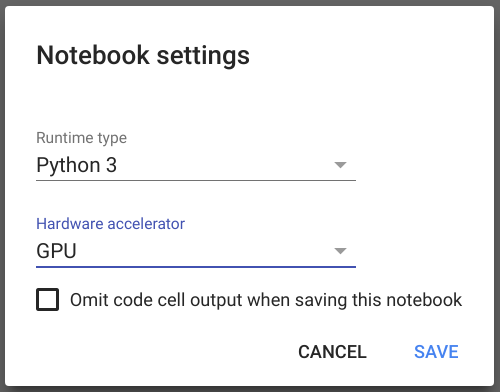
To create a new laptop, click on the link . After a successful login and laptop creation, select Runtime -> Change Runtime Type in the menu, in the opened dialog in the Hardware acceleration option, install the GPU, then save.
Then you can make sure that tensorflow uses the GPU. Just copy this code into the first cell of the laptop and execute by pressing shift + Enter :
import tensorflow as tf tf.test.gpu_device_name() Now we will try to run a simple tensorflow model from the examples, for this we clone the github repository and run the script.
! git clone https://github.com/tensorflow/models.git %run models/samples/core/get_started/premade_estimator.py After executing this command, we will see how the network learns and makes the first predictions. There are quite a few materials describing the possibilities of Jupyter, so I will not dwell on this in detail.
Mount google drive
Everything works fine, but after 12 hours, the virtual machine will be taken from you and all data inside the container will be lost. It would be nice to take care of permanent storage. In colab there are examples of how to use import data from cloud storage, google sheets. This implies an explicit invocation of the copy operation, and I would like to be able to mount an external drive to the file system inside the container, here google drive and FUSE driver for it comes to the rescue. Connect google drive, you can run the code for the recipe from the article
!apt-get install -y -qq software-properties-common python-software-properties module-init-tools !add-apt-repository -y ppa:alessandro-strada/ppa 2>&1 > /dev/null !apt-get update -qq 2>&1 > /dev/null !apt-get -y install -qq google-drive-ocamlfuse fuse from google.colab import auth auth.authenticate_user() from oauth2client.client import GoogleCredentials creds = GoogleCredentials.get_application_default() import getpass !google-drive-ocamlfuse -headless -id={creds.client_id} -secret={creds.client_secret} < /dev/null 2>&1 | grep URL vcode = getpass.getpass() !echo {vcode} | google-drive-ocamlfuse -headless -id={creds.client_id} -secret={creds.client_secret} After that, you will have access to the directory where you can write data, without fear of losing them after the container is stopped. You can define the model_dir parameter in the model configuration, tensorflow will automatically restore the model state from the last checkpoint. Thus, you can continue learning the model or run inference at any time.
Tensorboard
I like to use tensorboard in the process of experimenting with the structure and parameters of a neural network. If you want to know more about this tool, I recommend watching the presentation . Therefore, I was looking for the possibility of how to run tensorboard in colab. The answer was found on SO . Through the LOG_DIR variable, you need to specify the path to model_dir from the configuration of the tensorflow model, or to the root directory inside which contains a lot of saved models.
LOG_DIR = '/tmp' get_ipython().system_raw( 'tensorboard --logdir {} --host 0.0.0.0 --port 6006 &' .format(LOG_DIR) ) ! wget -c -nc https://bin.equinox.io/c/4VmDzA7iaHb/ngrok-stable-linux-amd64.zip ! unzip -o ngrok-stable-linux-amd64.zip get_ipython().system_raw('./ngrok http 6006 &') ! curl -s http://localhost:4040/api/tunnels | python3 -c \ "import sys, json; print(json.load(sys.stdin)['tunnels'][0]['public_url'])" After the execution, the last line will display the URL, opening which in the browser, we will see the usual tensorboard.
Ssh access
If you have experience using Jupyter. Then you probably know that, going beyond toy models, some of the advantages of the jupyter format of the notebook become its disadvantages. The laptop turns into a difficult-to-read mess, the results of calculations become difficult to reproduce. Jupyter laptops remain an excellent tool for learning, visualization and small experiments. However, in medium-sized projects, I prefer to structure the python code in the classical way, using a partition into modules and classes. It is more convenient to work on a serious project in PyCharm / Vim, etc. ... It is not very convenient to synchronize the code constantly through the repository, it is not very convenient to run .py files through jupyter, it is much more comfortable to use familiar tools for this.
Based on the example of running the tensorboard, I wrote code that opens an ssh tunnel into a container.
#Generate root password import secrets, string password = ''.join(secrets.choice(string.ascii_letters + string.digits) for i in range(20)) #Download ngrok ! wget -q -c -nc https://bin.equinox.io/c/4VmDzA7iaHb/ngrok-stable-linux-amd64.zip ! unzip -qq -n ngrok-stable-linux-amd64.zip #Setup sshd ! apt-get install -qq -o=Dpkg::Use-Pty=0 openssh-server pwgen > /dev/null #Set root password ! echo root:$password | chpasswd ! mkdir -p /var/run/sshd ! echo "PermitRootLogin yes" >> /etc/ssh/sshd_config ! echo "PasswordAuthentication yes" >> /etc/ssh/sshd_config ! echo "LD_LIBRARY_PATH=/usr/lib64-nvidia" >> /root/.bashrc ! echo "export LD_LIBRARY_PATH" >> /root/.bashrc #Run sshd get_ipython().system_raw('/usr/sbin/sshd -D &') #Ask token print("Copy authtoken from https://dashboard.ngrok.com/auth") import getpass authtoken = getpass.getpass() #Create tunnel get_ipython().system_raw('./ngrok authtoken $authtoken && ./ngrok tcp 22 &') #Print root password print("Root password: {}".format(password)) #Get public address ! curl -s http://localhost:4040/api/tunnels | python3 -c \ "import sys, json; print(json.load(sys.stdin)['tunnels'][0]['public_url'])" To create a TCP tunnel, you will need to create an account on ngrok.com and copy authtoken from there. In the free version of ngrok, two tunnels are not supported, so if the http tunnel on the tensorboard is still working, you need to disable it, for example, restart the container by pressing Ctrl + M then "." .
After starting the tunnel you will see in the laptop something like the following
Root password: 3KTyBVjtD6zPZX4Helkj tcp://0.tcp.ngrok.io:15223 Now you can log in to the colab container from the work computer using any ssh client and in this example the host 0.tcp.ngrok.io, port 15223. Example for linux
ssh root@0.tcp.ngrok.io -p15223 Bonus for kagler, for importing data from kaggle and sending submit directly from the laboratory you can use the official API client , installed with the command pip install kaggle .
')
Source: https://habr.com/ru/post/348058/
All Articles