Game development under NES in C. Chapters 1-3. From introduction to Hello World
For the first time I thought about how they develop games for consoles about 20 minutes after the very first time I saw Turbo Pascal. Subor sometimes came across with the keyboard, and the thought appeared: "Probably you can type some program and then play it." But interest quickly faded out, because absolutely no information on this topic was then available. The next time the same idea came up when I saw completely playable emulators of old consoles. Then it became clear that it’s not necessary to drive a listing into the console itself. Somewhere very then Habr appeared with a benevolent audience for such things. At some point, I even began to collect the scattered info to write the manual myself, and today I came across a ready-made textbook, which obviously needs to be translated.
Development under old consoles is documented up and down, but according to NES, 99% of the information is related to development in Assembler. For some reason, I was hacked to learn how to work with S.
- Where to begin
- How does cc65 work
- First program
- What is V-blank
- Some color
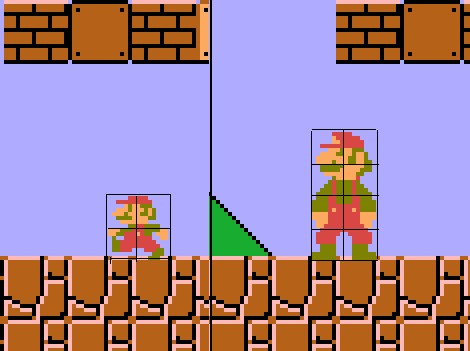
- Sprites
- Input
- Sprite collisions
- Work with background
- Background collisions
- Scroll
- Simple platformer
- Debag and Sprite 0
- Simple sounds
- Add music
- Add sound effects
- Game planning
- Coding 1
- Coding 2
- Coding 3
- Thanks
- What's next?
- Sounds DMC
- MMC3, bank switching, interrupts
Hello.
My name is Doug. I have been writing games for NES for a year now, and decided to start this blog. I intend to write a NES game development tutorial to inspire other people to make their own games.
A special feature of the blog will be the use of pure C, so other programmers will be able to start writing quickly and not really delving into the assembler for the 6502 processor. As far as I know, there are no other tutorials of this format on the cc65 compiler, except for a few examples of games on the Shiru website.
Also remember that I am not a professional neither in development nor in blogging. If you have questions about the NES, the answers are likely to be found in the wiki .
I will try to simplify the training as much as possible, and use the simplest examples. I also recommend starting with the simplest idea of the game. The reader obviously wants to make a new Zelda , but it will not work. The simplest game will require 2-3 months to develop, Zelda - 2-3 years. Such a project is likely to be abandoned. Focus on Pakman, at least the first time.
Console memory
Let's talk about the structure of memory. NES has two independent address spaces - processor memory with a range of $ 0- $ FFFF and PPU memory - a video chip.
Let's start with the processor memory.
- The first $ 800 is RAM.
- The range of $ 6000- $ 7FFF is used by some games for working with SRAM (saving on a cartridge with a battery), or as an additional Work RAM.
- ROM is displayed on the space of $ 8000- $ FFFF. Some mappers (extra processor in a cartridge) can use more than 32k ROM, but they still usually work through $ 8000- $ FFFF.
- The address $ FFFC- $ FFFD is a reset vector, which indicates the beginning of the program.
Here is more detailed information.
PPU has its own independent address space. It is $ 3FFF in size, but is mirrored in some places. Access to it goes through the registers in the memory of the processor. Video memory is enough for 4 screen buffers, but in the overwhelming majority of games only 2 are used - for scrolling.
- $ 0- $ 1FFF = Sprites are stored here.
- $ 2000- $ 23FF = Name Table 0
- $ 2400- $ 27FF = Name Table 1
- $ 2800- $ 2BFF = Name Table 2
- $ 2C00- $ 2FFF = Name Table 3
At the same time, tables 2 and 3 are a mirror of tables 0 and 1. - $ 3F00- $ 3F1F = Palette
The name table, nametable, links the background tiles and their position on the screen.
Mirroring allows you to control horizontal or vertical scrolling, but everything has its time.
Still in PPU there is a separate area of memory OAM, Object Attribute Memory, 256 bytes in size. Access to it is implemented through registers in the address space of the processor, and it allows you to control the display of sprites.
Here are the details of PPU memory:
http://wiki.nesdev.com/w/index.php/PPU_memory_map
One more thing. There are two types of cartridges. In some, two ROM chips - PRG-ROM with executable code and CHR-ROM with graphics. In this case, the schedule is automatically displayed in the addresses $ 0-1FFF PPU. This makes it very easy to draw - just write the tile number in the table. We will use this format.
Another type of cartridge uses CHR-RAM instead of CHR-ROM. This allows you to load a part of the graphics into this additional RAM. This is a complex technique and is not covered in this tutorial.
Now you can look at the software used for development.
- Compiler
- Tile editor
- Graphics editor
- Notepad ++
- Good emulator
- Tile wrapper
In this tutorial only cc65 is considered. This is one of the best compilers for 6502, NES processor.
I am using version 2.15 (for verification, type 'cc65 --version' in the console). Files from different versions are incompatible, so if necessary use nes.lib from your compiler kit.
Secondly, you need to create graphics. I use YY-CHR
To pre-process graphics you need any graphics editor: Photoshop or GIMP, to your liking.
It is convenient to write the code in Notepad ++ . It has highlighting of syntax and line numbering - this makes debugging easier.
And now the emulator. I use FCEUX 90% of the time, because it has cool debugger and memory tools, sprite viewers and all that. But it is not the most accurate in emulation. Games need to be tested somewhere else. Judging by the reviews, the most accurate emulators are Nintendulator, Nestopia, and puNES. It is also desirable to load a more accurate palette - is here .
There are two versions of FCEUX - SDL and Win32. The first works almost everywhere, the second only in Windows. So, the debugger is only in the second. So in the case of an alternative OS, you will have to use Virtualka or Wine.
And finally tile arranger. We can make a game without him, but he will definitely help. I recommend the NES Screen Tool . It perfectly shows the limitations of the console by color and is great for single-screen games. For games with scrolling, Tiled map editor is better suited.
How to use all this?
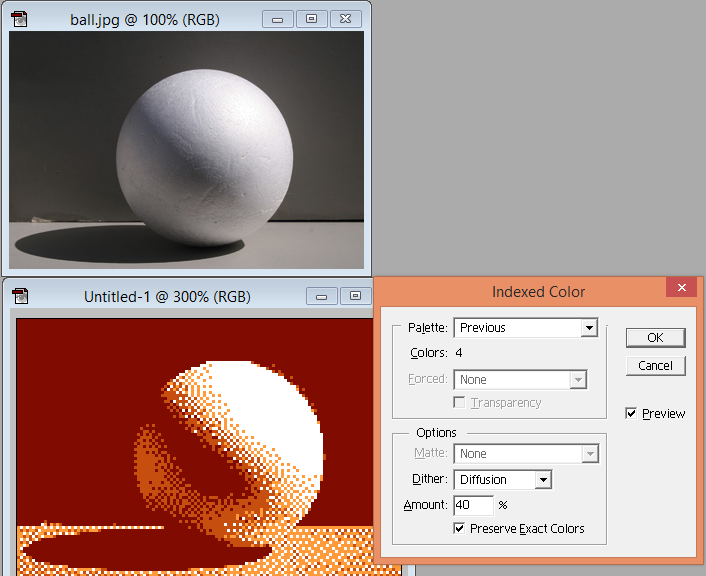
It is necessary to compress the image to an adequate size, for example 128 pixels wide. Then convert to 4 colors and correct if necessary flaws. Now you can copy-paste to YY-CHR.
In YY-CHR, you need to check that the color is two-bit.

The palette does not matter now, because it is still set elsewhere.
How does ss65 work
All compilers for NES work through the console, without a graphical interface. That is, we write the program in Notepad, and then we call the compiler with the necessary parameters.
To simplify the work, we will use .bat scripts and Makefiles. This will automate the process and collect the image of the cartridge in one touch.
The process is approximately the same. cc65 compiles a file with a code on C in the assembly code. ca65 collects the object file. ld65 links it to an .nes cartridge image that can be run in an emulator. Settings are stored in a .cfg file.
The console uses an 8-bit MOS 6502 processor. It does not know how to simply access variables larger than 8 bits. 16-bit addressing, from mathematics there is only addition, subtraction and bit shifts. So the code will have to write with these factors.
- Most variables must be of type unsigned char - 8 bits, values 0-255
- It is better not to pass the values in the function, or do it through the fastcall directive, which passes arguments through 3 registers - A, X, Y
- Arrays should not be longer than 256 bytes
- printf is missing
- ++ g is noticeably faster than g ++
- cc65 can neither pass structures by value nor return them from a function
- Global variables are much faster than local variables, even structures
Use the -O option to optimize. There are also options i, r, s, which sometimes combine in -Oirs, but they, for example, can remove a read from a processor register whose value is not used. And this is fatal.
Here are some more recommendations for using the compiler.
Optimization is vital, because an 8-bit processor has very few resources, and in some cases it is necessary to monitor the execution time of the code. And the usual C code does not meet these requirements.
Import of variables from other files is supported. cc65 can import variables and arrays from assembler modules with the command
extern unsigned char foo; and if it is a character from a zero page of memory, then add a directive
#pragma zpsym (“foo”); In the future, these designs will be rarely used. The only exception is the import of a large binary file. In this case, it would be optimal to wrap it in an assembly file:
.export _foo _foo: .incbin "foo.bin" and then import into C as
extern unsigned char foo[]; The _ sign is critical here, because when compiled into the assembler code, cc65 adds _ in front of each variable name. We need to match this.
You can call functions written in assembler via __fastcall__. In this case, the arguments are passed to the function through the registers, and not the stack - it saves time. In some cases, it is impossible to do without assembly code, for example, when initializing a set-top box. In any case, the fewer arguments passed to the function, the better. Compare two functions, with the test and A global variables:
void Test (char A) { test = A; } // 19 jsr pusha ldy #$00 lda (sp),y sta _test ; test = A; jmp incsp1 pusha: ldy sp beq @L1 dec sp ldy #0 sta (sp),y rts @L1: dec sp+1 dec sp sta (sp),y rts incsp1: inc sp bne @L1 inc sp+1 @L1: rts void Test (void) { test = A; } // , 3 lda _A sta _test rts You can also insert assembly code directly into sishny. I almost never do that, but it’s probably necessary sometimes. It looks like this:
asm ("Z: bit $2002") ; asm ("bpl Z") ; In addition, I replaced the bulky crt0.s initialization code with a compact reset.s, and corrected the configuration for all of this. These files will sometimes change. nes.lib is used standard from the compiler. The project is built with the option –add-source, which does not delete intermediate assembly files - you can examine the generated code.
It is more convenient to define variables in the sish code, and then import them into assembly code through
.import _Foo But this is a question of taste, in my opinion, such code is more obvious.
Hello world
This program will simply print text on the screen. It must be remembered that the prefix does not know about ASCII encoding and working with text in any form. But it is possible to display 8x8 images on top of the background.
So we make an array of sprite letters, so that the addresses of the letters in it correspond to their ASCII codes. Then they can be pulled from the code in C.

The prefix initialization code is taken as it is, after its execution, the transition to main () takes place.
We need to do the following operations:
- Turn off the screen
- Customize palette
- Print the cherished words
- Turn off scrolling
- Turn on screen
- Repeat
Turning off the screen is necessary because working with video memory causes garbage on the screen. It is necessary either to turn off the screen, or to wait for a personnel blanking impulse (V-Blank). We will consider this question in detail next time.
The initialization code fills the memory with zeros, so the entire screen will be filled with zero tile - in our case, it is empty. And the whole palette is filled with gray.
To display on the screen, you need to record the coordinates of the start of the fill starting from the high byte at $ 2006, and then write the tile numbers to $ 2007. PPU will display tiles with the corresponding numbers one by one, with the transition to a new line. You can reconfigure the PPU in an output step equal to 32 - the tiles will be displayed one below the other. We also need to set up step 1, through the register $ 2000. You can recalculate the coordinates of the screen to the address through the NES screen tool.
We also need to fill the first 4 colors of the palette - they are responsible for the background. They are written at $ 3F00.
Writing to the PPU registers breaks the scroll position, so it must also be reset. Otherwise, the picture may leave the screen. We do this through the $ 2006 and $ 2005 registers.
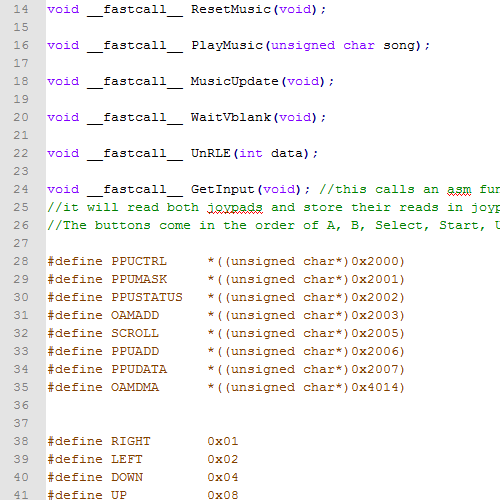
#define PPU_CTRL *((unsigned char*)0x2000) #define PPU_MASK *((unsigned char*)0x2001) #define PPU_STATUS *((unsigned char*)0x2002) #define SCROLL *((unsigned char*)0x2005) #define PPU_ADDRESS *((unsigned char*)0x2006) #define PPU_DATA *((unsigned char*)0x2007) unsigned char index; const unsigned char TEXT[]={ "Hello World!"}; const unsigned char PALETTE[]={ 0x1f, 0x00, 0x10, 0x20 }; //black, gray, lt gray, white void main (void) { // turn off the screen PPU_CTRL = 0; PPU_MASK = 0; // load the palette PPU_ADDRESS = 0x3f; // set an address in the PPU of 0x3f00 PPU_ADDRESS = 0x00; for(index = 0; index < sizeof(PALETTE); ++index){ PPU_DATA = PALETTE[index]; } // load the text PPU_ADDRESS = 0x21; // set an address in the PPU of 0x21ca PPU_ADDRESS = 0xca; // about the middle of the screen for( index = 0; index < sizeof(TEXT); ++index ){ PPU_DATA = TEXT[index]; } // reset the scroll position PPU_ADDRESS = 0; PPU_ADDRESS = 0; SCROLL = 0; SCROLL = 0; // turn on screen PPU_CTRL = 0x90; // NMI on PPU_MASK = 0x1e; // screen on // infinite loop while (1); } 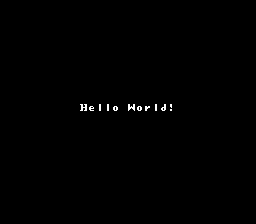
Link to code:
Dropbox
Github
On Gitkhab, I just fixed the Makefile to work correctly under Windows.
LineONCE: load = PRG, type = ro, optional = yes;
inside the segments {} section of the .cfg files is needed for compatibility with the latest version of cc65.
Turning on the screen via “PPUMASK = 0x1e” is described in the Wiki .
All files here are 0x4000. This is the smallest possible size of PRG ROM. 90% of games here do not fit, and will be displayed on the addresses of $ 8000- $ FFFF. In our country, the game is loaded into $ C000- $ FFFF addresses and mirrored to $ 8000- $ BFFF. To develop a larger game, you will need to reconfigure the start address of the ROM to $ 8,000, and set the size to $ 8,000 too. And also include the second bank of the PRG ROM in the header section.
')
Source: https://habr.com/ru/post/348022/
All Articles