Swift Package Manager
Along with the release in Swift open source on December 3, 2015, Apple introduced the decentralized dependency manager Swift Package Manager .
Notorious Max Howell , the creator of Homebrew, and Matt Thompson , who wrote AFNetworking, had a hand in the public version. SwiftPM is designed to automate the process of installing dependencies, as well as further testing and building the project in Swift on all available operating systems, but so far only macOS and Linux support it. If interested, go under cat.
Minimum requirements - Swift 3.0. An Xcode 8.0 or higher is required to open a project file. SwiftPM allows you to work with projects without an xcodeproj file, so Xcode on OS X is optional, but on Linux it is not.
It is necessary to dispel doubts - the project is still in active development. Using UIKit, AppKit and other iOS and OS X SDK frameworks as dependencies is not available, because SwiftPM includes dependencies as source code, which it then compiles. Thus, using SwiftPM on iOS, watchOS and tvOS is possible, but only using Foundation and third-party open-source dependency libraries. A single import UIKit makes your library unusable through SwiftPM.
')
All examples in the article are written using version 4.0.0-dev, you can check your version using the command in the terminal
swift package —version Ideology Swift Package Manager
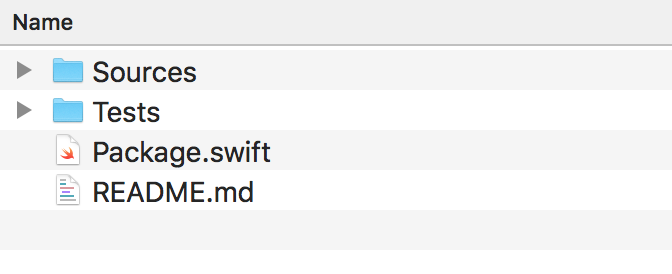
To work on the project, the * .xcodproj file is no longer needed - now it can be used as an auxiliary tool. Which files are involved in building the module depends on their location on the disk — for SwiftPM, directory names and their hierarchy within the project are important. The initial structure of the project directory is as follows:
- Sources - source files for package building, divided inside by product directories - there is a separate folder for each product.
- Tests are tests for a product under development, foldering is similar to the Sources folder.
- Package.swift - a file with a description of the package.
- README.md - package documentation file.
Inside the Sources and Tests folders, SwiftPM recursively searches all * .swift files and associates them with the root folder. A little later we will create subfolders with files.
Main components
Now let's deal with the main components in SwiftPM:
- Module (Module) - a set of * .swift – files that performs a specific task. One module can use the functionality of another module, which it connects as a dependency. The project can be assembled on the basis of a single module. Dividing the source code into modules allows you to select a function in a separate module that can be reused when building another project. For example, a network request module or a database module. The module uses the internal level of encapsulation and is a library (library) that can be connected to the project. A module can be connected from the same package (presented as another target) or from another package (presented as another product).
- Product (Product) - the result of assembling the target (target) of the project. This can be a library (library) or an executable file (executable). The product includes source code that relates directly to this product, as well as the source code of the modules on which it depends.
- Package (Package) - a set of * .swift – files and a manifest file Package.swift, which defines the name of the package and the set of source files. The package contains one or more modules.
- Dependency is the module required for the source code in the package. A dependency must have a path (relative local or remote to the git repository), version, list of dependencies. SwiftPM must have access to the source code of the dependency to compile them and connect to the main module. Targets from the same package or from a package-dependency can act as a target relationship.

We get that dependencies line up in a graph - each dependency can have its own, and so on. Resolving a dependency graph is the main task of a dependency manager.
I note that all source files must be written in Swift, the ability to use Objective-C is not.
Each package must be self-contained and isolated. It is debugged not by running (run), but by using logic tests (test).
Next, consider a simple example of connecting to the project dependencies Alamofire.
Test project development
Let's go through the terminal to the folder where our project will be located, create a directory for it and go to it.
mkdir IPInfoExample cd IPInfoExample/ Next, initialize the package with the command
swift package init This creates the following hierarchy of source files.
├── Package.swift ├── README.md ├── Sources │ └── IPInfoExample │ └── main.swift └── Tests └── IPInfoExampleTests ├ LinuxMain.swift └── IPInfoExampleTests └── IPInfoExampleTests.swift In the absence of the project file index * .xcodeproj, the dependency manager needs to know which source files should be involved in the build process and which targets to include. Therefore, SwiftPM defines a strict folder hierarchy and a list of files:
- Package file;
- README file;
- Sources folder with source files - a separate folder for each target;
- Folder Tests - a separate folder for each test target.
Already we can execute commands
swift build swift test to build a package or to run the Hello, world!
Add source files
Create an Application.swift file and put it in the IPInfoExample folder.
public struct Application {} We execute the swift build and see that 2 files are already compiled in the module.
Compile Swift Module 'IPInfoExample' (2 sources) Create the Model directory in the IPInfoExample folder, create the IPInfo.swift file, and delete the IPInfoExample.swift file as unnecessary.
// Codable JSON public struct IPInfo: Codable { let ip: String let city: String let region: String let country: String } After that, run the swift build command for verification.
Add dependencies
Open the Package.swift file, the content fully describes your package: package name, dependencies, target. Add the Alamofire dependency.
// swift-tools-version:4.0 import PackageDescription // , let package = Package( name: "IPInfoExample", // products: [ .library( name: "IPInfoExample", targets: ["IPInfoExample"]), ], dependencies: [ // - Alamofire, GitHub .package(url: "https://github.com/Alamofire/Alamofire.git", from: "4.0.0") ], targets: [ .target( name: "IPInfoExample", // – , // Alamofire dependencies: ["Alamofire"]), .testTarget( name: "IPInfoExampleTests", dependencies: ["IPInfoExample"]), ] ) Then again swift build, and our dependencies are downloaded, a Package.resolved file is created with a description of the installed dependency (similar to Podfile.lock).
If there is only one product in your package, you can use the same name for the package name, product and target. We have this IPInfoExample. Thus, the package description can be shortened by omitting the products parameter. If you look at the description of the Alamofire package, you will see that the target are not described there. By default, one target is created with the package name and source code files from the Sources folder and one target with the package description file (PackageDescription). Test target when using SwiftPM is not activated, so the test folder is excluded.
import PackageDescription let package = Package(name: "Alamofire", dependencies : [], exclude: [“Tests"]) To ensure the correctness of the creation of modules, target, product, we can execute the command
swift package describe As a result, for Alamofire we get the following log:
Name: Alamofire Path: /Users/ivanvavilov/Documents/Xcode/Alamofire Modules: Name: Alamofire C99name: Alamofire Type: library Module type: SwiftTarget Path: /Users/ivanvavilov/Documents/Xcode/Alamofire/Source Sources: AFError.swift, Alamofire.swift, DispatchQueue+Alamofire.swift, MultipartFormData.swift, NetworkReachabilityManager.swift, Notifications.swift, ParameterEncoding.swift, Request.swift, Response.swift, ResponseSerialization.swift, Result.swift, ServerTrustPolicy.swift, SessionDelegate.swift, SessionManager.swift, TaskDelegate.swift, Timeline.swift, Validation.swift If a package has several products, then we specify the dependency package as a dependency, and then, depending on the target, we specify the dependency on the package module. For example, SourceKitten is connected in our Synopsis library.
import PackageDescription let package = Package( name: "Synopsis", products: [ Product.library( name: "Synopsis", targets: ["Synopsis"] ), ], dependencies: [ Package.Dependency.package( // SourceKitten url: "https://github.com/jpsim/SourceKitten", from: "0.18.0" ), ], targets: [ Target.target( name: "Synopsis", // SourceKittenFramework dependencies: ["SourceKittenFramework"] ), Target.testTarget( name: "SynopsisTests", dependencies: ["Synopsis"] ), ] ) This is the description of the SourceKitten package. The package describes 2 products.
.executable(name: "sourcekitten", targets: ["sourcekitten"]), .library(name: "SourceKittenFramework", targets: ["SourceKittenFramework"]) Synopsis uses the SourceKittenFramework product library.
Creating a project file
We can create a project file for your convenience by running the command
swift package generate-xcodeproj and as a result we will get the file IPInfoExample.xcodeproj in the root folder of the project.
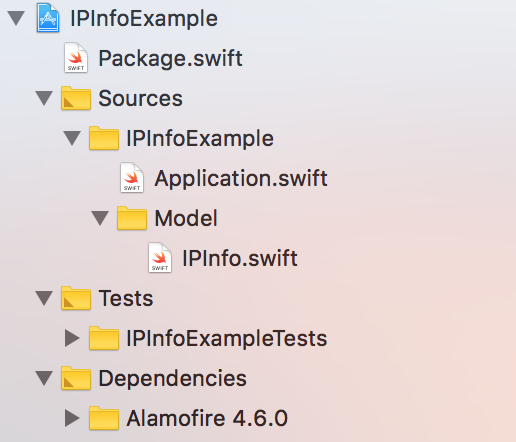
Open it, see all the sources in the Sources folder, including the Model subfolder, and the dependencies sources in the Dependencies folder.
It is important to note that this step is optional in the development of the product and does not affect the mechanism of operation of SwiftPM. Note that all source files are located in the same way as on the disk.
Check Connected Dependencies
Check if the dependency is correctly connected. In the example, we make an asynchronous request to the ipinfo service to get data about the current ip-address. JSON response is decoded into a model object - an IPInfo structure. For simplicity, the example will not handle JSON mapping error or server error.
// , cocoapods carthage import Alamofire import Foundation public typealias IPInfoCompletion = (IPInfo?) -> Void public struct Application { public static func obtainIPInfo(completion: @escaping IPInfoCompletion) { Alamofire .request("https://ipinfo.io/json") .responseData { result in var info: IPInfo? if let data = result.data { // JSON info = try? JSONDecoder().decode(IPInfo.self, from: data) } completion(info) } } } Then we can use the build command in Xcode, but we can execute the swift build command in the terminal.
Project with executable file
The above is an example for initializing a library project. SwiftPM allows you to work with the project executable file. To do this, during initialization use the command
swift package init —type executable. You can also bring the current project to this view by creating the main.swift file in the Sources / IPInfoExample directory. When you run the executable file main.swift is the entry point.
Let's write one line in it
print("Hello, world!”) And then we will execute the swift run command, the treasured sentence will be output to the console.
Package Description Syntax
The description of the package in general form is as follows:
Package( name: String, pkgConfig: String? = nil, providers: [SystemPackageProvider]? = nil, products: [Product] = [], dependencies: [Dependency] = [], targets: [Target] = [], swiftLanguageVersions: [Int]? = nil ) - name - the name of the package. The only required argument for the package.
- pkgConfig - used for modules of modules installed on the system (System Module Packages), determines the name of the pkg-config-file .
- providers - used for packages of system modules, describes hints for installing missing dependencies through third-party dependency managers - brew, apt, etc.
import PackageDescription let package = Package( name: "CGtk3", pkgConfig: "gtk+-3.0", providers: [ .brew(["gtk+3"]), .apt(["gtk3"]) ] ) - products - description of the result of assembling the project target - executable file or library (static or dynamic).
let package = Package( name: "Paper", products: [ .executable(name: "tool", targets: ["tool"]), .library(name: "Paper", targets: ["Paper"]), .library(name: "PaperStatic", type: .static, targets: ["Paper"]), .library(name: "PaperDynamic", type: .dynamic, targets: ["Paper"]) ], targets: [ .target(name: "tool") .target(name: "Paper") ] ) The above package describes 4 products: an executable file from the target tool, the Paper library (SwiftPM will select the type automatically), the static PaperStatic library, and the dynamic PaperDynamic from one Paper target.
- Dependencies - description of dependencies. You must specify the path (local or remote) and version.
Version control in SwiftPM occurs via git-tags. The versioning itself can be configured quite flexibly: fix the language version, git branches, the minimum major version, the minor version of the package, or the commit hash. Optionally, an @ swift-3 type suffix is added to the tags, so old versions can be supported. For example, with versions like 1.0@swift-3, 2.0, 2.1 for SwiftPM version 3, only version 1.0 will be available, for the latest version 4 - 2.0 and 2.1.
It is also possible to specify SwiftPM version support for the manifest file, specifying the suffix in the package@swift-3.swift name. Specifying a version can be replaced with a branch or hash commit.
// 1.0.0 ..< 2.0.0 .package(url: "/SwiftyJSON", from: "1.0.0"), // 1.2.0 ..< 2.0.0 .package(url: "/SwiftyJSON", from: "1.2.0"), // 1.5.8 ..< 2.0.0 .package(url: "/SwiftyJSON", from: "1.5.8"), // 1.5.8 ..< 2.0.0 .package(url: "/SwiftyJSON", .upToNextMajor(from: "1.5.8")), // 1.5.8 ..< 1.6.0 .package(url: "/SwiftyJSON", .upToNextMinor(from: "1.5.8")), // 1.5.8 .package(url: "/SwiftyJSON", .exact("1.5.8")), // . .package(url: "/SwiftyJSON", "1.2.3"..<"1.2.6"), // . .package(url: "/SwiftyJSON", .branch("develop")), .package(url: "/SwiftyJSON", .revision("e74b07278b926c9ec6f9643455ea00d1ce04a021")) - targets - description of targets. In the example, we declare 2 targets, the second for the tests of the first, in the dependencies we indicate the person being tested.
let package = Package( name: "FooBar", targets: [ .target(name: "Foo", dependencies: []), .testTarget(name: "Bar", dependencies: ["Foo"]) ] ) - swiftLanguageVersions - description of the supported version of the language. If version [3] is installed, the swift 3 and 4 compilers will choose version 3, if version [3, 4] the swift 3 compiler will choose the third version, and the swift 4 compiler will choose the fourth version.
Team Index
swift package init // swift package init --type executable // swift package --version // SwiftPM swift package update // swift package show-dependencies // swift package describe // Resources
Source: https://habr.com/ru/post/348004/
All Articles