Is it possible to use C ++ instead of C for small projects in microcontrollers?
It is believed that the use of C ++ in the development of software for microcontrollers is like shooting a gun on sparrows. They say that the code is large and clumsy, and we are used to fighting for every bit in RAM or ROM. And the software for the microcontroller can be written necessarily in C. Indeed, because the C language was conceived as an alternative to assembler, the code should have been just as compact and fast, and readability and ease of development make it easy to write fairly large programs. But after all, once the developers in assembly language said the same thing about C, since a lot of water has flowed, and programmers using only assembler can be counted on fingers. Of course, the assembler still plays an important role in developing code for fast parallel computing, writing RTOS, but this is rather an exception to the rule. Just as C had once made his way as a standard for embedded software, the C ++ language may well replace C in this area. C ++ of the C ++ 14 standard and modern compilers have enough means to create compact code and not to be inferior in efficiency to the code created in C, and thanks to innovations to be clearer and more reliable. Below is the search code for the smallest number in an array of 5 integers in the two languages C and C ++ on the IAR for ARM 8.20 compiler with optimization disabled.
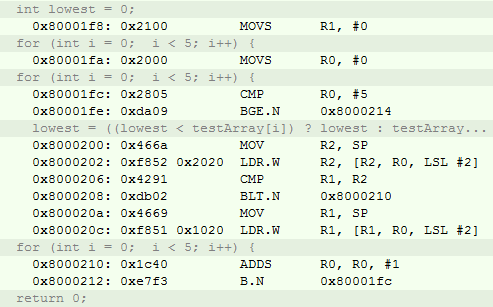
C code is 156 bytes
And its assembly representation
')
And the code in C + +, which occupies 152 bytes
And its assembly representation
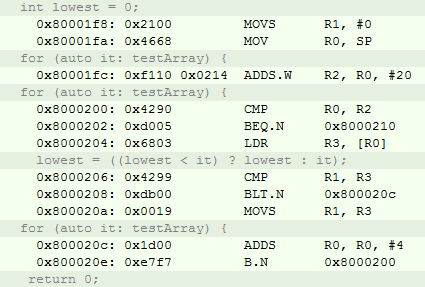
As you can see the code generated by the compiler in C ++ is 4 bytes less, and the speed is 12 clocks faster. All this is achieved through new features of C ++ 14. Of course, it can be noted that optimization was turned off for both compilers, that this is a very synthetic test that has nothing to do with the actual implementation, but still it can be said that everything is not so simple.
It is necessary to take into account the features of programming for microcontrollers, because the requirements for a small amount of program memory of 32.64..512 kB, an even smaller amount of RAM and a low frequency of microprocessors (especially when used for low-power sensors) impose their limitations. And it’s safe to say that not all C ++ chips are useful. For example, using the standard template library can take a significant amount of resources, and such important things in the big C ++ world can be thrown out of projects for small microcontrollers with confidence, since they require a significant increase in the stack size and code to store information about the exception handler and further searching for it. Therefore, I will try to tell you how to use C ++ and its new features for small projects and try to show that without a twinge of conscience C ++ can be used instead of C.
The first step is to determine the task. It should be simple enough, but also indicative enough to see how you can, for example, completely abandon macros , get away from pointers if possible, reduce the risks of stupid mistakes, and so on ...
The choice, as usual fell on svetodidy.
In order for the reader to understand what we want to do, I will give the final version of the task to be implemented on the microcontroller:
This is the final demand from the customer. But as is usually the case in practice, at first the customer came up with an easier idea, he decided that for complete happiness he lacked a bright indication, namely, a blinking green LED every 1 second. This task and rushed to implement a programmer named Snowflake.

So, on our board there are 4 LEDs: LED1, LED2, LED3 and LED4. They are connected to the ports GPIOA.5, GPIOC.5, GPIOC.8, GPIOC.9, respectively. For now, let's work with LED1, which is located on GPIOA.5.
To begin with, the programmer Snowflake wrote here is such a simple C code that will switch the LED. It looks like this:
The code works well and correctly, Snowflake was satisfied with his work and went to rest. But for the uninitiated in the subtleties of the PCB layout and user boolean operations, this code is not completely clear, so Snezhinka had to add comments that explain that there is an LED on the GPIOA.5 port and we actually want to switch it.
Let's think about how this code should look like in human language. Maybe so:
As we can see, comments are no longer needed here and the purpose of such code is intuitive. The most remarkable thing is that this pseudocode almost completely corresponds to the code in C ++. Look, the only difference is that we must first create an LED, indicating which port it is on.
Minimalist programmers can say that yes the code is clearer, but it’s redundant, an object is created, the constructor is called, the methods, how much RAM and additional code are generated. But if you look at the listing in assembler, you will be pleasantly surprised that the size of the C ++ code with the inline functions option enabled for both compilers will be the same as for the C program, and due to the peculiarities of the main function call, the common C + code + even one less instruction.
Assembler code from C source

Assembler code from C ++ source

This once again confirms the fact that modern compilers do their job of turning your remarkable and understandable C ++ code into optimal assembly code. And not every assembler programmer can achieve this level of optimization.
Of course, with optimization turned off, C ++ code will not be as compact in size as the stack and speed. For comparison, I will give a non-optimized version with a call to the constructor and methods.

For me, there is no dilemma between holding a lot of unnecessary details in my head to write the sensor firmware (which elements to which ports are connected, what current state the port or a particular module is in, etc.) and the simplicity and clarity of the code. After all, in the end, we need to describe the logic of the device, the interaction interface with the user, to implement the calculations, and not to remember that in order to read data from the ADC, you must first select it using the CS signal located on the port GPIOA.3 and set his unit. Let the developer of the ADC module deal with this.
Initially, it may seem that you need to write a lot of additional code, but I assure you, it will more than pay off when the application becomes a little more difficult than just blinking the LED.
Let's return to our task. The Snowflake did not have time to show the result of its work to the customer, as the customer, having felt the charm of LED blinking in the night, decided that it would be good to have four LEDs blinking in the “Herringbone” mode, especially since Chinese New Year is coming and there will be many potential buyers.
Our programmer Snowflake, who simultaneously performs several projects, decided to save time and do everything in the forehead with the most, as he believes in a reliable and understandable way:
The code works, but pay attention to the last entry TOGGLE_BIT (GPIO-> ODR, 5U). LEDs 1 and 4 are located on pin number 5, but on different ports. Using Ctrl C-Ctrl V, Snowflake copied the first entry, and forgot to change the port. This is a typical mistake made by programmers working under pressure from management, setting the deadline of "yesterday." The problem is that for the task, it was necessary to quickly write the code, and Snowflake did not have time to think about the software design, he just sat down and wrote what he needed, while allowing a small blot, which of course he would find at the first firmware in the device. However, you need to understand that he will spend some time on this. In addition, Snowflake added two terrible macros that in his opinion facilitate his work. In the previous C ++ example, we added quite a lot of code, including to replace these macros with great built-in functions. What for?
Let's take a look at the very popular setting macro. With it, you can set the bit in any integer type.
Everything looks very beautiful, except for one thing - in this code the error and the necessary bit will not be fixed. With the SET_BIT macro, 10 bits are set in the value variable, which is 8 bits in size. I wonder how much the programmer will look for such an error if the declaration of the variable is not so close to the macro call? The only advantage of this approach is the undoubted fact that the code will occupy the smallest size.
To avoid a potential error, let's replace this macro with a template function.
Here, the built-in function setBit accepts a reference to the parameter in which to set the bit and bit number. The function can take an arbitrary parameter type and bit number. In this case, in order to make sure that the bit number does not exceed the size of the parameter type, in other words, that the bit can be set exactly in a parameter of this type, we make a check using the assert function. The assert function checks the condition during execution and if the condition is met, the code continues to be executed further, but if the conditions are not met, the program will end with an error. The description of the prototype of the assert function lies in the cassert file, and it should be connected. Such a check will be useful during development, if suddenly someone decides to pass an invalid input parameter, you will notice it during operation when it works. It is clear that in the product code it makes no sense to use input parameter validation, since it takes up space, slows down work, and besides, during development you have already detected all the potential transmission of incorrect parameters, so you can disable assert by defining the NDEBUG symbol in the source file or defining it for the entire project.
Pay attention to the inline keyword. This keyword indicates to the compiler that it would be desirable for this function to be considered as embedded. Those. we assume that the compiler will simply replace the function call with its code, but in practice this can only be achieved with the optimization settings of the compiler. In IAR Workbench, this is the checkbox next to the “Function Inlining” option on the C / C ++ Compiler-> Optimization tab. In this case, our function is also fast and takes up as much space as the macro.
Let's go back to the Snowflake code, how are things going with extensibility?
After all, apparently the customer will not stop at this and what happens if the LEDs are not 4, but 40? Code size will increase linearly 10 times. The probability of an error will increase by the same amount, and support for the code will later become a routine.
A wiser C programmer could write code like this:
The main function now contains less code and the most important thing is easily expandable. With an increase in the number of LEDs, it is now quite simple to add the port to which the LED is connected to the pLeds LED array and change the LEDS_COUNT macro to the number of LEDs. At the same time the code size will not increase at all. Of course, the stack depth will increase significantly, since the array of LEDs is created on the stack, and it is already 56 bytes.
There is always a choice between the first solution and the second, which is more important for your specific implementation: Smaller code size, extensibility, readability and conciseness, or smaller RAM size and speed. In my experience in 90% of cases, you can choose the first.
But let's take a closer look at this code. This is typical C code using pointers and macros such as SET_BIT () and TOGGLE_BIT (). And in this regard, there are risks of potential problems, for example, the SwitchOnAllLed function (tLed * pLed, int size) accepts a pointer and an array size. First, you need to understand that nothing forbids passing a null pointer to this function, so you need to check that the pointer is not NULL, and you can accidentally pass a pointer to another object. Secondly, if the programmer suddenly transfers a size larger than the declared size of the array, the behavior of such a function will be completely unforeseen. Therefore, of course, it is better to check the size in this function. Adding such checks will increase the code, checks can be done using assert, but it's better to try to write the same thing in C ++
Yes, this code is already much more space. But we will see later on how such a design will help us save time, and the code size will be almost the same as in C, with the complexity of the program.
Here the LedsController class is used, I will give its code:
The SwitchOnAll () method no longer needs to pass a pointer to an array; it uses an already existing array stored inside the class object.
Why is this code considered more reliable? First, we do not use pointers anywhere, we store an array of objects on all existing LEDs in our class and refer directly to the object, and not to the pointer. Secondly, we use a special syntax for the for loop, which bypasses our array without having to specify its size; the compiler does it for us. This loop works with any objects that are iterators. An array in C ++ by default is such an object.
The only place to go wrong is to set the size of the array using the LedsCount constant. However, even from this small example, you can see that C ++ provides much more tools for writing reliable code.
Another point that needs attention is that we can mistakenly create several objects of the LedsController class, which will increase the size of the used RAM (stack) and the interesting behavior of the program. The Singleton template can help protect against this, but it’s worth doing only when you have a fairly large project, a large development team, and there is a risk that someone will forget that your controller object has already been created and will inadvertently create another one . In our case, this is an obvious oversupply, the function is small, and we clearly remember that we have one object of the LedsController class.
, , , ( ), : , . , , , .
. , , :
And although to add a new mode, you just need to add a new recloser, add a setting of the initial value for this mode and process the LEDs for this mode, the program still requires a thorough explanation and comments and already looks cumbersome. Therefore, it is decided to remove the processing modes in separate methods:
In this case, the main program looks much better:
But still I would like something like a human
You can try to do this in C, but then you have to keep several variables out of functions, for example, currentLed, Mode. These variables must be global so that the functions know about them. And global variables, as we know, are again a potential risk of error. You can inadvertently change the value of a global variable in one of the modules, since you cannot keep in mind all possible places, where and how it changes, and after a year you don’t remember why it is needed at all.
You can use structures to store this data and try to use OOP on C, but you should understand that in this case there will be a lot of overhead, you will at least have to store a pointer to a function, and the code will look very similar to C ++.
Therefore, we proceed immediately to the code in C ++
It seems that we managed to write C ++ code with practically human language? Isn't it very clear and simple code? This code does not require any comments, everything is clear and true. We even used the custom literal “sec” to make it clear that this is a second, which is then converted into samples for transmission to the Delay function, using the following construction:
The definition of a user literal is specified using the operator "" and the name of the literal. The constexpr keyword instructs the compiler that, if possible, the value should be calculated at the compilation stage and simply substituted into the code. In this case, all the values are known at the input, we pass 1 and we get 1000 at the output. Therefore, the compiler will simply replace the Delay (1sec) call with Delay (1000) - very convenient and readable. With the same keyword, you can replace all type macros,
on more understandable
Once again, we got a very extensible and understandable code, such that when adding new blinking modes with LEDs or changing the number of LEDs, nothing needs to be changed here! It will be necessary to make small changes only in the LedsController class, which is responsible for the behavior of the LEDs. On the face of the advantage of using this approach.
? , , ++ , , . , . — ++ 496 80 . ++ 606 112 .
, 20% . , IAR inline , - , . , , .
inline , . 396 72 .
The C ++ code is 400 bytes and 72 bytes on the stack. The difference is 4 bytes, and the assembler code is almost identical to the C code with an obvious advantage in simplicity and brevity of C ++ code. And who now will say that in C ++ is not profitable to write firmware?
PS:
.
vanxant , Mabu , exchg , Antervis . kosmos89 , NightShad0w std std
Jef239 leds static const, Led , . , …
C code is 156 bytes
int main(void) { int testArray[5U] = {-1,20,-3,0,4}; int lowest = INT_MAX; for (int i = 0; i < 5; i++) { lowest = ((lowest < testArray[i]) ? lowest : testArray[i]); }; return 0; And its assembly representation
')
And the code in C + +, which occupies 152 bytes
int main() { int testArray[5U] = {-1, 20, -3, 0, 4}; int lowest = std::numeric_limits<int>.max(); for (auto it: testArray) { lowest = ((lowest < it) ? lowest : it); }; return 0; And its assembly representation
As you can see the code generated by the compiler in C ++ is 4 bytes less, and the speed is 12 clocks faster. All this is achieved through new features of C ++ 14. Of course, it can be noted that optimization was turned off for both compilers, that this is a very synthetic test that has nothing to do with the actual implementation, but still it can be said that everything is not so simple.
It is necessary to take into account the features of programming for microcontrollers, because the requirements for a small amount of program memory of 32.64..512 kB, an even smaller amount of RAM and a low frequency of microprocessors (especially when used for low-power sensors) impose their limitations. And it’s safe to say that not all C ++ chips are useful. For example, using the standard template library can take a significant amount of resources, and such important things in the big C ++ world can be thrown out of projects for small microcontrollers with confidence, since they require a significant increase in the stack size and code to store information about the exception handler and further searching for it. Therefore, I will try to tell you how to use C ++ and its new features for small projects and try to show that without a twinge of conscience C ++ can be used instead of C.
The first step is to determine the task. It should be simple enough, but also indicative enough to see how you can, for example, completely abandon macros , get away from pointers if possible, reduce the risks of stupid mistakes, and so on ...
The choice, as usual fell on svetodidy.
In order for the reader to understand what we want to do, I will give the final version of the task to be implemented on the microcontroller:
- Used XNUCLEO-F411RE board
- The software must run on an STMF411R microprocessor, operating from an external frequency of 16 MHz.
- The software must support control of 4 LEDs on the board connected to the ports (LED 1 - GPIOA.5, LED 2 - GPIOC.9, LED 3 - GPIOC.8, LED 4 - GPIOC.5).
- The software must support 3 LED control modes (Yolochka - all LEDs light up alternately, then go off alternately in the same order. Chess - first even LEDs light up and odd lights go out, then vice versa. All mode — All LEDs light up and then go out). The time for changing the status of the LEDs is 1 second.
- The software must support the change of the LED control mode using a button connected to the GPIOC.13 port in a circular order in the Yolochka-Chess-All sequence.
This is the final demand from the customer. But as is usually the case in practice, at first the customer came up with an easier idea, he decided that for complete happiness he lacked a bright indication, namely, a blinking green LED every 1 second. This task and rushed to implement a programmer named Snowflake.
So, on our board there are 4 LEDs: LED1, LED2, LED3 and LED4. They are connected to the ports GPIOA.5, GPIOC.5, GPIOC.8, GPIOC.9, respectively. For now, let's work with LED1, which is located on GPIOA.5.
To begin with, the programmer Snowflake wrote here is such a simple C code that will switch the LED. It looks like this:
int main() { GPIOC->ODR ^= GPIO_ODR_OD5; // LED1 Delay(1000U); GPIOC->ODR ^= GPIO_ODR_OD5; // , return 0; } The code works well and correctly, Snowflake was satisfied with his work and went to rest. But for the uninitiated in the subtleties of the PCB layout and user boolean operations, this code is not completely clear, so Snezhinka had to add comments that explain that there is an LED on the GPIOA.5 port and we actually want to switch it.
Let's think about how this code should look like in human language. Maybe so:
Toggle Led1 then Delay 1000ms then Toggle Led1 As we can see, comments are no longer needed here and the purpose of such code is intuitive. The most remarkable thing is that this pseudocode almost completely corresponds to the code in C ++. Look, the only difference is that we must first create an LED, indicating which port it is on.
int main() { Led Led1(*GPIOA, 5U); Led1.Toggle(); Delay(1000U); Led1.Toggle(); return 0; } Full code
startup.cpp
#pragma language = extended #pragma segment = "CSTACK" extern "C" void __iar_program_start( void ); class DummyModule { public: static void handler(); }; typedef void( *intfunc )( void ); //cstat !MISRAC++2008-9-5-1 typedef union { intfunc __fun; void * __ptr; } intvec_elem; #pragma location = ".intvec" //cstat !MISRAC++2008-0-1-4_b !MISRAC++2008-9-5-1 extern "C" const intvec_elem __vector_table[] = { { .__ptr = __sfe( "CSTACK" ) }, __iar_program_start, DummyModule::handler, DummyModule::handler, DummyModule::handler, DummyModule::handler, DummyModule::handler, 0, 0, 0, 0, DummyModule::handler, DummyModule::handler, 0, DummyModule::handler, DummyModule::handler, //External Interrupts DummyModule::handler, //Window Watchdog DummyModule::handler, //PVD through EXTI Line detect/EXTI16 DummyModule::handler, //Tamper and Time Stamp/EXTI21 DummyModule::handler, //RTC Wakeup/EXTI22 DummyModule::handler, //FLASH DummyModule::handler, //RCC DummyModule::handler, //EXTI Line 0 DummyModule::handler, //EXTI Line 1 DummyModule::handler, //EXTI Line 2 DummyModule::handler, //EXTI Line 3 DummyModule::handler, //EXTI Line 4 DummyModule::handler, //DMA1 Stream 0 DummyModule::handler, //DMA1 Stream 1 DummyModule::handler, //DMA1 Stream 2 DummyModule::handler, //DMA1 Stream 3 DummyModule::handler, //DMA1 Stream 4 DummyModule::handler, //DMA1 Stream 5 DummyModule::handler, //DMA1 Stream 6 DummyModule::handler, //ADC1 0, //USB High Priority 0, //USB Low Priority 0, //DAC 0, //COMP through EXTI Line DummyModule::handler, //EXTI Line 9..5 DummyModule::handler, //TIM9/TIM1 Break interrupt DummyModule::handler, //TIM10/TIM1 Update interrupt DummyModule::handler, //TIM11/TIM1 Trigger/Commutation interrupts DummyModule::handler, //TIM1 Capture Compare interrupt DummyModule::handler, //TIM2 DummyModule::handler, //TIM3 DummyModule::handler, //TIM4 DummyModule::handler, //I2C1 Event DummyModule::handler, //I2C1 Error DummyModule::handler, //I2C2 Event DummyModule::handler, //I2C2 Error DummyModule::handler, //SPI1 DummyModule::handler, //SPI2 DummyModule::handler, //USART1 DummyModule::handler, //USART2 0, DummyModule::handler, //EXTI Line 15..10 DummyModule::handler, //EXTI Line 17 interrupt / RTC Alarms (A and B) through EXTI line interrupt DummyModule::handler, //EXTI Line 18 interrupt / USB On-The-Go FS Wakeup through EXTI line interrupt 0, //TIM6 0, //TIM7 f0 0, 0, DummyModule::handler, //DMA1 Stream 7 global interrupt fc 0, DummyModule::handler, //SDIO global interrupt DummyModule::handler, //TIM5 global interrupt DummyModule::handler, //SPI3 global interrupt 0, // 110 0, 0, 0, DummyModule::handler, //DMA2 Stream0 global interrupt 120 DummyModule::handler, //DMA2 Stream1 global interrupt DummyModule::handler, //DMA2 Stream2 global interrupt DummyModule::handler, //DMA2 Stream3 global interrupt DummyModule::handler, //DMA2 Stream4 global interrupt 130 0, 0, 0, 0, 0, 0, DummyModule::handler, //USB On The Go FS global interrupt, 14C DummyModule::handler, //DMA2 Stream5 global interrupt DummyModule::handler, //DMA2 Stream6 global interrupt DummyModule::handler, //DMA2 Stream7 global interrupt DummyModule::handler, //USART6 15C DummyModule::handler, //I2C3 Event DummyModule::handler, //I2C3 Error 164 0, 0, 0, 0, 0, 0, 0, DummyModule::handler, //FPU 184 0, 0, DummyModule::handler, //SPI 4 global interrupt DummyModule::handler //SPI 5 global interrupt }; __weak void DummyModule::handler() { for(;;) {} }; extern "C" void __cmain( void ); extern "C" __weak void __iar_init_core( void ); extern "C" __weak void __iar_init_vfp( void ); #pragma required=__vector_table void __iar_program_start( void ) { __iar_init_core(); __iar_init_vfp(); __cmain(); } utils.hpp
#ifndef UTILS_H #define UTILS_H #include <cassert> namespace utils { template<typename T, typename T1> inline void setBit(T &value, T1 bit) { assert((sizeof(T) * 8U) > bit); value |= static_cast<T>(static_cast<T>(1) << static_cast<T>(bit)); }; template<typename T, typename T1> inline void clearBit(T &value, T1 bit) { assert((sizeof(T) * 8U) > bit); value &= ~static_cast<T>(static_cast<T>(1) << static_cast<T>(bit)); }; template<typename T, typename T1> inline void toggleBit(T &value, T1 bit) { assert((sizeof(T) * 8U) > bit); value ^= static_cast<T>(static_cast<T>(1) << static_cast<T>(bit)); }; template<typename T, typename T1> inline bool checkBit(const T &value, T1 bit) { assert((sizeof(T) * 8U) > bit); return !((value & (static_cast<T>(1) << static_cast<T>(bit))) == static_cast<T>(0U)); }; }; #endif led.hpp
#ifndef LED_H #define LED_H #include "utils.hpp" class Led { public: Led(GPIO_TypeDef &portName, unsigned int pinNum) : port(portName), pin(pinNum) {}; inline void Toggle() const { utils::toggleBit(port.ODR, pin); } inline void SwitchOn() const { utils::setBit(port.ODR, pin); } inline void SwitchOff() const { utils::clearBit(port.ODR, pin); } private: GPIO_TypeDef &port; unsigned int pin; }; #endif main.cpp
#include <stm32f411xe.h> #include "led.hpp" extern "C" { int __low_level_init(void) { // 16 RCC->CR |= RCC_CR_HSION; while ((RCC->CR & RCC_CR_HSIRDY) != RCC_CR_HSIRDY) { } // RCC->CFGR |= RCC_CFGR_SW_HSI; while ((RCC->CFGR & RCC_CFGR_SWS) != RCC_CFGR_SWS_HSI) { } // RCC->AHB1ENR |= (RCC_AHB1ENR_GPIOAEN); //LED1 PortA.5, PortA.5 GPIOA->MODER |= GPIO_MODER_MODE5_0; return 1; } //, inline void Delay(unsigned int mSec) { for (unsigned int i = 0U; i < mSec * 3000U; i++) { __NOP(); }; } } int main() { Led Led1(*GPIOA, 5U); Led1.Toggle(); Delay(1000U); Led1.Toggle(); return 0; } Minimalist programmers can say that yes the code is clearer, but it’s redundant, an object is created, the constructor is called, the methods, how much RAM and additional code are generated. But if you look at the listing in assembler, you will be pleasantly surprised that the size of the C ++ code with the inline functions option enabled for both compilers will be the same as for the C program, and due to the peculiarities of the main function call, the common C + code + even one less instruction.
Assembler code from C source
Assembler code from C ++ source
This once again confirms the fact that modern compilers do their job of turning your remarkable and understandable C ++ code into optimal assembly code. And not every assembler programmer can achieve this level of optimization.
Of course, with optimization turned off, C ++ code will not be as compact in size as the stack and speed. For comparison, I will give a non-optimized version with a call to the constructor and methods.
For me, there is no dilemma between holding a lot of unnecessary details in my head to write the sensor firmware (which elements to which ports are connected, what current state the port or a particular module is in, etc.) and the simplicity and clarity of the code. After all, in the end, we need to describe the logic of the device, the interaction interface with the user, to implement the calculations, and not to remember that in order to read data from the ADC, you must first select it using the CS signal located on the port GPIOA.3 and set his unit. Let the developer of the ADC module deal with this.
Initially, it may seem that you need to write a lot of additional code, but I assure you, it will more than pay off when the application becomes a little more difficult than just blinking the LED.
Let's return to our task. The Snowflake did not have time to show the result of its work to the customer, as the customer, having felt the charm of LED blinking in the night, decided that it would be good to have four LEDs blinking in the “Herringbone” mode, especially since Chinese New Year is coming and there will be many potential buyers.
Our programmer Snowflake, who simultaneously performs several projects, decided to save time and do everything in the forehead with the most, as he believes in a reliable and understandable way:
#define TOGGLE_BIT(A,B) ((A) ^= (1U << ((B) & 31UL))) #define SET_BIT(A,B) ((A) |= (1U << ((B) & 31UL))) int main(void) { // SET_BIT(GPIOC->ODR, 5U); SET_BIT(GPIOC->ODR, 8U); SET_BIT(GPIOC->ODR, 9U); SET_BIT(GPIOA->ODR, 5U); // for (;;) { Delay(1000U); TOGGLE_BIT(GPIOC->ODR, 5U); Delay(1000U); TOGGLE_BIT(GPIOC->ODR, 8U); Delay(1000U); TOGGLE_BIT(GPIOC->ODR, 9U); Delay(1000U); TOGGLE_BIT(GPIO->ODR, 5U); //: TOGGLE_BIT(GPIOA->ODR, 5U } return 0; } The code works, but pay attention to the last entry TOGGLE_BIT (GPIO-> ODR, 5U). LEDs 1 and 4 are located on pin number 5, but on different ports. Using Ctrl C-Ctrl V, Snowflake copied the first entry, and forgot to change the port. This is a typical mistake made by programmers working under pressure from management, setting the deadline of "yesterday." The problem is that for the task, it was necessary to quickly write the code, and Snowflake did not have time to think about the software design, he just sat down and wrote what he needed, while allowing a small blot, which of course he would find at the first firmware in the device. However, you need to understand that he will spend some time on this. In addition, Snowflake added two terrible macros that in his opinion facilitate his work. In the previous C ++ example, we added quite a lot of code, including to replace these macros with great built-in functions. What for?
Let's take a look at the very popular setting macro. With it, you can set the bit in any integer type.
#define SET_BIT(A,B) (A |= (1 << B)) int main() { unsigned char value = 0U; SET_BIT(value, 10); return 0; } Everything looks very beautiful, except for one thing - in this code the error and the necessary bit will not be fixed. With the SET_BIT macro, 10 bits are set in the value variable, which is 8 bits in size. I wonder how much the programmer will look for such an error if the declaration of the variable is not so close to the macro call? The only advantage of this approach is the undoubted fact that the code will occupy the smallest size.
To avoid a potential error, let's replace this macro with a template function.
template<typename T, typename T1> inline void setBit(T &value, T1 bit) { assert((sizeof(T) * 8U) > bit); value |= static_cast<T>(static_cast<T>(1) << static_cast<T>(bit)); }; Here, the built-in function setBit accepts a reference to the parameter in which to set the bit and bit number. The function can take an arbitrary parameter type and bit number. In this case, in order to make sure that the bit number does not exceed the size of the parameter type, in other words, that the bit can be set exactly in a parameter of this type, we make a check using the assert function. The assert function checks the condition during execution and if the condition is met, the code continues to be executed further, but if the conditions are not met, the program will end with an error. The description of the prototype of the assert function lies in the cassert file, and it should be connected. Such a check will be useful during development, if suddenly someone decides to pass an invalid input parameter, you will notice it during operation when it works. It is clear that in the product code it makes no sense to use input parameter validation, since it takes up space, slows down work, and besides, during development you have already detected all the potential transmission of incorrect parameters, so you can disable assert by defining the NDEBUG symbol in the source file or defining it for the entire project.
Pay attention to the inline keyword. This keyword indicates to the compiler that it would be desirable for this function to be considered as embedded. Those. we assume that the compiler will simply replace the function call with its code, but in practice this can only be achieved with the optimization settings of the compiler. In IAR Workbench, this is the checkbox next to the “Function Inlining” option on the C / C ++ Compiler-> Optimization tab. In this case, our function is also fast and takes up as much space as the macro.
Let's go back to the Snowflake code, how are things going with extensibility?
Snowflake Code
#define TOGGLE_BIT(A,B) ((A) ^= (1U << ((B) & 31UL))) #define SET_BIT(A,B) ((A) |= (1U << ((B) & 31UL))) int main(void) { // SET_BIT(GPIOC->ODR, 5U); SET_BIT(GPIOC->ODR, 8U); SET_BIT(GPIOC->ODR, 9U); SET_BIT(GPIOA->ODR, 5U); // for (;;) { Delay(1000U); TOGGLE_BIT(GPIOC->ODR, 5U); Delay(1000U); TOGGLE_BIT(GPIOC->ODR, 8U); Delay(1000U); TOGGLE_BIT(GPIOC->ODR, 9U); Delay(1000U); TOGGLE_BIT(GPIO->ODR, 5U); //: TOGGLE_BIT(GPIOA->ODR, 5U } return 0; } After all, apparently the customer will not stop at this and what happens if the LEDs are not 4, but 40? Code size will increase linearly 10 times. The probability of an error will increase by the same amount, and support for the code will later become a routine.
A wiser C programmer could write code like this:
int main(void) { tLed pLeds[] = {{ GPIOC, 5U },{ GPIOC, 8U },{ GPIOC, 9U },{ GPIOA, 5U }}; SwitchOnAllLed(pLeds, LEDS_COUNT); for (;;) { for (int i = 0; i < LEDS_COUNT; i++) { Delay(1000U); ToggleLed(&pLeds[i]); } } return 0; } The main function now contains less code and the most important thing is easily expandable. With an increase in the number of LEDs, it is now quite simple to add the port to which the LED is connected to the pLeds LED array and change the LEDS_COUNT macro to the number of LEDs. At the same time the code size will not increase at all. Of course, the stack depth will increase significantly, since the array of LEDs is created on the stack, and it is already 56 bytes.
There is always a choice between the first solution and the second, which is more important for your specific implementation: Smaller code size, extensibility, readability and conciseness, or smaller RAM size and speed. In my experience in 90% of cases, you can choose the first.
But let's take a closer look at this code. This is typical C code using pointers and macros such as SET_BIT () and TOGGLE_BIT (). And in this regard, there are risks of potential problems, for example, the SwitchOnAllLed function (tLed * pLed, int size) accepts a pointer and an array size. First, you need to understand that nothing forbids passing a null pointer to this function, so you need to check that the pointer is not NULL, and you can accidentally pass a pointer to another object. Secondly, if the programmer suddenly transfers a size larger than the declared size of the array, the behavior of such a function will be completely unforeseen. Therefore, of course, it is better to check the size in this function. Adding such checks will increase the code, checks can be done using assert, but it's better to try to write the same thing in C ++
int main() { LedsController LedsContr; LedsContr.SwitchOnAll(); for (;;) { for (auto &led : LedsContr.Leds) { Delay(1000U); led.Toggle(); } } return 0; } Yes, this code is already much more space. But we will see later on how such a design will help us save time, and the code size will be almost the same as in C, with the complexity of the program.
Here the LedsController class is used, I will give its code:
#ifndef LEDSCONTROLLER_H #define LEDSCONTROLLER_H #include "led.hpp" #include <array> constexpr unsigned int LedsCount = 4U; class LedsController { public: LedsController() {}; inline void SwitchOnAll() { for (auto &led : Leds) { led.SwitchOn(); } }; std::array<Led, LedsCount> leds{Led{*GPIOC, 5U},Led{*GPIOC, 8U},Led{*GPIOC, 9U},Led{*GPIOA, 5U}}; }; #endif The SwitchOnAll () method no longer needs to pass a pointer to an array; it uses an already existing array stored inside the class object.
Why is this code considered more reliable? First, we do not use pointers anywhere, we store an array of objects on all existing LEDs in our class and refer directly to the object, and not to the pointer. Secondly, we use a special syntax for the for loop, which bypasses our array without having to specify its size; the compiler does it for us. This loop works with any objects that are iterators. An array in C ++ by default is such an object.
The only place to go wrong is to set the size of the array using the LedsCount constant. However, even from this small example, you can see that C ++ provides much more tools for writing reliable code.
Another point that needs attention is that we can mistakenly create several objects of the LedsController class, which will increase the size of the used RAM (stack) and the interesting behavior of the program. The Singleton template can help protect against this, but it’s worth doing only when you have a fairly large project, a large development team, and there is a risk that someone will forget that your controller object has already been created and will inadvertently create another one . In our case, this is an obvious oversupply, the function is small, and we clearly remember that we have one object of the LedsController class.
, , , ( ), : , . , , , .
. , , :
int main(void) { tPort Leds[] = { { GPIOC, 5U },{ GPIOC, 8U },{ GPIOC, 9U },{ GPIOA, 5U } }; tPort Button = { GPIOC, BUTTON_PIN }; // GPIOC.13 tLedMode Mode = LM_Tree; int currentLed = 0; SwitchOnAllLed(Leds, LEDS_COUNT); for (;;) { // . 1, 0 if (!CHECK_BIT(Button.pPort->IDR, BUTTON_PIN)) { // Mode = (Mode < LM_End) ? (tLedMode)(Mode + 1U) : LM_Tree; // currentLed = 0; switch (Mode) { case LM_Tree: case LM_All: SwitchOnAllLed(Leds, LEDS_COUNT); break; case LM_Chess: SwitchChessLed(Leds, LEDS_COUNT); break; default: break; } } // switch (Mode) { case LM_Tree: ToggleLed(&Leds[currentLed]); break; case LM_All: case LM_Chess: ToggleAll(Leds, LEDS_COUNT); break; default: break; } currentLed = (currentLed < (LEDS_COUNT – 1)) ? (currentLed + 1) : 0; Delay(300U); } return 0; } And although to add a new mode, you just need to add a new recloser, add a setting of the initial value for this mode and process the LEDs for this mode, the program still requires a thorough explanation and comments and already looks cumbersome. Therefore, it is decided to remove the processing modes in separate methods:
inline void SetLedsBeginState(tLedMode mode, tPort *leds) { switch (mode) { case LM_Tree: case LM_All: SwitchOnAllLed(leds, LEDS_COUNT); break; case LM_Chess: SwitchChessLed(leds, LEDS_COUNT); break; default: break; } } inline void UpdateLeds(tLedMode mode, tPort *leds, int curLed) { switch (mode) { case LM_Tree: ToggleLed(&leds[curLed]); break; case LM_All: case LM_Chess: ToggleAll(leds, LEDS_COUNT); break; default: break; } } In this case, the main program looks much better:
int main(void) { tPort Leds[] = { {GPIOC, 5U},{GPIOC, 8U},{GPIOC, 9U},{GPIOA, 5U} }; tPort Button = {GPIOC, BUTTON_PIN}; tLedMode Mode = LM_Tree; int currentLed = 0; SwitchOnAllLed(Leds, LEDS_COUNT); for (;;) { // . 1, 0 if (!CHECK_BIT(Button.pPort->IDR, BUTTON_PIN)) { // Mode = (Mode < LM_End) ? (tLedMode)(Mode + 1U) : LM_Tree; currentLed = 0; // SetLedsBeginState(Mode, Leds); } // UpdateLeds(Mode, Leds, currentLed); currentLed = (currentLed < (LEDS_COUNT -1)) ? (currentLed + 1) : 0; Delay(300U); } return 0; } But still I would like something like a human
If Button is Pressed then set Next Light Mode Update Leds Delay 1000ms You can try to do this in C, but then you have to keep several variables out of functions, for example, currentLed, Mode. These variables must be global so that the functions know about them. And global variables, as we know, are again a potential risk of error. You can inadvertently change the value of a global variable in one of the modules, since you cannot keep in mind all possible places, where and how it changes, and after a year you don’t remember why it is needed at all.
You can use structures to store this data and try to use OOP on C, but you should understand that in this case there will be a lot of overhead, you will at least have to store a pointer to a function, and the code will look very similar to C ++.
Therefore, we proceed immediately to the code in C ++
int main() { LedsController leds; Button button{ *GPIOC, 13U }; for (;;) { if (button.IsPressed()) { leds.NextMode(); } else { leds.Update(); } Delay(1sec); } return 0; } Full code
utils.hpp
#ifndef UTILS_H #define UTILS_H #include <cassert> namespace utils { template<typename T, typename T1> inline void setBit(T &value, T1 bit) { assert((sizeof(T) * 8U) > bit); value |= static_cast<T>(static_cast<T>(1) << static_cast<T>(bit)); }; template<typename T, typename T1> inline void clearBit(T &value, T1 bit) { assert((sizeof(T) * 8U) > bit); value &=~ static_cast<T>(static_cast<T>(1) << static_cast<T>(bit)); }; template<typename T,typename T1> inline void toggleBit(T &value, T1 bit) { assert((sizeof(T) * 8U) > bit); value ^= static_cast<T>(static_cast<T>(1) << static_cast<T>(bit)); }; template<typename T, typename T1> inline bool checkBit(const T &value, T1 bit) { assert((sizeof(T) * 8U) > bit); return !((value & (static_cast<T>(1) << static_cast<T>(bit))) == static_cast<T>(0U)); }; }; constexpr unsigned long long operator "" sec(unsigned long long sec) { return sec * 1000U; } #endif led.hpp
#ifndef LED_H #define LED_H #include "utils.hpp" class Led { public: Led(GPIO_TypeDef &portName, unsigned int pinNum): port(portName), pin(pinNum) {}; inline void Toggle() const { utils::toggleBit(port.ODR, pin); } inline void SwitchOn() const { utils::setBit(port.ODR, pin); } inline void SwitchOff() const { utils::clearBit(port.ODR, pin); } private: GPIO_TypeDef &port; unsigned int pin; }; #endif LedsController.hpp
#ifndef LEDSCONTROLLER_H #define LEDSCONTROLLER_H #include "led.hpp" #include <array> enum class LedMode : unsigned char { Tree = 0, Chess = 1, All = 2, End = 2 }; constexpr int LedsCount = 4; class LedsController { public: LedsController() { SwitchOnAll(); }; void SwitchOnAll() { for (auto &led: leds) { led.SwitchOn(); } }; void ToggleAll() { for (auto &led: leds) { led.Toggle(); } }; void NextMode() { mode = (mode < LedMode::End) ? static_cast<LedMode>(static_cast<unsigned char>(mode) + 1U) : LedMode::Tree; currentLed = 0; if (mode == LedMode::Chess){ for(int i = 0; i < LedsCount; i++) { if ((i % 2) == 0) { leds[i].SwitchOn(); } else { leds[i].SwitchOff(); } } } else { SwitchOnAll(); } }; void Update() { switch(mode) { case LedMode::Tree: leds[currentLed].Toggle(); break; case LedMode::All: case LedMode::Chess: ToggleAll(); break; default: break; } currentLed = (currentLed < (LedsCount - 1)) ? (currentLed + 1) : 0; } private: LedMode mode = LedMode::Tree; int currentLed = 0; std::array<Led, LedsCount> leds{Led{*GPIOC, 5U},Led{*GPIOC, 8U},Led{*GPIOC, 9U},Led{*GPIOA, 5U}}; }; #endif startup.cpp
#pragma language = extended #pragma segment = "CSTACK" extern "C" void __iar_program_start( void ); class DummyModule { public: static void handler(); }; typedef void( *intfunc )( void ); //cstat !MISRAC++2008-9-5-1 typedef union { intfunc __fun; void * __ptr; } intvec_elem; #pragma location = ".intvec" //cstat !MISRAC++2008-0-1-4_b !MISRAC++2008-9-5-1 extern "C" const intvec_elem __vector_table[] = { { .__ptr = __sfe( "CSTACK" ) }, __iar_program_start, DummyModule::handler, DummyModule::handler, DummyModule::handler, DummyModule::handler, DummyModule::handler, 0, 0, 0, 0, DummyModule::handler, DummyModule::handler, 0, DummyModule::handler, DummyModule::handler, //External Interrupts DummyModule::handler, //Window Watchdog DummyModule::handler, //PVD through EXTI Line detect/EXTI16 DummyModule::handler, //Tamper and Time Stamp/EXTI21 DummyModule::handler, //RTC Wakeup/EXTI22 DummyModule::handler, //FLASH DummyModule::handler, //RCC DummyModule::handler, //EXTI Line 0 DummyModule::handler, //EXTI Line 1 DummyModule::handler, //EXTI Line 2 DummyModule::handler, //EXTI Line 3 DummyModule::handler, //EXTI Line 4 DummyModule::handler, //DMA1 Stream 0 DummyModule::handler, //DMA1 Stream 1 DummyModule::handler, //DMA1 Stream 2 DummyModule::handler, //DMA1 Stream 3 DummyModule::handler, //DMA1 Stream 4 DummyModule::handler, //DMA1 Stream 5 DummyModule::handler, //DMA1 Stream 6 DummyModule::handler, //ADC1 0, //USB High Priority 0, //USB Low Priority 0, //DAC 0, //COMP through EXTI Line DummyModule::handler, //EXTI Line 9..5 DummyModule::handler, //TIM9/TIM1 Break interrupt DummyModule::handler, //TIM10/TIM1 Update interrupt DummyModule::handler, //TIM11/TIM1 Trigger/Commutation interrupts DummyModule::handler, //TIM1 Capture Compare interrupt DummyModule::handler, //TIM2 DummyModule::handler, //TIM3 DummyModule::handler, //TIM4 DummyModule::handler, //I2C1 Event DummyModule::handler, //I2C1 Error DummyModule::handler, //I2C2 Event DummyModule::handler, //I2C2 Error DummyModule::handler, //SPI1 DummyModule::handler, //SPI2 DummyModule::handler, //USART1 DummyModule::handler, //USART2 0, DummyModule::handler, //EXTI Line 15..10 DummyModule::handler, //EXTI Line 17 interrupt / RTC Alarms (A and B) through EXTI line interrupt DummyModule::handler, //EXTI Line 18 interrupt / USB On-The-Go FS Wakeup through EXTI line interrupt 0, //TIM6 0, //TIM7 f0 0, 0, DummyModule::handler, //DMA1 Stream 7 global interrupt fc 0, DummyModule::handler, //SDIO global interrupt DummyModule::handler, //TIM5 global interrupt DummyModule::handler, //SPI3 global interrupt 0, // 110 0, 0, 0, DummyModule::handler, //DMA2 Stream0 global interrupt 120 DummyModule::handler, //DMA2 Stream1 global interrupt DummyModule::handler, //DMA2 Stream2 global interrupt DummyModule::handler, //DMA2 Stream3 global interrupt DummyModule::handler, //DMA2 Stream4 global interrupt 130 0, 0, 0, 0, 0, 0, DummyModule::handler, //USB On The Go FS global interrupt, 14C DummyModule::handler, //DMA2 Stream5 global interrupt DummyModule::handler, //DMA2 Stream6 global interrupt DummyModule::handler, //DMA2 Stream7 global interrupt DummyModule::handler, //USART6 15C DummyModule::handler, //I2C3 Event DummyModule::handler, //I2C3 Error 164 0, 0, 0, 0, 0, 0, 0, DummyModule::handler, //FPU 184 0, 0, DummyModule::handler, //SPI 4 global interrupt DummyModule::handler //SPI 5 global interrupt }; __weak void DummyModule::handler() { for(;;) {} }; extern "C" void __cmain( void ); extern "C" __weak void __iar_init_core( void ); extern "C" __weak void __iar_init_vfp( void ); #pragma required=__vector_table void __iar_program_start( void ) { __iar_init_core(); __iar_init_vfp(); __cmain(); } main.cpp
#include <stm32f411xe.h> #include "ledscontroller.hpp" #include "button.hpp" extern "C" { int __low_level_init(void) { // 16 RCC->CR |= RCC_CR_HSION; while ((RCC->CR & RCC_CR_HSIRDY) != RCC_CR_HSIRDY) { } // RCC->CFGR |= RCC_CFGR_SW_HSI; while ((RCC->CFGR & RCC_CFGR_SWS) != RCC_CFGR_SWS_HSI) { } // RCC->AHB1ENR |= (RCC_AHB1ENR_GPIOCEN | RCC_AHB1ENR_GPIOAEN); //LED1 PortA.5, PortA.5 GPIOA->MODER |= GPIO_MODER_MODE5_0; //LED2 Port.9,LED3 PortC.8,LED4 PortC.5 PortC.5,8,9 GPIOC->MODER |= (GPIO_MODER_MODE5_0 | GPIO_MODER_MODE8_0 | GPIO_MODER_MODE9_0); return 1; } } //, inline void Delay(unsigned int mSec) { for (unsigned int i = 0U; i < mSec * 3000U; i++) { __NOP(); }; } int main() { LedsController leds; LedsController leds1; Button buttonUser{*GPIOC, 13U}; for(;;) { if (buttonUser.IsPressed()) { leds.NextMode(); } else { leds.Update(); leds1.Update(); } Delay(1sec); } return 0; } It seems that we managed to write C ++ code with practically human language? Isn't it very clear and simple code? This code does not require any comments, everything is clear and true. We even used the custom literal “sec” to make it clear that this is a second, which is then converted into samples for transmission to the Delay function, using the following construction:
constexpr unsigned long long operator "" sec(unsigned long long sec) { return sec * 1000U; } ... Delay(1sec); The definition of a user literal is specified using the operator "" and the name of the literal. The constexpr keyword instructs the compiler that, if possible, the value should be calculated at the compilation stage and simply substituted into the code. In this case, all the values are known at the input, we pass 1 and we get 1000 at the output. Therefore, the compiler will simply replace the Delay (1sec) call with Delay (1000) - very convenient and readable. With the same keyword, you can replace all type macros,
#define MAGIC_NUM 0x5f3759df on more understandable
constexpr unsigned int MagicNumber = 0x5f3759df; Once again, we got a very extensible and understandable code, such that when adding new blinking modes with LEDs or changing the number of LEDs, nothing needs to be changed here! It will be necessary to make small changes only in the LedsController class, which is responsible for the behavior of the LEDs. On the face of the advantage of using this approach.
? , , ++ , , . , . — ++ 496 80 . ++ 606 112 .
, 20% . , IAR inline , - , . , , .
inline , . 396 72 .
The C ++ code is 400 bytes and 72 bytes on the stack. The difference is 4 bytes, and the assembler code is almost identical to the C code with an obvious advantage in simplicity and brevity of C ++ code. And who now will say that in C ++ is not profitable to write firmware?
PS:
.
vanxant , Mabu , exchg , Antervis . kosmos89 , NightShad0w std std
Jef239 leds static const, Led , . , …
Source: https://habr.com/ru/post/347980/
All Articles