Writing a blockchain in less than 200 lines of Go code
Hi, Habr! I present to your attention the translation of the article " Code your own blockchain in less than 200 lines of Go! ".

This lesson is a well-adapted post about simply writing blockchain in Javascript. We ported it to Go and added additional features, such as browsing chains in the browser.
The examples in the lesson will be based on the heartbeat data. We are a medical company. For interest, you can calculate your heart rate (beats per minute) and take this number into account during the training course.
Almost every developer in the world has heard about blockchain, but most still do not know how it works. Many have heard only about Bitcoin, smart contracts . This post is an attempt to dispel rumors of a blockchain, helping you write your own blockchain on Go in less than 200 lines of code! At the end of this lesson, you can run and write data to the blockchain locally, as well as view it in a browser.
Is there a better way to learn about blockchain than to create your own?
What can you do
- Create your own blockchain
- Understand how hashing works in preserving the integrity of a block chain
- See how new blocks are added.
- See how collisions are resolved when multiple nodes generate blocks
- Create a view of your blockchain in the browser.
- Add new blocks
- Gain a basic knowledge of blockchain
What you can not do
To keep this post simple, we will not consider more sophisticated concepts of proof of work and proof of stake . Networking will be modeled so that you can view your blockchain and view the added blocks. Networking will be reserved for future posts.
Let's start!
Installation
Since we are going to write code on Go, we assume that you already have experience developing on it. After installation, we will also use the following packages:
go get github.com/davecgh/go-spew/spew Spew allows us to beautifully display structures and slices in the console.
go get github.com/gorilla/mux Gorilla / mux is a popular package for writing query handlers.
go get github.com/joho/godotenv Gotdotenv allows us to read from the .env file that lies in the root of the directory, so we don’t have to set parameters like http port in our code.
Let's create our .env file in the root of the directory that will determine the port on which we will listen for HTTP requests. Just add a line to the file:
ADDR=8080 Create a file main.go The entire implementation will be in this file and will contain less than 200 lines of code.
Imports
Package imports, along with package declarations:
package main import ( "crypto/sha256" "encoding/hex" "encoding/json" "io" "log" "net/http" "os" "time" "github.com/davecgh/go-spew/spew" "github.com/gorilla/mux" "github.com/joho/godotenv" ) Data model
Let's define the structure of each of our blocks, which are blockchain. Below we explain why all these fields are necessary:
type Block struct { Index int Timestamp string BPM int Hash string PrevHash string } Each block contains data that will be recorded in the blockchain and represents the event of each pulse measurement.
Index- the index of the data entry in blockchainTimestamp- timestamp when data is writtenBPM- beats per minute. This is your heart rate.Hash- SHA256 identifier identifying the current recordPrevHash- SHA256 identifier identifying the previous entry in the chain
Let's declare our blockchain, which is just a slice of structures:
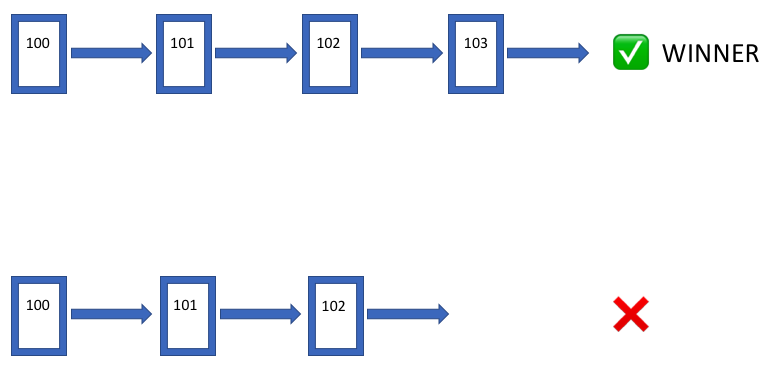
var Blockchain []Block So, how is hashing used in blocks and in blockchain? We use hashes to define and save blocks in the correct order. Due to the fact that the PrevHash field in each block refers to the Hash field in the previous block (that is, they are equal), we know the correct order of the blocks.

Hashing and creating new blocks
Why do we have to hash it? We get a hash for two main reasons:
- To save space. Hashes are made from all the data in the block. In our case, there are only a few data blocks, but imagine that we have data from hundreds, thousands or millions of previous records. It is much more efficient to hash this data into one SHA256 line and hash hashes than to copy all the data from previous blocks over and over.
- Maintaining the integrity of the chain. By keeping the previous hashes, as we do in the diagram above, we can ensure that the blocks in the blockchain are in the correct order. If an attacker wants to join and manipulate data (for example, change the heart rate to correct the prices of life insurance), the hashes will start to change and everyone will know that the chain is “broken” and everyone will know that you cannot trust this chain.
Let's write a function that takes our Block data and creates a SHA256 hash for them.
func calculateHash(block Block) string { record := string(block.Index) + block.Timestamp + string(block.BPM) + block.PrevHash h := sha256.New() h.Write([]byte(record)) hashed := h.Sum(nil) return hex.EncodeToString(hashed) } The calculateHash function combines the Index , Timestamp , BPM , PrevHash from the Block structure into one line, which is the argument of the function and is returned as a string representation of the SHA256 hash. Now we can generate a new block with all the necessary elements using the generateBlock new function. To do this, we will need to transfer the previous block so that we can get its hash and index, as well as transmit a new BPM pulse rate.
func generateBlock(oldBlock Block, BPM int) (Block, error) { var newBlock Block t := time.Now() newBlock.Index = oldBlock.Index + 1 newBlock.Timestamp = t.String() newBlock.BPM = BPM newBlock.PrevHash = oldBlock.Hash newBlock.Hash = calculateHash(newBlock) return newBlock, nil } Note that the current time is automatically recorded in the block in time.Now() . Also note that the function calculateHash was called. In the PrevHash field, the hash value from the previous block is copied. Index simply incremented by one from the value in the previous block.
Block check
Now we need to write a functional to check the validity of the previous blocks. We do this by checking the Index to make sure that they are increasing as expected. We also check that PrevHash would PrevHash match the Hash previous block. Finally, we recalculate the hash of the current block to ensure its correctness. Let's write the isBlockValid function, which performs all of these actions and returns a bool value. The function returns true if all checks pass correctly:
func isBlockValid(newBlock, oldBlock Block) bool { if oldBlock.Index+1 != newBlock.Index { return false } if oldBlock.Hash != newBlock.PrevHash { return false } if calculateHash(newBlock) != newBlock.Hash { return false } return true } What if we run into a problem when the two nodes of our blockchain ecosystem added blocks to their chains, and we got them both. Which one will we choose as the correct source? We choose the longest chain. This is a classic blockchain problem.
So let's make sure that the new chain we are taking is longer than the current chain. If so, we can rewrite our new chain, which has a new block or blocks.
We simply compare the length of the cuts of the chains:
func replaceChain(newBlocks []Block) { if len(newBlocks) > len(Blockchain) { Blockchain = newBlocks } } If you succeed, then you can pat yourself on the back! We described the framework of the functional for our blockchain.
Now we need a convenient way to view our blockchain and write to it, ideally in the browser, so that we can boast to our friends!
Web server
We assume that you are already familiar with how web servers work, and you have some experience with Go.
Use the package Gorrila/mux , which was downloaded earlier. Create a run function to start the server and call it later.
func run() error { mux := makeMuxRouter() httpAddr := os.Getenv("ADDR") log.Println("Listening on ", os.Getenv("ADDR")) s := &http.Server{ Addr: ":" + httpAddr, Handler: mux, ReadTimeout: 10 * time.Second, WriteTimeout: 10 * time.Second, MaxHeaderBytes: 1 << 20, } if err := s.ListenAndServe(); err != nil { return err } return nil } Please note that the port is configured from your .env file we created earlier. Call the log.Println method to display information about server startup to the console. We set up the server and call ListenAndServe . The usual practice in Go.
Now we need to write the function makeMuxRouter , which will define our handlers. To view and record our blockchain in the browser, two simple routes are enough for us. If we send a GET request to localhost , we review our chain. If we send a POST request, we can write data.
func makeMuxRouter() http.Handler { muxRouter := mux.NewRouter() muxRouter.HandleFunc("/", handleGetBlockchain).Methods("GET") muxRouter.HandleFunc("/", handleWriteBlock).Methods("POST") return muxRouter } GET request handler:
func handleGetBlockchain(w http.ResponseWriter, r *http.Request) { bytes, err := json.MarshalIndent(Blockchain, "", " ") if err != nil { http.Error(w, err.Error(), http.StatusInternalServerError) return } io.WriteString(w, string(bytes)) } We will describe the blockchain in JSON format, which can be viewed in any browser at localhost:8080 . You can specify a port in the .env file.
POST request is a bit more complicated and we need a new message structure Message .
type Message struct { BPM int } The code for the blockchain write handler.
func handleWriteBlock(w http.ResponseWriter, r *http.Request) { var m Message decoder := json.NewDecoder(r.Body) if err := decoder.Decode(&m); err != nil { respondWithJSON(w, r, http.StatusBadRequest, r.Body) return } defer r.Body.Close() newBlock, err := generateBlock(Blockchain[len(Blockchain)-1], m.BPM) if err != nil { respondWithJSON(w, r, http.StatusInternalServerError, m) return } if isBlockValid(newBlock, Blockchain[len(Blockchain)-1]) { newBlockchain := append(Blockchain, newBlock) replaceChain(newBlockchain) spew.Dump(Blockchain) } respondWithJSON(w, r, http.StatusCreated, newBlock) } The reason why we used a separate message structure is that the body of the POST request comes in JSON and we will use it to write new blocks. This allows us to send a POST request of the following type and our handler will fill in the rest of the block for us:
{"BPM":50} 50 is an example of a heart rate. You can use your pulse value.
After decoding the request body into the var m Message structure, we will create a new block, passing the previous side and the new pulse value to the generateBlock function, which we wrote earlier. We will perform a quick check to verify the correctness of the new block with the isBlockValid function.
Notes:
spew.Dumpis a handy function that beautifully prints the structures to the console. Very helpful in debugging.- for testing requests, we like to use Postman.
curlalsocurlwell if you can't get away from the terminal.
I would like to receive a notification when our POST requests are successful or ended with an error. We use a small wrapper to get the result. Remember that Go is never ignored errors.
func respondWithJSON(w http.ResponseWriter, r *http.Request, code int, payload interface{}) { response, err := json.MarshalIndent(payload, "", " ") if err != nil { w.WriteHeader(http.StatusInternalServerError) w.Write([]byte("HTTP 500: Internal Server Error")) return } w.WriteHeader(code) w.Write(response) } Almost done!
Let's combine all the developments in one main function:
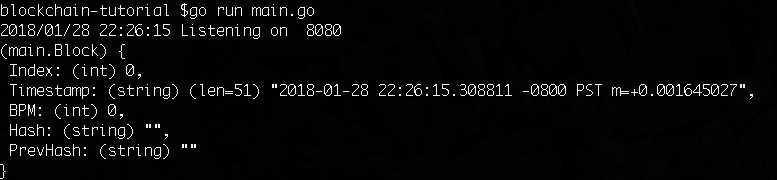
func main() { err := godotenv.Load() if err != nil { log.Fatal(err) } go func() { t := time.Now() genesisBlock := Block{0, t.String(), 0, "", ""} spew.Dump(genesisBlock) Blockchain = append(Blockchain, genesisBlock) }() log.Fatal(run()) } What's going on here?
godotenv.Load()allows us to read variables from a.envfile- genesisBlock is the most important part of the main main function. We need to initialize the first block, since previous block does not exist yet.
All is ready!
All code you can pick up from github
Let's check our code.
We launch our go run main.go application in the terminal
In the terminal, we see that the web server is working and we get the output of our initialized first block.
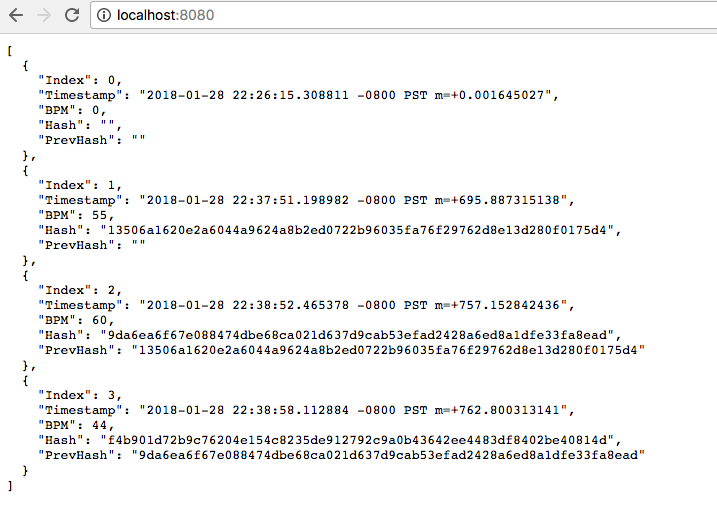
Now visit localhost: 8080 . As expected, we see the first block.

Now let's send POST requests to add blocks. Using Postman, we are going to add several new blocks with different BPM values.
curl command (from translator):
curl -X POST http://localhost:8080/ -H 'content-type: application/json' -d '{"BPM":50}' 
Let's update our page in the browser. Now you can see new blocks in our chain. New blocks contain PrevHash correspond to Hash of old blocks, as we expected!
Further
Congratulations! You have just created your blockchain with proper hashing and block checking. Now you can study more complex blockchain problems, such as Proof of Work, Proof of Stake, Smart Contracts, Dapps, Side Chains and others.
This lesson does not cover topics such as new blocks are added using Proof of Work. This will be a separate lesson, but there are many blockchain and without mechanisms Proof of Work. Now everything is modeled by recording and viewing blockchain data on a web server. In this lesson there is no P2P component.
If you want us to add the Proof of Work mechanism and work on the network, you can report it in the Telegram chat or follow us on Twitter ! These are the best ways to contact us. We are waiting for new feedback and new suggestions for lessons. We are glad to hear from you!
To learn more about Coral Health and how we use blockchain in medical research, visit our website .
PS The author of the translation will be grateful for the errors and inaccuracies of the translation.
')
Source: https://habr.com/ru/post/347930/
All Articles