Mobile devices from the inside. Changing the tablet memory layout
Changing the tablet memory layout
TABLE OF CONTENTS
1. Introduction.
Somehow I got into the hands of a tablet YB1-X90L from Lenovo , made on a chip from Intel :

Fig.1 . Tablet YB1-X90
I tried to perform some on it, in principle, I would say, the standard modifications for a mobile device (MU) that fell into the hands of the developer:
- unlock bootloader;
- install custom recovery;
- get ROOT;
- view memory markup;
- well, and general research work opportunities.
All items of the plan have been successfully implemented. One of the unplanned items was the study of the markup section, which I called the Intel-type GPT partition .
')
However, on many sites, the topic of changing the layout of MPs made on GPT- scheme is very popular, especially if this is a GPT -Intel-type partition. It turns out that this question, despite the theoretical calculations, is still not closed ... So I decided to seize the moment that I have a free ME on my hands, which can be “tortured” a little and carry out field tests of my theoretical knowledge . In short, I decided to change the memory layout ...
Before starting work, I took off everything that is possible on the existing markup: partitions files, dev / block / by-name /, and the image of a GPT partition.
What we have:
- tablet with stock firmware ;
- GPT image of an Intel- type partition;
- The partitions file, taken from a really working MU .
What I need: for my experiments, I needed a separate 512MB memory section.
Accordingly, to place it you need to find these megabytes somewhere in the memory of the tablet ...
2. Planning for changes in memory markup.
Let's take a closer look at the partitions file:
major minor #blocks name 179 0 30535680 mmcblk0 179 1 102400 mmcblk0p1 179 2 102400 mmcblk0p2 179 3 30720 mmcblk0p3 179 4 30720 mmcblk0p4 179 5 1024 mmcblk0p5 179 6 16384 mmcblk0p6 179 7 1024 mmcblk0p7 179 8 1024 mmcblk0p8 179 9 8192 mmcblk0p9 179 10 10240 mmcblk0p10 179 11 1048576 mmcblk0p11 179 12 262144 mmcblk0p12 179 13 3932160 mmcblk0p13 179 14 24986624 mmcblk0p14 179 48 4096 mmcblk0rpmb 179 32 4096 mmcblk0boot1 179 16 4096 mmcblk0boot0 179 64 1927168 mmcblk1 179 65 1927160 mmcblk1p1 "Candidates" for "cuts" due to their size can be, for example, three sections: android_country ( mmcblk0p11 ), android_data ( mmcblk0p14 ) and android_system ( mmcblk0p13 ). They, as a rule, have the size of a section much larger than the image that is poured into them, which would allow me to easily allocate memory for a new section. However, do not forget that resizing partitions, respectively, and shifts in the location of the partitions, will require fussing about restoring the data of these partitions, i.e. their backup and subsequent restoration ... Therefore, it is easier to “bite off” the free space from the data section, since it is located last. This will allow us to avoid performing a recalculation of the size of the affected sections of memory and will have to restore only one partition.
Thus, we only need to add a new partition between the android_system section and the android_data section. This section is called win_tools , and the size is set to 512MB. All parameters of the new section are summarized in the table:
.1. ==================================================== | № | | | | | / | | | | |====================================================| | 1 | 0x00 | Size | 0x200 | | 2 | 0x04 | Label | win_tools | | 3 | 0x4C | GuidType | | | 4 | 0x5C | GuidPartition | | ==================================================== 3. Changes to the firmware of the tablet.
We were lucky, because if the GPT- section were standard, then we would have to change both sections: primary and backup. And so we only change one GPT- section of Intel- type. Getting started ...
3.1. Making changes to the GPT file.
First, we make changes directly to the GPT file that stores the image of the GPT section of the tablet firmware. To do this, take the gpt.bin file from the stock firmware and:
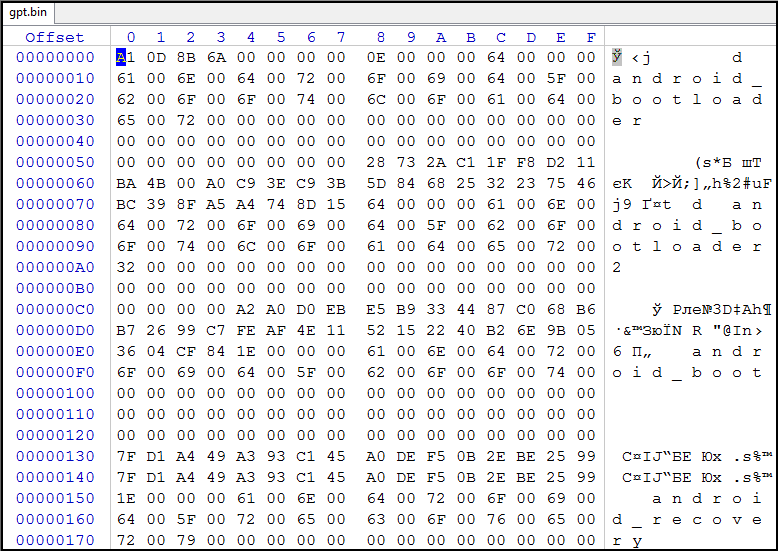
- Load it into a hex editor:Fig.2. Intel GPT partition file
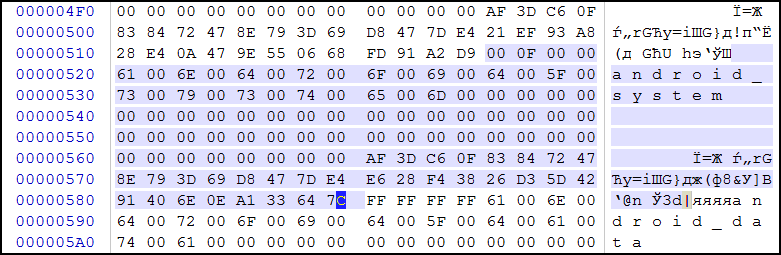
- Find the entry for the android_system section and copy it completely as a template for the new section:Fig.3. System partition entry
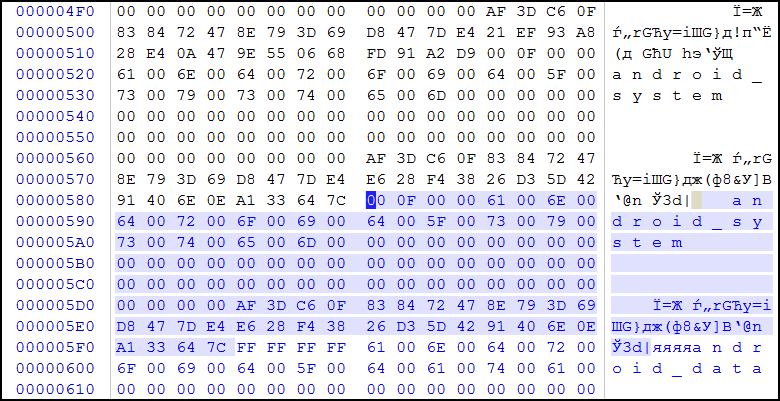
- Moving to the beginning of the next section, i.e. android_data , and paste the template:Fig.4. Adding a new section entry
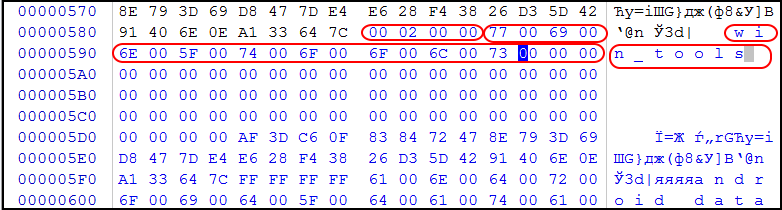
- The new entry should contain a description of the new section, take the parameter values of the description from Table 1 and fill in the Size fields (it was 0x00000F00 , it will become 0x00000200 ), Label (it was android_system , it will become win_tools ) of the new section. All changes are marked in red in the picture:Fig.5. Filling in the fields of a new section record
- Go to the header of the GPT- section and make changes in the Number field (Number of entries on the sections) (offset 0x08 header). The field had the number 0x000E (14 sections), we will write there the number 0x000F (15 sections), in the figure below it is highlighted in red:Fig.6. New number of entries in the header of the GPT section

- Save the updated Intel-type GPT file.
All, the partition markup changed, now you need to put it in the tablet.
3.2.PPT-GPT-file in MU.
Since we decided to move the beginning of the android_data section, then in order to find the saved data there, we will perform the backup section. After that, you can safely change the markup of memory ...
Flashing any partition images, removing / installing loader locking, etc. Actions are performed using the flasher from Intel PhoneFlashTools . And you need to use the one whose version is supported by your MU. The investigated tablet must be "dissected" version 5.3.2.0. An additional condition for a successful operation is the presence of a json file that controls the execution process. It is easy to understand the version of the flasher, but I had to write the json_file myself, because It seems that no one has tried to change the markup.
ATTENTION! Before performing any work on changing the markup of memory, it is MANDATORY to back up all sections of memory.
The point is that re-partitioning physically affects only one section - the partition section. All your data, system, IMEI is stored in the same places. Only change the pointers to these places, which are stored in the markup section. This leads to the fact that you, using the MU (operating system) means, simply cannot get to the storage locations.
4. Check the results of the work done.
After doing the work, I removed all the information on the new markup: the partitions files and the image of the new GPT partition.
Let's look at the contents of partitions:
major minor #blocks name 7 0 65536 loop0 179 0 30535680 mmcblk0 179 1 102400 mmcblk0p1 179 2 102400 mmcblk0p2 179 3 30720 mmcblk0p3 179 4 30720 mmcblk0p4 179 5 1024 mmcblk0p5 179 6 16384 mmcblk0p6 179 7 1024 mmcblk0p7 179 8 1024 mmcblk0p8 179 9 8192 mmcblk0p9 179 10 10240 mmcblk0p10 179 11 1048576 mmcblk0p11 179 12 262144 mmcblk0p12 179 13 3932160 mmcblk0p13 179 14 524288 mmcblk0p14 179 15 24462336 mmcblk0p15 179 48 4096 mmcblk0rpmb 179 32 4096 mmcblk0boot1 179 16 4096 mmcblk0boot0 179 64 1927168 mmcblk1 179 65 1927160 mmcblk1p1 Now you can compare what was and what became, with the markup:
=========================================================================== | | | |=====================================|=====================================| |major minor #blocks name |major minor #blocks name | |=====================================|=====================================| | 179 13 3932160 mmcblk0p13 | 179 13 3932160 mmcblk0p13 | | 179 14 24986624 mmcblk0p14 | 179 14 524288 mmcblk0p14 | | 179 48 4096 mmcblk0rpmb | 179 15 24462336 mmcblk0p15 | | | 179 48 4096 mmcblk0rpmb | =========================================================================== It can be seen that the mmcblk0p14 section of size 24986624 moved to the line below, decreased to the size of 24462336 and became now the section of mmcblk0p15 , and in its place a new section of mmcblk0p14 of size 524288 appeared .
Well, let's compare the contents of GPT-partition images before and after re-partitioning. Here is the header of the stock GPT section:
Fig.7a. GPT section stock image header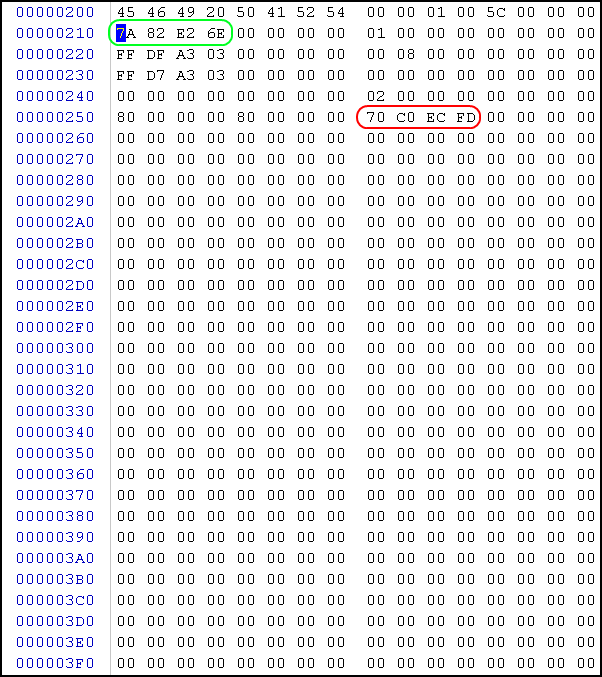
Here are the records of the system - data partition spacing of the same image:
Fig.7b. GPT partition image partition records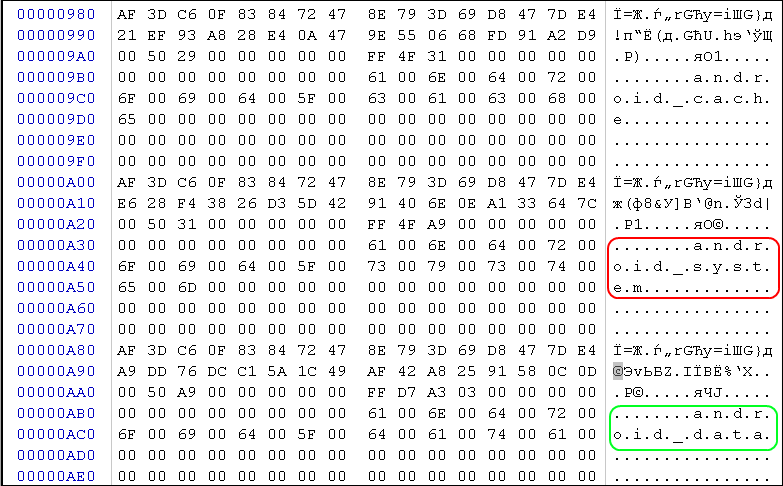
But the header of the GPT section after the re-markup:
Fig.8a. New GPT section header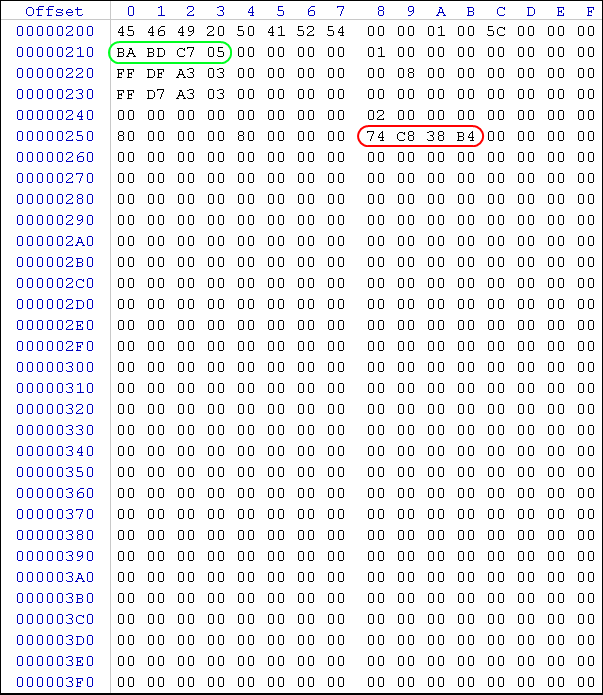
Here are the records of the same partition of the system - data sections of the GPT section after the re-markup:
Fig.8b. Partition entries for a new GPT partition image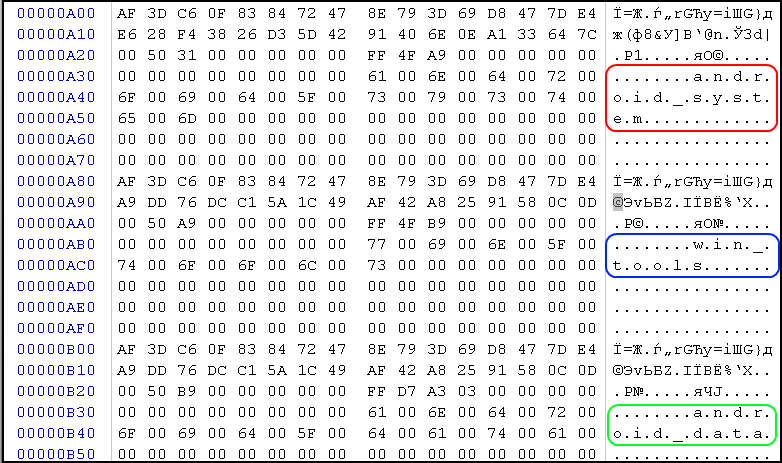
Everything speaks for the fact that the partition really exists, by the way, but the list of partitions, taken from the / dev / block / by-name folder with the help of Total Commander :
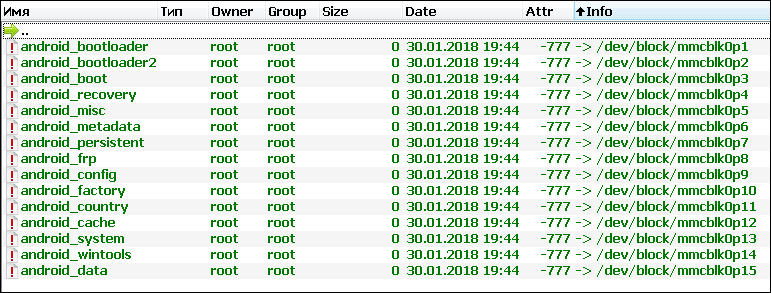
Fig.9 . List of images of MU sections
5. Conclusion.
Those who carefully read the publication, realized that making changes purely to the markup of the memory is not difficult, but when you consider that specialized editors exist for these purposes ...
Much more problems arise when putting this markup inside the ME , although this is already material for another publication ...
6. Sources of information.
1. Mobile devices from the inside. What is GPT?
2. Stock firmware YB1-X90L.
3. The construction of the GPT section.
4. “What is GPT?”
Source: https://habr.com/ru/post/347920/
All Articles