MODx Revo workflow. Workflow organization, version control and deployment
All the main elements of the MODX system, such as chunks, templates, snippets, etc., are stored in the database, from which there arises the problem of controlling the versions for these elements, as well as the difficulty of separating the site’s development and production versions.
I will give the basic requirements of what I want from my workflow on MODX Revo:
')
At the time of this writing, I had a web development experience of just over a year. I was lucky, I began my journey in this area with MODX Revo, but despite all the advantages of this framework, over time I began to face minuses. So far, I have not worked in a team on large complex projects and I don’t know how people usually cope with the above difficulties. I did not find any specific solution on the Internet, and this contributed to the creation of my workflow, which I want to present in this article. Immediately make a reservation, I did not come up with anything fundamentally new, but simply gathered pieces of information scattered on the Internet into one guide on how to arrange my workflow when working with MODX Revolution.
What we need.
- git
- npm + Gulp
For work, I use IDE PHPStorm.
The first thing that comes to mind when you think about how to organize a working (test, dev ) and release (combat, prod ) version of a site is just to have two copies of it. At first we are developing on a test site, and after approval by the manager or client, we transfer everything to the combat one. Simple and clear, only this process can turn into a nightmare, because everything is done manually and there is a considerable probability of an error during the transfer, then you have to check what you did wrong, and then it turns out that the combat site does not fully correspond to the test site and you need to edit something else, etc. etc. No, we do not need this.
I will not argue for a long time and I will say at once, I suggest using one instance of the site in which we will use the MODX Revo context mechanism. The standard web context will contain the release version of the site. Plus we will create another dev context, the work with which will be moved to the subdomain. So we need to:
- example.com domain running in the context of the web
- subdomain dev.example.com , working in the context of dev
With a delay, I need the changes made in the context of dev to be merged into the web in any way.
This part of the work starts from the moment when you have already installed the engine and the necessary components and configured domain names, i.e. when accessing both addresses example.com and dev.example.com , the same MODX start page is opened (the root directory of both domains is shared).
Now go to the admin panel → system settings → contexts and create a new context. Key, enter dev , name - whatever you like, I called Development . In the context menu on the left you will have a new context. First, create a resource for it, and then go to the context settings (right-click on context → edit → context settings) and set the settings
- site_start
- error_page
- unauthorized_page ,
indicating in them the ID of the created resource. This is necessary so that the system does not fall with an error if, when working in the context of dev, no page is found.

approx. I created the dev (Development) context and renamed the standard Website context to Production, the key of the standard context remained the same - web.
Now in the core / elements / common / plugins / folder (create the necessary folders) create the switchContext.php file with the following contents
I will explain what the plugin does. When working with the site through the admin panel, i.e. in the context of mgr , does nothing. When working with the front part of the site on the domain dev.example.com, the context switches to dev . When working on the front end on the main domain, it also does nothing. But if the execution of the script somehow falls into default , it displays an error in the log. This can happen, for example, when transferring a site to a new domain name, and this message is intended to make life easier for the developer who will understand why, after the transfer, nothing works. When I checked the scheme of work on the remote server described here, I just forgot to fix the domain names in this plugin and by mistake in the log I immediately understood what was wrong. Once again he said “Thank you” to himself.
Please note that at the very end of the plug-in file, you must put a return statement , if the plug-in should not return anything, this is necessary in order to rewrite the return value of the include statement, which we use when connecting the plug-in file.
Through the admin panel, create a new plugin that will pull up the created file
Hang up the plugin on the OnHandleRequest event.
Now we have two contexts, how to use them in further development will be shown below.
We create a project repository, for example on GitHub, while in the working directory there will be only files and folders not related to the engine. Like that
In this case, we will also control the files resulting from the assembly ( assets / web / and core / elements / web / ), in order to be able to roll back after an unsuccessful deployment. This folder structure will be explained below.
Developers, as usual, work in their local repositories and push commits to a remote repository. In addition, there must be a repository in the root of the site.
Sample .gitignore file
When I talked about Develpoment and Production versions above, I suggested using one copy of the site. This also implies the absence of its local copy (not to be confused with the project's local git-repository). We will edit the files on the local machine, but at the same time in our local working directory there will be only files and folders that are not related to the engine. We will make changes to existing files, then upload these files to the site. After performing any task, we commit in the local repository, then, if necessary, push the changes to GitHub, or where you are going to keep the project there.
Now I will tell you how I propose to arrange versioning of the main elements of the system - templates, chunks, snippets and plug-ins, and describe the workflow through IDE PHPStorm in conjunction with the MODX administration panel. This will help us with the legendary pdoTools and the Fenom template engine it uses.
As you know, the pdoTools parser allows you to connect external files directly into the body of the chunk, and it is this feature that underlies the entire version control device.
The pdoTools component has a pdotools_elements_path system setting with a default value {core_path} elements / . Well, respectively, create the elements / folder (if not already created) in the core / engine folder and inside create the following folder structure:
Actually, development is carried out in the dev / folder. An important rule for the whole team is in effect: “No one should ever make any changes in the web / folder”. When it is full, the entire contents of the dev / folder is copied to the web / using Gulp. The common / folder contains files common to both contexts, for example, a plugin that switches the current context described above.
This folder structure allows you to use the [[* context_key]] placeholder value when connecting external files using the Fenom template engine, like so
In the first line, we add the current context key ( dev or web ) to the $ ctx variable, and in the second line we use this value in the file path. This allows you to have two versions of the site on the same engine.
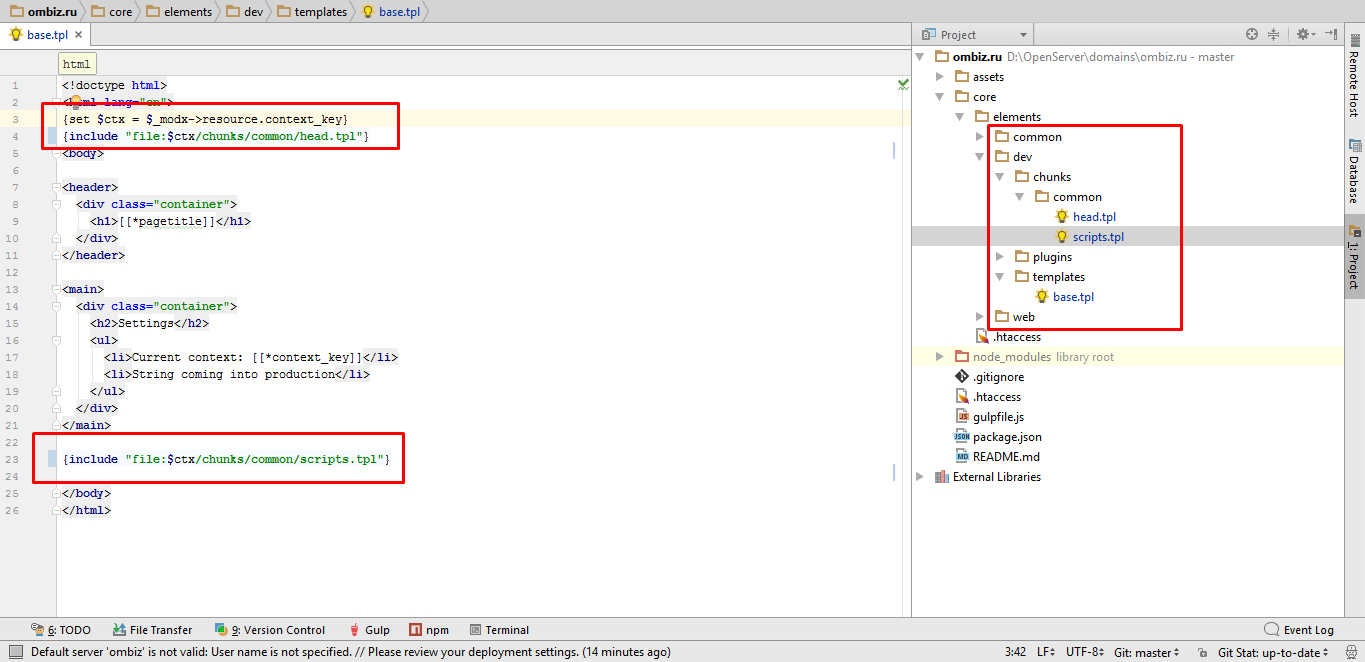
approx. Attach chunks in the template file
In addition to the files containing the main elements of the system, we also need to control the versions of the layout files and js. Typically, these files are located in the assets / folder as follows.
According to the old scheme, I propose to create the following structure
When working with layout files and scripts, consider the following point. For example, in the dev / js / folder there may be several .js files (for example, calendar.module.js and search-form.module.js ), but when deployed to production, these files should be combined into one and minimized (for example, main .bundle.min.js ), so that it is impossible to simply take and insert the necessary link [[* context_key]] in the file path, you should do something like this and deploy such a structure
We create templates in the core / elements / dev / templates / folder, in which we connect chunks from the core / elements / dev / chunks folder using the Fenom template syntax. At the same time, creating a template file, we also need to create a corresponding template in the admin panel. Only we will not create a static template, since we cannot specify a specific path to the file, because it depends on the context in which the template is used. Instead, in the body of the template, we prescribe a single line
Thus, this template will serve as a kind of template file switch for resources in various contexts.
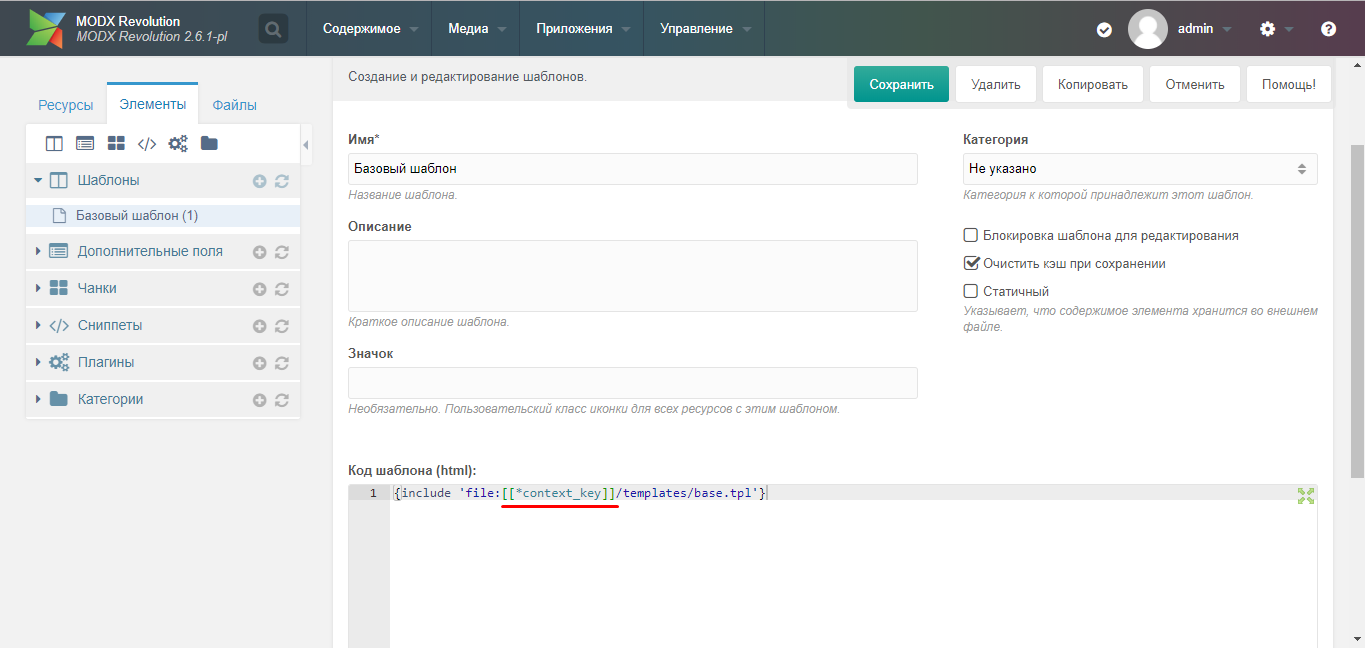
approx. Template file connection
With this approach, the development should be separately discussed the introduction of new plug-ins into the system.
Similarly to the situation with templates, we create plugins in the core / elements / dev / plugins / folder, in which we write the logic of the plug-in. Next, go to the admin panel and create the corresponding plug-in (NOT static!), In which we include the plug-in file via include as follows
Do not forget, of course, in the admin panel to set the events on which the plugin is hung. If we need a plugin common to both contexts, we add the value “common” to the context variable, as was done in the switchContext plugin.
Here we come to the crucial moment. We roll out a test version of the site for production. You must first perform some actions with the repository on the server, namely, create an SSH key, register it and set it in the repository settings on GitHub. I will not describe this process here. I will leave the link to the integration on key generation and registration below.
So, the city falls asleep, the developers stop their work, all the files are closed and run into a remote repository. The team leader wakes up, his task is to roll out all the work done to the release as quickly as possible. I suggest this procedure.

approx. An example of a commit tree.
The above described applies to the deployment of templates, chunks and snippets, as well as layout files, but what about the resources?
Consider this task. The site has a News section, with time the number of publications has become very large and it was decided to create a new section of the site News Archive .
In the dev context, you create the appropriate container, add a couple of instances of archived news, create chunks, if you need a template, etc. As a result, a new section appears on the domain dev.example.com . After approval by the customer, you produce the deployment described above, but the new production section will not appear, although all the files will be brought to the required form. Of course, this will happen because the created partition (meaning the totality of the created resources) will be in the context of dev and will not be available in the context of the web .
- And what to do?
- Copy-paste, comrades, alas.
Or rather the transfer. We simply transfer the created section to the web context, and then re-create its copy in dev so that the structure of the dev version of the site corresponds to production.
Yes, I did not succeed in completely getting rid of copy-paste.
Thus, I managed to organize a workflow that would arrange, first of all, me. In real work, this scheme has not yet been applied, therefore, no pitfalls have yet been discovered. Maybe a more professional view of readers will see significant shortcomings, so please write about it in the comments. And by the way, this is my first article, and I would like to know how accessible and clearly I managed to state my thoughts, I will be grateful for constructive criticism.
A development template created as the article is written is available on Github https://github.com/vanyaraspopov/start-code-modx .
pdoTools. Parser
pdoTools. File elements
Fenom syntax
Context switch based on URL
Contexts | MODX Revolution
Using One Gateway Plugin to Manage Multiple Domains
IDE PHPStorm setup
Nice build frontend project
8 Two Wheel MODX Revolution Tips
Generating a new SSH key
Github vanyaraspopov / start-code-modx
I will give the basic requirements of what I want from my workflow on MODX Revo:
- version control wherever I write some code (html, css, js, php),
- have a separate dev- version of the site on which the current development is conducted, and after that - deploy all changes to production, and, preferably, automate this process,
- at least kopipasta when developing and deploy.
Content
- Introduction
- Development and Production version of the site
- Version control
- Scheme of work
- Depla
- Conclusion
- Links
')
Introduction
At the time of this writing, I had a web development experience of just over a year. I was lucky, I began my journey in this area with MODX Revo, but despite all the advantages of this framework, over time I began to face minuses. So far, I have not worked in a team on large complex projects and I don’t know how people usually cope with the above difficulties. I did not find any specific solution on the Internet, and this contributed to the creation of my workflow, which I want to present in this article. Immediately make a reservation, I did not come up with anything fundamentally new, but simply gathered pieces of information scattered on the Internet into one guide on how to arrange my workflow when working with MODX Revolution.
What we need.
- git
- npm + Gulp
For work, I use IDE PHPStorm.
Development and Production version of the site
The first thing that comes to mind when you think about how to organize a working (test, dev ) and release (combat, prod ) version of a site is just to have two copies of it. At first we are developing on a test site, and after approval by the manager or client, we transfer everything to the combat one. Simple and clear, only this process can turn into a nightmare, because everything is done manually and there is a considerable probability of an error during the transfer, then you have to check what you did wrong, and then it turns out that the combat site does not fully correspond to the test site and you need to edit something else, etc. etc. No, we do not need this.
I will not argue for a long time and I will say at once, I suggest using one instance of the site in which we will use the MODX Revo context mechanism. The standard web context will contain the release version of the site. Plus we will create another dev context, the work with which will be moved to the subdomain. So we need to:
- example.com domain running in the context of the web
- subdomain dev.example.com , working in the context of dev
With a delay, I need the changes made in the context of dev to be merged into the web in any way.
Create context dev
This part of the work starts from the moment when you have already installed the engine and the necessary components and configured domain names, i.e. when accessing both addresses example.com and dev.example.com , the same MODX start page is opened (the root directory of both domains is shared).
Now go to the admin panel → system settings → contexts and create a new context. Key, enter dev , name - whatever you like, I called Development . In the context menu on the left you will have a new context. First, create a resource for it, and then go to the context settings (right-click on context → edit → context settings) and set the settings
- site_start
- error_page
- unauthorized_page ,
indicating in them the ID of the created resource. This is necessary so that the system does not fall with an error if, when working in the context of dev, no page is found.
approx. I created the dev (Development) context and renamed the standard Website context to Production, the key of the standard context remained the same - web.
Now in the core / elements / common / plugins / folder (create the necessary folders) create the switchContext.php file with the following contents
<?php /** * @var modX $modx */ /* don't execute if in the Manager */ if ($modx->context->get('key') == 'mgr') { return; } switch ($_SERVER['HTTP_HOST']) { case 'dev.example.com': $modx->switchContext('dev'); break; case 'example.com': break; default: $modx->log(modX::LOG_LEVEL_ERROR, 'Check this plugin! May be your headache coming from here.'); break; } return; I will explain what the plugin does. When working with the site through the admin panel, i.e. in the context of mgr , does nothing. When working with the front part of the site on the domain dev.example.com, the context switches to dev . When working on the front end on the main domain, it also does nothing. But if the execution of the script somehow falls into default , it displays an error in the log. This can happen, for example, when transferring a site to a new domain name, and this message is intended to make life easier for the developer who will understand why, after the transfer, nothing works. When I checked the scheme of work on the remote server described here, I just forgot to fix the domain names in this plugin and by mistake in the log I immediately understood what was wrong. Once again he said “Thank you” to himself.
Please note that at the very end of the plug-in file, you must put a return statement , if the plug-in should not return anything, this is necessary in order to rewrite the return value of the include statement, which we use when connecting the plug-in file.
Through the admin panel, create a new plugin that will pull up the created file
<?php $filepath = 'plugins/switchContext.php'; $context = 'common'; $plugin = $modx->getOption('pdotools_elements_path') . "$context/$filepath"; if (file_exists($plugin)) { return include $plugin; } Hang up the plugin on the OnHandleRequest event.
Now we have two contexts, how to use them in further development will be shown below.
Version control
We create a project repository, for example on GitHub, while in the working directory there will be only files and folders not related to the engine. Like that
assets/ |-- dev/ |-- css/ |-- js/ |-- img/ \-- scss/ |-- web/ |-- css/ |-- js/ \-- img/ core/ \-- elements/ |-- common/ |-- plugins/ |-- dev/ |-- chunks/ |-- plugins/ |-- snippets/ \-- templates/ |-- web/ |-- chunks/ |-- plugins/ |-- snippets/ \-- templates/ \-- plugins/ .gitignore gulpfile.js package.json In this case, we will also control the files resulting from the assembly ( assets / web / and core / elements / web / ), in order to be able to roll back after an unsuccessful deployment. This folder structure will be explained below.
Developers, as usual, work in their local repositories and push commits to a remote repository. In addition, there must be a repository in the root of the site.
Sample .gitignore file
# IntelliJ project files .idea/ *.iml out gen # ignore MODX files /assets/* /connectors/* /core/* /manager/* /setup/* /config.core.php /index.php /.htaccess # ignore node modules /node_modules/ # do not ignore !/assets/dev/ !/assets/web/ !/core/elements/ Scheme of work
When I talked about Develpoment and Production versions above, I suggested using one copy of the site. This also implies the absence of its local copy (not to be confused with the project's local git-repository). We will edit the files on the local machine, but at the same time in our local working directory there will be only files and folders that are not related to the engine. We will make changes to existing files, then upload these files to the site. After performing any task, we commit in the local repository, then, if necessary, push the changes to GitHub, or where you are going to keep the project there.
Now I will tell you how I propose to arrange versioning of the main elements of the system - templates, chunks, snippets and plug-ins, and describe the workflow through IDE PHPStorm in conjunction with the MODX administration panel. This will help us with the legendary pdoTools and the Fenom template engine it uses.
As you know, the pdoTools parser allows you to connect external files directly into the body of the chunk, and it is this feature that underlies the entire version control device.
It is necessary to set the pdotools_fenom_parser setting (Use Fenom on pages) to Yes
The pdoTools component has a pdotools_elements_path system setting with a default value {core_path} elements / . Well, respectively, create the elements / folder (if not already created) in the core / engine folder and inside create the following folder structure:
elements/ |-- common/ |-- plugins/ |-- dev/ |-- chunks/ |-- plugins/ |-- snippets/ \-- templates/ |-- web/ |-- chunks/ |-- plugins/ |-- snippets/ \-- templates/ \-- plugins/ Actually, development is carried out in the dev / folder. An important rule for the whole team is in effect: “No one should ever make any changes in the web / folder”. When it is full, the entire contents of the dev / folder is copied to the web / using Gulp. The common / folder contains files common to both contexts, for example, a plugin that switches the current context described above.
This folder structure allows you to use the [[* context_key]] placeholder value when connecting external files using the Fenom template engine, like so
{set $ctx = $_modx->resource.context_key} {include "file:$ctx/chunks/common/head.tpl"} In the first line, we add the current context key ( dev or web ) to the $ ctx variable, and in the second line we use this value in the file path. This allows you to have two versions of the site on the same engine.
approx. Attach chunks in the template file
In addition to the files containing the main elements of the system, we also need to control the versions of the layout files and js. Typically, these files are located in the assets / folder as follows.
assets/ |-- css/ |-- js/ \-- img/ According to the old scheme, I propose to create the following structure
assets/ |-- dev/ |-- css/ |-- js/ |-- img/ \-- scss/ |-- web/ |-- css/ |-- js/ \-- img/ When working with layout files and scripts, consider the following point. For example, in the dev / js / folder there may be several .js files (for example, calendar.module.js and search-form.module.js ), but when deployed to production, these files should be combined into one and minimized (for example, main .bundle.min.js ), so that it is impossible to simply take and insert the necessary link [[* context_key]] in the file path, you should do something like this and deploy such a structure
[[*context_key:is=`dev`:then=` <script src="[[++assets_url]][[*context_key]]/js/calendar.module.js"></script> <script src="[[++assets_url]][[*context_key]]/js/search-form.module.js"></script> <!-- --> `]] [[*context_key:is=`web`:then=` <script src="[[++assets_url]][[*context_key]]/js/main.bundle.min.js"></script> `]] Associate resources with templates
We create templates in the core / elements / dev / templates / folder, in which we connect chunks from the core / elements / dev / chunks folder using the Fenom template syntax. At the same time, creating a template file, we also need to create a corresponding template in the admin panel. Only we will not create a static template, since we cannot specify a specific path to the file, because it depends on the context in which the template is used. Instead, in the body of the template, we prescribe a single line
{include 'file:[[*context_key]]/templates/base.tpl'} Thus, this template will serve as a kind of template file switch for resources in various contexts.
approx. Template file connection
Create plugins
With this approach, the development should be separately discussed the introduction of new plug-ins into the system.
Similarly to the situation with templates, we create plugins in the core / elements / dev / plugins / folder, in which we write the logic of the plug-in. Next, go to the admin panel and create the corresponding plug-in (NOT static!), In which we include the plug-in file via include as follows
<?php $filepath = 'plugins/somePlugin.php'; $context = $modx->context->get('key'); $plugin = $modx->getOption('pdotools_elements_path') . "$context/$filepath"; if (file_exists($plugin)) { return include $plugin; } Do not forget, of course, in the admin panel to set the events on which the plugin is hung. If we need a plugin common to both contexts, we add the value “common” to the context variable, as was done in the switchContext plugin.
Depla
Here we come to the crucial moment. We roll out a test version of the site for production. You must first perform some actions with the repository on the server, namely, create an SSH key, register it and set it in the repository settings on GitHub. I will not describe this process here. I will leave the link to the integration on key generation and registration below.
So, the city falls asleep, the developers stop their work, all the files are closed and run into a remote repository. The team leader wakes up, his task is to roll out all the work done to the release as quickly as possible. I suggest this procedure.
- On your local machine, you need to synchronize files with a remote repository to make sure that all files in the local repository are up to date.
- We create a label, for example “v1.0.666-pre”, thus denoting a commit that precedes the build of version v1.0.666, for a quick and convenient rollback in case of unsuccessful deployment.
$ git tag v1.0.666-pre - With the help of Gulp we collect a new version of the project.
$ gulp modx:build
Drive example gulp file. Here I have described only one task for copying files from core / elements / dev to core / elements / web / , the rest of the task, for sure, you can write yourself.'use strict'; var gulp = require('gulp'); var paths = { dist: { // output js: 'assets/web/js/', css: 'assets/web/css/', img: 'assets/web/img/', fonts: 'assets/web/fonts/', modx: 'core/elements/web/' }, src: { // sources js: 'assets/dev/js/**/*.js', style: 'assets/dev/sass/style.scss', img: 'assets/dev/img/**/*.*', fonts: 'assets/dev/fonts/**/*.*', modx: 'core/elements/dev/**/*.*' }, watch: { // files watch to js: 'assets/dev/js/**/*.js', style: 'assets/dev/sass/**/*.scss', img: 'assets/dev/img/**/*.*', fonts: 'assets/dev/fonts/**/*.*', modx: 'core/elements/dev/**/*.*' } }; gulp.task('modx:build', function () { return gulp.src(paths.src.modx) .pipe(gulp.dest(paths.dist.modx)) }); - As a result of the assembly, new or new files will be added in the / assets / web / and / core / elements / web / folders. Make a commit, assign a label to it and push it with the --tags flag to send the created labels to the remote repository.
$ git add . $ git commit -m "Build v1.0.666" $ git tag v1.0.666 $ git push --tags - Through SSH we connect to the server and go to the root directory of the site, pull up data from the remote repository and do a hard reset to bring all the files of the site to the form in which they are stored in the repository.
$ git fetch --all $ git reset --hard origin/master - See the result in production. If I correctly imagine how the world of development and programming works, then in about 10 out of ten cases, something will go wrong. Therefore, go back to the console, execute the command
$ git checkout v1.0.666-pre
those. We translate the production files to the pre-build state and begin to figure out what's wrong.
approx. An example of a commit tree.
The above described applies to the deployment of templates, chunks and snippets, as well as layout files, but what about the resources?
And what about the resources?
Consider this task. The site has a News section, with time the number of publications has become very large and it was decided to create a new section of the site News Archive .
In the dev context, you create the appropriate container, add a couple of instances of archived news, create chunks, if you need a template, etc. As a result, a new section appears on the domain dev.example.com . After approval by the customer, you produce the deployment described above, but the new production section will not appear, although all the files will be brought to the required form. Of course, this will happen because the created partition (meaning the totality of the created resources) will be in the context of dev and will not be available in the context of the web .
- And what to do?
- Copy-paste, comrades, alas.
Or rather the transfer. We simply transfer the created section to the web context, and then re-create its copy in dev so that the structure of the dev version of the site corresponds to production.
Yes, I did not succeed in completely getting rid of copy-paste.
Conclusion
Thus, I managed to organize a workflow that would arrange, first of all, me. In real work, this scheme has not yet been applied, therefore, no pitfalls have yet been discovered. Maybe a more professional view of readers will see significant shortcomings, so please write about it in the comments. And by the way, this is my first article, and I would like to know how accessible and clearly I managed to state my thoughts, I will be grateful for constructive criticism.
A development template created as the article is written is available on Github https://github.com/vanyaraspopov/start-code-modx .
Links
pdoTools. Parser
pdoTools. File elements
Fenom syntax
Context switch based on URL
Contexts | MODX Revolution
Using One Gateway Plugin to Manage Multiple Domains
IDE PHPStorm setup
Nice build frontend project
8 Two Wheel MODX Revolution Tips
Generating a new SSH key
Github vanyaraspopov / start-code-modx
Source: https://habr.com/ru/post/347538/
All Articles