Application Security with Citrix NetScaler

Hello! It's no secret that a large number of threats have recently increased. Great attention has been paid to the topics of security and protection of access to the resources used. In this article we will analyze the product Citrix NetScaler VPX and its integrated platform Unified Gateway, and at the same time we will talk about what authentication methods are used today, what is multifactor authentication and much more. Anyone interested please read.
Let's start with what the lab environment consists of. The figure shows the router, the segments of the private network, the external network and the hypervisor, on which the virtual machines are located and are enclosed in a rectangle. In fact, all laboratory work will be focused on virtual machines. And this scheme is presented in order to abstractly show how a laboratory stand is organized. As you can see, the stand consists of 8 different virtual machines with different roles and configurations. We will not consider how to install these operating systems and their configuration, since the article will instantly turn into a book, as well as materials on how to configure Apache or Exchange fully. The focus will be on the configuration of NetScaler Unified Gateway, but as I write this article, I will comment on the key points of other virtual machines. And the first thing that comes to mind is where to get the NetScaler Gateway virtual machine. You can download it for free on the official website of Citrix .
The only thing required is to register.
')
Immediately write out all the IP-addresses of virtual machines in the table:

Since the domain controller is responsible for the training.lab zone, all further virtuals will be tied to it.
The first thing to start with is setting up NetScaler Unified Gateway. It is a kind of unified platform that provides specific content for a specific user. That is, a user who is authenticated to Citrix Unified Gateway (hereinafter briefly UG) will be able to access only those resources that are assigned to him. This greatly increases safety. This platform works within the Citrix NetScaler product and comes with version 11 and higher. We proceed to configure it. Open the web browser and go to the address NetScaller VPX (or NS_VPX_1). This is the address 192.168.10.50.

A window opens to enter a login and password, where we enter the data. By default, the login and password is nsroot.
After that the main page of NetScaler opens.
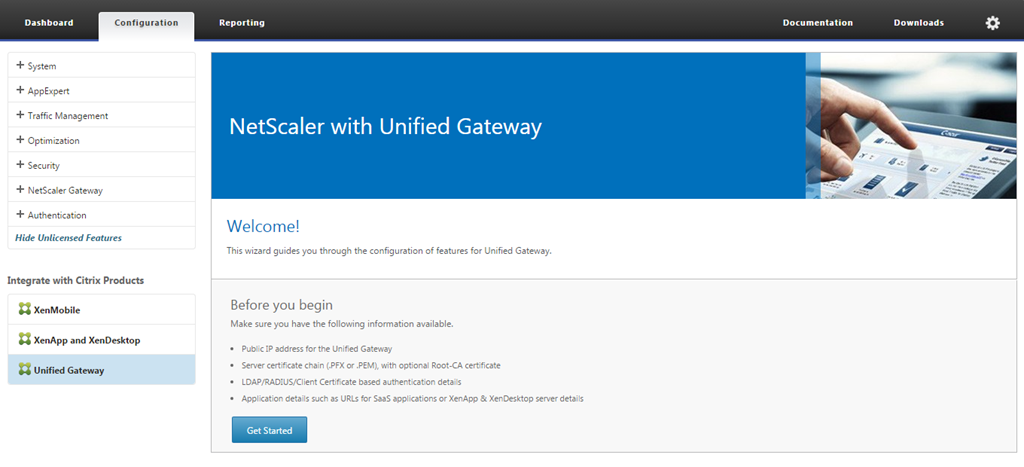
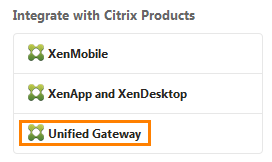
There are several tabs here. I note that you can manage NetScaler, both through the WEB-interface, and using the console interface. We are interested in the Configuration tab, namely the bottom left window of available products.
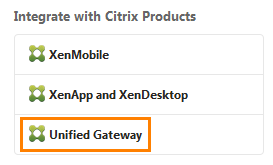
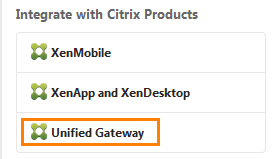
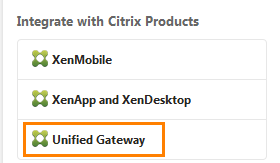
Select Unified Gateway . After clicking, the settings wizard opens.
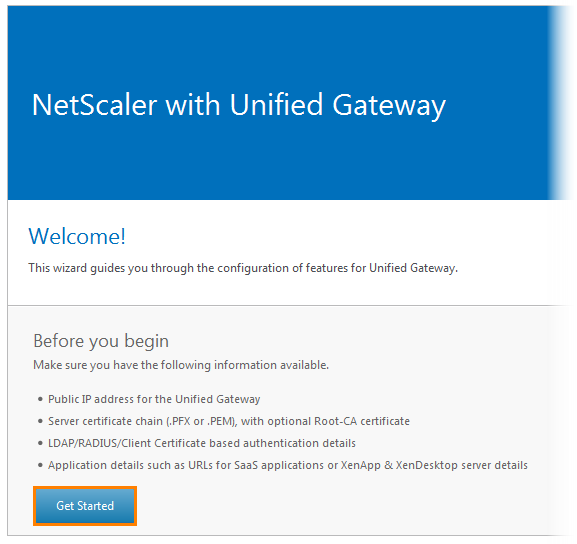
He warns that before you begin, you need to have a public IP address for the UG. We will not let it out, so there will be enough private IP-address. In addition, you need to have a root certificate, authentication accounts and applications that these users will log into. All this is available and will be further configured. Click Get Started .
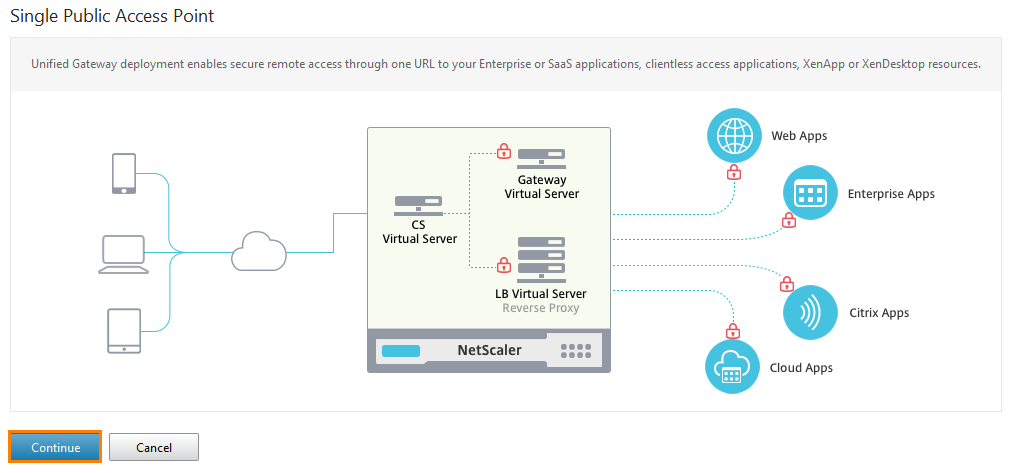
Another window appears, illustrating the functionality of the UG. Click Continue .
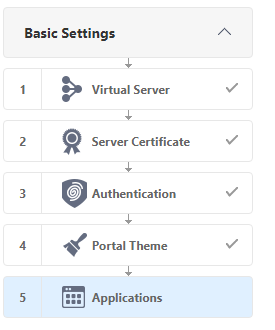
Further, the configuration will consist of 5 configuration steps: Virtual Server, Server Certificate, Authentication, Portal Theme and Applications.
The first thing that is proposed to configure is Virtual Server. A small digression - here a virtual server is simply a set of information describing a certain service with which Citrix NetScaler will interact. Most often it is the “name”, IP address and port number.
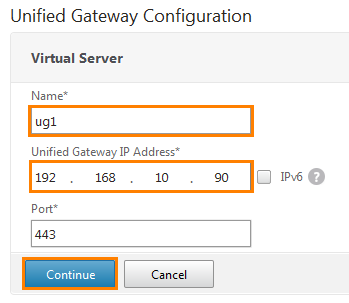
We call it ug1 and enter the IP address: 192.168.10.90. If the network uses IPv6 addresses, then you can put a daw next to it and register it. Port 443 is registered by default. Click Continue .
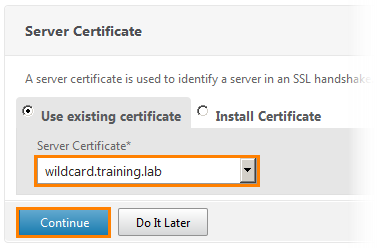
Select an existing certificate server and click Continue .
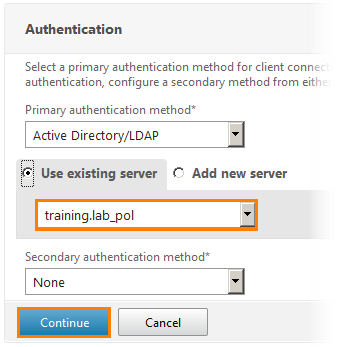
The authentication settings window opens. We select the main authentication method through Active Directory / LDAP and the existing server training.lab_pol . Click Continue .
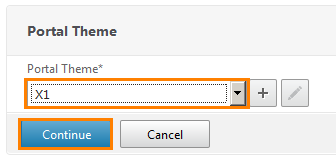
Select the theme that will be applied to the UG. Here the choice can be any. I chose X1. Click Continue .

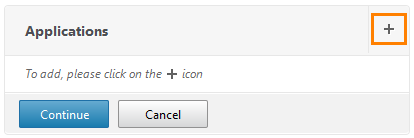
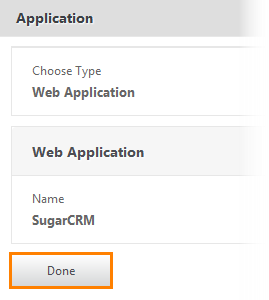
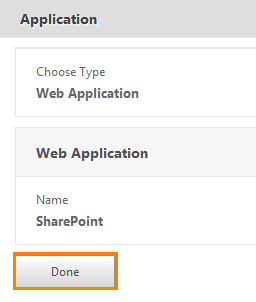
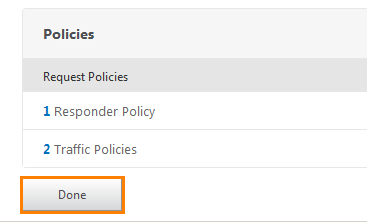
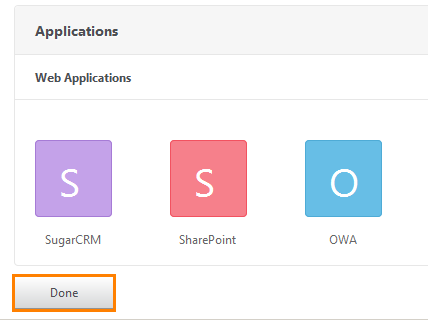
And the last window opens to customize the application. So far, we will not configure applications and click on Done .
Now UG is raised and you can go to it.
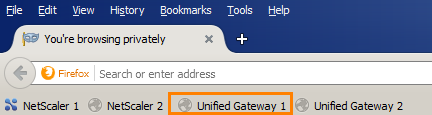
Open the private window of the web browser so that it does not cache the page.

And we type the address 192.168.10.90.
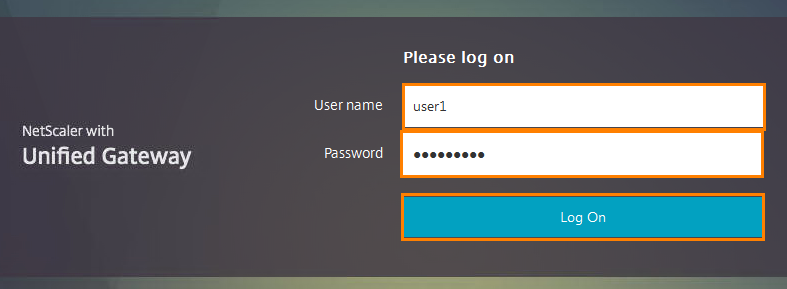
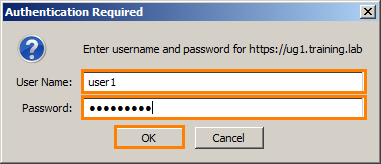
The Unified Gateway logon window opens. I use user1 account with password Citrix123.

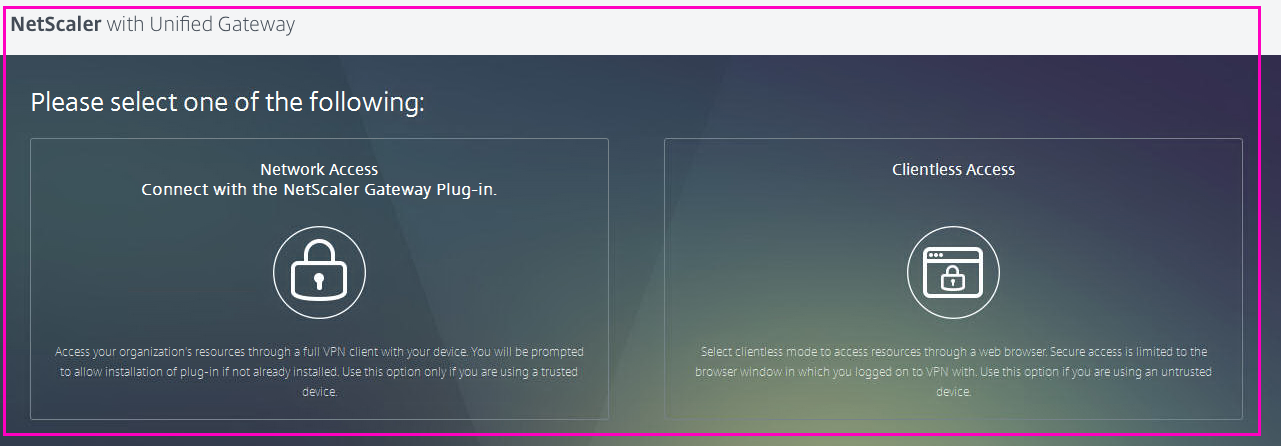
Choose Clientless Access .

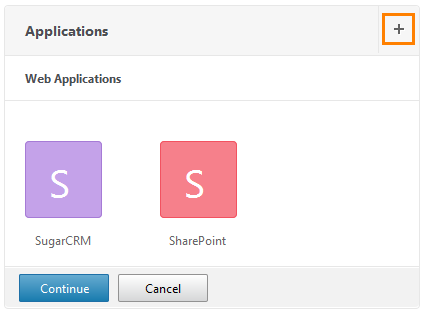
We fall on the personal page of this user, where his sites, applications are displayed. It is currently empty. Let us turn to the addition of WEB-applications.
Today it is difficult to imagine a company that does not have its own services and resources. For example, mail, general access to a platform and so on. And it happens that access to these resources needs to be organized not only within the company, but also abroad. At the moment, to organize remote access to the resources of the company is not difficult. However, it is very often used such an approach that, if necessary, remote access to any service, access is granted to the whole machine (virtual or physical). The disadvantages of this method are many. Starting from the load and ending with security. And why does the user need access to the whole machine when he needs to check his mail or quickly reply to an email. In addition to this, it is necessary to go through several stages of authentication in the form of establishing a connection, logging into the required computer, opening the necessary resource and entering a login with a password there. This significantly increases the time spent and complicates the access process.
To simplify authentication, the SSO mechanism was developed (from the Single Sign – On). This technology allows the user to use the applications available to him and navigate between them without requiring re-authentication. That is, he will not need to enter the same login with a password on each opened resource. SSO works with various authentication methods, but in this article we will consider only a few: Form – Based, NTLM, LDAP and RADIUS.
Let's start with the most popular. This is form-based authentication. Briefly about her work:
- The user requests a page from the web server.
- The web server sees that it is an unknown user who failed to authenticate and returns him a web page with login and password input forms.
- Having received this page, the user fills out the required forms and sends back to the web server.
- Having received this data, the web server checks for the presence of such a user and, if the account is authenticated, sends the page that was originally requested to it.
Virtually every modern web server supports this type of authentication.
On the pre-created virtual machine named Apache 1, the SugarCRM system is running. It has great functionality and capabilities, such as a task scheduler, a list of employees, a list of contacts, information on various transactions and much more. For those who are interested in exploring this product in more detail, they can follow this link . Our task is to integrate this service into the Unified Gateway and configure SSO.
Open NetScaler and go to Unified Gateway.

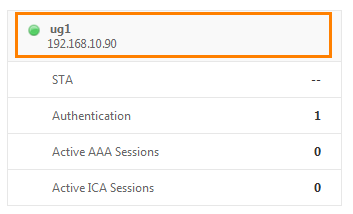
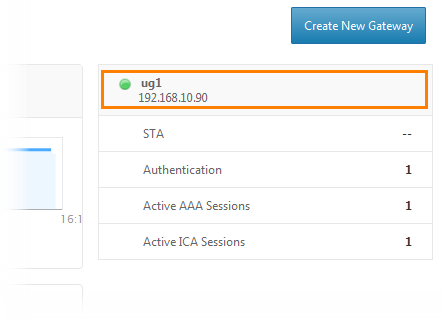
The UG panel opens, with various graphs and charts showing real-time performance. Click on ug1 and get into its settings.
Here are the very 5 settings options that we previously configured. Select Applications .
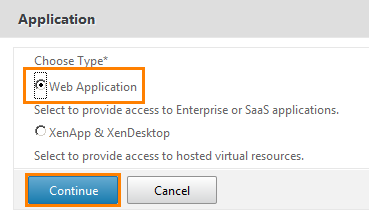
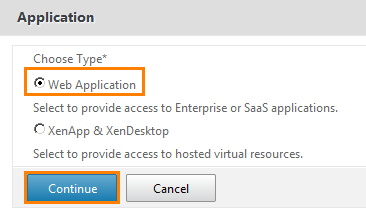
We select Web Application .

We get to the WEB-application configuration page. In the name field, we write SugarCRM , in the Application Type field, select Intranet Application from the drop-down list and put a check mark on the checkbox that says “ Make this application accessible through the Unified Gateway URL? ". That is, make this application available via the Unified Gateway URL.
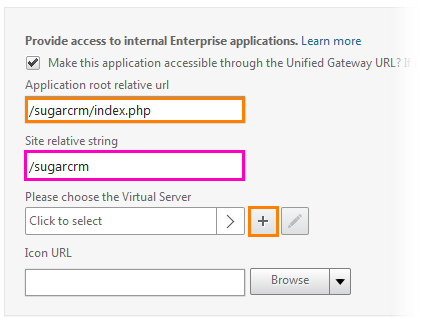
After the checkbox is set, a field for entering URL parameters for SugarCRM will open. In the first field we write the address /sugarcrm/index.php. That is the address of its main page. The parameter of the second field will be filled automatically. Next you need to select the server on which this service is running. Click on the button with "+".

Before us opens a new configuration window. In the Name field we write apache.training.lab . From the drop-down list, select the HTTP protocol . In the next field we indicate our ug1.training.lab . Register the IP address of the server running SugarCRM (i.e. Apache 1) and click “+” to add the address to the bottom field. Click OK .
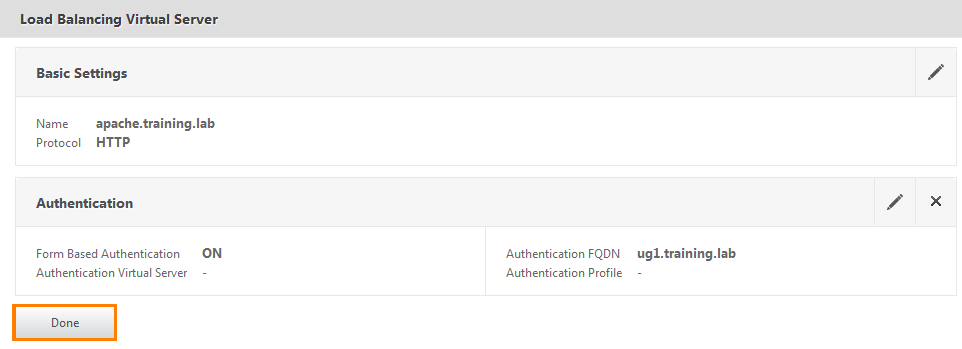
A summary window opens where you can check the configured settings. That's right, click Done .
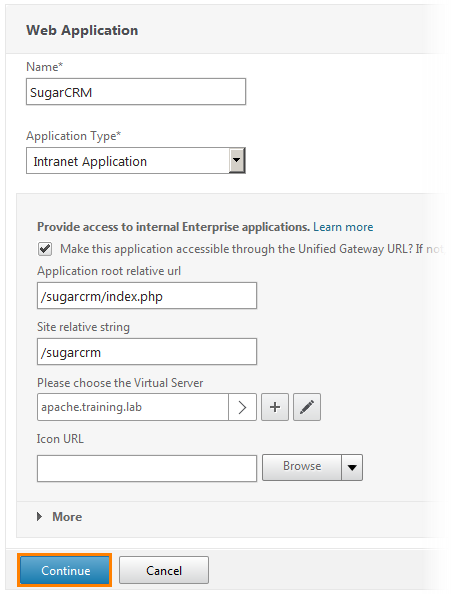
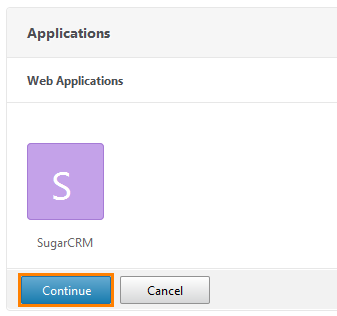
We return to the WEB application setup window and see that the virtual server has been added. Click Continue .
A summary window appears with the configured WEB application.
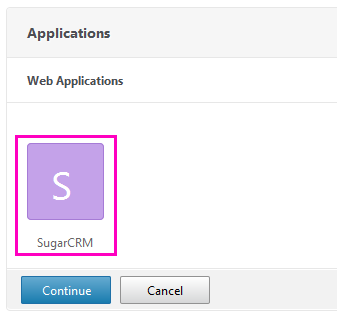
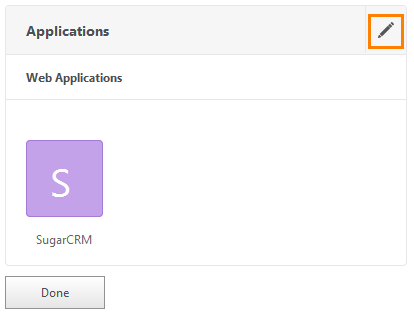
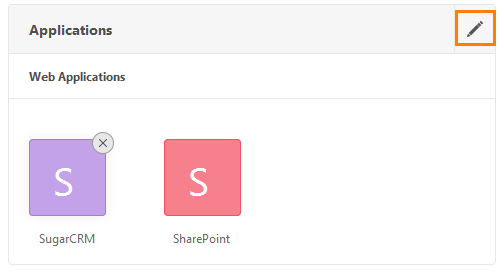
Make sure the application appears in the Unified Gateway list.
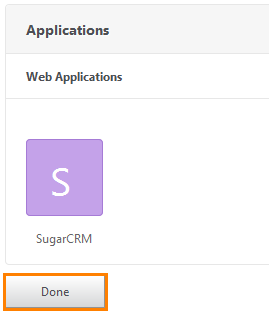
Click Continue and Done . Application created. Check its availability by going to the UG address.
Go to the address 192.168.10.90.
Enter the same credentials (user1 / Citrix123).
Choose Clientless Access .

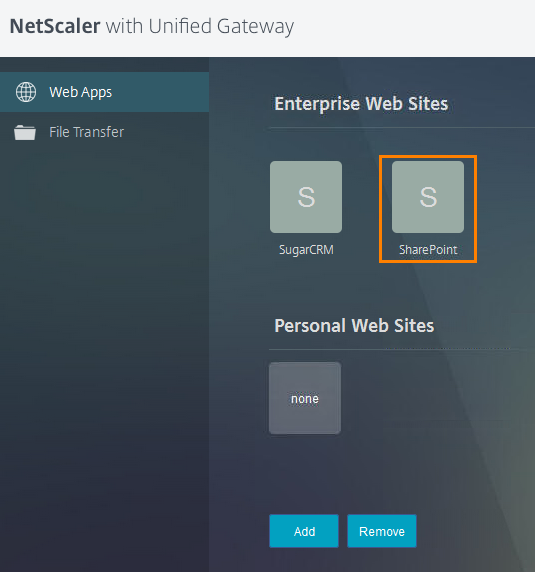
And in the Enterprise WEB Sites window we see the appeared SugarCRM. In the current configuration, if you click on it, a page with a login and password request will open, since we have not yet configured SSO.
In order to understand how Form-Based authentication works, we delve a little into the mechanism of its operation.

Open a new tab and go to the SugarCRM page located on the Apache 1 web server (not the Unified Gateway address). To understand how the client communicates with the server, you need to look at its source code. You can switch to the Page Source view using the keyboard shortcut Ctrl + U (the same for Firefox, Chrome and IE).
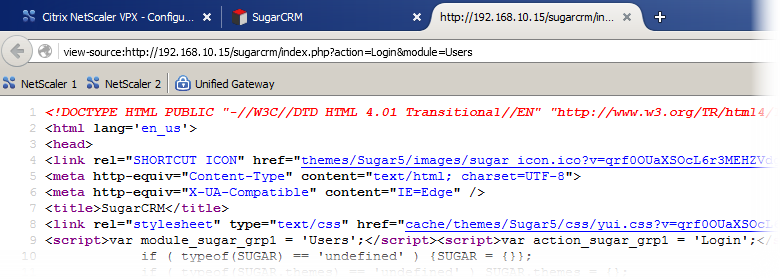
A page with a lot of text opens. We need to find the form that is responsible for the user login. Press the key combination Ctrl + F to open the search panel and enter "User Name" .


And we see that he really found such a line and highlighted it in green. Below you can see the line "Password" . These are the forms that are responsible for the login and password. In fact, these forms may be called differently in different applications.
In SugarCRM, they are called “user_name” and “user_password” .

Let us remember this information and return to it a little later.
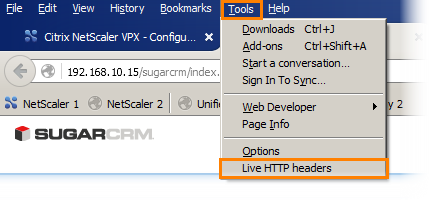
We return to the login page with a password and before entering something, open the “Live HTTP headers” utility.
After that, you can enter a login with a password (user1 / Citrix123). Click Log In and go back to “Live HTTP headers”.

We see that the application sends many different parameters in a POST message to the POST address /sugarcrm/index.php using HTTP protocol version 1.1. This information is very useful when we create a Form-based SSO profile.
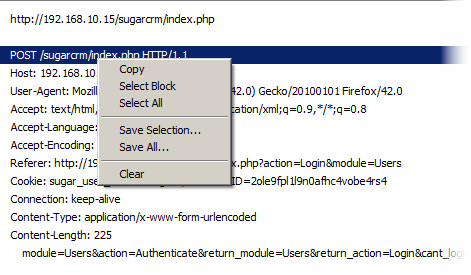
Copy this line and save in notepad.
Next, you need to see what is returned to the application after the request is sent.
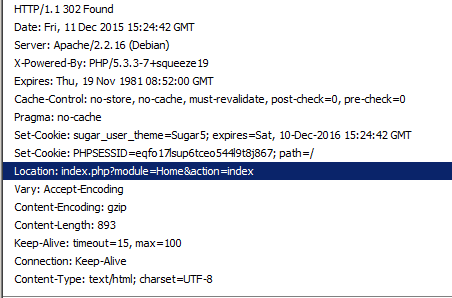
We scroll to the line with the response code 302.
We are interested in the Location header with its parameter. This line indicates that the client is successfully authenticated and will be redirected to the main page. This line is also copied.
Now configure NetScaler.
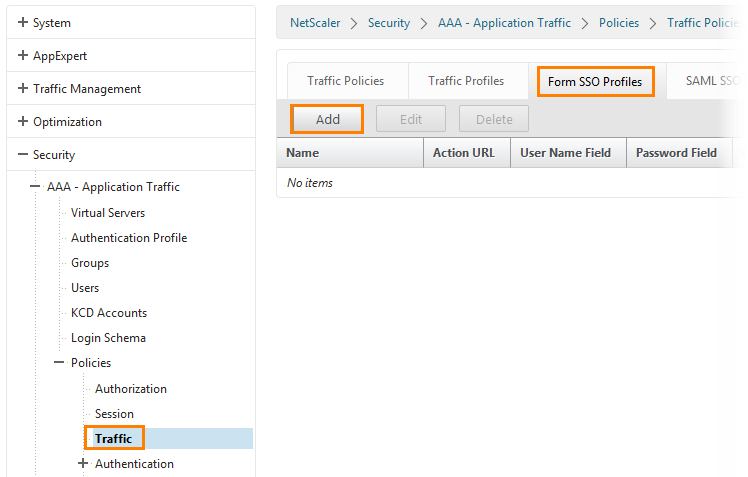
Being on the main page, go to Security -> AAA - Application Traffic -> Policies -> Traffic . Go to the tab Form SSO Profiles and click the Add button.
The SSO profile settings window opens:
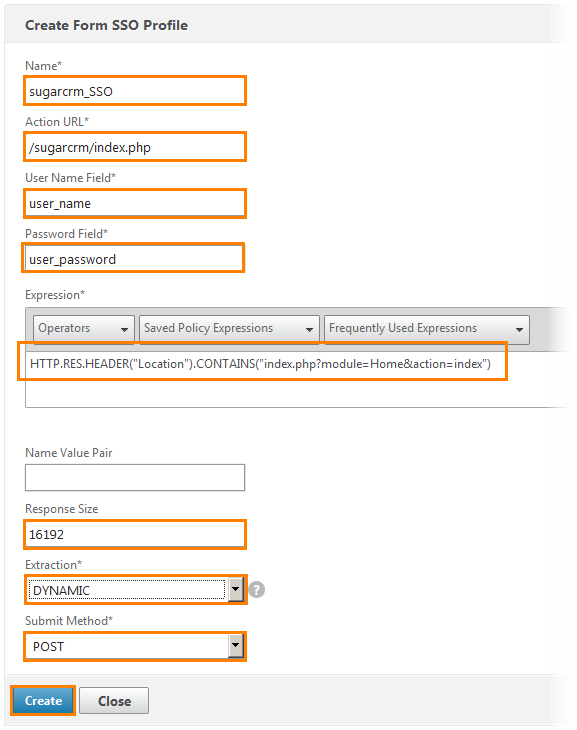
1) We write the name of the profile - sugarcrm_SSO.
2) Register the URL for which this profile is created.
3) The name of the form containing the login is registered.
4) Register the name of the form containing the password.
5) Register an expression or operation for this profile. This is what was copied.
6) Response Size set 16192. This is the size of the return.
7) Extraction choose Dynamic from the drop-down list.
8) Submit Method choose POST. That is, send a POST message.
Click Create .
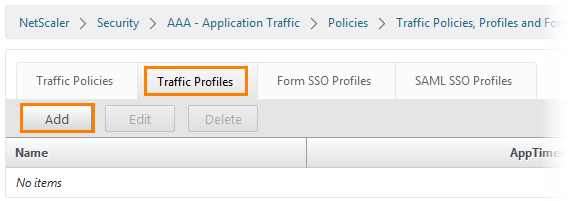
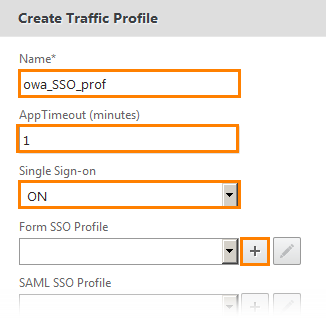
Next, open the Traffic Profiles tab and click the Add button.
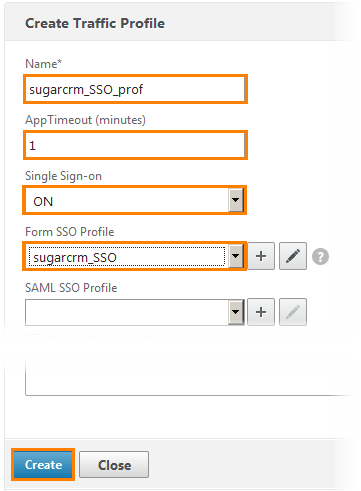
1) Set the name of the profile.
2) Configure the timeout (in this case, 1 minute).
3) Enable SSO for this profile.
4) Select the previously created SSO profile.
And click the Create button.
Go to the Traffic Policies tab and click the Add button.
Here we create the conditions under which form-based SSO will be performed.
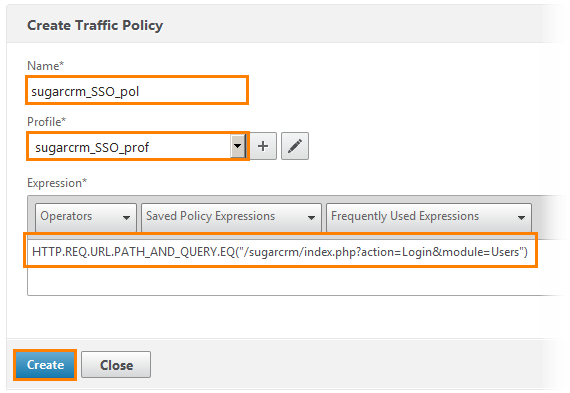
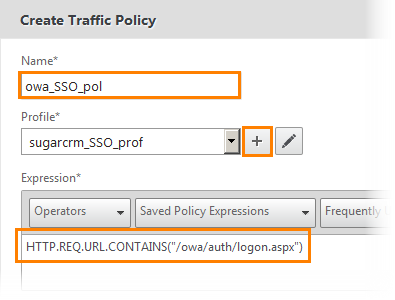
1) Give the name sugarcrm_SSO_pol.
2) Select the profile created earlier from the drop-down list.
3) Choose an expression for which, this policy will work out. HTTP.REQ.URL.PATH_AND_QUERY.EQ (" /sugarcrm/index.php ? Action = Login & module = Users"). In this expression, we add the address that was copied from the Live HTTP header.
Click Create . Politicians are created and now they need to be applied.
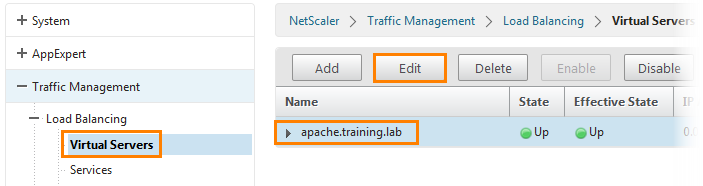
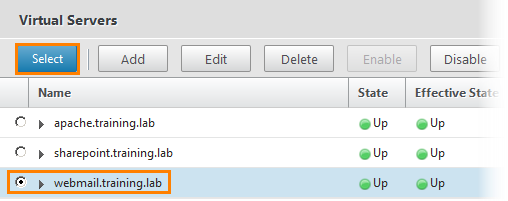
Go to the Traffic Management -> Load Balancing -> Virtual Servers tab, select the running apache.training.lab and click the Edit button.
The usual virtual server configuration window will open. We need the right column Advanced Settings .
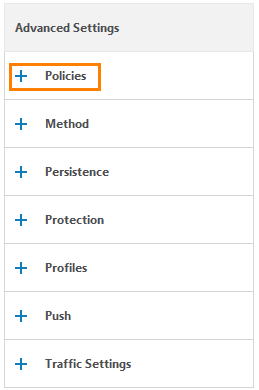
Select Policies .

In the window that opens, press the "+" button.
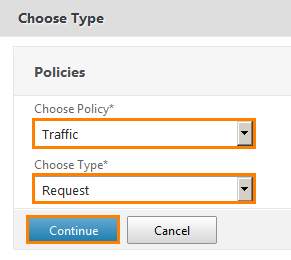
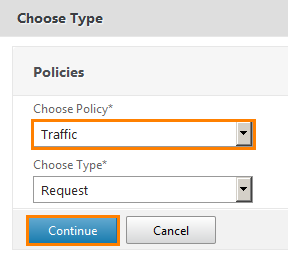
We select the Traffic policy and the traffic type Request . Click Continue .
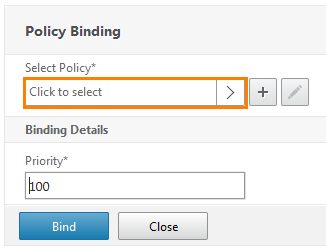
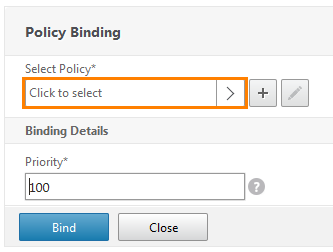
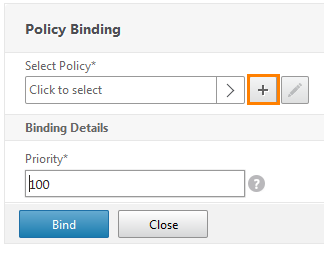
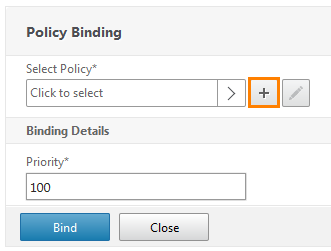
The Policy Binding window opens, where you need to select a policy. Open the Select Policy .
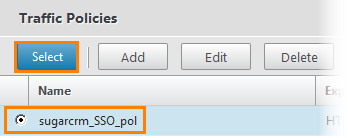
Select the created sugarcrm_SSO_pol and press the Select button.
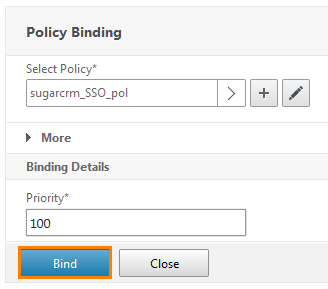
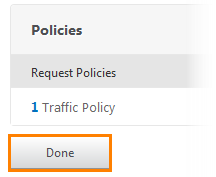
Make sure the policy is selected. Press the Bind and Done buttons.
The policy is applied, which means the SSO mechanism should work. Check it out.
Open 192.168.10.90 (I made a tab).
A familiar window opens. We enter there all the same account.
Choose Clientless Access .
Click on the SugarCRM label.

And we automatically get into the SugarCRM system, bypassing the additional entry of the login with a password. As you can see, this is much more convenient than typing the same logins with a password for each opened application.
The following authentication method that we will consider is NTLM (NT Lan Manger). A protocol developed by Microsoft for its operating systems. The latest version is called NTLMv2 and is used up to Windows 10. The authentication method is slightly different from Form-Based, but also quite simple.
1) The client sends a request to the server, where it reports which versions of NTLM it supports.
2) The server, upon receiving a request, selects the most secure protocol and sends a response to the client.
3) The client, having received the answer, understands which dialect (or protocol version) to communicate with the server and sends the request NEGOTIATE_MESSAGE . That is the establishment of a neighborhood.
4) The server, upon receiving this message, sends it to CHALLENGE_MESSAGE . This is a random 8-byte sequence.
5) The client receives this sequence and, with the help of its password, encrypts it and then sends the AUTHENTICATE_MESSAGE response to the server .
6) The server, having received the answer, performs the same operation of encrypting the sequence, and then compares the results. Based on these results, it allows or denies access.
One of the famous web applications used by the NTLM protocol is Microsoft Sharepoint. This virtual machine has already been created. You just need to add it to NetScaler.
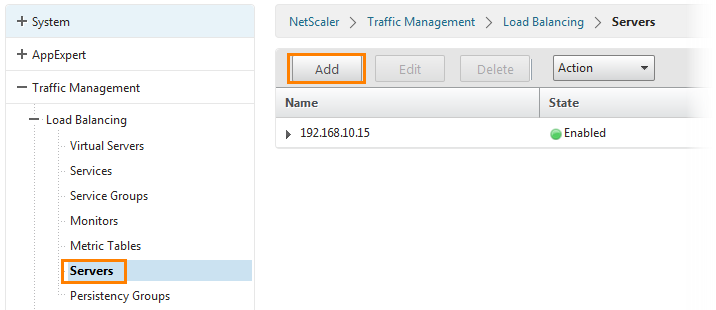
On the NetScaler main page, go to Traffic Management -> Load Balancing -> Servers and click the Add button.
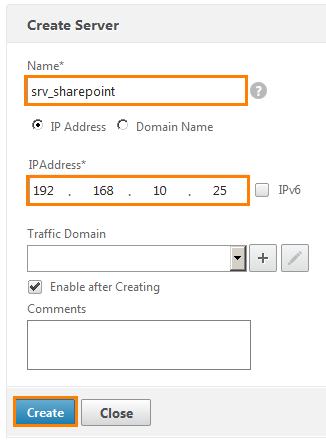
We write the server name srv_sharepoint and the IP address: 192.168.10.25 (virtual machine address). Click Create .
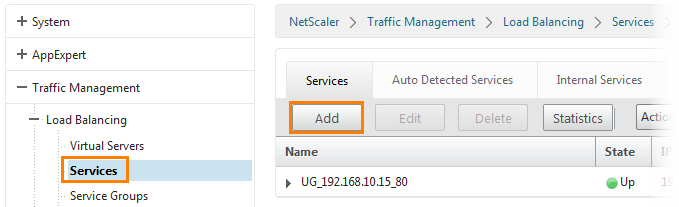
Next, go to the Services tab and click the Add button.
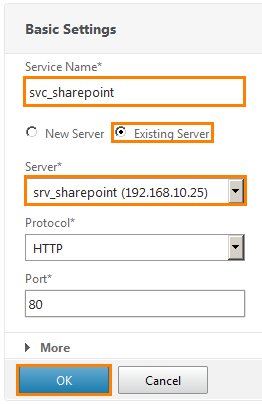
The service settings window opens. We write the name svc_sharepoint. Select Existing Server (that is, an existing one) and select the previously added srv_sharepoint. That is, we choose the HTTP service running on port 80 of the server located at 192.168.10.25. Click OK .
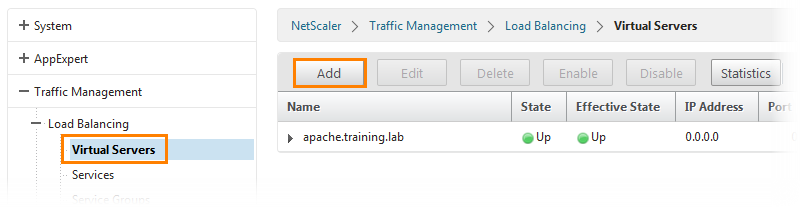
The next step is to create a load-balancing virtual server for Sharepoint. Go to the Virtual Servers tab and click the Add button.

The settings window opens. In the name field we write sharepoint.training.lab, HTTP protocol and IP address: 192.168.10.110. After that click OK .
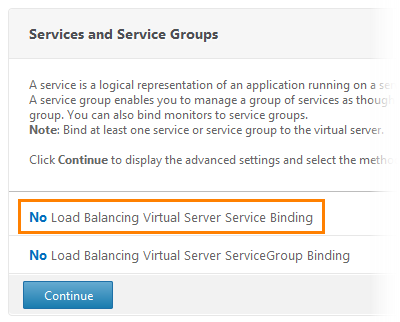
In the next window, a message appears indicating that balancing is not configured. Click on the first line and get into the service settings.
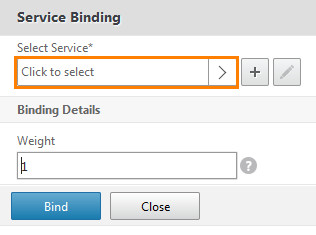
Click on the service selection window.
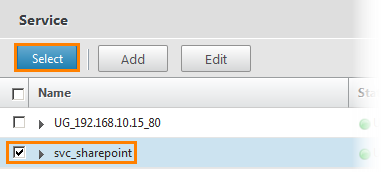
A window opens with a list of available services. Select svc_sharepoint and press the Select button.
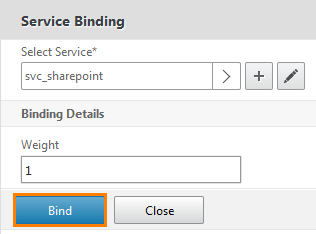
After that, go back to the previous window and press the Bind button.
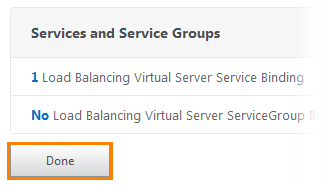
After this, a notification window will appear indicating that there is 1 virtual server of balancing.
The service is set up and try to enter it.
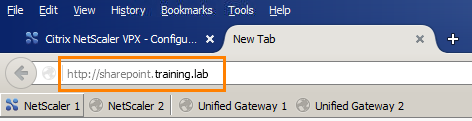
Open the browser and go to the domain name.
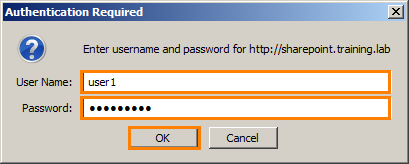
It will immediately display an authentication window. And if you enter a password, we get to the main page. Note that now we go directly to him. However, we need to enter it through Unified Gateway.
Up to now we have configured it on NetScaler. Add it to the Unified Gateway.
Open UG.
Choose a customized ug1.
And in the application window, click on the button with a pencil (which means edit).

After that, the pencil is replaced by "+" click on it.

We select WEB Application.

Give the name to the application and define the type as Clientless Access.

Register the URL to this service and click Continue .
A summary window appears. Click Done .

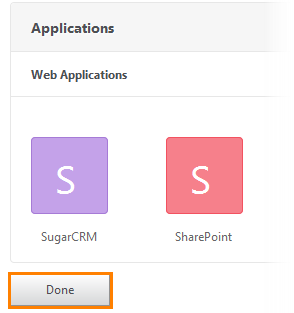
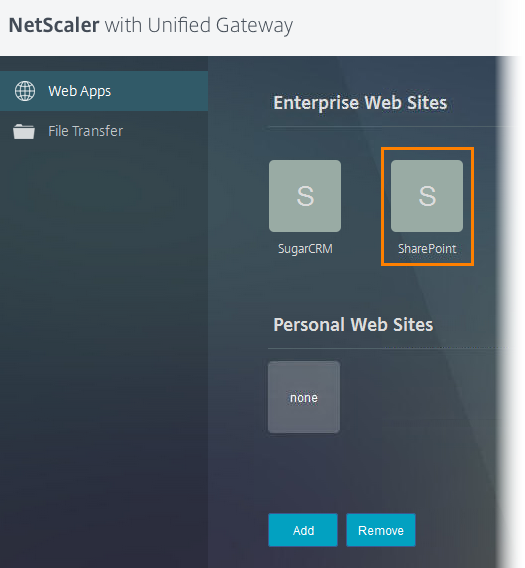
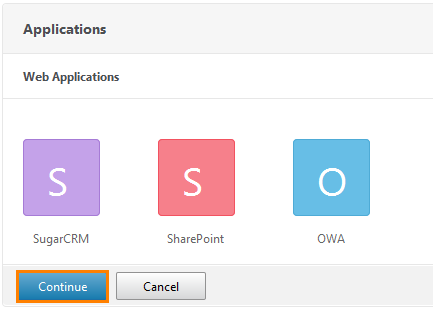
After that, we see the SharePoint application in the list next to the previously created SugarCRM. Check its availability by logging in under the user account.
Open UG.
Enter your credentials.
Choose Clientless Access .
We see that the application really appeared. If you click on it, it will immediately display the authentication window.
This does not suit us, and we return to the SSO settings for the NTLMv2 protocol.
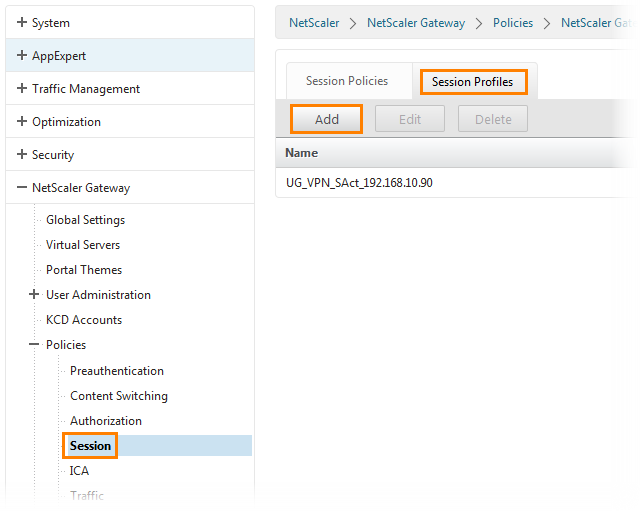
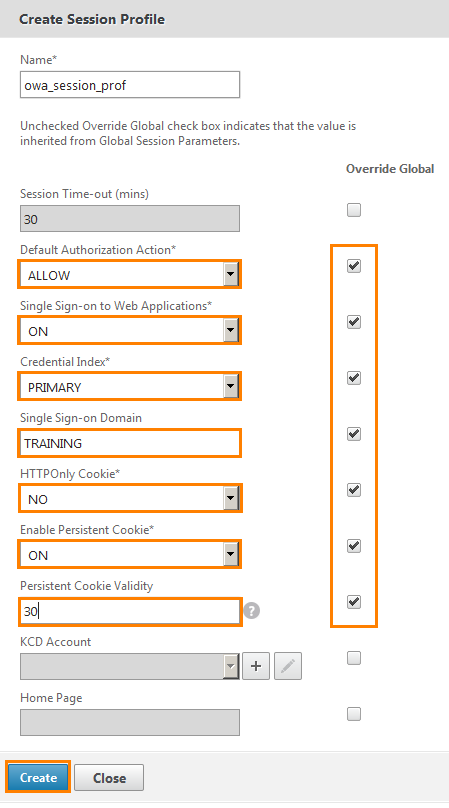
Go back to NetScaler. Go to NetScaler Gateway -> Policies -> Session . Next to the Session Profiles tab and click the Add button.
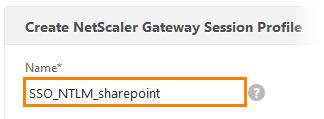
Create a new profile named SSO_NTLM_Sharepoint.
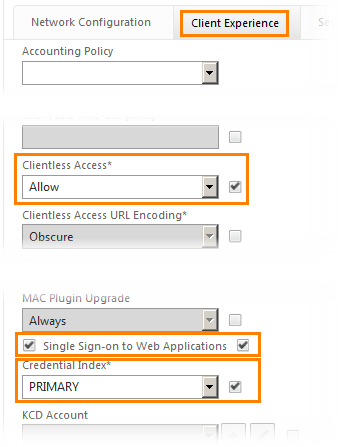
Select the Client Experience tab . From the drop-down list of Clientless Access, select Allow , put a check on SSO for web applications.
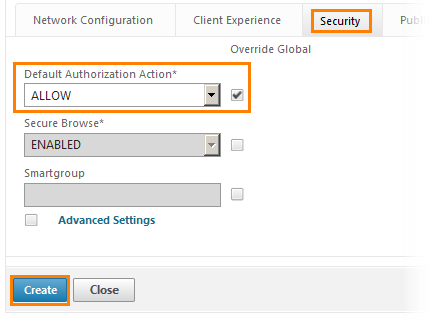
Go to the Security tab and select the standard action for authorization, as Allow (that is, allow). At the end click the button Create .
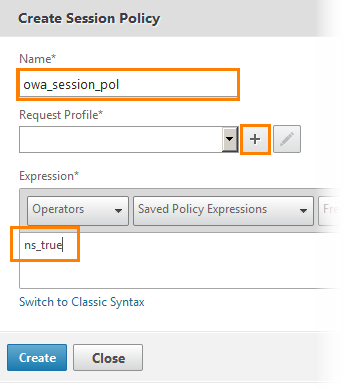
Now you need to create a policy for the session.
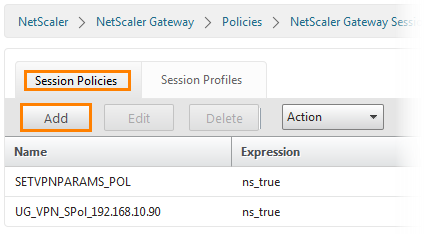
To do this, go to the Session Policies tab and click the Add button.
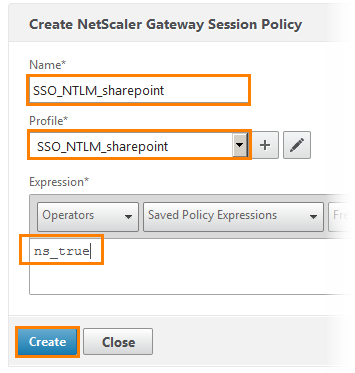
Give the policy name SSO_NTLM_sharepoint. From the drop-down list, select the profile created earlier. And write the expression ns_true.
Now you need to bind the created policy to Unified Gateway.
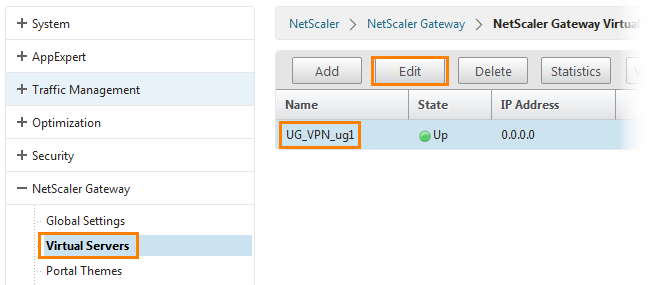
Go to NetScaler Gateway -> Virtual Servers and edit the existing UG_VPN_ug1.
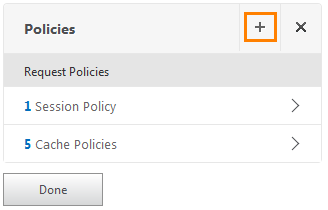
Click on the "+".
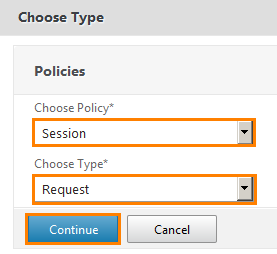
We define a new policy as Session and the Request type (i.e. requests).
Click the Add Binding button to bind the Session Policy .

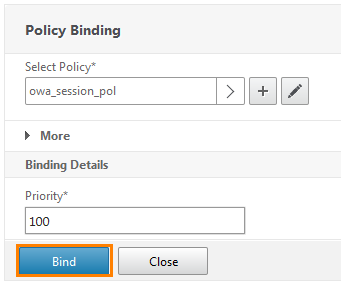
The Policy Binding window opens. Click on the drop-down list.
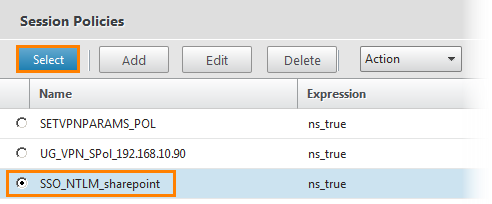
And select the previously created SSO_NTLM_sharepoint.
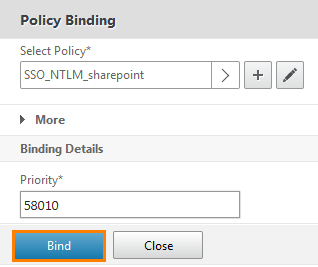
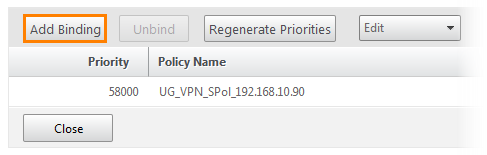
After that, we bind them by clicking the Bind button and close the window.
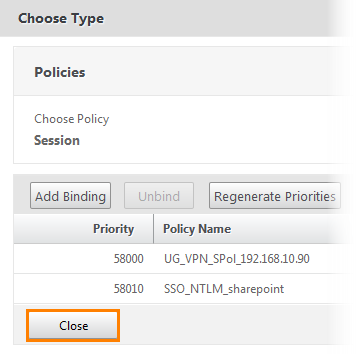
After that we see that now there are two Session Policies.
Now let's try to log in as user.
Click on the SharePoint shortcut.

And automatically get to the page with SharePoint. Note that the address bar is registered ug1.training.lab. Thus, Unified Gateway prokinul to the application, without requesting to re-login with a password. for authentication. Thus, we configured SSO to work with the NTLMv2 protocol.
The next service we configure is Outlook Web Access or OWA. One of the most popular corporate web clients to access the mail server. Therefore, be sure to add it. It is configured a little longer than the previous ones, but also quite simple.
To begin, let's add a virtual server with Exchange to which the OWA application will link.

Go to Traffic Management -> Load Balancing -> Servers and click the Add button.
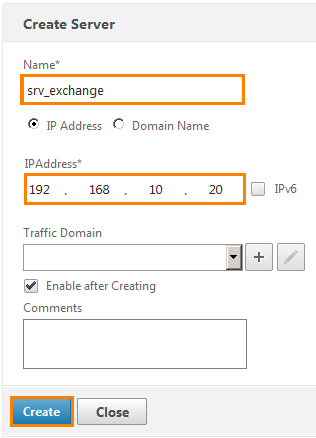
The server setup window opens. In the Name field we write srv_exchange and below we set the server’s IP address: 192.168.10.20 and click Create .
Next, you need to add a service that will respond to the state of the Exchange server. It is necessary for the work of the OWA-application.

Go to Traffic Management -> Load Balancing -> Monitors and click the Add button.
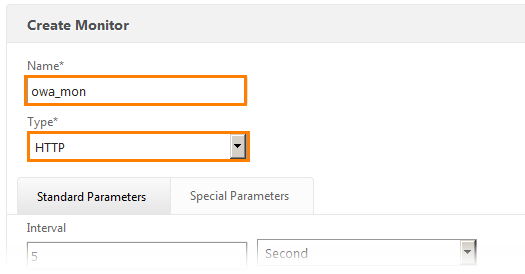
We get into the settings window, where we set the name and select HTTP protocol from the drop-down list.
Next, scroll down
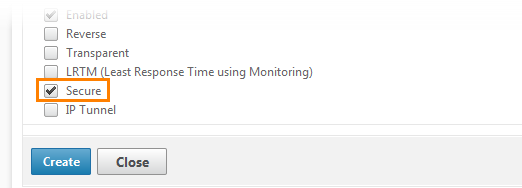
We put a check near Secure , but do not click Create !
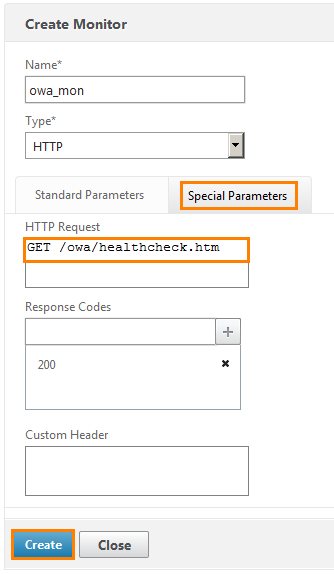
Go back up and go to the Special Parameters tab. Here we write the HTTP request “GET /owa/healthcheck.htm”. And below we leave the code 200. That is, when requesting this page, the answer should come with code 200 (that is, OK). Click Create .
Next you need to create a load-balancing service for the Exchange server.
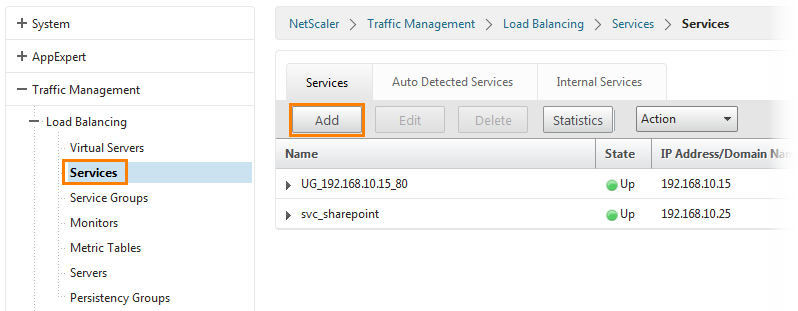
Go to Traffic Management -> Load Balancing -> Services and click the Add button.
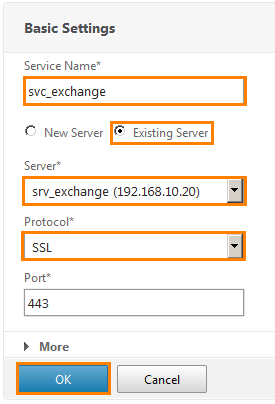
Register the name of the service. Select an existing server ( Existing Server ) and from the drop-down lists, select the previously added server and SSL protocol. Click OK .
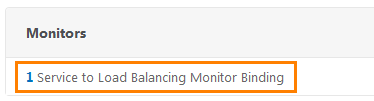
On the Monitors tab, we see that one service is already running. Click on it.
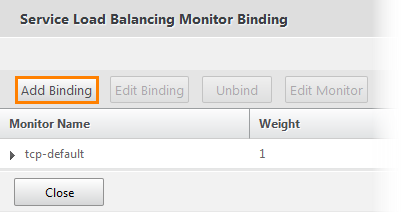
We see that the tcp-default service is already running. Add another by clicking the Add Binding button.
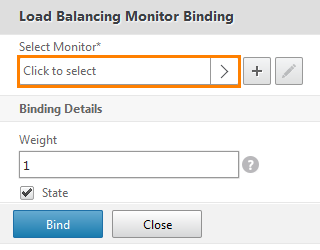
The settings window opens. Click the Select Monitor tab.
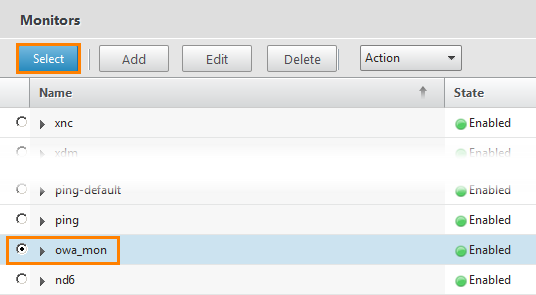
Select the owa_mon created earlier and click the Select button.
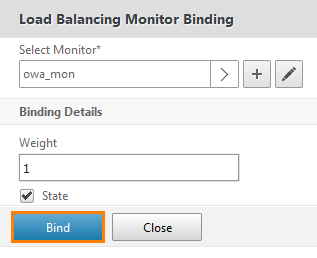
Bind button Bind .

Make sure the service is tied and click Close .
Now you need to create a virtual balancing server for the Exchange server.
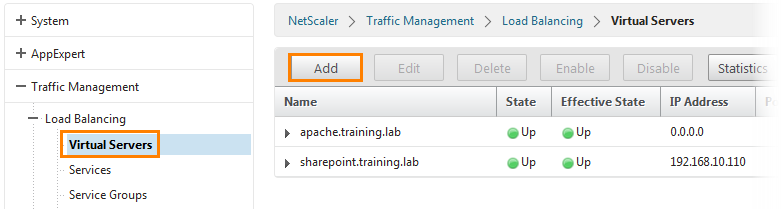
Go to Traffic Management -> Load Balancing -> Virtual Servers and click the Add button.
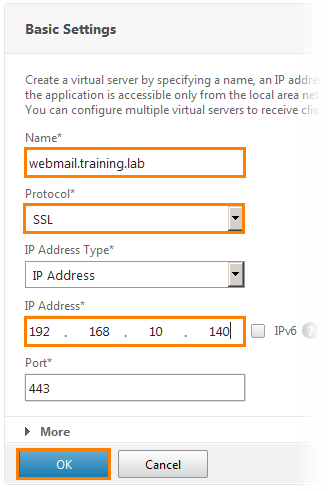
We fall into the settings window. Register the server name, select the SSL protocol and IP address from the drop-down list: 192.168.10.140. Click OK .
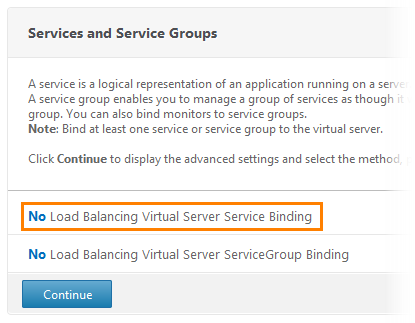
On the Services and Service Groups tab, we see that there is no binding to any service. Click on this line.
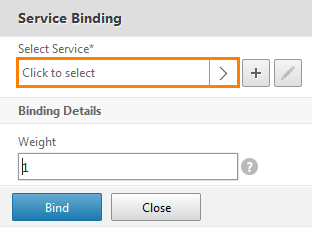
The service binding window opens. Click on Select Service .
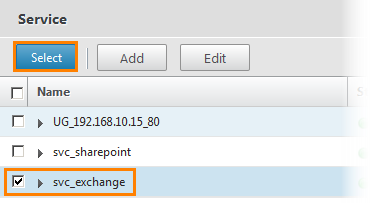
Choose svc_exchange.
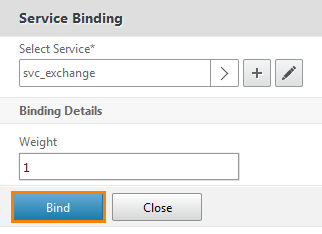
Click Bind .
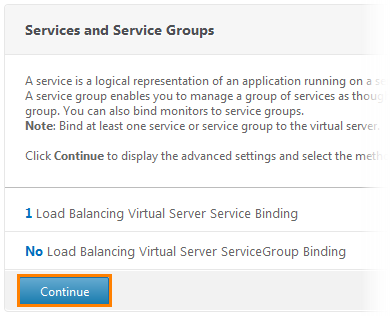
And Continue .
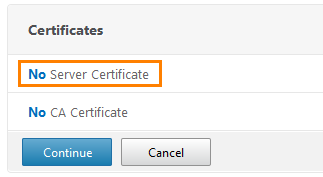
Now you need to add an SSL certificate to the virtual server.
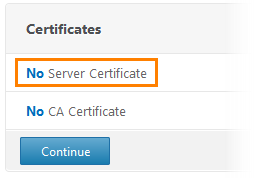
Go to the Certificates tab and click on the line " No Server Certificate ".
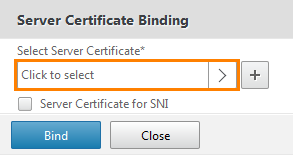
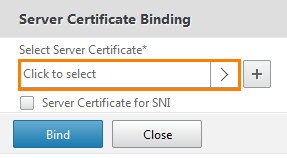
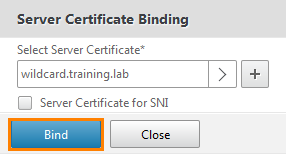
Click on Select Server Certificate .
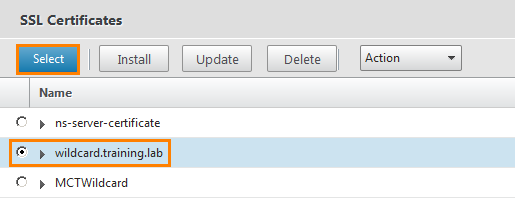
Choose a previously existing wildcard.training.lab.
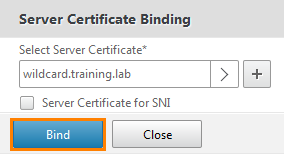
Make sure the certificate is selected and click the Bind button.
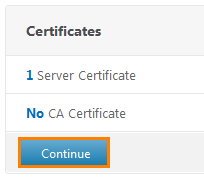
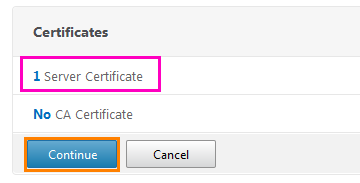
A window appears indicating that the certificate server has been added. Click Continue .
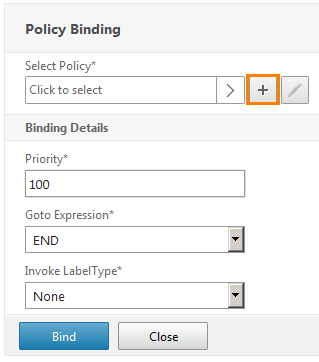
The next thing to do is to configure the virtual server policies.

On the Advanced Settings tab, select Policies .
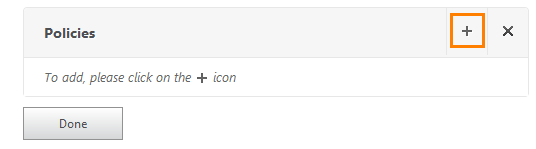
An empty window opens. Click the "+".
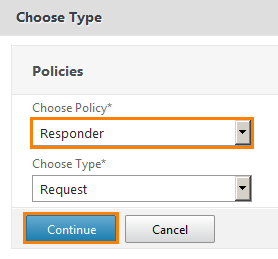
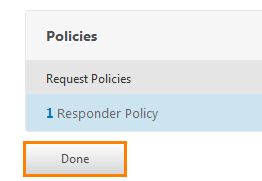
From the drop-down list, select Responder (that is, the answer) and click Continue .
Now we tie this policy. Click the "+" button to create an action for this policy.
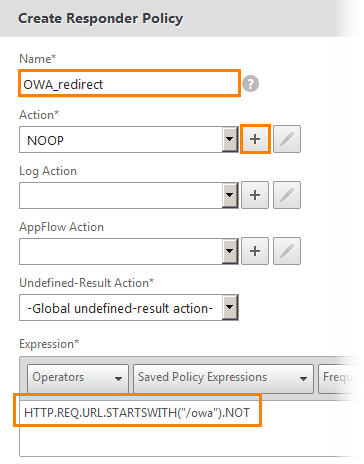
We set the name and the expression for it "HTTP.REQ.URL.STARTSWITH (“ / owa ”). NOT”. That is, for a request that does not start from the “/ owa” page. Click the “+” button to add the following action.

We write the same name and select it from the Redirect drop-down list (that is, redirect). And below the expression "/ owa". That is, this policy will redirect requests to this page. Click Create .
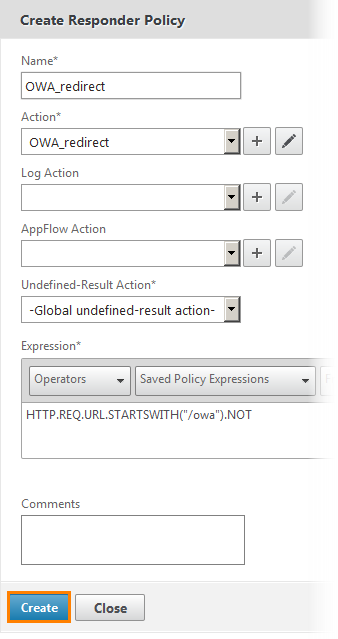
As a result, a window showing all policy settings is displayed. That is, for all requests that do not begin with “/ owa”, redirect to this page. Click Create .
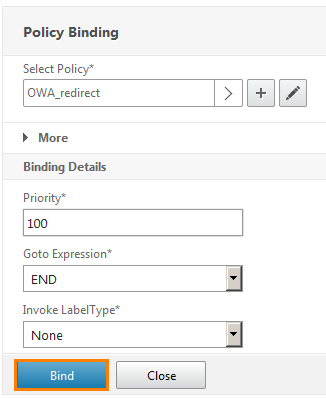
And bind this policy with the Bind button.
Now you need to add the AAA virtual server (Authentication, Authorization, Accounting) to configure SSO.
Go to Security -> AAA - Application Traffic -> Virtual Servers and click the Add button.
Register the name, IP-address and domain of authentication (that is, all who belong to the TRAINING domain). Click OK .
This is followed by a similar certificate configuration.


We will not use advanced policies and click Continue .
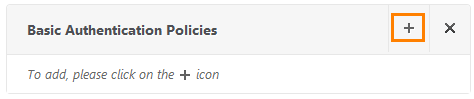
Set up a basic authentication policy.
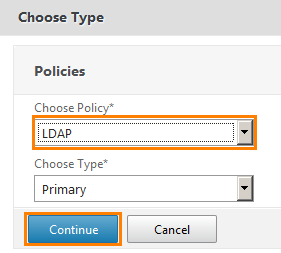
Select the LDAP protocol and click Continue .
Now you need to bind the policy. Click the Select Policy .
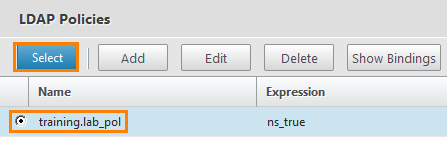
And select the previously created training.lab_pool.

Click Bind .
On the right side of the menu, we find the Advanced Settings window and select Policies from there.
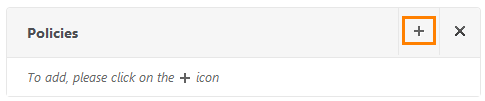
A blank window opens in which you can add a new policy. Click the "+".
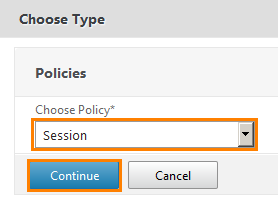
Choose a policy for Session.
We create the necessary policy.
We set a name and we write down expression "ns true". After clicking “+” to add an action to this policy.
In authorization rules we define as ALLOW (that is, allow). We enable SSO, define the domain, Cookie and set the validity. Do not forget to put checkboxes opposite custom fields to define these parameters globally and create them with the Create button.

A summary window appears, where we also click Create .
We return to the initial window and make sure that the previously created policy is attached. Combine the resulting Bind button.
Do not forget to save the configuration on NetScaler.
Now we will configure authentication on webmail.training.lab.
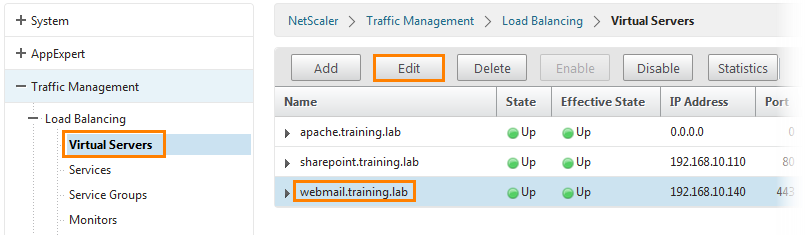
Go to Traffic Management -> Load Balancing -> Virtual Servers , select the server and edit it by clicking the Edit button.

We select Authentication .
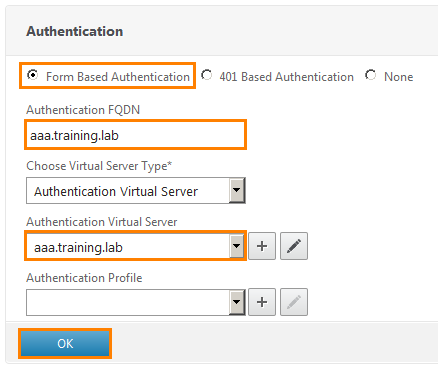
Select Form Based Authentication , give it a name, type of virtual server and select the one added earlier from the drop-down list.
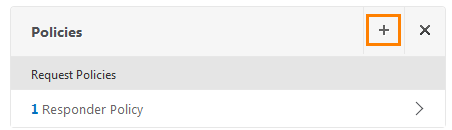
We already have one policy. But we still need to add policies for logging in and logging out of the system. Click the "+".
In the window that opens, select Traffic .
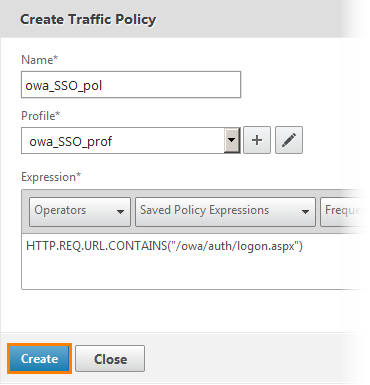
Now you need to create a policy and bind it.
Give the name of the policy and set the expression "HTTP.REQ.URL.CONTAINS (" / owa / auth / logon.aspx ")". After click "+" to create a profile.
Set the name, define the timeout in minutes and enable SSO. Next you need to determine the form for which SSO will work. Click "+" opposite Form SSO Profile .
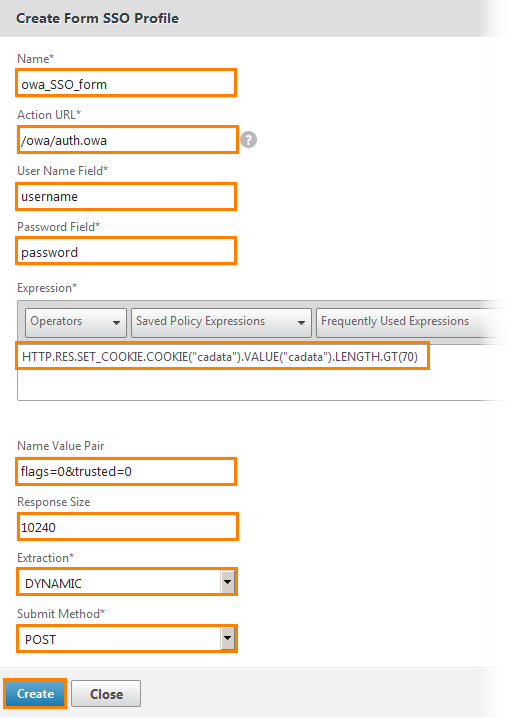
The SSO form configuration window opens. We set the name, action URL, login form with password, expression and other attributes. In fact, there is no point in going into details, since these are standard authentication parameters and they are the same for configuring OWA applications. Click Create .
Go back to the previous traffic policy window and click Create .

We get into the policy binding window and make sure that in the Select Policy field, it is really selected. After we press Bind .
Now we have created and attached a policy to log in or log on. It remains to create to exit or log off.

Create another policy by clicking the button with "+".
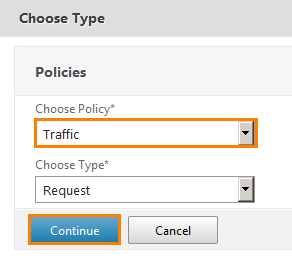
Choose a policy for traffic and click Continue .

Add a new binding.
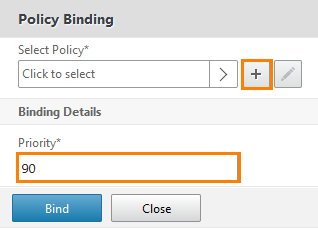
We add a new policy, prioritizing it with a priority of 90 (the priority of the previous one was 100) and click "+".

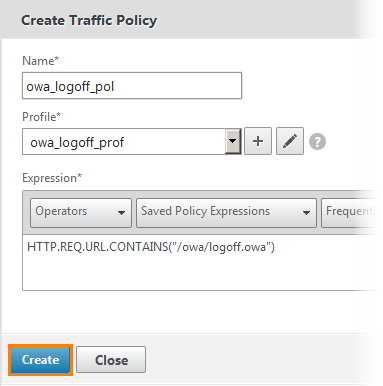
The traffic policy creation window opens. We set the name and write the expression “HTTP.REQ.URL.CONTAINS (“ / owa / logoff.owa ”)”. Now we will create a profile by pressing the button with “+”.
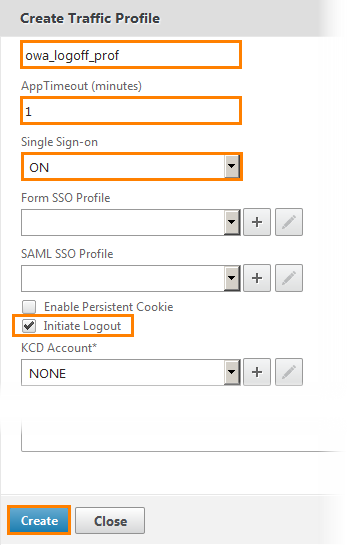
We give the name of the policy, specify the timeout in minutes, enable SSO and set a checkbox in front of the Initiate Logout (that is, initiate the exit). Click Create .
We return to the previous window. Make sure the profile is selected and click Create .
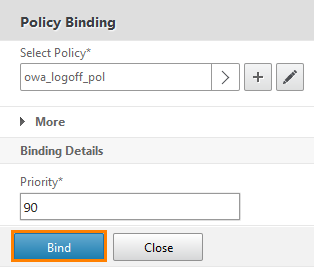
In the policy binding window, we see that the correct policy has been selected and we connect it with the Bind button .
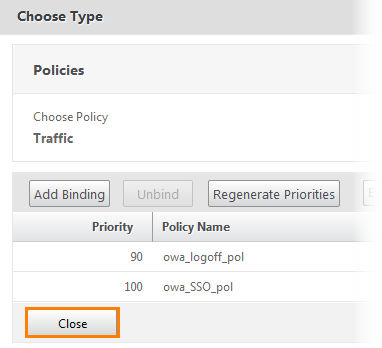
A window opens with a list of policies. Click Close .
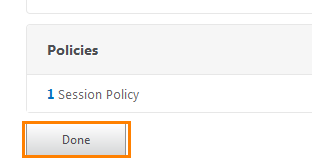
And Done .
Save the configuration to NetScaler.
Now that all the required settings and policies are configured, let's add the application itself to the Unified Gateway.
Go to Unified Gateway.
Choose ug1.
Go to edit mode by clicking the button with a pencil.
And add a new application.
We select WEB Application.

Set the name.But in the Application Type window we select not “Clientless Access”, but “Preconfigured application on this NetScaler”. Next, write the URL of the service. And choose a virtual server.
We select it and in the subsequent windows we press Continue and Done .
Application added. Now we’ll check by logging in to the UG under the user account.
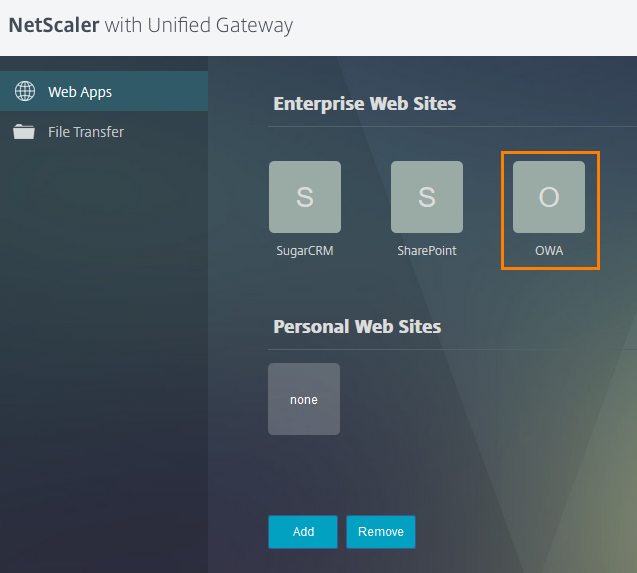
We see the appearing application and click on it.
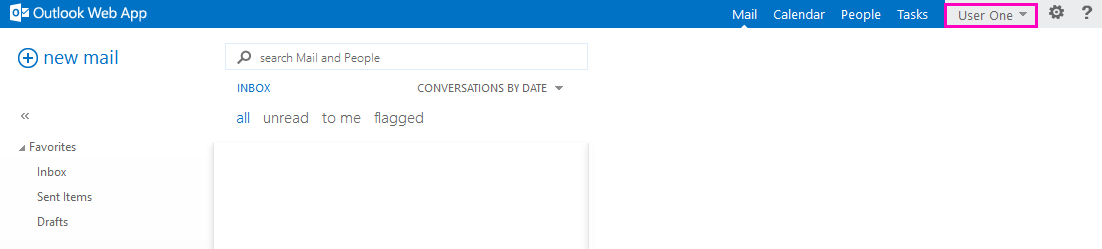
And without additional authorization windows, we get into the mail or Outlook Web App.
Thus, we set up access to corporate mail through Unified Gateway using the SSO mechanism. That is, entering a login with a password once.
However, some may argue that it is not safe and, having obtained a login with a password, you can gain access to the user's resources. For such cases, multifactor authorization is provided. When logging in, not one but several passwords are requested.
In the following example, we analyze how to configure two-factor authentication (or dual-factor). As the second method, choose authentication via a RADIUS server.
RADIUS is a protocol belonging to the AAA group. It allows you to authenticate the user (check the authenticity of the account), authorize (check the rights to certain objects) and keep records of the actions performed (that is, the audit of user actions).
We are more interested in authentication:
1) The client sends a request that contains the data to be sent (username and password).
2) The server, having received this data, verifies them and sends the answer. Answer options can be 3:
- Accept-Accept. This means that the user is successfully authenticated and can be allowed to the desired resource.
- Accept-Reject. Indicates that the request is not valid. This answer can be returned to the client for a variety of reasons (incorrect request, incorrect username and / or password, etc.). Therefore, on the server, you can configure to send a text message with this type of response, indicating what was transmitted incorrectly (but this is not necessary).
- Access-Challenge. , ( ). , . , , .
- Unified Gateway RADIUS-, .
In the NetScaler menu, select Unified Gateway.
Choose ug1.
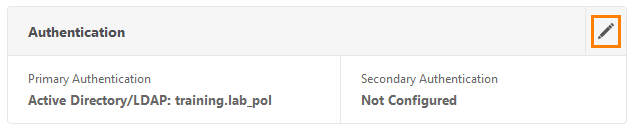
On the authentication panel click on the button with a pencil.

A previously configured window is opened, where from the drop-down list of the Secondary authentication method we select RADIUS.
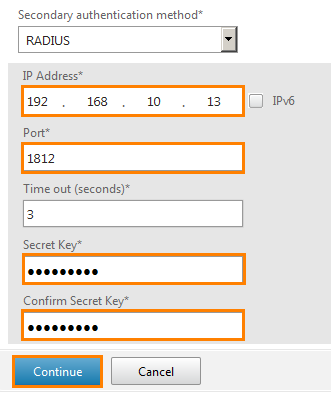
And enter the parameters of the RADIUS server. Its IP address, port, timeout in seconds (usually 3 seconds is enough, with a properly working channel) and the secret key to be entered when entering the UG. As part of the lab, we’ll select the Citrix456 key. In a real environment, choose the key more difficult. After clicking Continue and Done .
The second authentication method is added and now we check its operation.
Open the Unified Gateway.
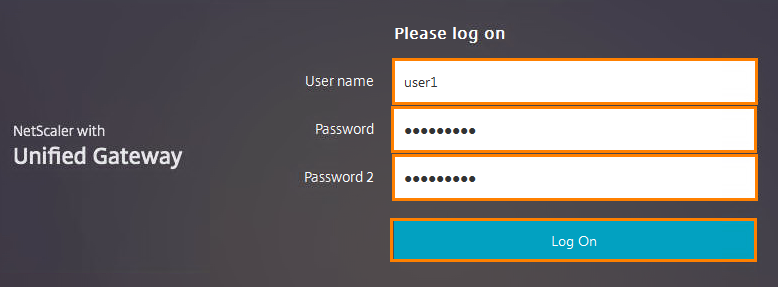
And we see that the second field for entering the password has appeared. Enter the credentials there (user1 / Citrix123 / Citrix456) and click Log On .
We see the usual window, which means that the setting was completed successfully. Thus, we set up multifactor authentication on our Unified Gateway, thereby increasing security.
The last thing we’ll touch on in this article is nFactor authentication. This type of authentication was coined by Citrix and integrated into their platforms. This is a very flexible and reliable method. Therefore, I cannot bypass it.
Since NS_VPX_1, located at 192.168.10.50 (NetScaler, on which the Unified Gateway is raised) is already configured and configured, we will use the other. On top of that, the nFactor authentication setting will not be performed in a graphical environment, but using the console.
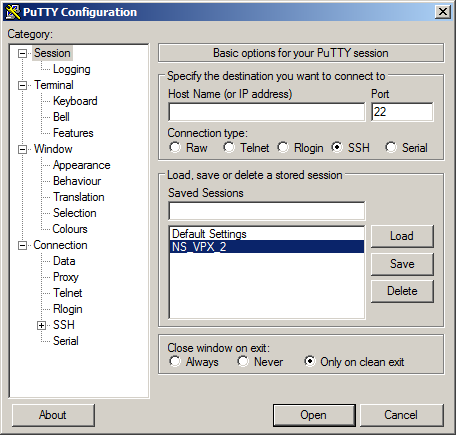
Open the Putty program (you can also use another terminal). I have it already in bookmarks under the name NS_VPX_2 (located at 192.168.10.55). I open it.
Initially, he will ask for a username and password. Enter the standard nsroot / nsroot.
We fall into the console NetScaler. Now you need to create an AAA server, configure it and bind a domain certificate to it. Enter the command:
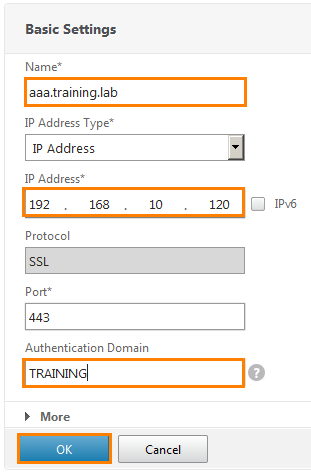
add authentication vserver security.training.lab SSL 192.168.10.125 443 –AuthenticationDomain training.lab That is, add an authenticating security.training.lab virtual server using SSL protocol located at 192.168.10.125, port 443 and the authentication domain training.lab .
Now you need to bind the certificate to this server. Enter:
bind ssl vserver security.training.lab –certKeyName wildcard.training.lab Link to the security.training.lab virtual server certificate wildcard.training.lab .
And add the authentication policy with the command:
add authentication Policy training.lab_ldap –rule true -action ad.training.lab Add an authentication policy named training.lab_ldap and an action to authenticate through the domain controller ad.training.lab .
The next thing you need to do is create an authentication scheme and a policy to bind. Enter the following:
add authentication loginSchema nfactor1 –authenticationSchema nfactorauth.xml –userCredentialIndex 1 –passwordCredentialIndex 2 Add a schema, specify the XML file in which it will be recorded and specify the recording parameters (login and password forms).
Now we associate the policy with the created schema:
add authentication loginSchemaPolicy nfactor1 –rule true –action nfactor1 We also create a scheme for skipping:
add authentication loginSchema nfactor2 –authenticationSchema noschema add authentication policyLabel nfactor_label –loginSchema nfactor2 Next, you need to create policies and authentication for the LDAP and RADIUS server for multifactor authentication. Add authentication via RADIUS server:
add authentication radiusAction radius_act –serverIP 192.168.10.13 –radKey Citrix456 We define the authentication method through RADIUS, set the IP address and key (or password).
add authentication policy radius –rule true –action radius_act Add a policy and bind to the method created above.
Now you need to bind the schema to the authenticating virtual server. We write the following command:
bind authentication vserver security.training.lab –policy nfactor1 –priority 1 –gotoPriorityExpression END That is, bind the nfactor1 policy to the security.training.lab virtual server and set the priority.
And we bind both created authentication policies to a virtual AAA server:
bind authentication vserver security.training.lab –policy training.lab_ldap –priority 1 –nextFactor nfactor_label –gotoPriorityExpression next bind authentication policyLabel nfactor_label –policyName radius –priority 2 –gotoPriorityExpression end That is, with priority 1, the authentication policy through the LDAP server is executed, and further, with priority 2, the authentication policy through the RADIUS server is executed. The end parameter at the end indicates that the action ends. That is, these 2 politicians must work together.
Finally, we activate the authentication for the virtual server:
set lb vserver nfactor.training.lab –authenticationHost security.training.lab –Authentication ON For the nfactor.training.lab virtual server, we specify the authentication host security.training.lab and enable authentication.
After saving the configuration:
save config At this setting is over. Check the work.
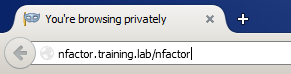
Open the specified server.
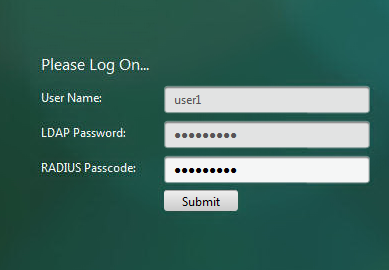
And we are transferred to a virtual AAA server, with content from an XML schema. That is, with a login form and two forms for entering a password.
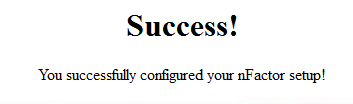
And after correctly entered data, the following message comes out.
So we deployed nFactor using the LDAP and RADIUS protocols. And then they tested how a virtual AAA server authenticates users.
Let's sum up. In this article, we have disassembled the Citrix NetScaler product, configured it using the WEB interface and the console interface. We learned how to raise the Unified Gateway platform, add applications to it, create policies, configure them and link them to a service. Plus, they figured out the authentication methods, the difference between multifactor authentication and the usual one.
I tried to describe everything as clearly and clearly as possible, because of which the article slightly increased in volume. I hope that it turned out to be useful and useful, with further settings. If you have questions, feel free to ask in the comments. Thanks for reading and waiting for the next issues!
Source: https://habr.com/ru/post/347398/
All Articles