Unit tests. Quick start - effective result (with examples in C ++)

Instead of intro
Hello! Today I would like to talk about how simple and happy to write test code. The fact is that in our company we constantly monitor and greatly appreciate the quality of our products. No wonder - after all, millions of people work with them every day, and for us it’s simply unacceptable to let down our users. Just imagine, the deadline for submission of reports has come, and you carefully and with pleasure, using the VLSI user interface carefully designed by us, prepared the documents, rechecked every tsifik once again, and again made sure that there would be no meetings with polite tax people. And here, with a slight click of the mouse, click on the cherished button “Send” and then BACH! the application crashes, documents are destroyed, the monitor burns with a hot flame, and it seems that people in uniform are already knocking hard at the door, demanding that reports be submitted. Something like this can happen:
Fuh ... Well, I agree, with the monitor, probably, still got excited;) But the situation that has arisen may leave the user of our product not in the most benign state of mind.
')
So, since we at Tenzor value the morale of our clients, it is very important for us that the products we have developed are comprehensively tested - in our company, this is largely ensured by almost 300 testers who control the quality of our products. However, we are trying to control quality at all stages of development. Therefore, in the development process, we try to use automated unit testing, not to mention integration, load and acceptance tests.
However, today from our experience of interviews it can be noted that not everyone has the skills to create test code. Therefore, we want to tell “on the fingers” about the principles of creating test code, and also show how you can create unit tests that are easy to maintain and upgrade.
The following material was largely presented at the C ++ Russia conference, so you can read it, listen to it and even see it.
Characteristics of good unit tests
One of the first tasks to be faced with when writing any automatically executed test is handling external dependencies. By external dependency we mean entities with which the code under test interacts, but over which it does not have complete control. These uncontrolled external dependencies include operations that require interaction with the hard disk, database, network connection, random number generator, and others.
I must say that automated testing can be done at different levels of the system, but we will consider issues related specifically to unit tests.
For a clearer understanding of the principles underlying the examples below, the code has been simplified (for example, const qualifiers are omitted). The test samples themselves are implemented using the GoogleTest library.
One of the most important differences between the integration test and the unit test is that the unit test has complete control over all external dependencies. This allows to achieve the fact that a single unit test has the following properties:
- we repeat - as a result of launching a test at the output always produces the same value (always brings the system to the same state);
- stable - at whatever time of the day or night the test runs, it either always passes or it does not pass;
- isolated - the order of launching all existing unit tests, as well as actions performed inside the tests, do not affect the result of the execution of a single unit test.
All this leads to the fact that the launch of multiple unit tests with the described properties can be automated and carried out, in fact, with the press of a single button.
A good unit test runs fast. Because if there are a lot of tests in the project, and the run of each of them will be long, then the run of all the tests will take considerable time. This can lead to the fact that with changes in the code, the run of all unit tests will be performed less frequently, because of this, the time it takes for the system to respond to changes will increase, which means that the time it detects an introduced error will increase.
It is said that with some applications, testing everything is much easier, but we, mere mortals, who do not possess such a high-speed spinner , are not so sweet. So we will understand further.

Unit testing. Where it all begins
Writing any unit test begins with the selection of its name. One of the recommended approaches to the name of a unit test is to form its name in three parts:
- name of the working unit under test
- test script
- Expected Result
Thus, we can receive, for example, such names: Sum_ByDefault_ReturnsZero , Sum_WhenCalled_CallsTheLogger . They are read as a complete sentence, and this increases the simplicity of working with tests. To understand what is being tested, it is enough, without understanding the logic of the code, just to read the names of the tests.
But in some cases you still need to understand the logic of the test code. To simplify this work, the unit test structure can be formed from three parts:
- part of Arrange - here is the creation and initialization of the objects required for the test
- part of the Act - actually conducting the test action
- part of Assert - here we compare the obtained result with the reference
In order to increase the readability of tests, it is recommended to separate these parts from each other with a blank line. This will orient those who read your code and help you quickly find the part of the test that interests them the most.
When covering the logic of code operation with unit tests, each module of the code under test should perform one of the following actions. So, you can test:
- return result
- system state change
- interaction between objects
In the first two cases, we are faced with the task of separation . It consists in not introducing the code into the means of testing, over which we do not have complete control. In the latter case, the recognition problem has to be solved . It consists in gaining access to values that are inaccessible for the code under test: for example, when control is required of receiving logs by a remote web server.
To write the code under test, you need to be able to implement and apply fake objects for the intended purpose.
There are several approaches to the classification of fake objects. We will consider one of the basic ones, which corresponds to the tasks solved in the process of creating test code.
It identifies two classes of fake objects: stub objects and mock objects . They are designed to solve different problems: a stub-object - to solve the problem of separation, and a mock-object - to solve the problem of recognition. The biggest difference is that when using a stub-object assert (the operation of comparing the obtained result with the reference one) is performed between the test and the tested code, and the use of a mock-object implies its analysis, which shows whether the test passed or not.
If the logic of work can be tested on the basis of an analysis of the return value or a change in the state of the system, then do so. As practice shows, unit tests that use mock objects are more difficult to create and maintain than tests that use stub objects.
Consider the principles on the example of working with legacy ( legacy ) code. Suppose we have a class EntryAnalyzer , presented in Fig. 1, and we want to cover with unit tests its public Analyze method. This is due to the fact that we plan to change this class, or we want to document its behavior in this way.
To cover the code with tests, we define its external dependencies. In our case, these dependencies are two: working with a database and working with a network connection, which is conducted in the classes of WebService and DatabaseManager, respectively.
class EntryAnalyzer { public: bool Analyze( std::stringename ) { if( ename.size() < 2 ) { webService.LogError( "Error: "+ ename ); return false; } if( false== dbManager.IsValid( ename ) ) return false; return true; } private: DatabaseManager dbManager; WebService webService; }; Fig.1. Code of class under test that is not suitable for covering by unit tests.
Thus, for the class EntryAnalyzer, they are external dependencies. Potentially, between testing dbManager.IsValid and the final instruction “return true” there may be a code that requires testing. When writing tests, we can get access to it only after we get rid of the existing external dependencies. To simplify further presentation, such additional code is not given.
Now consider ways to break external dependencies. The structure of these classes is shown in Fig. 2
class WebService { public: void LogError( std::string msg ) { /* , */ } }; class DatabaseManager { public: bool IsValid( std::string ename ) { /* , */ } }; Fig.2. Class structure for working with network connection and database
To write test code, it is very important to be able to develop, relying on contracts, and not on specific implementations. In our case, the contract of the original class is the determination of whether the cell name ( entry ) is valid or not.
In C ++, this contract can be documented as an abstract class that contains the virtual method IsValid , the body of which is not required to be defined. Now you can create two classes that implement this contract: the first will interact with the database and be used in the “combat” (production) version of our program, and the second will be isolated from uncontrolled dependencies and will be used directly for testing. The described scheme is shown in Fig. 3
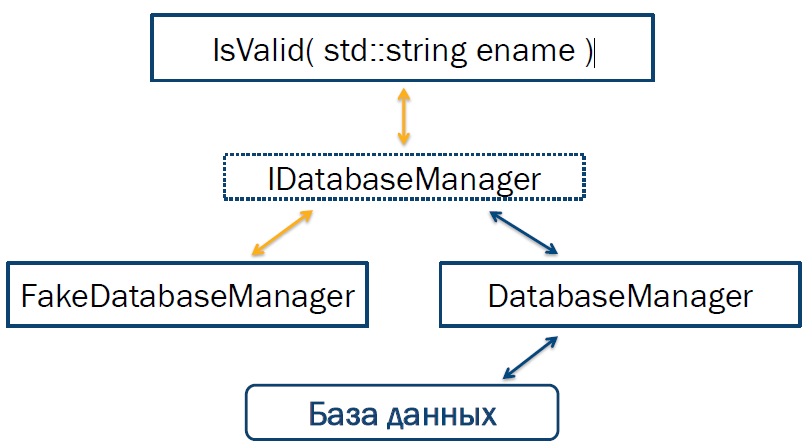
Fig.3. Introducing an interface to break the dependency on database interaction
An example of code allowing to break the dependency, in our case from the database, is presented in Fig. four.
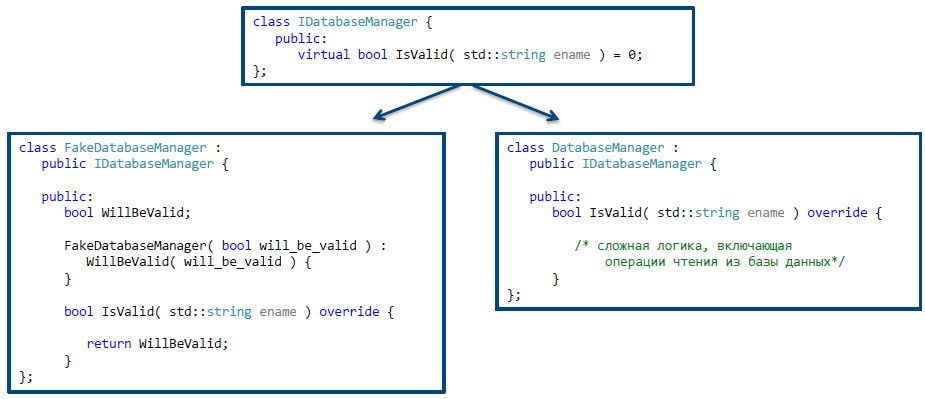
Fig.4. An example of classes that allow for breaking a dependency on a database
In the above code, you should pay attention to the override specifier for methods that implement the functionality specified in the interface. This increases the reliability of the generated code, as it clearly indicates to the compiler that the signatures of these two functions must match.
You should also pay attention to the declaration of the abstract class virtual. If this looks surprising and unexpected, then you can round up the book by S. Myers “Effective use of C ++” and read it avidly, with special attention given to rule No. 7 there;).
Spoiler for especially impatient
This is necessary to avoid memory leaks when a derived class object is destroyed via a pointer to the base class.
Break dependencies using stub objects
Consider the steps that are needed to test our class EntryAnalyzer . As mentioned above, the implementation of tests using stub objects is somewhat simpler than using mock objects. Therefore, we first consider how to break the dependency on the database.
Method 1. Parameterization of the constructor
First, we get rid of the hard-coded usage of the DatabaseManager class. To do this, go to work with a pointer, such as IDatabaseManager . To preserve the performance of a class, we also need to define a “default” constructor, in which we indicate the need to use a “combat” implementation. The made changes and the received modified class are presented on fig. five.

Fig.5. The class after refactoring, which allows you to break the dependency on the database
To implement dependencies, add another class constructor, but now with an argument. This argument just will determine which interface implementation should be used. The constructor that will be used to test the class is shown in Fig. 6

Fig.6. Constructor used for dependency injection
Now our class looks like this (the constructor used to test the class is circled in green):
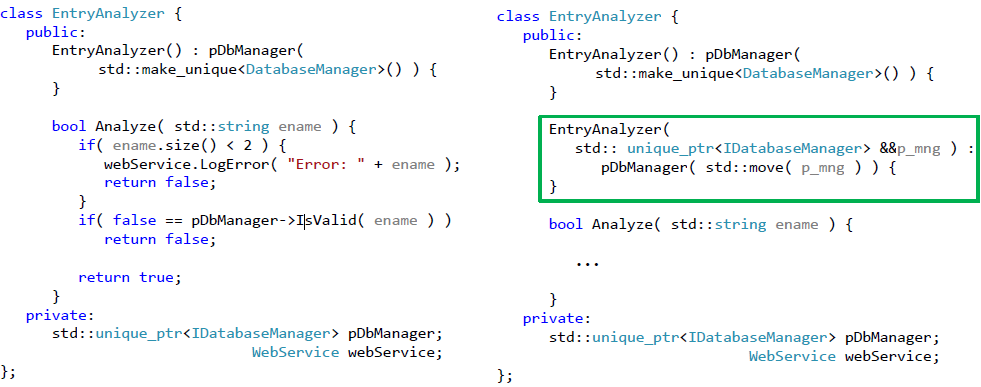
Fig.7. Class refactoring to allow database dependency to break
Now we can write the following test, which demonstrates the result of processing a valid cell name (see Figure 8):
TEST_F( EntryAnalyzerTest, Analyze_ValidEntryName_ReturnsTrue ) { EntryAnalyzer ea( std::make_unique<FakeDatabaseManager>( true ) ); bool result = ea.Analyze( "valid_entry_name" ); ASSERT_EQ( result, true ); } class FakeDatabaseManager : public IDatabaseManager { public: bool WillBeValid; FakeDatabaseManager( bool will_be_valid ) : WillBeValid( will_be_valid ) { } bool IsValid( std::string ename ) override { return WillBeValid; } }; Fig.8. An example of a test that does not interact with a real database.
Changing the value of the constructor parameter of a fake object affects the result of the execution of the IsValid function. In addition, it allows you to reuse the fake-object in tests that require both affirmative and negative results of accessing the database.
Consider the second way to parameterize the constructor. In this case, we need the use of factories - objects that are responsible for creating other objects.
First, we will do the same steps to replace the hard-coded use of the DatabaseManager class - let's move on to using a pointer to an object that implements the required interface. But now in the “default” constructor we will assign the responsibility for creating the required objects to the factory.
The resulting implementation is shown in Fig. 9.

Fig. 9. Class refactoring to use factories to create an object interacting with a database.
Given the factory class entered, the test itself can now be written as follows:
TEST_F( EntryAnalyzerTest, Analyze_ValidEntryName_ReturnsTrue ) { DbMngFactory::SetManager( std::make_unique<FakeDatabaseManager>( true ) ); EntryAnalyzer ea; bool result = ea.Analyze( "valid_entry_name" ); ASSERT_EQ( result, true ); } class DbMngFactory { public: static std::unique_ptr<IDatabaseManager> Create() { if( nullptr == pDbMng ) return std::make_unique<DatabaseManager>(); return std::move( pDbMng ); } static void SetManager( std::unique_ptr<IDatabaseManager> &&p_mng ) { pDbMng = std::move( p_mng ); } private: static std::unique_ptr<IDatabaseManager> pDbMng; }; Fig.10. Another example of a test that does not interact with a real database.
An important difference of this approach from the previously considered one is the use of the same constructor for creating objects both for the “combat” and for the test code. The factory takes all the care to create the required objects. This allows you to delineate the responsibility areas of classes. Of course, a person who will deal with your code will need some time to understand the relationships between these classes. However, in perspective, this approach allows for a more flexible code adapted for long-term support.
Method 2. "Select and override"
Consider another approach to breaking the database dependency - “Extract and override”. Perhaps its use will seem simpler and will not cause such emotions:

Its main idea is to localize the dependencies of the “combat” class in one or several functions, and then redefine them in the heir class. Consider in practice this approach.
Let's start with the localization of dependencies. In our case, the dependency is to refer to the IsValid method of the DatabaseManager class. We can isolate this dependence in a separate function. Please note that changes should be made as carefully as possible. The reason is that there are no tests with the help of which you can make sure that these changes will not break the existing work logic. In order for the changes we make to be the safest, you must try to preserve the signatures of functions as much as possible. Thus, we will move the code containing external dependency into a separate method (see Fig. 11).
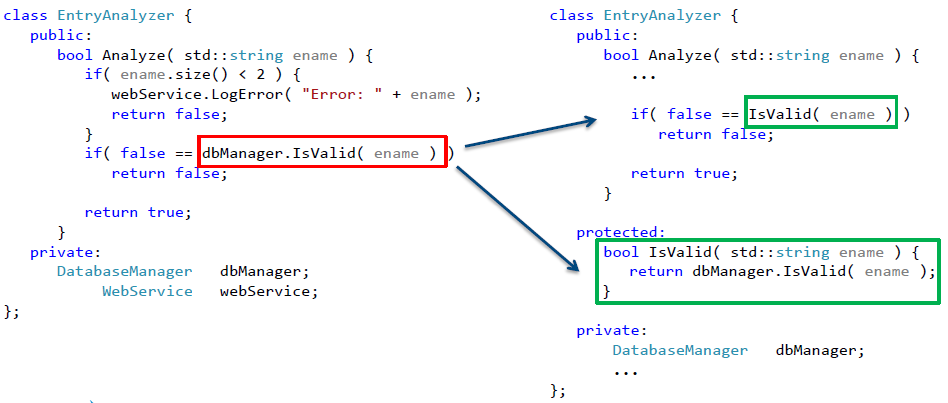
Fig.11. Delivering code containing external dependency to a separate method
How can we test our class in this case? Everything is simple - let's declare the selected function virtual, inherit from the original class a new class in which we will override the function of the base class containing the dependency. So we got a class that is free from external dependencies - and now it can be safely entered into test tools to cover the tests. In fig. 12 shows one of the ways to implement such a test class.
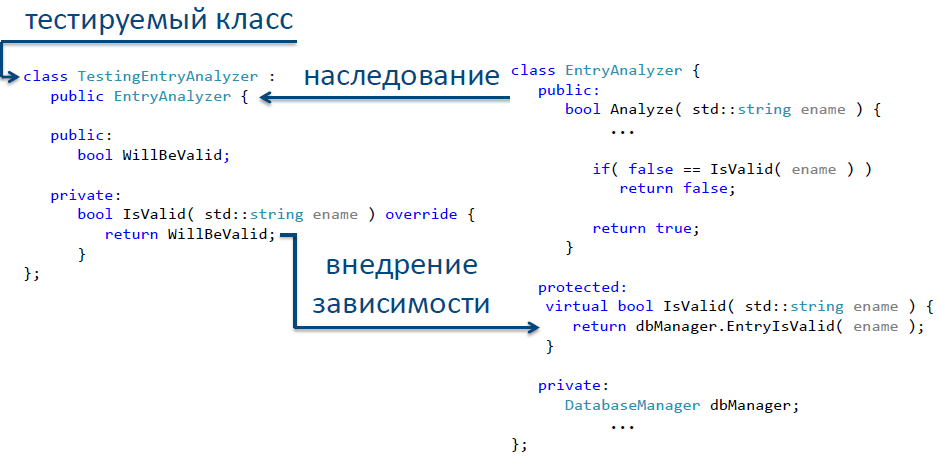
Fig.12. Implementing the Select and Override Method to Break the Dependency
The test itself can now be written as follows:
TEST_F( EntryAnalyzerTest, Analyze_ValidEntryName_ReturnsTrue) { TestingEntryAnalyzer ea; ea.WillBeValid = true; bool result = ea.Analyze( "valid_entry_name" ); ASSERT_EQ( result, true ); } class TestingEntryAnalyzer : public EntryAnalyzer { public: bool WillBeValid; private: bool IsValid( std::string ename ) override { return WillBeValid; } }; Fig.13. And another example of a test that does not interact with a real database.
The described approach is one of the easiest to implement, and it is useful to have it in the arsenal of your skills.
Break dependencies using mock objects
Now we can break database dependencies using stub objects. But we still have an unprocessed dependence on a remote web server. With the help of a mock object, we can break this dependency.
What do you need to do for this? Here we can use a combination of the already considered methods. First, we localize our dependency in one of the functions, which we then declare virtual. Do not forget while saving function signatures! Now select the interface defining the contract of the WebService class and instead of using the class explicitly, we will use the pointer unique_ptr of the required type. And we will create a class-successor in which this virtual function will be redefined. The class obtained after refactoring is shown in fig. 14.
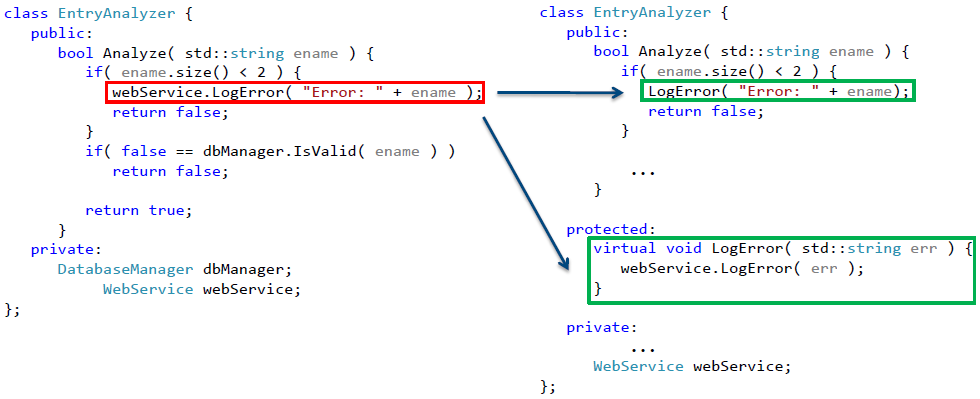
Fig.14. Class after refactoring, prepared to break the dependence on network interaction
Let's enter into the heir class a pointer shared_ptr to the object that implements the selected interface. All we have to do is use the constructor parameterization method to implement the dependency. Now our class, which can now be tested, looks like this:
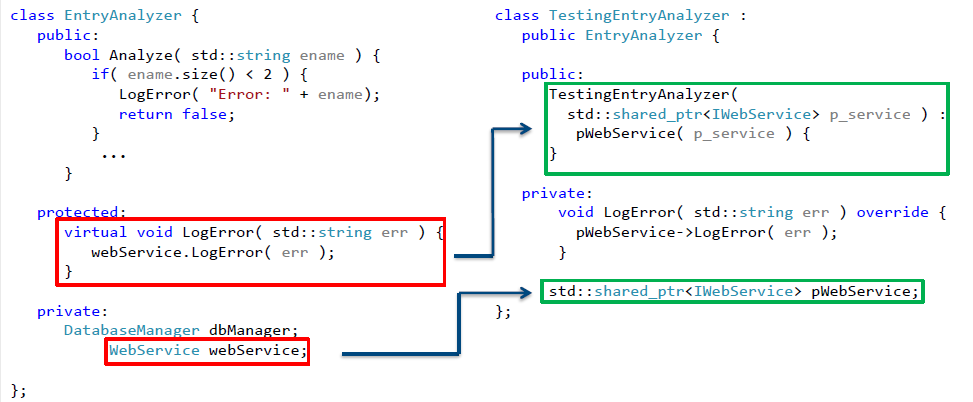
Fig.15. Test class that allows for discontinuity depending on network interaction
And now we can write the following test:
TEST_F( EntryAnalyzerTest, Analyze_TooShortEntryName_LogsErrorToWebServer ) { std::shared_ptr<FakeWebService> p_web_service = std::make_shared<FakeWebService>(); TestingEntryAnalyzer ea( p_web_service ); bool result = ea.Analyze( "e" ); ASSERT_EQ( p_web_service->lastError, "Error: e" ); } class TestingEntryAnalyzer : public EntryAnalyzer { public: TestingEntryAnalyzer( std::shared_ptr<IWebService> p_service ) : pWebService( p_service ) { } private: void LogError( std::string err ) override { pWebService->LogError( err ); } std::shared_ptr<IWebService> pWebService; }; class FakeWebService : public IWebService { public: void LogError( std::string error ) override { lastError = error; } std::string lastError; }; Fig.16. An example of a test that does not interact with a network connection.
Thus, by introducing a dependency using the parameterization of the constructor, based on the analysis of the state of the mock object we can find out which messages the remote web service will receive.
Recommendations for creating tests that are easy to maintain and upgrade
Consider now the approaches to the construction of unit tests, which are easy to maintain and upgrade. Perhaps, in many respects, this is again due to distrust of oneself.

The first recommendation is that one test should test only one result of the work. In this case, if the test fails, then you can immediately say unequivocally how much of the logic of the "combat" code did not pass the test. If in one test there are several asserts, then without re-running the test and subsequent additional analysis it is hard to say exactly where the logic was broken.
The second recommendation is that only public class methods should be tested. This is due to the fact that public methods, in fact, define a class contract - that is, the functionality that it undertakes to perform. However, the specific implementation of its implementation remains at its discretion. Thus, in the course of the project development, the way of performing one or another action can be changed, which may require changing the logic of the work of the private class methods. As a result, this may lead to the failure of a number of tests written for private methods, although the public contract of the class itself is not violated. If testing of the private method is nevertheless required, it is recommended to find a public method for the class that uses it and write the test for it.
However, sometimes the tests do not pass, and you have to figure out what went wrong. In this case, a rather unpleasant situation may arise if an error is contained in the test itself. As a rule, first of all, we begin to look for the causes of non-passage precisely in the logic of the tested "battle" code, and not the test itself. In this case, a lot of time can be spent on finding the cause of non-passage. In order to avoid this, we must strive to ensure that the test code itself is as simple as possible - avoid using any branching operators in the test ( switch , if , for , while , etc.). If it is necessary to test branching in a “combat” code, then it is better to write two separate tests for each of the branches. Thus, a typical unit test can be represented as a sequence of method calls with a further assert.
Now consider the following situation: there is a class for which a large number of tests are written, for example, 100. Inside each of them, you need to create a test object, for which the designer needs one argument. However, with the development of the project, the situation has changed - and now one argument is not enough, and two are needed. Changing the number of constructor parameters will result in all 100 tests not being successfully compiled, and in order to put them in order, you will have to make changes to all 100 sites.
To avoid this situation, let us follow the rule well known to all of us: “Avoid code duplication”. This can be achieved by using factory methods in tests to create test objects. In this case, if the signature of the constructor of the object under test is changed, it will be sufficient to make an appropriate edit only in one place of the test project.
This can significantly reduce the time spent on maintaining existing tests in working condition. And this may be especially important in a situation where once again we will have to tighten all deadlines from all sides.

Became interesting? You can dive deeper.
For further and more detailed immersion in the subject of unit testing, I advise Roy Osherove’s book The Art of Unit Testing . In addition, quite often there is also a situation when you need to make changes to an existing code that is not covered by tests. One of the safest approaches is to first create a kind of “safety net” - cover it with tests, and then make the required changes. Such an approach is very well described in the book of M. Fithers “Effective work with inherited code” . So mastering the approaches described by the authors can bring us, as developers, into the arsenal very important and useful skills.
Thank you for your time! I am glad if any of the above will be useful and timely. I am pleased to try to answer questions in the comments, if any.
Author: Victor Yastrebov vyastrebov
Source: https://habr.com/ru/post/347358/
All Articles