LittleFS is a compact and economical file system for ARM microcontrollers comprising mbed os. Fast start
 In December 2017, ARM introduced to the public a new version of the operating system for ARM microcontrollers “arm mbed os v.5.7” (version 5.7.3 was released on January 17, 2018), which received an integrated author file system, simply called “LittleFileSystem”, or just "LittleFS". I suggest today to talk about this new product.
The main advantages of the file system "LittleFS" are:
- Low requirements for microcontroller resources. The code does not use recursive calls and works without dynamic memory allocation. In “LittleFS”, the amount of RAM consumed always remains constant, regardless of what volumes are written to the drive and the amount of the drive itself;
- Availability of software for leveling media wear (so-called wear leveling), which allows minimizing reuse of media blocks;
- Resilience to power failure. This feature is regularly considering the cessation of power supply of the carrier, and uses the “copy-on-write (COW)” mechanism, in which data is not overwritten, but saved to a new location.
The system supports a complete set of POSIX functions for working with files and directories.
Let me remind you that the file system is integrated into the arm mbed os operating system that is being actively developed and maintained by the manufacturer, so I will have to say a little about this OS for ARM , in spite of a certain amount of materials about it, published on the resource. So here I’m a little distracted by mbed os , and someone who already has experience with it can skim the next few paragraphs.
')
The operating system is written in C / C ++, and the main advantage of the OS, and its main drawback, in my opinion (however paradoxical it may sound), is a really high level of abstraction from the hardware.
Those who, when working with STM32 microcontrollers (I am talking to them in association with them) used the HAL and SPL libraries (and even more so those who were crawling in the registers manually), remember how many lines of code needed to be created to configure, for example, interrupts on the falling edge at the PA_5 pin : enabling the clocking of the port, setting the operating mode of a particular pin, setting the interrupt itself, enabling the interrupt — and only then describing the handler.
In mbed os everything is much easier.
InterruptIn irq_button1(PA_5); irq_button1.fall(led_blink); At first I gave the name of the interrupt and indicated the output, by the change of the state of which I want to cause an interrupt. In the second line I indicated the sign by which I needed to go to the handler ( fall , the falling edge of the signal), and indicated the name of the interrupt handler itself ( led_blink ).
The high level of abstraction is convenient, but at the same time the novice novice does not understand at all what is happening in the microcontroller at the moment, and that in fact one line of code causes tens of values to be written to dozens of registers. And this, of course, is not very good.
The easiest way to get started with mbed os is to go to the mbed.com portal and register there as a developer (basic registration with confirmation by e-mail). From this point on, an online compiler is available to you, which will play an important role for the start. In short, what we are going to do: as a start and make it easier for us, we will take any example that includes mbed os from the repository on the os.mbed.com portal, and then import it as a project for our IDE and ideally for our microcontroller. The OS, by the way, is also a marketing tool, and ARM recommends so-called “ mbed-enabled ” debugging boards, and at first glance it may seem that only boards from the catalog on the site are suitable for mbed os. But this, of course, is not so.

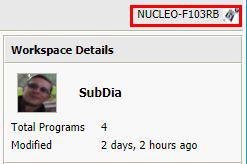
In the upper right corner, we have the button for choosing a debugging board, with which we are going to work (of course, it is assumed that we purchased one of the boards located in the catalog).
After clicking on the button, a window for selecting a specific board will appear. In the same place, in a window, there will be a button with a big green plus of " Add Platform ".
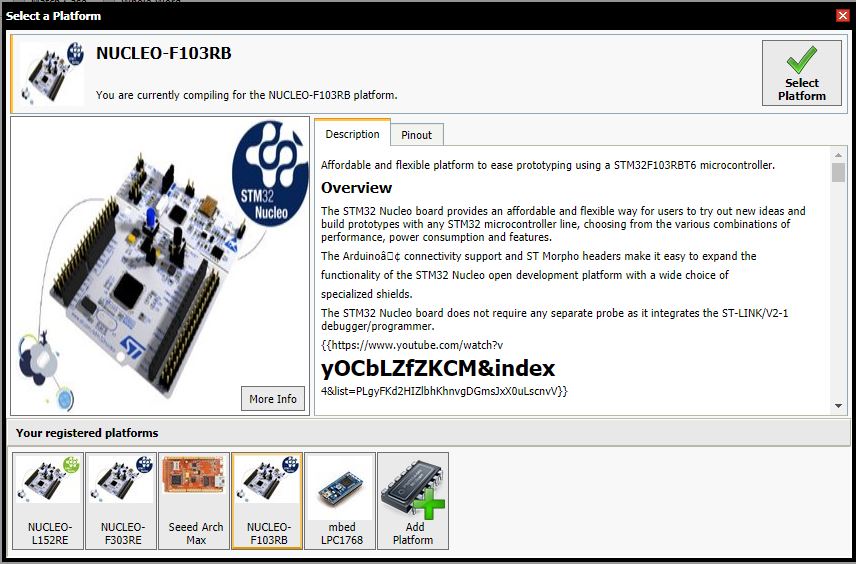
In a separate browser window, the platform selection window will open, among which we will select “ STMicroelectronics ”, and select a board on which the same microcontroller is installed as the one with which we are going to work. I was lucky - on my self-made debug board there is a microcontroller " STM32F103RBT6 ", as well as on the " Nucleo-F103RB " board .
In the near future I plan to write a little material on how to implement a project with arm mbed os under any arbitrary MK.
On the page with the description of the board that we selected in the selector, on the right, click the “ Add to your Mbed Compiler ” button.

Immediately below are examples. We will choose the smallest and simplest - “ Nucleo_blink_led ”.

In the window that opens, in the upper right, click the “ Import Into Compiler ” button.

Your online compiler will open and ask for confirmation of the project import. After confirmation, we will see our project in the project tree on the left.

It remains the case for the small - to import the project under our desktop IDE. The online compiler supports a lot of IDE, including “ IAR for ARM ”, “ KEIL uVision ”, “ CooCox CoIDE ”, and many other environments. I use the IAR for ARM v.8.20.1 environment , while ARM recommends IAR version 7.5 or higher for working with mbed os .
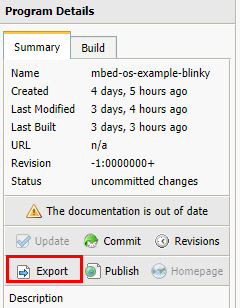
On the right, in the “Program Details” block, click on the “ Export ” button.
In the “Export program” pop-up window that appears, choose the platform and development environment that is installed on our computer.

After clicking on the “ Export ” button, the online compiler will think a little, and the download of the archive with the project will start in the browser. We unpack in any place convenient for us, open the development environment, open the project, clean up everything we don’t need in the main file “main.cpp”, start working.
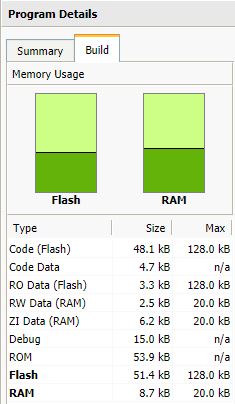
By the way, everything in the same “ Program details ” block, before exporting a project, you can evaluate the degree of project load on the built-in flash and the RAM of our target controller. Open the " Build " tab.
On this, perhaps, I will finish the already prolonged excursion into the quick start with mbed os , and return to the conversation about LittleFS .
To work correctly with the file system, we must include in the project the header files “ LittleFileSystem.h ” and, necessarily, the header file of the media. I assume to work with the SD card, so I include the file “ SDBlockDevice.h ” in the project. Among other devices are available MBRBlockDevice , HeapBlockDevice (very convenient for training, as it does not require the presence of physical media), and other types of devices.
// Block device #include "SDBlockDevice.h" // File system #include "LittleFileSystem.h" So, I propose to consider our sequence of actions when building a starting project for working with “ LittleFS ”. First we need to create the device objects (and initialize its output) and the file system. Then we will mount the file system, create a couple of files on the media, open the root directory and count from it the list of files contained in it.
Note the tree of class inheritance for working with streams implemented in mbed os .
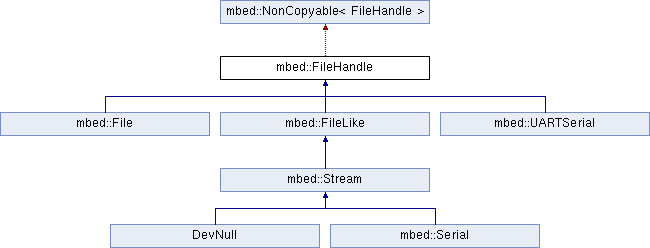
As you can see, we have implemented a whole “ File ” class for working with files. To work with directories there is a class " Dir ". Their description can be read on the pages File and Dir .
However, in practice there was one interesting nuance.
When trying to declare an object of the “ File ” class and use the File method (FileSystem * fs, const char * path, int flags = O_RDONLY) , which was designed to create files, the compiler refused to recognize the object.

And when using standard methods of working with streams (“ stdio.h ”) to create a file, and when trying to further work with it using methods of the “ File ” class, such as, for example, read or write , the operating system merrily dumped into mbed_die () , unrecoverable system error handler.
Therefore, for the time being, I will limit myself to writing a letter to ARM support, and we will work with files using the tools of stdio , which, perhaps, will turn out to be more familiar to someone. A full description of the stdio functionality can be found, for example, on this site .
So, the code:
#include "mbed.h" #include <stdio.h> #include <errno.h> // Block device #include "SDBlockDevice.h" // File systems #include "LittleFileSystem.h" SDBlockDevice bdsd(PB_15, PB_14, PB_13, PB_12); // mosi, miso, sclk, cs LittleFileSystem fs("fs"); /******************************************************************************/ // main() runs in its own thread in the OS int main() { printf("--- Mbed OS filesystem example ---\n"); // Try to mount the filesystem printf("Mounting the filesystem... "); fflush(stdout); int err = fs.mount(&bdsd); printf("%s\n", (err ? "Fail :(" : "OK")); if (err) { // Reformat if we can't mount the filesystem // this should only happen on the first boot printf("No filesystem found, formatting... "); fflush(stdout); err = fs.reformat(&bdsd); printf("%s\n", (err ? "Fail :(" : "OK")); if (err) { error("error: %s (%d)\n", strerror(-err), err); } } // Open the LittleFS.txt file FILE *f = fopen("/fs/LittleFS.txt", "r+"); printf("%s\n", (!f ? "Fail :(" : "OK")); if (!f) { // Create the LittleFS file if it doesn't exist printf("No file found, creating a new file... "); fflush(stdout); f = fopen("/fs/LittleFS.txt", "w+"); printf("%s\n", (!f ? "Fail :(" : "OK")); if (!f) { error("error: %s (%d)\n", strerror(errno), -errno); } } printf("\r Closing \"/fs/LittleFS.txt\"... "); fflush(stdout); err = fclose(f); printf("%s\n", (err < 0 ? "Fail :(" : "OK")); if (err < 0) { error("error: %s (%d)\n", strerror(errno), -errno); } // Open the Habrahabr.txt file f = fopen("/fs/Habrahabr.txt", "r+"); printf("%s\n", (!f ? "Fail :(" : "OK")); if (!f) { // Create the LittleFS file if it doesn't exist printf("No file found, creating a new file... "); fflush(stdout); f = fopen("/fs/Habrahabr.txt", "w+"); printf("%s\n", (!f ? "Fail :(" : "OK")); if (!f) { error("error: %s (%d)\n", strerror(errno), -errno); } } printf("\r Closing \"/fs/Habrahabr.txt\"... "); fflush(stdout); err = fclose(f); printf("%s\n", (err < 0 ? "Fail :(" : "OK")); if (err < 0) { error("error: %s (%d)\n", strerror(errno), -errno); } // Display the root directory printf("Opening the root directory... "); fflush(stdout); DIR *d = opendir("/fs/"); printf("%s\n", (!d ? "Fail :(" : "OK")); if (!d) { error("error: %s (%d)\n", strerror(errno), -errno); } printf("root directory:\n"); while (true) { struct dirent *e = readdir(d); if (!e) { break; } printf(" %s\n", e->d_name); } printf("Closing the root directory... "); fflush(stdout); err = closedir(d); printf("%s\n", (err < 0 ? "Fail :(" : "OK")); if (err < 0) { error("error: %s (%d)\n", strerror(errno), -errno); } // Unmounting printf("Unmounting... "); fflush(stdout); err = fs.unmount(); printf("%s\n", (err < 0 ? "Fail :(" : "OK")); if (err < 0) { error("error: %s (%d)\n", strerror(-err), err); } printf("LittleFS tested successfully!\n"); } First, we create objects of the SDBlockDevice classes (and immediately initialize them, passing the names of the outputs in a strict sequence in accordance with the purpose: mosi , miso , sclk , cs ) and LittleFileSystem (fs) .
Then, already in the “ main ” function, we try to mount the file system (which we, of course, will fail when using the new SD card). Format the media, and mount the file system again.
Next, we try to open the files “ LittleFS.txt ” and “ Habrahabr.txt ” one by one, and, without finding them, create them. After opening the file must be closed.
After successful operations with files, we read the contents of the root directory and output the file names to the I / O terminal. Close the directory.
We dismount the file system and report to the terminal about the successful verification of the file system operation.
And here is a screenshot of messages in the debugger terminal.

So, today we talked about a promising and, in my opinion, very modern file system for microcontrollers called “ LittleFileSystem ”.
When the issue is resolved with the use of "native" means of working with files and directories (using the File and Dir classes), I promise an update to the article.
Thank you for attention.
UPDATE.
I did not have time to go through the premoderation of the material, as it dawned on me - I incorrectly tried to use the methods of the File class. To create (or open an existing) file, use the open (FileSystem * fs, const char * path, int flags = O_RDONLY) method ; .
As a result, the code will be supplemented with new objects of the File and Dir classes for working with files and directories, for example,
File fhandle; Dir dhandle; So the whole example of working with the tools for working with files and directories integrated in mbed os OS will change a little. Also, besides the fact that we are creating and / or opening files, let's write something down and count it already. For these purposes we will create two buffers: from one a string will be written to the file, and in the second we count the contents of the file.
#define BLOCK_SIZE 16 char block[BLOCK_SIZE] = "tasty cake"; char rblock[BLOCK_SIZE]; So, the code for operations with the contents of the SD card (meanwhile, as we mount and unmount the file system).
/******************************************************************************/ err = fhandle.open(&fs,"testing.txt", (O_RDWR|O_TRUNC)); if (err<0){ printf("No file found, creating a new file...\n"); fflush(stdout); err = fhandle.open(&fs,"testing.txt", (O_RDWR|O_CREAT));} err = fhandle.write(block,10); if (err<0) printf("Writing error!\n"); printf("Written bytes (%d) ones\n", err); fhandle.rewind(); //go to the file beginning err = fhandle.read(rblock,10); if (err<0) printf("Reading error!\n"); printf("Read bytes (%d) ones\n", err); printf("Read from file: %s\n", rblock); err = fhandle.size(); printf("File size (%d) bytes\n", err); printf("Closing file..."); err = fhandle.close(); if (err<0) printf("Closing file failure!\n"); else printf("...OK\n"); /******************************************************************************/ // Display the root directory printf("Opening the root directory... "); fflush(stdout); err = dhandle.open(&fs,"/"); if (err<0) printf("Opening directory error\n"); else printf("OK\n"); printf("root directory:\n"); struct dirent *e = dhandle.readdir(); //Get the directory entry while (true) { err = dhandle.read(e); //Read while != 0 (end) if (!err) { break; } printf(" %s\n", e->d_name); } printf("Closing the root directory... "); fflush(stdout); err = dhandle.close(); if (err<0) printf("Closing directory error\n"); else printf("OK\n"); /******************************************************************************/ At the very beginning we are trying to open the testing.txt file for reading / writing. Note that in addition to the basic parameters (file system and file name), we pass the O_RDWR and O_TRUNC flags to the method, combined using the “or” bit operation: this is how the operating system rules work. The first means that we create or open a file for writing / reading, the second - that the file will be completely overwritten, even if it exists, and is filled with any information. The full list of flags is given in the header file " mbed_retarget.h ":
#define O_RDONLY 0 ///< Open for reading #define O_WRONLY 1 ///< Open for writing #define O_RDWR 2 ///< Open for reading and writing #define O_CREAT 0x0200 ///< Create file if it does not exist #define O_TRUNC 0x0400 ///< Truncate file to zero length #define O_EXCL 0x0800 ///< Fail if file exists #define O_APPEND 0x0008 ///< Set file offset to end of file prior to each write #define O_BINARY 0x8000 ///< Open file in binary mode In case of successful opening (creating) a file, we write to it what is contained in the block buffer, or rather, the first 10 bytes. The result of the operation will be the number of bytes written upon successful recording, and we output this value to the terminal during debugging.
To successfully read data from a file, we need to go back to the beginning of the file, and we do this with fhandle.rewind () . We also count the few bytes, and output their number to the terminal, as well as the file size ( fhandle.size () ).
In the process of debugging, we look into the rblock buffer, in which we read a line from a file. Everything is good:

We indulged with the file, now let's see what is in the root directory of the file system. Open the directory and get the number of entries in the directory: dhandle.readdir () . Now we read the name of all files, until dhandle.read (e) returns “0” - there are no more entries in the directory. Print the file names, close the directory.
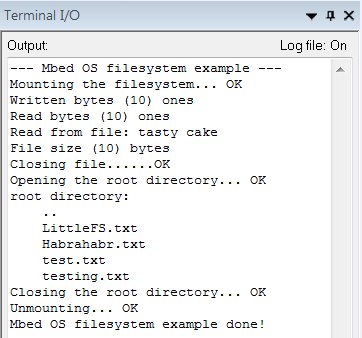
We admire the lines in the debug terminal.
Thanks again to everyone.
Source: https://habr.com/ru/post/347348/
All Articles