Introduction to ConcourseCI

Hello! I noticed that on Habré there is very little information about such a build server as ConcourseCI . I decided to fill this gap and write a small introduction. Under the cut description of this tool and a small tutorial.
So ConcourseCI is a CI / CD build server. It is developed by Pivotal , is currently under active development. In the company itself, there are several people who work full-time on this project entirely, so new versions are currently being released quite regularly, additional features are being actively implemented, and bugs are fixed quickly. Initially, as is most often the case, Pivotal made this tool for internal use, because they were dissatisfied with Jenkins, but later they published this project on GitHub and the community came up with new releases from third-party developers from the community. Written entirely in Go.
In this article:
- Virtues
- Installation
- Three concepts
- Appearance of the web interface
- Fly
- Pipeline configuration
- Secrets
- Why do we need task?
Virtues
I will list the main advantages of this product:
- Each operation is launched in a separate Docker-container, which makes this product completely independent of technology. That is, you can collect any code that is collected inside any docker container
- the assembly process is described in the form of a so-called. pipeline (pipeline), because the modern assembly is becoming less linear. And to describe a complex assembly procedure in the form of such a graph becomes very convenient and intuitive. ConcourseCI comes with a convenient, read-only web-based graphical interface.
Although a new design is currently in beta, it is being actively discussed by the community , so my screenshots are likely to become obsolete in the near future. The new interface might look something like this:
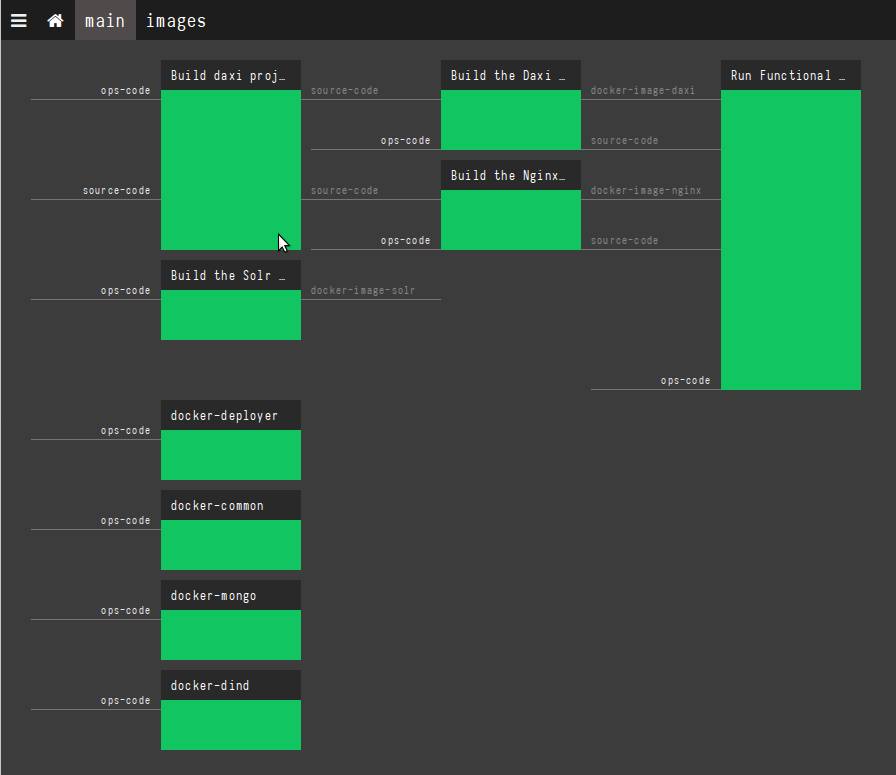
- out of the box easily expands horizontally. If you do not have enough resources, you can start another worker at the new machine, specify the main server’s address as parameters and everything else will be done for you: the worker will register himself, report about himself and be ready to do some work right away. . Moreover, if you have any parallel operations in the assembly process, they may well run on different physical machines. The operation of adding a new worker is literally launching one command.
Installation
As I mentioned, the project is written in Go, so the release comes as a single binary file, and you can run it in one command. But there is a better way. ConcourseCI provides the official docker image , so you can start a project with just one team, using docker-compose.
Launched ConcourseCI consists of three parts:
- PostgreSQL database
- Concourse Web . This is something like a master. The graphical web interface works here and the most important thing is ATC (the term ATC or Air Traffic Control is borrowed from aviation: this is a flight control tower, which stands at airports near the runway where air traffic controllers direct flights ). ATC allocates resources, runs various tasks, monitors the cluster. It is important to remember that the actual build does not occur in Concourse Web, it only manages the build, delegating tasks to the available workers. The system can have only one main Concourse Web.
- Concourse Worker - this is where the real work happens. A worker receives assignments from ATC and performs it, reporting on his results. There can be as many such workers in the system as long as you have enough iron. It is recommended to run one worker per server / instance.
Thus, a fully working server can be started with just one docker-compose command. But before the very first launch, you should generate the keys, because the ATC communicates with the workers over the encrypted channel and you need to slip the keys on both sides before launching. We generate keys like this:
mkdir -p keys/web keys/worker ssh-keygen -t rsa -f ./keys/web/tsa_host_key -N '' ssh-keygen -t rsa -f ./keys/web/session_signing_key -N '' ssh-keygen -t rsa -f ./keys/worker/worker_key -N '' cp ./keys/worker/worker_key.pub ./keys/web/authorized_worker_keys cp ./keys/web/tsa_host_key.pub ./keys/worker Well, after that we will be able to run the entire system with this file (see the official file here ):
version: '3' services: concourse-db: image: postgres:9.6 environment: POSTGRES_DB: concourse POSTGRES_USER: concourse POSTGRES_PASSWORD: changeme PGDATA: /database concourse-web: image: concourse/concourse links: [concourse-db] command: web depends_on: [concourse-db] ports: ["8080:8080"] volumes: ["./keys/web:/concourse-keys"] restart: unless-stopped # required so that it retries until concourse-db comes up environment: CONCOURSE_BASIC_AUTH_USERNAME: concourse CONCOURSE_BASIC_AUTH_PASSWORD: changeme CONCOURSE_EXTERNAL_URL: "${CONCOURSE_EXTERNAL_URL}" CONCOURSE_POSTGRES_HOST: concourse-db CONCOURSE_POSTGRES_USER: concourse CONCOURSE_POSTGRES_PASSWORD: changeme CONCOURSE_POSTGRES_DATABASE: concourse concourse-worker: image: concourse/concourse privileged: true links: [concourse-web] depends_on: [concourse-web] command: worker volumes: ["./keys/worker:/concourse-keys"] environment: - CONCOURSE_TSA_HOST=concourse-web:2222 Do not forget to export to the CONCOURSE_EXTERNAL_URL variable the real value of the web address at which the web interface will be available.
export CONCOURSE_EXTERNAL_URL=http://192.168.99.100:8080 As you can see, in this example, we run everything on one machine, but no one limits you to this and you can safely create a distributed cluster according to your needs.
After launch, you can open the address of your server in the browser (in the example above - http://192.168.99.100:8080 ) and you will see a still empty Concourse Web.
Read more about the installation here .
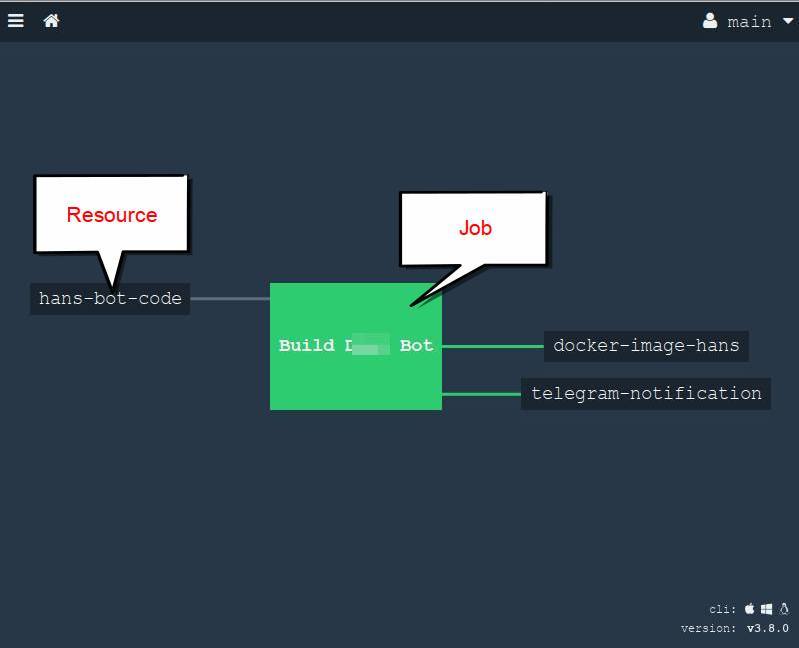
Three concepts
So, before we get down to business, let's look at the terminology to understand each other. ConcourseCI operates with three basic concepts.
Resource - a resource that can provide material for the assembly, or can be updated with the results of the assembly. Typical examples are git / hg repositories, docker registries, FTP, S3, chats, emails, telegram bots, and so on. A complete list here , plus you can always find something in the open spaces of the GitHub and in extreme cases you can write it yourself . It is important to understand that the resource does not do any specific work, it only “provides” material for further actions.
Task is a unit of work that can be done within your assembly. Task is launched in your chosen docker container.
- Job - the task; combines resources and tasks into one. In other words, inside the task, we take resources, somehow we process them in a task, collect and update resources with results. One task is completely isolated and can be run separately any number of times.
The appearance of the web interface
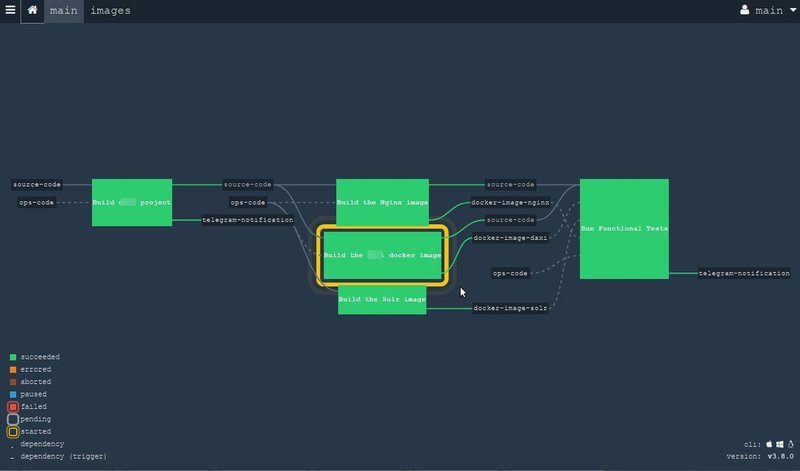
And in the ConcourseCI browser, it looks like this:
This is a very simple example for the pipeline, but here you can see how we take the sources from the Git repository and start building the project, create a docker image and notify everyone in the telegram channel with the help of the corresponding resource .
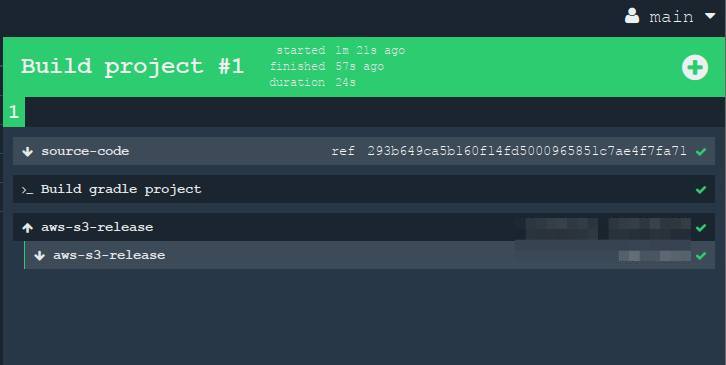
In this screenshot, only the resources and the task are visible, but the tasks are not visible. But if you click on one of the tasks (in this example we have one), then you can see what is going on inside the green square:
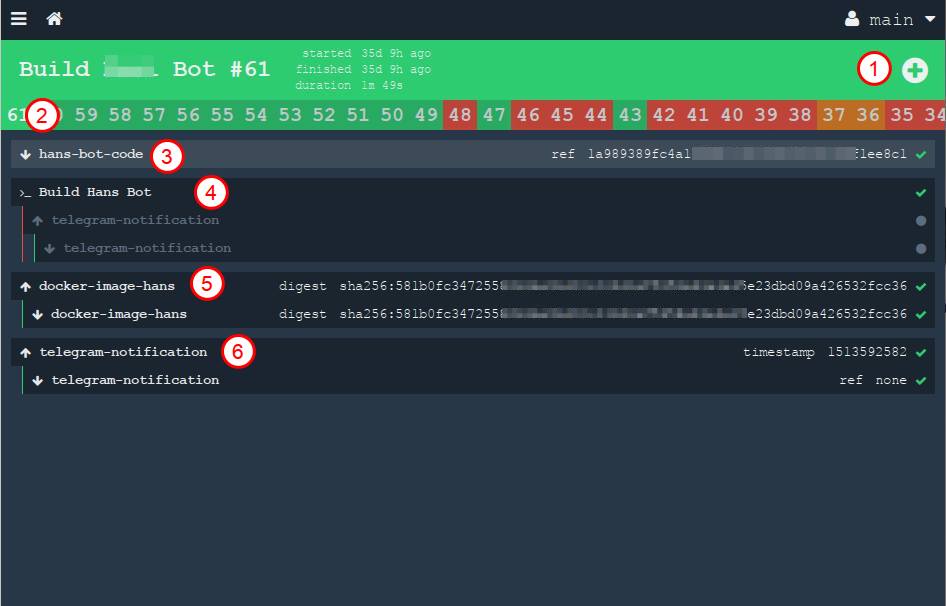
In this picture numbers are marked:
- manual start button. You can run it again at any time.
- All previous builds are arranged in a long chain under the title in the form of history
- resource that takes source. The down arrow means "get", that is, we are "taking" material from the resource.
- output work of one task. You can open this link and see the stdout log from our container, what happened during the assembly of our project
- we collect the resource (docker image) and throw it into a private register. The arrow "up" means "put", that is, we "update" the resource
- Finally, we throw a message in a private telegram channel
In this interface, you can view all the conveyors and tasks, monitor the results.
As an example of a completely “advanced” version of the pipeline, you can bring the pipeline of the ConcourseCI itself (yes, surprisingly, but he himself is going to do it himself :))
But as I mentioned above, the web is read-only here. A reasonable question arises: how then to add new conveyors to the project? It's time to introduce you to fly.
Fly
Fly is a command line utility that allows you to manage your entire ConcourseCI cluster from a terminal. It is installed on your work computer and is managed by the server. With it, you can perform all the necessary operations and maintain the cluster.
Displaying help for this command (small part):
$ fly help Usage: fly [OPTIONS] <command> Application Options: -t, --target= Concourse target name -v, --version Print the version of Fly and exit --verbose Print API requests and responses --print-table-headers Print table headers even for redirected output Help Options: -h, --help Show this help message Available commands: abort-build Abort a build (aliases: ab) builds List builds data (aliases: bs) check-resource Check a resource (aliases: cr) checklist Print a Checkfile of the given pipeline (aliases: cl) containers Print the active containers (aliases: cs) destroy-pipeline Destroy a pipeline (aliases: dp) destroy-team Destroy a team and delete all of its data (aliases: dt) execute Execute a one-off build using local bits (aliases: e) ..... .. The command is also a single binary written in Go. It can be downloaded from the githab , but it will be more convenient to download using the link at the bottom of the web interface:
and drop it into /usr/bin/fly , making it run.
So, you have set fly. To get started with ConcourseCI, you need to authenticate to your server. This is done quite simply:
$ fly --target office login --concourse-url=http://ci.your.concouce.server.com
Where:
- --target (or -t ) you specify any name for this server (target, target server). In this example, this is the name "office". The fact is that you can have several servers: one for the company, one for your team and, for example, one on your local computer where you train on tutorials. And with the -t option you can easily switch between these servers.
- login - login command
- --concourse-url - you specify the URL where your ConcourseCI cluster is located; is indicated only for the first time.
After entering the command, you will be asked to login and password. Enter the data you specified in the docker-compose.yml file during the installation (variables CONCOURSE_BASIC_AUTH_USERNAME and CONCOURSE_BASIC_AUTH_PASSWORD , see above)
You can find a list of all available commands by typing $ fly help or on the documentation page .
After a successful login, you can already start working. Let's say you can create your first pipeline with this command:
$ fly -t office sp -c pipeline.yml -p my-pipeline-name
Where:
- -t office - we specify the target server where we run the command (in this example, the office we created at the time of login in the previous step)
- sp (or set-pipeline ) - directly, the command to create a new pipeline. Each team has its short alias. You can write the full
set-pipelinecommand or use the short aliassp- the result will be identical - -c pipeline.yml - file with the configuration of the pipeline itself, described in the YAML markup language. This is the next chapter.
- -p my-pipeline-name - set the name of this pipeline, with which it will appear in the web interface.
After running this command, you can open our ConcourseCI in the browser and see our fresh pipeline. Initially it will be paused. To make the new pipeline active, you need to click on the blue "▸" button in the browser

or use the command
$ fly -t office unpause-pipeline -p my-pipeline-name
Pipeline configuration
It is time to consider how the description of the pipeline. The file is described by the YAML format, and can be stored in the same repository as the source code of your project, that is, as if "closer" to the code. In other words, we can say that every project "knows how to assemble itself," because the configuration lies in it. This is quite convenient, since each programmer will be able to see the details and subtleties of a complete assembly, which undoubtedly can help in the development.
The file can be divided into several parts: the declaration of resources (resources) and the description of tasks (jobs). Let's create a simple pipeline of, say, a Java project. In this case, we take the source from the Git repository, run the tests and build the project using Gradle, and, let's say, drop the build result into the Amazon S3 cloud.
Let's start with the resource. They are described in the resources section. In our case, we need to declare two resources: the Git repository and the AWS S3.
resources: - name: source-code type: git source: uri: git@your-project.git branch: master private_key: | ......... - name: aws-s3-release type: s3 source: bucket: releases regexp: directory_on_s3/release-(.*).tgz access_key_id: ........ secret_access_key: ........ Name (- name) we set any, by it we will refer to these resources, and with the same name we will see our resource in the browser.
Next, create one job (job) that will do three things:
- take source from
source-coderesource - build a project
- deploy to
aws-s3-release
Tasks are described in the jobs : section and you can create as many as you like. In our simple example, we do only one task with the name "Build project".
jobs: - name: "Build project" plan: # - get: source-code trigger: true # , # - task: "Build gradle project" config: platform: linux image_resource: type: docker-image source: {repository: "chickenzord/alpine-gradle", tag: "latest" } inputs: - name: source-code outputs: - name: result-jar run: path: sh args: - -exc - | cd source-code gradle test gradle build # output, # cp build/libs/app.jar ../result-jar # S3 - put: aws-s3-release params: file: result-jar/app.jar acl: public-read Let's look at this example in more detail.
Everything is clear with the resource: we declare it as - get : which means we will take data from it. The trigger: true parameter means that the task will start automatically each time the resource is updated (in this case, it means that someone has committed and started the commit). You can optionally specify more specific parameters that can be found in the documentation for the specific resource .
Task As you remember, this is where real action takes place. A task has two properties to keep in mind:
- it can have incoming and outgoing data ( inputs and outputs )
- it runs in the docker container (well ... actually, everything starts in containers, but for the task, you must explicitly specify the image).
In this example, we specified only one input source:
inputs: - name: source-code An incoming source can be either from a resource or from another task that was launched before (this way, you can run tasks in a chain and transfer intermediate results to the next). In practice, this means that inside the container we will have a folder with the same name and inside this folder ConcourseCI will accurately place the contents of the resource (in our case, the contents of the git repository). That is why the very first thing I did in the body of the task is to go into this folder ( cd source-code ), where I will have the sources of my Java project.
You also need to specify the image of the docker that you want to use for the assembly. The logic here is very simple: you need a container, inside of which there are all the assembly tools for a specific project. Let's say, in my case, since the project on Java is going to be done by the gredlom, then inside the container I need the version of Java I need and the Gredl itself. For example, this image works and is perfect for my task. Specify this image in the config like this:
config: platform: linux image_resource: type: docker-image source: {repository: "chickenzord/alpine-gradle", tag: "latest" } and inside this container we will be able to run our gredl haul, which I do as a demonstration:
cd source-code gradle test gradle build And yes, if you have any very specific requirements for the build environment, then it’s easy to assemble your own docker image and store it in your private registry: ConcourseCI can easily upload images from anywhere.
It is also worth noting that in this example I described everything in some detail so that it is as clear as possible in one single YAML file. But task can be taken out in a separate YAML file . It is so convenient to reuse tasks in different projects. In this case, the task will be declared with only two lines, while its "body" will be saved separately:
- task: hello-world file: path/to/my_task.yml The same applies to the run command: its contents can also be transferred to the shell script and referenced by one command, making the code shorter. This can be useful if you, say, want to test the script locally or to cover its unit with tests . In this case, the task will look something like this:
- task: "Run altogether" config: platform: linux image_resource: type: docker-image source: repository: somedocker/image tag: latest run: path: path/to/script.sh Just do not forget that your script should return the standard Unix output result (0 - everything is in order, any other number is an error). Only in this way will ConcourseCI know if your team is successful or not.
And the final touch is to briefly mention the second resource, which we declare as - put :, which means that we will update it (and not receive data from it, as is the case with source-code).
Now that our configuration file is ready, we save it in a file under any name, say, pipeline.yml and now we should create / update the pipeline on the remote ConcourseCI server with the command:
$ fly -t office sp -c pipeline.yml -p my-pipeline-name
and after that we open our browser and see the newly created (or updated) pipeline. If we make a commit to our git repository, it will start automatically:
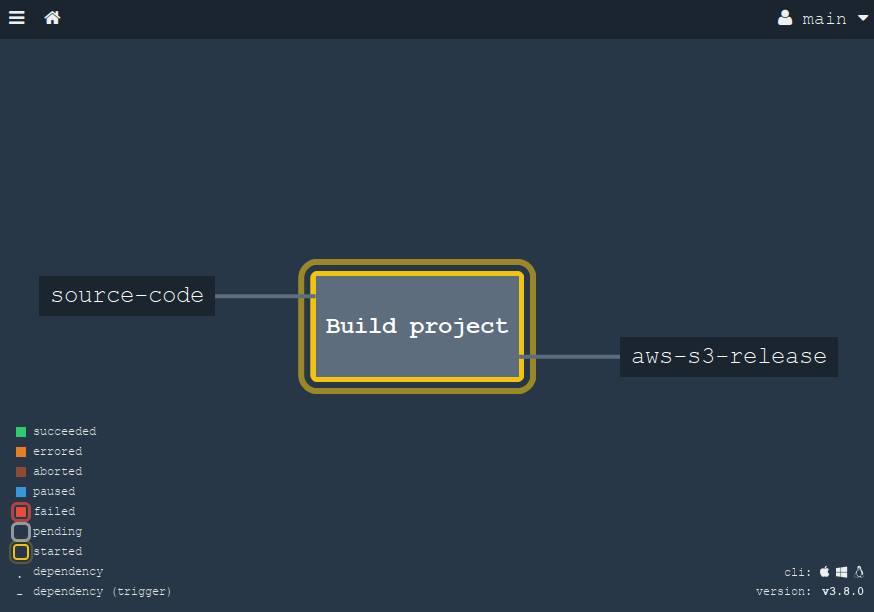
When we click on this large square (job "Build project"), then we will reveal the details. All these steps on the screen can be "expanded" to view the output from the console.
Secrets
You have seen in my example that I have written my secrets (passwords, keys) right in the code. Of course, in a real project, you should not do this in view of security considerations, since the YAML file will lie in a common repository. All secrets must be stored separately. In concourse, we can use special aliases, into which real values will be substituted only during the update of the pipeline. Let's say we replace passwords and private keys with placeholders, enclosed in double brackets:
- name: source-code type: git source: uri: git@your-project.git branch: master private_key: ((git-pivate-key)) - name: aws-s3-release type: s3 source: bucket: releases regexp: directory_on_s3/release-(.*).tgz access_key_id: ((aws-access-key)) secret_access_key: ((aws-secret-key)) And then we will create a local file (which is stored securely only on your computer or in another secure storage) with passwords and keys in YAML format (say, credentials-ci.yml ), containing all the values:
aws-access-key: "myawsaccesskey" aws-secret-key: "myawssecretkey" ftp-password: "my-secure-password" git-pivate-key: | -----BEGIN RSA PRIVATE KEY----- ............ And now we have to use the --load-vars-from parameter to substitute real values for our secrets. So, the full command to create / update the pipeline now looks like this:
fly -t office sp -c pipeline.yml -p my-pipeline-name --load-vars-from ~/credentials-ci.yml
Now, our pipeline will be stored in a common repository, and passwords only on the administrator's computer in a safe place. Now you can safely leave your build configurator even on a public github .
Alternatively, you can use the resource of the standard vault tool .
Why do we need task?
Probably, looking at my example, you ask yourself: why are jobs and tasks needed and why they cannot be combined into one whole (as, for example, this is done in GitLabCI )? Why should one task be split into smaller steps? Good question, I will try to explain with an example.
By design, a job is an isolated task that does not depend on other parts of the pipeline. This means that it can be launched at any time and it does not require any preliminary actions. All intermediate and final operations take place inside, and from the outside everything looks like a single step. Therefore, if you have any operations in the assembly that cannot exist separately, all the dependent steps should be combined into one task. On the one hand, this gives difficulty, because too many movements are concentrated in one task, on the other - we have an excellent tool to break the process down into logical steps: tasks. Moreover, each task can use different tools.
To make it clearer, consider the example more difficult. In the previous paragraph, I gave an example of a simple project that is built by just one command - the gradle build . But this is not always the case. Take the example of a classic monolith: some single project in which the frontend, the backend, and everything are all in the same repository. How is the assembly of such a project? We list all hypothetical steps:
we need to build a frontend. Let it have a styles preprocessor, like sass / less. You can even optimize and minify JS files. In order to build the project's face, we download the dependencies using the
npm installcommand and after that through some build tools, such asgulp/gruntgenerate ready-made code. Quite standard. After the build, we will get a certain folderdist, where the fully compiled optimized and minimized CSS and JS code will be.( this step was added for demonstration purposes, so it would be more interesting ) sometimes we want to "sew" some information about the current release somewhere directly into the code at the assembly stage, so that we can easily determine which version is currently running on production. Whether it is a small
build version 0.11.34.1122, which is located at the bottom of the page in the basement of the site, or some meta-information about the current commit in Git (like hash, author name and date), which are available as JSON on some URL let's say/version. There are many such options. This is very important if the team uses the practice of continuous delivery and makes releases very often. To do this, write a small script that takes the meta information from Git and "sew" tightly into some configuration file or directly into the HTML template, to whom it is more convenient. ( by the way, in Go you can achieve the same goal during compilation using the-ldflagsflag , but I intentionally left this step in a separate task for example )- and of course, the server side build. To do this, you need to download the dependencies, transfer the generated files in the previous step, putting it all together. Let's build a Go project this time. In this language, a zoo of different package managers, for example, I took a govendor , but this fact does not change. Before the build, we make the
govendor fetch -v +outcommand, which downloads all the latest dependencies as sourcegovendor fetch -v +outthem in thevendordaddy (well, it’s worth mentioning that some programmers will commit this entire folder to git so as not to unload the dependencies again and again ; both approaches have advantages and disadvantages, the discussion of which is beyond the scope of this article). Well, after the source code has been locally found, we can compile everything.
So what we counted? : npm, gulp, git (, , ssh), go, govendor. , ConcourseCI -, , -, ? — git, npm, go, ? , , , , . (job) -, -. , :
- NPM .
- Git
- Go
, , . (job), -, .
, , . — NPM, Gulp , — git ssh , — go-vendor . , , , !
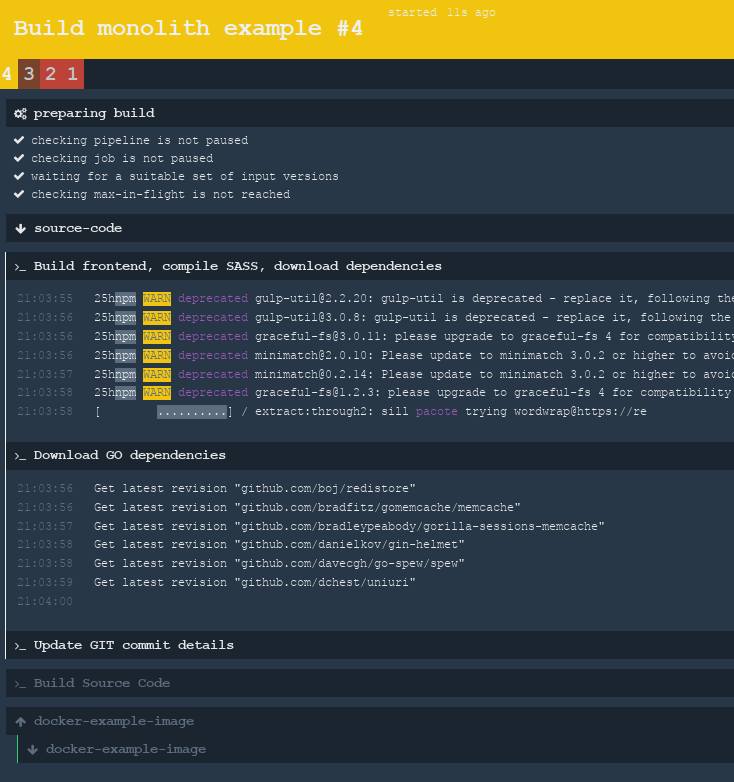
, , ? ! ConcourseCI aggregate , , , . , , , , , :
╭ NPM , Gulp build 1. ┨ Git version ╰ Go 2. go build , ( source-code docker-example-image ):
... jobs: - name: "Build monolith example" plan: - get: source-code trigger: true # aggregate, # - aggregate: # Build the frontend (SASS and Javascript) - task: "Build frontend, compile SASS, download dependencies" config: platform: linux image_resource: type: docker-image source: repository: 'monostream/nodejs-gulp-bower' inputs: - name: source-code outputs: - name: compiled-assets run: path: sh args: - -ec - | cd source-code/ # npm install # gulp build # outputs, # cp -r dist/* ../compiled-assets/ - task: "Download GO dependencies" config: platform: linux image_resource: type: docker-image source: repository: "electrotumbao/go-govendor" inputs: - name: source-code # Go: # # # # path path: src/authorName/repoName outputs: - name: vendor-output run: path: sh args: - -ec - | export GOPATH GOPATH="$(pwd)" cd src/authorName/repoName/ || exit # output, # govendor fetch -v +out cp -r vendor/* "$GOPATH"/vendor-output - task: "Update GIT commit details" config: platform: linux image_resource: type: docker-image source: { repository: 'alpine/git', tag: "latest"} inputs: - name: source-code outputs: - name: versioned-file run: path: sh args: - -ec - | # cd source-code GITSHA=$(git rev-parse HEAD) GITAUTHOR=$(git log --format='%an %ae' -1) GITDATE=$(git log --format='%aD' -1) TODAY=$(date) # - , # sed sed ... # output, # cp version.config ../versioned-file/ # , # , - task: "Build Source Code" config: platform: linux image_resource: type: docker-image source: {repository: "golang", tag: "alpine" } # inputs # inputs: - name: source-code path: src/authorName/repoName - name: versioned-file - name: compiled-assets - name: vendor-output outputs: - name: output-for-docker run: path: sh args: - -ec - | set -e export GOPATH GOPATH="$(pwd)" cd src/daxi.re/cyprus-tours/ || exit # cp -r "$GOPATH"/compiled-assets/* ./assets/ cp -r "$GOPATH"/vendor-output/* ./vendor # go test # , CGO_ENABLED=0 GOOS=linux go build -a -o app . # - # . # , -. # # docker-example-image (. ) # output cp app "$GOPATH"/output-for-docker/ cp Dockerfile "$GOPATH"/output-for-docker/ # , , # - # , # # Dockerfile # ( ) - put: docker-example-image params: { build: output-for-docker } get_params: {rootfs: true} , .
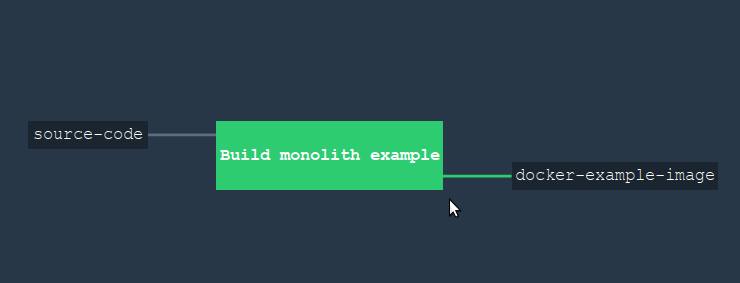
, , (job). , . , : NPM , — Go ( ). .
, , :
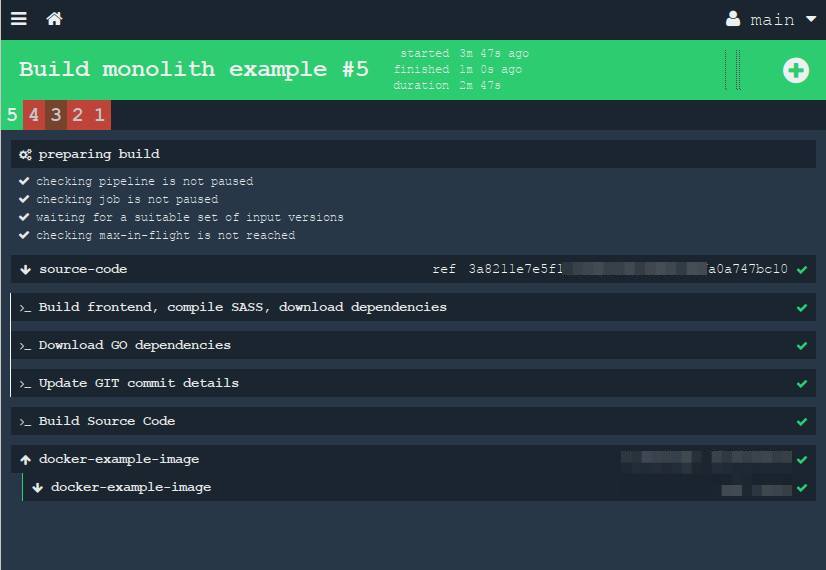
Voila! , ! . , -.
, . . Thank you for reading to the end! !
References:
')
Source: https://habr.com/ru/post/347186/
All Articles