Communication between computer and Android device through Processing
There is a certain category of people who would like to write programs, but is afraid of serious programming languages. These include children, humanities, craftsmen, older people, etc. Someone is trying to use "children's" languages like Scratch or other simplified constructors.
In my opinion, Processing, which is not so often mentioned on Habré, can be a good option for studying.
Processing is a simple Java development environment with a limited number of classes. There are variables, cycles, objects. First of all, Processing is designed to work with graphics, animation, and calculations. What children like so much. Everything is clear and beautiful.
If the user has a desire to move to a new level and start using a full-fledged Java language, then all developments will not be wasted. Most of the code does not require processing and you can freely copy more parts of the code.
Processing is constantly evolving and has grown to the third version. It has its own active community, which shares its source code.
')
The installation process is simple - download and unpack the archive. Run the executable file and we are ready to create the program.
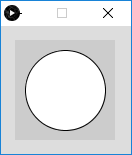
The file in which the source code is written and saved is called a sketch. To create a full window, just write one line!
We get the result.
Of course, there’s little use for such an application and you’ll have to write a bit more complicated code. A standard program usually has two methods: setup () and draw (). Let's complicate an example.
We have created a window of 480x120 pixels. If you place the mouse cursor in the window area and move it, white circles will be drawn, overlapping each other. Click and hold the left or right button and continue to move the mouse inside the window. Now the color of the circle will change to black.
Here arduinschinki can liven up by seeing the familiar syntax. No wonder, the Arduino IDE is based on Processing (like another program for working with Wiring microcomputers). Only instead of the draw () function, they use loop () . But the meaning remains the same - initialization takes place in setup () , an infinite loop rotates in draw () / loop () to update the data.
It was a warm-up. Let's move on to more complex things. By default, the program runs in Java mode. But Processing supports other modes, in particular, Android. In the upper right corner, click on the drop-down list and select the Add Mode ... command.

In the dialog box, select the Android Mode option and click Install .

The previous screenshots show the already installed components, you will have a little different.
After downloading the necessary files, you will be able to create full-fledged applications for Android (do not forget to switch to this mode).
If you prefer, you can use the full Android SDK, but this approach will look a bit strange. If you know the SDK, why not using Android Studio? Therefore, we will use the built-in processing capabilities. Let's try.
We connect the phone to the computer via USB and run the program. You can also run through the emulator (menu Sketch | Run in Emulator ). So he looks at the computer.

If possible, use a real phone. But if you have an iPhone, a USB cable is lost, a phone is not recognized, and 1000 other reasons, then use an emulator. Remember, on the emulator not all things can be done. But you can indulge.
If you completed this quest successfully, then proceed to the difficult stage - to make friends with a computer with a phone. We will write a program that will transmit the accelerometer readings of the phone to the computer, in turn, the computer will transmit the status of the pressed mouse button.
To solve this problem, we need libraries: Ketai and oscP5.
The Ketai library allows you to work with sensors, camera, network and more.
The oscP5 library allows you to transfer messages between devices.
They are installed in a couple of clicks. Open the Sketch menu | Import Library | Add Library ... and find the necessary libraries. Use the filter to quickly search.
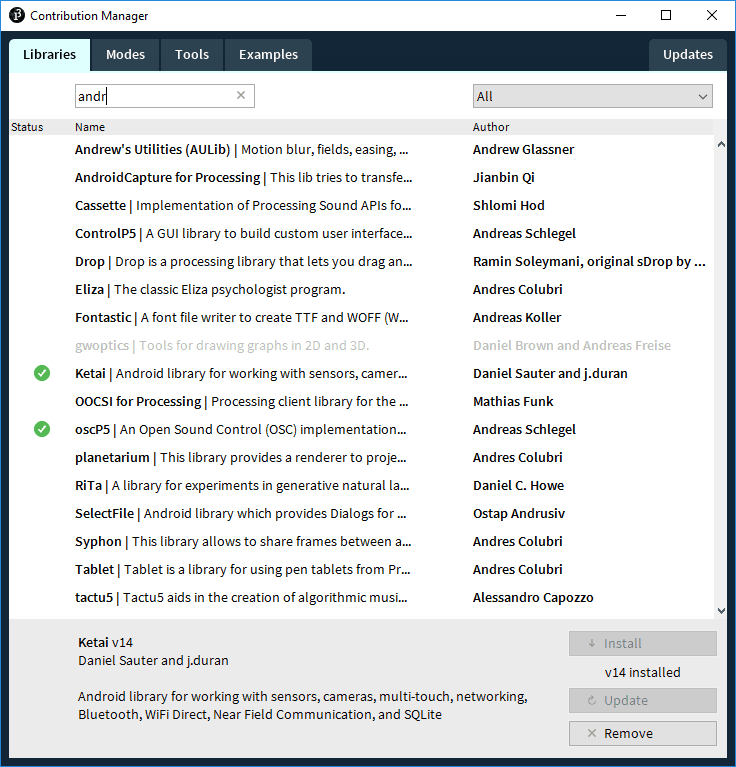
Select the desired library and click the iInstall button. The rest of the program will do itself.
For messaging, the computer and the phone must use a shared Wi-Fi network. Next, find out the IP address of the computer. On Windows, this can be done through the
Remember the address and enter it into the sketch for Android mode.
Since our phone will transmit data via the Internet, you need to enable permission to use it. Go to the Android menu | Sketch Permissions and check the box at the Internet .

Run the application on the phone (do not forget to turn on Wi-Fi). On the phone, we will see the data from the accelerometer, the distance sensor, the text of the message and two ip-addresses: your own and the remote computer. We remember the address of the phone and drive it into the sketch in Java mode.
Run the sketch on the computer. Put the phone on the table. Watch what is happening.
Click on the mouse button. The text should change to mousePressed: true .
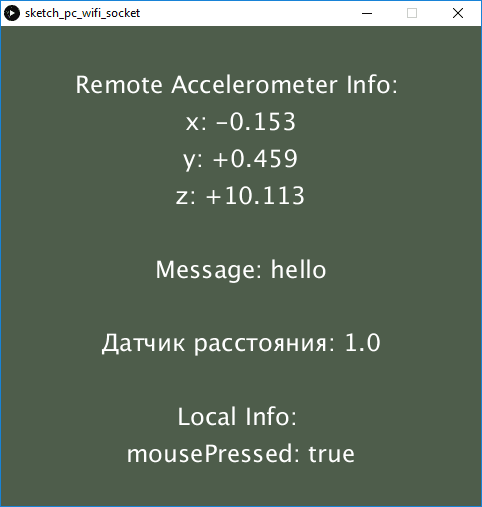
Look at the phone. There, the inscription synchronously changes to mousePressed: 1 .

Release and press the mouse button to see that both devices see each other and transmit information about themselves. Similarly, you can rotate the phone in your hands and see on your monitor changes in the accelerometer sensor readings.
That's not all! Place the phone on the table and cover it with your palm. The proximity sensor will work and the desktop application window will suddenly change color.
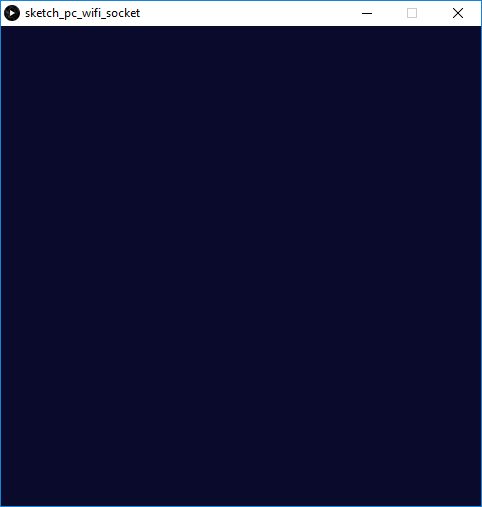
Remove your palm, the information will again appear.
The text "hello" was also received from the phone. You can change it in the code for the phone and restart the sketch to see the changes.
In the sketch for the phone, I commented out the code that allows you to get a list of all the sensors. You can remove the comment and see the list in the console.
I will not explain every line of code. If someone is interested in this topic, then in any case you will have to study the documentation. In a nutshell you can not describe here.
If you had to write similar functionality in Android Studio and IDEA, you would have to first learn a lot of related technologies and create complex projects with a lot of code. In Processing, many details are hidden from the developer. Of course, complex business applications cannot be written on it. But I remind you that Processing is intended primarily to "play around" with the graphics. And this may well be the first step in the world of programming for the child. In addition, Processing can communicate with the Arduino boards via the serial port.
Thus, you cover three devices at once: a computer, a phone and a microcomputer board. Smart home at your disposal, you only need to show imagination. The only problem is that there are few resources in Russian. Independently it will be difficult to understand, and not all parents will be able to help. In this case, you should look for a mentor or enroll in suitable courses.
In Russian, a couple of books were published for the basic level, which consider working on a computer. To work with Android, there is a free e-book on GitBook (in English) . Perhaps, if there is time, I will replenish my version .
Good luck to you programming!
In my opinion, Processing, which is not so often mentioned on Habré, can be a good option for studying.
Processing is a simple Java development environment with a limited number of classes. There are variables, cycles, objects. First of all, Processing is designed to work with graphics, animation, and calculations. What children like so much. Everything is clear and beautiful.
If the user has a desire to move to a new level and start using a full-fledged Java language, then all developments will not be wasted. Most of the code does not require processing and you can freely copy more parts of the code.
Processing is constantly evolving and has grown to the third version. It has its own active community, which shares its source code.
')
The installation process is simple - download and unpack the archive. Run the executable file and we are ready to create the program.
The file in which the source code is written and saved is called a sketch. To create a full window, just write one line!
ellipse(50, 50, 80, 80); We get the result.
Of course, there’s little use for such an application and you’ll have to write a bit more complicated code. A standard program usually has two methods: setup () and draw (). Let's complicate an example.
void setup() { size(480, 120); } void draw() { if (mousePressed) { fill(0); } else { fill(255); } ellipse(mouseX, mouseY, 80, 80); } We have created a window of 480x120 pixels. If you place the mouse cursor in the window area and move it, white circles will be drawn, overlapping each other. Click and hold the left or right button and continue to move the mouse inside the window. Now the color of the circle will change to black.
Here arduinschinki can liven up by seeing the familiar syntax. No wonder, the Arduino IDE is based on Processing (like another program for working with Wiring microcomputers). Only instead of the draw () function, they use loop () . But the meaning remains the same - initialization takes place in setup () , an infinite loop rotates in draw () / loop () to update the data.
It was a warm-up. Let's move on to more complex things. By default, the program runs in Java mode. But Processing supports other modes, in particular, Android. In the upper right corner, click on the drop-down list and select the Add Mode ... command.
In the dialog box, select the Android Mode option and click Install .
The previous screenshots show the already installed components, you will have a little different.
After downloading the necessary files, you will be able to create full-fledged applications for Android (do not forget to switch to this mode).
If you prefer, you can use the full Android SDK, but this approach will look a bit strange. If you know the SDK, why not using Android Studio? Therefore, we will use the built-in processing capabilities. Let's try.
void setup() { } void draw() { text(" ", 100, 100); } We connect the phone to the computer via USB and run the program. You can also run through the emulator (menu Sketch | Run in Emulator ). So he looks at the computer.
If possible, use a real phone. But if you have an iPhone, a USB cable is lost, a phone is not recognized, and 1000 other reasons, then use an emulator. Remember, on the emulator not all things can be done. But you can indulge.
A warning
If the computer is weak, then the emulator will be very slow.
If you completed this quest successfully, then proceed to the difficult stage - to make friends with a computer with a phone. We will write a program that will transmit the accelerometer readings of the phone to the computer, in turn, the computer will transmit the status of the pressed mouse button.
To solve this problem, we need libraries: Ketai and oscP5.
The Ketai library allows you to work with sensors, camera, network and more.
The oscP5 library allows you to transfer messages between devices.
They are installed in a couple of clicks. Open the Sketch menu | Import Library | Add Library ... and find the necessary libraries. Use the filter to quickly search.
Select the desired library and click the iInstall button. The rest of the program will do itself.
For messaging, the computer and the phone must use a shared Wi-Fi network. Next, find out the IP address of the computer. On Windows, this can be done through the
ipconfig command.Remember the address and enter it into the sketch for Android mode.
import netP5.*; import oscP5.*; import ketai.net.*; import ketai.sensors.*; OscP5 oscP5; KetaiSensor sensor; NetAddress remoteLocation; float myAccelerometerX, myAccelerometerY, myAccelerometerZ; float proximity; String msg; int x, y, p; String myIPAddress; String remoteAddress = "192.168.1.42"; // void setup() { sensor = new KetaiSensor(this); //println(sensor.list()); // orientation(PORTRAIT); textAlign(CENTER, CENTER); textSize(40); msg = "hello"; initNetworkConnection(); sensor.start(); } void draw() { background(78, 93, 75); text("Remote Mouse Info: \n" + "mouseX: " + x + "\n" + "mouseY: " + y + "\n" + "mousePressed: " + p + "\n\n" + "Local Accelerometer Data: \n" + "x: " + nfp(myAccelerometerX, 1, 3) + "\n" + "y: " + nfp(myAccelerometerY, 1, 3) + "\n" + "z: " + nfp(myAccelerometerZ, 1, 3) + "\n" + " : " + proximity + "\n" + "Message: " + msg + "\n\n" + "Local IP Address: \n" + myIPAddress + "\n\n" + "Remote IP Address: \n" + remoteAddress, width/2, height/2); OscMessage myMessage = new OscMessage("accelerometerData"); myMessage.add(myAccelerometerX); myMessage.add(myAccelerometerY); myMessage.add(myAccelerometerZ); myMessage.add(msg); myMessage.add(proximity); oscP5.send(myMessage, remoteLocation); } void oscEvent(OscMessage theOscMessage) { if (theOscMessage.checkTypetag("iii")) { x = theOscMessage.get(0).intValue(); y = theOscMessage.get(1).intValue(); p = theOscMessage.get(2).intValue(); } } void onAccelerometerEvent(float x, float y, float z) { myAccelerometerX = x; myAccelerometerY = y; myAccelerometerZ = z; } void onProximityEvent(float d) { proximity = d; } void initNetworkConnection() { oscP5 = new OscP5(this, 12000); remoteLocation = new NetAddress(remoteAddress, 12000); myIPAddress = KetaiNet.getIP(); } Since our phone will transmit data via the Internet, you need to enable permission to use it. Go to the Android menu | Sketch Permissions and check the box at the Internet .
Run the application on the phone (do not forget to turn on Wi-Fi). On the phone, we will see the data from the accelerometer, the distance sensor, the text of the message and two ip-addresses: your own and the remote computer. We remember the address of the phone and drive it into the sketch in Java mode.
import oscP5.*; import netP5.*; OscP5 oscP5; NetAddress remoteLocation; float accelerometerX, accelerometerY, accelerometerZ; float proximity; String msg; void setup() { size(480, 480); oscP5 = new OscP5(this, 12000); remoteLocation = new NetAddress("192.168.1.43", 12000); // ip- textAlign(CENTER, CENTER); textSize(24); } void draw() { background(78, 93, 75); text("Remote Accelerometer Info: " + "\n" + "x: "+ nfp(accelerometerX, 1, 3) + "\n" + "y: "+ nfp(accelerometerY, 1, 3) + "\n" + "z: "+ nfp(accelerometerZ, 1, 3) + "\n\n" + "Message: " + msg + "\n\n" + " : " + proximity + "\n\n" + "Local Info: \n" + "mousePressed: " + mousePressed, width/2, height/2); if (proximity == 0.0) { background(10, 10, 45); } OscMessage myMessage = new OscMessage("mouseStatus"); myMessage.add(mouseX); myMessage.add(mouseY); myMessage.add(int(mousePressed)); oscP5.send(myMessage, remoteLocation); } void oscEvent(OscMessage theOscMessage) { if (theOscMessage.checkTypetag("fffsf")) { accelerometerX = theOscMessage.get(0).floatValue(); accelerometerY = theOscMessage.get(1).floatValue(); accelerometerZ = theOscMessage.get(2).floatValue(); msg = theOscMessage.get(3).stringValue(); proximity = theOscMessage.get(4).floatValue(); } } Run the sketch on the computer. Put the phone on the table. Watch what is happening.
Click on the mouse button. The text should change to mousePressed: true .
Look at the phone. There, the inscription synchronously changes to mousePressed: 1 .
Release and press the mouse button to see that both devices see each other and transmit information about themselves. Similarly, you can rotate the phone in your hands and see on your monitor changes in the accelerometer sensor readings.
That's not all! Place the phone on the table and cover it with your palm. The proximity sensor will work and the desktop application window will suddenly change color.
Remove your palm, the information will again appear.
The text "hello" was also received from the phone. You can change it in the code for the phone and restart the sketch to see the changes.
In the sketch for the phone, I commented out the code that allows you to get a list of all the sensors. You can remove the comment and see the list in the console.
I will not explain every line of code. If someone is interested in this topic, then in any case you will have to study the documentation. In a nutshell you can not describe here.
If you had to write similar functionality in Android Studio and IDEA, you would have to first learn a lot of related technologies and create complex projects with a lot of code. In Processing, many details are hidden from the developer. Of course, complex business applications cannot be written on it. But I remind you that Processing is intended primarily to "play around" with the graphics. And this may well be the first step in the world of programming for the child. In addition, Processing can communicate with the Arduino boards via the serial port.
Thus, you cover three devices at once: a computer, a phone and a microcomputer board. Smart home at your disposal, you only need to show imagination. The only problem is that there are few resources in Russian. Independently it will be difficult to understand, and not all parents will be able to help. In this case, you should look for a mentor or enroll in suitable courses.
In Russian, a couple of books were published for the basic level, which consider working on a computer. To work with Android, there is a free e-book on GitBook (in English) . Perhaps, if there is time, I will replenish my version .
Good luck to you programming!
Source: https://habr.com/ru/post/347092/
All Articles