OAuth authentication in the Flask application
This article is a bonus to the new cycle of articles Flask Mega-Tutorial (2018) .
The author is the same Miguel Greenberg. The article is not new, but has not lost its relevance.
OAuth technologies are more than 10 years old, and 99% of Internet users have an account with at least one of the OAuth-enabled resources. Is the "Login through" button on almost every resource? We will understand how this is done using the Flask microform.

Many websites provide users with the option of simplified registration in "one click" using a third-party authentication service, using a user account, in any of the known social services. In my old Flask Mega-Tutorial course, I showed you how to use one of these protocols, called OpenID (which has now rested with the world of the translator ).

In this article, I want to give you an introduction to OAuth , which has replaced OpenID as the preferred third-party authentication mechanism these days. I will also show you the complete Flask app, which implements the Sign In with Facebook and Sign In with Twitter functions. With these two implementations as an example, it will be easy for you to add any other OAuth providers you may need.
Note of the translator: A couple more links about how OAuth works here , here
Brief introduction to OAuth
The best way to present OAuth is to list the events that occur during login:
- Processing form submission. The user goes to the home page of the application, for example http://www.example.com , and clicks the "Sign In with Facebook" button that refers to the route of the application, for example http://www.example.com/authorize/facebook .
- Fetch Request Token (internal request). The server receives the request and responds with a redirect to the OAuth Facebook authorization URL. All OAuth providers must document the URL to redirect the user.
- The request sends the Consumer key , the “application login,” and the request itself is signed using the Consumer secret , the “application password,” which protects it from counterfeit.
- In response, the Provider generates and returns a token-filled token called Request Token.
- Redirect to Authorization (via redirect in the browser). Now the user is prompted to log in to Facebook (if not already logged in). A request for information sharing is then provided when the user needs to grant Facebook permission to share the requested information with the source application. Everything is done on the Facebook website and is a private transaction between Facebook and the user, the application is not involved.
- Fetch Access Token (internal request). After the user accepts the request to share information, Facebook redirects back to the application to the pre-configured callback URL, for example http://www.example.com/callback/facebook . The redirect URL request string includes an authorization code that the application can use to access the Facebook API on behalf of the user.
- Call API (internal request). The application uses the Facebook API to retrieve user information. Of particular interest is the unique user ID ( Shared Secret ), which can be used to register a user in the application database after a user has registered for logging into the system.
The exchange between the application and the third-party service is not trivial, but for the user it is extremely simple, since all that the user needs is to enter a third party site and give permission to exchange information using the application.
Currently, two versions of the OAuth protocol are used, both in accordance with the general process described above, and with some differences in implementation. Twitter's OAuth 1.0a is the most difficult of the two. OAuth 2 , used by Facebook, is an incompatible revised version of the protocol that eliminates much of the complexity of version 1.0a, relying on secure HTTP for encryption.
Registration with OAuth providers
Before an application can use a third-party OAuth provider, it must be registered. For Facebook and Twitter, this is done on their respective developer sites with the creation of an “app” that represents the app for users of these sites.
Create an app for Facebook here. https://developer.facebook.com .
Click "START" and NEXT. Along the way, fill in various information about yourself.


')
Choose "Sign in with Facebook"

From the list of possible applications, select the type "WWW / Website".
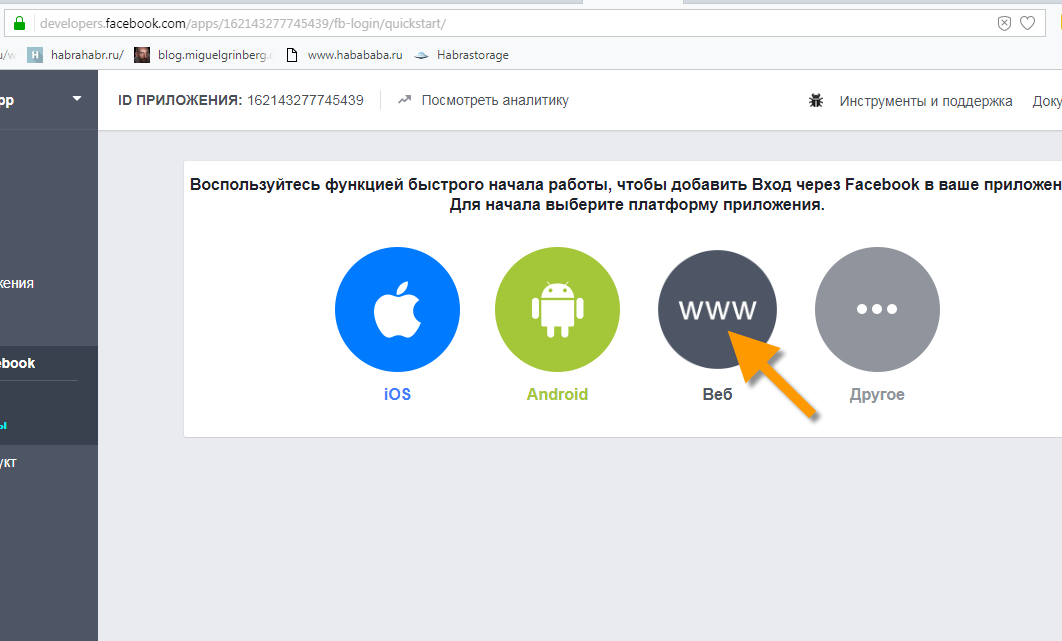
Specify the URL of the application, which, if it is launched on your computer, will be
http://localhost:5000 .
OAuth Authentication Example
In the following sections, I am going to describe a relatively simple Flask application that implements Facebook and Twitter authentication.
I'll show you the important parts of the application in the article, but the full application is available in this GitHub repository: https://github.com/miguelgrinberg/flask-oauth-example . At the end of this article, I will show you instructions for launching it.
User Model
Users in the sample application are stored in a SQLAlchemy database. The application uses the Flask-SQLAlchemy extension to work with the database and the Flask-Login extension to track registered users.
from flask.ext.sqlalchemy import SQLAlchemy from flask.ext.login import LoginManager, UserMixin db = SQLAlchemy(app) lm = LoginManager(app) class User(UserMixin, db.Model): __tablename__ = 'users' id = db.Column(db.Integer, primary_key=True) social_id = db.Column(db.String(64), nullable=False, unique=True) nickname = db.Column(db.String(64), nullable=False) email = db.Column(db.String(64), nullable=True) @lm.user_loader def load_user(id): return User.query.get(int(id)) The database has a separate table for users users , which in addition to id , which is the main key, contains three columns:
social_id: a string that identifies a unique identifier from a third-party authentication service used to log in to the system.nickname: alias for user. Must be defined for all users and does not have to be unique.email: the user's email address. This column is optional.
The User class is inherited from UserMixin from Flask-Login, which gives it the methods required by this extension. The user_loader callback function, also user_loader Flask-Login, loads the user by its primary key.
OAuth implementation
For Python, there are several OAuth client packages. In this example, I decided to use Rauth . However, even when using the OAuth package, there are many aspects of authentication by providers, which makes the task more difficult.
First of all, there are two versions of the OAuth protocol that are widely used. But even among providers that use the same version of OAuth, there are many details that are not part of the specification and must be performed according to their own documentation.
For this reason, I decided to implement an abstraction layer on top of Rauth, so the Flask application can be written in general form. Below is a simple base class in which specific provider implementations will be written:
class OAuthSignIn(object): providers = None def __init__(self, provider_name): self.provider_name = provider_name credentials = current_app.config['OAUTH_CREDENTIALS'][provider_name] self.consumer_id = credentials['id'] self.consumer_secret = credentials['secret'] def authorize(self): pass def callback(self): pass def get_callback_url(self): return url_for('oauth_callback', provider=self.provider_name, _external=True) @classmethod def get_provider(self, provider_name): if self.providers is None: self.providers = {} for provider_class in self.__subclasses__(): provider = provider_class() self.providers[provider.provider_name] = provider return self.providers[provider_name] class FacebookSignIn(OAuthSignIn): pass class TwitterSignIn(OAuthSignIn): pass The base class OAuthSignIn defines the structure that should be followed by subclasses that implement the services of each provider. The constructor initializes the name of the provider, as well as the application identifier and secret code assigned to them, and obtained from the configuration. Below is an example of the application configuration (of course, you will need to replace these codes with your own):
app.config['OAUTH_CREDENTIALS'] = { 'facebook': { 'id': '470154729788964', 'secret': '010cc08bd4f51e34f3f3e684fbdea8a7' }, 'twitter': { 'id': '3RzWQclolxWZIMq5LJqzRZPTl', 'secret': 'm9TEd58DSEtRrZHpz2EjrV9AhsBRxKMo8m3kuIZj3zLwzwIimt' } } At the top level, there are two important events supported by this class that are common to all OAuth providers:
- Initiating the authentication process. To do this, the application must redirect to the provider's website to allow the user to authenticate there. This is represented by the
authorize()method. - Once authentication is complete, the provider forwards the application back. This is handled by the
callback()method. Since the provider does not have direct access to the internal methods of the application, it will be redirected to the URL that will call it. The URL that the provider must redirect is returned by theget_callback_url()method and is created using the provider name, so that each provider`` gets its own dedicated route.
The get_provider() method is used to find the correct OAuthSignIn instance with the name of the provider. This method uses introspection to search for all OAuthSignIn subclasses, and then saves an instance of each in the dictionary.
OAuth Authentication with Rauth
Rauth represents OAuth providers with an object of class OAuth1Service or OAuth2Service , depending on the version of the protocol used. I create an object of this class in a subclass of OAuthSignIn each provider. Implementations for Facebook and Twitter are shown below:
class FacebookSignIn(OAuthSignIn): def __init__(self): super(FacebookSignIn, self).__init__('facebook') self.service = OAuth2Service( name='facebook', client_id=self.consumer_id, client_secret=self.consumer_secret, authorize_url='https://graph.facebook.com/oauth/authorize', access_token_url='https://graph.facebook.com/oauth/access_token', base_url='https://graph.facebook.com/' ) class TwitterSignIn(OAuthSignIn): def __init__(self): super(TwitterSignIn, self).__init__('twitter') self.service = OAuth1Service( name='twitter', consumer_key=self.consumer_id, consumer_secret=self.consumer_secret, request_token_url='https://api.twitter.com/oauth/request_token', authorize_url='https://api.twitter.com/oauth/authorize', access_token_url='https://api.twitter.com/oauth/access_token', base_url='https://api.twitter.com/1.1/' ) For Facebook, which implements OAuth 2, the OAuth2Service class is OAuth2Service . The service object is initialized by the service name and several arguments specific to OAuth. Arguments client_id and client_secret are those that are assigned to the application on the Facebook developer site. Authorize_url and access_token_url are URLs defined by Facebook for applications to which you need to connect during the authentication process. Finally, base_url sets the prefix URL for any Facebook API calls after authentication is complete.
Twitter implements OAuth 1.0a, so the OAuth1Service class is OAuth1Service . In OAuth 1.0a, the identification and secret codes are called consumer_key and consumer_secret , but are otherwise identical in functionality to OAuth 2 analogues. OAuth 1 protocol requires providers to display three URLs instead of two, there is an additional request request_token_url . The name and base_url arguments are identical to those used in OAuth 2 services. It should be noted that Twitter offers two parameters for the parameter authorize_url . The URL shown above, https://api.twitter.com/oauth/authorize , is the safest, as it presents the user with a window in which he needs to allow the application to access Twitter every time. Changing this URL to https://api.twitter.com/oauth/authenticate will cause Twitter to request permission only for the first time, and then silently allow access until the user logs out of Twitter.
Note that there is no standardization for URL entry points, OAuth providers define them as they see fit. To add a new OAuth provider, you will need to get these URLs from its documentation.
OAuth authorization phase
When a user clicks the “Login with ...” link to initiate OAuth authentication, the call follows this route:
@app.route('/authorize/<provider>') def oauth_authorize(provider): if not current_user.is_anonymous(): return redirect(url_for('index')) oauth = OAuthSignIn.get_provider(provider) return oauth.authorize() This route first ensures that the user is not logged in, and then simply receives the OAuthSignIn subclass corresponding to the given provider, and calls its authorize() method to initiate the process. The following is the authorize() implementation for Facebook and Twitter:
class FacebookSignIn(OAuthSignIn): # ... def authorize(self): return redirect(self.service.get_authorize_url( scope='email', response_type='code', redirect_uri=self.get_callback_url()) ) class TwitterSignIn(OAuthSignIn): # ... def authorize(self): request_token = self.service.get_request_token( params={'oauth_callback': self.get_callback_url()} ) session['request_token'] = request_token return redirect(self.service.get_authorize_url(request_token[0])) For OAuth 2 providers, such as Facebook, the implementation simply redirects to the URL created by the rauth service rauth . The scope depends on the Supplier, in this particular case, I ask Facebook to provide the user's email. In response_type = 'code', the argument tells the oauth provider that the application is a web application (there are other possible values for different authentication processes). Finally, the redirect_uri argument designates the route for the application, which the provider must call after authentication is completed.
OAuth 1.0 a providers use a slightly more complex process that involves receiving a request token from a provider, which is a list of two elements, the first of which is then used as an argument in the redirection. The entire request token is stored in the user session, as it will be needed again in the callback.
Callback OAuth Callback Phase
The OAuth provider redirects back to the application after authenticating the user and grants permission to exchange information. The route that handles this callback is shown below:
@app.route('/callback/<provider>') def oauth_callback(provider): if not current_user.is_anonymous(): return redirect(url_for('index')) oauth = OAuthSignIn.get_provider(provider) social_id, username, email = oauth.callback() if social_id is None: flash('Authentication failed.') return redirect(url_for('index')) user = User.query.filter_by(social_id=social_id).first() if not user: user = User(social_id=social_id, nickname=username, email=email) db.session.add(user) db.session.commit() login_user(user, True) return redirect(url_for('index')) This route creates an instance of the OAuthSignIn provider OAuthSignIn and calls its callback() method. This method has the function of completing authentication with the provider and receiving information about the user. The return value is a three-value tuple, a unique identifier (called social_id to distinguish it from the id primary key), a username and a user email address. The ID and alias are required, but in this sample application I made the email optional, because Twitter never shares this information with the applications.
The user is viewed in the database by the social_id field, and if not found, the new user is added to the database with information received from the provider, effectively registering new users automatically. The user is then registered using the login_user() function in Flask-Login and, finally, redirected to the home page.
The implementation of the callback() method for OAuth providers for Facebook and Twitter is shown below:
class FacebookSignIn(OAuthSignIn): # ... def callback(self): def decode_json(payload): return json.loads(payload.decode('utf-8')) if 'code' not in request.args: return None, None, None oauth_session = self.service.get_auth_session( data={'code': request.args['code'], 'grant_type': 'authorization_code', 'redirect_uri': self.get_callback_url()}, decoder=decode_json ) me = oauth_session.get('me').json() return ( 'facebook$' + me['id'], me.get('email').split('@')[0], # Facebook does not provide # username, so the email's user # is used instead me.get('email') ) class TwitterSignIn(OAuthSignIn): # ... def callback(self): request_token = session.pop('request_token') if 'oauth_verifier' not in request.args: return None, None, None oauth_session = self.service.get_auth_session( request_token[0], request_token[1], data={'oauth_verifier': request.args['oauth_verifier']} ) me = oauth_session.get('account/verify_credentials.json').json() social_id = 'twitter$' + str(me.get('id')) username = me.get('screen_name') return social_id, username, None # Twitter does not provide email In the callback() method, a verification token is transmitted, which the application can use to communicate with the provider API. In the case of OAuth 2, this occurs as a code argument, whereas for OAuth 1.0a it is oauth_verifier , both specified in the query string.
This code is used to get oauth_session from the rauth service object .
Note that in the latest versions of the Facebook API, the session token is returned in JSON format. The default format expected by rauth for this token should be specified in the query string. For this reason, you need to add a decoder argument that decodes the contents of the JSON. In Python 2, it's enough to pass json.loads , but in Python 3 we need an extra step, because the payload is returned as bytes that the json parser does not understand. Conversion from bytes to a string is performed in the internal function decode_json.
The oauth_session object can be used to provide API requests to the provider. Here it is used to request information about the user, which must be provided by a particular provider. Facebook provides the user ID and email address, but does not provide user names, so the username for the application is created from the left side of the email address. Twitter provides the user ID and username, but does not support email, so the email is returned as None .
The data received from the provider is finally returned as a three-element tuple for the view function. Please note that in both cases the id value from the provider is added with «facebook $» or «twitter $» before returning it, in order to make it unique for all providers. Since this is what the application will store as social_id in the database, it is necessary to do this so that the two providers who have assigned the same id two different users do not conflict in the application database.
Conclusion
As I mentioned above, the sample application allows any user to register and log in with a Facebook or Twitter account. The application demonstrates how to register users without having to enter any information, all they need to do is to log in with the provider and allow information sharing.
If you want to try this example, you need to complete some preparatory steps:
Clone or download the project repository: https://github.com/miguelgrinberg/flask-oauth-example
Create a virtual environment and install the packages on the list in the requirements.txt file (you can use Python 2.7 or 3.4).
Register your “app” using Facebook and Twitter.
as described above.
Edit app.py with the ID and secret codes of your Facebook and Twitter apps.
After following these instructions, you can start the application using python app.py , and then run http: // localhost : 5000 in your browser.
Hope this article is helpful in demisting OAuth.
If you have questions, write them below.
Miguel
Source: https://habr.com/ru/post/346918/
All Articles